Owners of old laptops, in an attempt to “speed up” the device, express a desire to install Linux. The easiest way to do this is from a flash drive, especially if the gadget is not equipped with optical drive. However, before you get started, you should learn more about this process.
Features of installing Linux from a flash drive
Linux and Windows user experiences may be similar in some situations. But their internal processes are very different. So the installation was not without its peculiarities:
- By running Linux from a flash drive, the user environment and main programs can be tested without necessarily installing it on the hard drive. Therefore, almost all distributions of this OS are called “Live-CD/DVD”.
- Installing Linux from a flash drive or disk can be done either as the only system on a PC or next to another OS.
- To record the distribution, you should use working USB drives, since low-quality media can overheat and turn off during installation.
- It is not recommended to install using a USB flash drive via USB hubs. Especially if, in addition to the storage with the installer, other equipment is connected to it. This can cause a lot of problems.
Programs for installing Linux from a flash drive
There is a huge list of software for burning operating system distributions onto USB drives. But the most versatile and proven is Unetbootin, as it works on both Windows and Linux.
How to burn an image using Unetbootin:
- Download the program from the link
- Run it, specifying that the target will be a disk image.

- By clicking the button with three dots, specify the distribution image.

- Select the type “USB Device”.

- Specify the carrier letter. If the media is connected in a single copy, the program detects it automatically.

- Click "Ok". The data on the media will be lost.

Everything is ready to start installing Linux from a flash drive to a laptop. You can close the program.

How to install Linux from a flash drive
The variety of Linux distributions does not allow us to talk about all types of installers at once. However, the most common among users are Debian builds, which include Ubuntu, Fedora, Zorin OS, ALTLinux, etc. And their installers give a complete picture of the ways and how you can install Linux. First, you need to boot from a flash drive. You need to get into the BIOS.
BIOS setup
Attention! On most laptops, you can get into the BIOS by holding or constantly pressing the F2 key when turning on the device.
However, depending on the manufacturer and model, the keys and their combinations may vary.
- MSI laptops – Del key, F2.
- Dell – Del, F1, Insert or
- Acer – F1, F2, Delete, Ctrl+Alt+Escape.
- Packard Bell – Del, F2.
- Hewlett Packard – F2, F11, Del.
Also, some manufacturers have a Boot Menu available, from which you can immediately select a device to bypass boot BIOS settings. It is usually accessible by pressing the keys – F10, F11 or F12.
If the Boot Menu is missing, but you managed to get into the BIOS, then the setting for most laptop models looks like this:

Installing Linux using Fedora as an example
Attention! Manual marking for installation operating system creates more favorable conditions for its further use.
- After booting from the flash drive, the user will be greeted with the following window, in which you need to select the “Start Fedora-Workstation” item and press “Enter”.

- will appear start page installer The “Install to Hard Drive” button starts the installation.

- Next you need to select your language and region.

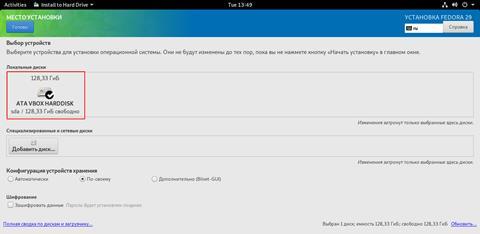
- Click on the Installation Location button.

- Select the hard drive on which Linux will be unpacked.

- Set the device configuration to the “In your own way” mode and click “Finish”.
- Next, change the partition scheme to “Standard partition”.

- Click on the “+” button to begin partitioning the disk.


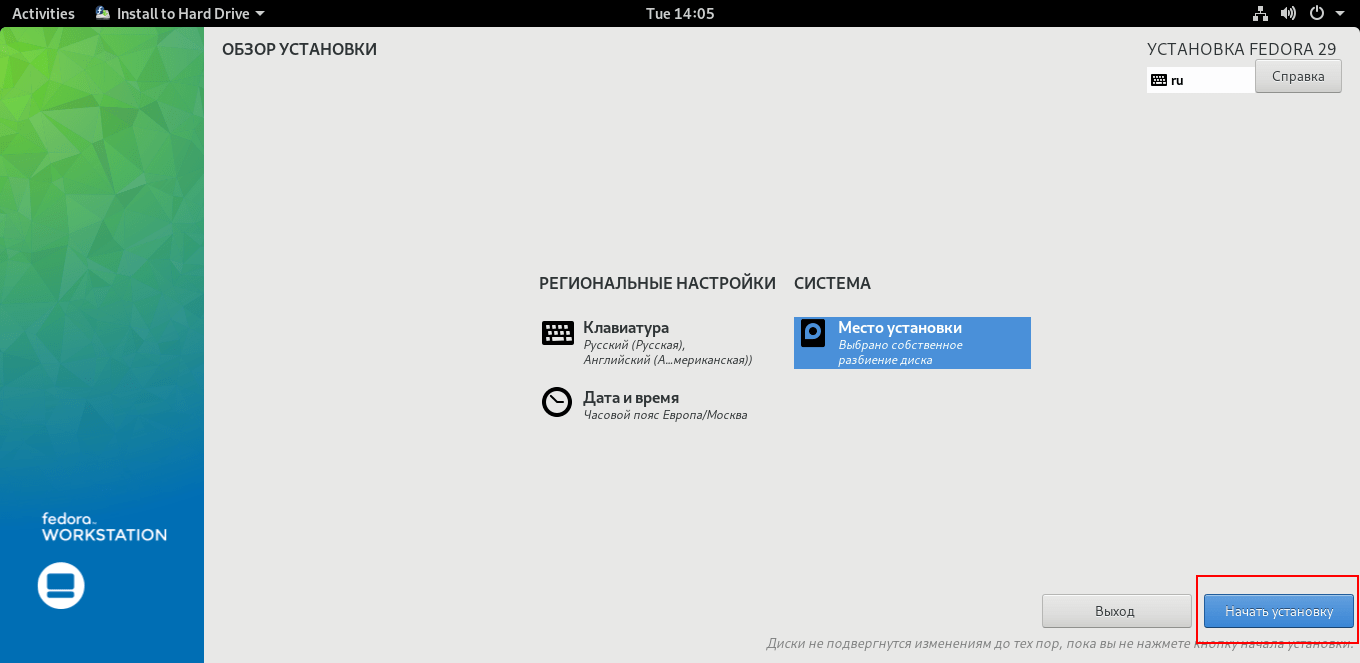
- Click the “Done” button.

- Then start the process by clicking on the “Start installation” button.
- The unpacking process will begin.

- When Fedora notifies you that the unpacking process is complete, click Exit.

- Then, in the control menu, restart your PC and remove the USB drive.


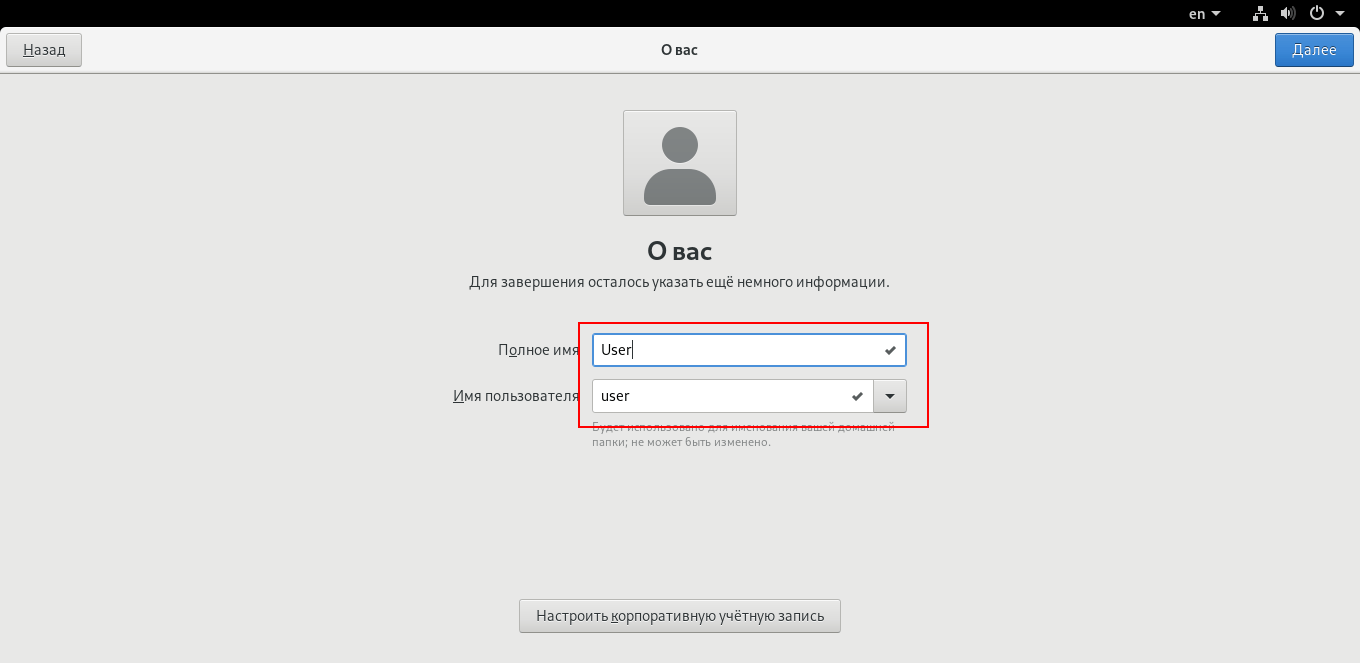
- The first time you launch Fedora, you'll see a welcome screen, where the last screen will be to enter your username and password.

- At the end of the setup, click on the “Get Started” button, and that’s it Fedora installation from the flash drive is completed.

Installation from a Zorin OS flash drive occurs through a standard installer for Debian-like builds and has minimal differences from this process in Linux Fedora. Namely:


Installation from a flash drive of ALTLinux and most other operating systems based on this kernel, such as Ubuntu, Elementary, Deepin and others, is the same, only the interfaces differ.
If Linux cannot be installed from a flash drive: common errors
Despite the apparent ease of installation, no one is immune from problems with it. If Linux cannot be installed from a flash drive, most likely:
- The BIOS settings have disappeared or were not installed correctly. Check your settings and save them again. If the situation does not change, try replacing the battery with motherboard laptop, it is responsible for saving settings, date and time on the device.
- If your computer has more than one hard drive after installing the Linux OS, go to the BIOS and select the hard drive to which the distribution package was unpacked as the first boot device.
- Broken image or poor quality recording. This can usually be verified using MD5 sums, but not all distributions come with them. So the most reliable option would be to re-download the Linux image from the official website (without parallel downloads of anything), and then write it to a USB drive without any extraneous running processes.
- Incorrectly marked hard drive. When the root section is smaller than recommended in system requirements specific assembly.
- The bootloader was installed on the wrong disk.
Conclusion
Recently, Linux has ceased to be a product intended exclusively for computer professionals. Thanks to this, anyone who reads this article will be able to independently install Linux from a flash drive.
Ubuntu occupies an honorable third place in the world of operating systems, and, probably, every experienced PC user has ever thought about experiencing new user experiences from using it. Below we will show you how to install Ubuntu on your computer using a USB flash drive.
What you will need:
- USB flash drive with 4 to 9 GB of memory on board. During the installation process, the flash drive will be formatted - make sure that there are no important files on it. Create backup copy just in case;
- a computer with an operating system already installed. Microsoft Windows, Mac OS or OS Linux;
- a backup copy of the “native system”, in case there is important data on it.
Case 1. Starting point - Windows 10,8.1, 7, Vista or XP
Installing Linux Live USB Creator
Step 1. Download Linux program Live USB Creator. It is distributed free of charge and is available from the official website of the developer.

Step 2.

Step 3. Reading useful information and click “Next”.

Step 4. We indicate the path where the program will be located after installation - “Install”. The installation starts.

Step 5. After the loading line has reached its end, click on the “Next” button.

Step 6. Close the installation program by clicking on the “Finish” button.

Downloading an Ubuntu Disk Image (ISO) File
An ISO file is essentially your OS. Distinctive feature The Ubuntu operating system is its openness. You can download it absolutely free from the official website.

Creating an installation USB flash drive
Step 1. Open the program Linux Live USB Creator.
Step 2. Insert an empty flash drive into the USB connector of the PC.
Step 3.

Step 4. In the “CHOOSE A SOURCE” column, click on the first icon of the disk image and indicate the path to the ISO file.

Step 5. We leave the next two columns unchanged - STEP 3 and STEP 4, respectively.
Step 6. The program will check the amount of available memory on the drive and give you the result.

Step 7 In the “STEP 5” column, left-click on the lightning icon. The program will begin creating a bootable USB flash drive. The process can take from a few minutes to 15 depending on the power of the PC.

Once the download is complete, the program will notify you that it has been successfully completed. If you Windows user skip the following sections until “Part 2: Installing the OS.”
Case 2. Starting point - Mac OS
Step 1.

Step 2. Open the terminal. The key combination Ctrl + spacebar will open a search in the “Spotlight” system, type “Terminal” in the input column and click on the corresponding icon.

Step 3. In the window that opens, enter the following text:

The installation flash drive has been created! If you're on a Mac, skip the next part.
Case 3. Starting point - OS Linux
Step 1.

Step 2. Insert the flash drive into the PC.
Step 3. Open the terminal using the key combination Ctrl+Alt+F1-F12 or through the “Dash” application menu.
Step 4. In the window that opens, enter the following text:

Ready! The computer wrote the installation data onto a USB flash drive.
Part 2. Installing the OS
Step 1. Open the BIOS menu. To do this, during system boot, press the key on the keyboard that corresponds to your brand. We list several such keys in the table below.
Step 2.

Step 3. Press Enter - the system reboots and starts
Step 4.

Step 5.

Step 6.

Step 7

Step 8 Select your time zone and click “Continue”.

Step 9

Step 10 Create an Ubuntu account and click on the familiar button in the lower left corner of the window.

Step 11 A window with a loading line will appear. Wait until it reaches the end and click on the “Restart Now” button.

The system will switch on, after which all you have to do is log in and start working in the new environment. Congratulations! You have successfully installed Ubuntu on your computer.
Read the detailed step by step instructions in a new article -
Video - Installing Ubuntu from a USB flash drive
Dear friends, the topic of today's discussion is installing Ubuntu from a flash drive. Naturally, before the installation itself, you still need to obtain a number of necessary information that will help you complete the job efficiently and without problems. So, what will we learn today:
- preparatory work;
- how it is created bootable flash drive for further usage;
- actually, how to install Ubuntu from a flash drive.
As the name of the block implies, we are now considering the preparatory stage. First, we need the flash drive itself, onto which we will write the image a little later. It must have a volume of at least eight gigabytes, as well as the NFTS format. If the last words don’t mean anything to you, don’t worry: in any case, the format can be changed, so, in principle, there’s no need to focus too much on this point. If the drive is not new, be sure to format it and check for viruses using antivirus programs and only then take action.
For Ubuntu installation from a flash drive to be successful, you also need to download the OS image. Otherwise, nothing will work. If you have ever reinstalled the operating system on your own before personal computer, then you should know that it all starts with loading the required image systems. Fortunately, they are available for download on the website http://ubuntu.ru/get. Only after this stage will it be possible to move on to the next ones. Please note that downloading may take a long time depending on the speed of your Internet connection. That is, if it is high, then the download will go quickly and vice versa.
Creating a bootable Ubuntu USB flash drive
Before you begin, you will need to install additional software on your computer. software. Therefore, the device must have an active internet connection. The program is called WinSetupFromUSB, and it is available for free download at http://www.winsetupfromusb.com/downloads/. Its installation is similar to the installation process of any other application for a computer or laptop. It is also worth noting that everything further actions are discussed using the example of the Windows operating system.

Operating system installation
Preparation
You can proceed to the last stage, which almost all users are afraid of: how to install Ubuntu from a flash drive. In fact, the worst is already behind us. It will be easier further, as you will see for yourself. To begin with, we recommend that you look in the instructions or on the website of the manufacturer of your device to see how the BIOS is called up on a PC. Most often this is one of the F or Delete keys. But to avoid getting into trouble, it is better to find out this information in advance.
Installation steps
Only after this we proceed to the next steps.
- We connect the flash drive prepared at the last stage to the computer and turn it off.
- Press the power button for it reverse switching and quickly press the key to call up the BIOS menu.
- Here you will need to change the priority to booting from a flash drive. To do this, go to the Boot tab, then open the Boot Device Priority item and using the navigation keys indicated at the bottom of the page, put our drive in first place. If you don't know English language, then use a translator. The BIOS menu is different on all computers, so there is no one general instruction for changing the boot priority.
- When you install the prepared drive in the first place, exit the menu with saving data. Wait while the PC downloads the data.
- If you have completed the previous steps correctly, you will see the installation welcome window. In the left block you can select the language, and on the right the installation type: this could be a simple launch of Ubuntu for testing (the system will not be installed, you can just get acquainted with it, for example) or, in fact, a full installation. Click on the second option.

- Set the required parameters in the next window and click “Continue”.
- Now you will need to select the installation type. As stated in the description, the system can be installed either next to an existing one or instead of it. If you need Windows, you can take the first option. If you only want Ubuntu, then choose the second type. Click “Continue”.

- In the next window, the user is asked to allocate disk space for the system and files. To do this, move the separator to set the necessary parameters. When you have distributed everything, click “Install now”, and in the dialog box that appears, click “Continue”, knowingly reading the information provided.

- After some time, you will see a window called “Who are you?” Write down all the data as you wish (name, password, etc.), then click “Continue”.

- Wait for the process to complete. After the computer restarts, the Ubuntu operating system interface will be presented. If you left Windows in the seventh step, then after the reboot you will have to select a system to start. And this will happen every time you turn on the PC.
Now you can customize the OS to suit your needs: install drivers, write programs, and so on. And also the OS may warn you about the need to download some files for correct operation. These steps are mandatory for the system to function properly.
Conclusion
Dear readers, we hope that the installation of Ubuntu from the USB flash drive was successful. Summarizing what was said earlier, we can highlight the main stages of our joint work:
- Preparing the flash drive for use.
- Create a bootable USB flash drive
- Reboot the computer with the drive set as the first boot priority in the BIOS.
- Installing the system in ten steps.
We remind you that all actions are performed at your own peril and risk. Read all messages on your computer carefully to avoid unpleasant situations. Tell us in the comments: did you manage to install Ubuntu on your PC?
Background
"Pocket distribution" is quite a convenient thing, because the vast majority of computers run on Windows control, and many people want to get a familiar work environment outside the home.
For a long time I used an SD card with SLAX. The distribution is convenient, customizable, can completely load into RAM and free up the port. However, the project has been frozen for 3 years and has outdated software. Lack of support for ext4 file systems and new hardware (especially video cards and WI-FI routers) forced me to abandon this system.
UPD: Slax has already been defrosted and released a new version. Details.
Next, I had the idea of installing the OS on a flash drive using the built-in tools of the Ubuntu system. But due to irrational preservation of changes, this system had to be abandoned. In the end, it was decided to use an installer called Ubiquity. It is this that is contained in the LiveCD and installs it onto the hard drive. Since this option requires much more space than the default CD image, I purchased a new 16 GB flash drive - Apacer AH325:
The distribution for installation was selected Linux Mint 12, which was already mentioned earlier. In general, you can use any Linux system, but it is better to opt for Ubuntu or ubuntu-based distributions.
Note: if you are going to make full use of the temporary partition (for example, watch large videos on YouTube), then it is better to increase the 100 megabyte limit. I don’t recommend removing the limit, because a frozen application can crash the entire system, filling up the temporary folder with its copies.
First boot
...as always, it lasts a long time. The main thing is to wait for the download to complete, do not interrupt it, otherwise you may suffer file system flash drives.You should then be greeted by the LightDM menu. After entering the password you will receive a fully functional system. You can begin further configuration and downloading packages. However, the best thing to do first is to open Update Manager and bring the system into current status. Everything else depends on your needs and tastes. But that is another story...
Results
So, the end result is a bootable flash drive, which is a full-fledged Linux desktop capable of handling almost any task.On my own behalf, I advise you to always produce backup important data "to the cloud" (Ubuntu One,
We welcome all those who have decided to join the humanistic philosophy and install an operating system on their computer Linux Ubuntu. operating room Ubuntu system has its advantages compared to, which we reviewed quite recently. If Windows installation 8 does not raise any questions for many users, installing Ubuntu has some differences and difficulties. That is why below we will provide you with instructions for installing Ubuntu from a flash drive in pictures.
Before installing Ubuntu, we recommend testing it without installation by launching this operating system from a flash drive or disk. For what? If you have never used or have not worked with the latest for several years Ubuntu versions, then it has changed quite a lot, so before changing the system you need to try it out. If you like Ubuntu and want to completely abandon Windows, then let’s get ready to install it.

Preparing to install Ubuntu
The preparation process is a mandatory stage, which consists of several procedures: loading installation image, recording it to a medium, as well as resaving data from hard drive.You can download the latest Ubuntu images at: Ubuntu.ru/get
Experts on the site recommend downloading the image from the “Newest Release” section marked “Raring Ringtail”, where you will also need to select the desired bit depth of the operating system (x32 or x64) and download the image itself.
How to burn an Ubuntu image to a USB flash drive?
Almost all of our readers know how to burn an image to a disk, but hardly anyone has written an image of an operating system onto a flash drive. Burning an image onto a flash drive is quite simple; for this you will need the Universal USB Installer program, which can be downloaded absolutely free on the program’s official website. Installing this program will not take much time, you will just need to indicate the path where the program should be installed, and also read and accept the terms of the license agreement. Then, when you launch the program, you will see the window shown in the picture below.

Now let's directly begin the process of writing the image to a flash drive:
- Step one. First, you need to select the operating system that you want to write to the flash drive.
- Step two. Point the program to the path to the Ubuntu image.
- Step three. Specify the letter under which the flash drive needed to record the image is located.
- Step four. Check that the settings are correct and click on the “Create” button.
Resaving data
If you decide to completely switch to Linux Ubuntu, we recommend formatting the entire HDD for convenient work with the operating system, since the ext4 file system it uses differs from NTFS in its structure. We will talk about this in more detail in an article entitled:. In order to completely format it in advance, resave all your data from drive D to third-party media (for example, DWD disks). If you do not want to format the hard drive partition with data, then leave it, resaving only the data from drive “C”.

Setting up the bootloader in the BIOS
The final stage of preparation for installation will be setting up the bootloader in which you will need to install the flash drive as the primary boot device, and the hard drive as the secondary one. To do this, insert the flash drive into the USB connector of the computer, restart the PC and hold down the “Delete” key on the keyboard. In the BIOS menu that appears, select the “Boot” setting. In the “1st Boot Device” field enter “USB-HDD”, and in the “2nd Boot Device” field - “Hard Drive”. Then exit the BIOS by selecting “Save and Exit”. When all of the above steps have been completed, we proceed to the system installation process.

Installing Linux Ubuntu
The Ubuntu installation will begin with a welcome window in which you will first need to select a language. Here you can try to run Ubuntu from a USB flash drive to test it without installation by clicking on the “Try Ubuntu” button. To install the operating system, click on the “Install Ubuntu” button, after which you will need to make some settings before directly installing the OS.
First you will need to confirm that your computer:
- Has at least 5.3GB of free disk space. This is exactly how much free space is needed on the partition to install Ubuntu and have it work correctly on the computer.
- Connecting to a power source. If you are installing this operating system on a laptop, make sure that it is connected to power.
- Connected to the Internet. In principle, an Internet connection is not necessary when installing Ubuntu, but it is very desirable for downloading updates and other system components.


The last thing you will need to specify is:
- your name. This is your name account in system. You can enter either a name or any desired nickname. Your name must be entered in Latin characters.
- Your computer name. You also need to enter the desired computer name to identify it on the network.
- Enter your username. The username is the name of the superuser account in the system (essentially, the administrator’s name), through which changes will be made to system settings and programs will be installed.
- Set and confirm a password. To access the superuser account, as well as to log into the system, you need to enter a password, after which you must repeat it in the bottom line. The password may include upper and lower case Latin characters, as well as numbers and special characters.
If no one else has access to the computer or laptop except you, then we recommend setting a point opposite the “Log in automatically” item, that is, so that when you turn on the computer or laptop, you do not need to enter a password, but so that the desktop starts immediately. If you want to protect yourself and protect your data from unauthorized access, then leave a dot next to the item: “require a password to log in.”
To keep your data safe, you can check the box next to “Encrypt my home folder”, so that all files located in the user’s home folder will be encrypted. In turn, we do not recommend encrypting your home folder unless absolutely necessary, since if the operating system fails, you will not be able to recover your encrypted data. After that, click on the “Continue” button.
From this moment the immediate installation of the operating room will begin Linux systems Ubuntu. The installer will format the hard drive, create the partitions necessary for the system to operate, and copy the OS files.

While the operating system is being installed, you will be shown a slide show that tells you about the innovations latest version Ubuntu operating system.

The first slide will tell you about the application center and the large number of programs that you can install on your computer.

The second slide talks about the Rhythmbox music player.


After the system installation is complete, the installer will ask you to restart your computer. To do this, click on the “Restart” button.

This is what the Ubuntu boot screen looks like - simple and pretty. After a few seconds, the desktop will load.

The desktop consists of the taskbar, which is at the top, and the quick access toolbar, which is on the left.

Immediately after installation, if your computer or laptop is connected to the Internet, you will be prompted to install the latest updates. To install them, click on the icon glowing below with the letter “A” in the middle. After installing the updates, the system will be completely installed and ready to work; all you have to do is configure it.

To configure the system, click on the gear and wrench icon. In the window that opens, you can configure all the necessary parameters.
Now you know how to install Linux Ubuntu from a USB flash drive and you can do it yourself.


