Comments:
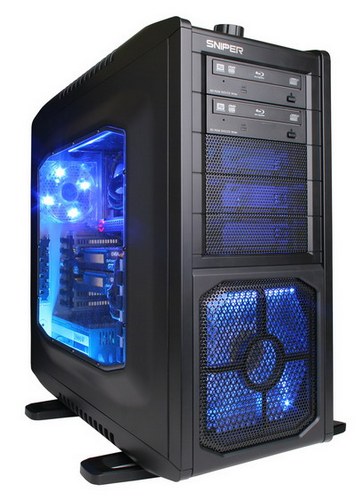
Performance modern computer is achieved at a fairly high price - the power supply, processor, video card often need intensive cooling. Specialized cooling systems are expensive, so a home computer usually has several case fans and coolers (radiators with fans attached to them).
The result is an efficient and inexpensive, but often noisy cooling system. To reduce the noise level (while maintaining efficiency), a fan speed control system is needed. Various kinds of exotic cooling systems will not be considered. It is necessary to consider the most common air cooling systems.
In order to reduce the noise during operation of the fans without reducing the cooling efficiency, it is advisable to adhere to the following principles:
- Large diameter fans work more efficiently than small ones.
- The maximum cooling efficiency is observed in coolers with heat pipes.
- Four-pin fans are preferred over three-pin ones.
There can be only two main reasons for excessive fan noise:
- Poor bearing lubrication. Eliminated by cleaning and new grease.
- The motor is spinning too fast. If it is possible to reduce this speed while maintaining acceptable level cooling intensity, then this should be done. The most accessible and cheap ways to control the speed of rotation are discussed below.
Fan Speed Control Methods
Back to index
The first way: switching in the BIOS the function that regulates the operation of the fans
The Q-Fan control, Smart fan control, etc. functions supported by some motherboards increase the fan speed when the load increases and decrease it when it falls. It is necessary to pay attention to the method of such fan speed control using the Q-Fan control as an example. It is necessary to perform a sequence of actions:
- Enter BIOS. Most often, this is done by pressing the "Delete" key before booting the computer. If you are prompted to press another key at the bottom of the screen instead of "Press Del to enter Setup" before booting, do so.
- Open the "Power" section.
- Go to the line "Hardware Monitor".
- Change to "Enabled" the value of the CPU Q-Fan control and Chassis Q-Fan Control functions on the right side of the screen.
- In the CPU and Chassis Fan Profile lines that appear, select one of three performance levels: enhanced (Perfomans), quiet (Silent) and optimal (Optimal).
- By pressing the F10 key, save the selected setting.
Back to index
The second way: fan speed control by switching method
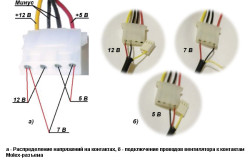
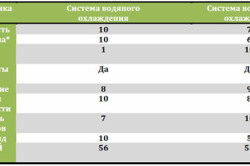
Figure 1. Distribution of voltages on the contacts.
For most fans, the nominal voltage is 12 V. When this voltage decreases, the number of revolutions per unit time decreases - the fan rotates more slowly and makes less noise. You can take advantage of this circumstance by switching the fan to several voltage ratings using an ordinary Molex connector.
The distribution of voltages on the contacts of this connector is shown in fig. 1a. It turns out that three different voltage values \u200b\u200bcan be removed from it: 5 V, 7 V and 12 V.
To ensure this method of changing the fan speed, you need:
- After opening the case of a de-energized computer, remove the fan connector from its socket. The wires leading to the power supply fan are easier to unsolder from the board or just have a snack.
- Using a needle or an awl, release the corresponding legs (most often the red wire is a plus, and the black wire is a minus) from the connector.
- Connect the fan wires to the contacts of the Molex connector for the required voltage (see Fig. 1b).
An engine with a rated rotation speed of 2000 rpm at a voltage of 7 V will give 1300 revolutions per minute, at a voltage of 5 V - 900 revolutions. Engine with a rating of 3500 rpm - 2200 and 1600 rpm, respectively.
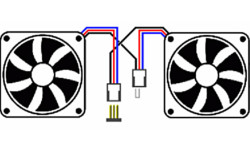
Figure 2. Scheme of serial connection of two identical fans.
A special case of this method is the serial connection of two identical fans with three-pin connectors. Each of them has half the operating voltage, and both rotate more slowly and make less noise.
The scheme of such connection is shown in fig. 2. The left fan connector is connected to the motherboard as usual.
A jumper is installed on the right connector, which is fixed with electrical tape or tape.
Back to index
The third way: adjusting the fan speed by changing the value of the supply current
To limit the fan speed, you can connect fixed or variable resistors in series to its power circuit. The latter also allow you to smoothly change the speed of rotation. Choosing such a design, one should not forget about its disadvantages:
- Resistors heat up, wasting electricity uselessly and contributing to the process of heating the entire structure.
- Characteristics of the electric motor in various modes can be very different, each of them requires resistors with different parameters.
- The power dissipation of the resistors must be large enough.
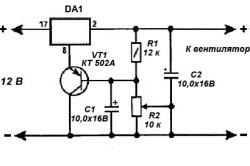
Figure 3. Electronic speed control circuit.
It is more rational to use an electronic speed control circuit. Its simple version is shown in Fig. 3. This circuit is a stabilizer with the ability to adjust the output voltage. A voltage of 12 V is applied to the input of the DA1 microcircuit (KR142EN5A). A signal from its output is supplied to the 8-amplified output by the transistor VT1. The level of this signal can be adjusted by a variable resistor R2. As R1, it is better to use a tuning resistor.
If the load current is not more than 0.2 A (one fan), the KR142EN5A chip can be used without a heat sink. If it is present, the output current can reach a value of 3 A. At the input of the circuit, it is desirable to include a small ceramic capacitor.
Back to index
The fourth way: adjusting the fan speed using reobas
Reobas - electronic device, which allows you to smoothly change the voltage supplied to the fans.
As a result, the speed of their rotation smoothly changes. The easiest way is to buy a ready-made reobas. It usually fits into a 5.25" bay. There is only one drawback: the device is expensive.
The devices described in the previous section are actually reobasses that allow only manual control. In addition, if a resistor is used as a regulator, the motor may not start, since the current is limited at the time of starting. Ideally, a full-fledged reobas should provide:
- Uninterrupted engine start.
- Rotor speed control not only in manual, but also in automatic mode. As the temperature of the cooled device increases, the rotation speed should increase and vice versa.
A relatively simple circuit that meets these conditions is shown in Fig. 4. Having the appropriate skills, it is possible to make it yourself.
Changing the supply voltage of the fans is carried out in a pulsed mode. Switching is carried out using powerful field-effect transistors, the channel resistance of which in the open state is close to zero. Therefore, the engine starts without difficulty. The highest speed will also not be limited.
The proposed scheme works like this: at the initial moment, the cooler that cools the processor runs at the minimum speed, and when heated to a certain maximum allowable temperature, it switches to the maximum cooling mode. When the processor temperature drops, the reobas switches the cooler back to the minimum speed. The rest of the fans support the manually set mode.
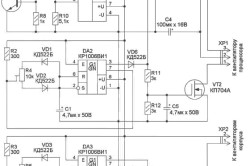
Figure 4. Scheme of adjustment using reobas.
The basis of the node that controls the operation of computer fans is the integrated timer DA3 and the field effect transistor VT3. Based on the timer, a pulse generator with a pulse repetition rate of 10-15 Hz was assembled. The duty cycle of these pulses can be changed using the trimmer resistor R5, which is part of the timing RC circuit R5-C2. Thanks to this, it is possible to smoothly change the speed of rotation of the fans while maintaining the required amount of current at the time of start-up.
Capacitor C6 performs pulse smoothing, due to which the rotors of the motors rotate softer, without making clicks. These fans are connected to the XP2 output.
The basis of a similar processor cooler control unit is the DA2 chip and the VT2 field effect transistor. The only difference is that when a voltage appears at the output of the operational amplifier DA1, it, thanks to the diodes VD5 and VD6, is superimposed on the output voltage of the DA2 timer. As a result, VT2 opens completely and the cooler fan starts to rotate as fast as possible.
As a processor temperature sensor, a silicon transistor VT1 is used, which is glued to the processor heatsink. Operational amplifier DA1 works in trigger mode. Switching is carried out by a signal taken from the collector VT1. The switching point is set by a variable resistor R7.
VT1 can be replaced by low power n-p-n transistors based on silicon, having a gain of more than 100. Replacement for VT2 and VT3 can serve as transistors IRF640 or IRF644. Capacitor C3 is film, the rest are electrolytic. Diodes - any low-power pulse.
The assembled reobas is configured in the following sequence:
- The sliders of the resistors R7, R4 and R5 are turned clockwise until they stop, the coolers are connected to the XP1 and XP2 connectors.
- 12 V voltage is applied to the XP1 connector. If everything is in order, all fans begin to rotate at maximum speed.
- By slowly rotating the sliders of resistors R4 and R5, such a speed is selected when the hum disappears, and only the sound of moving air remains.
- Transistor VT1 heats up to approximately 40-45 ° C, and the resistor R7 slider turns to the left until the cooler switches to maximum speed. After about a minute after the end of heating, the speed value should drop to the original one.
Any computer or laptop needs a good cooling system to function properly. During operation, items such as the processor (CPU), graphics card, motherboard give off a lot of heat, get very hot. The higher the CPU performance rating, the more heat it gives off. If the PC does not quickly remove air, this can lead to various system failures, incorrect functioning of equipment, reduced performance, and cause failure of important elements. Why is the processor getting hot? How to cool the CPU in PCs and laptops? Which cooler to choose for optimal PC cooling? We will try to answer these questions in this article.
Causes of CPU Overheating
If the computer starts to turn off, fail, freeze, this may be due to overheating of the CPU. The reasons why the PC processor starts to overheat are of a very different nature. Therefore, we will consider the main ones, and also give simple ways problem solution.
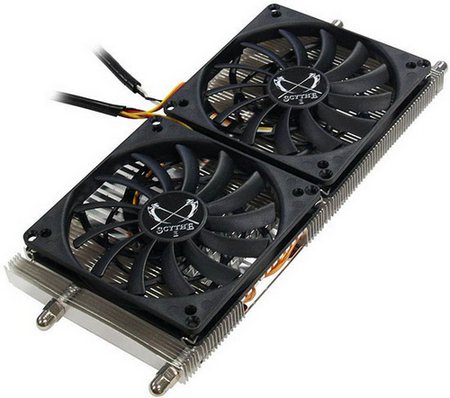
In most PCs, laptops, the main elements of the cooling system are a cooler (fan) and a radiator, which are installed on the processor. Due to the tightest contact, heat transfer between the surface of the heatsink and the processor is minimal, which in turn ensures fast, efficient heat dissipation.

The radiator can be monolithic or consist of two parts. In the first case, it is completely fixed on the processor (budget option), in the second case, only a small part of it is attached to the CPU, inside which there are heat pipes that transfer heated air to the main radiator.
The primary role in the system of ventilation of the case and cooling of the PC is played by the fan. Regardless of its location, it cools the entire radiator or its main part. The more efficiently it works, the better the heat dissipation from the CPU will be, and, accordingly, its temperature will be lower. Heat pipe coolers provide more CPU cooling.
If the processor starts to warm up, the main reasons include:
- contact deterioration between processor and heatsink;
- speed reduction cooler (fan) operation;
- use of inefficient cooling systems;
- absence ventilation systems in the case, in the PC power supply;
- pollution ventilation holes body dust;
- failure cooling systems;
- wrong fixing the radiator.
An increase in the process temperature can also be caused by the fact that the cooler is trite clogged with dust. For this reason, its speed and efficiency are reduced. The fan is simply not able to remove heat. To increase heat dissipation, after replacing the CPU, it is worth purchasing and installing a new model of case cooler.
Another reason is upgrade PC. For example, after replacing the old CPU, a new, more powerful, productive one was installed. But at the same time, the fan in the cooling system remained the same. Due to the increase in power, the processor cooler simply does not cope with its task in full.
If the processor is heating up, consider what to do in this situation.
How can I cool the processor of a PC, laptop
Overheating of the processor in laptops, desktop computers significantly increases the load on all system elements. To reduce heat generation, reduce energy consumption, it is necessary:
- check the condition of the cooling system, perform cleaning;
- reduce the load on the CPU;
- overclock the CPU cooler;
- replace thermal paste;
- install additional coolers.
You can also reduce the heat dissipation of the processor in BIOS settings operating system. This is the most simple and affordable way, which does not require special time costs, physical effort.
There are special technologies that reduce CPU frequency when idle. For AMD processor technology is called Cool'n'Quite, For Intel - Enhanced SpeedStep Technology. Consider how to activate it.
In Windows 7, you need to go to " Control Panel”, select the section “ Power supply". In the window that opens, check which mode is active: " Balanced», « High performance », « Energy saving". To activate the technology, you can select any, with the exception of "High performance". In Windows XP, select " Power Saving Manager».
Energy saving settings must be enabled in the BIOS, if they are not, then you can load the default settings.
It is equally important to pay attention to the system case ventilation. If the cooling system is working properly, it is cleaned regularly, but the CPU is still warm, then you need to see if there are any obstacles in the way of the air flow, for example, if they are covered with thick wire loops.
There should be two or three fans in the system unit, PC case. One - for blowing in on the front wall, the second - for blowing out on the rear panel, which in turn provides good airflow. Additionally, you can install a fan on the side wall system block.
If the PC system unit is in a nightstand inside the table, then do not close the doors so that the heated air comes out. Do not block the ventilation openings of the case. Place the computer a few centimeters from the wall, furniture.
For a laptop, you can purchase a special cooling pad.
Available for sale big choice universal models of stands that adapt to the dimensions, the size of the laptop. The heat-dissipating surface and the coolers built into it will contribute to more efficient heat dissipation, cooling.
When working on a laptop, always keep the workplace clean. The ventilation openings must not be blocked by anything. Objects lying nearby should not interfere with air circulation.
For laptops, you can also do cooler overclocking. Since the PC has at least three fans (on the CPU, video card, built-in storage), and most laptop models have only one. The second can be installed if there is a powerful video card. At the same time, you can overclock coolers:
- through special utilities;
- through the BIOS.
Before increasing the fan speed, first of all, you need to clean the cooler, the elements of the motherboard from dust.
Cleaning the cooling system of a laptop, a stationary PC should be done at least once every six to seven months.
Cleaning the cooling system
If the processor heats up, check the condition of the fan, the entire PC cooling system. Dust is a serious enemy of any technology. Clogged between the edges of the radiator, dust, villi, pet hair impair air circulation.
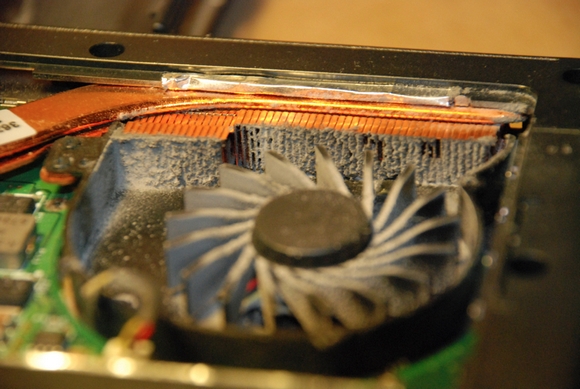
To thoroughly clean it, you need to disconnect the cooler from the power supply and disassemble it. By removing the fan, you can also clean the dust accumulated on the radiator. Cleaning of the radiator, cooler blades can be done with a special plastic spatula, a hard brush. After removing the dust, wipe the radiator with a damp cloth.
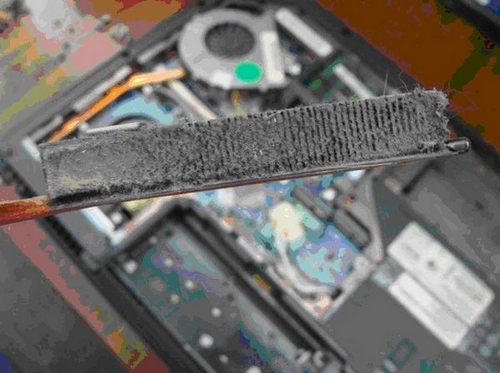
In addition to removing dust from the radiator, the cooler, wipe the wires in the case from dust. Blow or wipe the vents on the case.
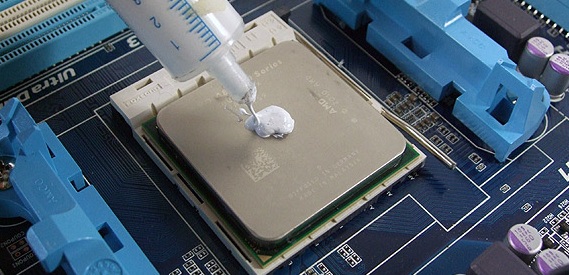
Replacing thermal paste
Updating, replacing the thermal paste on the processor will help reduce the heat dissipation of the processor. Thermal paste is nothing more than a lubricant for cooling the processor. It is a heat conductor between the CPU and the heatsink, eliminates the microscopic irregularities of the contacting surfaces, removes air between them, which prevents heat dissipation. Good, high-quality thermal paste will reduce the temperature by 5-10 degrees.
Over time, the paste dries out, loses all its properties, and does not cool the processor. Therefore, it must be replaced every six months. If the PC has a more modern CPU, the thermal paste can be changed less frequently. You can buy it at any store computer technology. Thermal paste should be of high quality, good.
Before the thermal paste that cools the CPU is applied, you need to get to the processor itself. For this:
How to choose a good thermal paste
Given the large selection of thermal pastes, many are interested in the question of which thermal paste is better. Note that the difference between the pastes of different manufacturers can be from ten to twenty degrees. It all depends on the quality characteristics, heat-conducting properties of thermal interfaces. A good thermal paste should have low thermal resistance, high thermal conductivity.
According to experts, to cool the processor, you can purchase:
- Arctic Cooling MX-4.
- Arctic Silver Ceramique.
- Noctua NT-H1.
- Prolimatech PK-1.
- Thermalright Chill Factor III.
- Zalman ZM-STG2.
- Glacialtech IceTherm II.
- Coollaboratory Liquid Pro.

Some pastes can also be used to overclock the processor. For example, Arctic Cooling MX-4, Glacialtech IceTherm II, Thermalright Chill Factor III, Coollaboratory Liquid Pro. Knowing which thermal paste is best, how often and how to replace it correctly, you can significantly reduce the temperature of the CPU, thereby extending its operational life.
How to undo cpu overclocking
Many users, in order to improve performance, speed up the CPU, overclock the processor (overclocking). But in some cases, this procedure significantly increases the load on the CPU, which can negatively affect its functioning and lead to a decrease in the operational resource.
To check the performance of the CPU after overclocking, it is necessary to warm up the processor using special utilities.
If you are interested in how to remove processor overclocking, go to CMOS and BIOS. Cancel all motherboard voltage settings, return them to normal configuration.
Actions are performed in the following sequence:
- We go into the BIOS by pressing the desired button when the computer starts.
- Select the item " Set BIOS Default/Use Default Settings", press Enter.
- A window will appear in which you need to press the Y key.
- After that, the original settings that were set before the overclocking of the CPU will be returned.
- Now we save all the changes made, exit the settings.
- We restart the computer.
You can also do this by selecting the option " Restore Fail Safe Defaults”, having previously found out on the Internet the exact specifications of the installed motherboard, CPU. This is necessary in order to make changes by setting basic settings frequency, voltage.
In addition, to the base value, you can change the setting of the system bus frequency, multiplier, returning back all the parameters that were changed during overclocking.
You can also remove the optional cooling hardware that you installed to prevent the CPU from overheating.
You can manage, control the operation of the processor through special utility - CPU Core, where you need to specify, set the desired values of the multiplier, bus frequency.
Installing additional fans
If the CPU continues to heat up after cleaning, canceling overclocking, then in order to increase the cooling efficiency, we recommend installing additional fans on the case to increase air circulation. This is necessary if there are many heating elements inside the system unit or if there is a rather small amount of free space inside it.
Opt for larger diameter coolers that provide more airflow at lower RPMs. Such models work efficiently, but noisily. When installing, consider the direction of their work.
CPU coolers are classified into:
- Boxed, without heat pipes. The most common models. Consists of an aluminum plate with ribs. May have a copper base with a fan attached to it.
- Cooling systems on thermal aluminum, copper tubes. They function by removing heat, which is carried out due to the liquid circulating in them. Have high performance efficiency.
When choosing fans for the cooling system, read the installation instructions, check its compatibility with the socket, motherboard What socket is there for the processor. Consider weight, fan size, heatsink type.
Too large, high-power fans will create an additional load on the motherboard, and may cause its deformation. As for the size, choose the chassis for the bus, consider the location of other components. Choose products from well-known, trusted manufacturers.
If a large number is installed hard drives, then you can additionally install a fan on the front panel of the case, as well as on the rear top of the system unit to remove warm air to the outside. Modern cases allow you to install at least two fans: from below, if there is no perforation on the front panel, and opposite the location of hard drives.
If the PC has a highly advanced hardware, the processor heats up, then you can remove the side cover of the system unit. In this case, the cooling efficiency will be increased significantly.
How to overclock the cooler
You can overclock the cooler, as already noted, through the BIOS or through special free utilities, which will allow you to control, control the speed of the fans. The programs are designed to various types processors.
Consider how to overclock coolers through BIOS:
For processors Intel programs will allow you to reduce or increase the speed of rotation of the cooler Riva tuner, speedfan. They have great functionality, a choice of settings, a clear interface, do not take up much space, automatically control the operation of coolers.
If third-party software on the PC does not allow you to adjust the fan speed, the processor cooler can be controlled using original utilities from manufacturers. For example, HP has a program Notebook Fan Control, in Acer - smart fan, ACFanControl. In Lenovo - fan control.
Modern "advanced" cooling systems, which are most often used in overclocking, include: radiator, freon, liquid nitrogen, liquid gel. Their principle of operation is based on the circulation of the coolant. Strongly heated elements heat the water, which is cooled in the radiator. It can be outside the case or be passive, working without a fan.
Conclusion
In this article, various causes of overheating of the processor and solutions for this problem were considered. Sometimes the reason for its occurrence can be ordinary dust, which periodically needs to be removed, or the consequences of inexperienced overclocking of equipment, as well as its upgrade. When replacing thermal paste, you must be careful and careful not to damage the equipment.
Related videos
Instruction
Before you start increasing the speed of the cooler, you should make sure that your motherboard supports this option. This information must be in the manual for it. Almost all modern motherboards from various manufacturers have the function of adjusting the speed of the cooler.
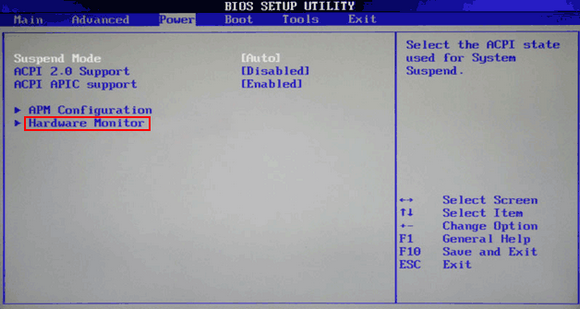
Turn on your computer. Right after that, you need to press the Del key. In most cases, it is with this button that you can open the BIOS menu. If nothing happens after pressing this key, refer to the motherboard manual. There should be a button that is responsible for opening the BIOS menu.
After opening the BIOS, go to the POWER section. In this section, select HW Monitor configuration. There should be an option to control the speed of the coolers. Depending on the model system board this option can be called differently, for example, CPU Q-Fan function or simply Fan control. You should focus on the word Fan. Select this option and press the Enter key. From the proposed options, select Enable, after which - the Profile line.
Several fan speed settings will appear. Select Performance mode. In it, the speed of the coolers will be maximum. But on some motherboards, Turbo mode may be available. If maximum cooling of computer components is extremely important to you, then if Turbo mode is available, it is best to choose it.
After selection desired mode exit BIOS. Be sure to save the changed settings beforehand. The computer will restart. The next time you run it, the speed of the coolers will increase.
Special fans are installed in modern stationary and mobile computers. Their main task is to provide high-quality cooling of all important PC elements. For the coolers to work properly, they need to be configured.
You will need
- Speed Fan program.
Instruction
First, try optimizing your coolers with standard motherboard features. Open the BIOS menu after restarting the computer. Find the menu responsible for fan settings. Activate the Always Fan option. This is especially true when working with mobile computers, because often coolers are simply turned off to save battery power.
Set the speed rotation required coolers. Usually you need to enter a number that determines the percentage of the rated speed to its maximum value. Save the fan settings and restart your computer.
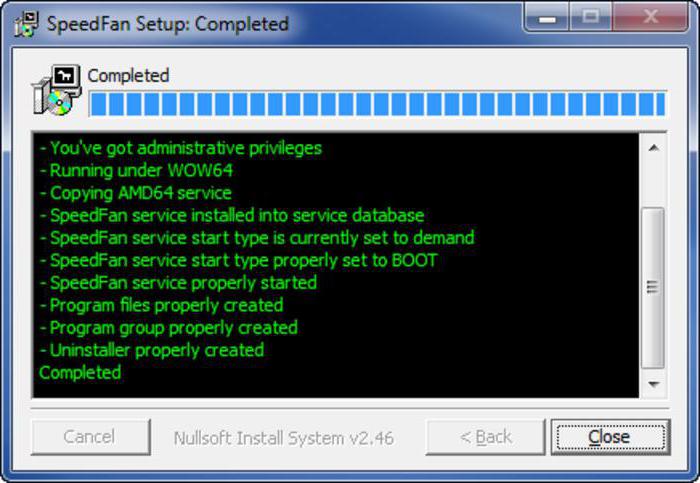
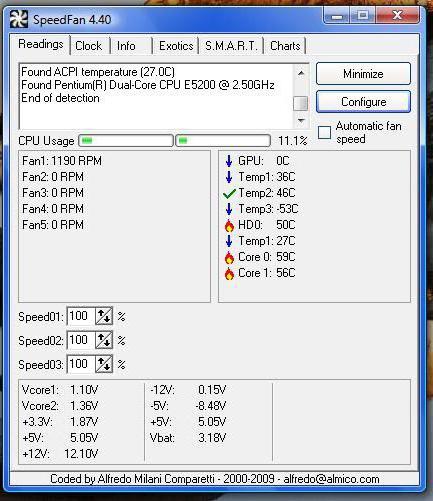
Quite often, the cooler settings function is not available in the BIOS menu. In such situations, it is necessary to use utilities that work with operating Windows systems. Install the program SpeedFan. Open this utility and go to the Clock tab. Expand the Motherboard menu and select the manufacturer of the motherboard you are using.
Go to the Readings menu and find the fields that display speed rotation coolers. Select speed rotations of each cooler. When set to 100%, the blades will rotate at maximum speed Yu.
If you downgraded speed coolers, make sure that the devices to which these fans are connected do not overheat. To do this, open the Charts tab and in the Analyze column select the Temperatures parameter. Select the checkboxes for the devices whose temperature changes you want to monitor.
After launching an application that actively uses PC resources, minimize it and look at the readings of the temperature graph. Make sure that during operation of all devices, their temperature does not exceed the permissible limits.
Sources:
- fan speed
If the system unit of your computer is very noisy, and after turning it off, silence in the room immediately becomes noticeable - this is not a normal situation. Noise from the computer should not exceed allowable norms, and certainly should not disturb your sleep or hear what your neighbor says to you.

You will need
- - computer
- - SpeedFan program.
Instruction
Perhaps your system unit is clogged with dust (over time, this happens with almost all personal computers) - clean it gently with a vacuum cleaner. If it is clean, you may just need to adjust speed fan rotation. Launch the browser and in the search bar enter the name of the program - SpeedFan. Follow one of the first links and download the program to your hard drive. You can download the program on one of the software portals www.softportal.com. Install the program by running the setup file.
Run the program. You will need to wait a little while the program performs an analysis of the operating system. If you find it difficult to navigate the inscriptions in English, click on the Configure button and change the language to Russian on the Options tab. Now you need to enable hardware support for fan speed control on the motherboard. Click on the "Configuration" button, then - the "Advanced" button. Change the value to Software contolled and click OK. If your motherboard was determined by the program, then this value will be set immediately.
Adjust the fan speeds in your computer by clicking on the control arrows. You should not greatly underestimate the performance, since the fans are installed in the computer system unit not for noise, but to provide cooling for spare parts. If the components overheat, it will damage the computer. Try to choose the most optimal parameter values in order to speed cooler was not low, but did not interfere with its sound to others.
Speedfan program also displays the temperature of the components, and if you leave it running in the taskbar, you can monitor the temperature regime inside your computer.
Related videos
Sources:
- what program to regulate the fans of the system unit
Increase speed work laptop possible in several ways. But even the use of operating system software utilities Microsoft systems Windows will significantly increase productivity work. All solutions provided are optional and remain at the discretion of the user.

Instruction
Press the "Start" button to call the main menu of the system and go to the "Control Panel" item to remove unnecessary applications.
Replace pre-installed programs with more "light" or portable software.
Type msconfig in the Open field and click OK to confirm the command.
Go to the "Startup" tab in the application window that opens and remove all unnecessary applications.
If the cooler (fan) on any PC device does not automatically accelerate to maximum speed, which leads to overheating, it makes sense to use the SpeedFan utility. This application allows you to set a constant speed of rotation of the screws or set it to change depending on the temperature read from the main sensors. SpeedFan Utility works only with those coolers whose speed can be adjusted through the BIOS.
Brief description of SpeedFan
overclocking software SpeedFan coolers distributed free of charge. It is suitable for changing the speed of fans installed on the video card, central processor, motherboard chipset. Before installing and running the utility, you must disable automatic adjustment in the BIOS. If this condition is not met, the utility may incorrectly read information about the maximum possible speed of the propellers and will not be able to spin them up to the maximum level in a critical situation.
For example, if during program startup the BIOS locks the RPM CPU cooler at 700 rpm, the SpeedFan application will take this value as the maximum. When the CPU temperature rises, the PC fan will not overclock. This will force the computer to shut down or damage the CPU.
Installation and first start
The installation distribution kit should be downloaded only from the official resource of the software manufacturer. In any case, it is advisable to check the downloaded file for viruses. In general, the installation process is standard. In the first step, you will be asked to accept. In the second step, you will be able to select places to create shortcuts. On the third - set the directory for unpacking the utility files.
During the first run, the cooler overclocker will search for all available temperature sensors and fans. When this process is completed, a small help window will appear on the screen. If you don't want it to appear after every launch of the program, you need to check the only checkbox and click on "Close".
When the help window is closed, you will see the application's main tab. Initially, the program is set to English localization. To switch the interface language, do the following:
Click on "Configure" on the top left of the main window.
Go to the "Options" tab.
Select the desired language from the "Language" menu. Russian localization is already built into the utility.
Main window
The blocks of the main window show basic information. On the right is information about the temperature of the main components of the computer, such as GPU video card, chipset, central processing unit, HDD. In addition to real ones, the program for overclocking coolers will also show "garbage" here. To determine the indicators that you should not pay attention to, you need to use the AIDA64 utility. To do this, compare the performance in SpeedFan and AIDA64. If there are no values in the latter, then they do not need to be taken into account.
On the left is a list of cooler controllers. The list usually shows more fans than are installed in the computer. Some of them reflect the speed of real coolers. Others, as in the case of temperature data, contain "garbage". Incorrect data in blocks is the only minus of the utility, which goes into each new edition.
Determining the correspondence of sensors and coolers
At the bottom of the program are the propeller speed controls. Their names are "Speed01", "Speed02", etc. (in SpeedFan in Russian - "Fan1", "Fan2"). But before adjusting the speed, you first need to determine the correspondence between the regulators and coolers.
The easiest way to do this is on a desktop computer. Remove the left cover of the system unit. Change the value of the first regulator by a few tens of percent. Observe which cooler starts spinning - faster or slower. Also write down or remember the line in the left block where the value changed.
For laptop users, the easiest way to determine the match is with the AIDA64 utility. At the same time, AIDA64 and the program for overclocking SpeedFan coolers should be running. After changing the value of one of the regulators in SpeedFan, trace in AIDA64, on the page of which device the fan speed indicator will change.
Setting
In order to change the names of sensors and speed indicators to understandable ones, click on the "Configuration" line. To do this, just select any element of the list, and then click on it with the left mouse button. Here, at the bottom of the tab, you can set the desired temperature of the device and critical.
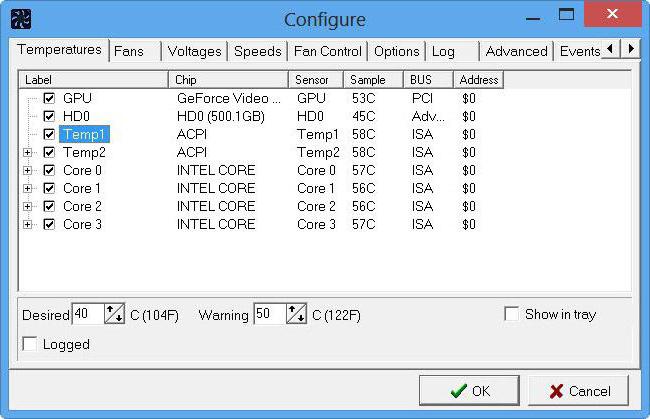
If the component is heated to a critical level, the utility will automatically make the PC fan rotate at maximum speed. When the device cools down to the desired temperature, the cooler speed will be reduced. If filling out the form is difficult for you, and you do not understand what specific values \u200b\u200bmust be entered in these columns, read the instructions that came with the device, or find up-to-date information on the equipment manufacturer's website.
After that, you should click on the "+" icon located next to the device name. In the drop-down list, leave only the checkboxes next to the fan that corresponds to this equipment. Any cooler (fan) can be renamed. To do this, go to the "Fans" tab.
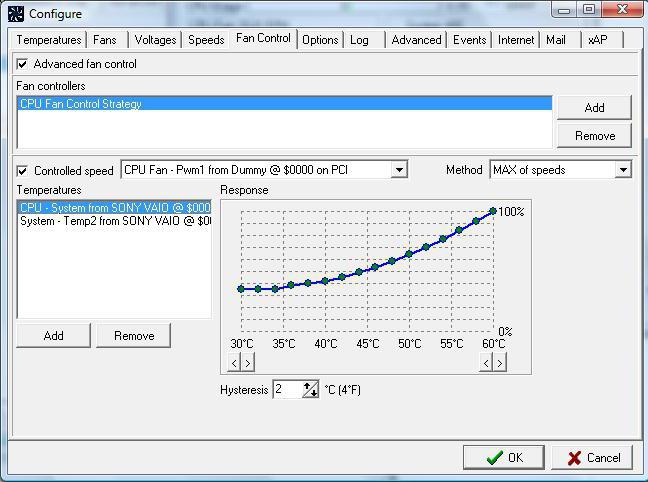
If you want to set up automatic change of the cooler speed, switch to the "Speeds" tab. Highlight the desired fan. At the bottom of the window, enter the minimum and maximum speeds as a percentage. Never set a value equal to 100% as the upper limit, because the cooler will overclock itself to the maximum when it reaches the peak temperature indicated on the main settings tab. Once entered, check the box next to the text "Auto Edit".
Conclusion
The program for overclocking coolers on a SpeedFan computer will appeal to advanced users and overclockers. Everyone else will find it difficult. It will be difficult for an inexperienced user to establish correspondence between fans and sensors and understand all the parameters. In addition, the normal temperature of devices and the critical temperature is not always indicated on the manufacturers' websites and in the instructions.
Some laptops use only half the power of the built-in fan or even less. A weak cooling system leads to overheating of the device, which is very dangerous for its operation as a whole. If you begin to feel that the laptop becomes hot during operation, then the problem lies precisely in the operation of the cooler.
This factor is due to the fact that the operating system specifically does not activate all the features of the fan to save energy. It is possible to fix this on your own and below we will discuss how to speed up the fan on a laptop.
Increasing laptop fan speed
To configure, you will need to download the Speed Fan program. Launch the application and follow the instructions below.
- Initially analyze the temperature parameters. In the window, find the device, according to which the excess of normal temperature is noticeable. Click on the "Up" arrow several times, which is located near the name of the fan built into the device. Next, wait until the desired temperature is normalized for the speed of rotation of the cooler. Then minimize (do not close!) the program.
- It is possible that this program does not interact with your operating system. In that case, download the AMD OverDrive app. Particularly good this application suitable for laptops AMD processor. Wait for the main menu to load and open the Fan Control tab (located in the Performance Control subsection). Below the image, drag the sliders to 100% and click Apply to set the values.
- Then click on Preferences and then on Settings. In the menu that appears, check the Apply my last settings checkbox. This function allows the program to automatically enable the parameters you specified each time the device is started. It remains to click OK and close the application.
For laptop with Intel processor ideal to use the Riva Tuner app to increase the fan speed. Below we will explain how to configure the settings in version 2.24c of the program. However, it is likely that other versions of the guide will also work. For proper operation, it is necessary that the laptop has installed NVIDIA graphics card and the corresponding driver.
- Install and activate the program.
- Next, go to the "Registry" and put the number 3 next to AutoFanSpeedControl.
- Close the program with a cross or press exit. Restart Riva Tuner.
- In the "Home" tab, left-click on the triangle next to the name of the video card and in the menu that opens, check "Low-level system settings".
- A window will open again, in which you should check "Enable low-level cooler control". Next, select "Define", set 100% and confirm with the "OK" button. After rebooting and checking the operation of the cooler according to the new parameters, you can set the automatic mode in the "Auto" section.
Important: At least once a year, the device must be dismantled and cleaned from the inside. Also be sure to lubricate the bearing. Thus, you will significantly extend and increase the speed of the fan and the laptop as a whole.