Sooner or later (it’s better, of course, if early) any user asks himself the question of how long the software installed on his computer will last HDD and isn’t it time to look for a replacement for him? There is nothing surprising in this, since hard disks due to their design features, they are the least reliable among computer components. At the same time, it is on the HDD that most users store the lion's share of a wide variety of information: documents, pictures, various software, etc., as a result of which an unexpected failure of the disk is always a tragedy. Of course, it is often possible to restore information on apparently “dead” hard drives, but it is possible that this operation will cost you a pretty penny, and will cost you a lot of nerves. Therefore, it is much more effective to try to prevent data loss.
How? It’s very simple... Firstly, do not forget about regular data backups, and secondly, monitor the condition of the disks using specialized utilities. We will consider several programs of this kind from the perspective of the tasks being solved in this article.
Control of SMART parameters and temperature
All modern HDDs and even solid state drives (SSDs) support S.M.A.R.T technology. ( from English Self-Monitoring, Analysis, and Reporting Technology - self-monitoring, analysis and reporting technology), which was developed by major manufacturers hard drives to increase the reliability of their products. This technology is based on continuous monitoring and assessment of the condition hard drive built-in self-diagnosis equipment (special sensors), and its main purpose is timely detection of possible drive failure.
Real-time HDD status monitoring
A number of information and diagnostic solutions for diagnosing and testing hardware, as well as special monitoring utilities, use S.M.A.R.T technology. to monitor the current status of various vital parameters that describe the reliability and performance of hard drives. They read the relevant parameters directly from the sensors and thermal sensors that all modern hard drives are equipped with, analyze the received data and display them in the form of a short tabular report with a list of attributes. At the same time, some utilities (Hard Drive Inspector, HDDlife, Crystal Disk Info, etc.) are not limited to displaying a table of attributes (the meanings of which are incomprehensible to untrained users) and additionally display brief information about the state of the disk in a more understandable form.
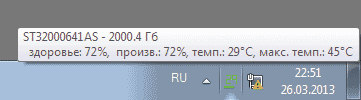
Diagnosing the condition of a hard drive using this kind of utility is as easy as shelling pears - just read the brief basic information about installed HDDs: with basic data about disks in Hard Drive Inspector, a certain conditional percentage hard health disk in HDDlife, the “Technical Status” indicator in Crystal Disk Info (Fig. 1), etc. Any of these programs provides the minimum necessary information about each of the installed computer HDD: data on the hard drive model, its volume, operating temperature, operating time, as well as the level of reliability and performance. This information makes it possible to draw certain conclusions about the performance of the media.
Rice. 1. Brief information about the “health” of the working HDD
You should configure the monitoring utility to launch simultaneously with the start operating system, adjust the time interval between checks of S.M.A.R.T. attributes, and also enable the display of the temperature and “health level” of hard drives in the system tray. After this, to monitor the status of the disks, the user will only need to glance from time to time at the indicator in the system tray, where brief information about the state of the drives available in the system will be displayed: their “health” level and temperature (Fig. 2). By the way, operating temperature is no less important an indicator than a conditional indicator of the health of the HDD, because hard drives can suddenly fail due to simple overheating. Therefore, if the hard drive heats up above 50 °C, then it would be wiser to provide it with additional cooling.
Rice. 2.Display HDD Status
in the system tray with the HDDlife program
It is worth noting that a number of such utilities provide integration with Windows Explorer, due to which a green icon is displayed on the icons of local disks if they are working properly, and if problems arise, the icon turns red. So you are unlikely to forget about the health of your hard drives. With such constant monitoring, you will not be able to miss the moment when some problems begin to arise with the disk, because if the utility detects critical changes in S.M.A.R.T. attributes. and/or temperature, it will carefully notify the user about this (with a message on the screen, a sound message, etc. - Fig. 3). Thanks to this, it will be possible to copy data from the dangerous media in advance.
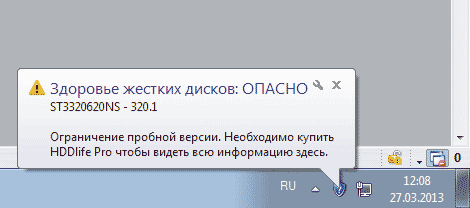
Rice. 3. Example of a message about the need to immediately replace the disk
Using S.M.A.R.T. monitoring solutions in practice to monitor the status of hard drives is completely easy, because all such utilities work in background and require a minimum of hardware resources, so their functioning will in no way interfere with the main workflow.
Control of S.M.A.R.T. attributes
Advanced users, of course, are unlikely to limit themselves to assessing the condition of hard drives by viewing a brief verdict from one of the utilities presented above. This is understandable, because according to the decoding of the S.M.A.R.T. attributes. You can identify the cause of failures and, if necessary, take precautionary measures. True, for self-control S.M.A.R.T. attributes will require at least a brief familiarization with S.M.A.R.T technology.
Hard drives that support this technology include intelligent self-diagnostic procedures so they can “report” their current status. This diagnostic information is provided as a collection of attributes, that is, specific characteristics of the hard drive used to analyze its performance and reliability.
B O Most of the important attributes have the same meaning for drives from all manufacturers. The values of these attributes during normal disk operation may vary within certain intervals. For any parameter, the manufacturer has determined a certain minimum safe value that cannot be exceeded under normal operating conditions. Unambiguously determine critically important and critically unimportant S.M.A.R.T parameters for diagnostics. problematic. Each of the attributes has its own information value and indicates one or another aspect of the work of the medium. However, first of all you should pay attention to the following attributes:
- Raw Read Error Rate - the frequency of errors in reading data from the disk caused by the fault of the equipment;
- Spin Up Time - average spin-up time of the disk spindle;
- Reallocated Sector Count - number of sector reassignment operations;
- Seek Error Rate - frequency of occurrence of positioning errors;
- Spin Retry Count - the number of repeated attempts to spin up disks to operating speed if the first attempt fails;
- Current Pending Sector Count - the number of unstable sectors (that is, sectors awaiting the reassignment procedure);
- Offline Scan Uncorrectable Count - the total number of uncorrected errors during sector read/write operations.
Typically S.M.A.R.T. attributes are displayed in tabular form indicating the attribute name (Attribute), its identifier (ID) and three values: current (Value), minimum threshold (Threshold) and the lowest attribute value for the entire operating time of the drive (Worst), as well as the absolute value of the attribute (Raw). Each attribute has a current value, which can be any number from 1 to 100, 200, or 253 (there are no general standards for upper bounds on attribute values). The Value and Worst values for a completely new hard drive are the same (Fig. 4).
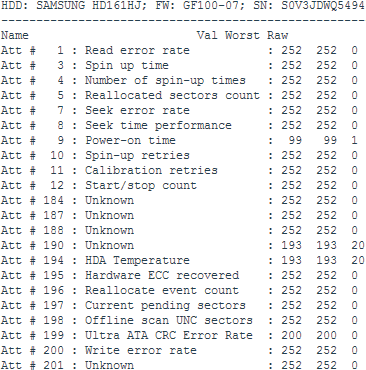
Rice. 4. Attributes of S.M.A.R.T. with a new HDD
Shown in Fig. 4 information allows us to conclude that for a theoretically serviceable hard drive, the current (Value) and worst (Worst) values should be as close as possible to each other, and the Raw value for most parameters (with the exception of the parameters: Power-On Time, HDA Temperature and some others ) should approach zero. The current value may change over time, which in most cases reflects deterioration of the hard drive parameters described by the attribute. This can be seen in Fig. 5, which presents fragments of the S.M.A.R.T attribute table. for the same disk - data were obtained with an interval of six months. As you can see, in the more recent version of S.M.A.R.T. the frequency of errors when reading data from the disk (Raw Read Error Rate), the origin of which is determined by the hardware of the disk, and the frequency of errors when positioning the magnetic head unit (Seek Error Rate) have increased, which may indicate overheating of the hard drive and its unstable position in the basket . If the current value of any attribute approaches or becomes less than the threshold value, then the hard drive is considered unreliable and should be replaced urgently. For example, a drop in the value of the Spin-Up Time attribute (average spin-up time of the disk spindle) below a critical value, as a rule, indicates complete wear of the mechanics, as a result of which the disk is no longer able to maintain the rotation speed specified by the manufacturer. Therefore, it is necessary to monitor the condition of the HDD and periodically (for example, once every 2-3 months) carry out S.M.A.R.T diagnostics. and save the received information in text file. In the future, these data can be compared with current ones and certain conclusions can be drawn about the development of the situation.
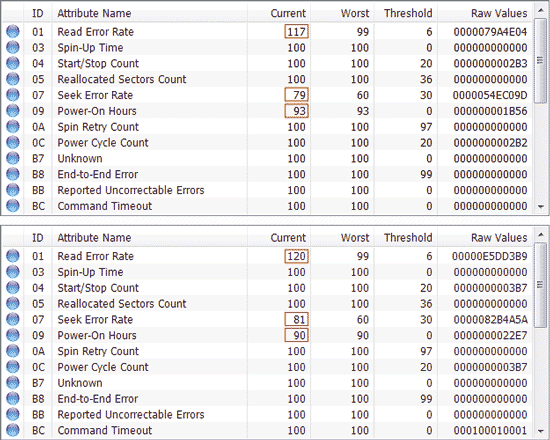
Rice. 5. S.M.A.R.T. attribute tables obtained at six-month intervals
(more recent version of S.M.A.R.T. below)
When viewing S.M.A.R.T. attributes, you should first of all pay attention to critical parameters, as well as parameters highlighted by indicators other than the base color (usually blue or green). Depending on the current state attribute in the output of the S.M.A.R.T. utility. in the table it is usually marked in one color or another, which makes it easier to understand the situation. In particular, in Hard program Drive Inspector color indicator can have green, yellow-green, yellow, orange or red - green and yellow-green colors indicate that everything is normal (the attribute value has not changed or changed insignificantly), and yellow, orange and red colors indicate danger (worse the color is red, which indicates that the attribute value has reached its critical value). If any of the critical parameters are marked with a red icon, then you need to urgently replace the hard drive.
In the Hard Drive Inspector program, let's look at the table of S.M.A.R.T. attributes of the same drive, which we briefly assessed using monitoring utilities earlier. From Fig. Figure 6 shows that the values of all attributes are normal and all parameters are marked green. The HDDlife and Crystal Disk Info utilities will show a similar picture. True, more professional solutions for analysis and HDD diagnostics are not so loyal and often label S.M.A.R.T. attributes more pickily. For example, such well-known utilities as HD Tune Pro and HDD Scan, in our case, were suspicious of the UltraDMA CRC Errors attribute, which displays the number of errors that occur when transmitting information via external interface(Fig. 7). The cause of such errors is usually associated with a twisted and poor-quality SATA cable, which may need to be replaced.
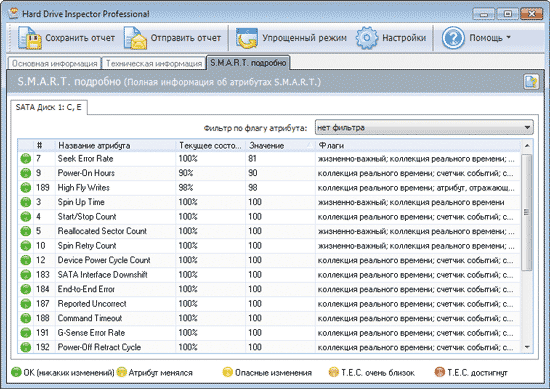
Rice. 6. Table of S.M.A.R.T. attributes obtained in the Hard Drive Inspector program
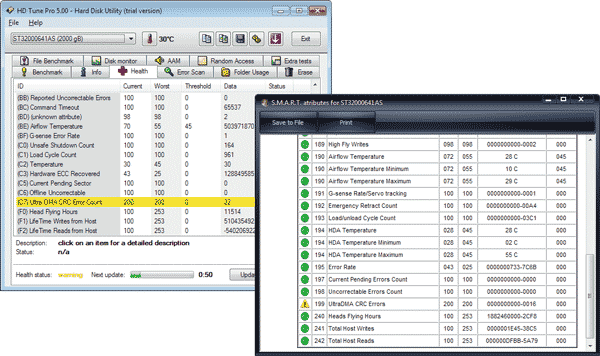
Rice. 7. Results of assessing the state of S.M.A.R.T. attributes
HD Tune Pro and HDD Scan utilities
For comparison, let’s take a look at the S.M.A.R.T. attributes of a very ancient, but still working HDD with periodically arising problems. It did not inspire confidence in the Crystal Disk Info program - in the “Technical Condition” indicator, the disk condition was rated as alarming, and the Reallocated Sector Count attribute was highlighted yellow(Fig. 8). This is a very important attribute from the point of view of the “health” of the disk, indicating the number of sectors reassigned when the disk detects a read/write error; during this operation, data from the damaged sector is transferred to the reserve area. The yellow color of the indicator for the parameter indicates that there are few remaining spare sectors with which to replace the bad ones, and soon there will be nothing to reassign the newly appearing bad sectors. Let's also check how more serious solutions assess the condition of the disk, for example, the HDDScan utility widely used by professionals - but here we see exactly the same result (Fig. 9).
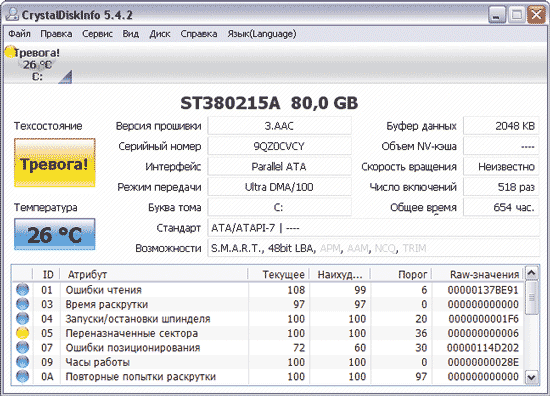
Rice. 8. Assessing a problematic hard drive in CrystalDiskInfo
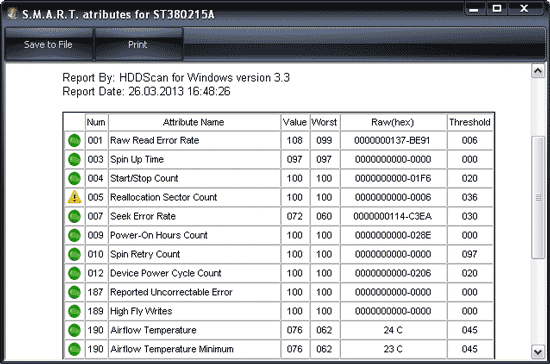
Rice. 9. Results of S.M.A.R.T. diagnostics of HDD in HDDScan
This means that it’s clearly not worth delaying the replacement of such a hard drive, although it may still serve for some time, although, of course, you cannot install an operating system on this hard drive. It is worth noting that if there are a large number of reassigned sectors, the read/write speed drops (due to the unnecessary movements that the magnetic head has to make), and the disk begins to noticeably slow down.
Scanning the surface for bad sectors
Unfortunately, in practice, monitoring SMART parameters and temperature alone is not enough. If the slightest evidence appears that something is wrong with the disk (in the case of periodic program freezes, for example, when saving results, reading error messages appear, etc.), it is necessary to scan the disk surface for the presence of unreadable sectors. To carry out such a media check, you can use, for example, the HD Tune Pro and HDDScan utilities or diagnostic utilities from hard drive manufacturers, however, these utilities only work with their own hard drive models, and therefore we will not consider them.
When using such solutions, there is a risk of damaging data on the scanned disk. On the one hand, if the drive really turns out to be faulty, anything can happen to the information on the disk during scanning. On the other hand, we cannot exclude incorrect actions on the part of the user who mistakenly starts scanning in write mode, during which data from the hard drive is erased sector by sector with a certain signature, and based on the speed of this process, a conclusion is drawn about the state of the hard drive. Therefore, compliance with certain precautionary rules is absolutely necessary: before starting the utility, you need to create backup copy information and during the inspection act strictly according to the instructions of the developer of the relevant software. To obtain more accurate results, before scanning, it is better to close all active applications and unload possible background processes. In addition, you should keep in mind that if you need to test the system HDD, you need to boot from a flash drive and start the scanning process from it, or completely remove the hard drive and connect it to another computer from which you can start testing the disk.
As an example, using HD Tune Pro, we will check the surface of the HDD for bad sectors, which did not inspire confidence in the Crystal Disk Info utility above. In this program, to start the scanning process, just select required disk, activate tab Error Scan and click on the button Start. After this, the utility will begin sequential scanning of the disk, reading sector by sector and marking sectors on the disk map with multi-colored squares. The color of the squares, depending on the situation, can be green (normal sectors) or red (bad blocks) or will have some shade intermediate between these colors. As we see from Fig. 10, in our case the utility did not find full-fledged bad blocks, but nevertheless there is a significant number of sectors with one or another read delay (judging by their color). In addition to this, in the middle part of the disk there is a small block of sectors, the color of which is close to red - these sectors have not yet been recognized as bad by the utility, but they are already close to this and will move into the bad category in the very near future.
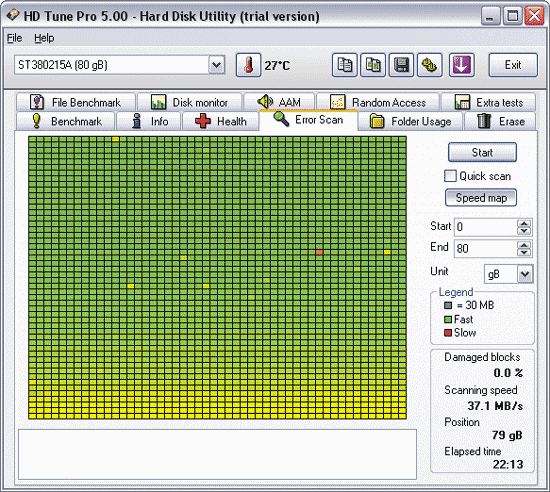
Rice. 10. Scanning the surface for bad sectors in HD Tune Pro
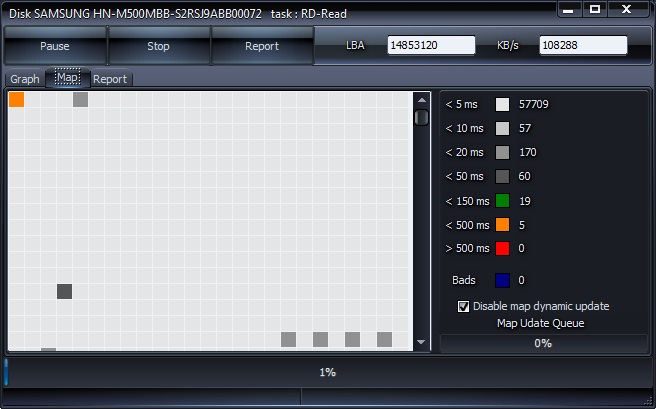
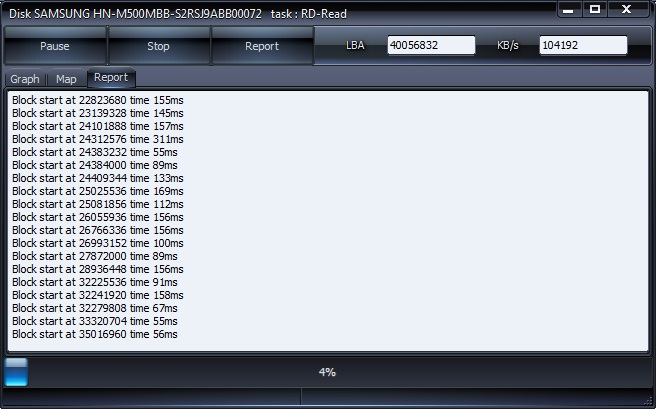
Testing a media for bad sectors in the HDDScan program is more difficult and even more dangerous, since if the mode is incorrectly selected, the information on the disk will be irretrievably lost. The first step to start scanning is to create new task by clicking on the button New Task and selecting the command from the list Suface Tests. Then you need to make sure that the mode is selected Read- this mode is installed by default and when used, the hard disk surface is tested by reading (that is, without deleting data). After this press the button Add Test(Fig. 11) and double-click on the created task RD-Read. Now in the window that opens you can observe the disk scanning process on a graph (Graph) or on a map (Map) - fig. 12. Upon completion of the process, we will get approximately the same results as those demonstrated above by the HD Tune Pro utility, but with a clearer interpretation: bad sectors no (they are marked in blue), but there are three sectors with a response time of more than 500 ms (marked in red), which pose a real danger. As for the six orange sectors (response time from 150 to 500 ms), this can be considered within normal limits, since such a response delay is often caused by temporary interference in the form, for example, of running background programs.
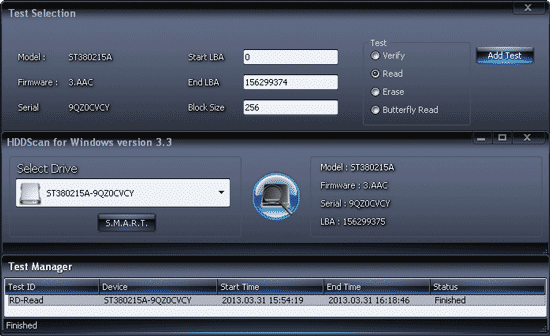
Rice. 11. Running disk testing in HDDScan program
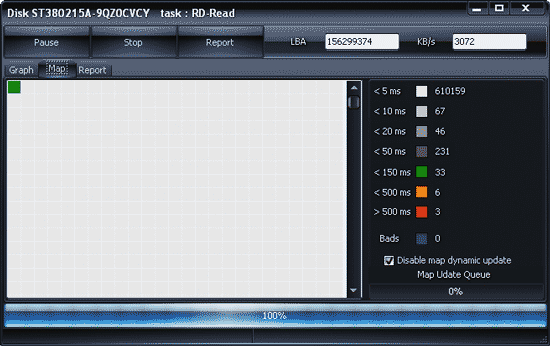
Rice. 12. Results of disk scanning in Read mode using HDDScan
In addition, it should be noted that if there are a small number of bad blocks, you can try to improve the condition of the hard drive by removing bad sectors by scanning the disk surface in linear recording mode (Erase) using the HDDScan program. After such an operation, the disk can still be used for some time, but, of course, not as a system disk. However, you should not hope for a miracle, since the HDD has already begun to crumble, and there are no guarantees that in the near future the number of defects will not increase and the drive will not completely fail.
Programs for S.M.A.R.T. monitoring and HDD testing
HD Tune Pro 5.00 and HD Tune 2.55
Developer: EFD Software
Distribution size: HD Tune Pro - 1.5 MB; HD Tune - 628 KB
Work under control: Windows XP/Server 2003/Vista/7
Distribution method: HD Tune Pro - shareware (15-day demo version); HD Tune - freeware (http://www.hdtune.com/download.html)
Price: HD Tune Pro - $34.95; HD Tune - free (for non-commercial use only)
HD Tune is a convenient utility for diagnosing and testing HDD/SSD (see table), as well as memory cards, USB drives and a number of other data storage devices. The program displays detailed information about the drive (firmware version, serial number, disk size, buffer size and data transfer mode) and allows you to set the device status using S.M.A.R.T. data. and temperature monitoring. In addition, it can be used to test the disk surface for errors and evaluate the device's performance by running a series of tests (sequential and random data read/write speed tests, file performance test, cache test and a number of Extra tests). The utility can also be used to configure AAM and securely delete data. The program is presented in two editions: commercial HD Tune Pro and free lightweight HD Tune. In the HD Tune edition, you can only view detailed information about the disk and the S.M.A.R.T. attribute table, as well as scan the disk for errors and test for speed in read mode (Low level benchmark - read).
The Health tab is responsible for monitoring S.M.A.R.T. attributes in the program - data from sensors is read after a set period of time, the results are displayed in a table. For any attribute, you can view the history of its changes in numerical form and on a graph. Monitoring data is automatically recorded in the log, but no user notifications are provided for critical changes in parameters.
As for scanning the disk surface for bad sectors, the tab is responsible for this operation Error Scan. Scanning can be quick (Quick scan) and deep - with quick check Not the entire disk is scanned, but only some part of it (the scanning area is determined through the Start and End fields). Damaged sectors are displayed on the disk map as red blocks.
HDDScan 3.3
Developer: Artem Rubtsov
Distribution size: 3.64 MB
Work under control: Windows 2000(SP4)/XP(SP2/SP3)/Server 2003/Vista/7
Distribution method: freeware (http://hddscan.com/download/HDDScan-3.3.zip)
Price: for free
HDDScan is a utility for low-level diagnostics of hard drives, solid state drives and Flash disks with USB interface. The main purpose of this program is to test disks for the presence of bad blocks and bad sectors. The utility can also be used to view the contents of S.M.A.R.T., monitor temperature and change some hard drive settings: noise management (AAM), power management (APM), forced start/stop of the drive spindle, etc. The program works without installation and can be launched from portable media, for example flash drives.
HDDScan displays S.M.A.R.T. attributes and temperature monitoring on demand. S.M.A.R.T report contains information about the performance and “health” of the drive in the form of a standard attribute table; the temperature of the drive is displayed in the system tray and in a special information window. Reports can be printed or saved as an MHT file. S.M.A.R.T. tests are possible.
The disk surface is checked in one of four modes: Verify (linear verification mode), Read (linear reading), Erase (linear writing) and Butterfly Read (Butterfly reading mode). To check a disk for the presence of bad blocks, a test in Read mode is usually used, which tests the surface without deleting data (the conclusion about the condition of the drive is made based on the speed of sector-by-sector data reading). When testing in linear recording mode (Erase), the information on the disk is overwritten, but this test can somewhat heal the disk, ridding it of bad sectors. In any of the modes, you can test the entire disk or a specific fragment of it (the scanning area is determined by indicating the initial and final logical sectors - Start LBA and End LBA, respectively). Test results are presented in the form of a report (Report tab) and displayed on a Graph and a disk map (Map), indicating, among other things, the number of bad sectors (Bads) and sectors whose response time during testing took more than 500 ms (marked in red ).
Hard Drive Inspector 4.13
Developer: AltrixSoft
Distribution size: 2.64 MB
Work under control: Windows 2000/XP/2003 Server/Vista/7
Distribution method: shareware (14-day demo version - http://www.altrixsoft.com/ru/download/)
Price: Hard Drive Inspector Professional - 600 rub.; Hard Drive Inspector for Notebooks - 800 rub.
Hard Drive Inspector - convenient solution for S.M.A.R.T. monitoring of external and internal HDDs. IN this moment the program is offered on the market in two editions: the basic Hard Drive Inspector Professional and the portable Hard Drive Inspector for Notebooks; the latter includes all the functionality of the Professional version, and at the same time takes into account the specifics of monitoring laptop hard drives. Theoretically, there is also an SSD version, but it is distributed only in OEM supplies.
The program provides automatic checking of S.M.A.R.T. attributes at specified intervals and upon completion issues its verdict on the condition of the drive, displaying the values of certain conditional indicators: “reliability”, “performance” and “no errors” along with a numerical temperature value and a temperature diagram. Technical data about the disk model, its capacity, total free space and operating time in hours (days) is also provided. In advanced mode, you can view information about disk parameters (buffer size, firmware name, etc.) and the S.M.A.R.T attribute table. There are various options for informing the user in the event of critical changes on the disk. Additionally, the utility can be used to reduce the noise level produced by hard drives, and reducing HDD power consumption.
HDDlife 4.0
Developer: BinarySense Ltd
Distribution size: 8.45 MB
Work under control: Windows 2000/XP/2003/Vista/7/8
Distribution method: shareware (15-day demo version - http://hddlife.ru/rus/downloads.html)
Price: HDDLife - free; HDDLife Pro - 300 rub.; HDDlife for Notebooks - 500 rub.
HDDLife is a simple utility designed to monitor the status of hard drives and SSDs (from version 4.0). The program is presented in three editions: free HDDLife and two commercial ones - basic HDDLife Pro and portable HDDlife for Notebooks.
The utility monitors S.M.A.R.T. attributes and temperature at specified intervals and, based on the analysis results, issues a compact report on the condition of the disk indicating technical data about the disk model and its capacity, operating time, temperature, and also displays the conditional percentage of its health and performance, which allows Even beginners can navigate the situation. More experienced users can additionally look at the table of S.M.A.R.T. attributes. In case of problems with the hard drive, it is possible to configure notifications; You can configure the program so that if the disk is in normal condition, the scan results are not displayed. Level control possible HDD noise and energy consumption.
CrystalDiskInfo 5.4.2
Developer: Hiyohiyo
Distribution size: 1.79 MB
Work under control: Windows XP/2003/Vista/2008/7/8/2012
Distribution method: freeware (http://crystalmark.info/download/index-e.html)
Price: for free
CrystalDiskInfo is a simple utility for S.M.A.R.T. monitoring the status of hard drives (including many external HDDs) and SSD. Despite being free, the program has all the necessary functionality to monitor the status of disks.
Disk monitoring is performed automatically after a specified number of minutes or on demand. At the end of the test, the temperature of the monitored devices is displayed in the system tray; detailed information about the HDD indicating the values of S.M.A.R.T. parameters, temperature and the program’s verdict on the state of the devices is available in the main window of the utility. There is functionality for setting threshold values for some parameters and automatically notifying the user if they are exceeded. Noise level management (AAM) and power management (APM) are possible.
Unfortunately, a considerable part of modern HDDs work normally for a little more than a year, then various kinds of problems begin, which over time can lead to data loss. This prospect can be completely avoided if you carefully monitor the condition of the hard drive, for example, using the utilities discussed in the article. However, you should also not forget about regular backup of valuable data, since monitoring utilities, as a rule, successfully predict disk failure due to mechanical faults (according to Seagate statistics, about 60% of HDDs fail due to mechanical components), but they are not able to predict the death of a drive due to problems with the electronic components of the disk.
Today we’ll talk about such an important computer component as the hard drive.
Sometimes users complain about the slow operation of the system, its frequent freezes, the appearance of blue screens BSOD death, system errors, loss or damage of files and/or directories, etc., without suspecting that the problem is not at all due to buggy Windows, clumsy drivers or viruses.
The problem is the hard drive, which is slowly starting to crumble. This is where the program comes in handy. hard checks disk.
To understand the further content of the article, first consider the principle of operation of a hard drive.
In addition to error detection, there is also a function to automatically correct them and restore the ability to read and write to the hard drive.
In addition to diagnosing hard drives, the tool can also be used to diagnose removable media (USB, SD cards, etc.).
Before checking the disk, close all programs and applications.
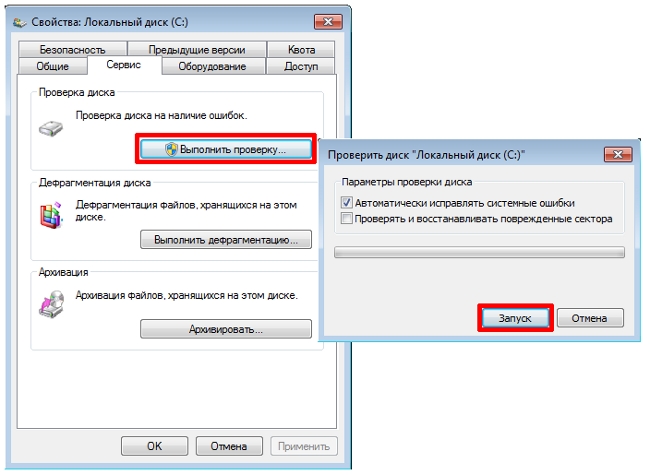
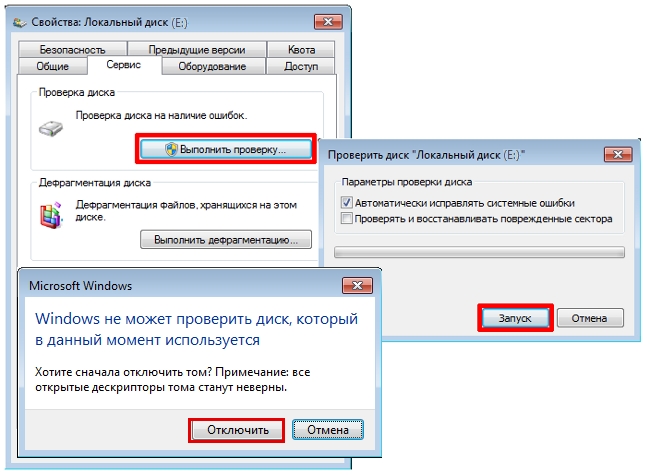
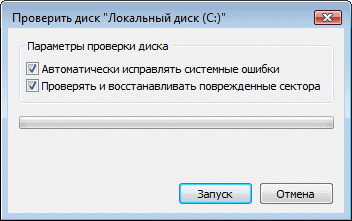
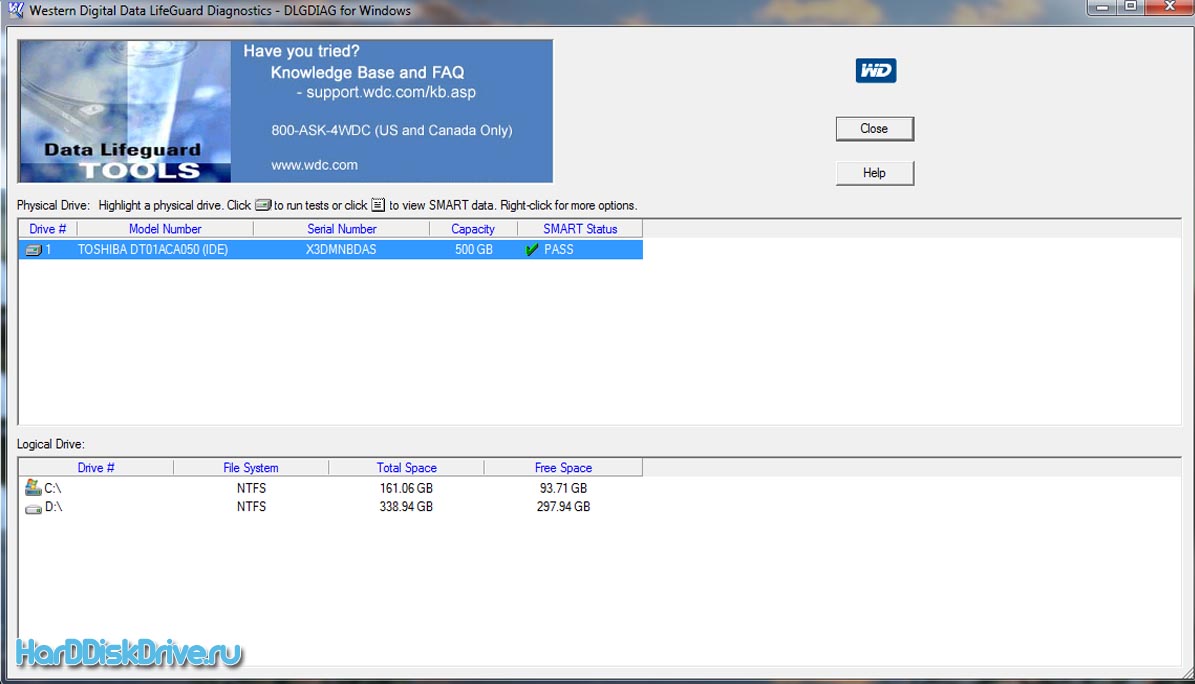
Click Start, write “My Computer” in the program search field, and select the item found by the system. In the central window we see a list of hard drives. Right-click on the hard drive you want to check and select “Properties”.
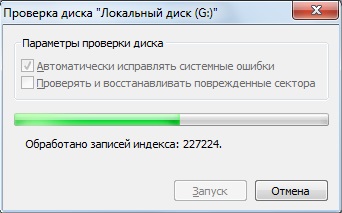
Go to the “Service” tab and click the “Run check” button, in the window that opens, check the “Automatically correct system errors” checkbox and click the “Run” button.
For initial diagnostics, these settings are quite sufficient.
For more detailed diagnostics, you need to check another box in the “Scan and repair” field. bad sectors" In this mode, verification may take longer than in the previous one.
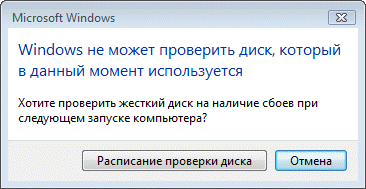
If the disk you select is a system one, i.e. an operating system is installed on it, it is impossible to perform a check at this point in time, because When checking, the disk must be disconnected.
In this case, the system will display a warning window and prompt you to perform a check before the next starting Windows(“Disk check schedule”).

If the disk you select is not the system one, there is no need to restart the computer; before checking, the system will prompt you to disconnect it. You must click “Disable” in the appropriate window, after which the scan will begin.
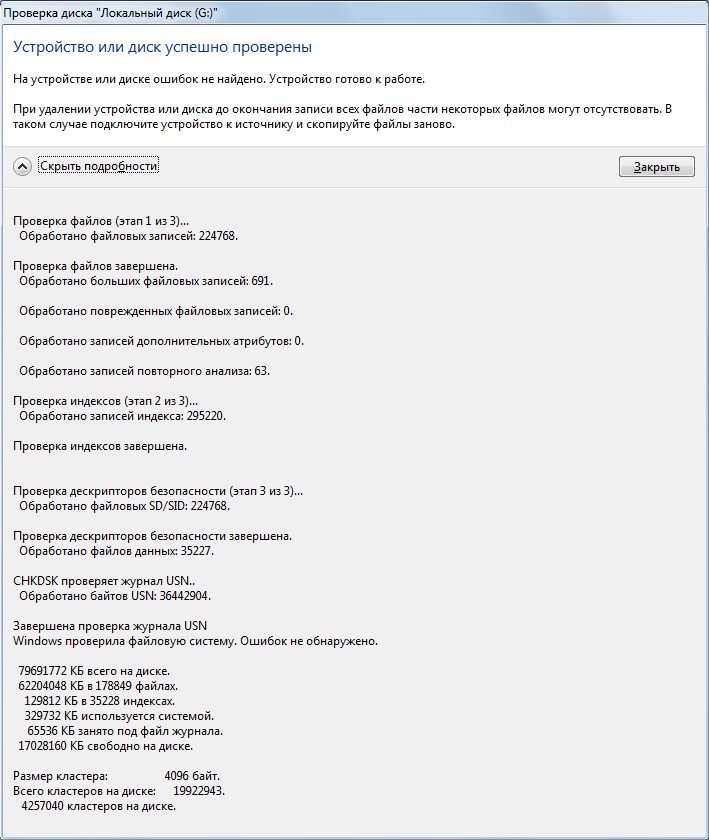
After the check is completed, we will see a window with its results.
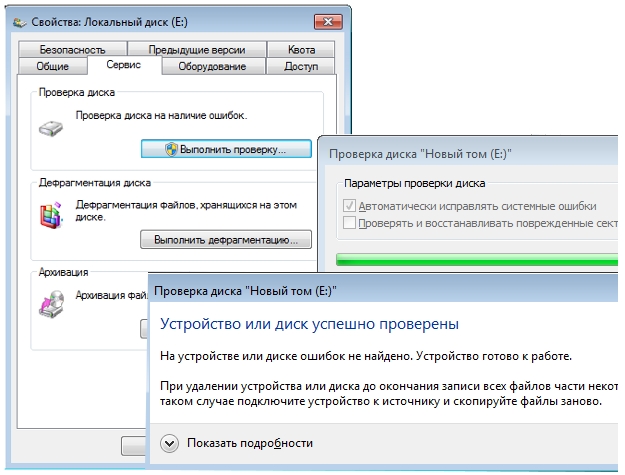
Availability bad sectors, the first sign that the hard drive will fail after some time.
Therefore, to avoid losing valuable information, we recommend that you do not waste time and immediately copy all valuable data to another physical hard drive.
Review of third-party programs for checking drives
To diagnose a hard drive, there are quite a large number of different utilities of varying functionality and convenience with free or paid types of licensing.
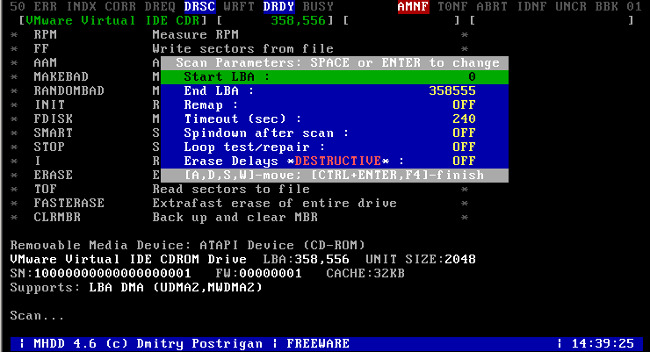
MHDD- a fast, free, compact program for working with low-level drives developed in 2000 by Dmitry Postrigan.
The program is aimed at professionals and has an ascetic DOS interface.
In addition to diagnostics, the program can read/write arbitrary sectors, manage the SMART and password system, noise management system, perform extreme testing, work with the drive’s password system, etc.
Before working with the program, in order to avoid damage to the equipment being diagnosed, the developer strongly recommends that you read the documentation for the program available on the official website.
Advantages:
+ free;
+ compact;
+ fast.
Flaws:
- works exclusively under DOS so is not suitable for beginners;
- has relatively complex settings;
- English language interface.
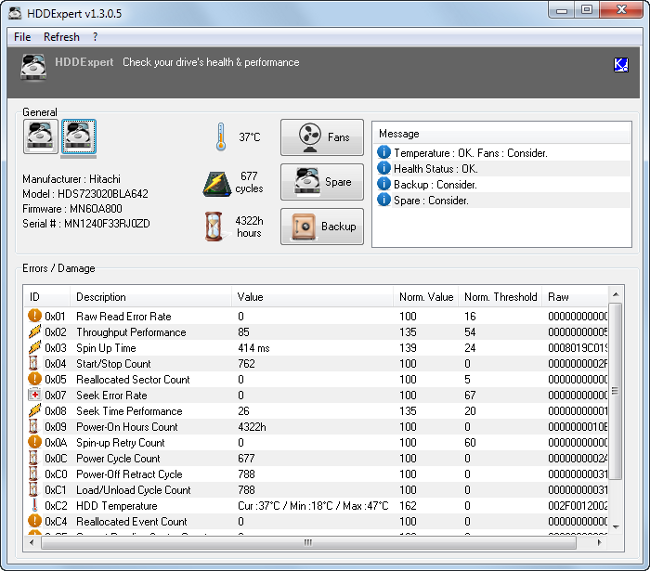
HDDExpert - free utility, the operating principle of which is to convert SMART information of drives into data convenient for user perception and analysis.
The program provides complete information about computer hard drives (performance, errors, warnings, temperature) and has the ability to test their performance.
The program's capabilities are limited by the parameters of SMART technology, so you can't count on serious diagnostics and testing.
Advantages:
+ has a simple interface.
Flaws:
- suitable for primary, shallow diagnostics;
- Some of the tips are promotional in nature.
Victoria. For testing hard disks, and also to fix some problems in 99% of cases, the Victoria program is suitable.
It was developed by Belarusian programmer Sergei Kazansky, is absolutely free, has a small size (up to 1 MB) and works with hard drives at the port level, i.e. at the lowest level, which allows achieving high performance qualities.
Thanks to these characteristics, the program is preferred by specialists service centers.
In addition to more complex tasks, the program allows you to perform a number of tasks for the average PC user: perform low-level testing, determine the average access time, manage noise levels, erase information without the possibility of subsequent recovery, and much more.
Among other things, the program can work in Windows environment and DOS. DOS mode is relevant when the operating system cannot be loaded and it is necessary to check the hard drive.

Advantages:
+ free;
+ compact;
+ has a wide range of functions;
+ works in MS DOS and MS Windows;
+ has a simple interface.
Flaws:
- The project is not being developed and some of the widely used versions of the utility have an English interface language and do not support work in 64-bit operating systems. The problem is solved by downloading alternative versions of the program created by the community.
This article does not provide step-by-step guides for hard drive diagnostics. However, you will find in it links to programs that allow you to comprehensively test your hard drive, as well as instructions for them. Additionally, the article explains how to check hard sections disk using built-in Windows tools.
On this page
Windows Check Disk Utility (chkdsk)
Windows OS has its own disk checking utility. It can be launched from GUI or from the command line.
Running disk check from the GUI
Open the window My computer, right-click on the drive or partition you want to check and select from context menu paragraph Properties. In the disk properties window, go to the tab Service and press the button Run check.
In the next window, click the button Launch.
Check not system partition will start immediately. If you are checking system partition, you will see a message stating that it cannot be completed at this time.
This is normal because the system partition is being used by the operating system. Click the button Disk check schedule. To run the scan, you must restart your computer. After the computer restarts, the disk check will be performed before the operating system starts.
Run disk check from the command line
Below is an example of running a partition check C from the command line.
Note. On Windows Vista command line necessary .
As in the case of scanning the system partition from the GUI, after running this command you will see a message indicating that the scan cannot be completed.
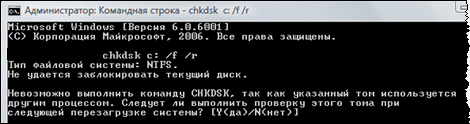
Enter Y and restart your computer to start checking.
Additional information about the utility's command line parameters chkdsk you can get it by running it with the key /? , or on this page.
Run a disk check if the system won't boot
If the operating system does not boot due to errors on the disk, you can check the disk using the installation tool. Windows disk.
Windows XP
If the problem occurs in Windows XP, use the Recovery Console. Booting from installation disk to the console, run the command
For more information about the Recovery Console, see the following Microsoft Knowledge Base articles:
- Installing and using the Recovery Console in Windows XP
- Enable automatic administrator login when using the Recovery Console
Windows Vista
- Boot from the installation disk Windows Vista.
- Select language options and press the button Further.
- Click the button System Restore.
- Select the system with the problem and click the button Further.
- In the window with a selection of recovery options, select Command line.
- At the command prompt, enter the command
For more information about restoring your system using the installation disc, see Windows Vista Help.
During operation, the computer sometimes breaks down. And most often the reason for this is a faulty hard drive. Moreover, this problem is often encountered not only by novice users, but also by quite experienced ones who have not used it before. In most cases, the breakdown itself appears completely unexpectedly. At first glance, the computer is working normally, but suddenly it stops providing information regarding the status of the hard drive or loading the operating system, and sometimes even makes a slight knock. In this case, it is necessary to take immediate action, since you can lose the entire array of stored information and then spend significant sums of money on its recovery. Therefore, you first need to test the hard drive to identify possible errors.
Practice has shown that most often problems arise with a hard drive due to the appearance of a Bad sector on it. This situation is possible due to prolonged use of the computer or incorrect actions on the part of the user. By itself this concept implies the presence of a sector on the disk that cannot be read. The consequence of this is a slowdown in the process of writing or reading information on the disk, the disappearance of hard drive partitions, or even a refusal to boot the operating system. Another sign of the presence of such a defect is errors during recording, as well as a message about errors in writing or reading information. In order to find out whether there are hidden defects on your hard drive, experts recommend using specially created test programs and utilities. Below you can easily get detailed description free programs for testing the hard drive, as well as links to download the most latest versions of this software.
Seagate Sea Tools
Seagate Sea Tools is a program designed to carry out various hard tests disk personal computer. Despite the fact that this utility was created by Seagate developers, it can be used to check hard drives from any manufacturer. Also, when faults are detected, Sea Tools is capable of eliminating them in damaged sectors or sections. It is quite simple to get this utility for use, since it can be easily downloaded from the official website. For convenience, we have provided a download link under the description of this program.
After downloading, installing and launching Seagate Sea Tools for Windows, you will see the main program window:
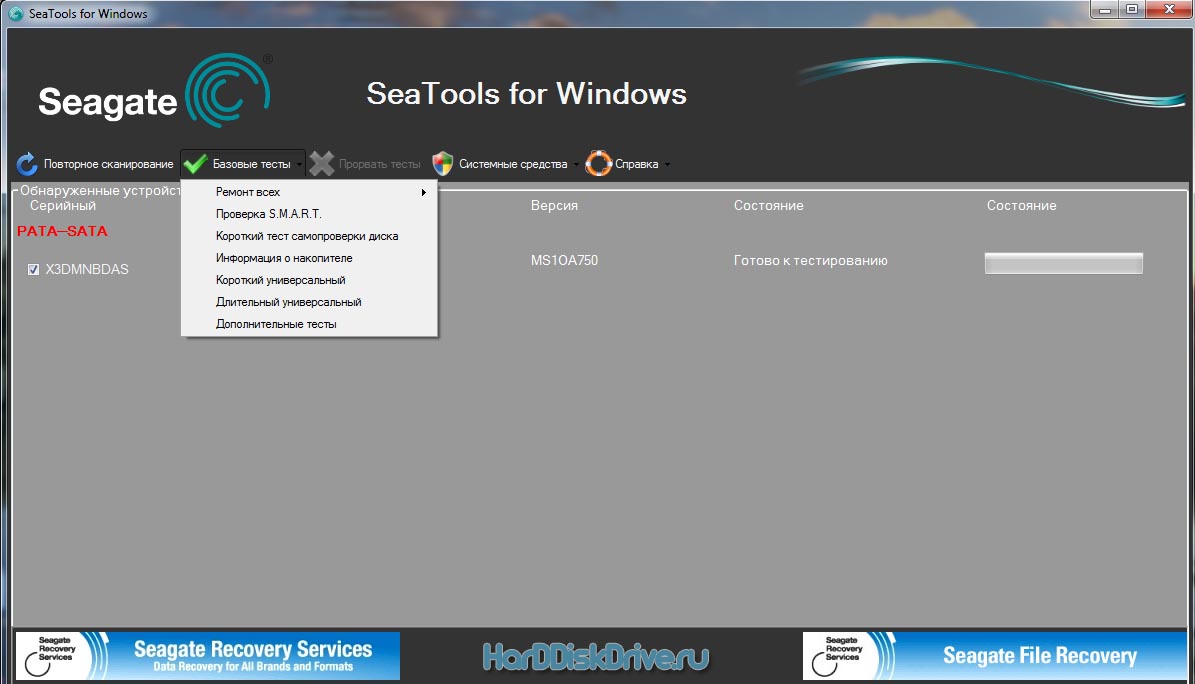
After starting the program, the user will see a list of all hard drives that are installed in the system, which will allow them to perform the full range of necessary tests, obtain SMART data, and also restore damaged sectors on disks in automatic mode. More information regarding this can be found in the Basic Tests section of the menu. This, for the convenience of the user, provides the presence detailed guide in Russian, which is located in the “Help” section.
In order to avoid certain problems during testing in Windows, a DOS version is provided. This is necessary due to the fact that during operation the operating system constantly contacts the hard drive, and this can negatively affect the progress of the test. To use the DOS version of Sea Tools, you need to download it from the manufacturer’s official website and burn the image to a CD/DVD disk or flash card. To test a hard drive using Sea Tools for DOS, you need to have confident operating skills, so the version for Windows is optimal for beginners.
Western Digital
Another, no less popular free program for testing disks is the Western Digital utility. Its main difference from the previous software product is that it can be used to check “hard drives” of the same manufacturer, which make up the vast majority on the market. Using such a testing program, you can also perform a test in Windows, view SMART data, conduct a sectoral test of hard drives, overwrite disks with zeros, and also view the test results.
Victoria
![]()
But one of the most popular free disk testing programs is Victoria. With its help you can carry out diagnosis of hard disk for errors and bad sectors, and also mark damaged sectors as bad, or try to restore them. The utility is available on the market in two versions – for Windows and for DOS. You can download both versions below in this article.
In this article we looked at the 3 most popular ones; in the future we plan to review each of these utilities separately.
We also suggest that you familiarize yourself with without data loss and with
.Hard disk (HDD) is the most important element of a computer on which all the necessary information, programs and user files are stored. Like any other component, over time the hard drive wears out, its normal operation is disrupted, and failures begin to occur. Along with physical wear and tear, leading to the appearance of so-called bad sectors (bad blocks), logical errors associated with file system, indexes and the main file table.
For the time being, you may not observe problems in work hard disk, but this does not guarantee that one fine day the hard drive will not die for long. Therefore, it is important to periodically (once or twice a year) check your hard drive for errors and bad sectors that require repair. Regular monitoring will allow you to track the condition of the media and respond in a timely manner to changes in its condition. Of course, you should not neglect such a proven method of protecting information as backup. The most valuable data must be duplicated on a backup storage device.
Symptoms of a failing hard drive
In most cases, HDDs operate smoothly for several years without requiring special attention. However, in case of improper use ( physical impact, lack of proper cooling) the resource of the storage medium is significantly reduced. In rare situations, there may be a manufacturing defect or sudden failure.
Failures in the hard drive may be indicated by loading the operating system for too long, the unreasonable disappearance of files and folders, and slow startup of applications. Obvious symptoms of a hard drive losing its functionality are slowdowns in programs and long periods of copying files. If the computer constantly hangs, and nothing but restarting helps, then in the process of identifying the causes, checking the hard drive should be the first point.
Using standard Windows 7/10 tools
You can test the media using standard using Windows. The easiest way is to select the desired hard drive in Explorer, right-click on it and go to the “Service” tab.
Next, click the “Run scan” button and set the scan parameters in the window that opens. If both checkboxes are checked, Windows will automatically correct all system errors and restore damaged sectors during diagnostics.
The results of the audit can be found in the report.
Command line
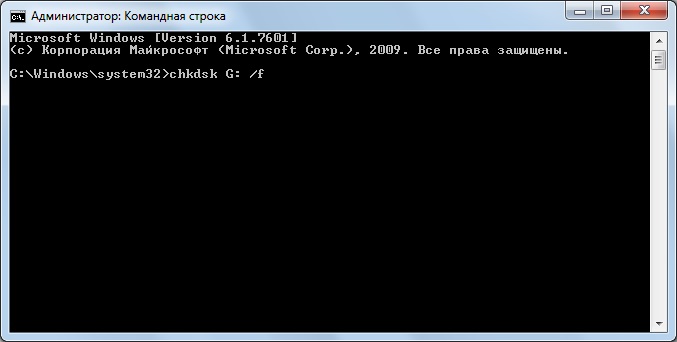
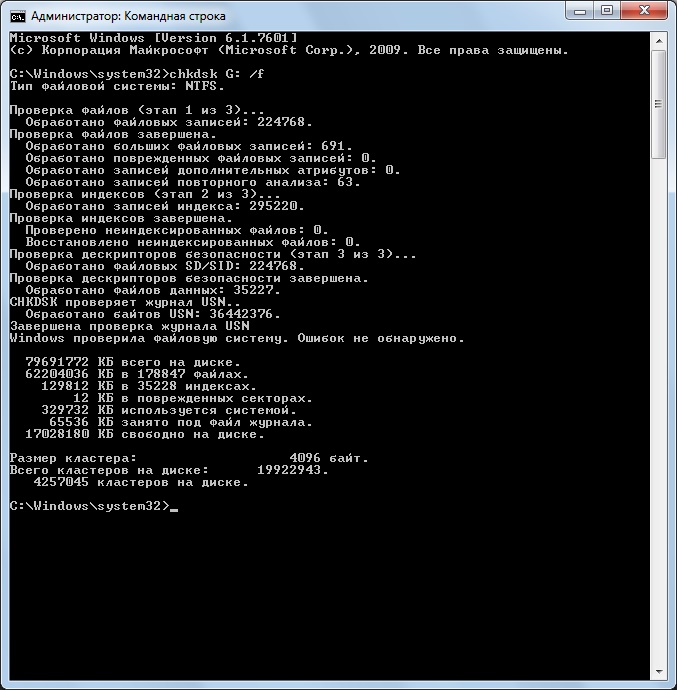
You can also audit your hard drive using the utility chkdsk called from the command line. In fact, such a check will not differ much from the above option.
So, launch the command line by selecting the required Start menu item. Then enter the command in the window: chkdsk G: /f /r
- G – name of the hard drive being tested (select the drive you will check);
- f – error checking and correction;
- r – detection and recovery of bad sectors.
All information about errors and bad sectors found will be displayed as the diagnostics are carried out.
Third-party programs for checking your hard drive
There are many programs and utilities for finding bad sectors and fixing HDD errors. We will list only the most famous ones.
Victoria
Perhaps the most popular instrument checking hard drives. The program can be launched both in Windows and in DOS mode from a bootable USB flash drive.
The interface provides five tabs: Standard, SMART, Tests, Advanced and Setup. First of all, go to the section Standard, where in the list of devices we select the hard drive we are interested in. The Drive passport area will display basic information about the HDD.
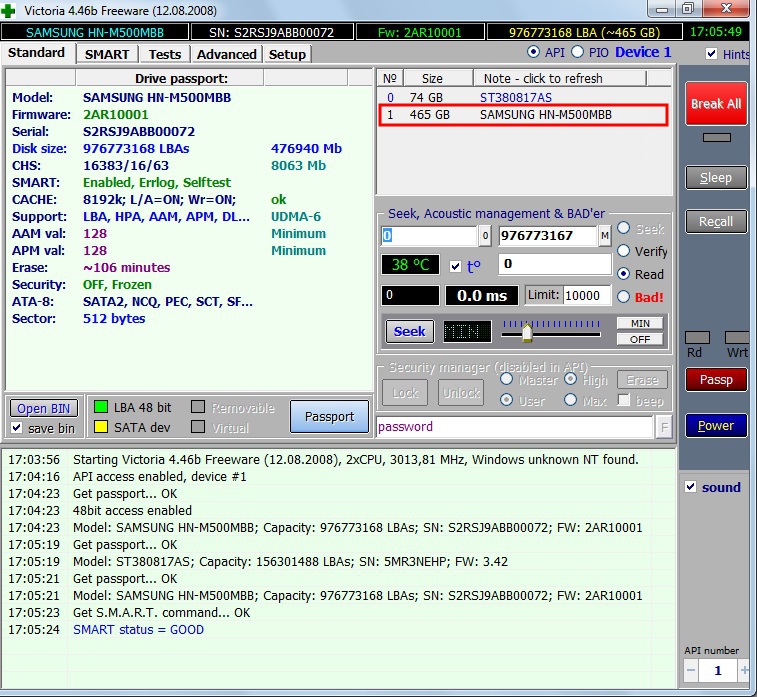
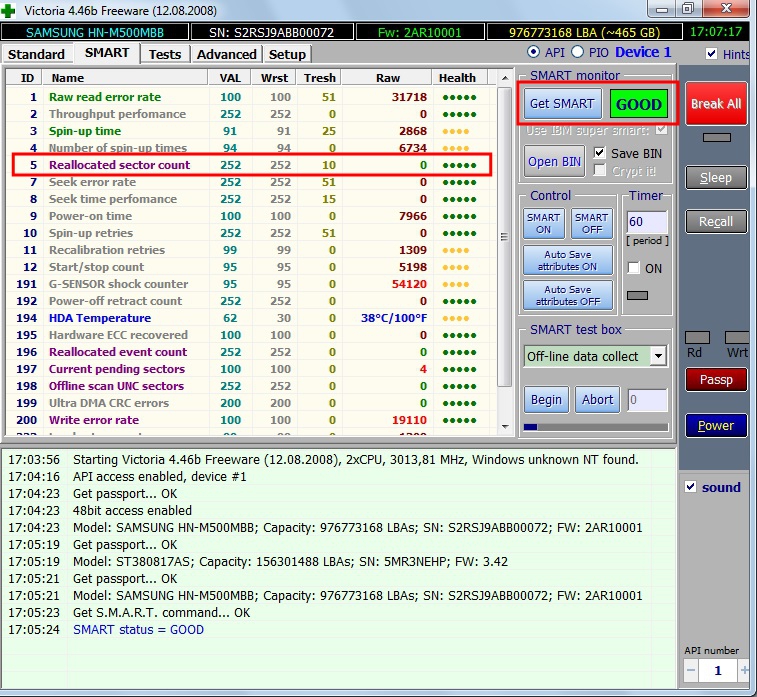
Next, select the tab SMART and press the “Get SMART” button. SMART (Self-Monitoring, Analisys and Reporting Technology) is a hard drive self-monitoring technology. Those. The hard drive monitors its operation during operation, recording information on a set of parameters that allows one to assess the condition of the media. It is this service information that we are trying to obtain.
After clicking “Get SMART”, either the inscription GOOD on a green background or the inscription BAD! will appear to the right of the button. on red. The second option will indicate that the media is in unsatisfactory condition and will most likely have to be replaced. For a more detailed study of SMART statistics, let's pay attention to the list of parameters on the left. Here we are primarily interested in the attribute 5 Reallocated sector count, indicating the number of sectors remapped. If there are too many of them, then the disk has begun to “crumble,” that is, its surface is quickly degrading and it is urgent to make a copy of all data. In this case, there is no point in restoring the hard drive.
Chapter Tests makes it possible to check the hard drive for bad sectors, as well as try to “cure” or reassign unreadable blocks. For simple testing of the hard drive, set the switch to Ignore and start the test with the Start button. Sector health is assessed by measuring response time. The smaller it is, the better. Each response time range has its own color code. The slowest blocks are marked in green, orange and red. Sectors that could not be read at all are marked in blue. If there are a large number of “slow” and unreadable blocks, the hard drive should be replaced.

The Victoria program allows you to restore bad sectors, but we will not consider all the nuances of the procedure. Moreover, “treatment” often contributes only to a slight extension of the service life of the storage medium. To reassign bad blocks, perform a check with the mode enabled Remap. If the restoration was successful, do not rush to rejoice. Re-diagnostics of the disk after a certain period of operation. The appearance of new bad blocks will indicate that the degradation of the hard drive is irreversible, and it’s time to find a replacement.
HDDScan
This is another one convenient program to identify problems with hard drives. After launching the application, select the drive that needs to be checked in the Select Drive list.

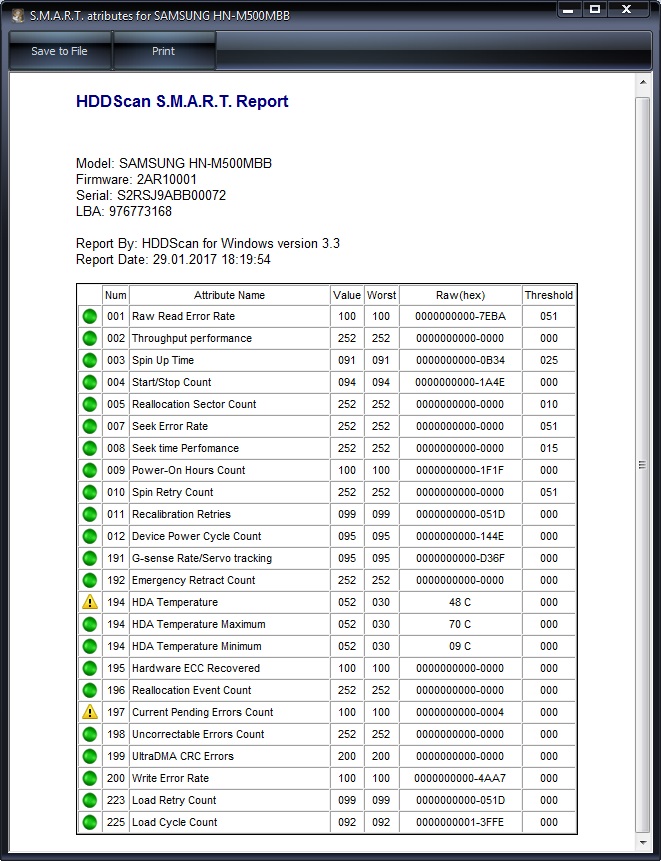
Below we click on the “S.M.A.R.T.” button and get acquainted with the provided report.
Now let's diagnose the disk surface. Click on the round button to the right of the drop-down list of media and select Surface Tests in the menu that opens.


Click on the Add Test button, thereby adding a test to the list and starting its execution.

You can receive information about the progress of testing in Graph, Map, and Report modes. All blocks are also distributed into groups with corresponding color markings depending on access time.

At the end, a final report is generated.

Perhaps this is all we wanted to tell you about the methods of checking a computer’s hard drive for functionality. We hope the information provided will be useful to you and help you save important data.


