Today you can find a wide variety of ways to install Windows 7 on your PC. Generally, most users prefer to use a flash drive to install this OS. However, there is a method that involves installing Windows 7 without using a flash drive or disk, which is suitable for those users who are not able to use these media on their PC. Let's see how we can do this.
Today we will look at:
Preparing the system
- First of all, install the utility or Ultra ISO on computer.
- Next, create an image operating system. Read more about this.
- Download and install the application EasyBCD , with the help of which further installation of Windows 7 will be carried out.
Setting up the hard drive
After the ISO image has been burned and the EasyBCD utility has been installed, you will need to create a new partition on your computer, where the newly installed operating system will be placed in the future.
For this:

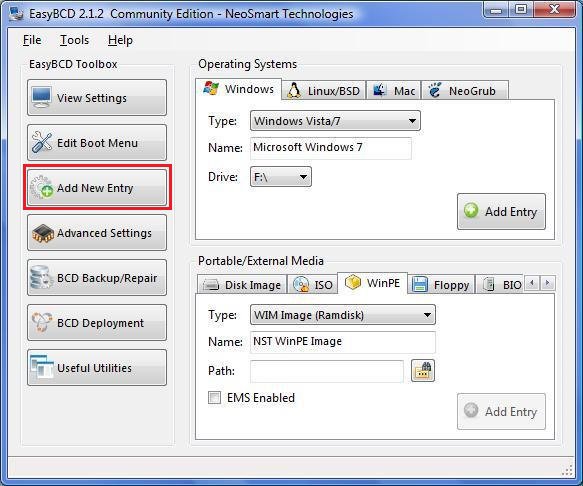
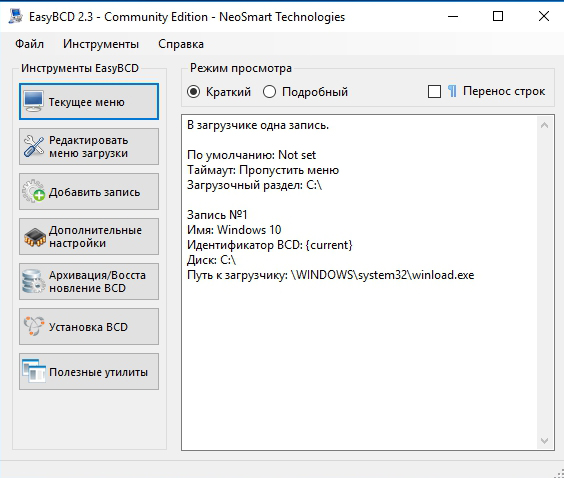
Launch EasyBCD
It's time to use the EasyBCD utility:
When you do everything, the system will be configured in such a way that the next time you start it, first of all, the OS you created will be loaded under the name that you gave it. Now all that remains is to install Windows 7 correctly.
Installing the operating system
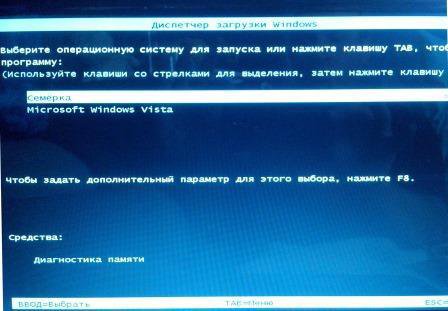
Once you restart your computer, you will see the Windows Installation Manager. The first position will contain the OS you created. Select it.
Having done this, you will start the standard Windows 7 installation process (more on this). All that remains is to complete the operating system installation process.
"Cleaning up our tails"
When the new Windows is successfully installed on the PC, the next time you start the computer, in the manager Windows boot Three operating systems will be displayed:
- the one you used before;
- the image that was used for installation;
- newly created OS.
Let's get rid of unnecessary ones using the already familiar EasyBCD utility:
- Launch the EasyBCD application.
- Open section Edit Boot Menu.
- Check the boxes for all the operating systems you want to remove.
- When you're ready, press the button Delete.
Important! You only need to remove unnecessary operating systems from the one where the EasyBCD program is installed. You can install the application on the newly created operating system and carry out the uninstallation process from there.
As always, we are ready to support you in this rather lengthy and difficult task by answering your questions in the comments.
The best way to get rid of viruses and constant crashes in the operating system is to install a new OS. Most often, installation occurs by creating bootable flash drive or using a disk with a new system, but there are several quick ways that will help you install a new copy of Windows without using third-party digital media.
The following OS replacement options will suit users personal computer, which:
- The drive is broken, damaged or missing.
- No DVD.
- It is not possible to use Flash media.
- Absent external HDD disk.
Installing Windows via Hard Drive and computer command line
Hard drive is HDD(hard drive) personal computer or laptop, which is designed to store user files and programs. Using the hard drive, you can install a new operating system.
Installation of a new OS occurs through command line when turning on the computer. This option of replacing the OS will allow you to clear all old disk partitions and create new ones. In order to begin the process of replacing the operating system, you need to download an iso image of the desired version of Windows. This can be done on the official Microsoft website or through a torrent client. The image will be downloaded to your computer in archive format; it needs to be unpacked to drive C. Then follow these instructions:
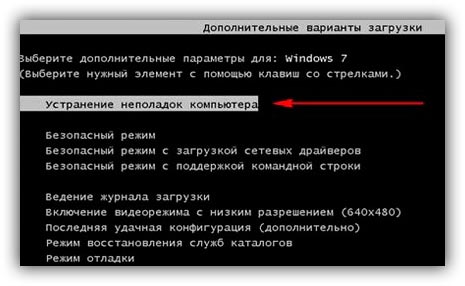
- While starting the computer, hold down the F8, Space or ESC button (depending on your computer model). After a few seconds, a custom menu should appear on the screen additional options OS loading.
- The next step is to select “Troubleshooting”. The selection is made by pressing the Enter key.
- Next, a system recovery options window will appear. In it you need to select input via the keyboard.
- Select a computer user from the list and enter a password, if one was set when logging in.
- From the proposed installation options, you need to select “Command Line”.
- After opening the command line window, you should type several commands. Input is via the keyboard. You can print a new command by pressing Enter. Navigate to the drive where the system installation file is located using the following command: “X:windowssystem32C:” (without parentheses). Press Enter (If the installation file is not on drive C, replace the letter in the command with the desired one).
- Enter the following command: ">setup.exe" (without parentheses).
- In a few seconds, the installation of the new OS will begin, which is no different from installing using a disk or flash drive.
This method is suitable for operating rooms Windows systems 7, Win 8/8.1, Windows 10.
Note: Please note that the installed and downloaded OS must have the same bit depth (32 or 64 bits).
Using the installation image and virtual drive
The easiest way to install Windows is to download a system image from the Internet. The process of downloading the image archive is exactly the same as in the previous section of the article, however, you do not need to unpack it. The disk image allows without using disk drive install any program, game, utility or operating system.
Users of OS Windows XP/7 must install additional software to work with images. In newer versions of Windows, you can work with images without using additional software (such files are recognized as archives; in order to install the image, you need to open it with an archiver and run the installation file).
Some tips for downloading an OS image:
- Do not download files from suspicious sites and resources.
- Refrain from choosing various modified OS builds. They almost always contain a lot of viruses and spyware that can steal your personal information, passwords or credit card numbers.
- Choose only trusted resources (sites Microsoft or specialized utilities for installing a new OS).
In the imaging utility, create a virtual disk with the new OS (read more about the most popular and reliable programs for creating virtual disks see the next section of this article for details). In order to create new disk, select the desired iso image in the program. Next, the program will provide all the necessary instructions. The disc creation process will take less than a minute. Next, double-click on the created disk, thus launching the OS installation window.
Programs for quickly creating a virtual drive
If you are using OS Windows XP/7, then you should select a program to work with virtual optical drives. The list below shows the most popular programs and their features:
- Daemon Tools. One of the very first and popular programs on the similar market software. The program is shareware - Lite and Premium versions are available to users. Working with existing virtual disks is organized in a very convenient way; the user can quickly create and delete disks. In the free version of the software, it is possible to create only 4 images at a time. The program supports iso, img, dmg, vdf, mds, mdf formats.
- The program is distinguished by its ability to create a large number of virtual disks simultaneously. There is also the ability to record to a removable CD. With this program, users will be able to store all their disks virtually in case physical disk will be damaged. It is also possible to download images from the Internet and mount them for further installation using this program.
- Software that works exclusively with ISO images. Images are mounted quickly and execution time is kept to a minimum. It is possible to convert images of other formats directly to ISO.
- The utility is free and available for download. The function of creating disk images yourself is available.
- Virtual CloneDrive. A program with a minimum of settings, high speed execution and reading of disks. The OS recognizes the created disk as a physical CD/DVD-ROM.
Free OS updates
Microsoft regularly provides users with licensed versions of the OS the opportunity to free update to newer software versions. Windows users 7 Home Edition can be upgraded to the Professional or Premium version through the official Microsoft.com website or through the Update Center, which is located in the control panel of each computer. Installing new software is as easy as pressing a few buttons. Basically installation new system takes from half an hour to 120 minutes, depending on the speed of the central processor of the computer or laptop.
It is possible to replace Windows 7 with Windows 88.1 for free. Follow the instructions to find out about the possibility of updating the OS:
- Download the Update Assistant from Microsoft here
- Run it and wait for the installation to complete. This will take a few minutes.
- Follow the on-screen instructions to learn which new version The OS is compatible with your system. Next, the program will offer to download new software and install it.
Such as a USB flash drive or optical disk. Unfortunately, it is not always possible to purchase the necessary drive; often the computer or laptop itself has broken USB ports or a missing disk drive. Therefore, in this article we will figure out how to install Windows without a disk or flash drive.
The algorithm for creating an installer without a disk or USB drive differs from the standard one.
We stock up on the necessary software
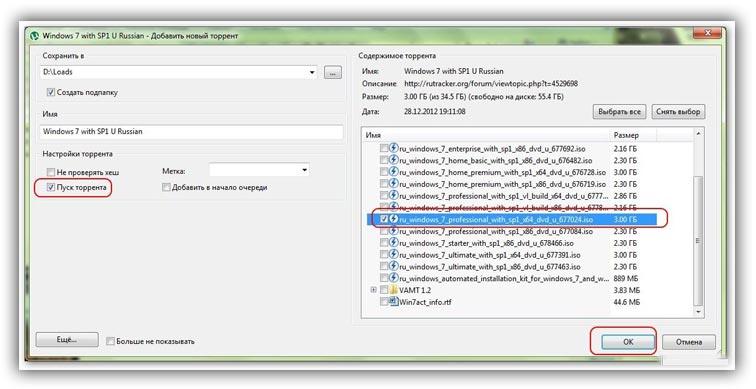
Let's try to prepare to install Windows without a disk or flash drive and not spend a single penny of our hard-earned money. To do this we need to download the Windows ISO image. Open the browser and download any image you like. If you don’t understand how to choose, click on any one you come across and download using a torrent client.
We need a program to emulate virtual media. Download free version Daemon Tools Lite. We will also need free program EasyBCD, download it from the official or third-party site. On the official website, you will need to indicate a worker to download Mailbox, choose for yourself. We no longer need the browser, so close it. Our programs and ISO image are ready to go.
Preparing the boot drive
How to install Windows without a disk or flash drive? It’s very simple, we need to make our own analogue of a flash drive! Usually the hard drive is split into two virtual disks: with the operating system (usually (C:)) and with files for everyday use (usually (D:)). In order to install an operating system from a hard drive, we need to “bite off” about 10 GB of usable space from the disk with the user’s files.
To do this, go to disk management. You can get there by right-clicking on the “My Computer” icon if you have Windows 7 and on the “Start” panel if you have Windows 10. Next, go to management.
We find a partition with free space (it should not be system) and right-click on it. Select “Shrink Volume”. We will be given an amount of free space ready to be compressed. Most likely, this figure will be many times larger than what will be enough for us, so we manually set the number 10,000, for example. Click the “Compress” button.
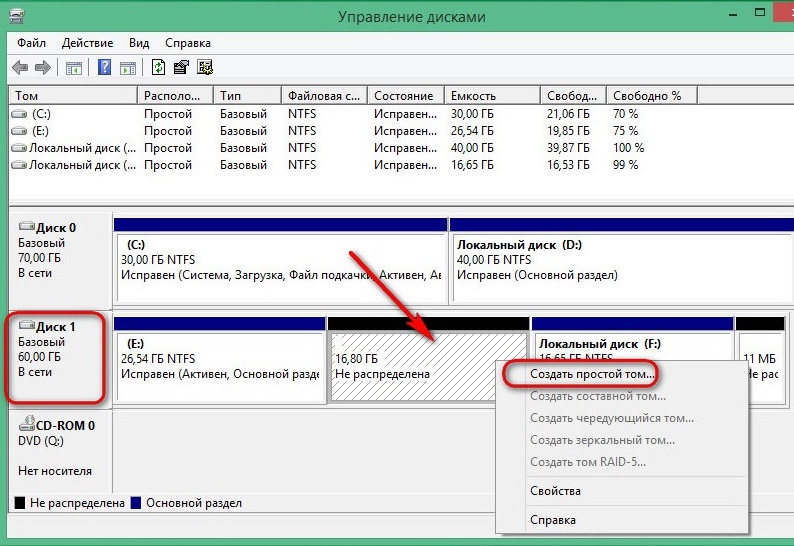
We now have unallocated space, usually it is highlighted in black. Right-click on the area of unallocated space and select “Create simple volume”. Next, follow the instructions of the New Creation Wizard. simple volume. In the settings, you can select the letter you like and specify the file system in which formatting will be performed. Default file system will be NTFS, changing it is not recommended. We have successfully created new volume. You can rename it already in Explorer in the “My Computer” window to make it clearer.
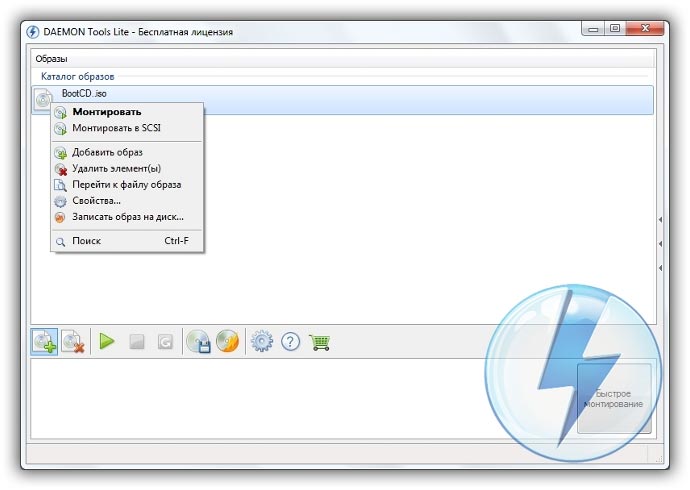
Now let's start working with ISO way operating system. Install Daemon Tools Lite and activate the free license. When installing, do not forget to remove the mountains of unnecessary checkboxes next to various desktop gadgets and products from Yandex, for example. Inside the program, click on the “Add image” button. We remember where we have the operating system image and indicate the path to it. We mount the image.
Opening virtual disk drive through explorer and copy setup files to the area that we recently “bited off” from the section (D:).
It's time to ask the bootloader program for help. Be sure to run EasyBCD as an administrator. A new window opens and in it we need to click on the “Add entry” button. Go to the “WinPE” tab. Fill in the “Name” field letter by letter as you named the newly created disk. In the next field, click on the folder icon and go to it, indicate the path to boot image new operating system. It will most likely be located in the Sources folder under the name boot.wim. Click the “Add” button, after which another one will appear in the bootloader new entry to install Windows.
This concludes our steps to prepare for installing the operating system with hard drive can be considered completed. Close EasyBCD.
Let's start installation
So, installing Windows without a disk or flash drive. From the created boot sector we will install the operating system on the disk (C:), or on the one that you have as a system one. In principle, we can install it on (D:), then we will have two operating systems, and we will be able to choose which one to boot from when starting the computer. Let's reboot.
After all that we did, we now have a menu with additional parameter. Appeared boot partition, which we created. Select it and press “Enter”.

- Select Russian language and click “Next”.
- If you need to restore the system after a fatal error, then click on the “System Restore” button, but we don’t need to restore anything, click the “Install” button.
- If we have a multi-variant assembly of the operating system with different versions, then the next window will be a window with a specific selection. Choose the one you like Windows version and click the “Next” button.
- We accept the license terms.
- Next, be sure to select “Custom installation for advanced users” if the corresponding window appears. This way we can customize all the parameters for ourselves.
- The next window is disk management. Here we can format required disk, delete, create new. We need to find the system one, format it and install it on our operating system. To do this, select the section marked “System”, look for the pink “Format” button at the bottom, wait a few seconds. Click the “Next” button. Make sure that before clicking “Next” the system disk, otherwise Windows will be installed on another partition.
- The installation of the operating system has begun. You can notice that it goes much faster than from any other media: flash drive or optical drive.
- The main part is over, all that remains is to deal with small settings like the computer name, color scheme, permissions and so on, we won’t stop here, all settings are purely individual.
We are in a new operating system installed from a hard drive. Remaining boot disk we can delete it through the same disk management if we no longer need it.
If modern laptop models are no longer equipped with disk drives, since the need for them is significantly reduced, then how to install Windows 7 without a disk and without a flash drive? As soon as it comes to reinstalling Windows, many begin to think that it would be better. But in fact, to reinstall Windows it is not at all necessary to have a disk drive, because you can install a new operating system using an external flash drive and even a database on it.
There is, of course, more than one way to install Windows 7 without a disk or flash drive. These methods are quite simple and understandable if you understand them. And so let's go.
1st method: Installing Windows without external media using the System Rollback utility
This standard way can be used if you have any problems with the OS. The utility loads well and responds normally to given commands. A system rollback involves returning the state of Windows to the working state, that is, the one that was in the beginning.
Actions:
1 – Open “Start” -> “Control Panel” -> “Recovery”.
2 – The “System Restore” window should appear; to continue working and start the recovery wizard, click the “Next” button. After this, the wizard will provide you with a choice of point Windows recovery 7. Select the option based on the date of normal operation of the OS and click the “Finish” button, and then continue working again using “Next”. 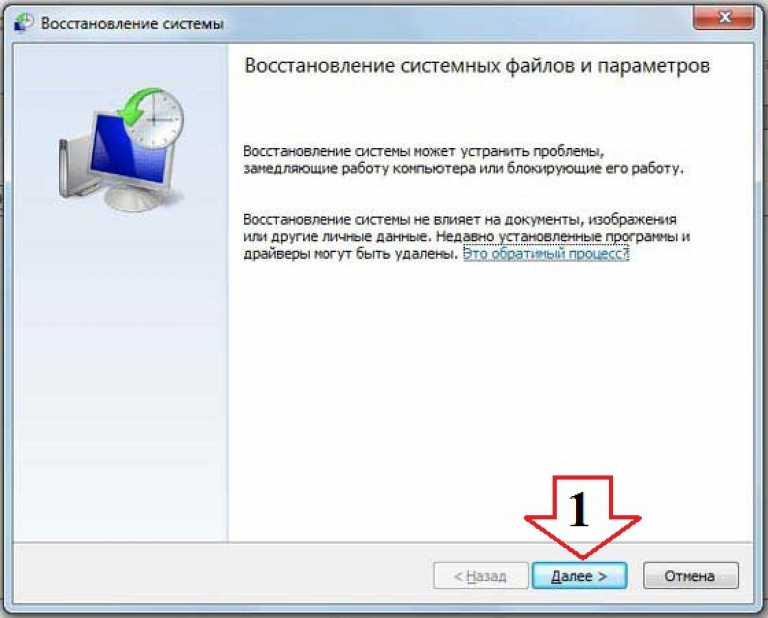
The operating system rollback is basically complete; the rest of the work will be done by the recovery wizard itself. This method is very simple and straightforward, and it does not change information that already exists on the device.
2nd method: Installing Windows 7 without external media using Recovery
If there are problems with the OS, and it does not start, then effective solution will use Recovery.
Recovery is a utility that is a built-in module in most modern laptops. On different models laptops, it may have a slightly different name, but its purpose is the same - to return Windows version to the factory one. That is, this method will be relevant only for those who had Windows 7 official.
1 – Start the Windows installation. In order to open the Recovery utility, you must restart the system and press the hotkey before it starts loading. In different laptop models this hotkey is different, it could be F4, F8, F9, F11, Dell and others.
2 – You will see a program window Recovery utilities. On the main window, the program provides you with a choice of actions on the OS. Select "Recovery".
3 – The “Full Recovery” window will appear, which will display the initial state PC, date backup copy, source, etc. You select (in the first column) the PC state that needs to be returned and click the “Next” button.
4 – Then a warning window will appear, informing you that all information from the PC will be deleted and asking you to confirm the launch of OS recovery.
5 – And at the end a window will appear showing the progress of the Windows 7 recovery process.


