The Windows 7 boot loader stops working for many reasons - if boot.ini is damaged or you try to install XP along with the “Seven”, after which the latter does not want to boot. This happens because XP overwrites the boot record. MBR Windows 7. Typically, Windows 7 boot loader recovery is carried out standard means systems. You can use another tool, for example, Bootice.
The easiest way to restore the bootloader
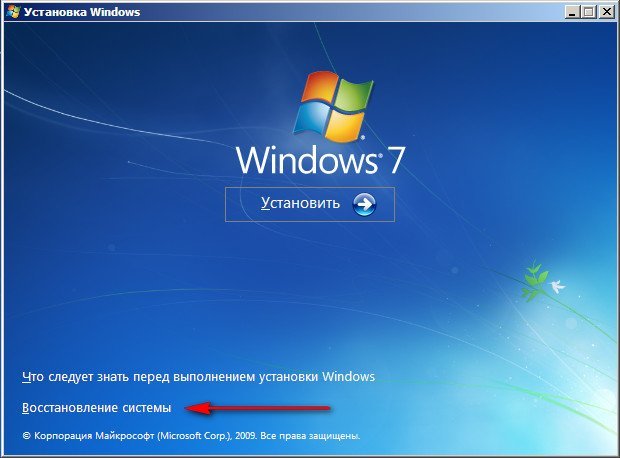
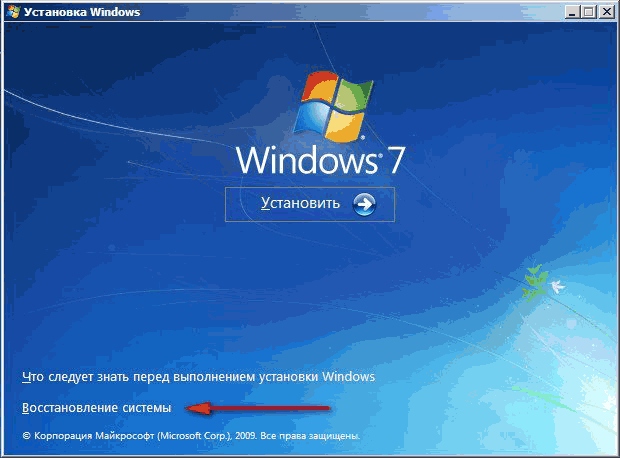
If pressing F8 does not open additional ways launcher and troubleshooter, you will need to use a disk or flash drive Windows recovery 7. From this drive you will need to boot your computer into the recovery environment by clicking on the system recovery link at the bottom of the OS installation window.
- The computer will automatically try to find a solution to the problem, which will notify you in the window that opens.
- If the recovery utility copes with the task, all that remains is to reboot.
If you cannot restore the Windows 7 boot loader after XP, use the startup repair tool, which, along with others, is part of installation disk or flash drives. Usually these simple ways can handle simple MBR startup problems.
Editing boot.ini
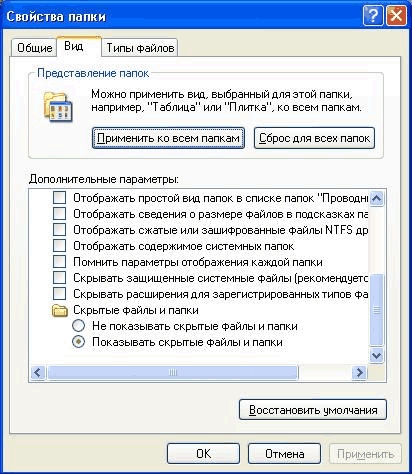
Boot.ini is responsible for starting the system by default. If one of the operating systems is installed incorrectly or uninstalled, its non-working entry will be stored in the same boot.ini. It is located at the root of the system partition, so to edit it you need to configure your computer to show hidden files.
Sometimes boot.ini can be corrupted by a virus or some program could have caused it, after which the OS does not start on its own.
The fix is simple - boot from the LiveCD and edit boot.ini using regular notepad. There are only two sections - boot loader, which controls the boot, and operating systems. There are several parameters to remember:
- timeout=10 - time in seconds during which the user can select an OS to start;
- multi(0) and disk(0) are parameters that must have zero values;
- rdisk(0) - number of the disk with the system partition (counting from zero).
In general, boot.ini with one OS should look like in the picture.
Using the command line to restore the MBR sector
Get into mode command line maybe from the same place boot disk or flash drives by opening the system recovery tool and selecting the very last item “Command Prompt”.
- Enter the command Bootrec and then press Enter, it will appear full list opportunities;
- Write down the MBR sector, for which there is the command Bootrec.exe /FixMbr;
- After pressing Enter, the computer will notify the user about the successful completion of the operation in the next line;
- Next, carry out the procedure for writing a new boot sector by entering Bootrec.exe /FixBoot;
- All that remains is to enter Exit and try to restart the computer.
- Log in to the command line from the installation disk or flash drive;
- Enter Bootrec /ScanOs, after which the utility will scan the computer for the presence of an operating system;
- Write to next line command Bootrec.exe /RebuildBcd, the program will prompt you to add all found versions of Windows, including XP, etc., to the start menu;
- All you have to do is agree with this by pressing Y and Enter in sequence, after which when loading the system you will have a choice of which OS to load - XP or Seven.
You can also fix the problem with the MBR with one more command. To do this, enter bootsect /NT60 SYS at the command line, then Enter. Enter Exit to exit. This will update the main boot code and your systems will appear in the list at boot time.
In case of serious problems, it may not be possible to restore the MBR using the described methods, so it is worth trying to overwrite the files located in the download storage.
BOOTMGR is missing
The computer usually displays this message on a black screen when the MBR sector is damaged or deleted. The reason may not be related to the MBR, for example, if the BIOS settings on the Boot tab have been reset and the system is trying to boot from the wrong disk. But more often than not, it is the bootloader that is to blame, so we will describe how to restore Windows 7 boot.
The Windows 7 disk always has a small 100 MB reserved hidden partition for writing boot files OS, including damaged BOOTMGR. You can simply copy BOOTMGR from installation media and write it down in this section. For this:
- Open a command prompt from your recovery drive.
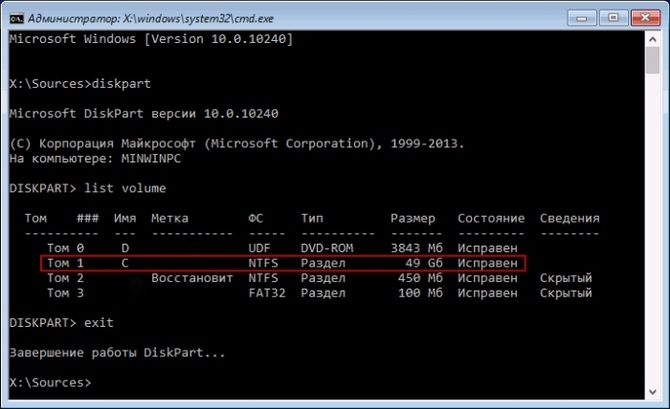
- Enter the diskpart and list volume commands in sequence, after which a list of your disks and the letters that the system has assigned to each of them will appear on the screen. We are interested in the reserved partition of 100 MB and optical drive- drives C and F, respectively, as in the picture.
- To exit, type Exit and press Enter.
Enter the installation drive letter followed by a colon and the command to copy the bootmrg bootloader to the reserved partition. It will look like this:
- F: and then Enter;
- copy bootmgr C:\ and press Enter;
- Exit, the utility will exit.
If copying to a hidden partition fails, the boot store can be completely overwritten. Restoring the Windows 7 boot loader is performed with the command bcdboot.exe N:\Windows, where N is the drive letter of the OS. After you are informed that the files were created successfully, you can exit the tool with the Exit command and restart your computer.
- write down the line diskpart in the command line, which calls the utility;
- to display all available physical disks, write list disk;
- is selected required disk command sel disk 0, where 0 is the number of the only installed HDD;
- to display all hard drive partitions, enter list partition;
- to select a reserved partition, write the command sel part 1, where 1 is the partition number;
- make it active by typing active;
- exit the application by typing exit.
As a last resort, you can completely manually delete and format the system partition by starting from some LiveCD, and then use the bcdboot.exe command to create the sector again.
Using Bootice
If Windows XP was installed after "Seven", due to the overwritten MBR sector, only XP starts and you do not have the ability to select a system after you turn on the computer. At the same time, both systems are fully functional, and you can return the startup menu very easily, for which you use the Bootice utility:

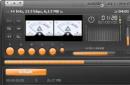
In the new Bootice window on the left you will see the OS boot list, to which you will need to add the missing “Seven” to Windows XP:
- click "Add";
- in the list that opens, select the line new Windows entries 7;
- V right side in the top input field, select the hard drive;
- in the field below, indicate the section with “Seven”;
- click on save basic settings.
The program will notify you that this element has been successfully changed in Boot and you can exit Bootice. The next time you turn on your computer, you can already choose which OS to boot from your hard drive - Windows 7 or XP.
Skills that will help the user restore the Windows 7 bootloader are necessary if the operating system does not start at all or a number of problems arise during the process of turning it on.
The operating system loader is system program, which is designed to launch the OS. In simple terms, this is a utility with which you turn on your computer.
With the advent of new versions operating systems Bootloaders are also improving. For example, Windows XP boots using UEFI. Newer versions of the OS (starting from the seventh) during the boot process I use system utility BOOTMGR.
Types of bootloader problems
The most common cause for concern is the following errors:
- When you try to start the system, messages called “Bootmgr is missing” and/or “Non system disk” appear. They occur as a result of damage to the bootloader or master boot record;
- .
In this case, it is necessary to restore the bootloader if a message from a hacker asking to send money to destroy the virus appears immediately after the user presses the start button on the personal computer or laptop;
Remember! If the operating system has already begun the startup process and errors began to appear only later, this does not indicate a problem with the bootloader. Try turning on the OS in safe mode and troubleshooting any problems (for example, virus software).
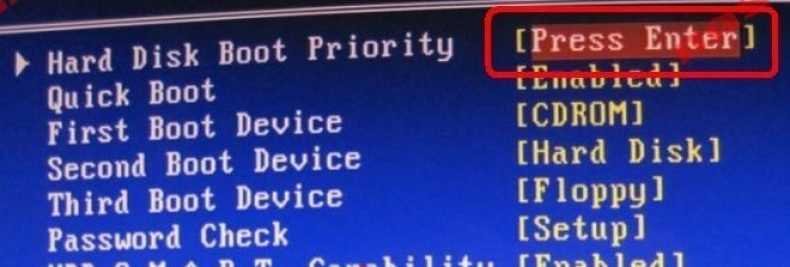
Before attempting to set up the boot loader, go to the BIOS and make sure that the system is set to the correct boot order for all hard drives.
If you have two hard drives installed on your computer at once and their startup order is incorrect, problems with the bootloader may occur.
The first in line should be the disk on which the operating system to be launched is installed.
Automatic recovery using USB drive
You need to solve the problem starting with the easiest method. If you are unable to fix the bootloader using the method below, try the following solution to the problem presented in the article.
To begin the process of solving the problem, take the disk from which the OS was installed. If you don’t have one, you can restore without a disk - in this case, you need to create a bootable external usb media.
The version of the operating system located on the media must fully match that installed on the computer.
To perform automatic recovery from a flash drive or disk, follow these steps:
- Insert the disk into the drive or flash drive into the slot. Start the computer and in the first few seconds press the F button on the keyboard. This way you will instantly launch the BIOS menu before a problem occurs.
In the BIOS, change the boot order of the OS components - the disk or flash drive should come first (depending on which device with the OS image you connected to the computer).
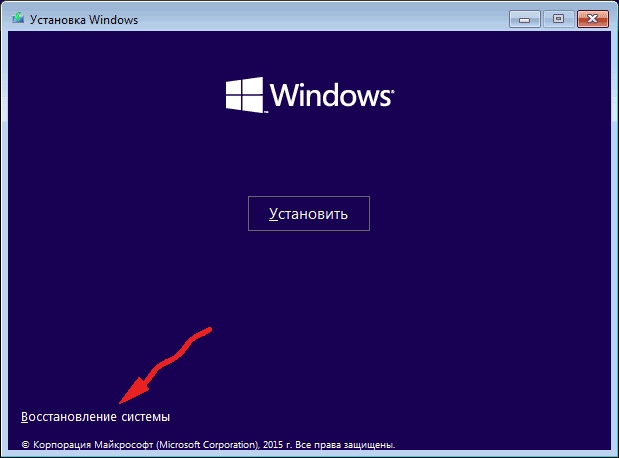
After the boot queue has been set, save all changes and exit the BIOS settings. The OS startup process will begin again, however, now it will boot directly from the image media. The following window will appear;
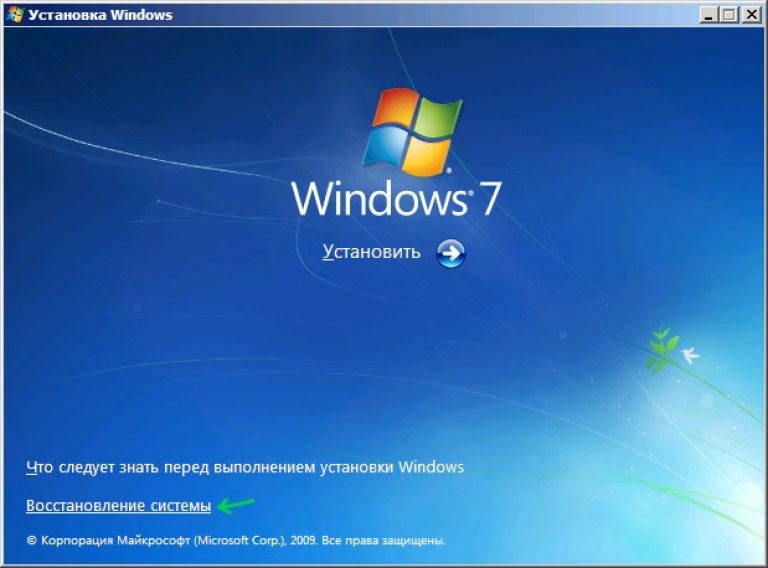
- At the bottom of the window (Figure 2), find the OS recovery item and click on it. Now you need to select the OS that needs to be restored (if several systems are installed on the computer at the same time);

- After you have decided on the name of the OS whose operation you want to fix, a window will appear with all the available operating system recovery options. To get started, select automatic troubleshooting.
This method may help, but not in all cases. If the system still does not turn on after this automatic fix, repeat steps 1-3 again and now select the second item (enable previously saved OS state).
Wait until all the necessary actions are carried out automatically by the program. If the system boots successfully, the problem is resolved. If not, you should restore it manually.
Restoring OS boot configuration data
OS startup configuration information contains detailed information about the order in which data should be loaded when the computer's operating system is turned on.
Often the OS bootloader fails to complete due to corrupted items in the Boot Configuration Data. To fix the problem, you need to add new configuration data to the OS bootloader:
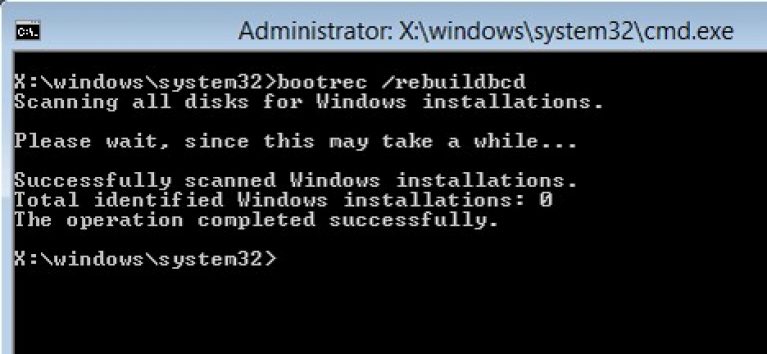
A complete configuration update can be performed using the rebuildbcd command. To perform it, you need to open a command line window in the system recovery options (as in the figure above).
In the line, enter the text “bootrec.exe /rebuildbcd” (without quotes) and press the Enter button to execute the command. The update process may take several minutes. After its completion, a line about the result of the command will appear in the utility window.
After restoring the data, you should turn off the computer, remove the disk with the OS image from it, configure the standard boot order in the BIOS and turn on the device again. If all actions were done correctly, the system will start in standard mode.
If after executing the command you receive a system notification that the configuration could not be restored, you need to boot into safe mode.
To do this, enter the command bootrec.exe/safeboot at the command line - it allows you to start the operating system using a minimum number of drivers and third party utilities, which may cause an OS boot loader error.
To view and edit bootloader configuration parameters, run the BCDEdit.exe command:
![]()
Bootloader Configuration Edit Command
8. Restore Windows 7 boot without installation disk.
Option 1. Automatically - using the Windows RE recovery environment in Windows 7.
During Windows installations 7, a service partition is automatically created on the hard drive, providing access to the Windows RE (Recovery Environment). Using this service section, you can:
Boot into recovery environment from hard drive
Create a CD containing the recovery environment
1) Boot into the recovery environment from your hard drive or system recovery disc.
To enter the menu Additional options boot, press F8 after turning on the computer (but before loading the operating system).
2) Select the first menu item (Repair your computer) and press Enter.
3) Select the language of the keyboard layout in which you have set your administrative password account.
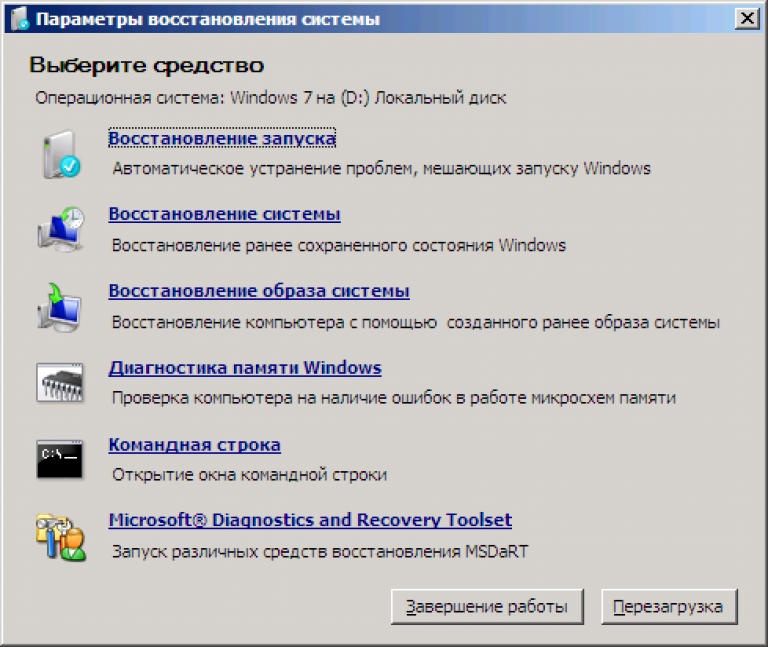
4) Enter the administrator password. After entering your password, you will see a window with recovery options.
5) Select an item Startup recovery(Startup repair), the item can also sometimes help System Restore(System Restore), which allows you to return to the point created before the problem occurred.
Option 2. Manual recovery, creating a multi-boot menu.
The main thing here is to get to the command line to enter further commands.
1) Download the archive Bootfiles_x86+x64.zip (contains files: Bcdboot.exe; Bcdedit.exe; Bootsect.exe)
2) Create a Boot folder
3) Unpack the downloaded archive and copy the files Bootsect.exe and Bcdedit.exe of the required bitness to the Boot folder you created.
4) Start the environment required for work:
5) Boot into Windows installed on another drive or recovery environment (On the hard drive, start by pressing the F8 key. If the F8 key is used motherboard, after selecting the drive, press F8 again, select the menu item Troubleshooting your computer
6) Launch Command Prompt.
On Windows: Win+R -> cmd -> Ok.
In the recovery environment: Select the keyboard language in which your administrative account password is set. Enter the administrator password. Select an item Command line(Command Prompt)
1) Windows 7 uses an improved boot method - the Boot Configuration Data Store. This store contains all the information about all the operating systems installed on the computer. Therefore, bootloaders of earlier operating systems Windows systems, cannot be used to run it. So, to restore the boot sector of Windows 7, we rewrite the boot sector on all partitions:
X:\boot\bootsect.exe /nt60 all
where X is the drive letter containing the Bootsect.exe program
2) If you have a second Windows XP system, then you need to perform a number of more actions:
Create a Windows 7 download repository - a repository for Windows XP downloads.
Bcdedit /create (ntldr) /d " Microsoft Windows XP"
If the system refuses to do this, then this storage has already been created, so you just need to rename it:
Bcdedit /set (ntldr) description "Microsoft Windows XP"
Bcdedit /set (ntldr) device partition=C:
Then point the Windows 7 bootloader to the path to the Windows XP bootloader:
Bcdedit /set (ntldr) path \ntldr
Then add the line about choosing Windows XP in the boot menu and placing it under the others:
Bcdedit /displayorder (ntldr) /addlast
Also, to work with boot loaders, you can use the EasyBCD program, which allows you to perform the above actions using a graphical interface.
For information:
Master Boot Record (MBR), compatible with the operating system loader (ntldr - for Windows XP and bootmgr - for Windows 7/Vista);
Boot files: for Windows XP - ntdetect.com and boot.ini files, for Windows 7/Vista - boot storage - Boot Configuration Data (BCD), which is located in a hidden system folder BOOT.
Option 3: Manual recovery using bootrec.exe.
1) Boot into the recovery environment (On the hard drive, launch by pressing the F8 key. If the F8 key is used by the motherboard, after selecting the disk, press F8 again, select the menu item Troubleshooting your computer(Repair your computer) and press Enter)
2) Select the operating system you want to restore and click "Next".
3) In the window Recovery System Options(System Recovery Options) select Command line(Command Prompt).
4) A cmd.exe command line interpreter window will open, where you should enter:
Bootrec.exe /FixMbr
The /FixMbr parameter writes to system partition Master Boot Record compatible with Windows 7. This option does not overwrite the existing partition table. This option should be used to troubleshoot problems with MBR corruption or if you need to remove non-standard code from the MBR.
Bootrec.exe /FixBoot
The /FixBoot switch writes a new boot sector to the system partition using a boot sector that is compatible with Windows 7. Use this switch if at least one of the following conditions is true.
The Windows 7 boot sector has been replaced by a non-standard boot sector
Boot sector is damaged
After installing Windows 7, more than early version Windows operating system. In this case, the Windows NT Boot Loader (NTLDR) is used instead of Windows Boot Manager (Bootmgr.exe) to start the computer.
Bootrec.exe /RebuildBcd
The /RebuildBcd switch searches all drives for installed operating systems that are compatible with Windows 7. Additionally, this option allows you to select the installed systems that you want to add to the boot configuration data store. This option should be used if you need to perform a complete rebuild of the boot configuration data.
If you don’t remember the value you need, you can simply enter:
and the utility will display help on the available command line switches.
Need good advice on how to produce Windows 7 Boot Loader Recovery, if restoring the startup using the 7 installation disk did not help. I’ll briefly explain what’s going on: Windows 7 was first installed on the computer, then the second system needed Windows XP, after installation it naturally started alone, to boot two operating systems I used the EasyBCD program. Later, XP was no longer needed and I formatted the partition on which it was located from Windows 7. Now, when loading, there is nothing except a black screen. What can be done in this case? More details if possible. Sergey.
Restoring the Windows 7 bootloader
Hello friends! The most important thing is don’t worry, your problem is not complicated and, in principle, the “Recovery” remedy is simple. Windows startup 7" described in our article should help, but! If this article does not help you, then two others should help:
These articles describe several more good ways restore the boot of your operating system, besides them there is another one, so try it and don’t just give up.
Let me remind you that you cannot install an older operating system after a younger one; Windows 7 will under no circumstances boot after installation on Windows computer XP, since the latter, when installed, overwrites the master boot record (MBR) with itself. Therefore, you installed an additional boot manager, which is used to configure the boot of several operating systems and, in turn, has its own bootloader.
- I also want to say that often in unsuccessful booting Windows 7 mistakes are to blame file system, you can fix them even if the operating system does not boot, all the details are in our other article " "
- Friends, in this article we will work with the Windows 7 recovery environment, or more precisely with the recovery environment command line. I will give you the necessary commands, but if it is difficult for you to remember them, you can. This will make your work much easier.
- home boot record(MBR) is the first sector on the hard disk, which contains a partition table and a small bootloader program that reads data from which partition in this table hard drive load the OS, then the information is transferred to the partition with the installed operating system for loading it. If the master boot record contains incorrect information about the location of the system, then we will receive various errors during boot, here is one of them “BOOTMGR is missing press CTR-Alt-Del for restart” or we will see a black screen. The problem is being fixed restoring the Windows 7 boot loader.
When you uninstalled old XP along with EasyBCD, you left your computer to the mercy of fate with an incomprehensible boot record, and it gives you a black screen as a sign of gratitude. To rectify the situation, we will carry out boot recovery Windows 7, namely, we will overwrite the master boot record using the Bootrec.exe utility located on the recovery disk or on the installation disk Windows disk 7 (friends, if you have a netbook and want to use the recovery environment located on a flash drive, then read the comments first). We will also use this utility to record a new boot sector, understandable to Windows 7.
Recovering Windows 7 bootloader automatically
We boot from a recovery disk or installation disk with Windows 7, in the initial phase of booting the computer, when prompted to boot from the disk “Press any key to boot from CD...”, press any key on the keyboard for 5 seconds, otherwise you will not boot from the disk
A short search takes place installed systems Windows and analysis of problems preventing them from loading
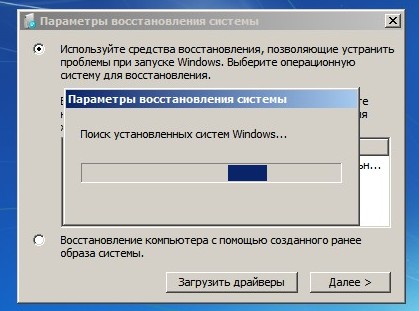
Usually problems are quickly found and the recovery environment offers to fix them automatically. Click on the "Fix and restart" button, after which the computer will restart and boot Windows 7 will be restored.
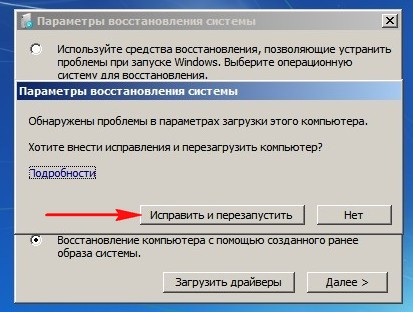
If problems with loading the system continue or you are not prompted to fix the problems automatically, then in this window you need to select the operating system that you need to restore, you most likely have one and Next.
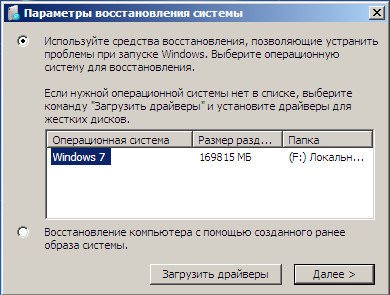
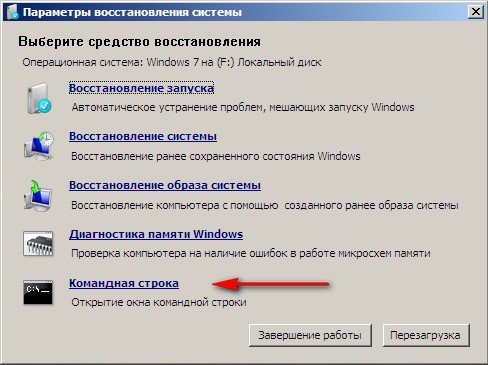
First of all, choose a productStartup recovery, it can also solve Windows 7 boot problems
![]()
Restoring the Windows 7 bootloader manually
If this remedy does not help, choose a remedy Command line
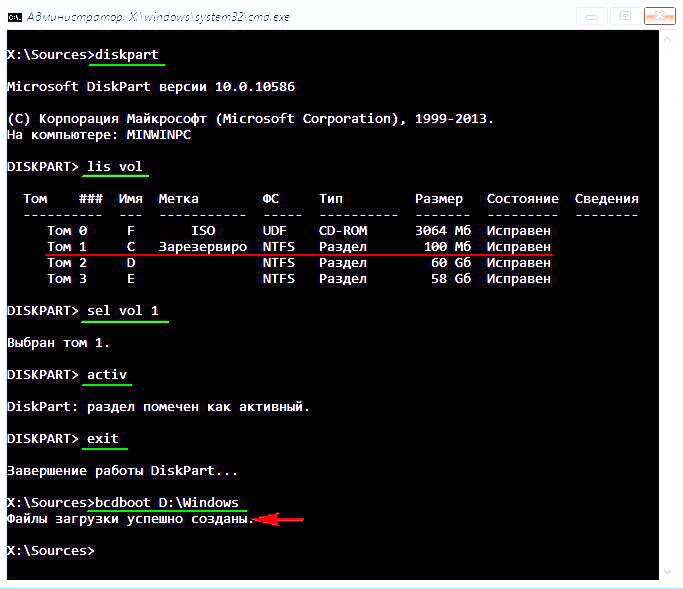
Enter the commands:
diskpart
lis vol (we display a list of hard drive partitions and see that “Volume 1” is a hidden System Reserved partition, volume 100 MB, it should contain Windows 7 boot files and it is this that needs to be made active). We also see a section with installed Windows 7, it has the letter D:, the volume is 60 GB.
sel vol 1 (select Volume 1)
activ (make it active)
exit (exit diskpart)
bcdboot D:\Windows (where D: the partition with Windows 7 installed), this command restores the Windows 7 boot files (bootmgr file and boot storage configuration files (BCD))!
"Download files created successfully"
Restoring the Windows 7 bootloader manually (method No. 2)
In the command line window, enter the Bootrec command and
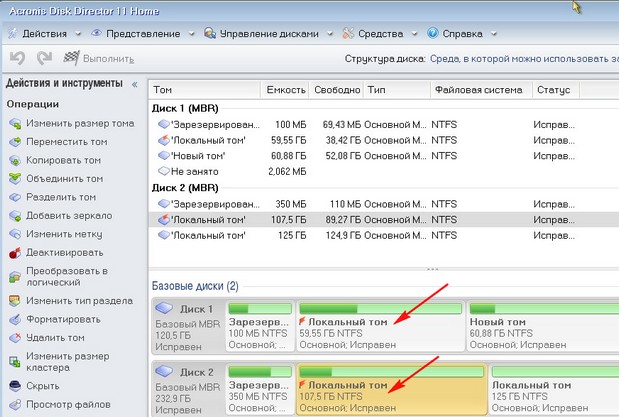
So, the error is that on both hard drives the first ones should be marked with a red flag hidden sections System Reserved. On Windows 7, the volume of such a partition is 100 MB, and on Windows 8, 350 MB, these sections have the attributes: System. Active and it is on these partitions that the boot store configuration files (BCD) and the system boot manager file (bootmgr file) are located. And it turns out that these attributes are carried by other sections. Because of this, Windows 7 and Windows 8 will not boot.
Choose the first one HDD 1, right-click on the first System Reserved partition and select “Mark as active”
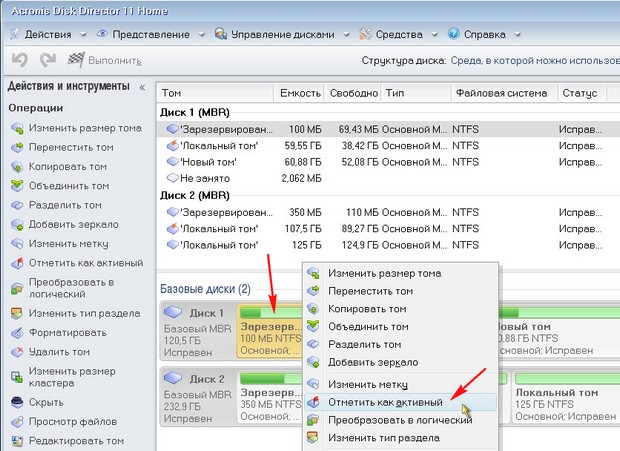
The System Reserved volume will be marked as active. Click OK.

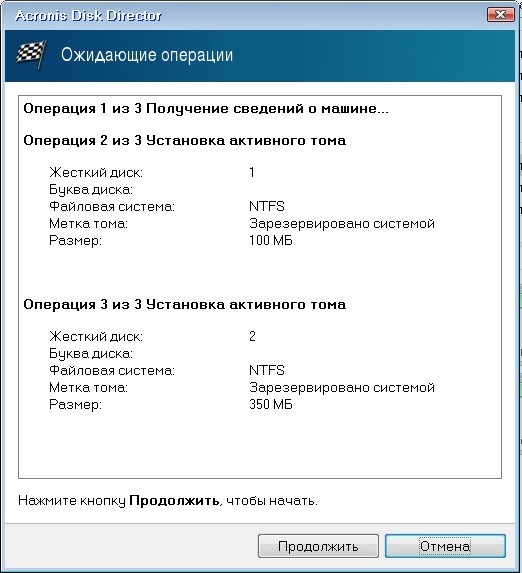
We do the same with Disk 2. Acronis Disk Director works in pending operation mode; for the changes to take effect, click the “Apply pending operations” button

Continue.
As you can see, after our changes, those sections that were needed became active.
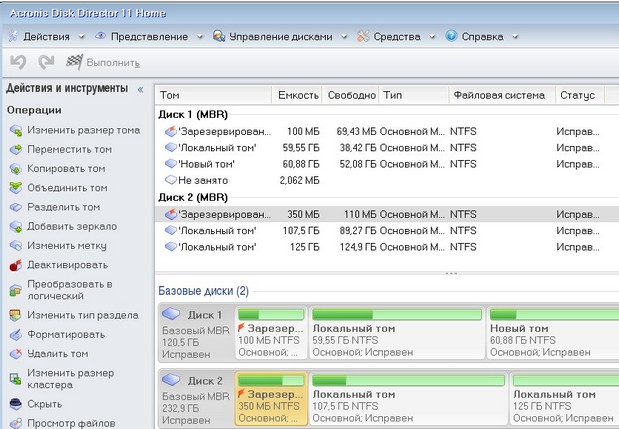
We exit the program and reboot. The result of the work is positive - both operating systems are loaded one by one.
Bootmgr and ntldr are standard boot loaders, but they are designed for different OSes. Bootmgr- that's more latest version bootloader, which is used starting from Windows 7. It characteristic faster data processing and the ability to load the maximum version of the operating system. Also, bootmgr is new generation implementation of the interface between computer hardware and operating systems, and in the near future, will completely replace the BIOS model that has existed for several decades.
In its turn, ntld used on old OS versions (Vista and XP). This bootloader was different slow data processing and the ability to process simple tasks.
New boot manager bootmgr oriented to use a special BCD (Boot Configuration Data) boot configuration store, as well as specially developed applications and specification data EFI. For compatibility with Windows versions Before Windows Vista, the new BOOTMGR manager provides support for booting previous generation BIOS-based computer operating systems.
Restoring the bootloader in Windows XP
Today, many more users use on their personal Windows computers XP and due to the fact that this version The OS is already outdated, the bootloader may malfunction, to correct which can be done as follows:
If, when Windows restarts, it displays the message NTLDR is missing, then the cause of the problem is due to the fact that the boot record was completely deleted. To solve this problem required:
If similar problems occur on Windows Vista, the actions are similar, since the same type of bootloader is used.
Fixing the bootloader in Windows 7
Windows 7 uses a new type of bootloader, which is why there is several ways its restoration.
We use boot from disk or flash drives:
But, this method, can only help if the damage to the bootloader is minimal. At more serious problems, you should use the boot.ini editing process.
Usage bootrec:
Troubleshooting Windows 8, 10
Windows 8 and 10 use the same type of bootloader (although in Windows 10 it has increased processing speed for various operations). Therefore, the restoration of this element occurs in a similar way.
Automatic recovery
Usually, automatic recovery enough to normalize the operation of the entire operating system.
As you can see, this method is in many ways similar to a similar recovery on Windows 7, with the exception of a few elements.
Manual recovery
If automatic troubleshooting does not bring the desired result, you will have to resort to manual recovery using the console: