Over the course of several years, cloud file storage services have transformed from being unusable into a convenient and accessible tool for exchanging documents, providing the ability to access them from anywhere, including a shared one.
Always have everything with you
Cloud storage is a method of storing digital information, which involves uploading data to remote server, where they are posted on a free, shareware or paid basis. If you have the Internet and a browser or a special application for working with the service, you can access your profile and all the files located in it from any place and device, be it a PC with Linux, a laptop or an iPhone. Although the information is located in the so-called cloud, it is presented to a person as one HDD or PC, is actually distributed over a network of devices that form a single virtual server.
Among “domestic” cloud services, Yandex.Disk has become popular due to its ownership by a large transnational company.
Generalized concept of Yandex.Disk
Yandex.Disk what is it? It belongs to Yandex cloud storage. It works, like similar resources, on the principle of storing downloaded files on remote storage and provides the ability to access files and directories. Here the function of sharing and editing documents is implemented depending on the distributed privileges.
Now, according to the developer, there are more than 16 million active users registered in the service, and their number is steadily increasing.
How to use Yandex.Disk
There are no difficulties in operating the resource, even for those new to working with such technologies. They prefer to visit their account through a browser or client application for their platform. Let's get acquainted with the intricacies of using the resource, starting with registration.
Create an account and install the Yandex.Disk client
In order to create an account in the system, you will first have to create Mailbox from Yandex. This is done as follows (if you have an account, go to step No. 9).
- We go to mail from Yandex using the link https://mail.yandex.ua.
- Click “Registration”.

- We fill in all fields.

The password should be as long and complex as possible, but consist of Latin letters, numbers and symbols. Instead of entering and confirming your phone number, you can specify a security question to restore access to your account.
- If you chose the option with a phone, click “Get code”, after a second a message will be sent to the specified number.
- Enter the digital code contained in it and click on the “Confirm” icon.

- In the case of a security question, select it and enter the answer.

- Enter the code from the picture and check the box below after reading the terms of use of the service.
- Click “Register”.

As a result, we immediately get to our email. After this, you can log in to Yandex.Disk.
- Click on the link https://disk.yandex.ua/client/disk to enter the storage.
- Click on the “Download Disk for Windows” icon to save the client installer to your computer.

- Choose operating system and click “Disk for...”.

- After downloading the application to your computer, run the executable file and wait for the download of the program distribution to complete.

- If you don’t want to install a browser from Yandex and replace home page in the Internet browser, uncheck the boxes, and click “Finish”.

- In the first window, click “Next” and close the dialog asking you to use the options for working with screenshots.
As a result, we were able to create an account, if we didn’t already have one, and after logging in we can start working.
Logging into the repository
After launching the Yandex.Disk application, you will be asked to log in to your profile by specifying your login and password.
- To enter your page, enter your email login details (they are also used to visit Yandex.Disk).

- Click “Get Started” and wait while the connection is established. After this, a new directory will appear in the My Computer directory - Yandex.Disk.

If you have already used the service before, you will have to wait until it finishes synchronizing the data with that stored on your computer. You can disable the option in the pop-up window after clicking on the client icon in the tray, but after that the files uploaded to the remote server will not appear in the shared directory.

Now you can assign a different shared folder: go to “Settings” through the context menu of the application icon and change the directory on the first tab.

Working with files
Mastering the Yandex.Disk client will not take much time. Working in it is no more difficult than in Windows Explorer or that OS. You can send an object to the cloud by dragging it to the appropriate directory on Disk, through the context menu, or using keyboard shortcuts for working with files: Ctrl + C, Ctrl + V.

You can move and copy something in the same way as you do in Explorer. After deleting, the object is placed in the Recycle Bin and will take up space until it is emptied (you can empty the Recycle Bin through the context menu). The file is stored for 30 days, during which it can be restored; after this time, it will be automatically erased from the server. As soon as you remove an item from the trash, it will immediately free up the space it occupied. Searching for objects is also no different from the process in Explorer and, interestingly, downloaded content is not indexed by search engines.
If someone opens access to their documents, after confirmation they will take up space in the user’s storage, because the folder/file(s) will be copied to your disk. Naturally, you won’t be able to accept an invitation to a large shared directory if you don’t have enough disk space for it. After you stop sharing, your personal copy of the directory will have to be deleted to free up disk space.
- Upload a file from your computer, making it publicly available: through the context menu of the object, call the “Copy public link” command and after transferring the document to the server, a direct link to the page for viewing/downloading it will be copied to the buffer.

You can open public access to the directory through its context menu: select “Yandex.Disk” “Set up sharing”.

Afterwards, the browser will open to the page for configuring public access to the directory. Here we select privileges (full access, viewing) and indicate the users who need to be invited to edit/view the catalog.

Useful information about Drive
The basics of working with the service are covered. It remains to touch upon such points as: the size of the space provided, confidentiality and security of resource operation, working with documents on other platforms.
Cross-platform
For the convenience of managing your own collection of documents and other data, clients have been created for the following operating systems:
- computers – Windows any editions, Linux and Mac;
- mobile devices – for Android (4.0.3), iOS (8), Windows Phone and Symbian.
The program for Linux supports all its major distributions and is distinguished by the absence of an interface - all actions are carried out through command line. This provides a number of advantages:
- increased read/write speed due to lower latency;
- low system requirements, including Internet quality/speed;
- synchronization speed.
An experimental 2nd version of the client has been released for Windows and Mac with a number of improvements, and most importantly, it is compatible with classic Yandex.Disk. On mobile platforms the capabilities are the same, there is also auto-uploading of photos/videos and a function to disable it when in use mobile network. Browser add-ons that allow you to instantly share pictures and links will help simplify your work with the cloud.
Amount of available space
If, after registration, you don’t know how much space Yandex provides for uploading personal files, go to the storage through your browser and pay attention to the lower left corner. It shows the used space and the available space - 10 GB.
![]()
This space is quite enough for documents, but for photos and other content it is clearly not enough, especially for active and business people. They are offered to increase their available disk space for a small fee:
- 10 GB – for 300 rubles per year (30 rubles per month);
- 100 GB – for 800 rubles (80 rubles per month, respectively);
- 1 TB – 2000 and 200 rubles.
Prices are affordable for any user, especially if there are monthly tariffs.

For those who don’t want to pay to expand their space, there are Yandex shares. After clicking “Buy more”, click on the “Promotions with partners” link. Here you can get a lifetime increase in cloud space for purchasing the specified products, enabling auto-upload of photos/videos from the gadget’s camera and other periodic promotions. Reviews from satisfied participants will not allow you to doubt the fairness of their implementation.

File lifetime
According to Yandex representatives, any document will be stored on the server forever until the user deletes it or his account. This can only be prevented by something serious, comparable to a global cataclysm. Objects deleted to the recycle bin are automatically erased after 30 days of storage in this temporary directory.
Security and privacy
Among the benefits that users who use the cloud service from Yandex receive are:
- access to downloaded files from any place and device where there is Internet and the necessary software (browser, client);
- absolute reliability – the system automatically takes care of backing up information without involving the client in such procedures;
- pay only for the required disk space within the framework of available tariff plans;
- it is almost impossible to gain access to someone else’s account, the owner of which has linked a phone number to the profile;
- no need for any system maintenance or support;
- information is transmitted in encrypted form (however, perfect security algorithms do not exist);
- the ability to share and collaborate on files in the cloud.
The following points in the operation of the online storage service are criticized:
- very limited space;
- security problems – documents not protected by a password can fall into the hands of ill-wishers;
- the need for high-quality Internet of sufficient speed and reliability;
- low speed of working with the cloud and long delays are likely, especially with a narrow Internet channel;
- the storage belongs to someone, which means the information can be viewed by third parties and can disappear at any time.
conclusions
The cloud is convenient to use on any platform for the convenience of exchanging files, collaborating on them and temporarily storing documents, copies of which are always available on a PC or other media, and their loss is not so terrible. If you want to upload files with personal data (PIN codes, copies of documents and photo cards) to a cloud service, think carefully about the possible consequences, in case this information ends up in third hands.
And one more important point: few people know how files are used by the owners of the service; there is no guarantee that access to the data will not stop at one point or that it will not disappear for any reason (you can upload something to Yandex Disk, but access to these files cannot be received).
Always store copies of valuable documents on media independent of the Internet (flash drive, hard drive).
Convenient free cloud storage with which you can share files with friends and colleagues, store data that you need to access from anywhere, create and edit documents and images. It's all about Yandex Disk.
Before you start using the cloud, you must first create (register) it. This process for Yandex Disk it’s quite simple. Actually, by registering Disk we mean creating a mailbox on Yandex. Therefore, we will consider this process in detail.
- First of all, you need to go to the Yandex main page and click the button "Get mail".

- On the next page, enter your first and last name, come up with a username and password. Then enter your phone number and click "Confirm number".

- We are waiting for a robot call that will tell us the code, or an SMS with a code that must be entered in the appropriate field. If the numbers are correct, confirmation will occur automatically.

- We check the data and click on the big yellow button with the inscription "Register".

- After clicking, you will be taken to your new mailbox. Look at the very top, find the link "Disk" and we move along it.

- On the next page we see the Yandex Disk web interface. We can get to work (installing the application, setting up and exchanging files).

Let us remind you that Yandex’s policy allows you to create an unlimited number of boxes, and therefore Disks. So, if the allocated space seems not enough, you can create a second (third, n-th).
Everyone good day! Today we are talking about a very convenient service that I have been using in my work for a long time - Yandex Disk. What kind of “beast” is this? - you might ask. I will talk about this in detail in the article below. If you have any questions, ask them in the comments, we will figure it out and look for answers! In the meantime, let's get acquainted with one of the most convenient file storages from the developers of the popular Russian search engine Yandex.
1. Yandex Disk: what is it
Yandex.Disk is a popular cloud storage that allows users to store various information(photos, videos, audio, texts and other files) in the so-called “cloud”, i.e. on a server on the network. Data stored on Yandex.Disk can be shared with other users, and also accessed from various devices– other computers, tablets and smartphones. Basic version Yandex.Disk is completely free and available to everyone. I remember that in 2012, registration was by invitation only, and I used an alternative service - Dropbox. But now I have completely switched to Yandex Disk Cloud. After all, free, and even accessible from everywhere, 10 GB is never superfluous.

2. Yandex Disk: how to use - step-by-step instructions
So, I convinced you, and you decided to install Yandex Disk on your computer. Now let’s take a closer look at how to use Yandex Cloud (also called Yandex.Disk, since it is a cloud data storage).
2.1. How to create Yandex Disk (registration in Yandex Cloud)
In order to start using Yandex.Disk, you need register and create a mailbox from Yandex(if you already have one, go straight to the second point).

After you have selected the operating system that you have installed, the download of the distribution will begin.
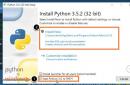
3. How to install Yandex Disk on a computer. Open the downloaded file, the further installation program will start, which will end with the following message:

Personally, I always uncheck the boxes and do not install any additional applications, but you can leave them. Click the “Finish” button. Congratulations, you are amazing :)
The installation of Yandex Cloud on your computer has completed. Now in the settings you need to specify your email login and password, after which you can safely use all the functions of the cloud storage.
After installation, a Yandex.Disk shortcut will appear on the desktop:

The folder is also available when you go to My Computer:

On the Internet, you can go to Yandex.Disk from your email or via the link - https://disk.yandex.ru/client/disk
4. Installing Yandex.Disk on a smartphone. Free apps available for iOS and Android, so you can download them without any problems App Store And Google Play. The application for iOS does not have a very high rating, there are some shortcomings, all of which can be seen in the reviews.

2.3. Yandex Disk: how much free space?
Immediately after registering and installing Yandex.Disk, you can access 10 free GB of space in the Cloud. This is quite enough for a start; it lasted me about six months. What to do if there is not enough space?
- Additional free 10 GB for inviting friends. You can get 512 MB of free cloud space for each friend you invite. Go here - https://disk.yandex.ru/invites and you will see your referral link, which you need to copy and send to your friends. After each user registers using your link, you will receive additional disk space, and the invited friend will receive an additional 1 GB.

- Additional up to 250 GB as a gift from Yandex partners. Various promotions are regularly held that will allow you to get additional gigabytes of free space. Track current promotions possible on this page.
And of course, as you can expect from Yandex, additional space can be purchased. However, the pleasure does not come cheap:

If you need a lot of space in the Cloud, but don’t want to pay, you can create several mailboxes and create Yandex.Disk for each of them.
2.3. Login to Yandex Disk
Registration has been completed, the available space has been sorted out, the question arises -?
You can view downloaded files in several ways:
1. Open the Yandex.Disk folder shortcut on the Desktop, if you did not delete it after installation.
2. Open Yandex.Disk in the My Computer folder.
3. Click on the Yandex.Disk icon in the taskbar, located in the far right corner of the screen.

4. Log in to your Yandex mail through any browser and at the top there will be a link to the Cloud:
6. Go to the Yandex main page while logged in to your email. On the right top corner there will be a link to Yandex.Disk:

2.4. How to upload files to Yandex Disk - 7 easy ways
Let us now consider the most important point, because of which we took all these actions -. Again, there are several ways to do this:
1. Via context menu. Select the file that needs to be uploaded to the Cloud, right-click on it and select the item: “Yandex.Disk: Copy public link”:

2. Copy the file to the Yandex.Disk folder(I wrote above how to enter it). By default, this folder is synchronized automatically, so when you copy there, all files will be immediately added to your Disk.
3. Upload files via mobile app iOS or Android. I can consider this method in a separate article, if you leave such a wish in the comments.
4. Upload a file to the Cloud via browser. To do this, simply drag and drop the selected files into a browser window with Yandex.Disk open:

5. Copying other people's files. If someone shared with you a link to a file that is stored on Yandex.Disk, you can easily save it to your Cloud. To do this, you need to follow the sent link like https://yadi.sk/*** and click on the “Save to Yandex.Disk” button on the right.


They also often ask - how to upload a folder to Yandex Disk. The principle is the same as stated above in the files section. But one more thing appears additional benefit– folder can be assigned General access. This way, other users to whom you grant access rights will be able to view and download files in this folder, as well as upload their own files there.

How to upload a video to Yandex Disk?– is also a very popular question from Cloud users. This is due to the fact that video files are usually large, and many people worry that they simply won’t “fit” and cannot be stored there. This is not true, video files, just like photos, can be uploaded and stored on Yandex.Disk.
2.5. Yandex Disk: how to transfer files to another user

You can also remove access to the file by clicking the mouse and switching it to the OFF position.
If for some reason you need to remove Yandex.Disk from your computer, then you should do the same as with regular application– take advantage standard means operating system.
Let's move on: Start -> Control Panel -> Programs and Features
In the window that appears, select Yandex.Disk (usually it is the last one in the list) and click the “Delete” button. The downloaded files will remain in your account; only the application will be deleted from your computer.

Yandex.Disk is one of the services of the Yandex website. It is an online storage into which you can upload anything from your computer: a file, a drawing, an animation, a document, an archive, a video. This is a great way to do backup copy important information. It will remain on the site even if something happens to your equipment. Yandex.Disk is also an excellent file sharing service. Through it you can generate a download link. Figure out how to register Yandex.Disk, how to use it, how to share programs, photos and videos with friends. With its help, you can distribute a large archive to several people - and you will not need to send the data to each person personally.
We will tell you about Yandex Disk
Yandex is a popular and multifunctional search engine. It has many interesting and useful resources, such as maps and a navigator, translator, poster, TV program, news, blogs, weather, radio, market, buying tickets, ordering a taxi and much more. Of course, the list includes Yandex.Disk itself. After registration you will be able to use all these services. Although many of them are available without an account.
Yandex.Disk will combine cloud storage and file sharing. You can upload any file there - no matter what size or format it is (although there is a limit on the total volume of all uploads). It will remain there until you remove it yourself. Keep it for personal use or set permissions so that someone else can download it.
If you have several computers, it will be more convenient to use them with Yandex.Disk. You don't have to transfer every file between devices. Just put it in storage. You can download at any time as long as you have Internet access. And you don’t need to carry memory cards and flash drives, which are easy to lose.
The service provides 15 GB of free space for free. Additional volume must be purchased.
Yandex.Disk registration
Before uploading a file to Yandex.Disk, you need to create an account on yandex.ru.
- Go to the website.
- Click “Create mail” at the top right. With it you can use the storage. Registration is also available via social media. To log in through them, you need to click on one of the icons next to the “Login” button on the main page (to see all the options, click on the ellipsis icon). You can quickly create an account on Yandex if you are already registered in Facebook, VKontakte, Twitter, Google, Mail.ru, Odnoklassniki or Yandex.Key
- Fill out the forms. You must provide your first name, last name, login, password and number mobile phone. You can use a pseudonym. The login must be unique. If the nickname matches an existing one, the system will warn you about this. The phone is needed to check data and restore access if the password is lost. Can be replaced with a security question and answer.
- If you do not plan to use this mail, you will still have to register an account. All your data, including those uploaded to the file hosting service, is linked to your login. Without this, you will not be able to upload a file or video to the storage.

Standard procedure for filling out the required fields
How to create Yandex.Disk:
- Log in with your Yandex username.
- You will be redirected to your email.
- If you've recently signed up, there will be informational messages in your inbox. You can read them to familiarize yourself with the service.
- In the top menu, find the “Disk” link. This is enough to create Yandex.Disk.
- When you first log in, the service will greet you, give you a brief tour and offer to install the Disk program. Some people find it convenient to use it, while others find it easier to download a file, archive or video through a browser.
You can also enter the vault using home page Yandex. The corresponding button will appear in the upper right after authorization. This link is also available in the resource services global network. To see it, click on “More” above the search bar.
Uploading files and using Yandex.Disk
Yandex.Disk is quite easy to use. Its interface is somewhat reminiscent of a standard Explorer. There are folders and categories. Each file has its own name. Information about it is available: size and date last change. You can, for example, create a “Video” section and place videos there. This way you will quickly find out where and what is located, and you will not have to look for the necessary data among unsorted information.

Mastering the capabilities of the web interface
How to use this service:
The storage limit is 15 GB. If you want to dispose of a larger file, you will have to purchase additional space for a fee.
Yandex.Disk program
Yandex.Disk has a utility that performs the functions cloud service. With it you can synchronize shared folders on different devices or simply add new objects to Yandex.Disk without opening the browser. This is convenient if you work on a computer and laptop at the same time. You won't waste time transferring data back and forth.
How to upload a video to Yandex.Disk or some other formats using the program:
- Download it. When you log into Yandex.Disk, a proposal will appear. In addition, the download link is on the right.
- After installing the application, enter your username and password.
- The Yandex.Disk folder will appear in “My Computer” with an icon in the form of a flying saucer. A similar “plate” can be found in the taskbar.
- To upload a file to storage, simply copy it to this folder and wait for synchronization.
- This also works the other way around. What is on Yandex.Disk will appear on the computer after synchronization. If you install the utility on several PCs and log into it under the same login, they will have a common folder.
- To change some program parameters, click on its icon in the taskbar, then on the small “gear” at the bottom and select “Settings”. There you can enable or disable automatic launch of the application, specify where files will be saved, assign keyboard shortcuts and set objects for synchronization. Select, for example, one folder on Yandex.Disk, data from which should be added to the PC. Then you won’t need to load the entire storage at once.
- To make a download link, go to the program folder and right-click on the shortcut. IN context menu there will be a necessary option.

Desktop version of the system in Windows environment
Removing Yandex.Disk
Here's how to remove Yandex.Disk from your PC:
- Click on its icon on the taskbar, then on the “gear” and select “Settings”.
- In the “Account” tab, click on “Disconnect the computer from the Disk” and confirm the action by clicking on “OK”.
- Open the “gear” again and click “Exit”.
- Go to Start - “Control Panel”.
- Select Programs and Features (or find the Uninstall Programs menu).
- Find Yandex.Disk there.
- Click "Delete".
- Confirm the action and wait for the process to complete.

If you want to temporarily exit the service, use this dialog
The application will be erased from the computer. However, the data previously uploaded to the site will remain there. From unnecessary files you will have to get rid of it manually through the browser. Although this is quite easy to do - it has a responsive and user-friendly interface.
If you don’t know how to remove Yandex.Disk from Yandex.ru itself, you can only do this together with account and by mail. It’s easier to erase everything from the site and not visit it again if you don’t need it. The global network resource itself removes inactive users.
Yandex.Disk is a convenient and accessible file storage. You can upload various data into it, share it with friends, or leave it for personal use.
The cloud is a service where you can store data and easily manage it. That is, you can upload your files to it, work with them directly on the Internet, download them at any time, and also transfer them to another person.
Any user can get such a service at their disposal completely free of charge. It's essentially your own hard drive on the Internet.
You could say it's something like Local disk computer, but only with the ability to use it on any device with Internet access. Plus, you can transfer files to other users by simply sending them a download link.
So, the cloud is needed to:
- Store files and folders with files
- Work with them on any computer or smartphone that has the Internet
- Easily and quickly transfer files to other people
Thus, it replaces flash drives, disks and other devices for transferring information.
That is, I can upload the files I need to such a service and work with them on any other computer where there is Internet. These can be documents, books, music, videos - in general, any files.
Initially, they are available only to me, but if I wish, I can make some of them public. Then they can be downloaded.
That is, a special Internet address (link) will be generated where the file can be saved to your computer. I can send this address to any person (for example, on Skype or via mail), and the person will be able to download my file.
Where and how to get the cloud
There are sites that provide clouds to users. It's like with mail: there are sites where you can get it. We go to such a site, register and get a cloud service for storing data.

We are allocated a certain free volume. On some services it is a very decent 50-100 GB. If you want more, it's for money.
Or you can register several times and, accordingly, receive several free volumes. Everything is free, everything is legal!
The easiest way to get a cloud is to do it where you have your mail. The fact is that the largest email sites (Yandex, Mail, Gmail) distribute such services for free. You just need to want it.

That is, you don’t even need to register. Just open your mail and indicate that you want to receive the cloud. They give it to you right away.
Sites that give away clouds for free
Yandex.Disk is a cloud service from Yandex. If you have mail there, then you also have such a disk. 10 GB is given free of charge and forever.
To receive Yandex.Disk, you need to open the website yandex.ru and go to your mail. Then open the “Disk” tab (at the top).

They will greet you and offer to download special program to your computer for convenient work with Yandex.Disk.

It’s better not to do this right away - you can always install it later. I recommend closing this window and first learning how to use Yandex.Disk without the program.
That's all! Upload files, sort them, share, delete. In general, you already have a cloud. There are even some files and folders with files already loaded onto it for example.

To further access Yandex.Disk, you need to follow all the same steps: open the yandex.ru website, open your email, go to the “Disk” tab.
Or you can install and configure a special program “Disk for Windows” and use the cloud directly from your computer - without going to the website yandex.ru
Cloud Mail.ru is a service from the mail site mail.ru. 25 GB is given free of charge.
To receive this goodness you just need to have a mail.ru mailbox. If you have it, then you also have a cloud.
To enter it, you need to open the mail.ru website and open your mail. Then click on the “Cloud” button at the top.

Your personal cloud service will open. Some example files are already loaded into it. You can remove them, or you can leave them. In general, your cloud is already ready to go.
You can use it directly, via email, or you can download and install a special application (program). Then the cloud will be accessible directly from the computer - a shortcut will appear on the Desktop to instantly open it.
Google Drive is a service that is “attached” to gmail.com. 15 GB is allocated for free.

To get into it, you need to go to your email account on the website gmail.com. Then click on the picture with small squares next to your name (top right) and click on the “Disk” item.

Perhaps after this Google will ask you a couple of questions. Below, in the pictures, it is shown what he should answer in this case.

After this, your personal cloud will load. It will already have a folder with several files. You can delete this folder with all its contents, or you can leave it - as you wish.
So, the disk is ready for use. You can start downloading!
It opens in exactly the same way - through mail. Or you can install a special program. Then it will be accessible from your computer.
![]()
It seemed to me that this cloud is much more difficult to use than all the others. Not everyone will understand. But there are certain advantages that other services do not have. For example, you can create a document, presentation, table, form or drawing right in it.

That is, a program will open directly on the Internet to create a file of the desired type. It is quite simple and allows you to both create a file and save it to Google Drive, as well as download it to your computer in the desired format.
Such programs can be used instead of Word, Excel, Power Point. It is very convenient when you have to work on a computer on which they are not installed.
Which service is better
As various tests have shown, the “mail” clouds that I just talked about are superior in quality, convenience and free opportunities all other similar services.

I won’t go into details, but the places were distributed as follows:
Therefore, I recommend that you still use one of these services. If you don't have email box none of them, you just need to register. You will have new mail (which, by the way, you don’t have to use at all) and a cloud.

Of course, there are other sites where you can get a cloud service for free. But most of them have free versions There are various unpleasant restrictions.
But there is one that compares favorably with all the others (including the “postal” ones). It is best suited for transferring files to other people. His address: mega.co.nz
Mega - this service makes sense for those who host files for downloading. The fact is that through special downloader programs such as MiPony, they can be saved to your computer very quickly and easily. Much easier and faster than with other cloud services. 50 GB is allocated for free.

Initially the site opens on English language. To switch to the Russian version, click on the Menu button (top right), select Language from the list, then click on Russian and the Save button.
Just in case, I’ll give you two more good cloud services:
Dropbox - 2 GB free.
One Drive - 7 GB free.
How to manage the cloud
You can manage it on the very site where you received it. Log in there with your username and password, go to a certain section and get access to the cloud.

And you can do this even easier, more conveniently and, most importantly, much faster: with the help of a small application (program).
Each service has its own, that is, you need to download it from the site where you have the cloud.
This application allows you to quickly and easily upload, watch, download files and folders with files from your cloud service. It takes up very little space, and you can install such a program on any computer or smartphone (not just yours).

How to install the application. Open your cloud and there will be a download link or button in a prominent place. The pictures below show where such a button is in “mail” cloud services.

Download the program file and open it. The installation will begin. Below are illustrated instructions for each “mail” service. Do everything as in the pictures and the application will install.
Yandex.Disk:

Cloud Mail.ru:


How to use the application
After installing the application, a program shortcut appears on the Desktop. With the help of it we will work with the cloud.

When you first launch the program, you will be asked to enter data from the cloud. Type your email address and password. Then agree to the terms of service and click “Login”.

Now, when you open the program icon, your cloud will open directly on your computer - in a regular folder.

Also, when an application is opened, its icon appears in the tray.
This is where the computer clock is - in the lower right corner of the screen (on the taskbar, where the other icons are).

This icon may be hidden under a small arrow next to the alphabet.

Using it you can control the application. To do this, click on it with the left or right mouse button.

File/folder synchronization. This is the most difficult part to understand, but it is absolutely necessary to understand it in order to successfully work with the application.
The point of synchronization is that the computer or smartphone on which the application is installed must connect to your cloud and download files from or to it.

This process must be completed, otherwise we will not be able to use the downloaded data. Synchronization occurs via the Internet. That is, without the Internet it is simply impossible.
Consider the following situation. My cloud already has downloaded files and folders with files.

By the way, initially, when you receive the cloud, it already has some information. So if you didn’t specifically delete it, then there are several files there.
I installed the application on my computer, opened it, entered my username and password. A folder with a cloud has opened. So, all the data that was on it initially should be uploaded to this folder. That is, my cloud and computer must be synchronized.

It turns out that all the files that are on the cloud are downloaded to my computer in this very folder. And if there are few of them and they are small in size, then this process will happen quickly - I may not even notice it.
But if the files are large and my Internet is not very fast, then synchronization will take some time.
In practice, it looks like this: I open an application shortcut and see an empty folder, although I know for sure that there are files on my cloud.

Usually in this case, users begin to get nervous - they worry that their files have been deleted. In fact, they are all there. But we don’t see them because the synchronization procedure has not yet been completed.
And this can be verified. When synchronization is in progress, the application icon (the one in the tray) seems to move.
And if we click on it, then in the menu that opens there will be an item indicating the progress of the process.

In fact, at this moment, files are downloaded from the Internet. That is, the Internet itself may work slower because of this.
If necessary, synchronization can be turned off. To do this, click on the application icon in the tray and select the appropriate item from the menu. By the way, you can completely exit the program there.
In general, while synchronization is in progress, the files will not be accessible. The same thing happens when transferring information from a computer to the cloud.
How to upload a file (folder with files) to the cloud. To do this you just need to copy necessary files, and then paste them into the application folder.

Copy/paste occurs as usual, but after this all transferred files should be synchronized. Otherwise, they will not be uploaded to the Internet on your cloud.
In the Cloud Mail.ru application, this process occurs instantly. Moreover, even for large files (from 1 GB).
In the Yandex.Disk program, synchronization takes some time, but it still happens quickly.
For me, on a fairly slow Internet, a 1 GB file downloaded in just a few minutes. If directly uploaded to the cloud (without an application), this process would take more than an hour.
But Google Drive lags behind in this regard. Apparently this application works using a different technology, and synchronization takes the same amount of time as a regular file download.

My results may differ from yours. Perhaps your synchronization process will be faster or, on the contrary, slower than mine.
How to download a file (folder with files) from the cloud. All files that you want to download to your computer or phone from the application must be fully synchronized.

You can transfer them to your computer by simply copying them. That is, open the application, copy the necessary files and paste them into the computer folder of your choice. That's all! A couple of seconds - and the files are downloaded.
Cons of cloud services
Everything has both pros and cons. And cloud services also have them. I will list the main ones:
1. Memory consumption. In other words, the work of cloud services “stresses” the computer. In the case of Yandex.Disk and Cloud.Mail.ru, the load is insignificant, but Google Drive is quite voracious. Modern computers This may not be noticed, but the old ones will have to puff.

2. Security. Since the cloud is an Internet service, there is always a certain chance that your files could fall into the wrong hands. Of course, modern data protection technologies minimize this probability, but there is always a risk. Moreover, the service is public.

3. Internet required. Without the Internet, you will not be able to use any cloud service.

Additional Information
In case the information provided in this lesson is not enough for you.
Each cloud service has detailed instructions by use. Users don’t particularly like it, but it does contain a lot of useful and interesting information.