Quite often during a speech or report, presentation new program or product, there is a need to visualize some information in front of the public. Most popular program for this is Microsoft Power Point 2007 – an environment for creating presentations with various effects. Now almost no event, such as a seminar, conference, or thesis defense, is complete without graphic support created in Power Point. The development of technology has made it possible to reproduce presentations not only on a computer or TV screen, but also on interactive whiteboards and using projectors.
The software product is called a presentation. They add additional slides in the same template format they need and add text, images, and graphics. As they learn, they add special effects, slide transitions, music, graphics and animations - all built into the software- to enrich the experience for the audience. You and your team can work on the same presentation at the same time. Our guide to use. You can combine text, graphics, and multimedia content to create professional presentations.
Power Point Review
Making a presentation on your computer is not the only feature of Microsoft Power Point. With this program it is possible:
- impress the audience with an informative presentation;
- create graphic support for the target flow of people;
- scale slides, increasing or decreasing the desired areas;
- quickly switch slides, both automatically and manually;
- create unique graphic support for the report;
- use both your own themes and designs developed by the program manufacturer;
- quickly and easily create desired charts, graphs, etc.;
- add various visual and sound effects.
Video: business presentation
Step 2: Make the Most of Graphics and Animation
Organize and structure your presentation; Create a professional and consistent format; Provide an illustrative background for the content of your presentation; Animate your slides to add more visual impact. Tutorial Student Education for advice on planning the content and structure of your presentation. The guidelines below will ensure you create slides that are easy for your audience to read and understand. Make sure all slides have the same or similar background images and color schemes. Avoid using red or green for text or highlighting as it is difficult to read.
- Prepare slides that use bold color contrast, for example.
- Black or dark blue text on a cream background.
- A useful guide is the six by six rule.
- Create bullet points that are clear summaries of key points.
- There is no need for bullet points to be complete sentences.
- Don't mix fonts and font sizes.
Presentation Components
The presentation consists of slides, the number of which is practically unlimited. They are sequentially collected into one file with the extension “.ppt”, which opens on any computer where the Microsoft program Power Point.
Slides can be shown from electronic media or printed on paper.
All basic display parameters are set here
They tend to be very low quality and are likely to pixelate when you project them onto a large screen. Make sure the images you use are simple and clear so they can be easily read from a distance. Small, overly complex and poor image quality will only frustrate your audience.
Many images are protected by copyright. Unless it is explicitly stated that an image is not copyrighted or is available for use in educational contexts, you must ask permission to use the image.
- Beware of images you take from the Internet.
- Make sure the graphics relate to your text and are not just decorative.
You can place everything you need for a demonstration on the slides:
- text information;
- photographs, pictures, drawings, etc.;
- tables, graphs, diagrams;
- videos, films, clips;
- audio files;
- other graphic objects.
Power Point slides can be customized and modified:
- size;
- marking (location of objects on it);
- template (design and design);
- visual and sound transition effects.
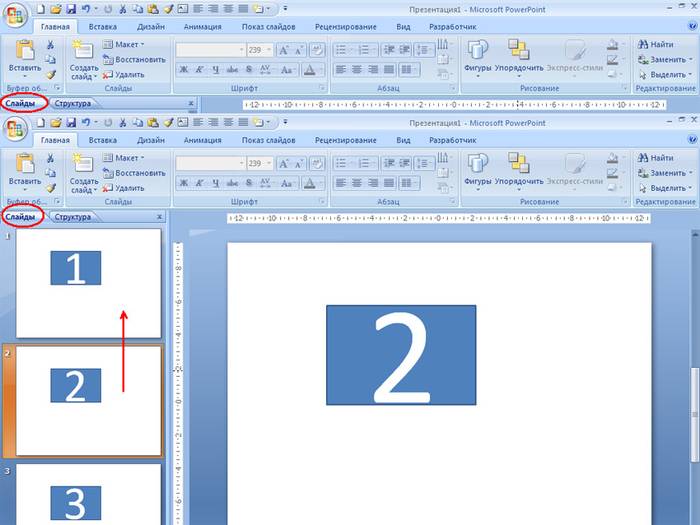
The initial editor window in the program looks like this:
Using Animations and Transitions
Behind additional information please refer to the University of Leicester Teachers' Guide to Copyright. However, it is very easy to overuse these features and create a presentation where the animation distracts the audience from the content of your presentation. If you can't think of a reason to animate your slide, don't do it! Try to ensure that you use similar types of animations for similar functions. For example, if your text is always on the left, it will be distracting if it suddenly appears from a different direction or uses a different animation technique.
- Use animation to show progression.
- Animation is very effective in highlighting a process one step at a time.
- Make sure any animation you use serves a clear purpose.
- Be consistent.
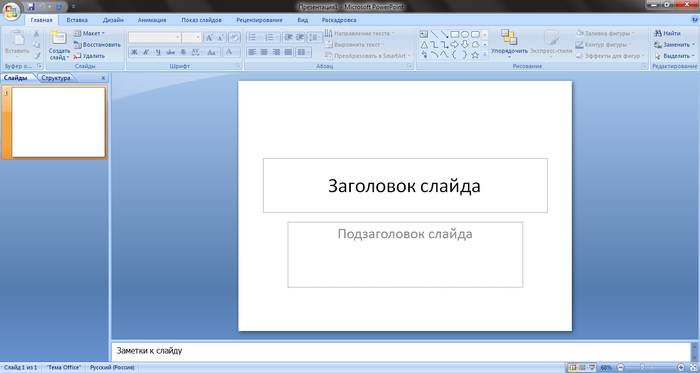
The Menu bar contains all important commands program, and the main and frequently used options are displayed on the toolbar. This panel can be edited by adding or removing certain elements. By clicking on the “Create Slide” button, an empty template will appear on the screen, on which you will have to work.
This can be done via
All views can be selected from the View menu. Use the Outline tab in Normal View to display the text content of your presentation. This will help you focus on the structure of your content rather than the visual impact of your presentation. Use the Notes panel in Normal View to create a script or prompts that you can use when you submit your presentation. Use the Slide Sorter view to get an overview of the visual impact of your presentation. This is also a useful view for rearranging slides or deleting multiple slides. Avoid using too many slides in a presentation as this will distract the audience.
The left panel displays all the slides that make up the presentation. They can be in the form of miniature copies of themselves, or they can be displayed in structured text, displaying headings or content of the slide. You can also move and rearrange the slides in this panel. The task pane (located on the right) will display actions that you can use while creating your impression. At the bottom of the screen there is a Notes area where you can enter all the comments on the slide being created, which are visible only while working on the presentation.
In general, you should use about one slide every two minutes, so a ten-minute presentation should consist of five slides. Find out as much as you can about your audience and the environment you are going to present in before you present. Ask yourself the following questions.
Is my presentation appropriate for the time I have been allocated? Selecting a rehearsal time from the slideshow menu can help you estimate how much time you're spending on each aspect of your presentation. Do I have an alternative plan if the technology fails? This could be a second copy of acetate slides, a set of handouts, or a second disc format. Will people be able to see my slides from the back? . An audience that tries to copy detailed information from your slides will not have your full attention.
All areas on the work screen can be enlarged or reduced by placing the cursor on their end line.
How to make your presentation step by step
There are several ways to create a presentation for an interactive whiteboard:
- develop a completely new presentation;
- from a standard or previously made template;
- from a ready-made file;
- from auto content wizard.
If we take a closer look, in the new demo you need to do all the markup, design styles, fonts, etc. yourself. Rework finished presentation will not ultimately yield a unique product. Selecting a template is similar to previous method and allows you to use ready-made graphic and design developments from the creators of the program. If you use the Auto Content wizard, the program will ask you questions and, based on the answers, create the desired presentation template.
Consider using handouts for your audience to help them focus on listening and understanding. Below are some points to consider when presenting your slides. Treat each slide like a mini-presentation where you can introduce an idea, give a detail, and then conclude that slide with an explanation of how that point fits into the rest of your presentation. Direct your audience's attention to your slides when they contain information that is key to receiving your message. If, for example, the slide contains a quote or diagram - introduce the slide, give them time to read and understand it, and then explain its relevance. Don't move the pointer on the screen unless you are using it to demonstrate something, as this will distract your audience. Don't just read the text on the slides, they should be a summary or supplement to the content of your oral presentation.
- Give your audience time to assimilate the material on your slides.
- Don't leave a screen saver as this will distract your audience.
Start of creation
To start creating a slide show, you need to open the desired program.
This can be done via:
- Start;
- Programs;
- Microsoft Office;
- Microsoft Office PowerPoint 2007.
IN open program a working window will appear in which you need to select one of the previously the listed methods creating a slide show.
Student training has a wide range to help you improve your presentation skills. It can be a powerful tool for creating clear, well-structured presentations that have a strong visual impact. However, overuse or misuse can distract you from your presentation. Presentations will be easily accessible in the cloud whenever you need them. Present information effectively. No graphs or images. Well-known navigation options and ribbon menus help you get started quickly.
Create a presentation that you can start with one of the elegant templates and then let your imagination run wild. You can create, view and edit presentations on the go and easily access them in the cloud. Display information exactly the way you want - in landscape or portrait orientation, with rich formatting, graphics, animations, transitions and speaker notes. You can open presentations with one click. To share documents with others, simply send a hyperlink or email.
Video: Power Point 2007 Presentation
We make according to the template
You can create beautiful presentation using a large number of Power Point templates. They include ready-made slides in terms of design, where you need to enter data. The design of the templates takes into account:
Find out more in these related articles
An apple is a fruit of corn in which the ovary and surrounding tissue become fleshy and edible when ripe. Jobs is often cited as one of corporate America's biggest speakers, and that's simply because he understands one thing: how to tell a story. The trick is to figure out how to engage your listeners, keep them focused, and use the right visuals to convey your message. More often than not, you don't need to be a great designer, writer, or speaker to come up with an attention-grabbing presentation.
- Background color;
- Slide color schemes;
- Fonts, etc.
You can create a slide show from a template through the menu:
- File;
- Create;
- Create a presentation;
- Templates.
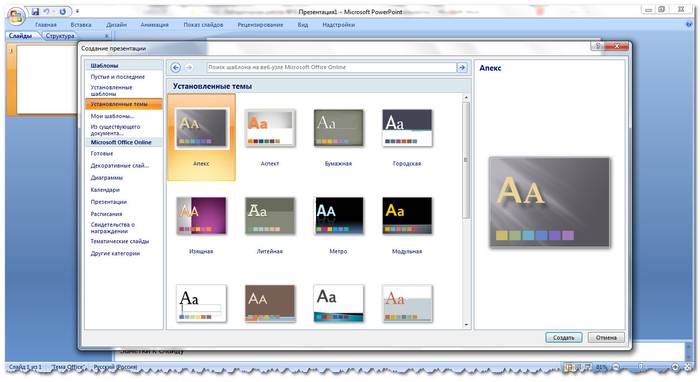
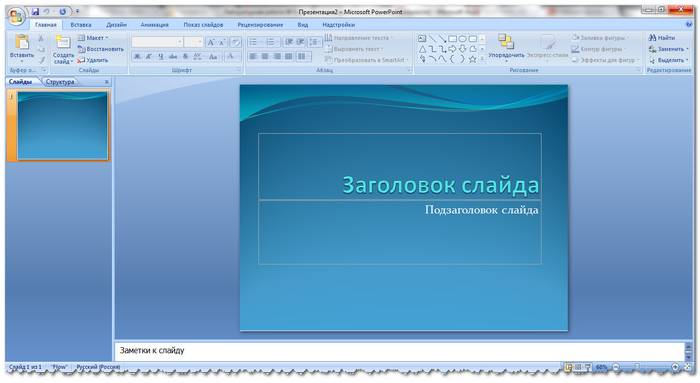
Select the desired template and click “Create”. The slide of the selected style will appear in the work area and can be edited.
However, you need to figure out how to capture the audience's focus AND maybe a little bit of their imagination. One smart tip Borneman recommends is five words per line and five lines per slide. Kawasaki's recommended structure for any entrepreneurial vision is as follows.
Regardless of the specific structure you choose for your presentation, your story should achieve three goals: solve the problem, introduce the problem, and explain how you will solve the problem. This may seem obvious, but according to Borneman, it's one of the biggest—and most common—mistakes made by presenters.
Loading slides
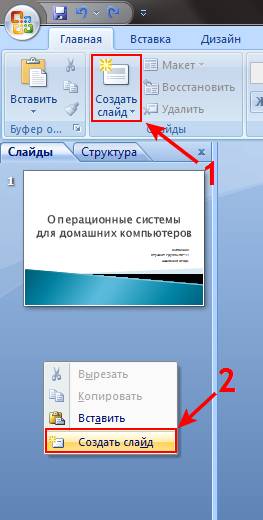
To create a new slide, click on the corresponding button on the toolbar. You can also do this by right-clicking on the slide thumbnail in the window on the left and selecting the same command.
When a presenter lists too many details on slides, few will be able to retain it. A great presentation "should really just give the main points," says Borneman. For example, Steve Jobs is famous for using virtually no text - a new product icon or two or three words of a "big picture" will be enough. "People are afraid to use a one-word slide, but it makes sense because we have to process the information before moving on to the next idea," says Borneman.
It's also nice to segment your presentations in places where your audience's minds can summarize and process the information so they can actually think about what you're telling them. "It's very important for the mind to be able to rely on an idea or a thought, so if it's a constant stream of words, people will get tired," she adds.
In the presentation outline area, you can copy or delete slides by selecting them and pressing the appropriate keyboard buttons. Or through the menu that opens with the right mouse button when you click on the slide.
Slides can also be swapped:
Change markup finished slide possible through:
In other words, it becomes easy to customize. Your audience needs to digest information. Don't be afraid to linger on a slide or create a slide with just one picture and nothing else. Taking these risks will help sell your presentation to your audience and prevent them from becoming “glazed over” by a look of boredom.
When you're putting together slides for a presentation, including clip art, slide transitions, and other sticky animations, it's easy to muddy your brand message. While they are easy to use, they make your brand look generic and outdated. You don't want to have a circus of effects, says Bornemann, go with colors and fonts. Focus on the message - everything should have a reason. And, she adds, the "effects" on steroids "have no cause."
- Home;
- Layout.
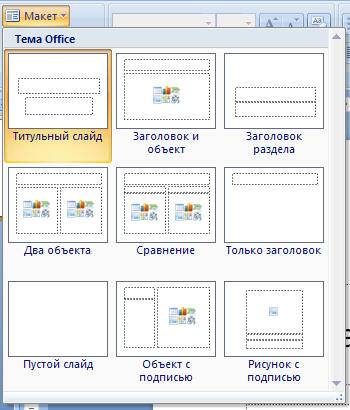
Text is entered in special fields on the slide. When marking a slide, space for text is already allocated automatically, but you can also add it to other places through the “Insert-Title” control panel item. Enter text in the field that appears.
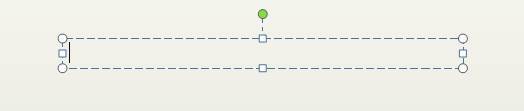
The size of the input field will expand as you add text. You can finish typing by clicking on any free area of the slide.
You can insert a drawing or your own picture using the command:
- Insert;
- Drawing.
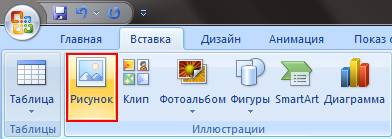
Or by clicking on the picture in the slide layout itself:
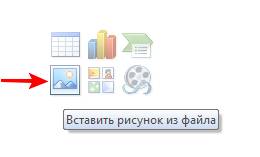
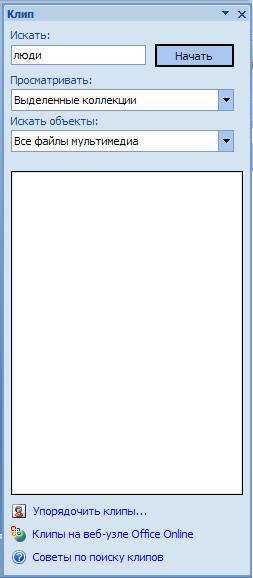
In the window that opens, select the desired file location and the image itself, and then click the “Insert” button. If you select “Clip”, you will be asked to find an image among the standard pictures of the program.
Any field on a slide can be moved and its size changed.
To do this you should:
- Click once on the desired object:
- then move the cursor over its boundaries - the change option will be available.
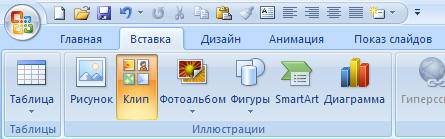
It is possible to add sound, video, tables, graphs, charts and autoshapes to a slide. Their buttons are available in the slide work area and in the Insert menu. There are quite a few options for each object, and the accessible design of Microsoft Power Point makes it possible to quickly understand them.
New design
You can change the site design through the menu:
- Design;
- Themes.

It has subsections:
- Colors;
- Fonts;
- Effects.
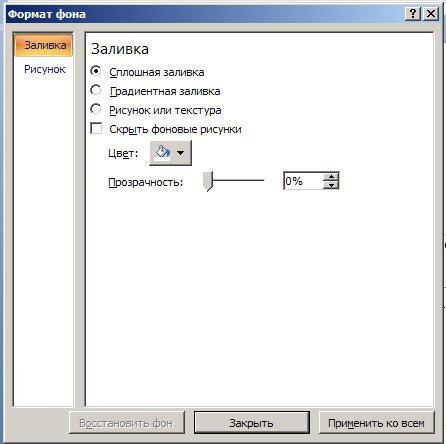
You can apply the selected theme to the entire show or to an individual slide. Color scheme within a specific topic may also change. To do this, click the corresponding column in the design area. Select the outline and right-click on it, applying it either to the entire presentation or to a selected slide: You can make your own image or fill as the background:
- Design;
- Background styles;
- Background format.
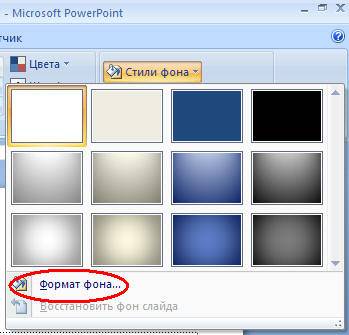
In this window you can select the fill type:
- Solid;
- Gradient ( smooth transition one color to another);
- Pattern or texture.
Text formatting - important stage in creating a slide show. A lot depends on the readability of the test.
To edit you should:
- select the desired piece of text;
- then use the tools on the main taskbar.
By default, each new line in the text is treated as bulleted list. This is changed via the toolbar. Power Point also contains buttons for setting special effects, text direction, changing line spacing, etc. When selected in the slide workspace graphic image, the “Working with Pictures” tab will appear on the toolbar.
There you can change:
- Brightness;
- Contrast;
- Display style;
- Color;
- Size.
Video: Presentation in 10 minutes
Animation
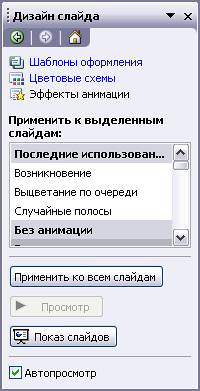
It is advisable to give beautiful visualization to slides filled with information. This is done using Animation Effects in the Slide Design task pane. From a large list of effects, you can choose any one for each object on the slide. Then during the demonstration they will appear beautifully on the screen. One effect applies to one slide, but you can click the Apply to All Slides button and it will appear on all slides in the presentation.
You can also set up animation for each object on the slide:
- select it and right-click, selecting “Animation Settings”;
- or go to the menu item “Animation” - “Animation Settings”.
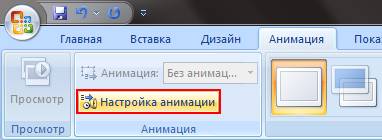
Then it will appear with right side panel where you can add a separate effect to each object, as well as adjust its speed, sound and appearance time.

Adding transitions
Transition is used when changing from one site to another. The new slide can appear immediately or gradually. Fade in makes the presentation more beautiful and interesting.
To set up a transition, you need to select the slide and go to:
- Animation;
- Animation settings:
- Next, you should select the transition effect you like, the sound for it and the speed of the process. An automatic transition can also be configured (then its time is set) and by mouse click. The transition can be made for each slide separately, or it can be configured for the entire presentation at once.
Completion
At the end of your presentation, you should adjust the settings for the slide show itself to avoid unpleasant moments during the presentation. This is done in the “Slide show” - “Demonstration settings” item:
![]()
All basic display parameters are set here:
- Slide management;
- Changing slides;
- Slide numbers.
Also in the “Slide Show” menu you can hide slides that are temporarily not needed for display, but which cannot be deleted.
You can view the finished work by clicking on the “From Beginning” button:
- Save as…;
- Select a save location;
- Write the title of the work;
- Save.
Microsoft Power Point– accessible and simple program to create presentations on your computer. A bunch of visual effects and design themes will allow you to quickly create an original and unique presentation for your public speech or school assignment.
Work inPowerPoint. Creating presentations
Option 1
1. What is Power Point?
Microsoft Office application for creating presentations
application program for processing code tables
a computer device that manages its resources in the process of processing data in tabular form
system program that manages computer resources
2. A component of a presentation containing various objects is called...
3. In which section of the program window menuPowerPointthe team is locatedCreate new) slide ?
Slide show
4. Which panel buttonDrawing in a programmePowerPointchanges the color of the outline of the figure?
font color
line type
stroke type
line color
5. Commands for adding a diagram topresentationprogramsPowerPoint - ...
Edit - Add Chart
File - Add Chart
Insert– Diagram
Format – Diagram
6. Opening the panelWordArtin the program windowPowerPointcarried out using the commands:
View - Toolbars– WordArt
View – WordArt
Insert– WordArt
Tools – Toolbars– WordArt
7. In which section of the program window menuPowerPointthe team is locatedAnimation settings ?
Slide show
Format
Insert
8. KeyF5 VprogramPowerPointmatches the command...
Help menu
Slide properties
Slide show
Animation settings
9.Which key interrupts the slide showpresentationsprogramsPowerPoint?
regular presentationMicrosoftPowerPoint.
Test work No. 8
Work inPowerPoint. Creating presentations
Option 2
1. What is a presentationPowerPoint?
demo set of slides prepared on a computer
spreadsheet processing application
computer device that controls slide shows
a text document containing a set of drawings, photographs, diagrams
2. LaunchprogramsPowerPoint
Start – Main Menu – Programs –Microsoft Power Point
Start – Main Menu – Find –Microsoft Power Point
Taskbars – Settings – Control Panel –Microsoft Power Point
Worker table – Start – Microsoft Power Point
3. Selecting a slide layout in the programPowerPointdone using commands...
Format – Slide color scheme
Format – Slide Layout
Insert - Duplicate Slide
Edit – Special insert
4. Which panel button Drawing in Power Point changes the color of the inner area of the figure?
line color
fill color
shadow style
font color
5. Commands for inserting a picture intopresentationprogramsPowerPoint…
Insert– An object
Insert – Drawing– Images
Format – Drawing– Images
Format – Drawing – From file
6. Apply a background to a specific slide inpresentationsPowerPoint -
Format – Background – Apply
Format – Background – Apply to All
Insert– Background
View - Design– Background
7. Commands for inserting a picture intopresentationprogramsPowerPoint…
a) Insert– An object
b) Format – Picture – From file
c) Format – Drawing– Images
d) Insert – Drawing– Images
8. Animation effects individual objects slidepresentationsprogramsPowerPointare given by the command...
Slide Show - Animation Settings
Slide Show - Animation Effects
Slide Show - Action Setup
Slide Show - Presentation Setup
9. Executing the commandStart slide show presentationsprogramsPowerPointcarried out by the key...
10. Specify the extension of the file containingregular presentationMicrosoftPowerPoint.


