Using the “remote desktop” function, you can access any computer connected to local network or directly to the Internet. For example, you can access your data located on your home PC from your work computer, or vice versa. This tool has become very widespread among system administrators who manage the operation of PCs on the local network of a certain enterprise. Any user of this network can turn to the administrator for help, and he, having his desktop on his monitor screen and not running around the enterprise, will provide him with the necessary assistance. Many remote desktop management tools have been developed. Among them there is a tool built into Windows 7, as well as a number of third-party programs.
Determining the name of the remote computer
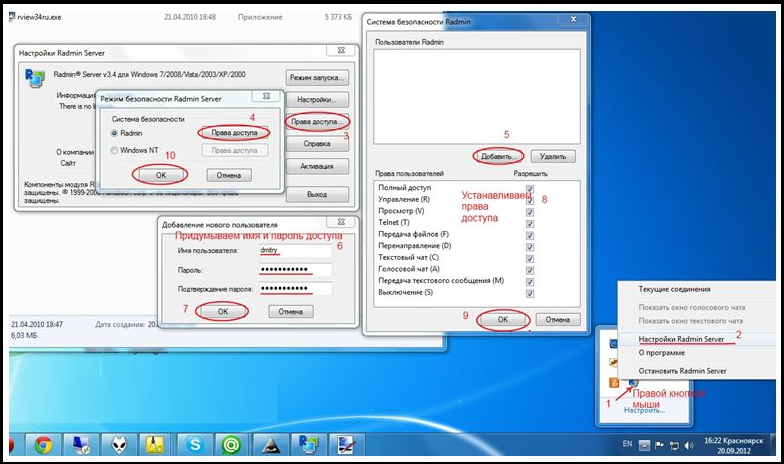
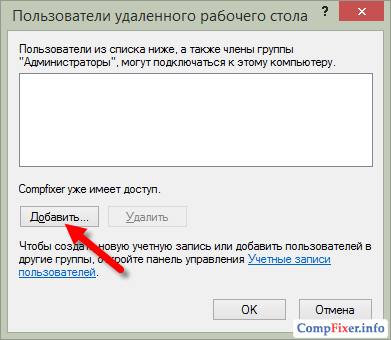
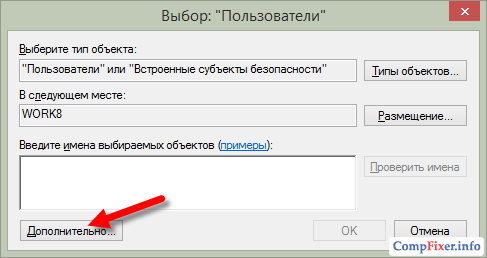
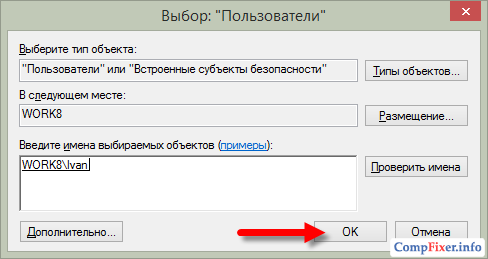
We'll add computer users to specify which users can connect remotely. Click the Add button to add users. Enter the name of the user or group of users to whom we grant access, to display a list or search for users, click More.
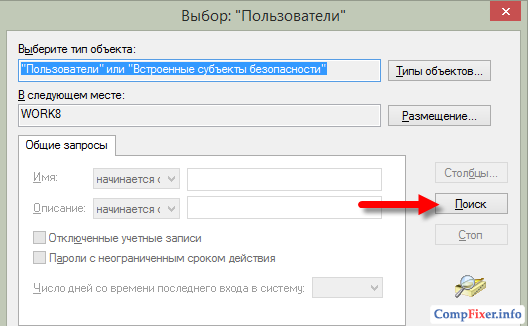
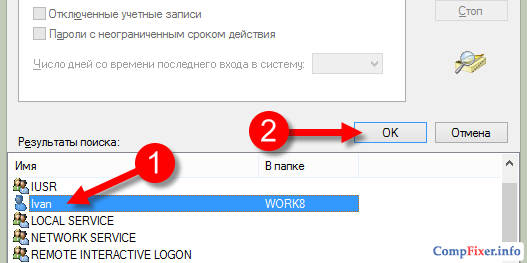
Enter your username or click More to select them from the list. By clicking "Search Now" we will show a list of existing users on the computer, double clicking on it will select it. After selecting the users to whom we will allow remote access to the desktop, operating system will add an exception to your firewall to allow this type of connection. We can see this rule in “Start” - “Configuration” - “Control Panel”.
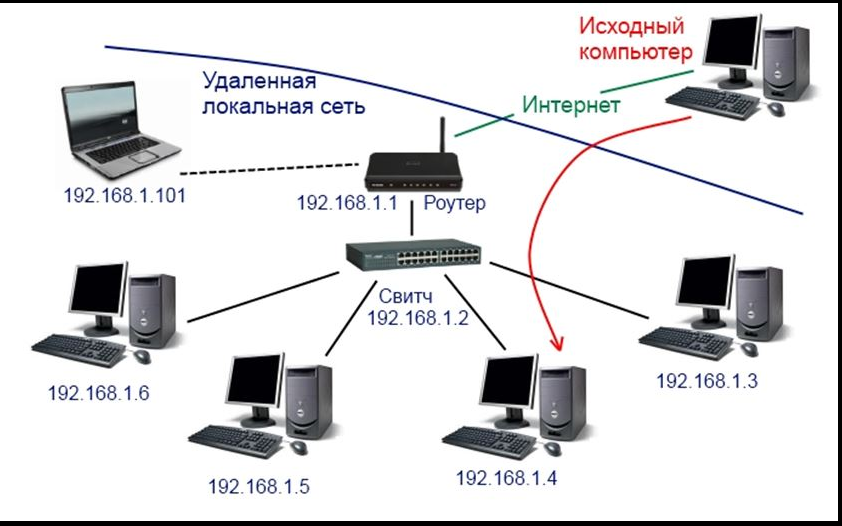
Let's imagine such a situation. There is a local network that includes five PCs connected via a router, as shown in the figure:
The administrator (PC with local IP address 192.168.1.2) is faced with the task of connecting the computer buh3 for remote access to his desktop and providing assistance. This is just a typical case when you need to connect a remote PC without resorting to an Internet connection. What setup is required for this?
Connecting to rdp
It will show us this firewall configuration window, by default it is enabled. If we go to the Exceptions tab, we can see which applications and which ports are open. Among the exceptions we have should be the "Remote Desktop" call. Map ports on a router or firewall for external access using Remote Desktop. Its use is very simple.
Well to add new server, we open the application and we provide "Add" and we will leave the following screen. Options screen for connecting to a new server. Here we will give a name that we will pass to the connection. The logical port for which we will connect. Username. The one we have on the server.
What should the user do
In order for an administrator to connect a user's PC in Windows 7, the latter must give permission to do so. Setting up his PC, that is, the sequence of his actions is shown in the following figure:
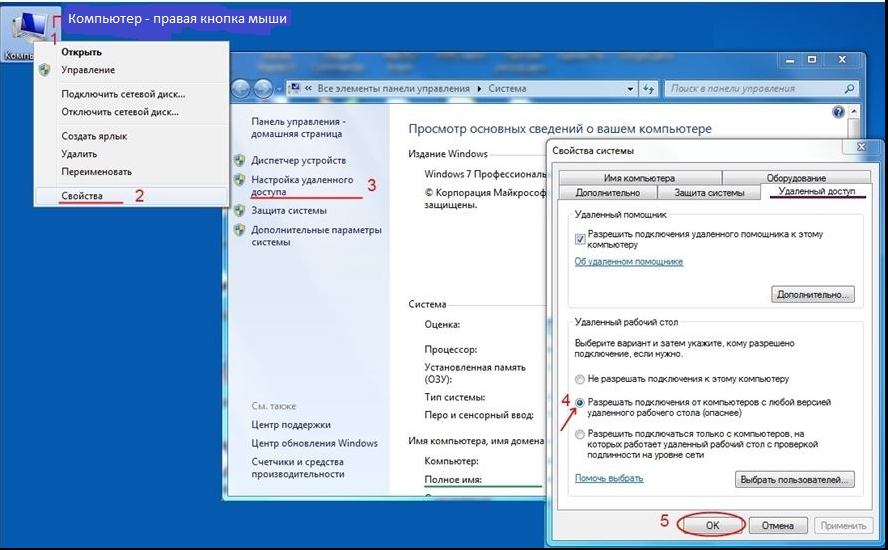
The setup of the remote computer is completed; now on the administrator’s PC you need to start connecting to it.
Password. The one we have is our server user. Connect to the console. Color depth. We will set the number of bits required for color rendering. More bits of more real colors and more bandwidth consumption. Permission. We will adjust the resolution in which we want the remote computer to be presented to us in the local terminal.
Screen for connection parameters to the new server. Drive redirection. It allows you to access the local storage block from the server. Audio redirection. Allows you to play remote audio on your local computer. Enables or disables viewing the desktop background of the remote computer. Font smoothing. Show the letters of the texts more carefully.
Starting a connection to a remote PC
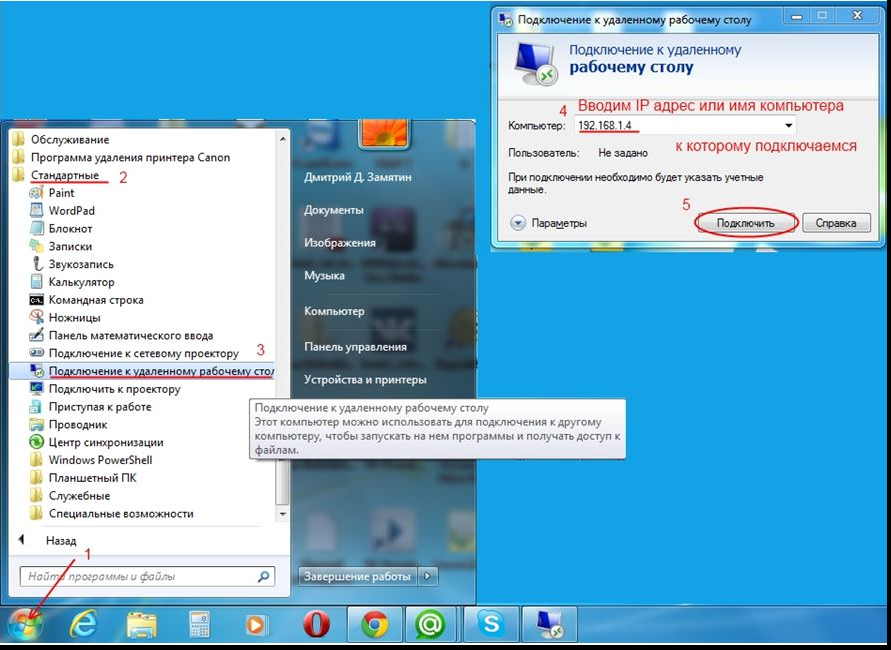
To connect a desktop Windows user 7 to his PC, the administrator must follow the sequence of actions shown in the following figure:
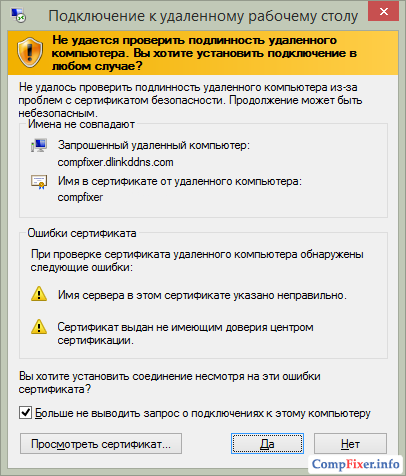
If, when starting a connection, the administrator receives a message that the connected PC does not have a certificate, he should continue the connection procedure by entering an affirmative answer. 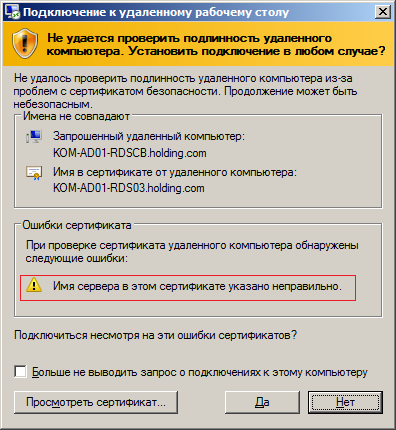
Animation of menus and windows. This allows menus and windows on the remote computer to show animation changes and not appear and disappear suddenly. Composition of the desktop. Show the contents of the window while dragging. As the name suggests, you can see the window as you drag it to change position. If it is inactive, the window will not move with the mouse while we drag it, but we will see that it does an outline of the same thing.
Problems. Allows you to view topics on a remote computer. Raster caching. Cache images and forms for more smooth change graphics. Enable compression. Enables client-server communication using compressed data. Rewrite the computer name. We can change the name of this command here. After configuration, our server will find it in the list of servers.
After all the settings are completed, the connection with the remote PC is established, and its desktop is given to the administrator, he gets full control of this PC. His user cannot access his desktop because it is locked by Windows. There is one drawback to this - he does not see what the administrator is doing. To return control of the computer to yourself, the user needs to unlock the system. To do this, he needs to press Ctrl+Alt+Delete and log into Windows 7 with his username and password.
List of available servers. The Options section uses the configuration when it is already connected to the server. Accept all certificates. Accepts all security certificates from all servers. Auto-connections. Sort connections by name. Screen keyboard. Allows you to choose between showing the keyboard automatically, always keeping it on the screen, or not showing it.
To make this connection you need
Select your phone. Here you select the keyboard layout. Select mouse mode. Here you can change the appearance of the mouse on the screen. Satellite mode is a circle with which we move the cursor to the side, surrounding the circle we have the right button and keyboard icons. Select a volume mode. Allows you to use the volume keys of the device used for connection, such as scroll control, local volume control, or remote control volume.
Managing remote PCs using RAdmin
RAdmin is one of many and probably the best program for remote control of multiple Windows computers. In addition to administering remote PCs via their desktop, it provides file sharing capabilities, Telnet functionality, and much more. Functionally, this program has two components - Server (server part) and Viewer (client part). The first of them must be installed on those computers that need to be administered.
Card gesture. Here we can assign various gestures depicted on the screen so that they are recognized and the action is performed on the server. Clean all connections. Well, this clears all connections. When clicking on the server it will be connected to, if not, it will ask for a user and password.
This requires
Authentication on the server. On-screen keyboard and mouse for interacting with the server. Horizontal server desktop. The application can be downloaded here and is completely free. To do this, we are going to divide the tutorial into 4 parts. Yes, we can do this, but always in the next three rooms.
Setting up the RAdmin server part
After this component is installed, the RAdmin shortcut will appear in the notification area of the taskbar. Setting up remote access is done by clicking on this shortcut, which leads to the appearance of a settings dialog. The following figure shows the sequence of necessary actions (1 – 9) to configure the RAdmin server component:
- You must be in the same domain environment.
- The user used must have administrator rights.
- The firewall on the remote machine must be disabled.
Previous step: disable the firewall. . If you need protection and only require the firewall to be open to the remote desktop and everything else active, you should also run the following command line. It is called the previous step because if the remote machine's firewall is disabled, this step does not need to be performed.
RAdmin Server has the following features:
- Autorun when Windows starts.
- Checking user access rights when connecting.
- Protection of transmitted data via AES protocol.
- Reproducing the actions of a remote user on the monitor screen.
- Work in server mode to provide chat functions (text and voice).
- Ensure image accuracy, including cursor shape and movement, from multiple remote monitors.
- And much more.
Setting up the RAdmin client part
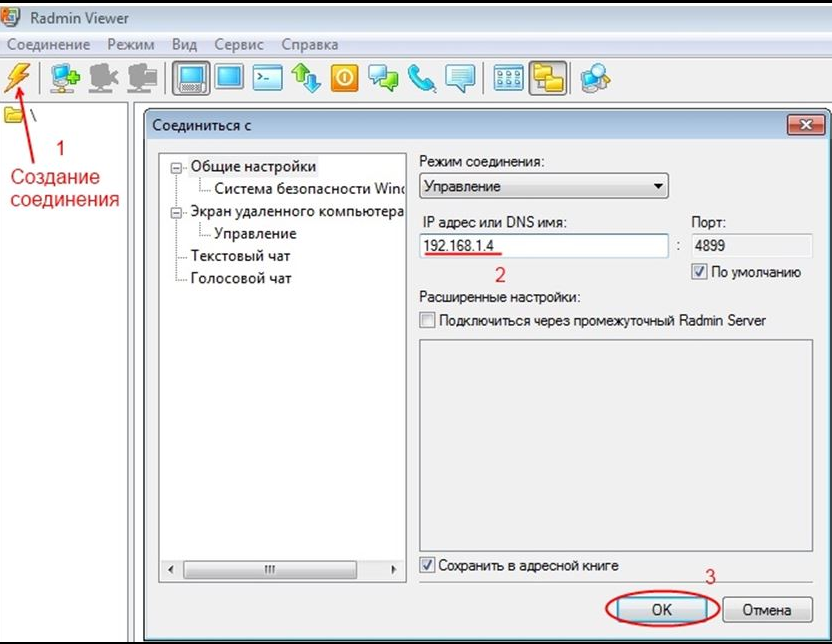
The second component – Viewer – must be installed on the PC from which control is performed. Typically this is a PC system administrator, but this is optional. After starting Viewer, you need to create a new connection, specify the connection mode, set the IP address of the managed computer, the name and password that are specified on the RAdmin server side. The sequence of these actions for the case of a local network is shown in the following figure:
Enter the name of the remote computer and connect. Edit the registry to enable Remote Desktop. . Enter the machine name and connect. Start Remote Desktop Services on the remote computer. . Go back to step 1, find the service and enable it.
At this stage we will be able to connect to the remote desktop. Remember that only with administrator rights can you describe everything. If everything is done correctly but the connection fails, you may have to check your firewall rules to be absolutely sure nothing is being blocked.
After connecting to the managed computer, the administrator has at his disposal the user’s desktop and the ability to work with it as if it were his own. Moreover, everything that he will do is displayed on the connected PC online.
Managing remote PCs over the Internet
If you need to connect a remote computer without being on the same local network, you must connect to it via the Internet. Regardless of the remote desktop management tool you use (built-in Windows method, or the RAdmin program), the process of connecting to such a PC is similar to connecting to a local network, only in this case, instead of the local IP address of the PC, its external address on the Internet must be specified.
How to enable clipboard on remote desktop
Usually this strange error has a simple solution in most cases. If the copy and paste feature stops working, simply follow these steps. Having done this, the copy and paste function should work on the remote machine. This will be handled by the batch file.
If it fails, it will display an error and abort the setup. If you report the error "The remote service cannot be started" to us. We'll have to fix this. This error is given by the application in the configuration because it understands that we do not have administrator rights on the computer and this error is given by bad translation.
The matter becomes somewhat more complicated if the managed computer does not have an external address, since it is connected to a local network, which the managing PC is not a part of. This is a common phenomenon for modern network topologies, when the Internet is connected not to a separate PC, but to a switch to which all other PCs are connected. In this case, they do not have an external IP address, but only internal (local) IP addresses, and from the outside, this network structure has one external address assigned to the switch, which is the “entry point” into it. All of the above is illustrated by the figure below:
The list of administrative users can be seen in the properties of the “Administrators” group. Adding firewall rules is not recommended if. Expand Network → Personal Firewall options and click Rules and Zones. In the Zones and Rules Editor section, click Configure. . Figure 1-2 Click on image to enlarge.
It is used to access a remote computer and can work on it as if you were sitting right in front of you. Their applications are varied. Remote Desktop can also be used on a regular basis by companies where sometimes you have to bring in computers from remote delegations to perform some operations. This patch is required for multiple sessions.
In this configuration, the connection to one of the managed PCs should proceed as follows:
- First you need to connect the switch using its external IP address.
- The switch will then connect to a specific computer using the port number on which it communicates with that PC.
Therefore, the managed computer must be specified by the switch address and port number, separated by a colon.
It is advisable to deactivate the antivirus before extracting and executing the files contained in the compressed folder, since it can be identified as a threat by the nature of its utility, which is a login to the computer from other computers, which by default the antivirus identifies as a threat, after installation, do not forget to activate the antivirus again.
For reference or in case of new updates, this page is the original page where the patch updates are posted. If it doesn't work, check availability new version. Of course, we've all seen ourselves in the same situation; Someone we know has a problem or crash on their computer and after a few calls we ended up at their house to practice "home techs". The travel time is not insignificant, and perhaps our friend's problem comes right at the worst moments, because we go home or work.
TeamViewer program
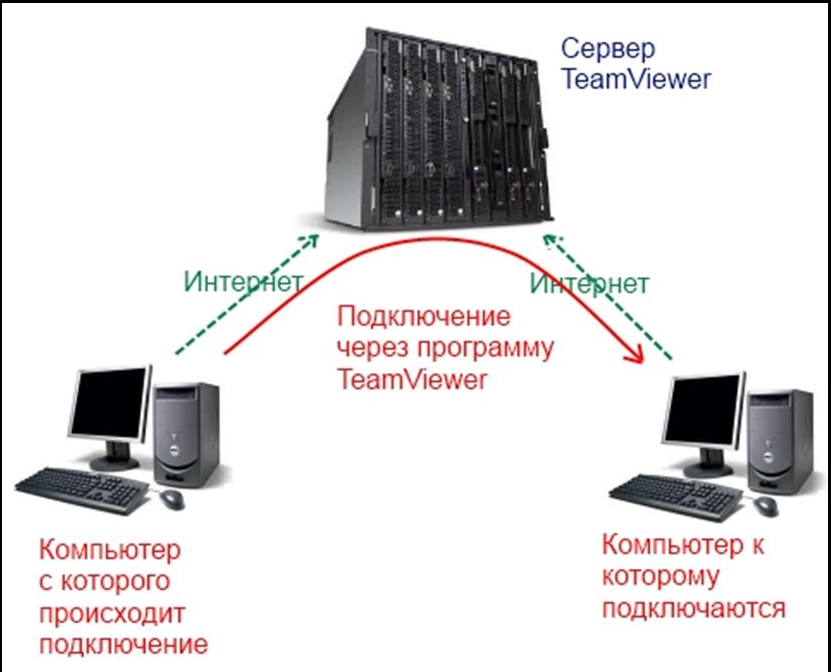
This utility is a way to connect two PCs via the Internet to perform two main tasks:
- Allow one of them to control the other using his desktop.
- Exchange files between them.
The good thing about the program is that it does not require the user to know about the network configuration, and the location of the PC does not play any role. The connection is made through the TeamViewer server, as shown in the following figure:
In fact, although it may seem complicated to some, these types of tools have a very low learning curve and are not at all difficult to set up or use; so we can also use them to control our computer remotely. Depending on the systems we're going to connect to, we'll have to dive between remote desktop tools, console access tools, or, if we're looking for something extremely simple, tools to share our screen with another remote user.
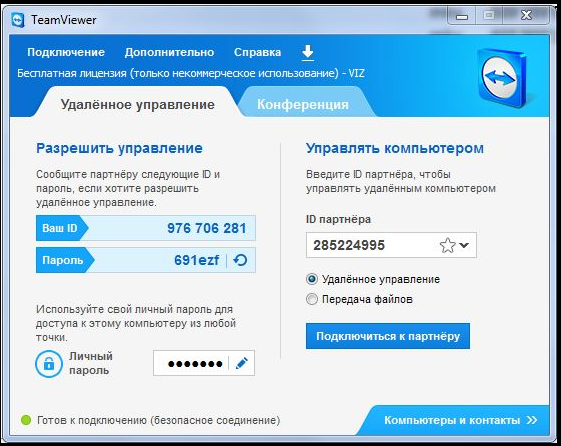
This utility must be installed on both computers being connected. After launching, it displays its main window, which looks like:
Connection setup
When connecting, only two parameters are used: identifier (ID) and password. Users of both PCs tell each other their ID and password. For both of them, in the “Partner ID” field, the ID of the other user must be indicated, that is, its value in the “Your ID” parameter, and the switch is set to “ Remote control" If, for example, user ID1 decides to gain control of a computer with ID2, then he clicks the “Connect to partner” button. His PC searches the Internet for a computer with ID2, and if it finds it, it issues a connection invitation to it. In response to this prompt, user ID2 enters the password set on PC ID1. The password is checked, and if it is correct, the connection is established. As a result, user ID1 is given the contents of the screen of computer ID2 (in particular, his desktop), control completely passes to ID1.
Remote Desktop Tools
To make it easier for you to find best tool that suits your needs, let's take a few minutes to learn about some of the available remote access tools available on the web. Remote desktop tools are very useful for controlling computers without having to sit in front of them. If we have to help someone, control our computer remotely, revise work without having to go through the office, or install an application on the computer without going from our website, these types of tools will work very well and will make our life easier.
In contact with
Common task: setting up remote access to a computer that is connected to the Internet via a router.
Solution: do port forwarding on the router. Port forwarding is also called publication of the port or port forwarding. In English terminology the terms are used Port Forwarding And Port Publishing.
For example, you can use all of your work computer's programs, files, and network resources from your home computer as if you were sitting in front of your computer at work. To have permission to connect, you must be in the user list.
There are two groups
Before starting the connection, it is recommended that you review the name of the computer you are connecting to and check whether Remote Desktop Connection is allowed through the computer's firewall. If your user account does not require a login password, you will need to add a password before you can connect to the remote computer.
What is port forwarding
Port redirection is the mapping of a specific external port of a gateway (router, modem) with the desired port of a target device on the local network (server, workstation, network storage, camera, recorder, etc.)
But which port to forward depends on how you want to access the computer.
How to set up remote access via RDP (remote desktop, terminal)
RDP connections are made to port 3389 of the target computer. What should be done:
Step 1 Allow incoming RDP connections on the computer
Attention! It is possible to make INCOMING connections via Remote Desktop to the following editions of Windows OS:
Windows XP Professional;
Windows 7/8.1 Professional;
Windows 7/8.1 Ultimate;
Windows 7/8.1 Corporate.In Windows XP Starter, Home Edition, in Windows Vista/7/8/8.1 Starter, Home Basic, Home Premium there is no possibility of incoming connections.
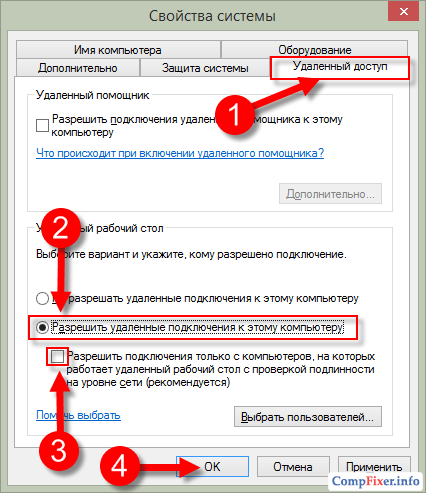
To do this we open Properties of the system(WIN+Break), click on the link Extra options systems:
Go to the tab Remote access, put the switch in position Allow connections to this computer, uncheck Allow connections only from computers running Remote Desktop with network level authentication (recommended) and click OK to apply the setting:
Step 2 Create on computer account, under which the remote desktop user will connect.
Requirement No. 1. This the account must have a password. According to default settings local politics security, accounts Without a password, RDP connection is prohibited. It is not recommended to allow remote access to non-password-protected accounts in security policies. This will create a threat of unauthorized access from intruders.
Requirement No. 2. If the user is NOT an administrator on the local computer, he must be added to the group. This can be done in two ways.
How to allow a user without administrative privileges to connect to a remote desktop
Method one.
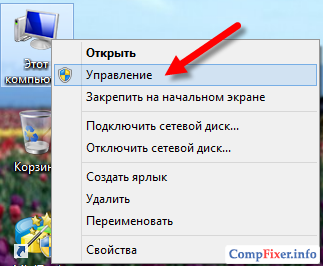
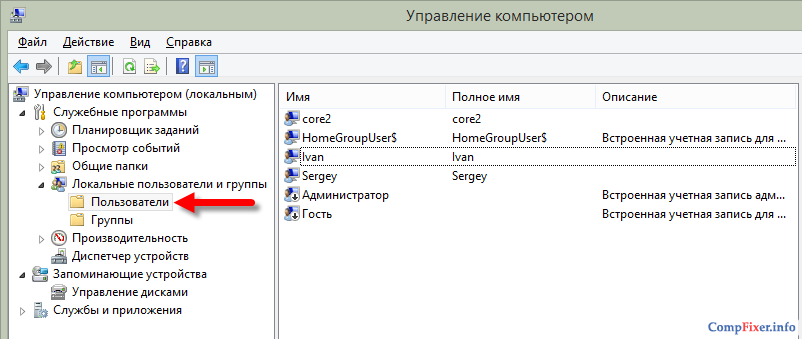
Right click on the system shortcut This computer and select Control:
In the window Computer management select Local users and groups => Users:
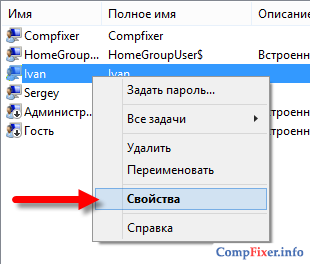
Find in the list the desired user and double-click to call its properties:
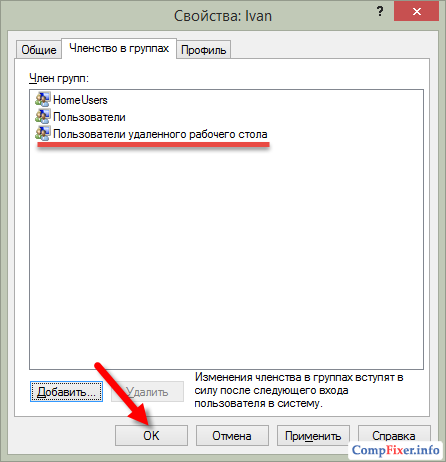
Go to the tab Group Membership and press the button Add:
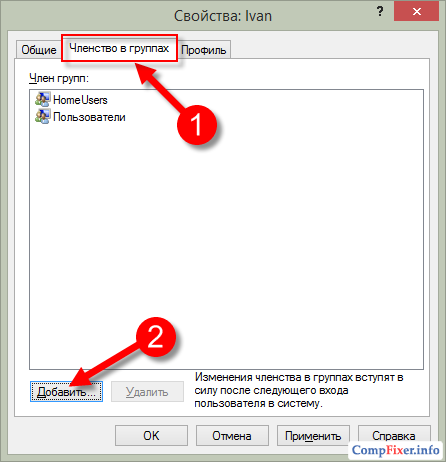
Click the button Additionally:
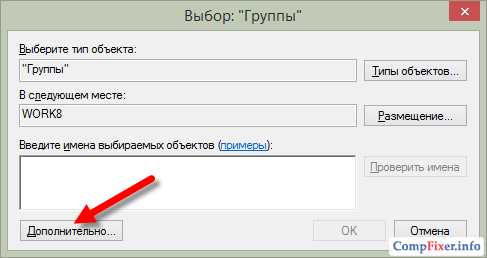
Then, button Search:
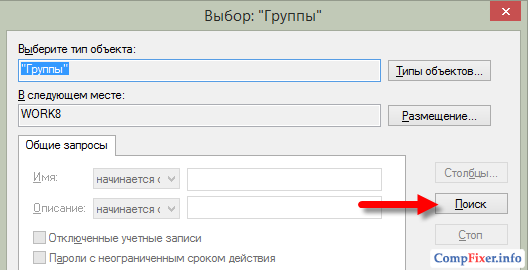
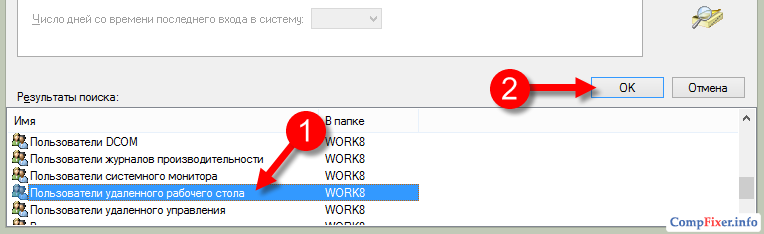
Select a group from the list Remote Desktop Users and press OK:
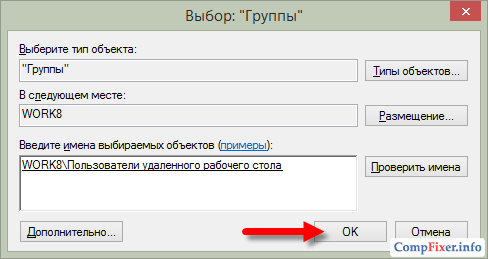
In the windows Group selection And Properties:<пользователь> click OK:
Method two.
Open system properties (Win+Break), click Extra options:
Go to the tab Remote access and press the button Select users:

Click the button Add:
Click Additionally:
And Search:
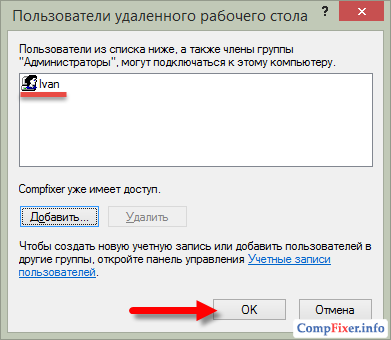
In the list, select the user account to which you want to grant remote access rights and click OK:
Now click OK in the following two windows:
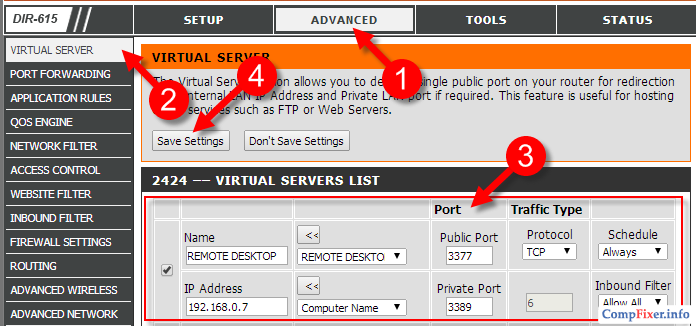
Step 3 Create a forwarding rule on the router, according to which, when a request is made on a given port, the connection will be redirected to port 3389 of the desired computer.
In D-Link routers, the required section may be called Virtual Server, as in D-Link DIR-615:
Also, it may be called Port Forwarding, as, for example, in DIR-300:
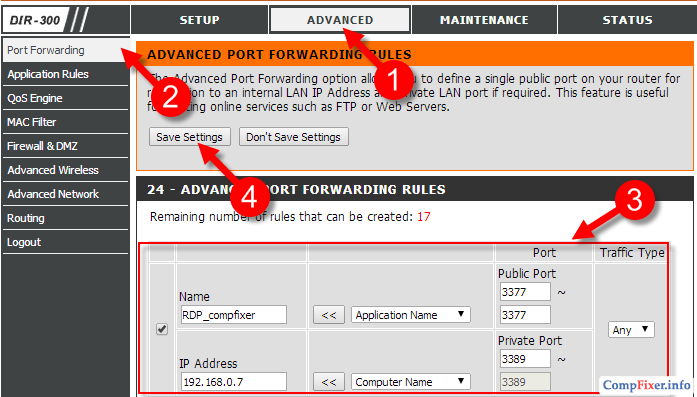
The essence is the same:
- We give an arbitrary name to the rule;
- Open a non-standard port on the router that is not occupied (field Public Port);
- We indicate the IP address of the target computer on the network where the remote user should go (field IP address);
- We indicate the port number through which the application or service runs on the computer. In our case, for the Remote Desktop Server service this is port 3389 (field Private Port).
If your ISP gives your router a dynamic address, you can conveniently use the Dynamic DNS service. D-Link has its own service where you can register an Internet address (i.e. domain) for free and set up access to your router and local network through it.
To configure Dynamic DNS, go to the section MAINTENANCE, select subsection DDNS Settings and click on the link Sign up... to go to the site and register a domain. Then set up synchronization of the domain with the router's IP address in the area DYNAMIC DNS SETTINGS and save the settings with the button Save Settings:
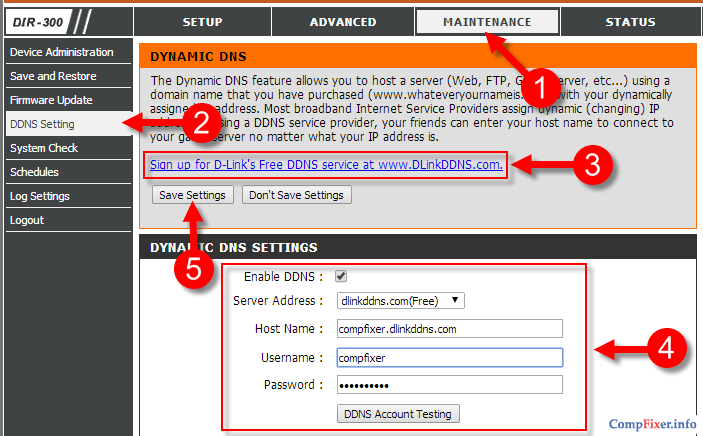
After this, you can connect not by IP address, but by an address like your-adres.dlinkddns.com:port
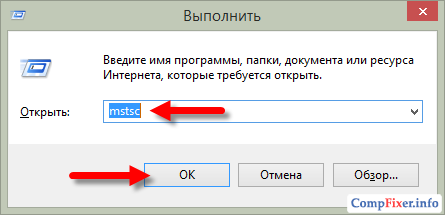
Checking the connection to the computer via remote desktop
Start the Remote Desktop Server client:
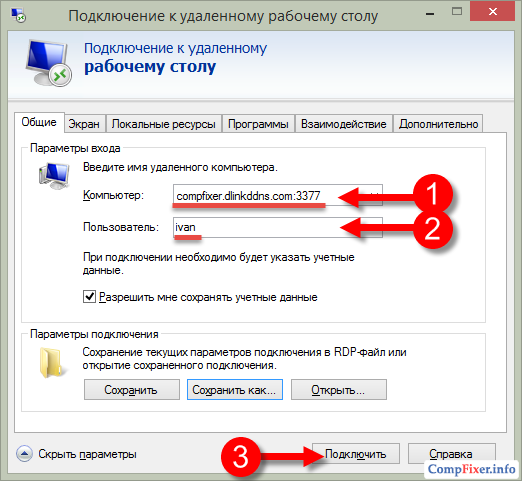
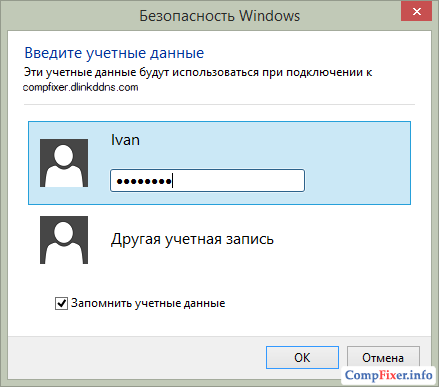
In field Computer Enter the address and port separated by a colon. In field User enter your username and click the button To plug:
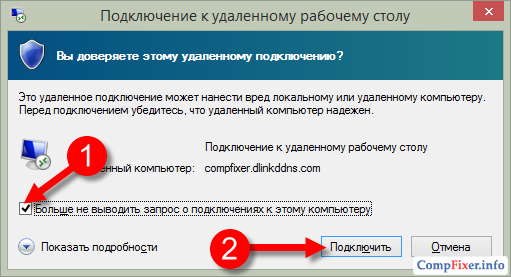
Check the box and click the button To plug:
Now enter the user password, check the box Remember credentials, if you don't want to enter your password every time, and press OK:
After this, a message may appear:
The authenticity of the remote computer cannot be verified. Do you want to connect anyway?Here you can check the box Don't ask for connections to this computer again and press Yes: