Thanks to their mobility and stylish design, as well as good functionality, laptops and netbooks have become very popular. Nowadays, every modern person uses the Internet. Thanks to Wi-Fi technology, taking a book with you to a bar or cafe you can communicate with friends and work colleagues, check your email, read news on the Internet and much more.
Many laptop users are interested in the question: how to turn on WiFi on a laptop. As a rule, in order to turn on Wi-Fi you need to perform a couple of simple operations.
Quickly turn on wifi on a laptop
The combination of keys pressed depends on the specific laptop model. Here are several options for launching a wifi network on popular models.
- On laptops Samsung To turn on wifi, you need to press the Fn and F12 or F9 buttons for a couple of seconds, depending on the model.
- On Aser laptops, turn on by holding the Fn + F3 buttons
- To enable on Asus, you need to press Fn + F2
- On Lenovo, turn on wi-fi by pressing Fn + F5. But there are also models where there is a separate switch with a wireless network design for this.
On different laptop models, from different manufacturers Use your own keyboard shortcut to turn on wi-fi. For more detailed information about the startup scheme, please refer to the user manual for the laptop. All modern laptops have an Fn key. If there is no such button, then there is a separate switch or button to start wifi. And it looks like this:
Did you turn on Wi-Fi using the required key combination or a separate button, but it doesn’t work? This means you need to configure wifi on your laptop.
Checking Wi-Fi Drivers
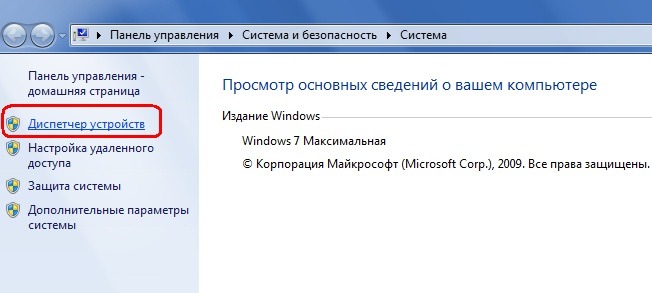
Let's start with the main thing, check the version and availability installed drivers. This is necessary to make sure whether the necessary drivers are available and whether they are enabled. On the desktop, select the icon<<компьютер>> and select the item<<свойства>>. Then in the left column select<<диспетчер устройств>>.
In the window that opens, find the line network adapters. This line should contain our wifi adapter and be signed as a wireless network adapter.

If there is no such line or there is an icon with an exclamation mark on a yellow background, then the driver is either not installed or is not working correctly. We solve the problem by installing them from the disk that came with the laptop. If there is no such disk, then you will have to look for them on the laptop manufacturer’s website.
Turn on the Wi-Fi adapter
We sorted out the drivers by installing the ones necessary for our laptop model. Now you need to start wifi. To do this we do the following: Control Panel > Network and Internet > Network Control Center and shared access > Change adapter settings. Choose Wireless network connection Right-click on it and select Enable from the menu.

If everything was done correctly and wi-fi was turned on, then you will see this icon on your desktop.

Click on the icon, a menu will appear with available wireless networks, which should include yours.

After you click on the name of your network and click Connect, a window like this will appear in which you need to enter the security key - the password for your network. If it is not password protected, the connection will occur automatically.

Problems with connecting to a wireless network from a laptop often arise even for experienced users, and beginners do not even know how to approach the settings. Therefore, we decided to consider this issue in more detail. In the article we will figure it outhow to turn on Wi-Fi on a laptop, and we will provide a connection algorithm for different types operating system. We will also find out what main problems users face and how to solve them.
How to turn on Wi-Fi on a laptop
First of all, let's figure out how to activate the Wi-Fi module on the device. Use without this wireless communication and you won’t be able to configure the connection. Typically, activation depends on the laptop model and varies slightly in each specific case. The process involves certain function keys.
- For an ASUS laptop this is FN+F.
- If your gadget is named Acer or Packard bell, then you need to press FN+F3.
- Gadget from HP includes dedicated WiFi module touch button, indicated by the antenna icon or FN+F12. A number of models from this manufacturer have a simple button with an antenna to activate a wireless connection.
- Lenovo - FN+F5, if there is no dedicated button.
- Samsung - FN+F9 or FN+F12, depending on the model.
We have listed the most common equipment manufacturers. If your laptop was produced by another company, then the required combination can be clarified in the instructions for the gadget or on the company’s website. Usually this is the FN function key, which is found on all modern laptops and an additional one from the F1-F12 series. 
If the power button is dedicated, then you can look for it in a separate block or even at the ends of the case. Usually it is indicated by the corresponding icon associated with the distribution of the signal.
Wi-Fi settings depending on OS
Now let's talk about those inclusion methods that are intra-system. Simply, how to enable a wireless network connection in operating system. We will analyze the two most common ones; by analogy, you can make settings on other versions of Windows.
Windows 10
How to turn on Wi-Fi on a laptop, if everything is in order with the settings, the answer to this question is no less important than enabling the module. So, we bring to your attention a step-by-step algorithm for the tenth version of the operating system.

That's all. As a result, the laptop will connect and you will be provided with Internet access.
Windows 7
We also consider setting up for this version provided that the system is equipped with the necessary drivers and has a network adapter. That is, technically all the nuances have been met and the WiFi module is enabled. 
In the case of this version of the OS, everything is much simpler. You can simply click on the Internet connection icon in the lower right corner and select the desired network from the list of available wireless connections. Enter the password and wait for the connection to activate. That's all.
What to do if you can't connect

Situations often arise in which, when performing the above algorithms, the connection to the network is not achieved. In this case, two options are available:
- WiFi adapter is disabled;
- the necessary drivers are missing.
Don't be afraid. In both cases, the issue is not as terrible as it seems and everything is completely solvable.
Seventh version of the operating system
For the seventh Windows versions The verification algorithm will be as follows.

The absence of an entry or the presence of a yellow sign next to the inscription means there are problems with the drivers for the adapter. In this situation, you will have to reinstall them from the disk provided with the laptop or the manufacturer’s official website. In any case, the process is simple, just download necessary programs and reboot the computer, the system itself will distribute the software to the required location and activate it.
If there is a yellow icon, then click on it and in the menu that opens, click the “Engage” command. Then right-click on the adapter and in the “Properties” section, select “Power Management” and in the option to turn off the adapter in power saving mode, uncheck the box, if any. 
Enable the adapter in “Network Connections”, find the wireless connection here and click “Enable” next to it. At this point, all the problems in Windows 7 that the user can solve on their own have been fixed, and if the problem remains, it means that the problem is a technical issue and it is better to contact a professional.
Tenth version of Windows
If you have “Ten”, then, solving the issuehow to connect Wi-Fi on a laptop, problems with the adapter and drivers should also be ruled out.
If the icon for connecting to Wi-Fi is not found on the taskbar, then the adapter is disabled. To be able to connect to the Internet, the first one must be turned on.

If there is no “Wireless Network” icon at all, then go to the first section of our article and read how to enable WiFi using hardware.
To check the drivers, you need to right-click on an empty space on the taskbar and context menu select the “Options” section. Then in the main section, select “Devices” and go to “Device Manager”. Expand the block " Network adapters» and look for an entry with the word Wireless. If the icon is accompanied by an exclamation mark, it means that the driver is not working correctly and needs to be reinstalled. If after downloading new drivers the problem is not solved, then you should also contact a professional.
24.03.2015
The wi-fi function is the most important element of laptops that is very popular today. A laptop without wifi is like a gas industry without gas.
Usually, when you buy a new laptop, the wifi function is turned off by default or you have to manually configure the wifi settings.
Configuration is carried out differently on different operating systems. There is also external settings which differ according to laptop models (activated using keys).
In this article I will tell you how to enable wifi on different laptops and how to make internal settings.
First of all, you need to configure the router and check whether wifi is turned on on the router itself. There are two ways to enable or disable wifi on your router:
1. On the back of the router there is a wifi button to turn it on and off.
2. Wi-Fi is turned on and off in the internal settings of the router.
We carry out an external inspection of the laptop, if you see an icon in the form of an antenna that lights up, it means that wi-fi is turned on, if it doesn’t light up, it’s turned off.

If you see an “X” on the wi-fi sign at the bottom of the panel, it means that the network is disabled.

Almost all laptop models have a mechanical switch wifi networks or built-in software which turns wifi on and off. Laptop with mechanical wi-fi switches.

How to enable wifi on different laptop models
HP laptop:

HP Connection Manager software.
To open the program, go to “Start” - “all programs” - “HP Connection Manager”. Opening this program Before connecting the device, press the power button. Let's look at the picture

Asus laptop:

On laptops asus switching on Wi-fi is performed using a mechanical switch (on or off button).
In this case, managing wi-fi becomes convenient, but if the switch fails, there will be some problems.
Wi-Fi can also be controlled using the Fn+ F12 key combination on the keyboard, hold down the Fn key and press F12
Acer laptop:

But some Acer laptop models do not have a button on the case to turn Wi-Fi on and off. Therefore, to manage wi-fi connection The Fn+ F12 keyboard is used. You need to press Fn and without releasing press F12.
Lenovo laptop:

To enable wi-fi on lenovo laptops The Fn+ F5 keys are used. Press the Fn key and without releasing it press F5. After performing these steps, the wi-fi indicator on the laptop should light up
Samsung laptop:

To connect a laptop to a wireless wi-fi network, you need to press the Fn+F9 combination on the keyboard. Hold Fn without releasing and press F9. As in all cases, if the connection to the network is successful, the indicator on the laptop will light up.
Toshiba laptop:

To activate wi-fi on Toshiba laptops, use the Fn+F8 key combination. Again, hold down the Fn key and press F8.
Internal wifi setup on a laptop
These settings depend on the operating system, which is configured differently. Basically, all settings are related to wi-fi in sleep mode, i.e. In some cases they must be enabled manually. Let's look at the settings on each Windows operating system. Before starting the settings, check the following parameter.
On the bottom panel on the desktop we look for the battery charging sign. Right-click on this sign and select “windows mobility center.”
In the window that opens, look for the wireless network section and make sure it is turned on.

How to enable wifi on a laptop with windows 7 operating system
Open “Start”, go to “Control Panel”, select “Network and Internet”. In the window that opens, go to “Network and Sharing Center”. Next, on the left side of the window, go to the “change adapter settings” section.

After that, the wireless networks window will open. Right-click on “wireless network connection” and select “enable”

If the network is on, leave everything as it is. If the data section is enabled, the window that opens will contain available wifi points.
Select the desired network and click connect. If at setting up wifi On the router you specified a password, then when you connect to the laptop network, it will ask you for that password, enter the password and press OK.
How to enable wifi on a laptop with windows vista operating system
In order to set up wifi on Windows Vista, you need to follow the same steps as on Windows 7.
Go to “start” and open “control panel”. On the left side, click “switch to classic view.”
Now you need to select “Network and Sharing Center”. On the left side of the window, click “manage network connections.”
Now go to “network and connection management” and right-click on “wireless” network connection" and click "connect".
After completing these actions, a list will open wifi connection. Select the desired connection, click connect, if necessary, enter the password, click OK.
How to enable wifi on a laptop with windows xp operating system
So that the laptop can connect to the wifi network in the operating room windows system xp you need to complete the following steps.
Click “start”, open “control panel”, go to “ network connections" Right-click on the “wireless network connection” section.
Right-click on “connection” and select “view available wireless networks.” A window will open in this window, click on “change order of network preference”.
Next, click on “network and access point” and click on the checkbox “ automatic connection to the network." Now go to the “view available wireless networks” section, select the network you need and click “connect”. If everything is done correctly, a message will appear on the taskbar in the lower corner indicating a completely successful connection to wifi.
If the above settings fail to enable wifi laptop, then you need to check the following parameters.
Installing the wifi adapter driver on a laptop
To check if the driver is working wifi adapter you need to go to “Start” “Control Panel” “System and Security” and click “System”. Next, go to the left side of the window “Device Manager”

In the window that opens, go to the network adapters section. If it's worth yellow triangle with an exclamation mark as in the picture

This means that the driver is not working, to fix this situation Right-click on the non-working driver and select “update driver”.
In the window that opens, select “ automatic update", in the event that you have internet. Or go to the official website of your laptop manufacturer, download drivers in the section required driver.
In practice, there are cases when the wi-fi adapter is disabled. In this case, right-click on the adapter and click “enable”.
There are also cases when the adapter is located under the energy saving filter. To check whether the adapter is under this filter, go to the “control panel” “security system” “system” “device manager” then right-click on the driver itself, click “properties” in the window that opens and go to “power management”

In this window, uncheck “Allow the computer to turn off this device to save energy.”
This solves the question of how to turn on wifi on a laptop. I hope the information was useful to you. If you have any questions, write comments.
Today we can say with confidence that Wi-Fi has become quite firmly entrenched in our lives. Wires that always get tangled underfoot have long become obsolete. Wi-Fi technologies have made our existence much easier, and also allowed us to use the Internet not only at home, but also in cafes, taxis, train stations and other public places. However, enabling such Internet can be difficult for inexperienced users.
How to quickly and easily enable Wi-Fi on an Acer laptop and get excellent speed, we’ll tell you how to connect WiFi on your Acer laptop!
Drivers
For Wi-Fi to work smoothly, you need to make sure that the necessary drivers are installed. If not, then you should just go to the Acer website, where you can find drivers for any model range Acer.
However, you should remember that you must choose drivers specifically for your PC, since Acer laptop manufacturers may use a variety of adapter solutions in their respective models. After the required driver has been downloaded and installed, you must try to turn on the Internet. If suddenly at startup you see an error, then it may be due to the wrong drivers.
If unsuccessful, you can use one of two methods for setting up Wi-Fi. If suddenly after you have set everything up, don’t panic, most problems can be fixed on your own!
First way
Let's look at the first way to enable Wi-Fi on an ACER laptop. First of all, you need to make sure that . To do this, you need to launch Device Manager. Also this information can be obtained by paying attention to the icon on the taskbar, which is located in the lower right corner. 
If there is a need to search for a Wi-Fi access point, then it is best to use the desired button located on the laptop body in close proximity to the keyboard. Pressing it will enable Wi-Fi.
Sometimes, in order to turn on the network if there is no special button in a certain model, you can configure it yourself using hot keys. However, in the best possible way checking adapter operation wireless internet will use the network control center.
In this case, you will need to perform the following steps sequentially:


Second way
Let's also consider the second option, how to connect Wi-Fi on an ACER laptop.
First you need to log in "Device Manager" - You can use the keyboard shortcut Win + R and enter the command devmgmt.msc in the window. Find in item "Network adapters" your device (it should have the word Wireless or WiFi in its name, right click on it and activate it. 
Hello.
Every modern laptop is equipped with a wireless adapter Wi-Fi networks. Therefore, there are always a lot of questions from users regarding how to enable and configure it :)
In this article I would like to dwell on such a (seemingly) simple point as turning on (off) Wi-Fi. In this article I will try to consider all the most popular reasons why some difficulties may arise when trying to turn on and configure a Wi-Fi network. And so, let's go...
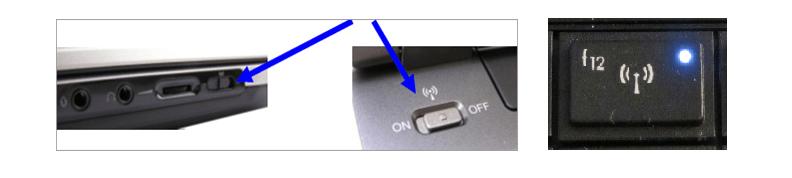
1) Turn on Wi-Fi using the buttons on the case (keyboard)
Most laptops have function keys: for turning on and off various adapters, adjusting sound, brightness, etc. To use them, you need to: press the buttons Fn+F3(for example, on Acer laptop Aspire E15 - this is the inclusion of a Wi-Fi network, see fig. 1). Pay attention to the icon on the F3 key (Wi-Fi network icon) - the fact is that on different laptop models, the keys may be different (for example, on ASUS most often Fn+F2, on Samsung Fn+F9 or Fn+F12) .
Rice. 1. Acer Aspire E15: buttons to turn on Wi-Fi
Some laptop models are equipped with special buttons on the device body to enable (disable) the Wi-Fi network. This is the easiest way to quickly turn on the Wi-Fi adapter and access the network (see Figure 2).
Rice. 2. HP NC4010 laptop
By the way, most laptops also have an LED indicator that signals whether the Wi-Fi adapter is working.
Rice. 3. LED on the device body - Wi-Fi is on!
From my own experience, I will say that turning on the Wi-Fi adapter using the function buttons on the device body, as a rule, does not cause problems (even for those who have used a laptop for the first time). Therefore, I think there is no point in dwelling on this point in more detail...
2) Enable Wi-Fi in Windows (on Windows example 10)
The Wi-Fi adapter can also be turned off software in Windows. Turning it on is quite simple, let's look at one of the ways to do this.
First you need to open the control panel at the following address: Control Panel\Network and Internet\Network and Sharing Center access(see Fig. 4). Next, click the link on the left - “ Change adapter settings«.
Among the adapters that appear, look for the one whose name will be “ Wireless network"(or the word Wireless) - this is the Wi-Fi adapter (if you don’t have such an adapter, then read paragraph 3 of this article, see below).
There may be 2 cases waiting for you here: the adapter will be turned off, its icon will be gray (colorless, see Figure 5); the second case - the adapter will be colored, but a red cross will light up on it (see Figure 6).
Case 1
If the adapter is colorless (gray), right-click on it and in the context menu that appears, select the enable option. You will then see either a working network or a colored icon with a red cross (as in case 2, see below).
Case 2
The adapter is turned on, but the Wi-Fi network is turned off...
This can happen when, for example, “airplane mode” is turned on, or the adapter was turned off in additional mode. parameters. To enable the network, simply right-click on the wireless network icon and select the option " connection/disconnection"(see Fig. 6).
Next in the pop-up window - enable wireless network(see Fig. 7). After turning it on, you should see a list of available Wi-Fi networks to connect to (among them, for sure, will be the one you plan to connect to).
By the way, if everything is in order: the Wi-Fi adapter is turned on, there are no problems in Windows - then in the control panel, if you hover the mouse over the Wi-Fi network icon, you should see the inscription “ Not connected: yes available connections "(as in Fig. 8).
I also have a small note on my blog about what to do when you see a message like this:
Rice. 8. You can choose a Wi-Fi network to connect to
3) Are the drivers installed (and are there any problems with them)?
Often the reason why a Wi-Fi adapter does not work is due to the lack of drivers (sometimes the built-in drivers in Windows cannot be installed, or the drivers were “accidentally” deleted by the user).
First, I recommend opening device Manager: to do this, open the panel Windows management, then open the section " Equipment and sound"(see Fig. 9) - in this section you can open the device manager.
Next, in the device manager, look to see if there are any devices next to which the yellow (red) light is on. Exclamation point. This is especially true for devices whose names contain the word “ Wireless (or wireless, Network, etc., for example, see Figure 10)«.
Rice. 10. No driver for Wi-Fi adapter
If this is the case, you need to install (update) the drivers for Wi-Fi. In order not to repeat myself, here I will give a couple of links to my previous articles, where this issue was disassembled “in its bones”:
Programs for auto-updating all drivers in Windows:
I turned on Wi-Fi on my laptop, but there is still no Internet access...
After the adapter on the laptop is turned on and working, you need to connect to your Wi-Fi network (knowing its name and password). If you don’t have this data, most likely you haven’t configured your Wi-Fi router(or another device that will distribute the Wi-Fi network).
Given the wide variety of router models, it is hardly possible to describe the settings in one article (even the most popular ones). Therefore, you can read the section on my blog on setting different models routers at this address: (or third-party resources that are dedicated to specific model your router).
With this, I consider the topic of enabling Wi-Fi on a laptop to be covered. Questions and especially additions on the topic of the article are welcome :)
Since this is a New Year's article, I want to wish everyone all the best in the coming year, so that everything you have wished or planned will come true. Happy New Year 2016!


