The development of digital technologies does not stand still, and software, as well as the operating system, is no exception. So, today the most modern OS is Windows 8, which is even more convenient to use. However, due to some changes, many users are asking the question, how to enable the WiFi module on a laptop with Windows 8?
In fact, everything is extremely simple. And now we will analyze in detail the process of turning on the adapter and connecting to WiFi networks in Windows 8. It is worth noting that this operating system is not much different from previous version Windows (the so-called seven). The only differences are in the design of the interface and changes in some services. The setup of both systems is identical.
At the same time, the launch of funds WiFi settings Networking in Windows 8 is now even more convenient and simpler compared to previous versions of the OS.
In addition, the function of turning on and off the Wi-Fi adapter has been added, without the need to launch the task manager or perform other operations. Moreover, now enable the module wireless communication can be done with one click of the mouse.
How to enable WiFi adapter on a laptop with Windows 8: Video
How to turn on the wireless adapter
It is worth noting that the Wi-Fi module can be turned off in different states:
- Hardware condition.
- Software enablement.
In order to perform a hardware activation, you just need to press the “Fn” key combination and the Wi-Fi enable button (it is designated as a radio icon) as in the picture. In other words, hold down “Fn” and, without releasing it, press the key to turn on the WiFi module. As a rule, it is located on the “F2” or “F5” button, but on different models laptops it can be on different keys. In addition, there are computers in which the button to turn on the wireless adapter is located separately. In this case, you just need to press it.
If for some reason the Wi-Fi enable buttons on the keyboard do not work, then you can turn on the adapter as follows. In the tray, click on the WiFi icon (or network connection) as in the photo.
A pop-up window will appear allowing you to enable or disable the wireless adapter. This completes the hardware enablement of the WiFi module in Windows 8. If the laptop does not automatically start searching available connections, then you should enable the adapter software.
How to enable WiFi adapter on a laptop: Video
Software activation of the wireless module
How to programmatically enable the WiFi module on Windows 8? To do this, you need to launch the control panel. This is done as follows. This is done by simply pressing the Windows + X key combination. After this, a menu will appear in which we can simply find and open the service we need.
Next you need to launch the “Network and Internet” item. In the window that appears, you need to find and launch “Network and Sharing Center”. The main window will open, in which you can make various connections, create private groups, as well as manage adapter settings and configure file sharing.
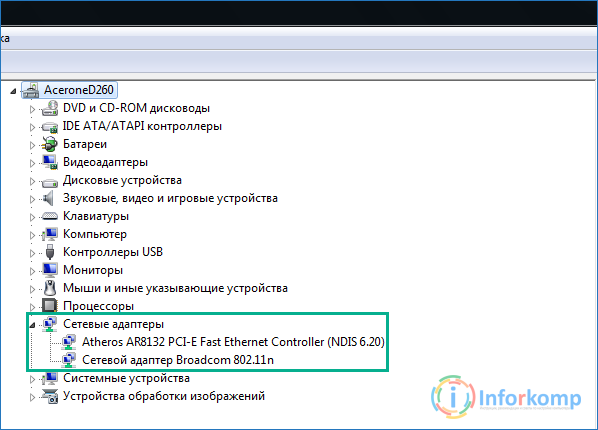
Here you need to go to the “Change adapter settings” item. In the window that appears, you need to find a shortcut called “Wireless network connection" If it is gray (as in the picture), then you should use it.
To do this, right-click on the shortcut and select “Enable”. After this, the Wi-Fi module will automatically start searching for available connections and offer you a list from which you need to find and select the required network.
Articles on the topic
There is another way to launch the Connection Control Center. To do this, you need to move your mouse cursor to the right top corner, and a pop-up menu will appear. Here you will see different items, among which there will be “Search” - click on it. In the search bar you should enter “Network and Sharing Center” shared access" The program will find the desired service, and you just have to launch it by clicking the left mouse button. Then everything is done as described above.
Without question, it is clear that you cannot enable Wifi on your HP 620, 4535, 655, Pavilion g6, dv6, g7, dv7, g62, g series, p157nr, Probook 4525s, 4530s, 4520s or any other laptop.
Don’t worry, regardless of the OS: windows 7 or windows 8 – we’ll quickly solve this problem.
What you need to do to enable wifi on your hp pavilion or probook laptop.
The first thing, and at the same time the most important thing, is to make sure that you have the wifi driver installed.
How to check? You can either use the method described below.
How to check if the wifi driver is installed in an HP laptop
Open and click on the left side on the set of words: “Changing adapter settings.”
If you see that you have the “Wireless Network Connection” adapter displayed (as in the picture below), and also 5 green stripes, that will be great. If it’s gray, right-click on it and click on the “enable” line.
If you don’t see a Wi-Fi adapter there, then download the Wi-Fi driver specifically for your HP laptop model.
Turning on wifi on hp laptops using keys and keys on the keyboard
Manufacturers very often install special buttons on laptops, in particular HP, to turn the wifi interface on and off.
On older models, look for a button with an antenna icon above the keyboard, then press and hold it. In the new ones, this button is below the keyboard and also on the left side.
If you don’t find it, carefully inspect the keyboard to see if there is a key with an antenna icon on it.
If you find it, then hold down the fn key and press it until Wi-Fi turns on.
In general, there may be many more reasons why wifi will not turn on than described above - it may be disabled in the BIOS, the module itself may fail, something with services, and so on, but this is another topic. Good luck.
How to turn on WI-FI on Lenovo laptops? A topic that I am sure will interest most owners of laptops from this manufacturer. I would like to immediately emphasize that all the information presented below is for the most part intended for all modern models from Lenovo. But, despite this, owners of laptops from other manufacturers can also learn a lot useful information in this article.
From the title and the first paragraph, you can easily understand that the article has a narrow focus, that is, it is specially prepared for users with Lenovo laptops. This is connected with one case when different users brought me three laptops from Lenovo, asking me to look at why WiFi was not working.
This, of course, did not happen in one day, but every other day for sure. In general, along the way I found several interesting features due to which Wi-fi may not work on Lenovo or will turn on only after performing certain actions.
Below I will provide information on how to enable Wi-Fi on Lenovo laptops in various situations, based on my personal experience when working and setting up computers from this manufacturer.
What to do if Wi-Fi does not work on Lenovo laptops
Of course, I understand that there are a lot of situations and reasons why a wireless network may not work. But, if you are one hundred percent sure that everything is ok with the router, then the cause of the malfunction is probably hidden, unrelatedly, in the laptop.
Therefore, I will describe several main points for turning on the network adapter, after which you will either have access to the Internet, or, based on the data received, you will be able to move forward, for example, by starting to check the network settings.
Enabling the wireless adapter
Checking the installed driver
Before further configuration, be sure to check whether you have installed the driver for the Wi-Fi adapter.
You can download the driver on the Lenovo website, in the support section. The easiest way to find the page you need is to type the following phrase into a search engine: “ Lenovo z50 driver"substituting, of course, your model instead of the z50.
As for the installation, everything is simple and familiar, run Setup, wait a few seconds and reboot the computer.
Turning on Wi-Fi onLenovo using monitor cover
In general, it turned out that the two laptops that came to me turned out to be the same model, namely Lenovo z50. The problem was that when the system loaded, the adapter did not turn on automatically, and when you pressed the key combination responsible for turning it on, the computer did not react at all.
But, as soon as you close the monitor lid for a few seconds, then after opening the wireless adapter will turn on and begin searching available networks, which is quite surprising.

In general, this feature worked on both laptops in such a way that I recommend using at least this connection method first to configure it further.
The algorithm is simple: close the laptop lid, wait a few seconds, and open it. Voila - the Internet is working. I know for sure that this option works on many laptop models from Lenovo.
Launch automatic switching on wireless adapter
Another option for turning on the adapter is the function keys on the keyboard, which I mentioned above. Usually they are located on F1–F12 and are displayed in the form of various icons, and are used only in combination with another key “ Fn».
I’ll also immediately note that in newer models, more and more manufacturers are swapping these buttons, as a result of which F1-F12 works only when “Fn” is pressed, while the function keys, on the contrary, act as regular keys.
How it soared, for turning on Wi-Fi adapter answer F5,F6,F7. To make it easier to determine the required button, you can look at the icon that is applied to it. Usually this is a Wi-Fi antenna or an airplane (Mode: on an airplane). For example, in the z50 I remember exactly that this is the F6 key and there is an airplane on it.

In general, after clicking, for example, on “ FN+F6" or simply " F6", an icon should appear on the screen confirming that network adapter was on. Well, if nothing happens, then most likely you do not have the necessary package installed with software, which uses these keys.
Installing Lenovo Energy Management
So, if your function keys do not work or only some of them work, then most likely you do not have the Lenovo Energy Management.
The fact is that Wi-Fi may simply not work for you because the adapter is turned off, but you can turn it on only using the function keys, which in turn only work after you install this utility.
You can download it at the office. Lenovo website, for any Windows versions. After you install it, I recommend restarting your computer and try using the adapter's power key. If everything is ok, a small menu will appear on the screen in which you can enable or disable Wi-Fi and bluetooth.
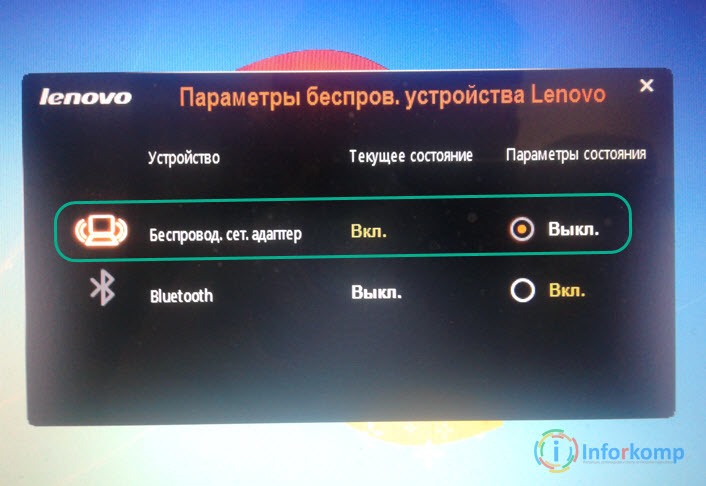
In our case, we need to set the value opposite the wireless network to “ On”, respectively, selecting it with the mouse. After this, the adapter should turn on and start searching for available wireless network. In addition, now you do not have to manually launch each time you boot operating system, since it will do this automatically.
Also, if the necessary keys do not work, it would be advisable to check or even install a driver on the keyboard by downloading it from the Lenovo support page.
InclusionWIFI on Lenovo using a button
In addition to the method of turning on the wireless adapter using the keyboard, some models may have a separate special button or switch on the case that is solely responsible for launching Wi-Fi on the laptop.
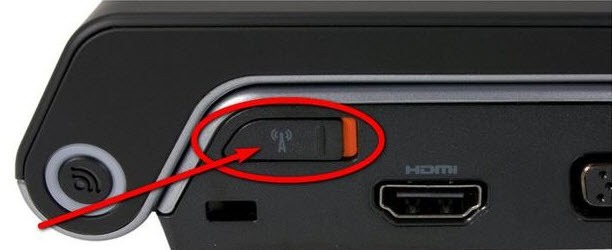
It is usually located on one of the side edges of the body of your laptop or near the power button, the special features by which it can be recognized are still the same; it most likely displays an icon in the form of small antennas.
Power Saving Mode
Power saving mode, which is enabled by default in device properties, may also be the cause incorrect operation wireless connection or turning it off altogether. You can remove this function by going to the network adapter settings.
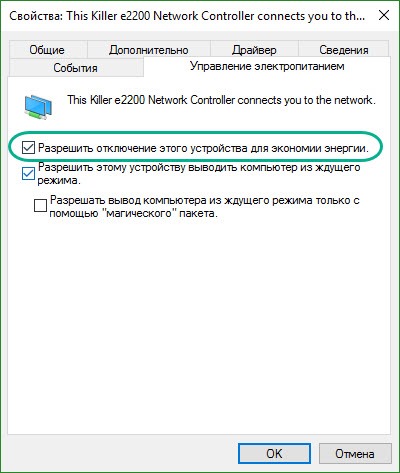
Afterwards, do not forget to restart the laptop and check whether something worked or not.
Is the WI-FI adapter connected to the motherboard?
Well, and finally, if nothing helps you, I can recommend checking whether the antennas are connected to the adapter, directly on the motherboard itself.
I once had a case where for some reason Wi-Fi did not work on a completely new laptop, while the drivers were installed and the device was turned on. But he didn’t see any network, except in cases where it was distributed using a smartphone. Ito, he connected to it, but there was still no access to the Internet.
Having tried everything, I decided to check if everything was fine with the connection under the cover by unscrewing it. As it turned out, the antennas were simply not connected to the adapter itself, although the laptop was new, there is a possibility, of course, that they fell off, or they simply forgot to connect them.
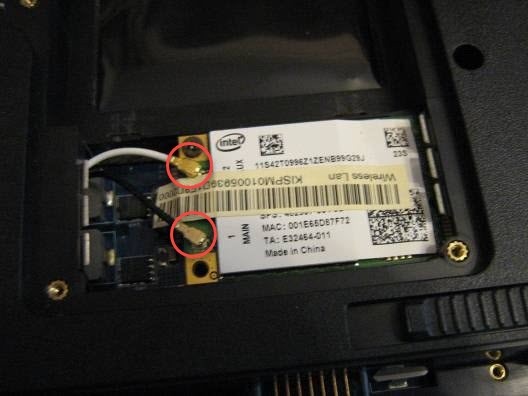
Basically, after I connected them. Everything fell into place and Wi-Fi worked normally.
Here is some of what, in my practice, helped me enable Wi-Fi on Lenovo laptops, perhaps some of it will be useful for you. In general, as always, I look forward to your comments and wish you good luck in setting up your computers.


