In this article we will look at the most common tasks associated with local Windows user accounts, namely we:
- Let's create a local user account.[ Three universal ways 2 in GUI, 1 in CMD]
- Let's consider changing/setting the password for a local account.
- Let's add the user to the group. [In general, you may need to add the user to any other Administrators group as a local administrator]
Also, along the way, we will consider options that are not so important, but come to our attention.
All material presented in this article was tested on Windows 10 and Windows Server 2016 .
Working with a local account in Windows 1. - Working in "Local users and groups"", follow the steps -> Go to "Run"[Win+R] -> Enter - lusrmgr.msc -> Click "OK".(Fig.1.1)
Fig.1.1 - Run - lusrmgr.msc
1.1. - Create a local accountA window will open - "".(Fig.1.2)
In the middle we see a list of users existing in the system.
In order to create a local user, on the left, right-click on the "Users" section and select "" from the drop-down menu.
 Fig.1.2 - Local users and groups.
 A window will open - "".(Fig.1.3)
The standard procedure for adding a user... we enter what we want... in my case, I create a user with the name - firstdeer.
- User: firstdeer
- Full name: firstdeer
- Description: may not be entered.[ ]
- Password: By default, the minimum password length is 0 characters [in both Windows 10 and Windows Server 2016], so you don't have to enter a password if necessary. [What is not recommended when working with Windows Server 2016...security is everything...]
Pay attention to the checkbox - “Require a password change the next time you log in”, by default it is turned on, if you are creating a user for yourself, then for convenience it would be better to turn it off. If you uncheck this box, the following checkboxes will become active:
- The password validity period is unlimited. [By default, the password validity period is 42 days, if necessary, it can be changed in group policies]
Also pay attention to the checkbox - “Disable account". - An account existing in the system can be disabled; if it is disabled, then it will not be possible to log in to the system using it. [For example, in Windows 10, standard accounts are disabled by default - “Administrator” and “Guest”]
After entering all the data -> Click - “Create” -> all entered information will disappear -> click “Close”.
 Fig.1.3 - New user.
 That's it, your account has been created, you can log in to the system using it.
1.2. - Change/Set account passwordAttention!!! This method of changing the password should only be used if the user has forgotten his password and there is no disk with the password archive
In order to Change/Set a user account password, you need to find in the list of users the desired user-> Right-click on it -> Select the item from the drop-down menu "Set password". (Fig. 1.4)
delete account [Selecting "Delete"]
 Fig.1.4 - Local users and groups.
 A warning ↓ will open (Fig. 1.5):
Resetting your password may result in permanent loss of information for that user account. For security purposes, Windows protects some information by preventing access to it when you reset the user's password.
This command should only be used if the user has forgotten their password and there is no disk with the password archive. If there is such a disk, then you should use it to set a new password.
If the user knows the password and wants to change it, press CTRL+ALT+DELETE and click the "Change Password" button.
Click "Continue".
 Fig.1.5 - Setting a password for the user.
 In the next window, Enter and Confirm a new password, and also pay attention to the warning (Fig. 1.6):
A little about password complexity, for general development.
Password complexity is adjustable group policy- “The password must meet complexity requirements”, by default this policy is disabled in Windows 10, and enabled in Windows Server 2016, so in Windows 10 you can set any password, but in Windows Server 2016 you will have to come up with a password that is at least 6 characters long, not containing the user account name or parts of the full user name longer than two adjacent characters, as well as containing characters from three of the four categories listed below:
- Latin capital letters [A to Z]
- Latin small letters [a to z]
- Numbers [0 to 9]
- Characters other than letters and numbers [for example, !, $, #, %]
It’s strange that when creating a local user, the system does not look for the presence group policy, and when changing the password for an existing user it looks...
If you click the "OK" button, the following will happen:
This account will immediately lose access to all of its encrypted files, saved passwords, and personal security certificates.
Click "OK".
 Fig.1.6 - Setting a password for the user.
 All! Password has been changed!
1.3. - Adding a user to the "Administrators" groupto any other group, but we will consider adding the user to the "Administrators" group, thereby making our user a local administrator."
Let's get started.
In the window - "", we see our newly created user. (Fig. 1.7)
Right-click on the user -> go to “Properties”.
 Fig.1.7 - Local users and groups.
 In the "Properties" window, on the "General" tab, you can edit the data of an existing user, such as "Full name" and "Description".(Fig.1.8)
You can also check the following boxes if necessary:
- Require a password change the next time you log in.
- Prevent the user from changing the password.
- The password has no expiration date.
- Disable account.
We have already discussed this in the previous paragraph...
 Fig.1.8 - Properties - General.
 Go to the "Group Membership" tab.(Fig.1.9)
If you need to make your user a local administrator, then here you need to add him to the "Administrators" group.
Click - "Add".
 Fig.1.9 - Properties - Group membership.
  Fig.1.10 - Select: Groups.
 -> Click "Search" -> see a list of all local groups -> Select "Administrators" -> Click "OK". (Fig. 1.11)
 Fig.1.11 - Select: Groups.
 Here also - Click "OK". (Fig. 1.12)
 Fig.1.12 - Select: Groups.
 In order for the “Group Membership” changes to take effect, you need to re-login to the system.
1.4. - Roamable accountIn the "Properties" window on the "Profile" tab, you can create a roaming account. (Fig. 1.13)
Let's say we have a file server [Shared folder] with an IP address - 10.0.0.25 profile and the user's home folder - firstdeer was stored on this server.
- Profile path to which is \\10.0.0.25\Users\firstdeer
- The home directory is the path to which -
[Personally, I tested with existing folders on the server.]
There is nothing complicated here, just insert the paths and click “OK”.
 Fig.1.13 - Roamable account.
 This is where we finish with the ""[lusrmgr.msc] snap-in.
2. - Working in "User Accounts"In order to open the “User Accounts” snap-in, follow these steps -> Go to “Run” -> Enter - control userpasswords2 -> Click “OK”.(Fig.2.1)
 Fig.2.1 - Run - control userpasswords2 2.1. - Create a local account
 The window “User Accounts” will open. (Fig. 2.2)
To add a new local user, click the "Add" button.
Also note that here you can delete an account [by selecting the account and clicking -> “Delete”], we don’t need this now, but just keep it in mind.
 Fig.2.2 - User accounts.
 A window will open - "Add user".(Fig.2.3)
The standard procedure for adding a user... enter what we want... and click "Next".
 Fig.2.3 - Adding a user.
 In the next window, simply click “Finish”.(Fig.2.4)
 Fig.2.4 - Adding a user.
 Now in the “User Accounts” window, our newly created account will appear, with the help of which you can already log in to the system.
2.2. - Change/Create account passwordIn "User Accounts", if necessary, you can change/create a user password.
Select the user -> Click "Change password".(Fig.2.5)
 Fig.2.5 - User accounts - Change password.
 In the window that opens - “Change password”, enter and confirm the new user password -> Click “OK”. (Fig.2.6)
 Fig.2.6 - Enter and confirm the password. 2.3. - Adding a user to the "Administrators" group
 As stated at the beginning of the article - "...you may need to add the user to any other group, but we will consider adding the user to the Administrators group, thereby making our user a local administrator."
Let's get started.
Select the user -> Go to "Properties".(Fig.2.7)
 Fig.2.7 - User accounts - Properties.
 In the properties on the "General" tab (Fig.2.8) we can change:
- Username: firstdeer
- Full name: firstdeer
- Description: you don’t have to enter it. [It is only needed in order not to get confused in the huge list of accounts]
 Fig.2.8 - User properties - General.
 In the properties on the "Group Membership" tab, you can specify the level of access granted to this user. [Add user to group] (Fig. 2.9)
Make him a regular User, PC Administrator, or specify a different access level [Guests, Remote Desktop Users...]
As we remember, we were going to make our user a local administrator, so we have two options:
- or switch the radio button to - "Administrator"
- or switch to - "Other" and select the group you need, in our case - "Administrators"
And click "OK".
 Fig.2.9 - User properties - Group membership.
 In order for the “Group Membership” changes to take effect, you need to re-login to the system.
This is where we finish with “User Accounts”[control userpasswords2].
Working with a local account in WindowsFirst, we need to run the command line with administrator rights, to do this, follow the steps -> Go to "Run" -> Enter - cmd -> Press the key combination "CTRL" + "SHIFT" + "ENTER" on the keyboard. All! Let's get started.
3. - NET USER commandHere we will consider working only with local accounts.
The net user command is designed to manage user accounts. To display complete help, use the command:
Net user /help
The syntax for this command is:
net user [USER [password | * ] [options]]
net user USER (password | * ) /ADD [options]
net user USER
net user USER
net user USER
3.1. - Displaying a list of existing accounts in the systemIn order to view the list of user accounts existing in the system, you need to enter the command - net user without parameters (Fig. 3.1):
Net user  Fig.3.1 - Command output - net user.
As you can see, there are three accounts in my system:
- DefaultAccount
- Administrator
- Guest
/add - To create a user account without a password, use the command:
Net user USER /add
To create a user account with a password:
Net user USER PASSWORD /add
If necessary, you can add the parameters described in the next paragraph to the command.
The command might look something like this: [immediately specifying the full name, description, time to log in and prohibiting the user from changing the password]:
Net user USER PASSWORD /add /fullname: "FULL_NAME" /comment:"DESCRIPTION" /times:Mon-Fri,09:00-18:00 /passwordchg:no
In my case, I create a user - firstdeer, with a password - pa$$w0rd. (Fig.3.2):
Net user firstdeer pa$$w0rd /add  Fig.3.2 - Creating a user account with a password on the command line.
/del - Delete a user account:
Net user USER /del
3.3. - Changing accountsTo change settings in your account, use the command:
Net user USER PARAMETER1 PARAMETER2 ... PARAMETER5
Here is a description of the parameters, and the commands for copy-paste:
/fullname:"FULL_NAME" - Add full name:
Net user USER /fullname: "FULL_NAME"
/comment:"DESCRIPTION" - Add account description:
Net user USER /comment: "DESCRIPTION"
/expires:( never | DATE ) - Specify the validity period of the scientific record:
The never value means unlimited validity period.
Net user USER /expires:never
The DATE value is an indication of the date until which the account will be active. The date is indicated in the format DD.MM.YY. The year can be indicated with four [ 2019] or two [ 19] digits. Date elements are separated by a dot[ .] or slash [ /] without spaces.
Net user USER /expires: DD.MM.YY
/passwordchg:( yes | no ) - Allow / Deny the user to change their password.
Allow the user to change their password [default - allowed]:
Net user USER /passwordchg: yes
Prevent a user from changing their password:
Net user USER /passwordchg: no
/passwordreq:( yes | no ) - The user account should / Should not have a password [ As a result of my testing... in short, this option does not work... The user is not prompted to set a password if there is none, and if there is one, then the user can remove it]:
The user account must have a password:
Net user USER /passwordreq: yes
The user account must not have a password:
Net user USER /passwordreq: no
/countrycode:NNN - Specify the country code for the operating system. [Specifies the language files of which country should be used when displaying user help and error messages]:
I still don’t understand how this parameter works. I tried to specify a bunch of different codes and always received an error in response - "... an invalid value was entered." What code do I need to enter? I don’t know... please tell me in the comments.
The value 000 is the default country code.
The NNN value is the country code you want to specify.
Net user USER /countrycode:NNN
/active:( no | yes ) - Disable / Enable account. By default, the newly created account is active[Enabled].
You can turn it off [make it inactive] with the command:
Net user USER /active: no
Enable[make active]:
Net user USER /active: yes
/times:( all | TIME ) - Specifies the time for the user to log in to the system.
The all value means no time limit for logging into the system.
Net user USER /times: all
TIME value - Indication of time, you will understand in more detail how time is indicated in the examples below ↓
Example 1: Let's allow the user to log in only from Monday to Friday, from 9 am to 6 pm:
Net user USER /times:Mon-Fri,09:00-18:00
Example 2: Let's allow the user to log in only on Monday and Thursday, from 9 am to 6 pm:
Net user USER /times:Mon,Thu,09:00-18:00
You can specify a different time period for each day, then the entries [ Day, Time_period; Day,Time_period] will have to be separated by a semicolon[;]
Example 3: Let's allow the user to log in only on Monday - from 9 am to 6 pm, and on Thursday from 12 noon to 9 pm:
Net user USER /times:Mon,09:00-18:00;Thu,12:00-21:00
Two parameters:
/homedir:"PATH" - Specifies the path to the user's home directory.
/profilepath:"PATH" - Specifies the path to the user's login profile.
3.4. - View account propertiesTo view account properties, use the command:
Net user USER
In my case, I look at the properties of the user - firstdeer (Fig. 3.3):
Net user firstdeer  Fig.3.3 - Viewing account properties.
To change or set the user account password, use the command (Fig. 3.4):
Net user USER *
In my case, I change the password for the user - firstdeer. (Fig. 3.3):
Net user firstdeer *  Fig.3.4 - Changing the account password.
Let's say we have a file server [Shared folder] with an IP address - 10.0.0.25, and we need to make sure that the profile and home folder of the user - firstdeer - are stored on this server.
- The profile will be stored in a folder on the server, the full path to which is \\10.0.0.25\Users\firstdeer
- Our user's home directory will be a folder on the server, the full path to which is \\10.0.0.25\Usersfolder\firstdeer
[Personally, I tested with existing folders on the server.]
In order to implement our plans, we need two parameters:
/homedir:"PATH" - Specifies the path to the user's home directory.
/profilepath:"PATH" - Specifies the path to the user's login profile.
Here's the command for copy-paste:
Net user USER /profilepath: "PATH" /homedir: "PATH"
And in my case the command will look like this:
Net user firstdeer /profilepath: "\\10.0.0.25\Users\firstdeer " /homedir: "\\10.0.0.25\Usersfolder\firstdeer "
3.7. - Adding a user to the "Administrators" groupThe first thing you need to do is look accurate name groups, this is done using the command displaying all local groups-net localgroup
Net localgroup
This action is mandatory, since the name of the group can be in both Russian and English and the command for the Russian language will not work in English and vice versa :c
And so I see that the names of my groups are in Russian, and the group I need is called “Administrators”. (Fig. 3.5)
 Fig.3.5 - List of local groups.
 Now you need to look at the members of this group [Who is on the list]. (Fig. 3.6)
Net localgroup "Administrators"
As you can see, in the “Administrators” group there is one account - “Administrator”.
 Fig.3.6 - View members of the local group.
 Now we need to add our user to the group, to do this we will use the command:
Net localgroup "GROUP_NAME" "USER" /add
To remove a user from a group:
Net localgroup "GROUP_NAME" "USER" /del
In my case, I add a local user - firstdeer to the Administrators group (Fig. 3.7):
Net localgroup "Administrators " "firstdeer " /add  Fig.3.7 - Adding a user to a group.
Net localgroup "Administrators"  Fig.3.8 - View members of the local group.
All OK! Our user is in the group and is a local administrator. In order for the changes to take effect, the user needs to re-login to the system.
How we did the same in PowerShell -
Visitors to this site are often interested in how to create a new user in Windows 7. Most often, this need arises when more than one person works on the same computer. Files and shortcuts for programs from different users begin to get confused on the desktop, and this inevitably creates a lot of inconvenience. In this article, we will talk about how to create a new user in Windows 7 and solve this problem forever.
In order to create a new user, you need to open the Start menu and go to Control Panel. If you want to create a new user in Windows 8, then use our article about.
So, after you have opened the Control Panel, go to the “Add and remove accounts” section.
After this, you will see a list of accounts that have already been added to your operating system. If you haven't added anything before, there should only be two users here: the main user (which you created with ) and the guest user. To add a new user in Windows 7, click on the “Create an account” link.
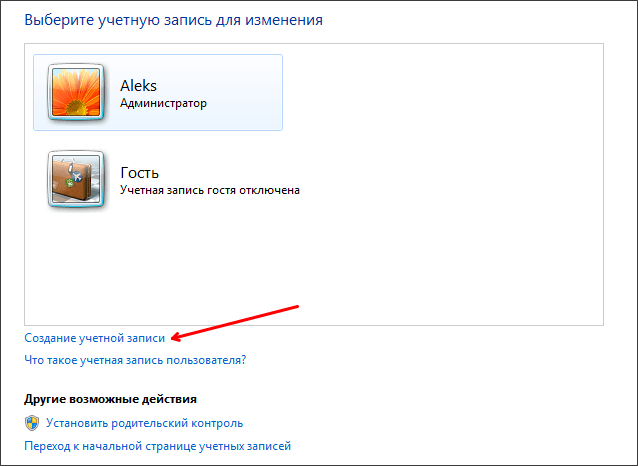

That’s it, after clicking on the “Create an account” button New user will be created. Please note that if you select the “Standard User” account type, the user using such an account will not be able to install new programs or make changes to operating system settings.
How to create a new user entry in Windows 7 via command lineYou can also create a new user via the command line. In order to create a new Windows 7 user via the command line, you must first run it with administrator rights. We have already talked about this in one of the articles.
After that, in the command line that opens, enter the command:
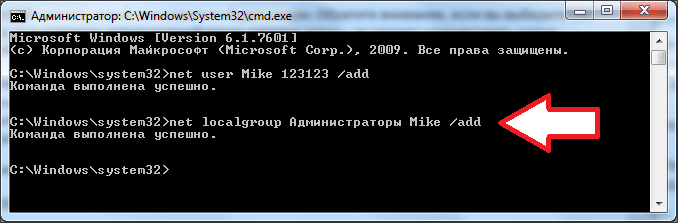
- net user username userpassword /add
For example, in order to add a user with the nickname Mike and password 123123, you must enter net user Mike 123123 /add.

After entering this command, a new user will be created. But by default it will be regular user(not an administrator). In order to make this user an administrator, you need to enter one more command:
- net localgroup Administrators username /add
For example, in order to make the user Mike an administrator, we need to enter the command net localgroup Administrators Mike /add.
Everything, as we can see, add a new user to Windows 7 using command line not much more difficult than adding a user through the Control Panel.
Good afternoon, readers. Today, once again, I had to go searching for the necessary information. Often you have to help Windows users directly from the user account, and there are no tools at hand except the one built into Windows command cmd.exe lines. When working under a restricted account, you often have to perform some task with elevated Administrator rights. cmd is the most suitable tool for these tasks, so as not to enter the administrator password many times, just run the command line once as an administrator and perform the necessary actions, run the necessary commands, which I will describe below:
appwiz.cpl - Installing and removing programs
certmgr.msc - Certificates
ciadv.msc - Indexing service
cliconfg - SQL network client program
clipbrd - Clipboard
compmgmt.msc - Computer management
dcomcnfg - DCOM component management console
ddeshare - DDE Shares (does not work on Win7)
desk.cpl - Screen properties
devmgmt.msc - Device Manager
dfrg.msc - Disk defragmentation
diskmgmt.msc - Disk Management
drwtsn32 - Dr.Watson
dxdiag - DirectX Diagnostic Service
eudcedit - Personal symbol editor
eventvwr.msc - Event Viewer
firewall.cpl - Windows firewall settings
gpedit.msc - Group Policy
iexpress - IExpress (I don’t know what it is)
fsmgmt.msc - Shared folders
fsquirt - Bluetooth File Transfer Wizard
chkdsk - Check disks (usually run with parameters drive_letter: /f /x /r)
control printers - Printers and faxes - does not always start
control admintools - Computer administration - does not always start
control schedtasks - Scheduled tasks (scheduler)
control userpasswords2 - Account management
compmgmt.msc - Computer Management ( compmgmt.msc /computer=pc - remote control PC computer)
lusrmgr.msc - Local users and groups
mmc - creating your own equipment
mrt.exe - Malware removal
msconfig - System configuration (autostart, services, etc...)
mstsc - Remote Desktop Connection
ncpa.cpl - Network connections
ntmsmgr.msc - Removable memory
ntmsoprq.msc - Removable RAM operator queries (for XP)
odbccp32.cpl - Data Source Administrator
perfmon.msc - Performance
regedit - Registry Editor
rsop.msc - Resulting Policy
secpol.msc - Local security settings ( Local politics security)
services.msc - Services
sfc /scannow - Recovery system files
sigverif - File signature verification
sndvol - volume control
sysdm.cpl - System properties
sysedit - System file editor (don't know what it is)
syskey - Account database protection
taskmgr - Task Manager
utilman Utility Manager
verifier Driver Verification Manager
wmimgmt.msc - WMI management infrastructure
This list is mainly GUI applications. Below I will highlight console commands in a separate list.
You can also run applications in the Control Panel with administrator rights by right-clicking while holding down the Shift key. And select Run as (RunAs...) (relevant for Win XP).
List of console commands:
nbtstat -a pc - username of the user working on the remote machine pc
net localgroup group user /add - Add user user to the group group
net localgroup group user /delete - Remove a user from a group
net send pc ""text " " - send a message to the user of the pc computer
net sessions - list of users
net session /delete - closes all network sessions
net use l: \\computer name\folder\ - connect network drive l: folder on the remote computer
net user name /active:no - block user
net user name /active:yes - unblock user
net user name /domain - information about the domain user
net user name/add - add user
net user Name /delete - delete user
netstat -a - list all connections to the computer
reg add - Add a parameter to the registry
reg compare - Compare parts of the registry.
reg copy - Copies from one section to another
reg delete - Deletes the specified parameter or section
reg export - Export part of the registry
reg import - Respectively import part of the registry
reg load - Loads the selected part of the registry
reg query - Displays the values of a given registry key
reg restore - Restores the selected part of the registry from a file
reg save - Saves the selected part of the registry
reg unload - Unloads the selected part of the registry
shutdown - shuts down a computer, you can shut down another one remotely.
SystemInfo /s machine - will show a lot of useful information about the remote machine
Here is help on the wonderful net program, or more precisely on its work with users: net user. Sometimes, for example, you need to activate a guest or administrator account in Windows 10 on a client PC. Then the short and easy-to-remember Windows net user Guest /active:yes may be more convenient than other methods:
The syntax for this command is:
NET USER
[username [password | *] [options]]
username (password | *) /ADD [options]
Username
Username
The NET USER command allows you to create and modify Accounts users on computers. Running a command without parameters displays a list of user accounts of this computer. User account information is stored in the user account database.
- username - The name of the user account to add, delete, edit, or view. The user account name must not exceed 20 characters.
- password - Assigns or changes the user account password. The password length must not be less than the minimum length specified by the /MINPWLEN parameter of the NET ACCOUNTS command. In addition, the password length should not exceed 14 characters.
- * - Displays a prompt to enter a password. When you enter your password at this prompt, it does not appear on the screen.
- /DOMAIN - The operation is performed on the current domain controller.
- /ADD - Adds a user account to the user account database.
- /DELETE - Deletes a user account from the account database
- users.
Description of parameters:
- /ACTIVE:(YES | NO) - Activates or deactivates an account. If the account is inactive, the user will not be able to access the server. Default value: YES (account is active).
- /COMMENT:"text" - Allows you to add a description of the user account. The text must be enclosed in quotation marks.
- /COUNTRYCODE:nnn - Uses the operating system country code to include the appropriate language files when displaying user help and error messages. The value "0" corresponds to the default country code.
- /EXPIRES:(date | NEVER) - Account expiration date. The NEVER value corresponds to an unlimited account validity period. The account expiration date should be entered in mm/dd/yy(yy) format. The month is indicated by a number or name (full or abbreviated to three letters). The year is indicated by two or four digits. Use forward slashes (/) without spaces to separate date elements.
- /FULLNAME:"name" - The user's full name (as opposed to the account name). The name must be enclosed in quotation marks.
- /HOMEDIR:path - Path to the user's home directory. This path must already exist.
- /PASSWORDCHG:(YES | NO) - Indicates whether the user can change their password. Default value: YES (password can be changed).
- /PASSWORDREQ:(YES | NO) - Specifies whether the user account must have a password. Default value: YES (password required).
- /LOGONPASSWORDCHG:(YES|NO) - Indicates whether the user should change their password the next time they log in. Default value: NO (no password change required).
- /PROFILEPATH[:path] - Specifies the path to the user's login profile.
- /SCRIPTPATH:path - Path to the user login script.
- /TIMES:(time | ALL) - Login hours. The TIMES parameter value should be specified in the format day[-day][,day[-day]],time[-time][,time[-time]], with the time increment interval being 1 hour. The names of the days of the week can be indicated in full or abbreviated. The clock is set in 12- or 24-hour format. For the 12-hour format, the notations are am, pm, a.m. or p.m. A value of ALL indicates no restrictions on login time, and an empty value indicates no login at all. Days of the week and time values are separated by a comma. Multiple entries for day of week and time values are separated by a semicolon.
- /USERCOMMENT:"text" - Allows an administrator to add or edit a user comment for an account.
- /WORKSTATIONS:(computer name[,...] | *) - Allows you to specify up to 8 computers from which the user can log into the network. If /WORKSTATIONS is not listed or is set to *, the user can log on to the network from any computer.
- net user - Displays a list of all users on this computer.
- net user kyrych - Displays information about the user "kyrych".
- net user kyrych /add /times:Mon-Fri,08:00-17:00/fullname:"kyrych" - Adds a user account kyrych with the full user name and the right to connect from 8 to 17 hours from Monday to Friday.
- net user kyrych /delete - Deletes the kyrych account.
- net user kyrych /active:no - Disables an account.
- Forward
- Network discovery does not turn on in Windows 7/8/2008/2012
- Error: This application failed to start because it could not find or load the Qt platform plugin "windows".
- Configuring automatic restart of rphost.exe worker processes on 1C 8.3 server
-
How to reduce the size of the transaction log (.ldf) in MS SQL 2008/20012
MS SQL, like any decent industrial DBMS, along with the database, keeps transaction logs that allow you to roll back the state...
In addition to the above methods, user accounts can be created, modified, and deleted using the command line. To do this you need to do the following:
Run Command Prompt as Administrator;
To create an account using the command line, use the command net user.
The net user command is used to add users, set passwords, disable accounts, set options, and delete accounts. When you run the command without command line parameters, a list of user accounts present on the computer is displayed. User account information is stored in the user account database.
Example command:
net user User /add /passwordreq:yes /times:monday-friday,9am-6pm/fullname:"New user"
Parameters used:
/add – this parameter indicates that a new account needs to be created;
/passwordreq – this parameter is responsible for ensuring that the user changes his password when logging in for the first time;
/times – This parameter determines how many times the user is allowed to login. Here you can specify both single days and entire ranges (for example Sa or M-F). Both 24-hour and 12-hour formats are accepted for time indication;
/fullname – this parameter is identical to the “Full name” field when creating a user using the previous methods.
In the server room operating system Windows Server in a domain Active Directory User accounts can be created in six ways:
Creating users using Active Directory Users and Computers
Creating users using the net user command line
Importing Users Using the CSVDE Command
Importing Users Using the LDIFDE Command
Creating users with using Windows PowerShell
Creating Users Using VBScript
Conclusion. Questions about user accounts are briefly discussed. A user account is a record that contains information necessary to identify the user when connecting to the system, as well as information for authorization and accounting. Methods for creating local and domain user accounts were discussed. Real exercises and problems are discussed in laboratory work No. 3 and practical lesson No. 2.
Lecture 4 Protecting files and shared folders.
Permissions file system when accessing resourcesProtecting files and shared folders
The topic of information security is more popular today than ever. IT professionals draw knowledge from everywhere: from special articles in the magazine and even from daily newsletters. e-mail. Most technical means protect the organization's resources from outside interference.
But it is often necessary to share access to information within the enterprise itself. Just imagine the problems that could arise if all employees had access to the personal records of their colleagues.
The NTFS file system in Windows and its shared folder permissions are specifically designed to protect the contents of folders public access from both internal and external leaks. Let's look at how to correctly assign NTFS permissions and control access to shared folders and files.
File access control
Most users make files publicly available to some employees of their company. To do this you need: 1. Right-click on the folder with the files to which you want to grant access. 2. From the drop-down menu, select Sharing And Security. 3. In the folder properties dialog box, go to the Sharing tab and select the Share This Folder command.
1. Enter a name for the folder in the Share Name field. 2. If desired, you can add a few explanatory words to the Comment column. 3. Click OK.
It is important to remember that the default permissions allow all users (the Everyone group) to access directory contents. Therefore, they need to be limited.
Also, in order to assign different permissions to different users, you need to disable the default Windows Simple File Sharing option: 1. Open Windows Explorer Explorer. 2. Go to the Tools menu. 3. Select Folder Options. 4. Go to the View tab. 5. In the Advanced Settings window, uncheck the Use Simple File Sharing (Recommended) | Use simple file sharing (recommended). 6. Click OK.
To disable permission for Everyone and configure the access level for each user individually: 1. Right-click the desired folder. 2. From the drop-down menu, select Sharing And Security. 3. Click on the Permissions button. The Permissions For... dialog box opens.
Image B: Setting access permissions on the Share Permissions tab of the Permissions For... dialog box.
4. Select the Everyone object from the list of presented groups or users. 5. Click the Remove button. 6. Click the Add button. The Select Users Or Groups dialog box opens. 7. In the Enter The Object Names To Select window, select the users or groups for which you want to configure access permissions, and click OK. 8. In the Group panel Or User Names (Groups or users) select the objects for which access permissions will be configured: you can allow or deny (Allow or Deny) Full Control, Read (Change) and Modify (Read) information located in the folder. 9 Click OK to apply the changes and close the dialog box, or click OK to exit the folder properties window.
Full Control permissions allow users or groups to read, modify, delete, and run files contained in a folder. In addition, such users can create and delete new subfolders in this directory.
Users who have the right to change information in a folder (Change) can view and change files in the directory, create their own files and folders in it, and run programs located in it for execution.
Users and groups with Read permissions are only allowed to view files stored in the directory and run programs. For information on Windows disks XP formatted with the NTFS file system, you can set additional permissions. NTFS permissions (NTFS file system permissions) NTFS permissions in Windows environment provide an additional set of parameters that can be configured for each individual file or folder. First, you need to make sure that your Windows settings allow you to work with the NTFS file system: 1. Click Start. 2. Select the Run command. 3. Enter compmgmt.msc in the line and click OK. The Computer Management console opens. 4. Go to the Disk Management object on the Storage tab to find out what type of file system is used on each disk. If the disk or one of its partitions is not formatted in NTFS, this can be corrected by entering convert X: /fs:ntfs, replacing X with the letter the desired disk or section. The convert command will change the current disk file system to NTFS without destroying the data stored on it. However, before running the execution command, it is better to do backup copy disk contents. To configure NTFS permissions: 1. Click on the required file or folder. 2. From context menu select Properties. 3. Go to the Security tab. 4. Use the Add/Remove buttons to add or remove users and groups for which you want to configure NTFS access permissions. 5. Select the desired object from the Group Or User Names window and assign/deny permissions by checking or unchecking the appropriate boxes in the Permissions For window, as shown in Image D. 6. Click OK to save the changes.

Image D: NTFS Permissions has more configurable options than the Simple Sharing service.
Please note that by default, subdirectories inherit the properties of their root directories. To change this, click the Advanced button on the Security tab of the Properties dialog box. Types of NTFS permissions: Full Control - allows users and groups to perform any operations with the contents of the folder, including viewing files and subdirectories, launching application files, managing the list of folder contents, reading and running executable files, changing the attributes of files and folders, creating new files, adding data to files, deleting files and subdirectories, and changing access permissions for files and folders. Modify - Allows users and groups to view files and subdirectories, run application executables, manage the list of folder contents, view folder settings, change folder and file attributes, create new files and subdirectories, add data to files, and delete files. Read & Execute - Allows users and groups to view a list of files and subdirectories, run application executable files, view the contents of files, and change the attributes of files and folders. List Folder Contents - Allows users and groups to navigate through directories, work with a list of folder contents, and view file and folder attributes. Read - Allows users and groups to view the contents of a folder, read files, and view attributes of files and folders. Write - Allows users and groups to change the attributes of files and folders, create new folders and files, and change and add to the contents of files. To determine the final permissions of a user, subtract from the NTFS permissions granted to him directly (or as a member of a group) any individual denials (or denials that he received as a member of a group). For example, if a user has Full Control to a given folder, but at the same time is a member of a group for which Full Control is denied, then as a result he will not have Full Control rights. If a user's access level is limited to the Read & Execute and List Folder Contents options in one group, and at the same time they are denied access at the List Folder Contents level, then as a result NTFS permissions will be limited to the Read & Execute level only. For this reason, administrators should approach prohibitions with extreme caution, since prohibited functions take precedence over those allowed for the same user or group. Windows XP is equipped with a convenient utility for confirming the current permissions of a user or group: 1. Open the Properties dialog box for the desired file or folder. 2. Go to the Security tab. 3. Click on the Advanced button. The Advanced Security Settings For dialog box opens. 4. Go to the Effective Permissions tab. (Image E) 5. Click the Select button. 6. The Select User Or Group dialog box opens. 7. In the Enter The Object Name To Select field, enter the name of the user or group whose permissions you want to confirm and click OK. 8. The Advanced Security Settings For dialog box will display the final set of NTFS permissions for the selected user or group.
 Image E: The Effective Permissions tab helps you easily determine what permissions a user or group actually has.
Combining NTFS permissions with sharing permissions
To determine the final permissions of a particular user, compare the resulting sharing permissions with the resulting NTFS permissions. Remember that access restrictions will dominate permissions.
For example, if a user's resulting NTFS access rights are limited to the Read and Execute level, and the resulting public access rights are limited to the Full Control level, the system will not grant that user actual Full Control rights, but will select the highest priority level, in this case it is NTFS read and execute permission.
It is always necessary to remember that the resulting restrictions in rights prevail over the resulting permissions. This is a very important point that is easily forgotten, after which it causes a lot of trouble for users. Therefore, carefully calculate the ratio of prohibitions and permissions between NTFS and public access permissions.
English version: techrepublic.com.com
Copying of the article is permitted only if an explicit hyperlink to the website winblog.ru is indicated as the source of the Russian version. )