You may someday have to disable the USB ports on your computer to prevent anyone from connecting any USB devices to it. In an office setting, for example, disabling USB ports can help prevent information from being stolen from computers or from becoming infected with viruses or other malware.
Disable USB ports in BIOS settings
- Enter BIOS
- After you have moved to BIOS settings, look in the Advanced menu (Advanced BIOS features) for options to enable or disable USB ports.
- Make sure all USB and Legacy USB Support options are disabled or off.
- Once the changes have been made, save the settings and exit. Typically, you need to press F10.
- After restarting the computer, check the functionality of the USB ports and make sure they are disabled.
Disabling USB in Windows
If your computer's BIOS settings do not allow you to disable USB ports, or your BIOS does not disable all ports, and you are running Windows XP, Vista, 7, or 8, follow these steps.
Note: You will need to edit Windows registry. Be aware that changing registry values may result in errors or the system not booting at all.
Tip: The following tip only allows you to disconnect USB storage devices (such as a flash drive). USB devices such as keyboards and mice will still work.
1. Open the Windows registry by entering regedit command in the search field (“Run”) by clicking on the “Start” button.
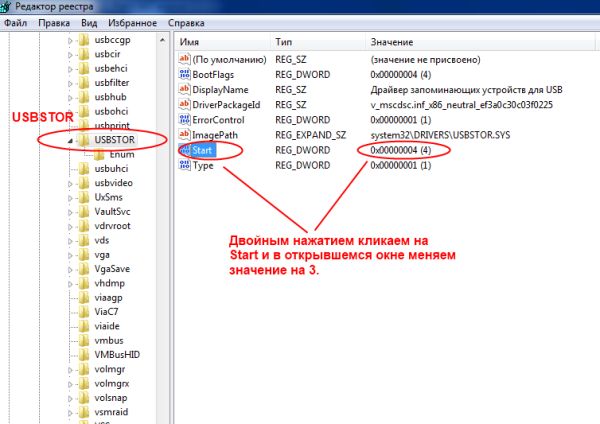
2. Once you have entered the Registry Editor, go to the branch
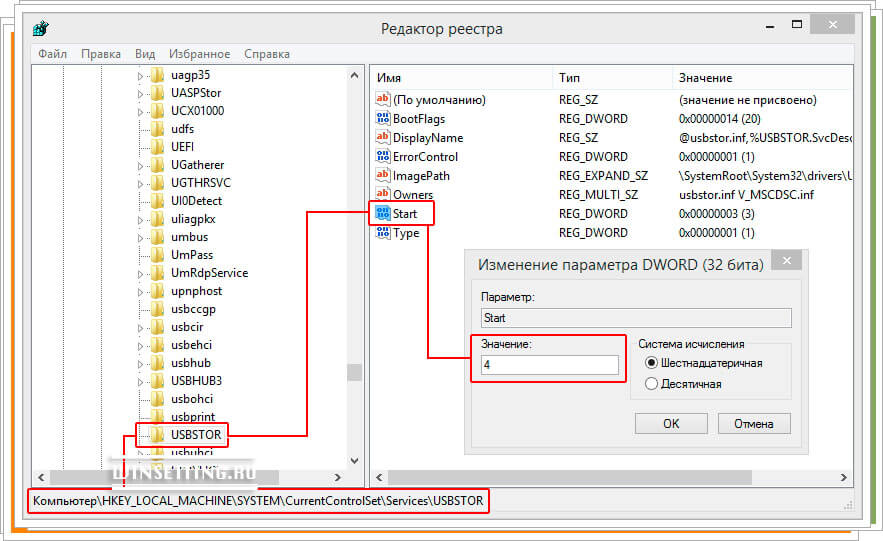
HKEY_LOCAL_MACHINE\SYSTEM\CurrentControlSet\Services\USBSTOR
3. In USBSTOR, find the DWORD parameter " Start", double-click on it and change the value to " 4 “, and then click on “Ok”.
4. Close Registry Editor and the next time booting Windows USB will not work.
Tip: If you need to re-enable USB after doing the steps above, follow these steps again and change the value from "4" to "3".
Note: The above steps only work when the driver for the storage controller has already been installed. If you are doing this for security reasons and the driver has not been installed, then the value will change to 3 when the user connects the storage device and Windows installs the drivers.
You can use ready-made bat files to enable/disable USB ports.
https://yadi.sk/d/jGMdhaNDEBE3W
Physically disconnecting USB
Although this is often not possible, there is an option to physically disable the USB ports on system board. If the USB ports are on the front or top panel computer, you can simply disconnect the cable going to USB.
Why don't USB ports work? Reasons and solution
USB interfaces are used in PCs so often that we cannot even imagine a computer or laptop without them. TO USB interface Various peripheral devices are connected: printers, web cameras, flash drives and many others. But what to do if the USB ports are out of order. Let's look at the main problems with usb work and we will try to eliminate them.
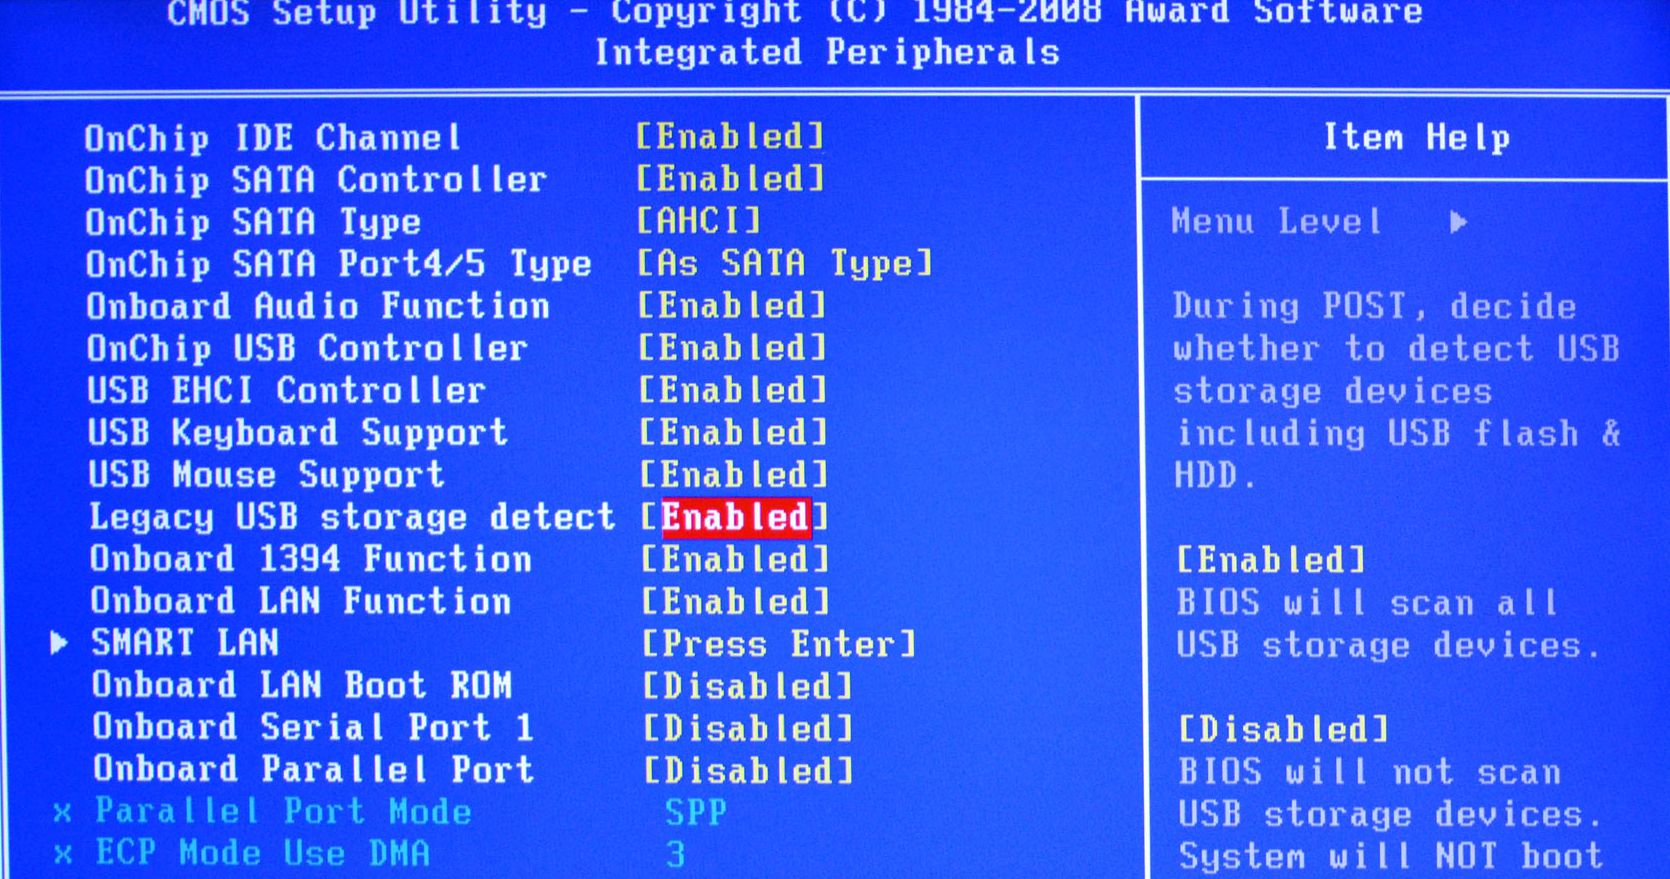
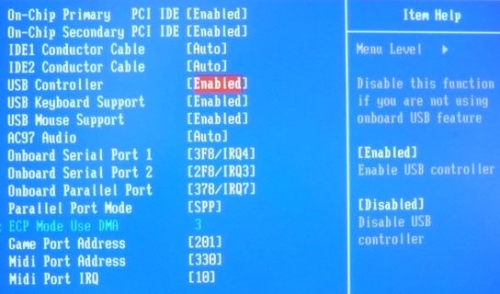
USB interfaces are disabled in BIOS
This problem occurs very often, since a suddenly turned off light or a dead battery can reset the BIOS settings, thereby disabling USB interfaces.
To enable them, let's enter the BIOS. To do this, after starting the computer, quickly press the Del or F2 button.

Depending on the software version and manufacturer turning on USB functions may be in different BIOS items.
- Basic BIOS options:
- Enable/disable - Disabled/Enabled
- To do everything USB ports available - Both
- Make available ports that are located directly on motherboard-Primary
- Number of USB ports used - 2USB Ports, 6USB Ports
- Using USB 2.0 - USB 2.0 Controller.
- Changing the operating frequency of the USB bus - USB Speed.
Enabling USB in AMI BIOS
Enabling USB in Award BIOS
USB port driver removed from the system
Errors of this kind occur after a virus attack on a computer or a critical field. Windows errors. To restore the functionality of the USB controller, you should install or, if it does not work correctly, update USB drivers controller. To update the USB driver, follow these steps:
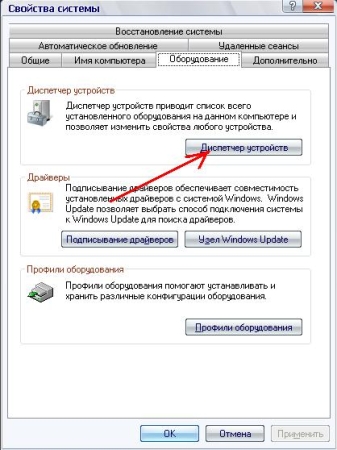
1.Open Device Manager on the Hardware tab in System Properties.
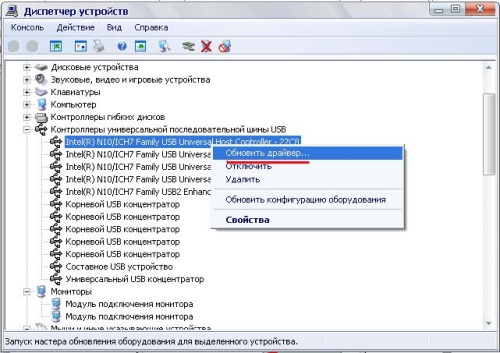
2. Find the USB controller item and right-click on it and select “Update driver”.
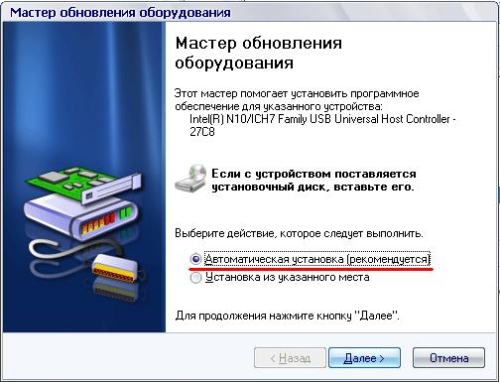
3. In the hardware wizard that starts, select the item “ Automatic installation» to search for a suitable driver.
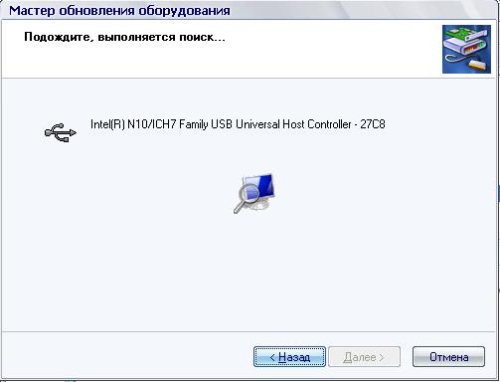
4. The wizard will find the driver we need and install it.
5. If the wizard was unable to find a suitable driver, we will need to download it from the Internet and install it from the specified location. To do this, when choosing the driver installation option, you need to select the “Install from a specified location” option. In the next window we will be asked to search for drivers in the specified locations. Check the box next to “Include next search location” and click browse.
In the drop-down menu, indicate the package with the downloaded drivers. The wizard will check the folder for the presence of a suitable driver and select the one you need. After this, for correct installation, you should restart your computer.
The USB controller burned out.
There are cases when, due to high voltage, the USB controller overheats and fails. The only people who can help you solve this problem are: service center, since it is not possible to fix this at the software level.
I have already told you how or on a laptop... today we will talk about how to disable usb ports on any computer. This can protect your data from theft or prevent your computer from being infected using a flash drive.
Easily and simply disable USB ports
Simple and free computer USB program Ports Disabler doesn't do anything special - it just allows without going deep into the weeds operating system, disable and enable the USBSTOR service, which is responsible for the operation of all USB ports on the computer, with one click of the mouse.
When this service is deactivated, the system stops seeing them - this is convenient to use for security purposes. So in a simple way we will close the loophole for introducing viruses into a computer using external media and at the same time prevent the possibility of stealing (copying) our data from it.
What I liked most about this program is that it disables USB ports only for external storage media (flash drives, disks, third-party drives...), and things such as a USB adapter wireless mouse, continues to define itself and work – great.
So, launch USB Ports Disabler and click on the button labeled “Disable USB”...
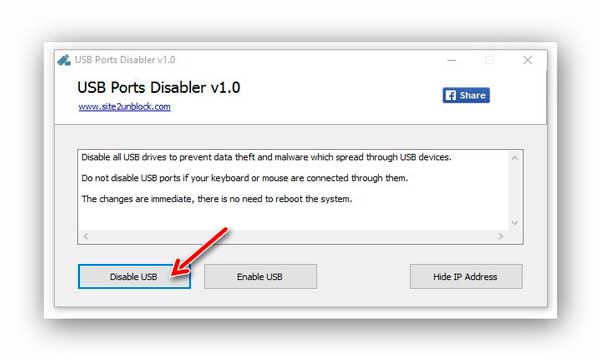
...we agree to disable the USB ports (if I were the author of the program, I would remove the second window - why is this intermediate confirmation?) ...
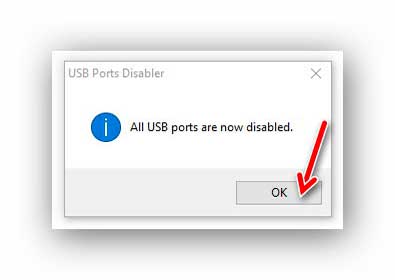
That's it - the ports are disabled. The manufacturer recommends rebooting the system, but this is not necessary, as I have seen. If, when you disconnected the ports, you had a flash drive sticking out in one of them, then you are not surprised that it continues to be detected - remove it from the port and try to connect it again... that’s all, the computer no longer sees it.
USB ports can be disabled without using third party programs. Windows tools You can turn off all USB ports at once, or those that need to be turned off at the moment.
The theft of confidential information from users' computers is currently extremely important. To prevent data leakage, you may need to disable USB ports. Very often we have to connect various external storage devices to the PC, in particular via USB ports. These external devices may contain malicious code, which is actually the reason for the “leaking” of confidential data into the hands of “malware”. Today we will tell you how you can teach your computer to quickly disconnect USB ports without resorting to installing and using third-party programs.
To implement our plans, we will need to make some changes to the Windows registry. To do this, first we need to open it, for this in the search engine Windows line(V Windows XP-7 The search bar is located in the Start menu, in Windows 8 on the panel, as shown in the figure below), you must enter the regedit command, press the Enter key and select regedit.exe registry editor from the search results.
In the registry editor window that opens on your screen, to start disabling USB ports, go to the “UsbStor” registry key, opening the HKEY_LOCAL_MACHINE\SYSTEM\CurrentControlSet\Services sections in sequence. Find the “Start” parameter in the final section, click on it with the left mouse button and context menu select “Change” and change its value from “3” to “4”, where “3” is the default value of the parameter.
After changes have been made to the registry, a flash drive connected to the computer via a USB port will still be detected by the system, but will not automatically connect to it. In other words, it will be impossible to write data from the flash drive or run any programs from it. If you need to return the USB port settings to their original ones, all you need to do is change the value of the “Start” parameter to the previous one, that is, “3”. In this case, you do not need to restart your computer for the changes you made to take effect.
Disable certain USB ports
There are times when it is not possible to disable all USB ports on the system at once and you only need to disable some of the USB ports. In this case, you can use another method.
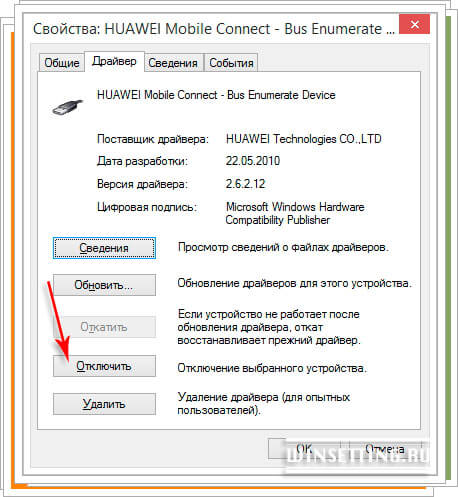
Launch “Device Manager” on your computer, then find it and go to the “USB Controllers” line. By the way, to open “Device Manager” just press the key combination “Win” + “Pause” and in the window that opens, click on the corresponding link on the left side.
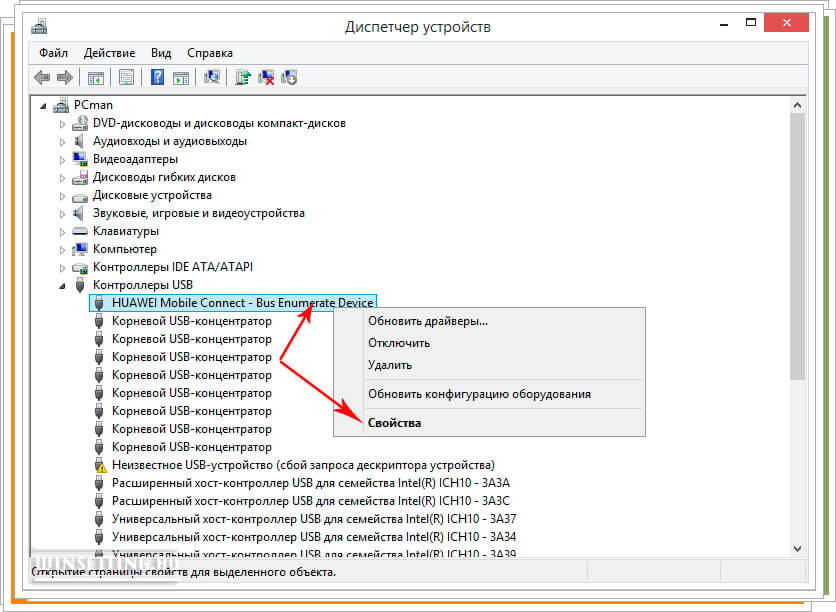
Now in the newly opened “Properties” window USB ports” Go to the “Drivers” tab and click on the “Disable” button in it. All is ready!
We hope that you have found the answer to your question - “how to disable USB ports” and now, depending on the situation, you will be able to disable them all at once, or only those that you consider necessary.
All products Microsoft Windows Server 2003, Enterprise Edition for Itanium-based Systems Microsoft Windows Server 2003, Datacenter Edition (32-bit x86) Microsoft Windows Server 2003, Enterprise Edition (32-bit x86) Microsoft Windows Server 2003, Standard Edition (32-bit x86) Microsoft Windows Server 2003, Web Edition Microsoft Windows XP Home Edition Microsoft Windows XP Professional Microsoft Windows Server 2003 Service Pack 1 Microsoft Windows Server 2003, Datacenter Edition for Itanium-Based Systems
All products Prerequisites
Description of the problem
If you connect and remove several times in a row with short breaks USB device, That USB port may stop responding. When the port is in this state, it does not recognize the USB device and it stops working.
This article describes ways to resolve this issue.
The necessary conditions
To perform some of the troubleshooting steps in this article, you must be logged in. Windows system With account administrator. If the computer is personal, you are likely already logged in with an administrator account. If your computer is a work computer and connected to a network, you may need to contact your administrator for assistance. To ensure that you are signed in to Windows as an administrator, go to the following Microsoft website:
Solution
To resolve this issue, use the following methods in the order listed. After using each method, check to see if the problem is resolved. If not, move on to the next method.
This article also provides a workaround that you can use if other methods fail.
Method 1: Update hardware configuration using Device Manager
Update your hardware configuration using Device Manager. The computer will then be able to recognize the USB device connected to the USB port and it can be used.To update your hardware configuration, follow these steps:
- Click the button Start and select Execute.
Note. In Windows Vista, click Start and use the window To start searching.
- OK
- In Device Manager, click the computer name to highlight it.
- On the menu Action select item Update hardware configuration.
Method 2: Restart your computer
If updating the configuration did not resolve the issue, restart your computer. After this, check if the USB device is working.If you are able to resolve the issue, you can skip the rest of this article. If the problem persists, continue to the next method.
Method 3: Disable and re-enable the USB controller
Disable and re-enable all USB controllers using Device Manager. This will restore normal operation of the USB port. USB controllers present USB ports in Device Manager. If you are having trouble with advanced troubleshooting, go to the section.To disable and re-enable USB controllers, follow these steps:
- Click the button Start and select Execute.
Start and use the window To start searching.
- Enter devmgmt.msc and click the button OK. Device Manager will open.
- Expand the section.
Note: You may need to scroll through the list to find the item you want.
- Right-click the first USB controller in the section Universal Serial Bus Controllers and select Delete.
- Repeat step 4 for all USB controllers in the section Universal Serial Bus Controllers.
- Restart your computer. After the computer boots, the hardware configuration will be automatically updated, and all remote USB controllers will be reinstalled.
- Check if the USB device is working.
If you are able to resolve the issue, you can skip the rest of this article. If this method does not resolve the problem, see "Workaround" section.
Temporary solution
If the following methods do not resolve the issue, disable the temporary shutdown feature. Please note that this action affects all USB controller drivers (and therefore all USB ports and connected USB devices). Therefore, it is not possible to unplug USB devices connected to your computer and they will continue to consume power. In addition, the checkbox Allow this device to turn off to save power does not appear on the tab Power management for USB root hub.
For help disabling the sleepover feature, go to . If advanced troubleshooting is not a problem, you can disable this feature yourself. To do this, go to the section.
Get help solving the problem
To fix the problem automatically, click the link To solve a problem. In the dialog box, click Execute and follow the troubleshooting wizard.Note: The interface of this wizard can only be accessed on English language, however, the automatic fix works in other language versions of Windows.
Note: The troubleshooting solution can be downloaded to any computer, saved to a flash drive or CD, and then run on the desired computer.
Solving the problem yourself
This section is intended for advanced users.As a workaround, you can disable the USB kill switch by editing the registry. The USB device may not respond due to a race condition in the shutdown feature. Selective Suspend allows you to efficiently manage power by turning off USB devices. However, sometimes it may not wake up USB devices correctly. As a result, when you try to use the USB device, it does not respond.
You can also disable the temporary shutdown feature on a server for which power management is not important or is not required at all.
Important ! This section, method, or task includes steps to modify registry settings. However, changing them incorrectly can lead to serious problems, so be extremely careful when performing such actions. For additional protection create a backup copy of the registry. This will allow you to restore it if problems occur. additional information about the creation backup copy and repairing the registry, see the following Microsoft Knowledge Base article: To disable the temporary shutdown feature, follow the steps below.
- Click the button Start and select Execute.
Note: In Windows Vista, click Start and use the window To start searching.
- Type regedit and click the button OK. The Registry Editor will open.
- Locate and select the following registry subkey:
HKEY_LOCAL_MACHINE\System\CurrentControlSet\Services\USB
- If there is an entry in the registry DisableSelectiveSuspend, double-click it. If this entry does not exist, create it. To create a registry entry, follow these steps:
- On the menu Edit select item Create, then - DWORD parameter.
- Type DisableSelectiveSuspend and press ENTER.
- On the menu Edit select item Change.
- In the Value field, enter 1 to disable the sleepover feature and click the button
State
Microsoft is working to resolve this issue. Additional Information will be posted as it becomes available.