In this article we will talk about recovery bad sectors hard drive and the reasons for their appearance. Step by step instructions will help you prepare for this procedure and cope with it yourself.
What are bad sectors?
Let's take a quick look at the structure of the hard drive. It consists of several separate disks, above which there are magnetic heads designed for reading and writing information. When storing data, the heads magnetize certain areas of the disk, which is divided into tracks and smaller components - sectors. It is in them that units of information are stored. If a sector becomes unreadable, it is called “broken”.
Several signs indicate the occurrence of such a problem:
- creaks, rattles, tapping when the disk is operating;
- heating the surface of the HDD (this should not happen under normal conditions);
- common errors during operation and startup operating system.
Typical reasons
The main reasons for the appearance of broken hard drive segments are:
Also, malfunctions in the hard drive may occur due to mechanical damage. They are often caused by dropping a hard drive or computer, resulting in damage to the magnetic surface (for example, during transportation). Non-working parts also appear due to manufacturing defects. In this case, they may not appear immediately, but “crumble” over time, quickly increasing their number to a critical level.
Important! If you suspect mechanical damage or defects, you should immediately contact specialists or exchange the hard drive under warranty.
Recovering bad HDD sectors using Victoria
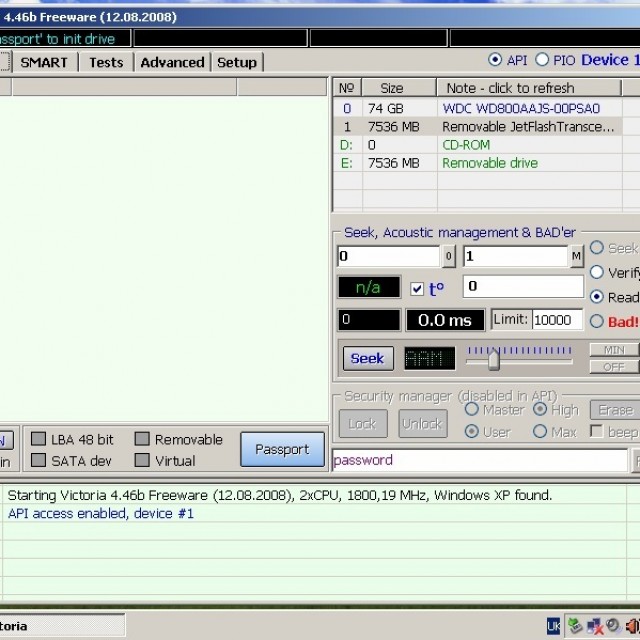
If the appearance of broken segments is due to software glitches, then they can be restored using specialized software. One such program for recovering bad hdd sectors is Victoria. The utility is available in two versions - for Windows and DOS. Recovery via DOS will be the most effective, since when the OS is running, some sectors may be occupied and therefore unavailable for scanning.
Victoria HDD- diagnostic program
Scanning
To get started, we will need to do a little preparation. First, you will need a disk with a program image recorded on it or a bootable flash drive. If everyone can cope with recording an image, then creating a flash drive may be difficult.
Let's take a closer look at this step:
Note! The program takes up very little space, so after installing it, the drive can be used to store other information. To avoid accidentally deleting files necessary for the utility to work, it is recommended to select a separate folder for them.
Let's start the scanning process:

Here we need a point "Reallocated sector count", which displays the number of fragments located in the reserve zone, as well as "Current pending sectors", where parts that cannot be read are displayed. If their number is not very high, then the disk can be restored.
Hard drive recovery
Let's figure out exactly how this process happens. Problem segments can be roughly divided into two types. The first ones are not readable due to a mismatch between the information stored in them and its checksums.
This error occurs during a power outage, when new data has already been written, but the checksums remain old. They simply cease to be recognized and are restored quite easily - by formatting them and recording the correct amounts.
The second type occurs as a result of mechanical damage. In this case, recovery is more difficult, but still possible. Restoring the functionality of such parts is carried out through the use of reserve areas that are on each hard drive.
We begin to recover each of these types of errors.
Video: HDD - “healing” bad sectors
First, let's try to fix bad sectors by erasing the information stored in them:
- press F4 and get to the verification menu;
- in the menu for selecting operations with unreadable sectors, indicate “BB: Erase 256 sect” and press “Enter”.
A long process of scanning and repairing broken files will begin. HDD sectors. If the program finds a bad sector, it will try to erase it, thereby correcting the error. If there is a mechanical defect, an error will be reported. In any case, you must wait until the check is completed and then separately correct the sectors with physical defects.
For this:
Now the recovery operation will work on a different principle, trying not to erase bad sectors, but to replace them with space from the reserve area.
Important! If there are a lot of such sectors, then the reserve space may run out. A special message will inform you about this, and further restoration will become impossible.
After successfully recovering bad sectors on your hard drive, it is recommended to conduct a full check of the file system for errors.
You can do this using CHKDSK utilities or in the following way:
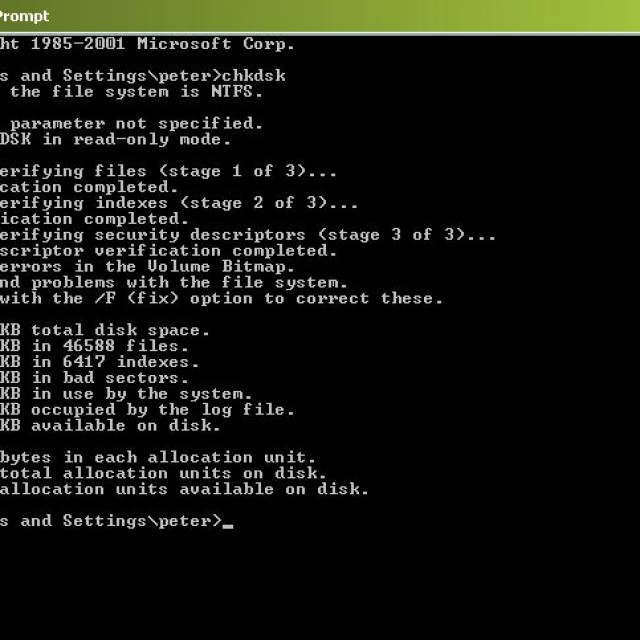
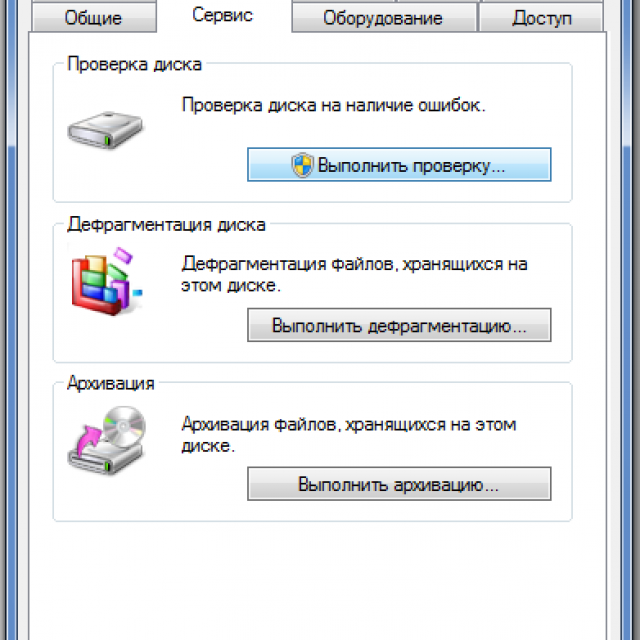
Photo: checking the disk for errors
Attention! To ensure that the system not only finds, but also corrects problems, before starting the scan, select “Automatically fix system errors.”
The methods described above will help you easily deal with non-critical cases of problem sectors, find and fix them. By following our instructions exactly, any user can do this on their own, even without computer education. We hope that this information was useful for you.
Any HDD not eternal. Every HDD eventually develops bad sectors that are unreadable. When the number of such blocks becomes too large, the hard drive stops performing its functions. But you can try to fix bad sectors on your hard drive by using special program.
Important! If bad sectors have formed on the hard drive, experts do not recommend using it, since even after treatment it may suddenly fail.
Hard drive treatment utility
One of the most popular free utilities is Victoria. Many people wonder: erase Victoria, what is it? This program in DOS mode it helps to fix bad blocks, but to use it you need to have at least minimal skills.
1. You will need to burn the VictoriaHDD ISO image to a USB flash drive using the WinSetupFromUSB program.
3. A window will appear where you need to specify removable drive, check the box next to it and check “FAT32”.
4. Next you should check LinuxISO/otherGrub. There is a square next to this line on the right. You need to click on it and point to the conductor to the program image.
5. After that, click “Go”.
6. The next step will require you to restart your computer and enter the BIOS.
7. Find the “Main” section, and in it the line “SATA Mode”. Opposite this phrase we install “IDE”.
9. Reboot the computer again and press F11 during startup.
10. A menu will appear where you need to select a flash drive with the program and run it in DOS mode.
11. After the utility starts working, press the Russian letter “Z” on the keyboard.
12. The “Select Port” list appears.
13. If the hard drive is connected via SATA, you must select “Ext. PCI ATA/SATA" if via IDE - accordingly.
14. A list of channels will appear. Under this list there will be a line where you should enter the numerical value of our hard drive.
15. After this, you need to press F9. The SMART table will appear, where in the line “Reallocated sector count” sectors from the reserve zone are defined, in the item “Current pending sectors” - bad blocks.
16. To try to cure the hard drive, you need to press F4 and turn on the “BB: Erase 256 sect” mode.
17. Victoria will analyze the condition of the elements, and if it does not find physical damage, will try to restore their functionality.
Important! During the treatment of sectors, the information will be destroyed. Therefore, it is worth copying all files to another medium in advance.
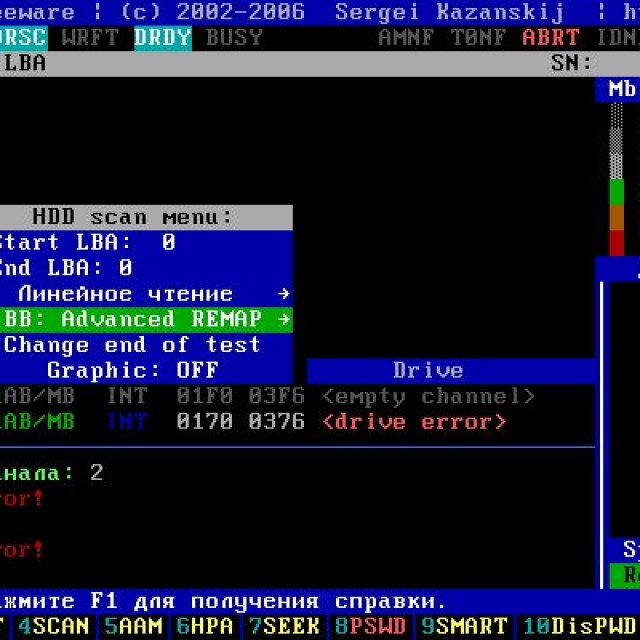
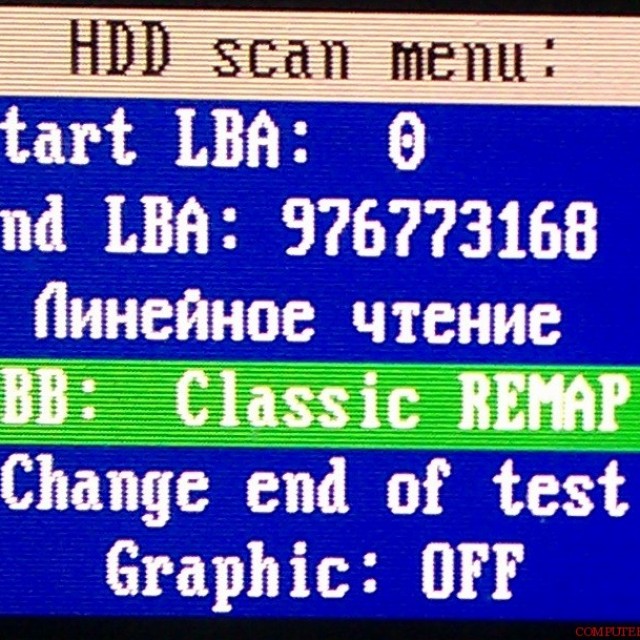
18. If the program has not found a solution on how to restore bad sectors on the hard drive, they can be transferred to the backup area. Then press F4 and open the “BB: Classic REMAP” mode.
19. Upon completion of the check, a table will appear where there will be fewer bad elements.
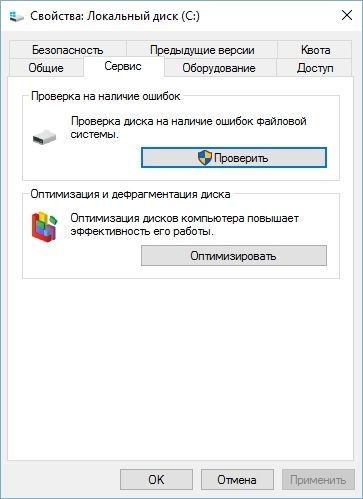
20. After treating the hard drive, you need to start Windows, open “Computer”, then “Properties of local drive C” - “Tools” - “Run check” - “Error correction”.
Treatment of the hard drive will eliminate bad sectors, which will increase the efficiency of the hard drive.
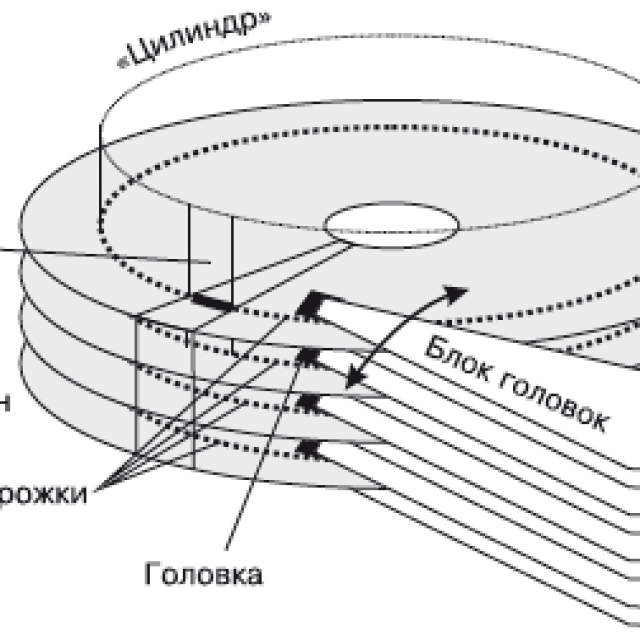
Hard drive - complex physical device, designed for recording and storing information. The surface of the disk is divided into tracks. The vertical stack of these tracks forms a cylinder. The track is divided into smaller sections called sectors. Each sector is marked. Their number depends on the interface that is used to communicate with the disk.
The hard drive is vulnerable. The cause of failure may be a malfunction software devices, failure of the controller, power failures, disruption of physical contact with the interface, sticking of the magnetic head, etc. The main defects of disks are sectors with damaged magnetic coating. Information cannot be stored in these areas.
Defective sectors are called bad sectors. Bad sectors located on the zero track are especially dangerous, because this is the boot area.
To determine the presence of bad sectors and the possibility of restoring them, Belarusian programmer Sergei Kazansky developed the Victoria utility. The latest release of the program was June 26, 2013. License type is Freeware, which makes it especially popular.
Purpose
The Victoria program allows you to produce low-level hard testing drive with a parallel connection interface - IDE (ATA - Advanced Technology Attachment) and SATA interfaces- serial connection interface. At the exit detailed information about the physical condition of the drive, its performance, errors.
The Victoria program performs in-depth analysis HDD status with the ability to restore bad sectors. This tool can be used by both professionals service center, and by ordinary users to evaluate the performance of the drive, the ability to correct errors, and analyze all the physical characteristics of the hard drive.
Video: Victoria HDD scan
Key Features
- comprehensive information about technical specifications hard media;
- analytics of HDD self-monitoring parameters;
- testing of many technical parameters;
- the ability to change disk space due to bad clusters;
- constructing surface graphs;
- eliminating bad clusters from used ones - replacing them with backup ones;
- HDD performance analysis;
- determining the speed of access to clusters;
- clearing the disk of information without the possibility of recovery;
- protecting the device by setting a password;
- the ability to copy any sectors to a file;
- context help system;
- other useful features.
Installation and launch
There are:
- boot versions of the program. In this case, you need to create either a boot floppy disk or boot disk. The tool for creating a floppy disk is the makedisk.bat file. To create a bootable CD, you need to unzip the program file and burn it ISO image to disk;
- not bootable version. The program is unpacked directly onto your hard drive.
In the first case, after downloading from the devices, you can start working with the program.
In the second, to obtain a complete picture of the state of the hard drive, a number of conditions must be met:
- disable the controller channel of the disk being checked;
- shut down all running programs;
- run Victoriyu only on a warm disk.
Launch from the operating system is carried out by the application vcr446f.exe.
After launch, the user is presented with a window with a clear English-language interface.
HDD recovery using Victoria
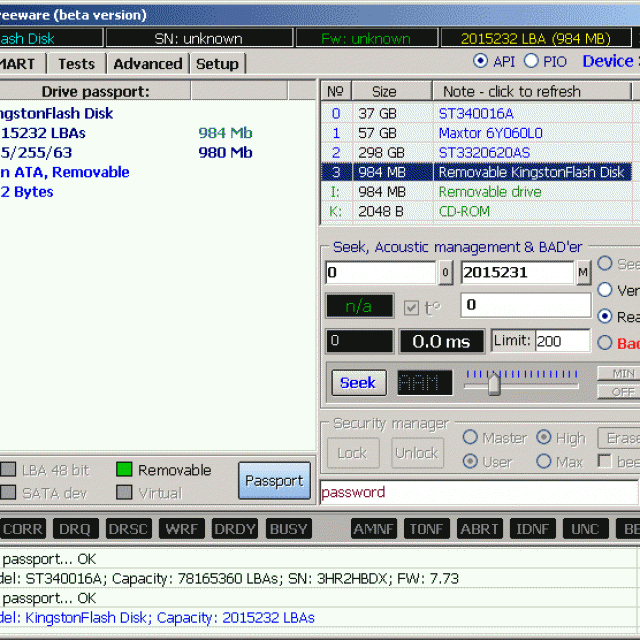
The first tab is Standard, which provides information about the passport of the hard drive or drive that we want to test. (Selection is made in the upper right window of the section).
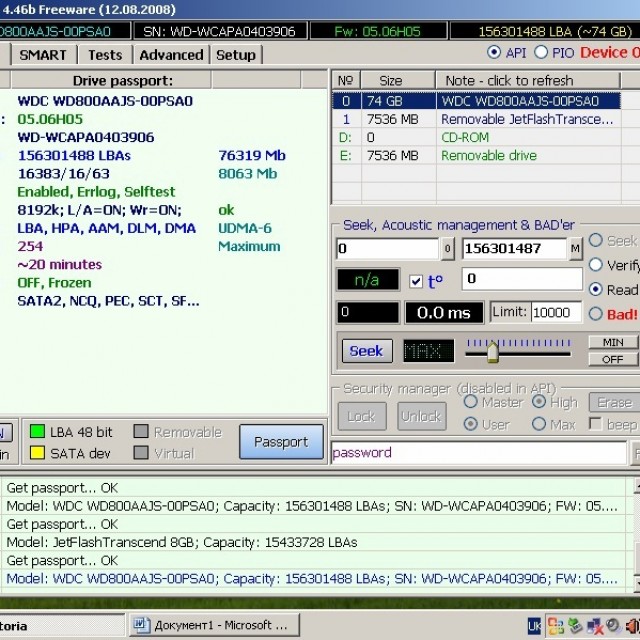
Photo: information about the hard drive passport
The second tab is Smart.

Photo: tab for checking disk self-test parameters
Here you can check such parameters of the HDD self-testing system as:

On the right side of the window, click the GetSMART button and get an assessment of the health of the hard drive as a whole (next to the GetSMART button) and by parameters.
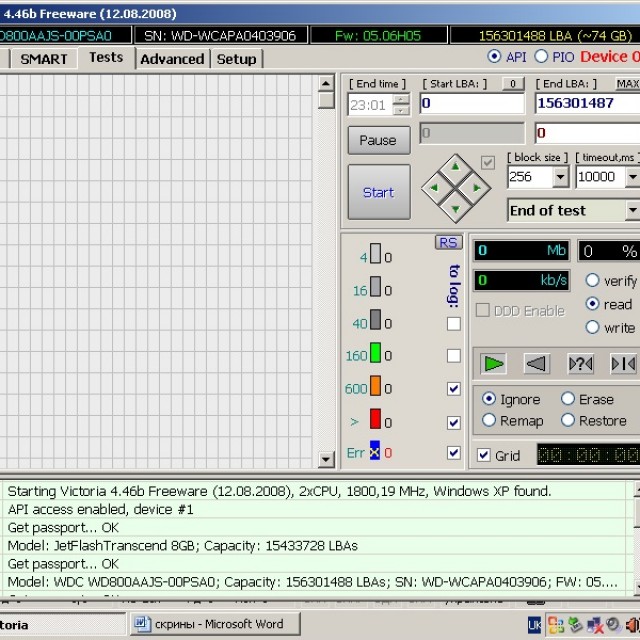
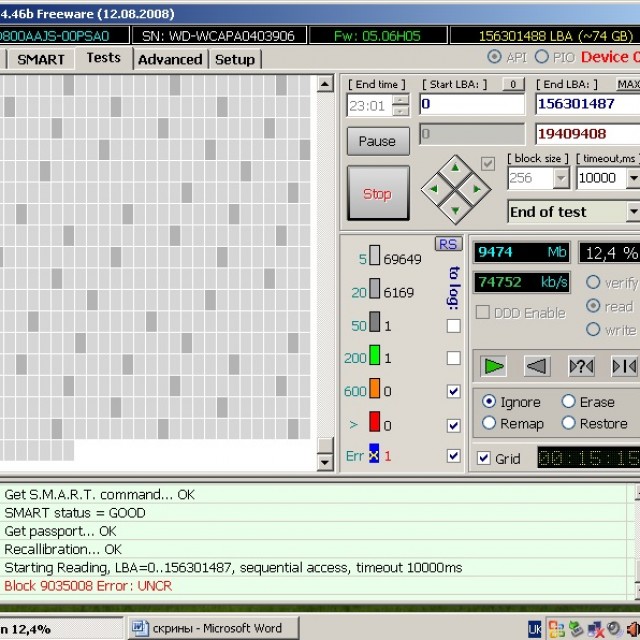
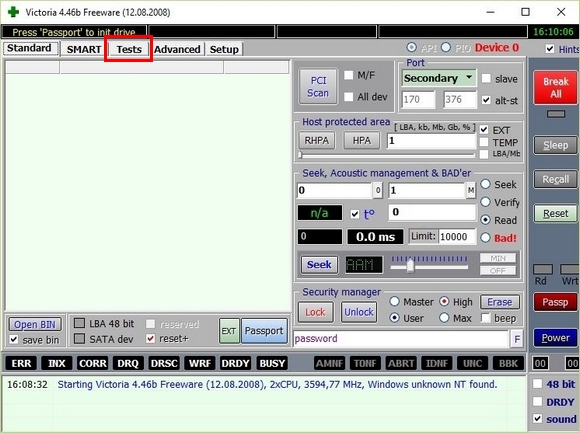
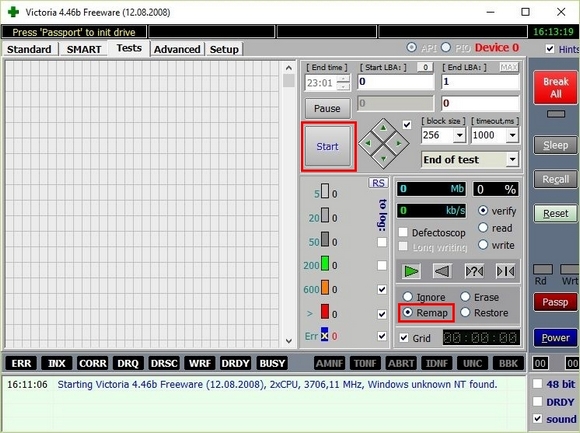
The third tab is Tests. The main partition, which allows you to quickly detect and cure disk sectors.
The hard drive is divided into many clusters of the same size. The Victoria program, while running, accesses each cluster during testing. The duration of the call is analyzed. The longer the wait time, the more likely there is a physical defect in that area.
There are many reasons for defects:
In this section, testing launch modes are important, which can be selected in the lower right window. These are the modes:
- Ignore - allows you to run the test in information mode, without making adjustments;
- Erase - mode for cleaning the hard drive (used carefully and rarely);
- Remap - check with simultaneous replacement of damaged sectors with working ones. Can be used after checking in ignore mode if damaged clusters are found;
- Restore - restoration. Used in the case when the remaining sectors are not reassigned after checking in remap mode.
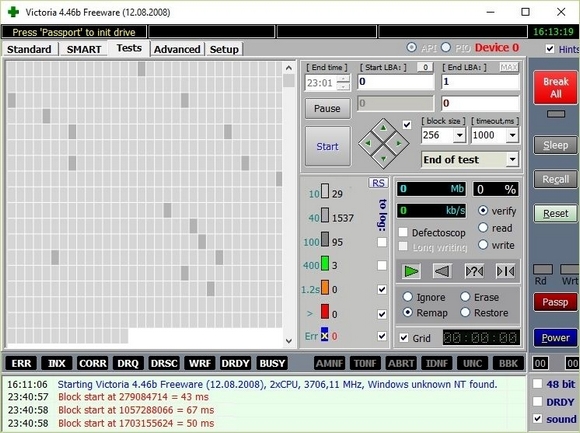
To start the test, press the “START” button. The sectors being checked are graphically displayed in the left window and are indicated by color. In the windows on the right you can see the percentage of the tested device volume and the number of tested clusters.
Bad sectors on the HDD are hidden by replacing them from the reserve area of the hard drive. Reassigned so that they are no longer read. The utility allows you to restore only a hard drive that does not have any physical damage in its parts. If there is wear or an obvious breakdown, then software, of course, cannot be corrected.
Testing with the utility is considered low-level, but has high performance. So testing a 232 GB device takes about 60 minutes.
After the testing, error correction or recovery procedure, you need to restart the computer and recheck. The result should improve.

If, as a result of testing, there are too many bad clusters and they are located at the beginning of the hard drive, then such a disk is not recommended. Viktoria contains a function that is useful in this case, allowing you to halve the size of the hard drive at the expense of bad sectors. After this procedure, the HDD can be used as a second disk, or external storage. It is not suitable for installing an operating system.
Video: HDD diagnostics and repair
Legend
During testing, you can see rectangles of different colors in the window.
They clearly display a picture of the disk status:
- The sector marked in white is considered normal. The response from him comes within 5 ms;
- light grey. Response within 20 ms;
- grey. The response comes within 50 ms;
- green. Response within 200 ms;
- orange. Response within 600 ms;
- red. Sectors that will no longer work;
- blue. "Deadly" sectors. Cannot be restored.
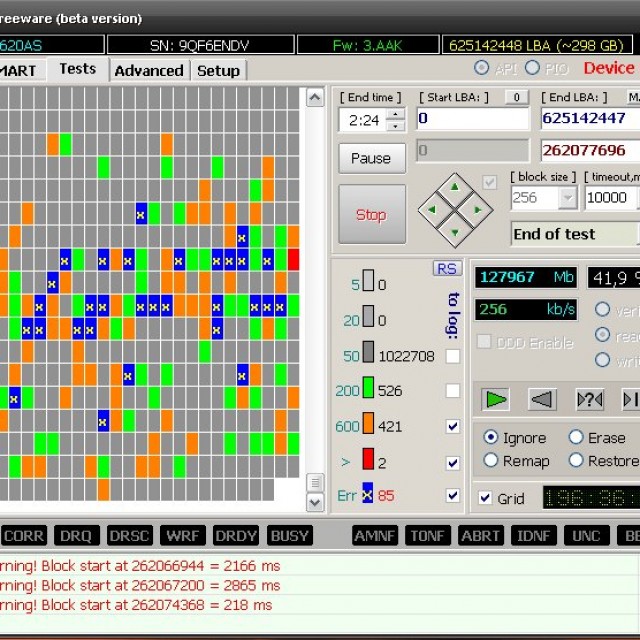
All these designations are in the test section, in the middle lower window. Next to them are numbers indicating the response time from the cluster to the program. The gray and white sectors are not damaged. Green is also a worker, but already strives for bad things.
Orange is a bad sector that can be restored either low level formatting, or the utility of S. Kazansky.
In order to be able to use the functions of restoring these sectors, you need to check the boxes opposite the designations in the check boxes.
To ensure proper operation of your computer, it is recommended to periodically test its component devices. The main device is the hard drive. Typically it houses the operating system. The user's comfort at the computer depends on the performance of the disk and its performance. Perform production tasks.
A high-quality, fast HDD testing program is necessary for a specialist involved in technical support, and for the average user. The functions of full-fledged and, importantly, fast low-level testing are performed by Sergei Kazansky’s Victoria program.
Majority modern computers run under the Windows operating system, so it is recommended to use version 4.46. It can be found on the manufacturer's website. The latest release of the program was June 2013. It is compatible with Windows 7, does not load the registry, and can be launched from any media. Easy to use.

Victoria serves as an assistant in various situations. For example, when buying a used drive to assess its technical condition, when the operating system slows down, to restore important information. In other matters, and to delete irrevocably classified information.
The program is a complete solution that combines the capabilities of several diagnostic utilities for the hard drive and useful functions. It is one of the most widely used programs for recovering bad HDD sectors.
On the most reliable and high-quality hard drives, bad sectors may appear some time after installation in the computer. If there are too many bad sectors, the hard drive stops functioning normally and requires replacement. However, it is often possible to recover a hard drive using third-party software. In this material we will describe treatment programs hard drives, and we will also conduct detailed instructions on working with them.
Bad sectors
User information on a personal computer can be recorded on magnetic disks. Their surface is divided into sectors and tracks. If it is not possible to extract information from a sector, it is called faulty. Recovering such bad blocks is difficult, but quite possible. It is worth considering that after treatment, information from the hard drive must be copied to another drive. Over time, it is better to replace the hard drive. If bad sectors begin to appear on the hard drive, their spread will not stop after repair. The device may fail at any time.
Victoria HDD
One of the most effective treatment programs sectors of hard The disk is considered Victoria HDD. The program is distributed completely free of charge. The application runs in DOS mode, so it requires certain preparatory operations. First you need to create a bootable flash drive. You also need to download the Victoria HDD utility image in ISO format. You will need to download and run an application called Win Setup FormUSB. In the drop-down menu you need to select a USB drive, which should become bootable as a result. You need to check the box next to the “Autoformat” item. Also check the “LinuxISO” box and specify the full path to the Victoria HDD program image. To begin the process of recording these files, click on the “Go” button.
BIOS Settings
Since programs for treatment of severe drives are operating in DOS mode, you must BIOS setup. Then you need to restart your computer. After shutdown, to enter the “Setup BIOS” utility, you need to press the F8 or DEL button several times. Some devices may have different keys set to launch BIOS settings. To find out which key is responsible for entering SetupBIOS on your PC, you need to read the information at the bottom of the screen immediately after turning on the device. After that, go to the “Main” section and find the “SATAMode” item in it. Here you need to press the “Enter” button and select “IDE”. In the “First Boot Device” field you need to set the value to “USB”. Now, to save the settings changes, press the F10 key. After this, the computer will restart.
Check and recovery
If the above steps were performed correctly, then after booting the computer, the VictoriaHD program should start automatically. To start restoring your hard drive, you need to press the key with the English letter “P” on your keyboard. In the menu that opens, you need to select the port to which the hard drive is connected. Today, almost all drives operate via a SATA socket. Therefore, it is necessary to set the switch to the Ext PCIATA/SATA position. Now press the F9 key. As a result, the information obtained from the SMART table should appear on the screen. Particular attention should be paid to the “Currentpendingsectors” column. This indicates the number of sectors from which information is not read. This number needs to be remembered or written down. After this, you need to press the F4 key and start scanning in the “BB: Erase 256” mode. The utility will automatically try to find bad sectors and restore them. Information stored in these sectors will be deleted. You need to open the SMART table again and see if the number of bad sectors has decreased. If some of them could not be recovered, then you can try scanning the hard drive in a different mode. To do this, press the F4 button again and select “BB: ClassicRemap”. In this mode, when the application detects a bad sector, it will not restore it, but will simply mark it as non-working. This approach allows you to stop the spread of bad sectors. After the Victoria HDD application finishes checking, you need to restart your personal computer.
Programs for HDD recovery: operating system tools
After the drive is scanned by the Victoria HDD utility, you need to check special utility, which is installed by default in the operating system. To do this, open “My Computer” and right-click on the local disk icon. Now go to the “Service” tab and select “Run check” in it. In the window that opens, opposite the line “Automatically correct errors” you need to check the box. After that, click on the “Run” button and wait until the program finishes. Do not turn off your computer until the verification process is completed.
HDD Regenerator
HDD Regenerator is free program, designed to treat the hard drive. The main advantage of this program is its clear and user-friendly interface. This is the reason why many users choose HDD Regenerator. Before running this program, it is better to close all applications first. After this, you need to open the “Recovery” menu and click on “Start processing” in it. A warning window about BIOS settings should appear on the screen. Here you need to click on the “No” button. Now select the drive that needs treatment. After this, the screen should open command line, in which you need to enter a number from 1 to 4. You need to enter the value “2” and press the “ENTER” key. The utility will ask you to specify where to start scanning. Then you need to click on the “Enter” button. The application will scan the HDD and provide information about bad sectors. When the check is complete, enter 2. After this, the utility will not only check hard disks, but will also try to restore bad sectors. It should be noted that the built-in hard drive cleaner works very slowly. The process sometimes takes several days. The HDDRegenerator utility allows you to restore the ability of blocks to store information, rather than simply marking them as unused. This explains such a long scanning time.
The MHDD program has the same set of functions as Victoria HDD. Works this application in DOS mode. Using MHDD, you can view the SMART table, diagnose and treat the hard drive. There is no Russian version of the program. To work with MHDD, you need to create a bootable flash drive, just like for the Victoria HDD utility. After this, you need to configure the BIOS and restart the PC. Then you need to press the F2 key and select the device with which you will work. To scan the surface of the hard drive, you need to press the F4 key or enter the word “SCAN”. As a result, the screen will display settings in which all destructive functions, such as erasing and deleting bad sectors, are disabled. After this, you need to press the F4 key again. As a result, the scanning process will start. The display will display a table in which the colors of the cells will change during the test. White, gray and green colors indicate that the sector is healthy. Yellow indicates a risk of sector damage. Red color means the block is damaged. If the drive has bad sectors, you will need to copy all the information to another hard drive, and then enter the ERASE command, which will completely erase all data from each sector. This will allow you to get rid of soft-bad blocks. If this action does not solve the problem, then you can try pressing the “F4” key and enabling the REMAP option. After this, the utility will simply mark the bad sectors so that they will no longer be used, as the built-in operating system tools do. Windows systems for hard drive treatment.
Frequent users personal computers encounter hard drive problems that affect system performance. The main causes of hard drive failure are: bad sectors in HD D and faulty file system. In this material we will describe in detail HDD problem fixing process, and also describe methods for recovering information on hard drives, if it is faulty or completely out of order. I would also like to note that problems associated with the hard drive need to be given special attention. For example, if the HDD becomes completely faulty, then you are unlikely to be able to recover information from it. That is, all your documents, personal videos and photographs, as well as other files may be lost forever.
Reading SMART readings from the hard drive
If files are not copied on your computer, programs freeze after opening, then possible reason this could be faulty HDD. Typically this behavior of the operating system is due to with bad sectors in the hard drive. To be sure that the problem is related to bad sectors of the HDD and not to malware, the first step is to confirm this guess. If the situation described above is observed on your computer, we will install the utility on it CrystalDiskInfo. This utility describes the status of all hard drives installed on your computer. You can download CrystalDiskInfo from its official website http://crystalmark.info. The utility supports Windows OS, from XP to Windows 10.
To check information about the hard drive, the utility uses self-diagnosis technology SMART. SMART technology is used on all manufactured HDDs. Below is an example of checking SMART readings using the CrystalDiskInfo utility in the hard drive WD1200JS. From this window you can see that the program has detected its status as " Fine" - this means that this hard drive is in perfect order and you should not worry about it.
In the following image in the SMART readings, the CrystalDiskInfo utility detected the status of the screw with the message " Anxiety" This message means that the hard drive already has bad sectors or is overheating.
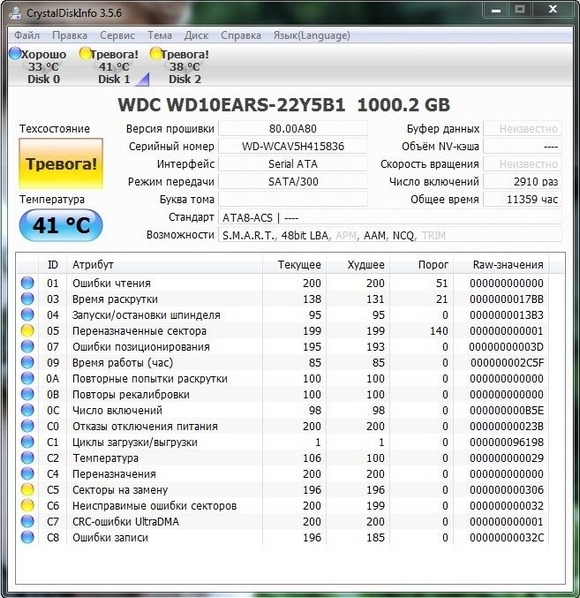
If you see the message " Bad", then this will mean that all the bad sectors on the hard drive have been reassigned and soon it will be completely covered.

In both cases, when the program detected messages " Anxiety" And " Bad", you should do backup copy all data on the computer, since the screw will soon become unusable.
One solution that can temporarily fix your screw is the utility Victoria. This utility can do REMAP BAD sectors, that is, it will reassign bad sectors to backup ones. In the next section we will describe in detail the process of REMAP BAD sectors using the Victoria utility.
Recovering a hard drive using the Victoria program
Utility Victoria created by a Belarusian programmer and distributed free of charge. You can download the utility on its official website hdd-911.com. The Victoria utility is distributed in two versions for Windows and DOS. In our case, we will download the Windows version. After launching the Victoria utility on Windows, we will be taken to such a window.
To fix the hard drive, we need to go to the “Tests” tab. On this tab we are interested in the area with the radio buttons Ignore, Erase, Remap and Restore, as well as the Start button. To fix it, we need to select the Remap radio button and click Start.
After these steps, the Victoria program will begin the process of repairing sectors, which can take quite a long time.
After reassigning the sectors, Victoria may be able to restore the bad sectors, and the CrystalDiskInfo utility will display the value “Good”. But a magical fix may not happen, since the reserve sectors may simply be absent and Victoria will not be able to help. In this case, there is only one way out - do a complete HDD replacement. In addition to screw treatment, Victoria also provides checking readings SMART on the " tab SMART».
I would like to note that all the operations that you perform with with the help of Victoria, you do at your own peril and risk. Using the utility, an inexperienced user can damage the hard drive and also deprive it of warranty service.
Fixing file system problems on your hard drive
Many users on Windows computers often experience problems related to file system errors NTFS. File system problems occur due to malicious utilities and various software. Also, file system problems most often occur due to inexperience the PC user himself. For example, incorrect handling of the utility Acronis Disk Director. To solve this problem, Windows itself will help us. Windows provides file system repair tool. In order to fix file system on a specific section, you need to go to its properties. In our case it is system partition operating system Windows 10. To run the fix we need to go to the “ Service».
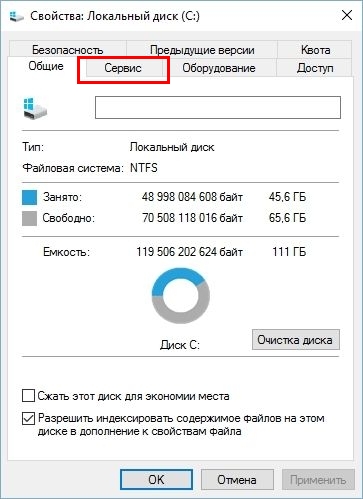
On this tab there is a button Check that we will click.
After this action, a window will appear in which you need to confirm our actions.
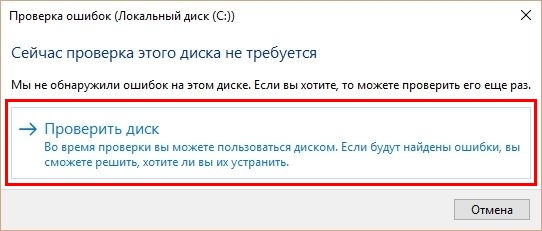
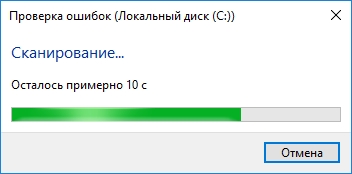
After confirming the action, Windows will scan this partition.
After scanning, the system will display a message with the results of scanning the partition for errors.
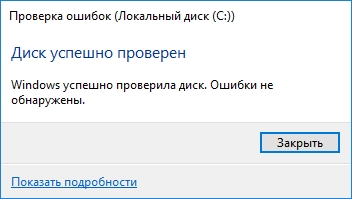
Using this method, many users restored the operating system to normal operation without having to reinstall it. If the problems lie in the HDD itself, then no amount of checking the disk or reinstalling the OS will help in this case. The only option in this case is that you can resort to the Victoria utility or completely replace the screw with a new one, while reinstalling Windows.
Recovering disks using Acronis True Image 2016
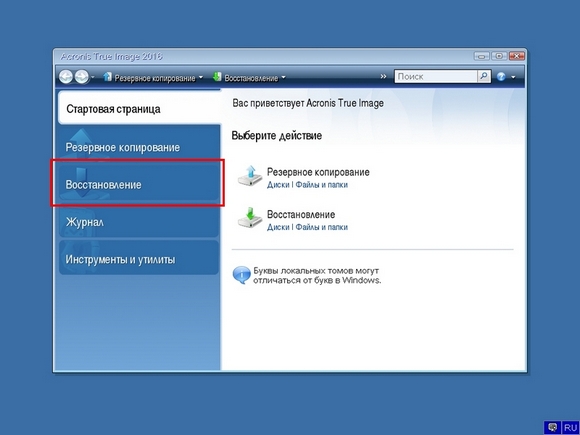
The software is the ideal tool to create a full backup all local partitions, including the system one. This feature is used by many administrators around the world. The created backup of local disks can be restored in a very short time. For example, if the system is infected with a virus or the HDD is broken, in this case you will restore all OS disks in a short period of time. You can find Acronis True Image 2016 on its official website www.acronis.com. By launching the program in question, we will be taken to such a window.
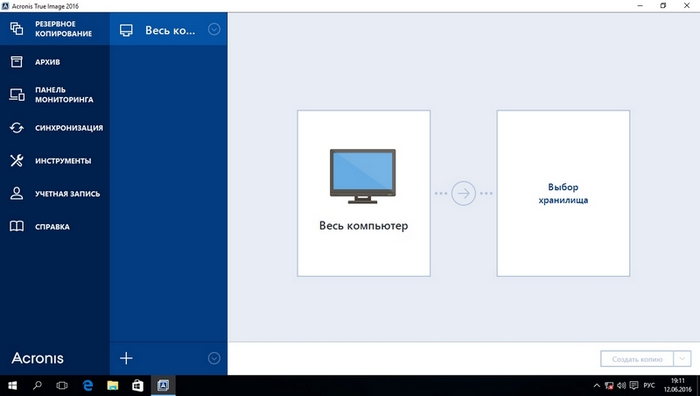
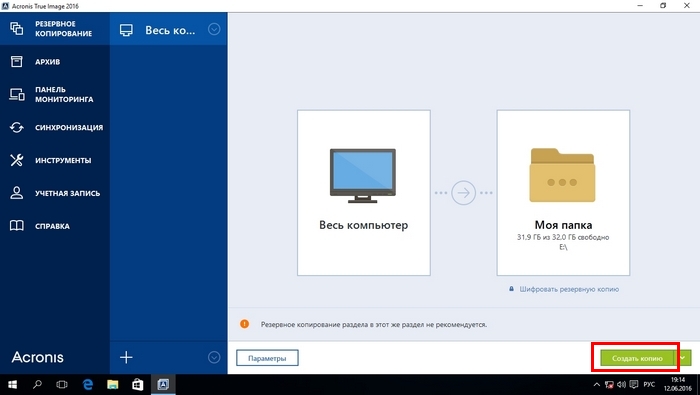
First of all, we will show our readers how you can create a backup copy of local Acronis True Image 2016 partitions. On the first tab “Backup” you can see that the entire computer is selected for backup. That is, a complete backup of all local partitions, including the system one, will be carried out. In the next block you need to select a backup location. In our case, this is local drive E. After selecting the type of backup data and where to save it, click the Create a copy button located in the lower right corner.
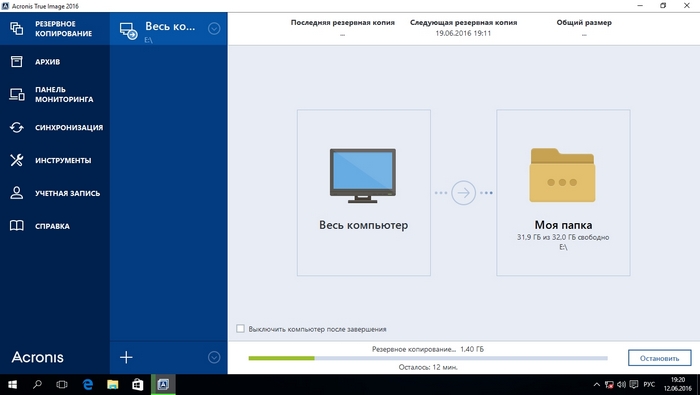
Depending on the amount of data being saved, the time it takes to create a backup will depend.
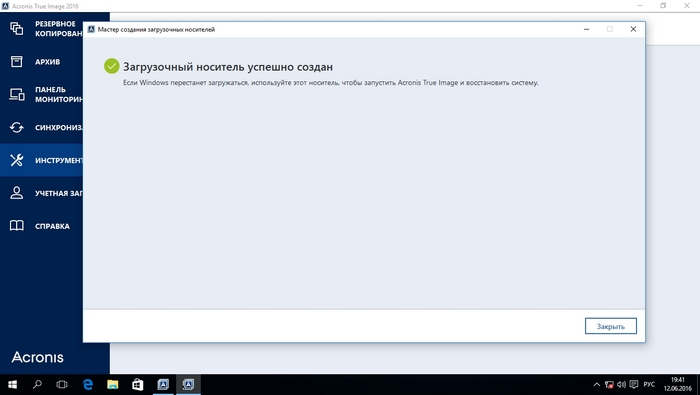
Having completed backup, we will describe the process of restoring a computer. To do this, we need to create a boot disk or flash drive for Acronis True Image 2016. This can be done by going to the “ TOOLS/BOOTABLE DRIVE CREATION WIZARD" Below is the wizard that should open.

In this wizard, we will select the first option and continue. In the window that appears, select where we will save the boot drive: into the image or to a flash drive.

After saving the boot drive, the wizard will display a final window.
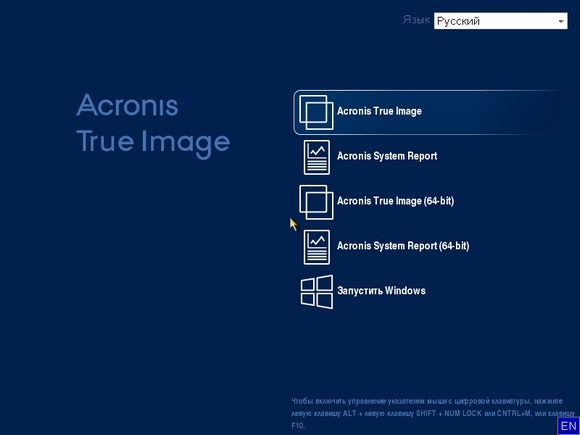
By creating a bootable USB flash drive or optical disk with Acronis True Image 2016, you can start data recovery. To do this, let's boot from bootable flash drive when the computer starts. After booting from the boot drive, we find ourselves in the Acronis True Image 2016 menu. Select the first item in this menu, after which we find ourselves in the main Acronis True Image window.
In the program window, go to the “” tab and find the backup copy of the entire system we previously created.
Now to restore system disk with Windows and local disks, press the button Disk recovery.
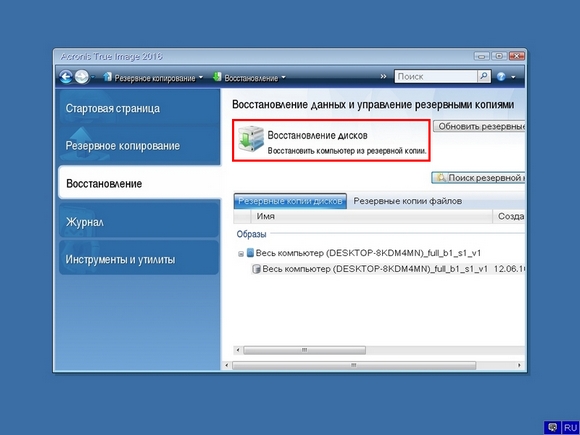
In the wizard that appears, select the item “ Recover disks and partitions" and continue.
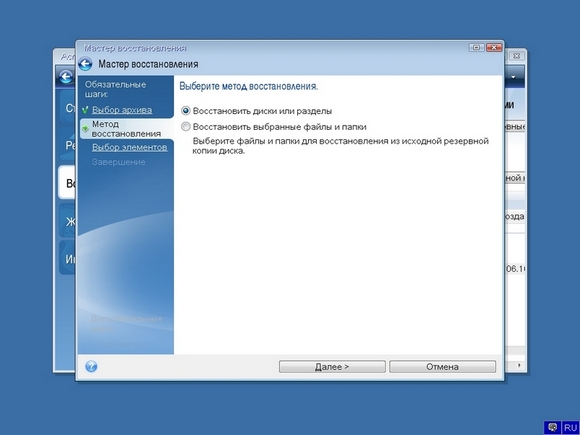
In the next window, select all local disks and continue the wizard.
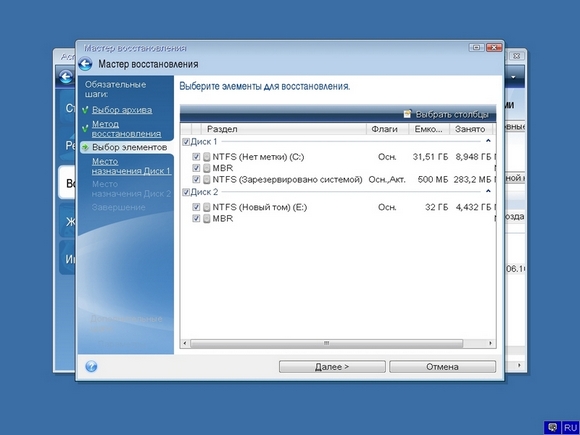
In paragraphs " Destination"For the first and second disks, select the original HDDs. If there are many hard drives installed in the system, be careful not to mix up the screws. In the final window, click the Proceed button.
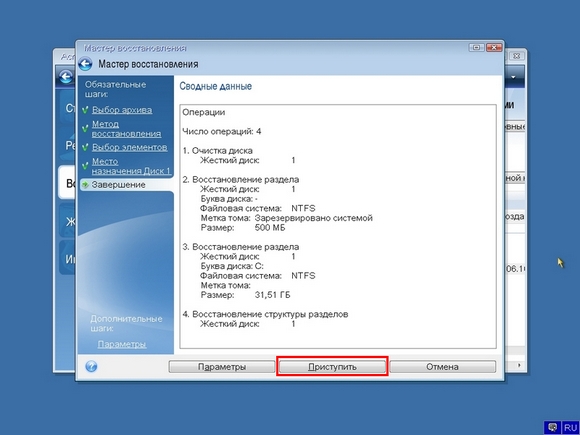
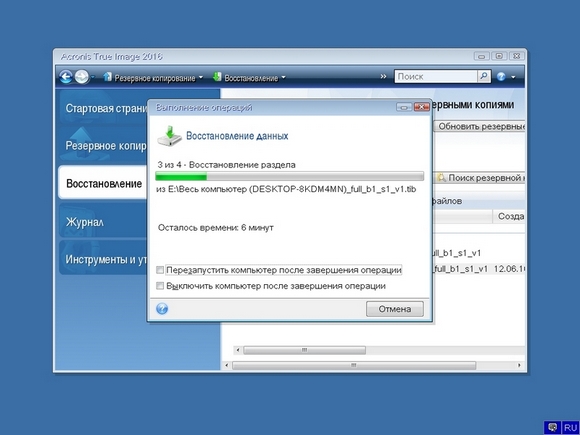
The backup recovery time depends on the size and speed of the HDD. In our case it took 10 minutes.
The example shows how easy it is to make a backup copy of your entire computer, so if you master the Acronis True Image 2016 software package, you can easily restore its functionality in cases where the system is infected or the hard drive is broken. Also, after mastering the program, you will not have questions about how to recover data from a hard drive.
Data recovery using Recuva
There are cases when reinstalling Windows or when using Acronis software, users mistakenly erase all information from the hard drive. If this is exactly the situation you have, then you shouldn’t be upset, since all the information can be found restore. Will help us with this task free utility Recuva. You can download the utility on its official website www.piriform.com. After launching the utility, the user is taken to a wizard that will help you restore all your data. Below is the sequential work of the master.

The example shows that data recovery using Recuva is a fairly simple process and almost any PC user can handle it.
Let's sum it up
From this article it can be emphasized that restoring a hard drive is not a very simple task, but depending on the situation, even regular user PC. I would also like to advise laptop owners to handle it as carefully as possible. For example, if the laptop is dropped or receives a strong impact, the HDD may be damaged. In addition, if you yourself have identified the problematic screw, then do not be afraid to open the case of a laptop or desktop computer yourself, since replacing the HDD is quite simple task. And we, in turn, hope that our material will be useful to our readers and will allow you to restore your hard drive.
Video on the topic