VirtualBox is software for virtualization personal computer from Oracle. The program has two versions - open source and closed. WITH using VirtualBox you can run different operating systems simultaneously, set up a network between them, share files, and much more.
You can run VirtualBox on Linux, Solaris, Mac OS X and Microsoft Windows, and also install most well-known operating systems on it. In this article we will look at how to use VirtualBox. Let's talk about installing and configuring VirtualBox, as well as some of the subtleties of working with virtual machines that can help you a lot. For ordinary users this software is available completely free of charge.
1. Installing VirtualBox
The VirtualBox virtual machine is installed like most other programs. On Windows you can download installation file from the official website. And on Linux, the program is available through official repositories. For example, in Ubuntu it is executed with the command:
sudo apt install virtualbox
We will not dwell on this issue in detail, since there are more interesting problems. After installation, you will find the program shortcut in the main menu. In terms of virtual machines, the main computer where Virtualbox runs is called the host, and all running machines are called guests.
2. Create a virtual machine
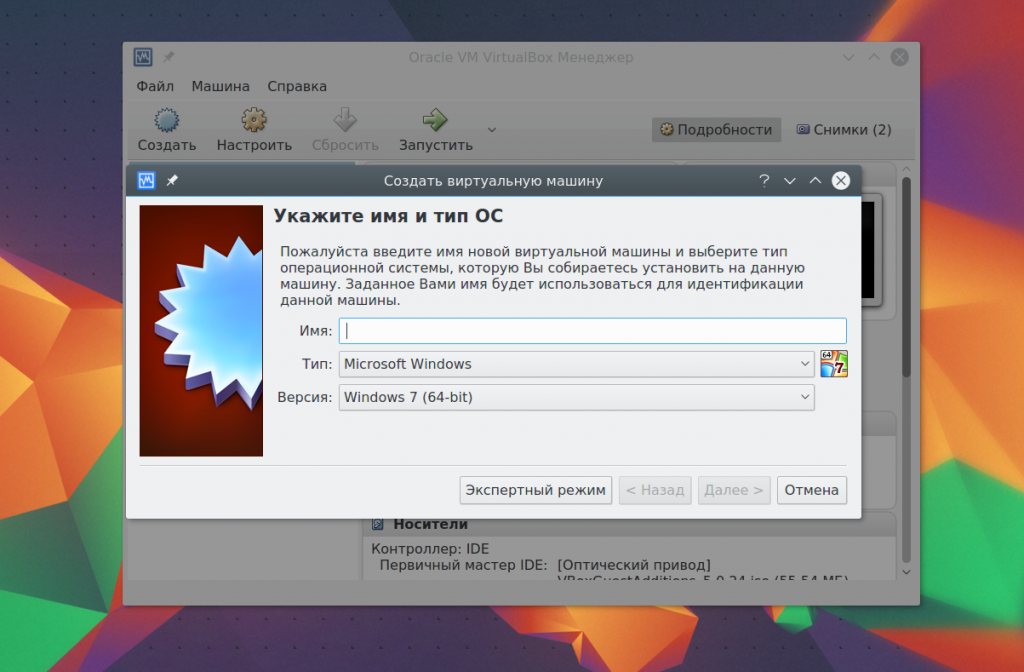
Before you can launch your first guest car, you need to create a new virtual machine in the program. To do this, click the button Create in the main window:
In the first step you need to select the type operating system, For example, Linux -> Ubuntu this will enable some optimizations needed for this system:
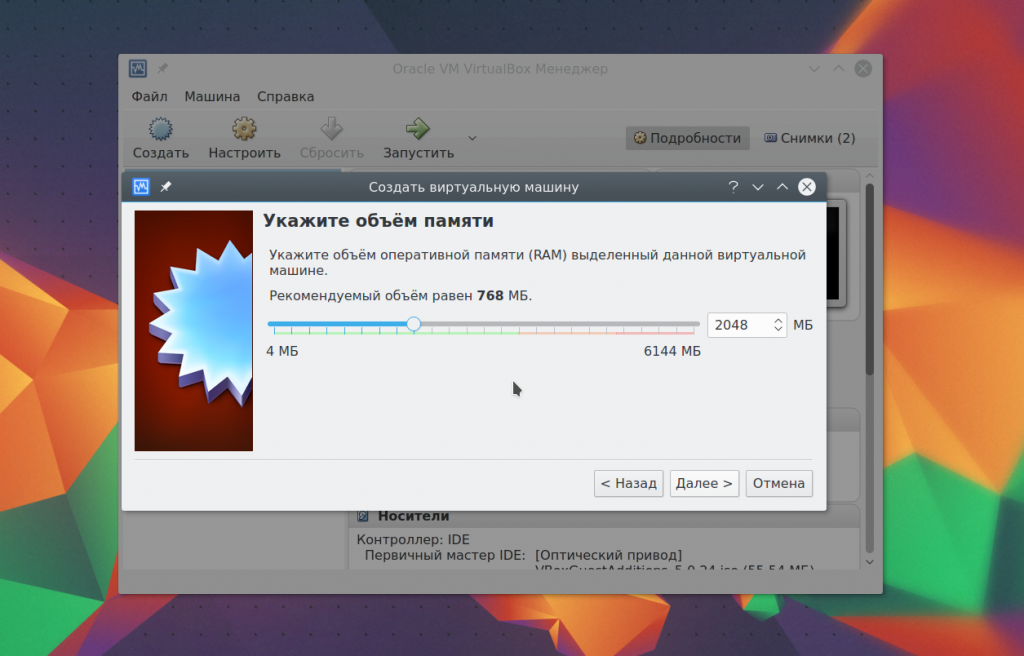
If you are working on a 64-bit system, you will be able to run both 32-bit and 64-bit programs. At the next step of the wizard, select the required quantity random access memory. This is a very important parameter, so if you have enough of it, it’s better not to regret it, 2 gigabytes will be quite enough.
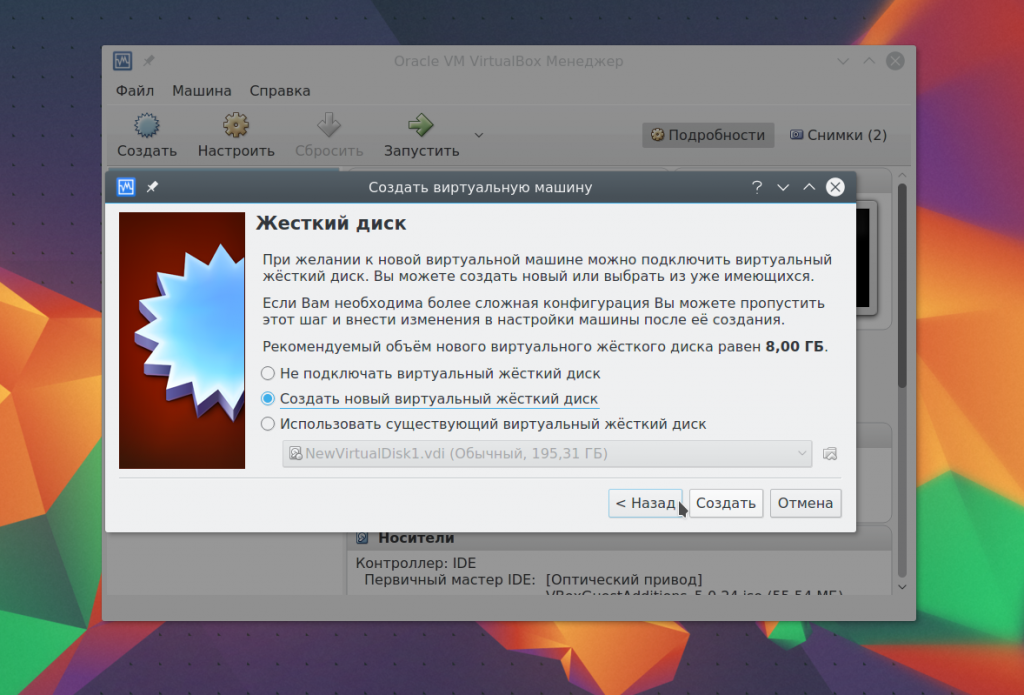
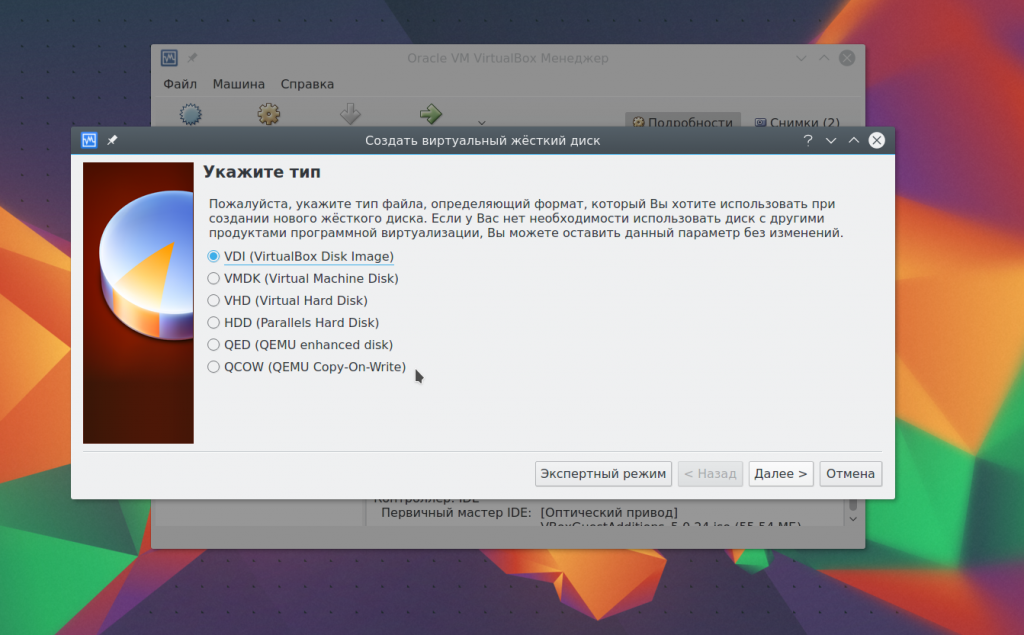
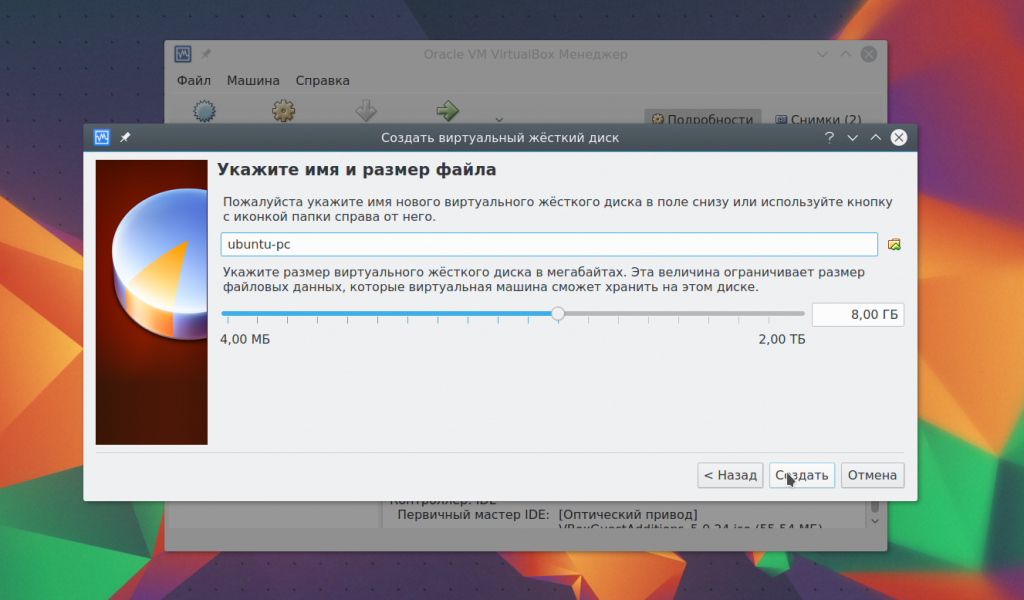
And at the last stage you just have to choose the size for the new disk, as well as its name:
3. Processor settings
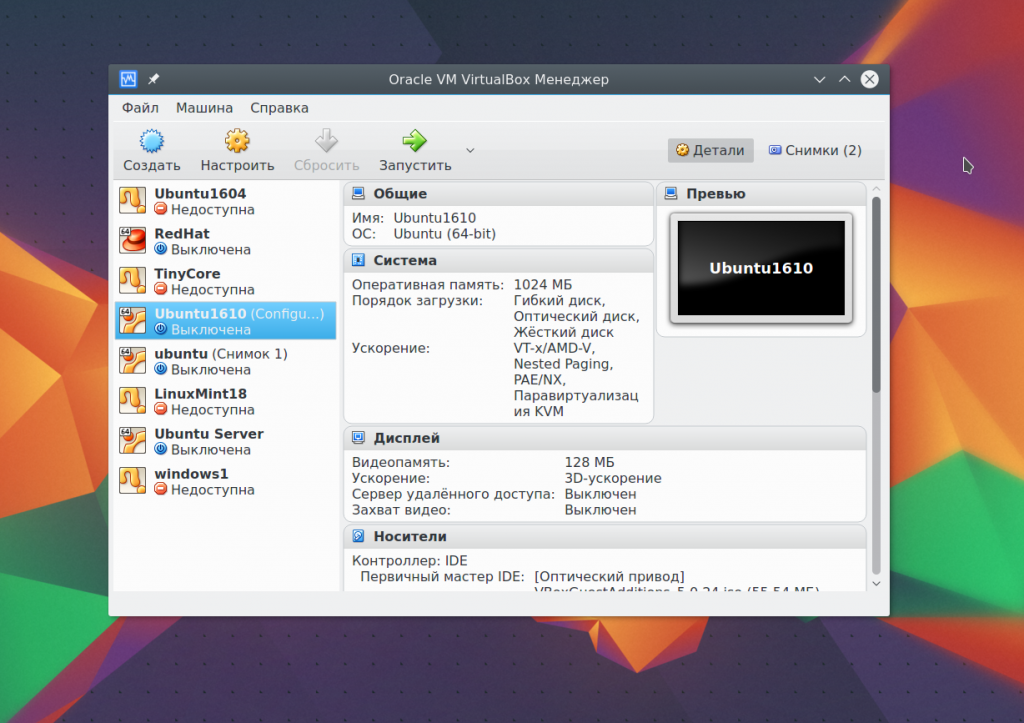
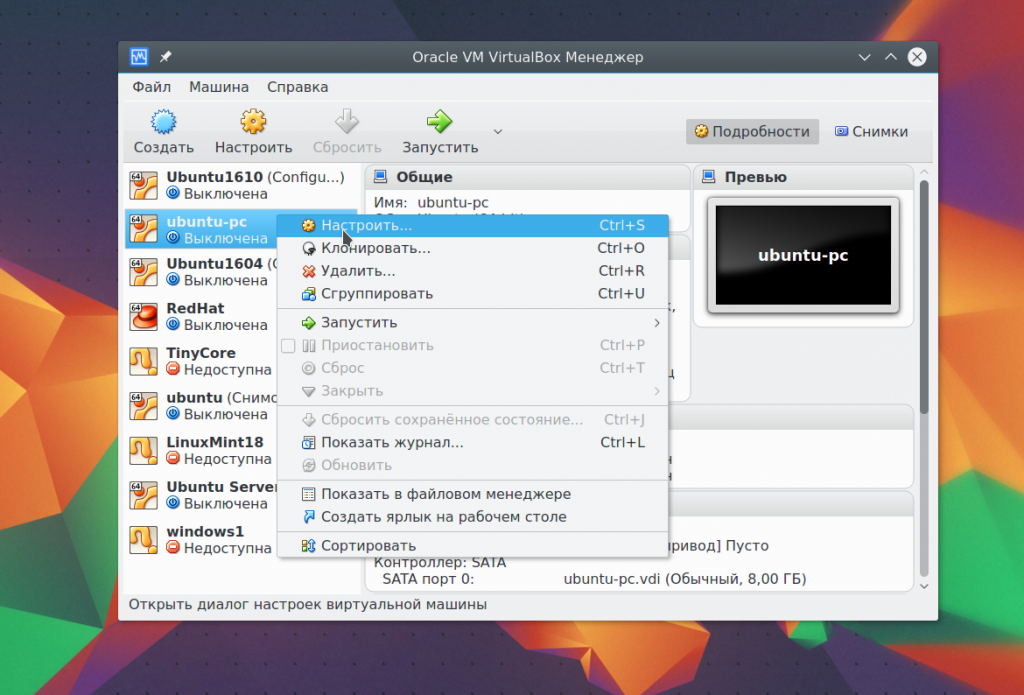
Select the created virtual machine and click Settings.
Select System, then go to the tab CPU:
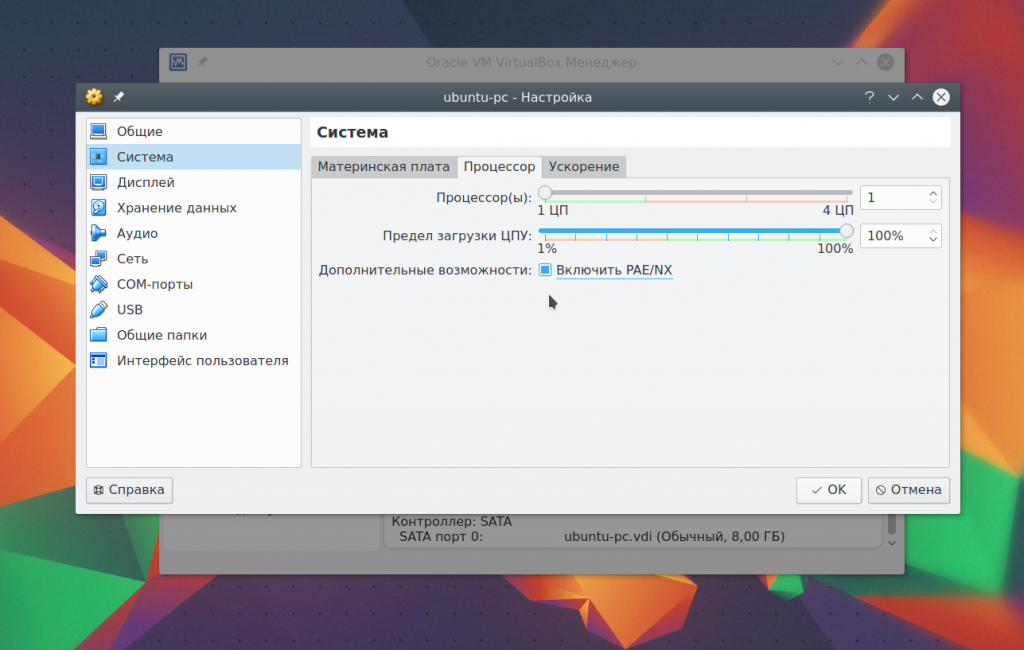
Here you can select how many processor cores the virtual machine can use, as well as enable PAE to support more than 4 GB of RAM on 32-bit systems and EFI emulation mode. Then go to the tab Acceleration.
Here you can select the hardware virtualization mode, as well as enable such additional features, like AMD-V and Intel-VT. This will increase the speed of the system.
4. Graphics settings
Default for virtual machine 18 MB of video memory available. This is very little for modern systems. Select an item Display, then drag the slider Video memory, so as to give the machine at least 128 MB of memory:
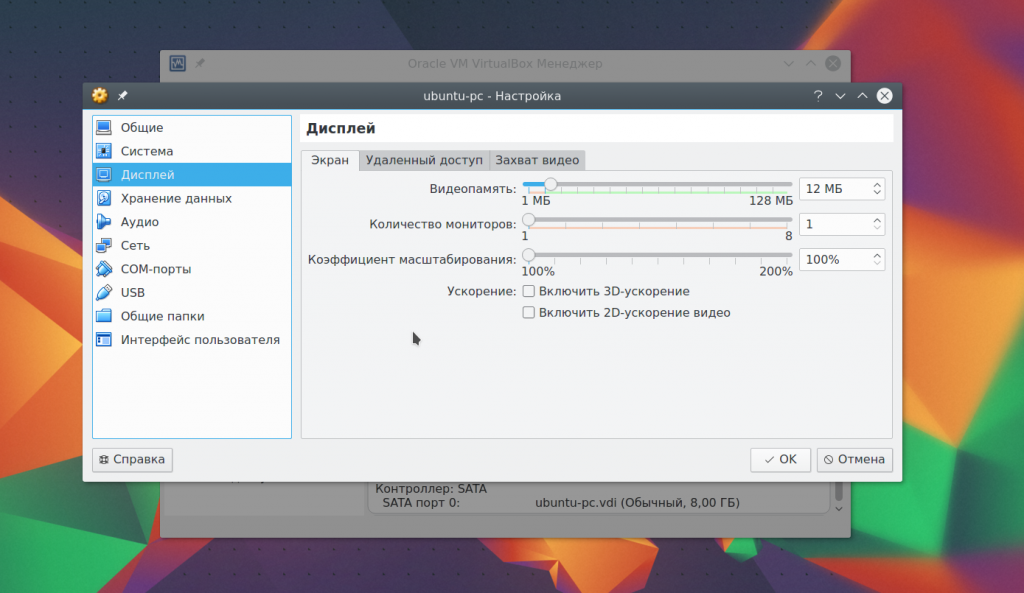
For 2 GB video cards, 256 MB will be available. Also, here you can configure the number of screens.
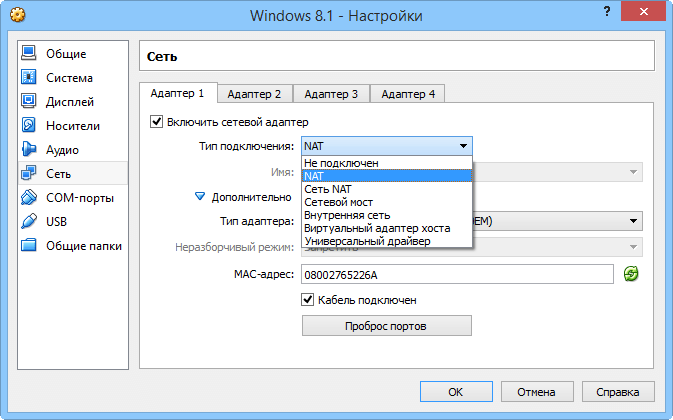
5. Network setup
By default, the virtual machine uses a network via NAT, which is convenient if you need to access the Internet from the machine. But if you want to set up communication between the machines themselves, or between a guest and a host over a network, you'll need a different method. Close the machine setup menu. Then open the menu File -> Settings.
There, select the network item and go to the tab Virtual Host Adapter:
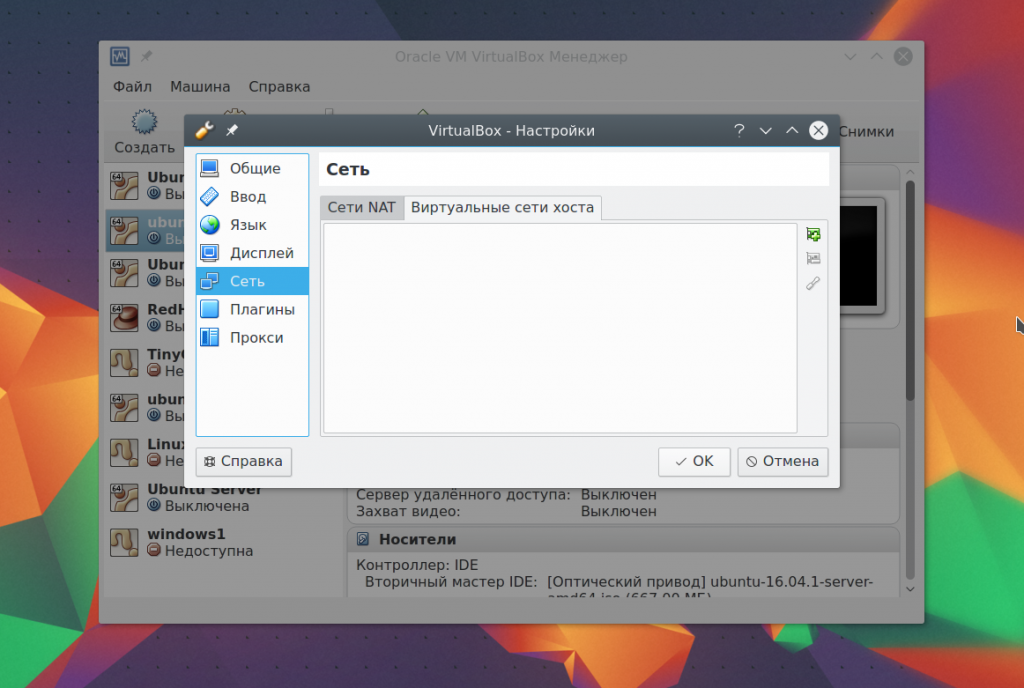
Here you will need to create a new virtual adapter using the green button with a plus sign:
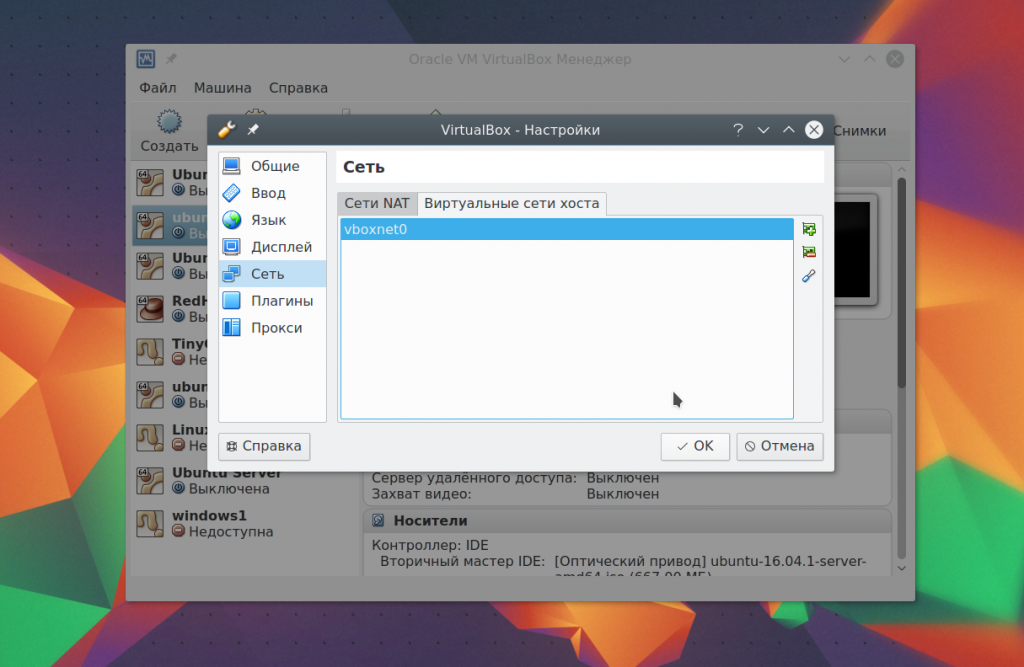
There is no need to change the settings, after that click OK. Next, open the machine settings again, go to the network item and select the adapter type - virtual host adapter, and the name - the one that was created for your adapter, for example, vboxnet0:

Now there will be a virtual network between all virtual machines connected to vboxnet0 and the host.
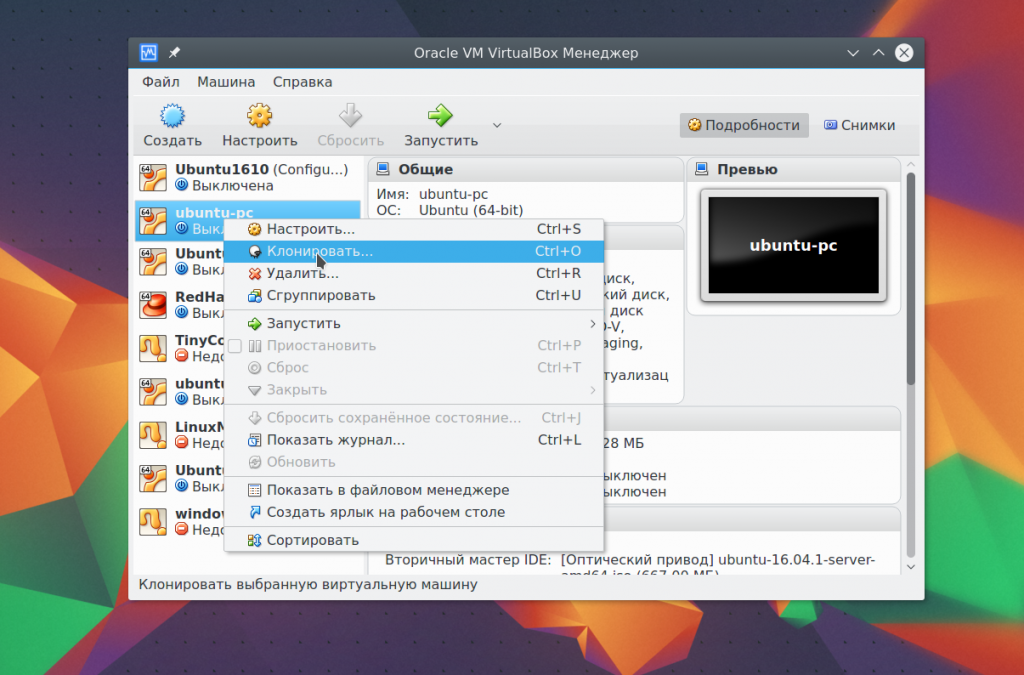
6. Cloning
You can do backup copy machine so that you can use it later or transfer it to another computer. To do this, use the option Clone. Just select it in the menu for the car:
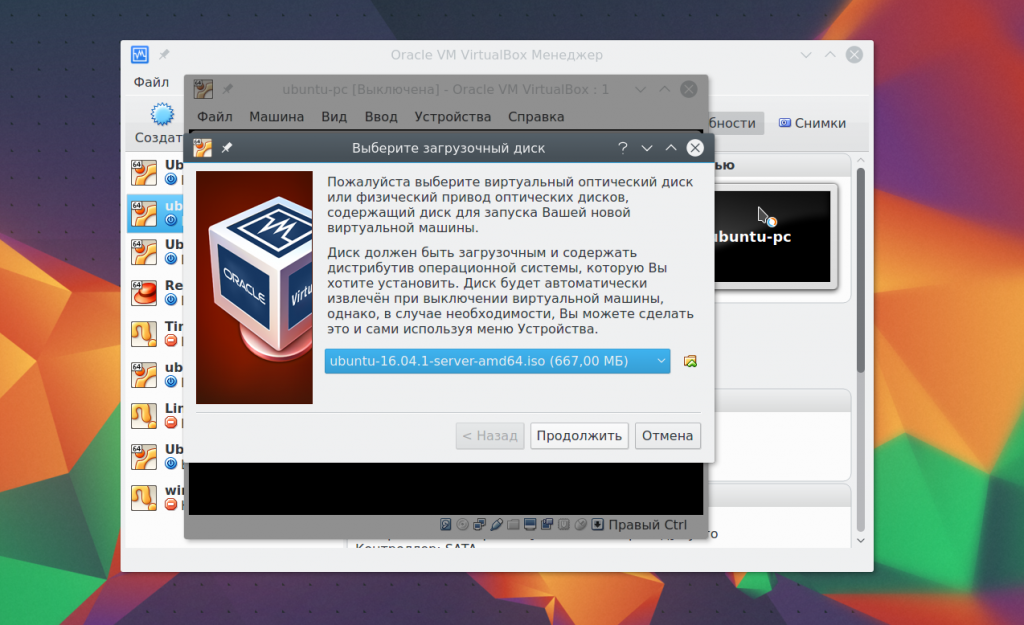
7. Starting the machine
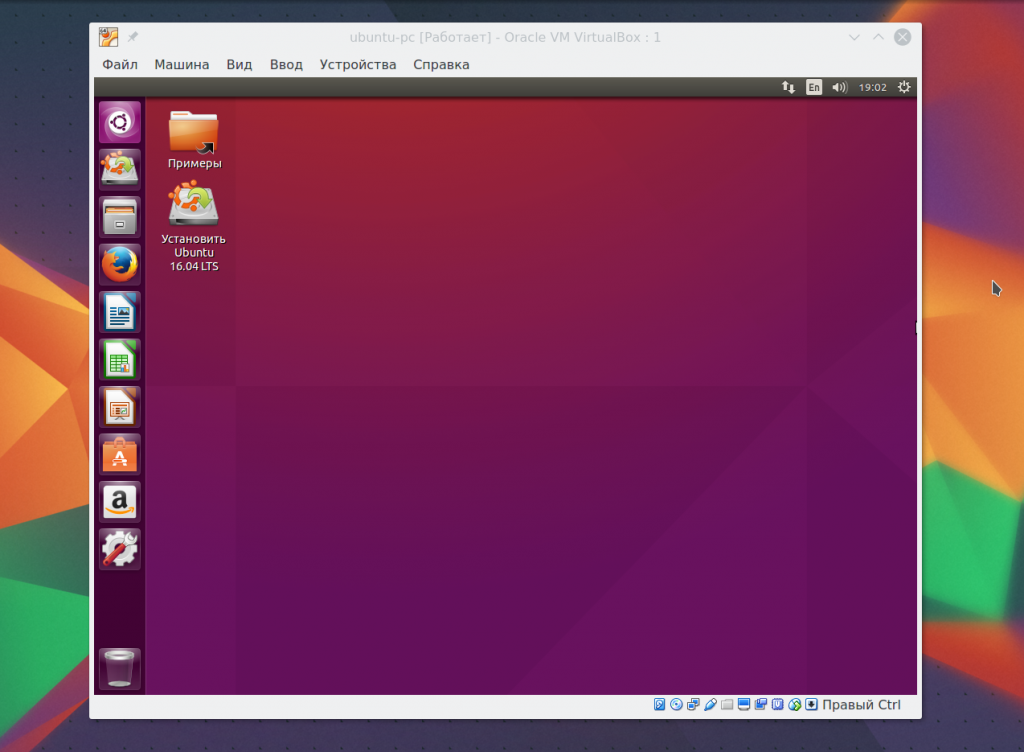
When you first start, you will have to select the media from which to install new system, it could be a DVD-ROM or ISO image systems:
You can change this image from the Devices -> menu Optical discs for already running car:

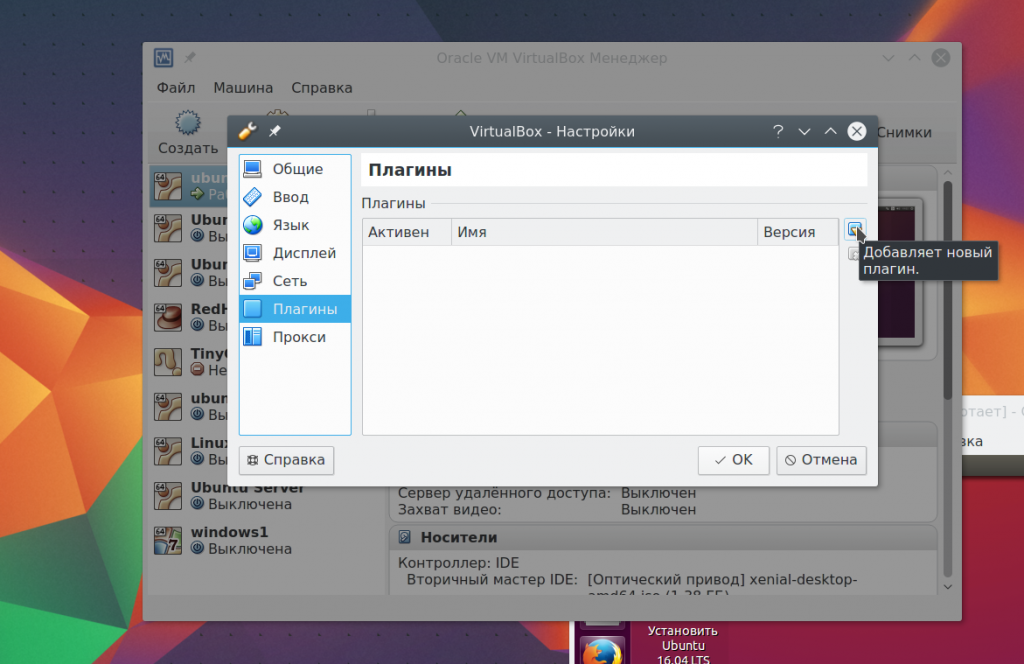
8. Additional plugins
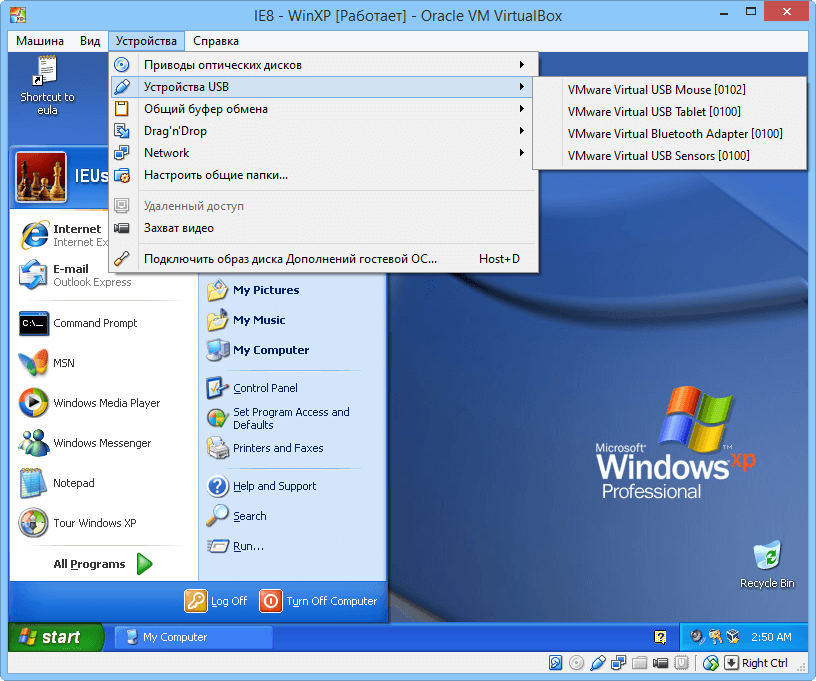
Additional VirtualBox extensions allow you to access USB devices from a virtual machine, webcam, configure remote access and other. To install, first download the VirtualBox-Extension-Pack file from the official website:
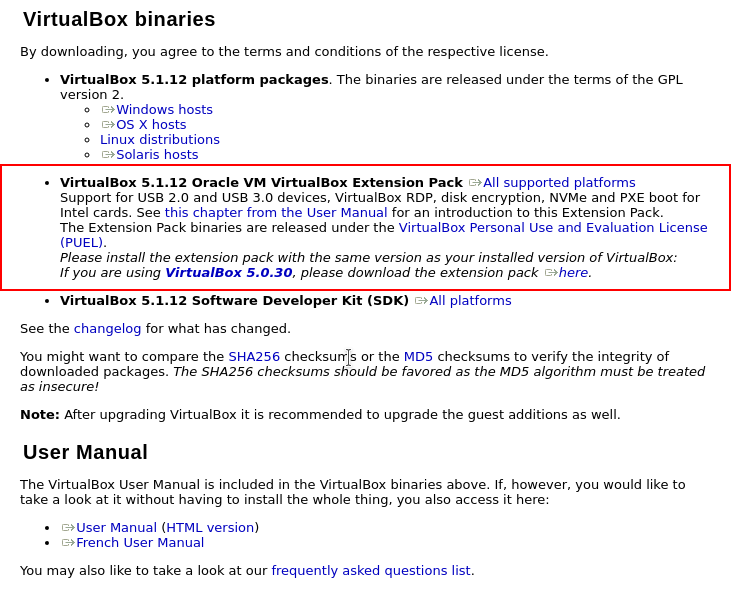
Then open the menu File -> Settings, go to the plugins tab and click the green button:
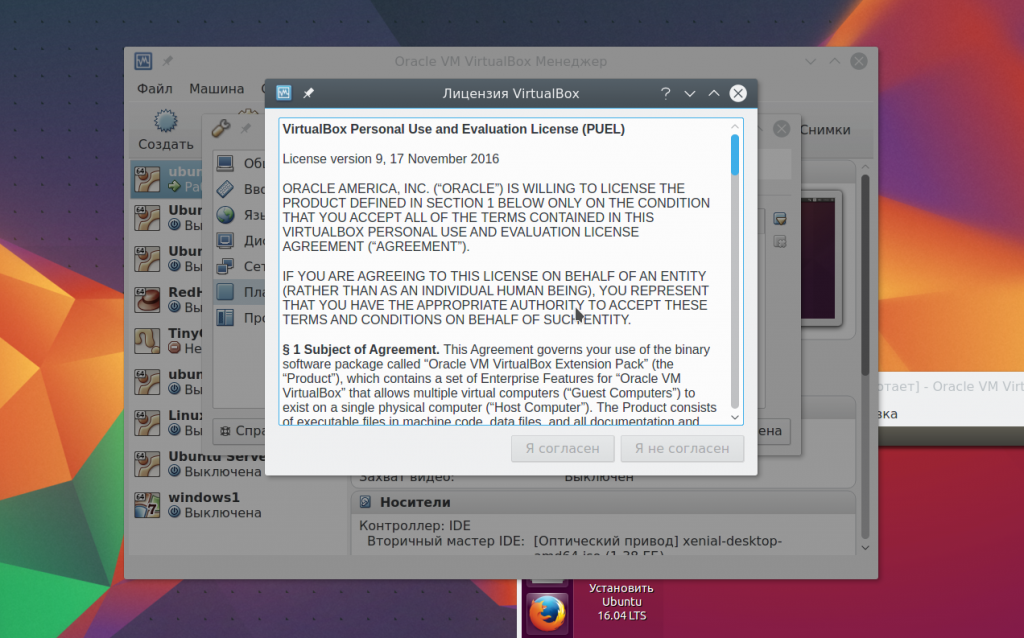
Confirm installation and accept the license:
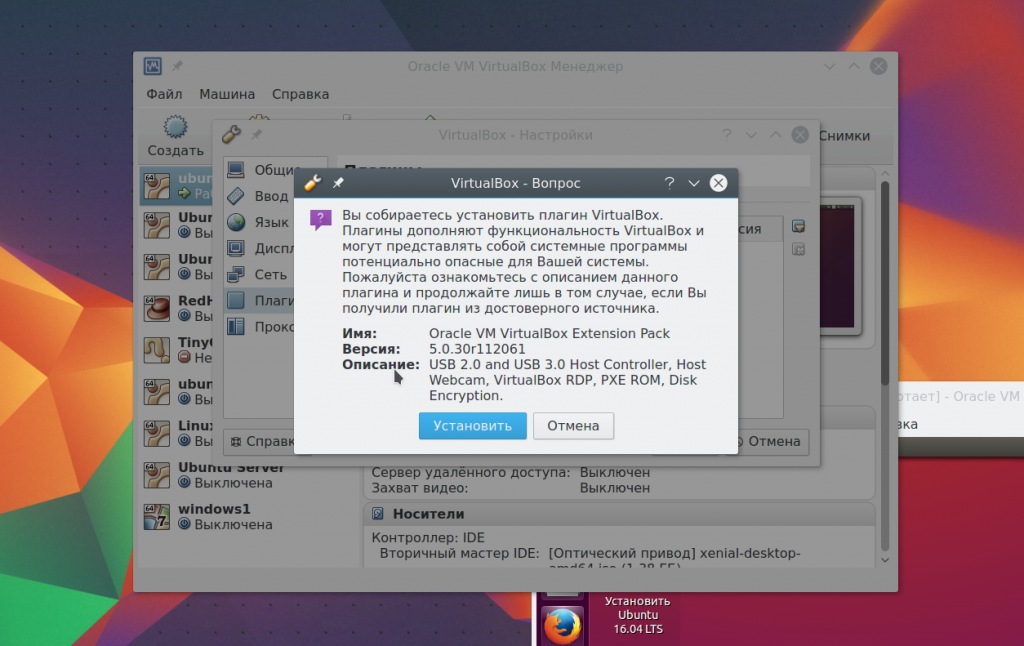
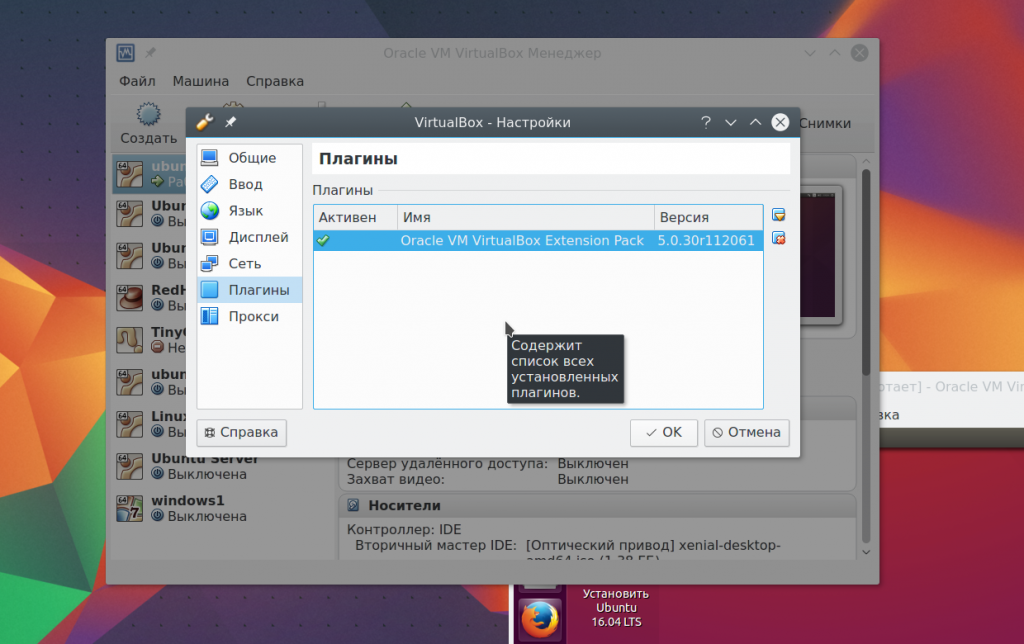
Done, the official plugin is installed and now you can work with USB devices 3.0 in your virtual machine.
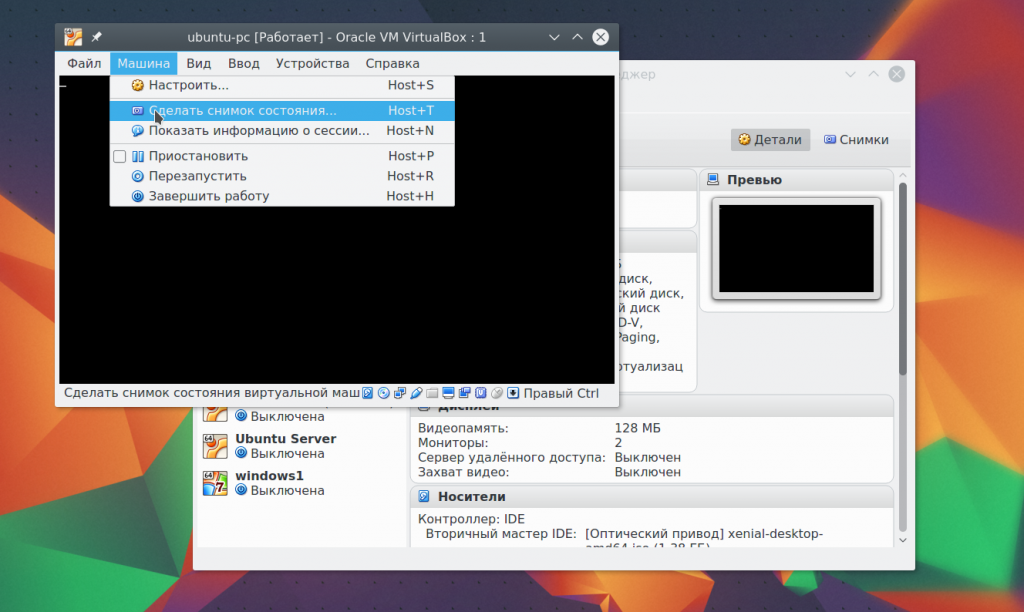
9. Snapshots
You could create a copy of the virtual machine every time you need to test something. But this is not at all necessary. It supports such a great feature as snapshots. You simply take a snapshot, or you can then restore the system to a saved state at any time. You can create a snapshot of a running machine from the menu Car -> Take a snapshot of the state:
You can create pictures for a switched off machine on the tab Pictures:
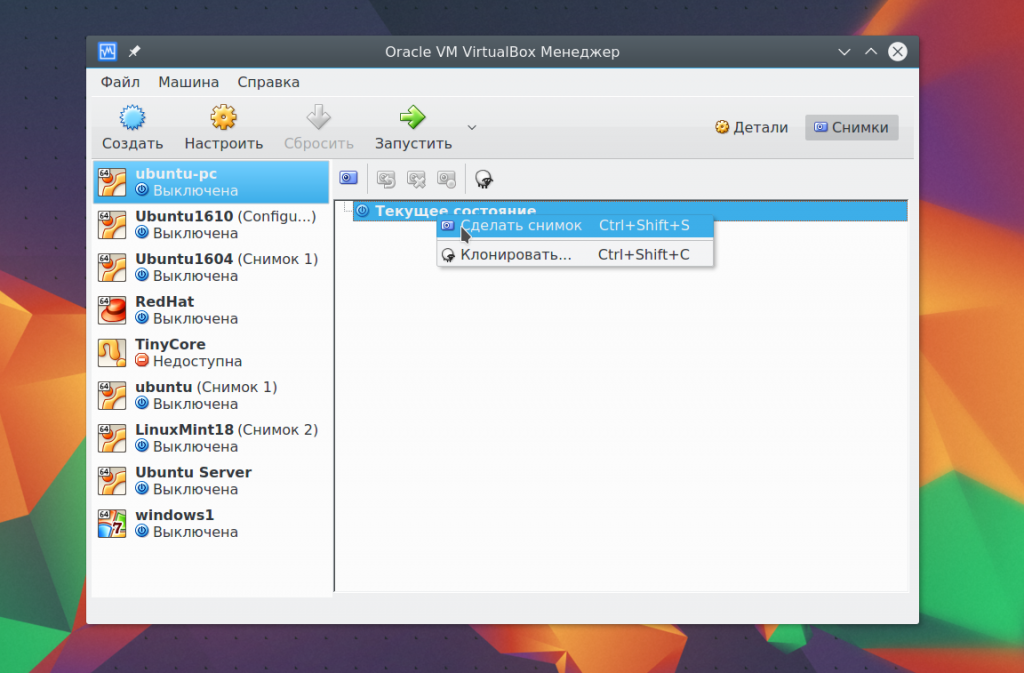
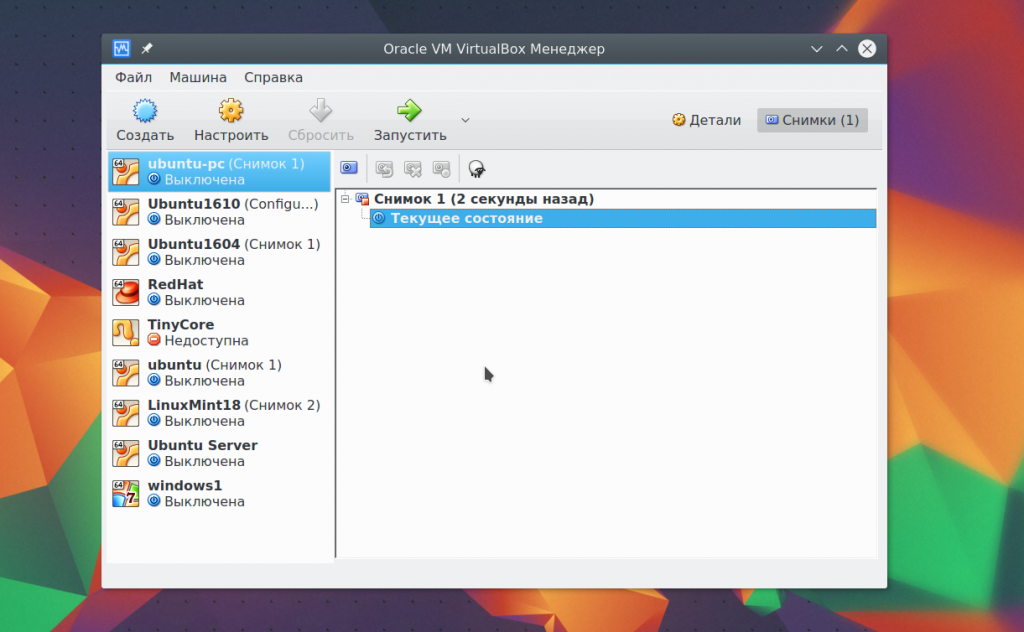
To do this, select the item context menu Create a photo. All created images are available here:
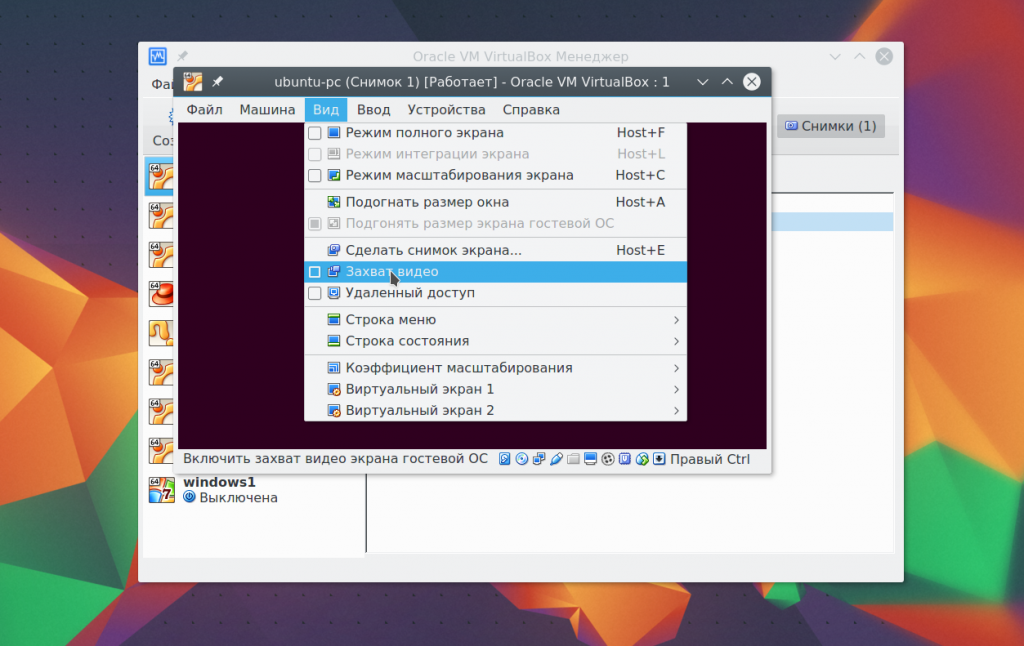
10. Video recording
You can capture video directly into the virtual machine screen. To do this in the menu View check the box Capture video. The video will be saved in the virtual machine folder:
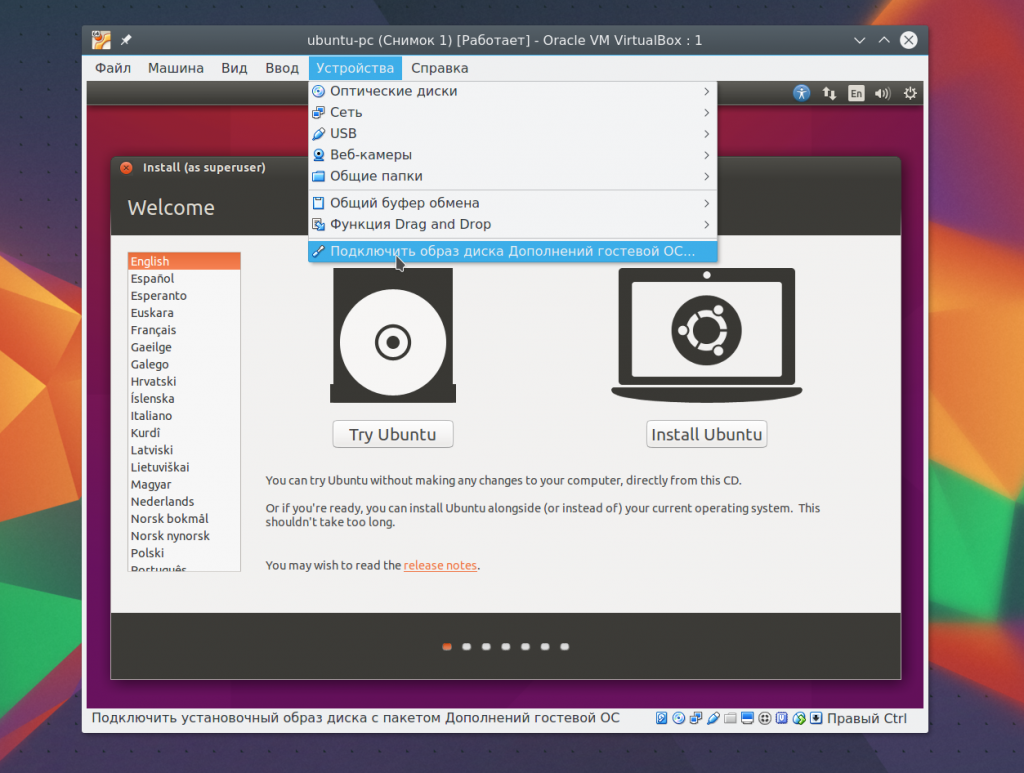
11. Guest Additions
Guest Additions enable features such as a shared clipboard, shared folders, drag-and-drop file integration, screen integration, virtual machine resolution adaptation, and more. This is an indispensable thing when working with virtual machines. Add-ons are installed on every guest system and make using VirtualBox easier.
To install add-ons in the menu Devices select Mount the guest additions image:
12. Real disk in VirtualBox
We have already almost covered everything about how to use VirtualBox Linux, but let’s also focus on working with disks. Sometimes there is a need to work with a real disk. You can create a link file to a real disk using the VBoxManage command:
sudo VBoxManage internalcommands createrawvmdk -filename ~/realdisk.vdmk -rawdisk /dev/sda
Here we create a disk called ~/realdisk.vdmk, which points to our /dev/sda disk. You can link to any other drive. Just to start the machine, you will have to run VirtualBox as superuser. You can also create a copy of a real disk by converting it to VDI, just make sure you have enough space:
sudo VBoxManage internalcommands converthd ./realdisk.vmdk newdisk.vdi
On Windows, the command will look like this:
"C:\Program Files\Oracle\VirtualBox\VBoxManage.exe" internalcommands createrawvmdk -filename C:\drive.vmdk -rawdisk \\.\PHYSICALDRIVE1
13. Access to virtual disk
Sometimes the opposite need arises - to access the virtual disk and its contents from real system. And this is also possible. First, look where the data starts on your disk:
VBoxManage internalcommands dumphdinfo storage.vdi | grep "offData"
Here storage.vdi needs to be replaced with the address of your disk, then mount it:
sudo mount -t ext4 -o rw,noatime,noexec,loop,offset=2097152 ~/VirtualBox\ VMs/storage.vdi /mnt/
Now you have full access to the disk and can even make changes that will be saved. This way, working with Virtualbox will be much easier.
conclusions
In this article we looked at how to use virtual virtualbox machine. Even though this is a free product with open source, it has all the features you need and more. What virtualization software do you prefer? Write in the comments!
After installation, along with the main VirtualBox distribution, the program will ask for permission to install network services and protocols from Oracle.
In order to different versions The operating systems functioned normally among themselves - install all recommended add-ons.
The installed VirtualBox program looks like this:
To install Windows 7 and Linux operating systems with an emulator, you need to have their images on your computer or on a flash drive/sidirom.
We do the following:
1. Click the Create button. Select the name and type of your virtual OS.
2. In the next step, you need to specify the amount of RAM that you want to allocate for your new operating system. We recommend setting it to at least 512 MB.
4. Format of this disk leave unchanged.
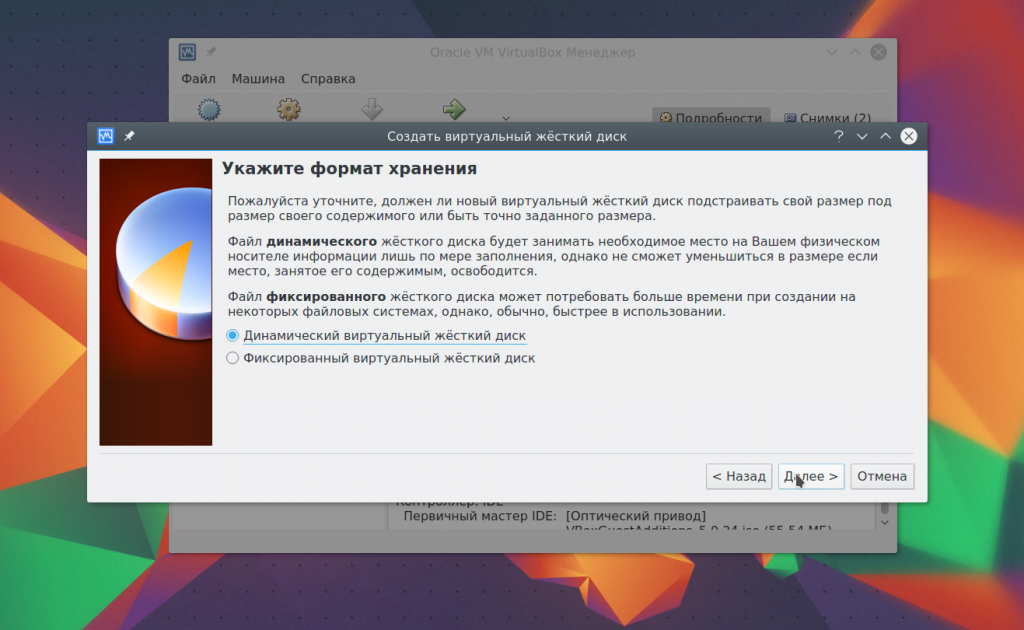
5. Select one of your drive options. Dynamic will be able to grow in size when you fill it with new files. Static - will not grow in size, will have the previously specified size, and not 1 MB more
6. Specify the location where it will be created on your PC virtual disk(it is advisable to place it on NOT system disk), provide a name for your disk and size.
7. After your virtual disk has been created, you need to launch it.
8. After starting, you need to install a new OS on it from an ISO image or from a seedrom.
Select the disk image from which the new OS will be installed.
After installing the operating system, you will have a unique opportunity to use different operating systems in one VirtualBox window.
Allows users to create, import and run multiple virtual machines on their computers at the same time, whether older and with different versions of Windows or with other operating systems such as Linux or Mac OS X. The program provides default settings for new users and also provides rich customization options for those more experienced, such as fine-tuning the allocated memory and size hard drive.
Run multiple virtual machines with different versions Windows
Program features:
- Run multiple virtual machines simultaneously
- User-friendly workspace
- Managing virtual machines
- Configuring parameters for each VM (such as RAM and HDD size)
- Cloning virtual machines or resetting them to default values (i.e. reinstalling the OS)
- Preservation current state VM (i.e. getting a snapshot)
- Recording video frames
Overview of VirtualBox features and settings
Virtualization applications are generally not widely used by casual PC users, even though those who have played at least once with VMware, Parallels or Virtual PC can immediately point out their benefits.
Do we want to play a very old video game on our modern computer Whether running a legacy application that is not supported by later releases of Windows, testing a suspicious program without affecting the host, or simply exploring an old operating system, these OS virtualization tools provide the right environment to achieve such goals. A well-known application in this area is VirtualBox Oracle.
Virtual Machine Manager
Firstly, it stands out among many similar products due to its price. While other programs are primarily intended for professional use, and their price certainly reflects this, VirtualBox is free program, accessible to anyone sufficiently interested in its functionality.
Secondly, the program has the ability to create several virtual machines (VMs) on the host computer, be they with the same OS as the host, with different versions of Windows or based on different platforms(e.g. Linux, Mac OS X), which gives the user the opportunity to flexibly adjust their hardware settings, such as RAM and disk size distribution, Internet access and USB support. There's also simplified folder sharing, drag-and-drop and copy-paste functionality between host and guest, along with many other features.
NOTE: our tests used a host machine Intel Core i5-3470 with CPU @3.20GHz and 12GB RAM, on Windows 8.1 Pro.
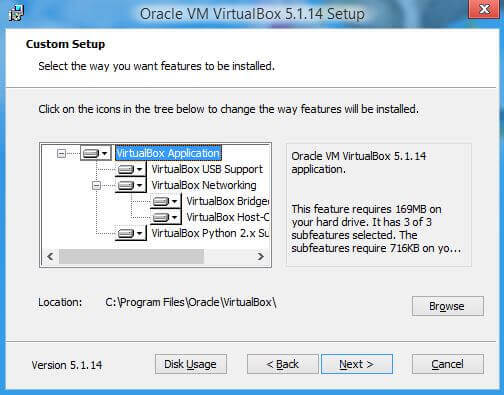
In addition to what the core files allow, the complete package includes support for USB devices, networking (via bridge, host only), and Python 2.x. The application can also make file associations. It warns users that they are temporarily disconnected from the Internet and that they should exercise caution with any ongoing lengthy downloads or running applications who require network connection.
Given the existing technical features, the VirtualBox interface is quite convenient. Despite the abundance of advanced settings, they are largely visual, and the application interface is quite convenient to work with.
Creating and managing virtual machines
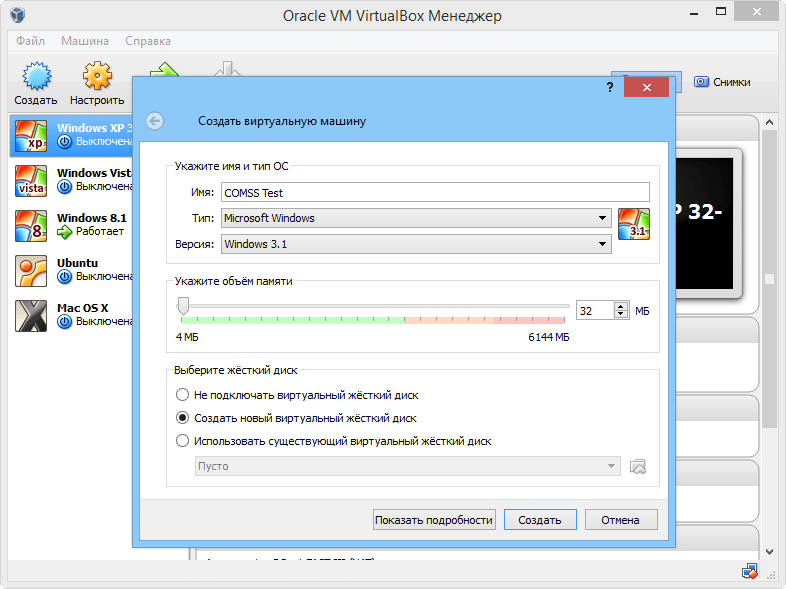
A new virtual machine can be created by specifying a name, type (Windows, Linux, Solaris, BSD, IBM OS/2, Mac OS X, etc.) and version, as well as the sizes of allocated RAM and hard disk space (or instead follow VirtualBox recommendations). You can create virtual hard disk with dynamically allocated or constant size, use existing file(VMDK, VDI, VHD, HDD, QED, QCOW, QCOW2, VHDX) or skip this step.
Creating virtual machines
Existing virtual devices (i.e. previously created using VirtualBox) can be easily imported from OVA or OVF format files. For example, users can download old ones for free Windows versions from the Microsoft website - modern.ie.
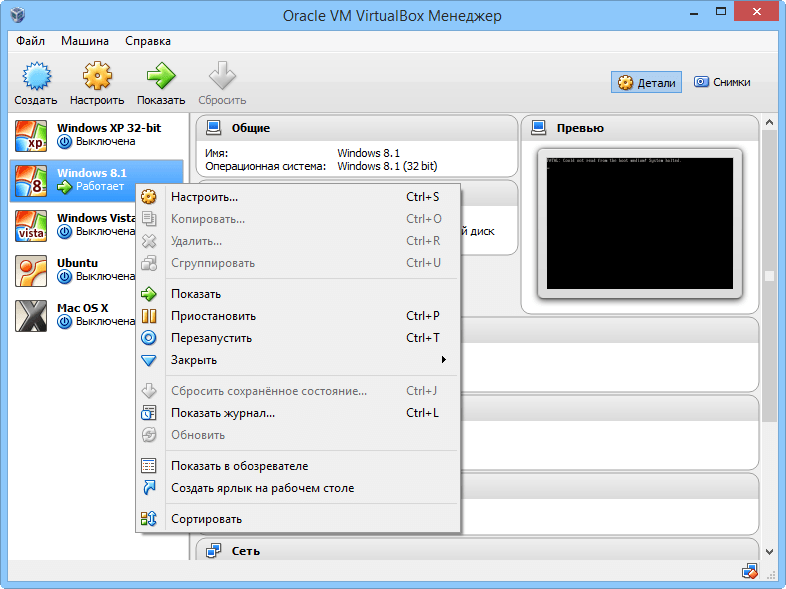
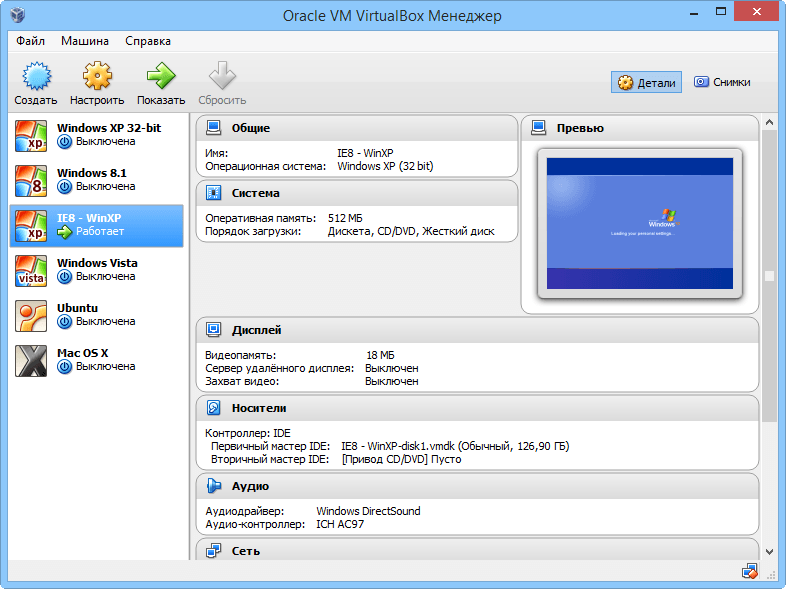
Managing virtual machines using the context menu
VirtualBox Manager stores all newly created and imported devices in one place, allowing users to launch, reset, copy or delete them, organize them into groups, create desktop shortcuts for them, open VM folders in Windows Explorer, view log entries for any of the machines and use other basic management capabilities.
Setting up a virtual machine
Probably the most interesting part of VirtualBox is in the settings panel of each guest machine. While users can apply default settings when importing or creating VMs, they can also change them at any time when it comes to Clipboard sharing and drag-and-drop support (host to guest, guest to host, or both ways), machine name, type and version, and snapshot folders (these contain VM states).
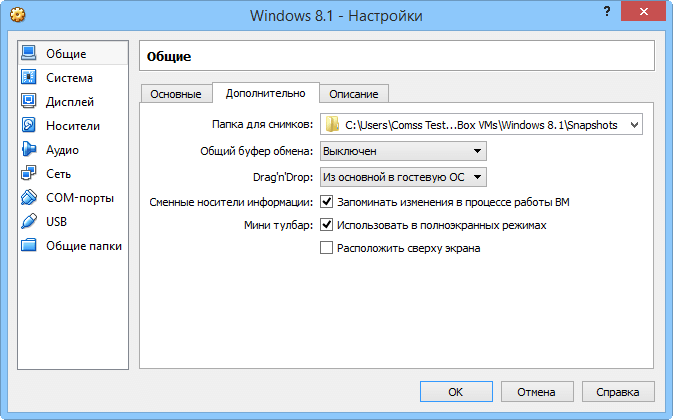
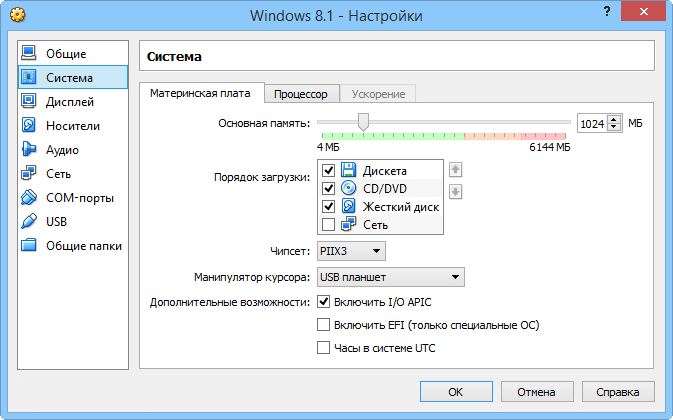
Setting up general and system parameters VMs
You can also adjust the main memory allocated to the VM, adjust the order bootstrap(like BIOS), change the chipset and keypad, and enable some advanced options, namely APC I/O, EFI and UTC hardware clock (for motherboard), PAE/NX (for the processor), as well as VT-X/AMD-V and nested paging (for hardware virtualization). The processor and upper execution limit can also be adjusted.
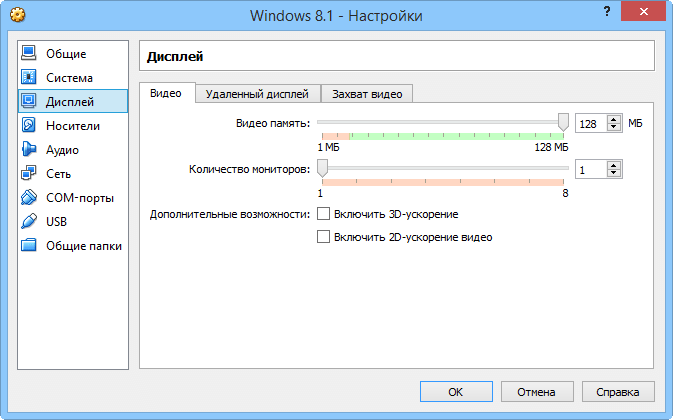
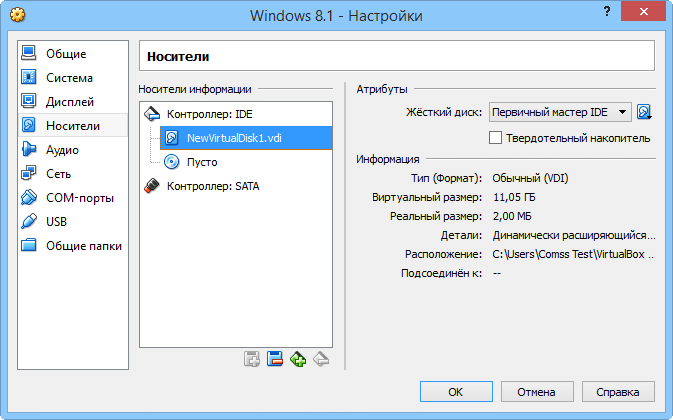
Configuring display and data storage settings for virtual machines
Similar parameters can be configured for display, and this applies to video memory and the number of virtual monitors provided for the VM, 3D and 2D video acceleration, remote server display and video capture capabilities (file path, frame size and aspect ratio, quality, number of screens).
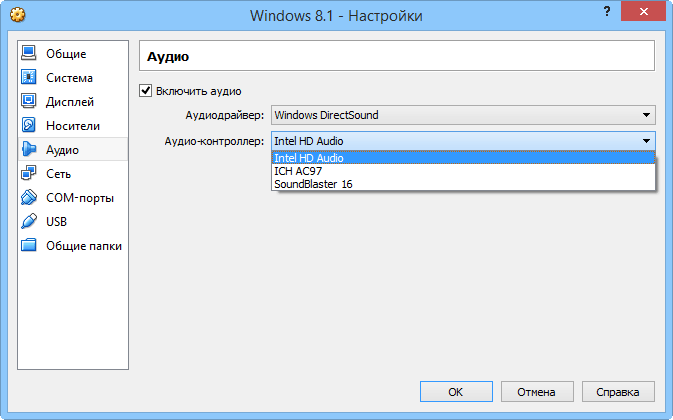
Configuring audio and network settings for virtual machines
Attributes associated with storage devices can be assigned to controllers, hard drives, and CD/DVD drives (eg, "primary master", "secondary slave"), while newly attached ones can be added to the device tree. Other configurable options concern audio (host controller and driver), network adapters, serial ports, USB controllers, and folders shared between the host and guest machines.
Operations inside virtual machines
Several virtual machines can run simultaneously. Although it takes resources, it is definitely doable. In most cases, the virtual machine can be switched to full screen mode to work with it as a host OS. For example, using the keyboard shortcut Ctrl+Alt+Delete executes a command on the host operating system. Limiting this in the guest environment, along with other commands, can be set from the toolbar.
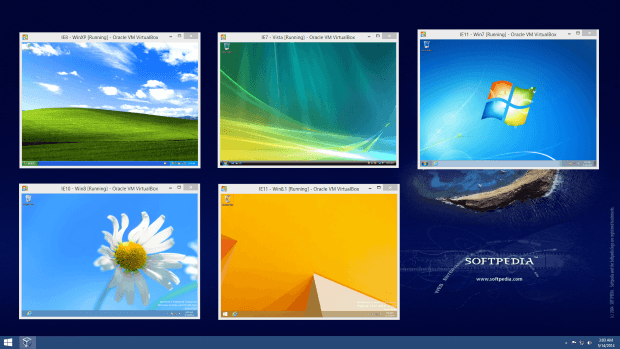
Simultaneous operation of several virtual machines
Users can take a “snapshot” by capturing the current state to revisit it at any other later time, take screenshots and save them in image files (PNG, BMP, PPM, XBM, XPM), view information while the program is running and settings in detail, disable mouse integration, switch to holistic mode to place the guest Start menu on the host desktop and easily perform operations between them, and enable zoom mode to quickly resize the guest OS window (good for placing multiple virtual machine windows side by side).
In terms of device support, users can select CD or DVD disc file, connect USB devices, disconnect network adapter to disable Internet access, select a shared Clipboard and destination for the drag-and-drop feature or disable them completely, change shared folder settings, insert Additional Guest disk files into the virtual drive, and start capturing video frames and saving them on the host machine.
Using Toolbar Options
It is worth mentioning that attached USB devices (including smartphones or tablets) will be automatically disconnected from the host since the host and guest machine cannot read from the same device at the same time. In order to return the device to the host, it needs to be disconnected from the guest (or simply exit the VM). However, that rule does not apply to CDs and DVDs.
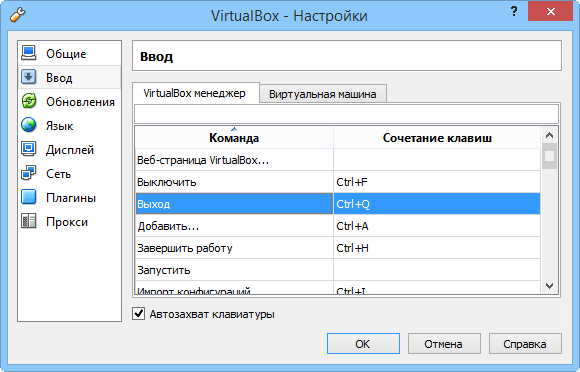
Setting up VirtualBox
Hotkeys can be used both in the VirtualBox Manager and in virtual machines, they are subject to change. The utility can automatically check for updates at a user-defined frequency and only look for stable versions, all new versions or all new and preview.
Reconfiguring keyboard shortcuts
It is possible to change the default machine folder and VRDP (VirtualBox Remote Desktop Protocol) authentication library, user interface language and maximum guest screen size, as well as network and proxy settings. There are also extensions for VirtualBox that can be downloaded from the developers' website. They include improved support for USB 2.0 devices and the aforementioned VRDP (running a virtual machine on a PC and managing it from a remote PC).
Oracle VM VirtualBox 4 Review:

Advantages
The VirtualBox user interface has been translated into many languages, and it is possible to reconfigure keyboard shortcuts. The program has default virtual machine settings that are suitable for beginners, and advanced configuration options for experienced users. Besides comprehensive guide When using the product, the program displays convenient tips throughout the interface.
The program allows users to save operating system states as "snapshots" and return to them later (similar to working with the Clipboard or Sandbox log), capture frames and save as image files, record frames in video files, and clone virtual machines or reset them to default values (i.e. reinstall the OS).
Flaws
A couple of times during our evaluation, the program crashed when we tried to open virtual machines.
The drag and drop feature often didn't work, whether you were trying to copy something from the host to the guest machine or vice versa. The same is true for the general clipboard when it comes to files (copying or pasting text and pictures works fine).
Overall rating
Considering that VirtualBox is free, it is one of the most robust virtualization applications available today, allowing users to run one or more virtual machines in a convenient environment, while giving them the ability to customize each setting individually.
Translating to Russian language: Alexander Ryabov
VirtualBox is one of the most popular programs for virtualization. Allows you to create virtual machines with different parameters and running different operating systems. Great for testing software and security systems, as well as just getting to know new operating systems.
Article about VirtualBox. Let's look at the main functions of the program and figure out how it works.
How to install and configure VirtualBox
Here we’ll talk about how to use VirtualBox, and specifically how to install and configure the program.
VirtualBox Extension Pack - extension pack for VirtualBox
VirtualBox Extension Pack adds features to the program that are not included in the standard distribution.
Install the VirtualBox Extension Pack
In this article, we will install an extension pack for VirtualBox.
Installing VirtualBox Guest Additions
Add-ons for the guest operating system make it possible to connect the guest system with the host system via a network, create shared folders and change the screen resolution to a custom one.
Creating and Configuring Shared Folders in VirtualBox
Shared folders allow you to exchange files between a virtual and real machine. In this article we will talk about how to create and configure shared folders.
Setting up a network in VirtualBox
For normal interaction with the virtual machine and for connecting the latter to global network You need to configure your network settings correctly.
How to install Windows 7 on VirtualBox
We are creating a “training ground”. To do this, we will install an operating system Windows system 7 on VirtualBox.
Installing Linux on VirtualBox
Linux systems are notable for the fact that working with them allows you to look from the inside at the processes occurring in the operating system, and even take part in them. To get acquainted with Linux, let's install Ubuntu OS on a virtual machine.
VirtualBox doesn't see USB devices
One of the most common problems with VirtualBox is a problem with USB devices. The information provided in this article will help you cope with troubles.
VMware or VirtualBox: what to choose
Which virtualization program should you choose? Paid or free? How are they different from each other and how are they similar? In this article we will analyze the main features of programs such as VMware and VirtualBox.
All the articles above will help you get acquainted and even learn how to work with the VirtualBox program.
VirtualBox is a free program that allows you to run an operating system inside another, through virtualization. For example, by installing this program on Windows 10, you can run other versions of Windows, Linux, Android and others in it. It works like this:
The program reserves part of your PC's resources (Processor, RAM, video memory, OS storage space) for operating the operating system.
Installing VirtualBox
First you need where you can find latest versions programs for different OS. I'll download the Windows version.
There are no difficulties in installation, everything is as in regular programs. It is not recommended to change the installed components.
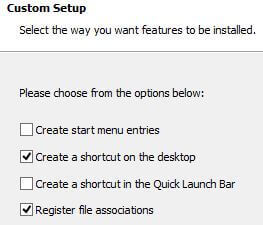
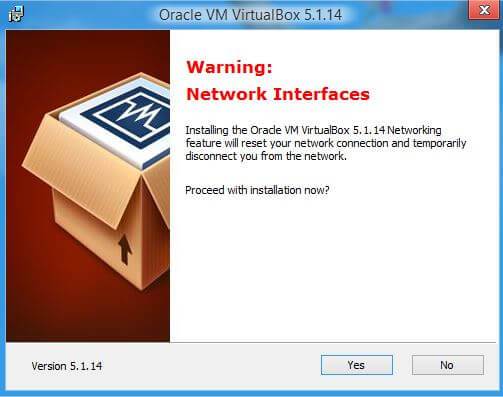
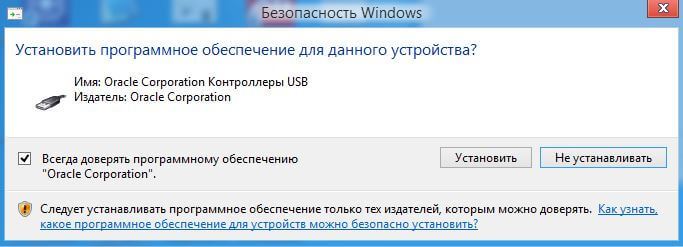
If you wish, you can uncheck some of the checkboxes, but I recommend leaving the second and fourth ones. Next, you will receive a warning that the Internet network connection will be interrupted to install the virtual driver, we agree. Click “Yes”.
Then click “Install”.
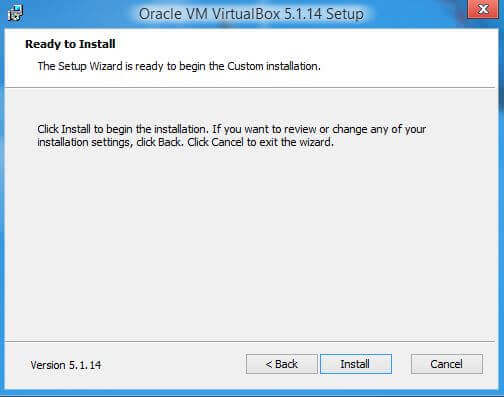
The installation process will begin, where you will be presented with offers to install the driver; for all such offers, click “Install”.
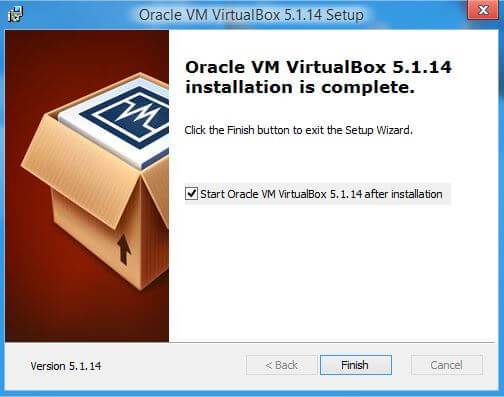
This completes the VirtualBox installation process. Click “Finish”.
Creating a virtual machine on VirtualBox
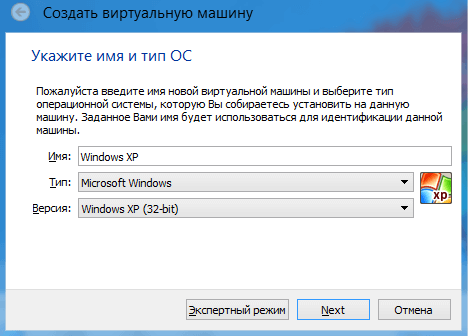
There should be no difficulties in creating a virtual machine. Launch the program and click the “Create” button.
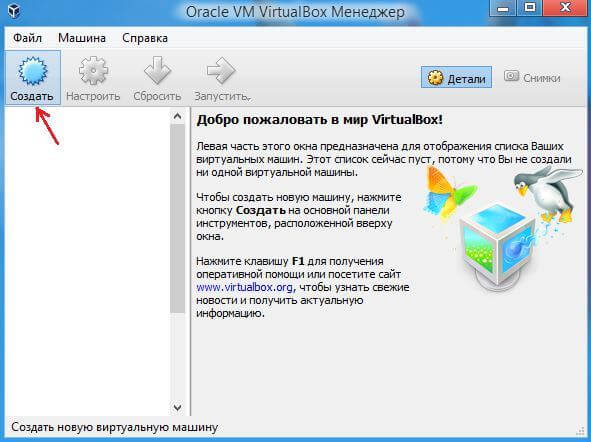
In the next window you will need to specify the name and type of OS you will install.
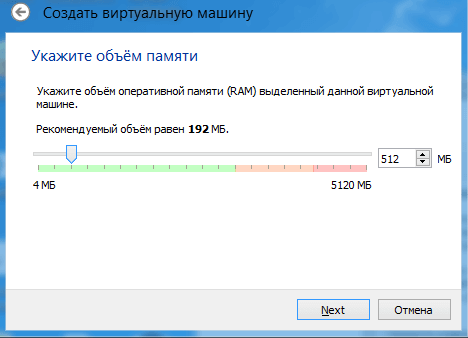
Next, we determine the size of RAM allocated to the virtual machine. For Windows XP I will allocate 512MB of RAM. It all depends on the amount of memory you have installed. If there is enough, then much more can be allocated.
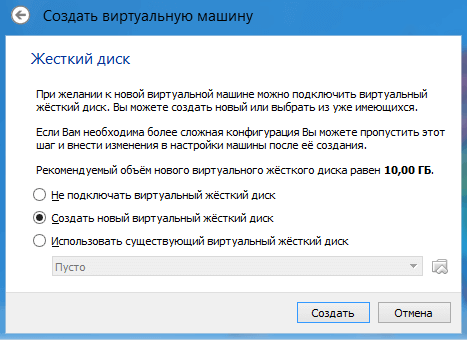
In the next window you are asked to select the location and size where the OS will be installed. Since we are setting up a virtual machine for the first time, we need to select “Create a new virtual machine” HDD" Click “Create”.
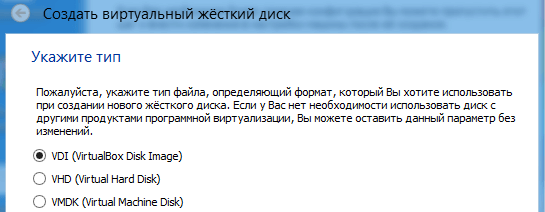
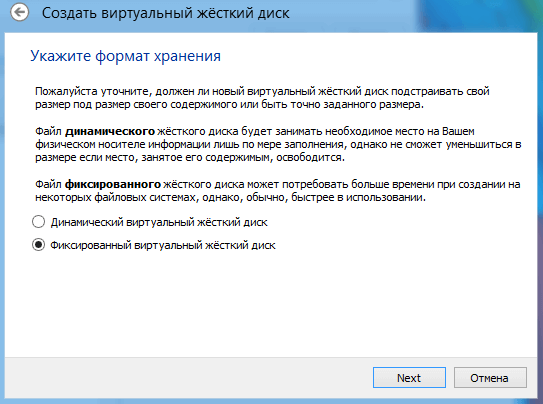
In the next window you need to select the disk type, fixed or dynamic. It depends on your preferences, I will choose fixed.
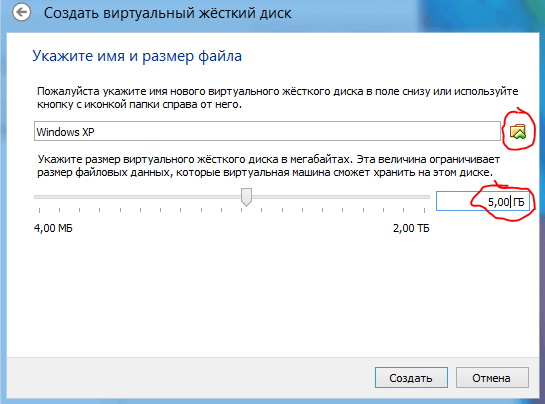
Select how many GB of memory you want to allocate for installing the OS and its programs. I'll allocate 5GB. And also the place where the created disk will be stored, choose where there is free memory. Click “Create”.
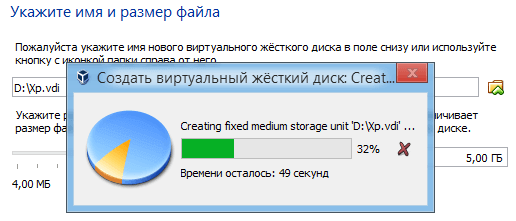
The process of creating a virtual disk will begin.
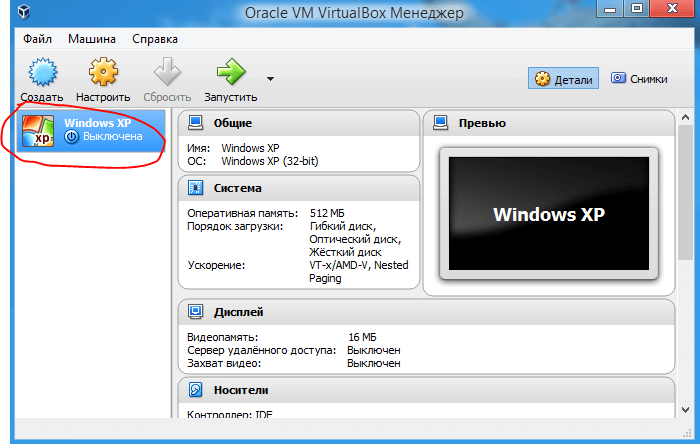
This completes the creation, and you will see that you will have a virtual machine with the name that you gave it earlier, for me it is Windows XP.
Addition:
If you click on the “Configure” button, you will see sections in which you can configure the machine’s properties in more detail.
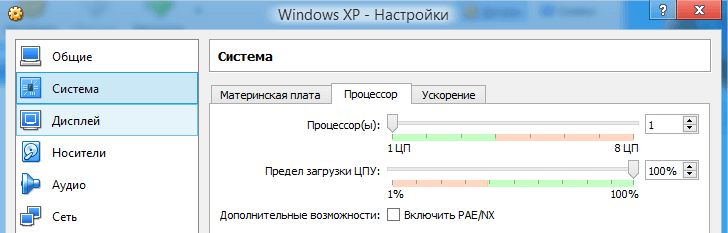
For example, how many cores do you want to give and their load limit. And in the “Display” section you can increase the amount of video memory for the video card.
Installing the operating system on VirtualBox
To start the installation, click on the green button (arrow) “Run”. A window will appear asking you to select the path to the installation disk image.
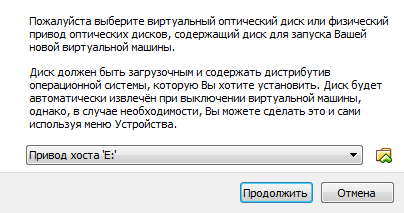
Specify the path to the pre-downloaded OS image.
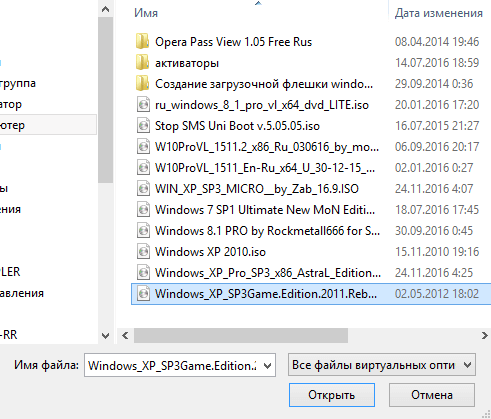
Click “Open”. After this, click “Continue”. It will go as usual for everyone, normal installation OS. You will also need to create one or more local disks. When the installation is complete you will need to remove it. installation image. To do this, click on the “Devices” tab,
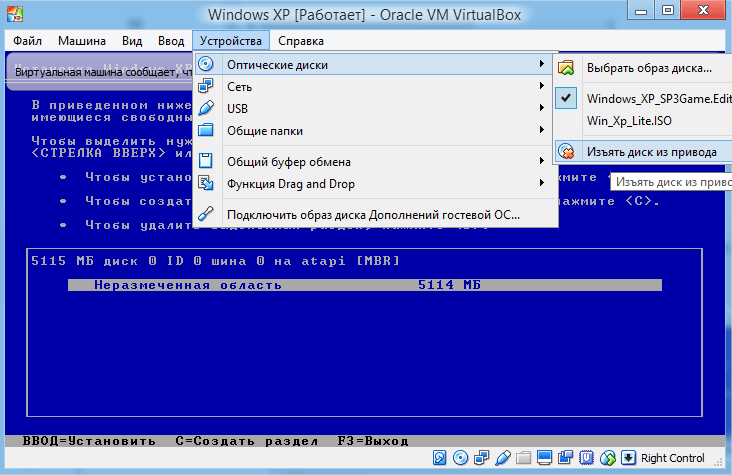
in it, select the “Optical disks” sub-item and click “Remove disk from drive” there, and reboot the newly created OS. That's all for now, good luck.


