Linux OS is interesting to many users, but few decide to change Windows to it. However, if you delve into the essence of the work of this platform, it will become clear that Windows is not the only possible variant(especially given its high cost). First you need to understand how Linux is installed on virtual machine.
What is needed to achieve this goal?
Obviously there is also a traditional option, but in this case, the download takes longer, since the download of images will have to contain many more packages. At this stage, we will be asked to create a new virtual hard the disk where the virtual operating system will be installed.
Without going too far into these details, let's leave all the settings as they are predefined. This kind of request can be provided with support for virtualization, that is, the ability to create virtual hardware resources that are required by the operating system, and then install the entire "virtual" platform on them.
1.
Processor must support hardware rendering
2.
Installed application VM VirtualBox from Oracle (hereinafter referred to as VB)
3.
Downloaded ISO image of the Linux operating system
Once you've set up the virtual machine (which is a fairly quick process), you're ready to tackle the actual Linux OS itself.
Today you can find many variations of Linux developed on its kernel. Now we will look at the most common of them - Ubuntu OS.
To understand how convenient this is, consider the drives that are used by virtual system, which are in fact nothing more than simple files, and how they perform operations better Reserve copy. These tools, in addition to representing the real software interface, use the technical support provided by modern processors, just to optimize virtualization. They are very suitable for desktop systems or in any case for all situations in which the graphical interface has a dominant role.
1. Launch VB and click "Create".

Specify the name of the VM - ubuntu, as well as the type of OS - linux. The platform version must also be specified; it depends on whether the bit depth of the loaded OS is 32x or 64x.
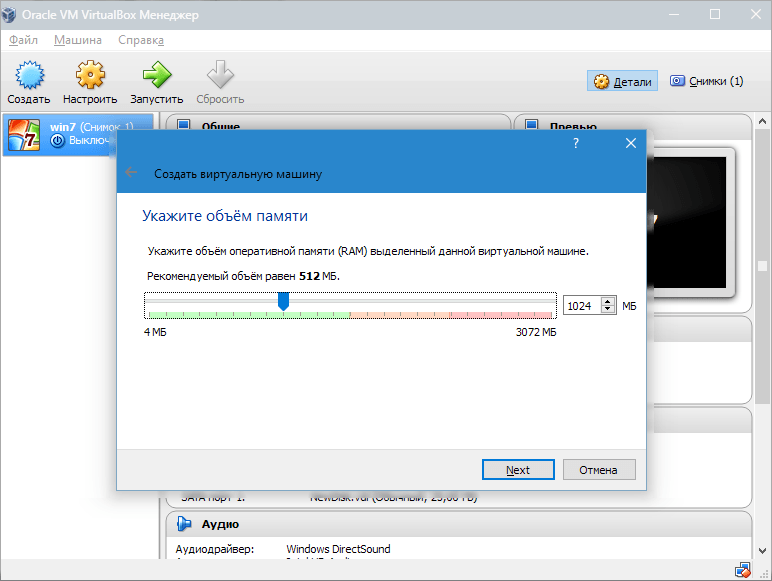
2. Set the amount of RAM that should be allocated for the VM. In this case, the operating system will function normally with a volume of 1024 MB.
Checking virtualization support
In this article, we will see how to install and use it. To do this, you can enter the following command on the terminal. Otherwise, alas, you will not be able to use this powerful tool. In the following, for obvious reasons, we will use a platform that supports virtualization technology.
The procedure is quite simple, especially if you are using the largest server distributions. Once the installation is complete, there is one more detail to keep in mind. Output an empty list of virtual machines as output, as shown in the following figure.
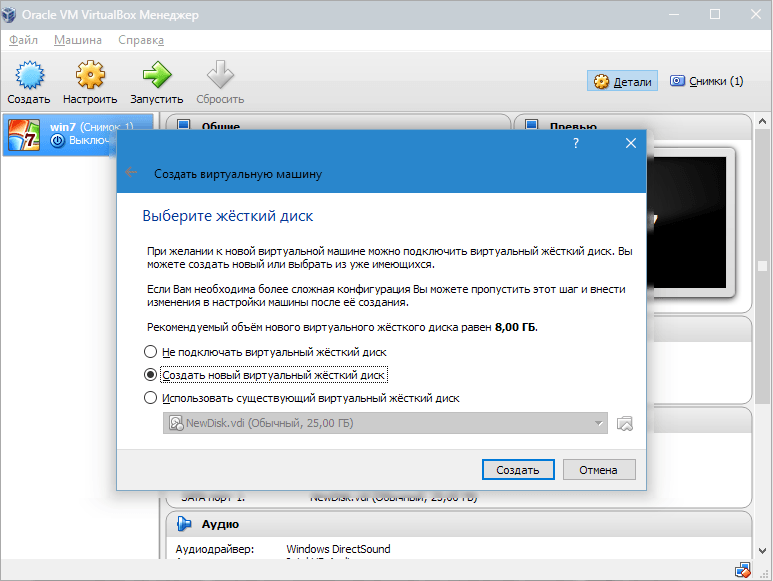
3. We create a new HDD. Select the file type that is used when creating a new disk image. It's best to leave it active. VDI.

We can start it with the following commands. How many of you have come to install a virtual machine in life, and often fail for dark reasons in the world. You will need to make some changes. Let's go to "Screen" and increase the "Video RAM" to 128 MB. That's when our virtual machine is almost ready to use.
It advises you to run the prompt as an administrator. Let's press "Start", then it will look like the code that works, rest assured that everything is fine. If you liked this post, share it with your friends!
- So just create a copy and as you say it's worth installing from scratch.
- Mauro Tassinari.
If we want the disk to be dynamic, then we mark the corresponding parameter. This will allow the disk space to grow as the VM fills up with files.
![]()
This is a historical program that allows you to install an operating system "inside" the operating system, creating and managing a real "virtual PC" independent of the PC on which the program is running. For example, use programs that only work with older systems, or try programs without using the operating system you are using. It should be emphasized that an additional disk partition is not required, and it cannot compromise the system by modifying the existing one.
To install an operating system, you need a hard drive, and since this is a virtual machine, you need to create a virtual drive that will store all files, applications, and data. For fans or those who want to use such non-physical machines that go beyond mere pleasure and pastime, it is undoubtedly interesting to follow the path of various formats " virtual disks”, because currently each virtualization program always uses and only its own format.
We have created a VM, but it is not currently active. To enable it, you need to launch it by clicking on the button corresponding to the name. Or you can double-click on the VM itself.
Linux installation
Installing Ubuntu is as simple as possible and does not require special skills. After starting the VM, the installer window will appear. It should specify the location of the downloaded Ubuntu image.
Switching virtual disk images or using the same virtual disk with multiple systems is a possibility around the corner, designed to make them more common and widespread. But the clouds were swept away last year when they began distributing the first beta versions of what would become a major new release, which, once it reached the final version, was accompanied by many maintenance releases dedicated to resolving problems that arose in the first months of life.
By the time we write, we can download Release 16, which was released at the beginning of March, which is a testament to the remarkable activity of the developers in supporting products after the launch of the release. In fact, compatibility is not yet complete: the program icons have been updated, and the guest desktop can be easily scaled, but the program interface elements are not yet fully compatible.
![]()
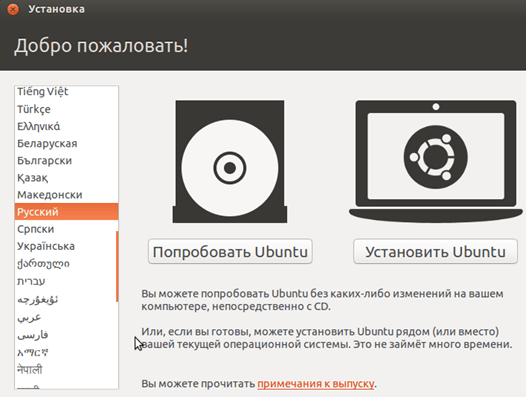
With this image selected, we will move on to the next step. In the new window, select the interface language - Russian, so that the installation process is completely understandable.
As in previous versions, the installation takes place in two steps: first you download and install the executable for your operating system, and then you add an extension that increases the functionality and compatibility of the hardware. The virtual machine interface can be increased; Especially useful for those who use high density pixel monitors.
Creating a virtual machine is as easy as ever thanks to step by step guide step by step on the main tasks of hardware configuration virtualization. New items, as we said, can be found by scrolling through the properties available in the virtual machine configuration windows. Many innovations, both small and large, improve compatibility with the latest equipment: for example, support for a set of additional instructions provided by latest processor, both virtualization and more general Guest operating systems are detected.
You can get an idea about the operating system in the first case, however full installation will allow you to better immerse yourself in its environment. Let's choose "Install".
After that, the installation preparation window will appear. Let's check if the PC parameters are consistent with the requirements of the developers. If yes, move on to the next step.

Hardware support for virtualization allows features such as second-level address translation, also known as nested paging, to be enabled. This set of functions allows you to run a lot of memory page management operations on hardware, providing significant performance. Recognition is also new GUI to manage the connection of removable drives to virtual machines.
Significantly improved support for drag and drop of files and folders and sharing notes between hosts and guests: these features must be manually enabled in the virtual machine configuration, but then work stably and reliably, unlike what happened in the past. Use any operating system with virtual machines.
During installation, we will select the item that offers to erase the disk and install Ubuntu.
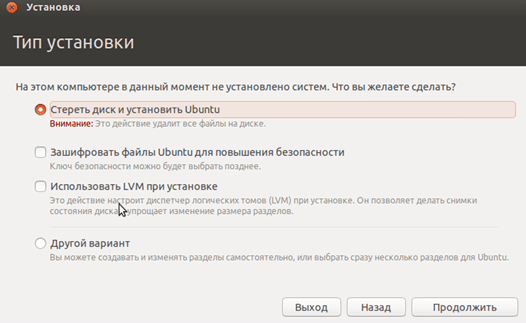
During installation, you can set the time zone and specify the keyboard layout.

Introduction. We see the operating system, we will try it, study it, learn it at the same time, because we don't want to install it, and we don't have any version available. We are using a virtual machine. So what is a virtual machine and how is it used? This will be the purpose of this article. Explain in a simple and casual way how this is and how the virtual machine works.
A virtual machine is nothing but a PC inside a PC, like a Russian nesting doll. Inside the computer, the software creates a sterile and virgin environment where you can install a new and different operating system from what we use, Or even the same if we want.
The installation procedure will take approximately 20 minutes.
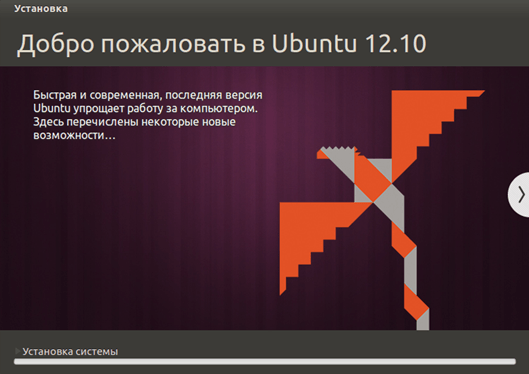
After its completion, the PC will automatically reboot, after which the desktop of the installed Ubuntu will start.
Installation linux ubuntu completed, you can begin to get acquainted with the system.
Now let's see what are the positives and negatives of this software. Now we can move on to the installation. We see step by step how to install a virtual machine. On right side the blue app bar will be "icon".
Let's look at it twice and you will see the following. Now we will install another one. Click the "Create" button. We will see three different options, we will choose the first one to create a new car. We need to choose a name for our virtual machine. This is a thin passage. Here we have to choose which operating system we want to set up.
Sometimes you need to use Linux as a second OS, but you can’t completely remove the old operating system, constantly restarting the computer to change the OS is long and inconvenient. What to do then? The solution has long been invented, and it is a virtual machine.
App from Oracle Virtual Box is a virtual machine for running different operating systems in a separate window. It can be Windows, any Linux distribution, Android, OS X or Chrome OS. Today we will install Linux. Easy and casual.
As you can see above, this is the pass where we select the ram to allocate the virtual machine. If so, we can also change this setting. Then leave this as the default. As you can see, he has a lot of depots. and highlighting so few restrictions on the operating systems we can install.
Now we need to choose which virtual hard disk we want to use since we don't have one previously created hard drive, we select the second option and click Next. Choose the location and size you like best according to your needs.
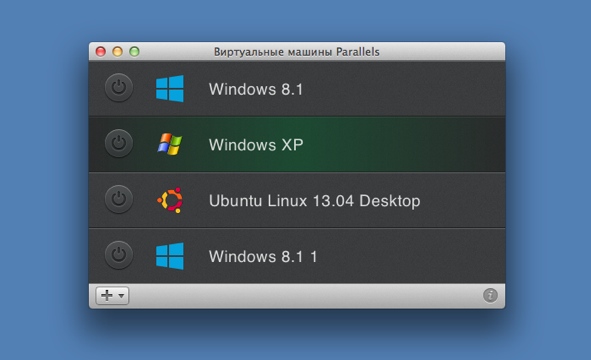
We have repeatedly published articles on the topic of the VirtualBox virtual machine. Here are the latest:
What will be needed?
To work, you need, firstly, VirtualBox itself, and secondly, iso image linux. What is the first, what is the second - absolutely free. So you can safely download from official sites. Download VirtualBox from this link. You can choose any Linux distribution, each has its own website where you can quickly find an ISO image.
As you can see in the picture below. The window below will appear. We now have "another operating system inside the PC". If you enlarge a full screen window, I repeat, you cannot return to windows without restarting your computer. We learned what they are and how they work.
The textbook is divided into 2 parts. The default folder is Documents. Let's look at the settings. However, the only setting we are going to do now is " Network adapter”, where we will select “Bridge”. Click "Kali" in the menu on the left and then go to "Enable this virtual machine".
You can easily install a virtual machine yourself, there is nothing complicated there. Let's take a closer look at how to install Linux on VirtualBox.
Installing a virtual OS consists of three main steps: creation, configuration, and launch.
Create a virtual machine
In this step, we will create a virtual device for Linux. The characteristics of our machine should be sufficient for the OS, but not too generous - we need to leave something for Windows as well.
Let's stay and click "continue". At this point, select the last item "Do not configure network at this time". Be careful not to forget your password because you need to access the system! In a few seconds we will see this box where we will have to select the entry "Slave the whole disk". This is how we tell Kali not to crash the hard drive.
Here we select the first element and continue. At this point, we will confirm the selection by selecting "Finish partitioning and write changes to disk", which should already be selected. And in the next window, we just need to move with the left arrow to "Yes" to confirm the split.
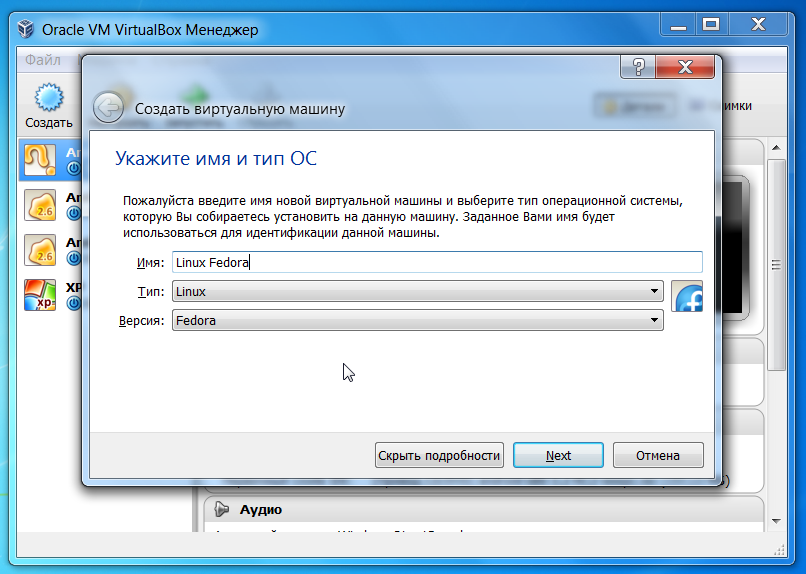
Open Virtualbox. At the top left, click Create.
A window will appear where you need to enter the name of the device (any), select the OS below, even lower the OS version. It is more convenient to give a name that corresponds to the type of OS. For example, "Linux Fedora". In this case, VirtualBox will pick up the following two items itself.
A virtual computer means installing a different operating system. A virtual computer is absolutely independent of a real PC, it has its own network connection, own drivers and own life. Once you've chosen a name for the new virtual machine, click Next. The virtual machine is ready with the virtual hard disk and the configuration is complete.
Before you start, you must click on the icon and then go to "Settings", "Settings" to fix some details. Among the options are also the "Network" and "Shared Folders" settings, which still do not change, but which are useful if you want to transfer virtual computer real so you can switch files with each other.
Although you can set them manually. We will install OS Linux distribution Fedora. Therefore, in the second paragraph, select “Linux”, in the third - “Fedora”.
VirtaulBox has prepared settings for all OS known to it. Linux Fedora is one of them. Therefore, in the following windows (“Select the amount of memory”, “Specify the hard disk”, “Specify the type”, Specify the storage format, “Specify the name and size of the file”), just click “Next”.
Setting up a virtual machine
During the setup phase, we insert the disc into virtual drive with Linux Fedora so that our machine knows where to install the OS. Only in our case, everything is virtual, even the disk. The ISO image we downloaded is the virtual DVD.
Go to "Settings". There, on the right, select "Media", then click on the empty IDE controller, then next to the drive on the window in the form of a disk. There we need the item "Select an optical disk image".

Look for the ISO file in the search box. We find and choose.

We see that now the IDE controller (DVD) is not empty, it has a "disk" with Linux Fedora.

launch
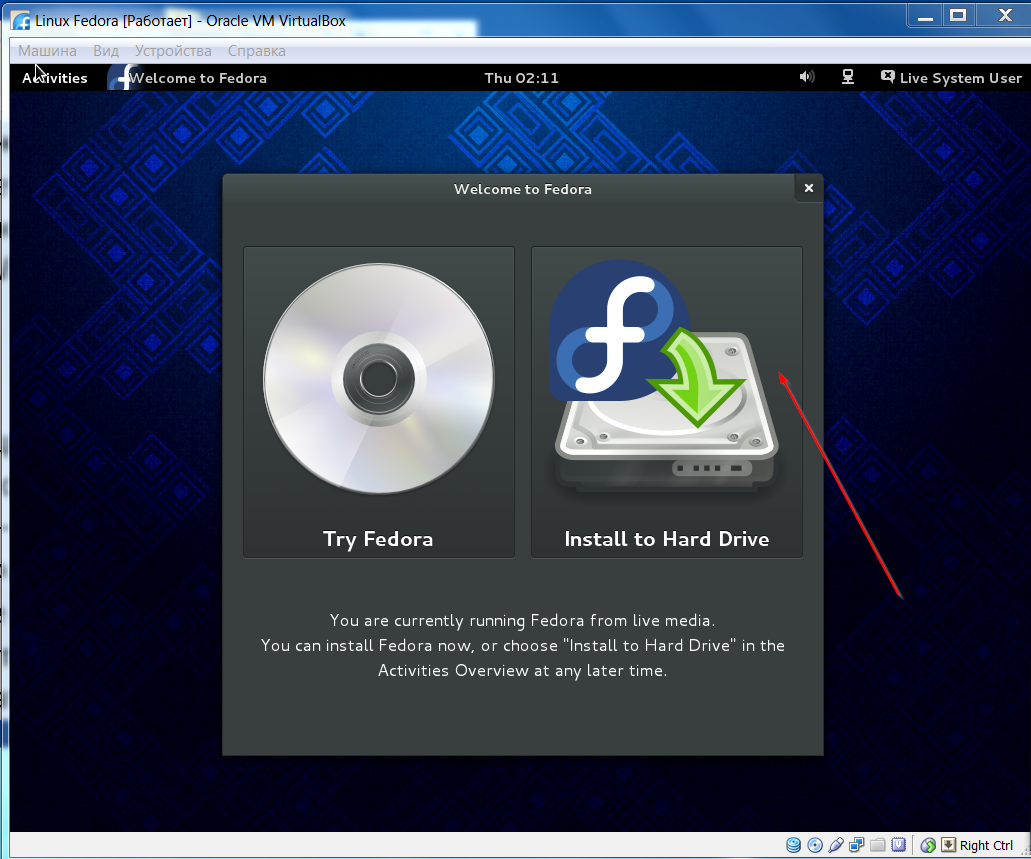
In the launch phase, we will finally move on to installing Linux on VirtualBox. A window will appear Fedora installations, where there are 3 options: Fedora Live - enter the OS without installation (but then you always need a disk); Troubleshooting - problem solving; and installation. To start it you need to press Tab. Which is what we do.

Fedora asks for some reason again - to run from the disk or still install. Install, so select "Install to Hard Drive".
Further language and basic settings- keyboard, date, installation location. Conveniently in Fedora, the installation location is set automatically. No need to manually set up partitions like in Ubuntu. For someone who tries Fedora for the first time - just right. In a word, click "Start installation".
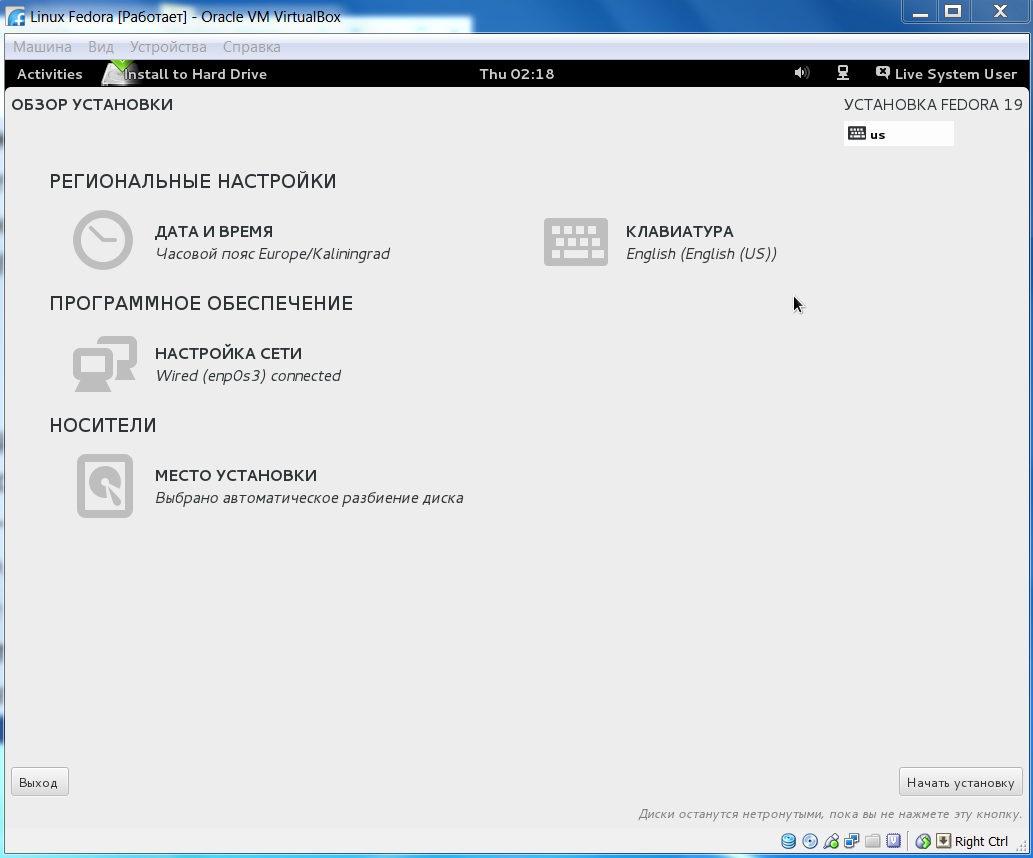
The installation has started. See progress below. Above are the items that need to be completed in the meantime.
On Linux, it is mandatory to set the Root password. Create it to complete the installation.

Everything, Linux is on your hard drive. Now you can pull out the “DVD” (ISO file). To do this, "Settings", "Media", "Drive", "Remove disk from drive".

Run Linux Fedora without a disk. Just click "Launch". If you have not created a user before, you will have to create one.


Two helpful points:
- When you log out of the system, it is advisable to turn off Linux culturally - through Shut Down. Sometimes, if it gets hot, you can just turn off the virtual machine - this is not fatal.
- There are two modes of operation of the mouse non-integrated and integrated. You can set them in the "Machine" menu. To return the mouse from integrated mode, use "Ctrl".
The virtual machine is very convenient way test new versions of operating systems without disrupting the main system. I've been using it myself for a long time. Since my main operating system is OS X, I chose Parallels Desktop for myself.
But the essence of the virtual machine does not change from this - it is a simple, convenient and understandable (often on an intuitive level) means to see something new. Be sure to try, as you can see, there is nothing complicated in this.


