Or installing its newest version requires removing the old one from your computer. And at this stage, some users have problems: they Can't uninstall an earlier versionSkype. Most often this is discovered during installation. new version when the installation suddenly stops with error code 1603.
Cause
The reason why it is not possible to carry out complete removal old version, as a rule, lies in the fact that standard means operating system uninstallation is carried out too “carefully”. At the same time, the “tails” of already deleted applications often remain in the system in the form of configuration files, registry entries, account information and other “garbage”. Over time, all this accumulates on the hard drive and can significantly slow down the system.
Solution
In general, there are three main ways to remove any application:
- uninstallation using standard means of the operating system itself;
- removal using uninstallers built into the application;
- applications from third party developers.
If Skype cannot be removed using traditional methods, third-party programs and utilities can come to the rescue. For example, the Microsoft utility Microsoft Fix it. It not only allows you to completely remove unnecessary file, but also empty the Recycle Bin (it happens that files from there categorically refuse to be erased), and also carry out automatic search some errors in the operating system. Unfortunately, the utility is not supported on Windows 10.
Another useful tool is Revo Uninstaller. It helps remove unnecessary “remnants” of uninstalled applications.
And, of course, the famous CCleaner is a time-tested utility. It not only removes junk files, but also cleans the registry automatically.
Updating the program brings with it not only new functions, but also various bugs. Installing a fresh client may cause freezing, problems with authorization, startup, etc. Therefore, many users are interested in how to return the old Skype that was before the update and worked properly? There are several ways to roll back the utility.
Reinstalling the program
The simplest method is to uninstall and install the old version of the utility. However, the method has a noticeable drawback. The user must have saved the installer of the previous Skype client. Only the latest application can be downloaded from the official resource; outdated software is removed. Load installation file from unfamiliar resources is not recommended.
To reinstall you need:
Outdated Skype versions may not work correctly. Old utilities have glitches, performance deteriorates, etc.
System rollback
Old Skype clients attract users with a familiar interface, the absence of bugs and errors, simple and understandable settings, etc. After each update, thousands of users begin to “spit” and complain about changes in their favorite program. Some users are even ready to take drastic measures, such as rolling back the operating system.
What is needed to return your favorite version of the program?
To roll back the operating system you need:

If the rollback is successful, the user needs to erase the last file from backup. After completing the procedure, you need to launch the messenger, enter your personal data and log in.
In case of various problems with the Skype program, one of the frequent recommendations is to remove this application, and then installing a new version of the program. Overall, this is not a complicated process that even a beginner should figure out. But sometimes emergency situations occur that make it difficult to remove or install a program. This happens especially often if the removal or installation process was forcibly stopped by the user, or was interrupted due to a sudden power loss. Let's figure out what to do if you have problems uninstalling or installing Skype.
In order to insure yourself against any surprises, you should close the Skype program before uninstalling. But this is still not a panacea for problems with uninstalling this program.
One of the most the best tools, which solves problems with uninstalling various programs, including Skype, is Microsoft application Fix it ProgramInstallUninstall. You can download this utility on the official website of the developer, Microsoft.
So, if various errors pop up when deleting Skype, run Microsoft program Fix. First, a window opens in which we must agree with license agreement. Click the “Accept” button.

After this, the installation of troubleshooting tools follows.

Next, a window opens where you need to decide which option to use: entrust the main troubleshooting decisions to the program, or do everything manually. The last option is recommended to be chosen only by very advanced users. So we select the first option, and click on the “Identify problems and install fixes” button. This option, by the way, is recommended by the developers.


Next, scanning is performed hard drive computer, during which the utility receives data about applications installed on the computer. Based on this scan, a list of programs is generated. We look for the Skype program in this list, mark it, and click the “Next” button.

Then, a window opens in which the utility offers to remove Skype. Since this is the goal of our actions, click on the “Yes, try to delete” button.

Next, Microsoft Fix it performs a complete removal Skype programs along with all user data. In this regard, if you do not want to lose your correspondence and other data, you should copy the %appdata%\Skype folder and save it somewhere else on your hard drive.
Removal using third-party utilities
Also, if Skype does not want to be removed, you can try uninstalling this program forced by third party utilities, which are specifically designed for these tasks. One of the best such programs is the application Uninstall Tool.
Like last time, first of all, we close Skype program. Next, launch the Uninstall Tool. We look for the Skype application in the list of programs that opens immediately after launching the utility. Select it and click on the “Uninstall” button located on the left side of the Uninstall Tool window.

After this, the standard Windows uninstaller dialog box opens. It asks if we really want to delete Skype? We confirm this by clicking the “Yes” button.

After this, the program removal procedure is performed using standard methods.

Immediately after its completion, the Uninstall Tool starts scanning the hard drive for the presence of Skype remnants in the form of folders, individual files, or entries in the system registry.

After the scan is completed, the program displays the result of which files are left. To destroy residual elements, click on the “Delete” button.

The residual elements of Skype are forcibly removed, and if it was impossible to uninstall the program itself using conventional methods, it is also removed. If some application blocks the removal of Skype, the Uninstall Tool asks you to restart the computer, and during the restart it removes the remaining elements.
The only thing you need to take care of, as last time, is the safety of your personal data, before starting the deletion procedure, by copying the %appdata%\Skype folder to another directory.
Problems installing Skype
Most problems with installing Skype are due to incorrect uninstallation previous version programs. You can fix this using the same Microsoft Fix it ProgramInstallUninstall utility.
At the same time, we even perform almost the same sequence of actions as the previous time, until we reach the list installed programs. But here there may be a surprise, and Skype may not be on the list. This is due to the fact that the program itself was uninstalled, and the installation of the new version is prevented by its residual elements, for example, entries in the registry. But what to do in this case, when the program is not on the list? In this case, you can perform a complete uninstall using the product code.
To find out the code, go to file manager at C:\Documents and Settings\All Users\Application Data\Skype. A directory opens, after viewing which we need to separately write down the names of all folders, consisting of a sequential combination of alphabetic and numeric characters.

Following this, open the folder at C:\Windows\Installer.

We look at the names of the folders located in this directory. If any name repeats what we previously wrote out, then cross it out. After this, we are left with a list of unique names.
We return to the Microsoft Fix it ProgramInstallUninstall program. Since we cannot find the name Skype, we select the “Not in the list” option and click the “Next” button.
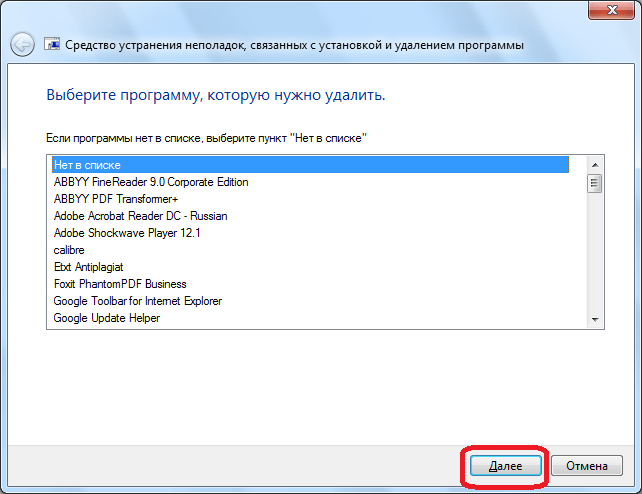
In the next window, enter one of those unique codes that have not been crossed out. Click the “Next” button again.

In the window that opens, as before, confirm your readiness to delete the program.
This action must be performed as many times as you have unique uncrossed out codes left.
After this, you can try to install Skype using standard methods.
Viruses and antiviruses
Also, Skype installation can block malware and antiviruses. To find out if there is malware on your computer, run a scan with an antivirus utility. It is advisable to do this from another device. If a threat is detected, we remove the virus or disinfect the infected file.

At incorrect setting, antiviruses can also block the installation of various programs, including Skype. To install this, temporarily disable your antivirus utility and try to install Skype. Then, don't forget to turn on your antivirus.

As you can see, there are a number of reasons that cause problems with uninstalling and installing Skype. Most of them are associated either with incorrect actions of the user himself, or with the penetration of viruses onto the computer. If you do not know the exact reason, then you need to try all the above methods until you get a positive result and are able to perform the desired action.
Judging by the reviews of active Skype users, one of the common problems they encounter is the inability to remove this software from their computer. All difficulties are related to the design of the software itself. The developers were clearly interested in this. So that you stay with them as long as possible! So, what to do if the old version of Skype is not deleted?
Getting ready for removal. Clearing history
Skype does not have a feature to automatically delete chat history. Therefore, when installing a new version, you may encounter the fact that all old and unnecessary data will be transferred there, without our knowledge. Therefore, first you need to have other data from it, and then delete Skype itself. How to do it? It's actually very simple, try the following:
- Sign in to Skype.
- Find the Tools tab.
- Select settings in the drop-down window.
- A new tab opens, look for the security icon.
- After clicking on it, on the left side of the window that opens, approximately in the middle, find the clear history button and click on it.

All! The program is now fully prepared for removal. You can proceed directly to permanently removing it from your computer.
Attention! The developers assure that if you do not use a registered account, it will be completely deleted from the registry within 72 hours. Therefore, if you remove old Skype That's right, you can completely get rid of it!
Further more - delete the old Skype completely!
We continue to describe a step-by-step plan of what to do if old skype is not deleted. If you have already deleted the old correspondence, all that remains is to uninstall the software itself. This is done as follows:
- Close the program. The saving red cross will not help in this case. Software configured to simply minimize Skype and leave it in working mode. To exit, you will need to find the program icon on the screen. Right-click on it and in the window that appears, select the “exit Skype” button. We confirm that we really want to do this.
- Now let's take advantage of the installed operating system. In the Start panel, look for the “Control Panel” window, there we select the “Programs and Features” column. Click on it and look for Skype in the list that opens.
- Select it and click delete.
- We wait for the process to complete and restart the computer.
All old Skype can be completely removed.
Alternative ways to solve the problem
If all of the above did not help. And this happens! You can use software specifically designed to remove unnecessary programs and other system garbage. One such program is Revo Uninstaller. It allows you to completely destroy everything existing files. By the way, it would be useful to check the presence of old Skype folders with its help. A friend can also come to help. It also checks all files and cleans up any garbage remaining after the program runs. If this does not help, then you can go another way. Instead of the first step described above. We do the following:
- Open the start menu.
- We are looking for the address C:\Documents and settings\windows_username\Application data\Skype\.
- We delete all found folders. This should help.
All account information is ultimately stored on your computer, so after uninstallation necessary files old Skype will be completely removed.
Important! In order for the user to be able to delete the necessary folders, he must have administrator rights. You will also need to enable the show hidden files feature.
Skype is a universal program that provides stable voice, visual and text communication from anywhere in the world, originally created by Skype Technologies in 2003, but 8 years later it was successfully purchased by Microsoft for $8.5 billion.
After the purchase, Microsoft began to actively develop “its” program, delighting users with constant improvements in capabilities and the addition of new functionality. As a result, the company annually released a new version of the program. But do not forget that with each new update the utility changes not only visually, but also internally, thereby improving the level of protection, which significantly reduces the risk of hacking and leakage of your personal data.
Therefore, it is strongly recommended to always have latest version, but there are times when updates do not arrive or a new version cannot be installed, often this happens due to an old or malfunctioning program, and in this article we will help you solve this problem by completely removing Skype from your computer.
Uninstalling Skype
There are several ways to remove this utility, but first we will look at the simplest and fastest one. This method involves uninstalling Skype using the Control Panel.
- First, go to the start menu by hovering your mouse over Windows icon in the lower left corner, then select ““.
- Note: Some versions Windows location « Control panels" may differ; if difficulties arise, you can use the built-in search.
- You can also access programs using a command. To do this, open the dialog box using the keyboard shortcut Windows + R and enter appwiz.cpl.

- Next, in the window that opens, find the category “ Programs" and select " Uninstalling a program«.

- Then we look for Skype in the list of available utilities and delete it in accordance with the information shown in the screenshot.

- After you confirm your actions, deleting Skype takes a couple of minutes on average.
Problems with deletion
Often some users have a problem: they simply cannot delete old version Skype. As usual this error discovered when installing a new version. Basically, the reason is hidden in the built-in uninstallers that are too “weak”; in fact, they do not completely remove the utility, thereby leaving a bunch of all kinds of “garbage”. The solution to this problem is manual step-by-step removal of the program, which we will now show you in detail.
- First you need to delete the folders Skype And SkypePM, if they exist, to do this, open the dialog box with the keyboard shortcut Windows + R and enter the command %appdata%.

- In the window that opens, look for the corresponding folder and delete it.

- Next, in order to completely make sure that the folder with the program is completely deleted, go to this path: Computer:\Local disk C:\Program Files(If you have Windows 8 or higher, then go to C:\Program Files (x86)) and perform a similar procedure.

- Also, in special cases, it is recommended to remove the program from the registry, but be careful, since if you change the registry incorrectly, serious problems can occur. To go to the registry, we also open the dialog box using Windows + R and enter the command regedit.

- Then in the registry that opens, in the upper left corner, select “Edit” and “Find”.

- In the search that opens, fill in all the selected parameters with checkboxes and click “Find Next.”
- We delete all found values.
After completely and correctly uninstalling Skype, you can easily install the latest version from the official website without any difficulties or errors.
Results
- If you are 100 percent sure that after a normal uninstallation you will be able to install the new version without any problems, then feel free to use the method described in detail at the beginning of the article.
- If you have problems installing a new version due to incomplete removal of the previous one, then for your consideration is the second method, which involves completely removing the program from the computer.


