We will implement our plan using a third-party program, since it is very small in size and very easy to configure. In my opinion, this path is much simpler and easier than raising this matter with the regular capabilities of the great and terrible Windows.
So, let's get down to business. The program for distributing the Internet via WiFi, which we will consider in this article, will be MyPublicWiFi. You can download it from the link here:
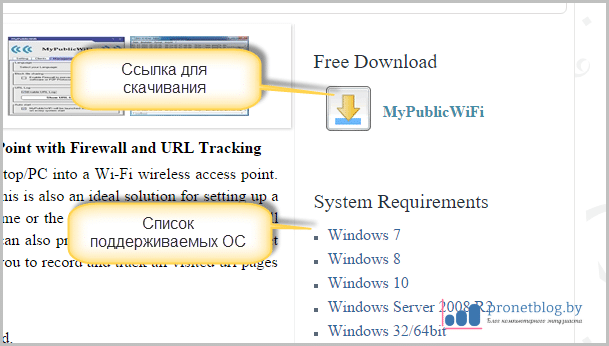
As you can see in the screenshot above, all major operating systems are supported: Windows 7, 8 and 10. Those who still have good old XP will not be able to use this program. Alas, you need to update to at least seven. Yes, guys, progress does not stand still and nothing lasts forever.
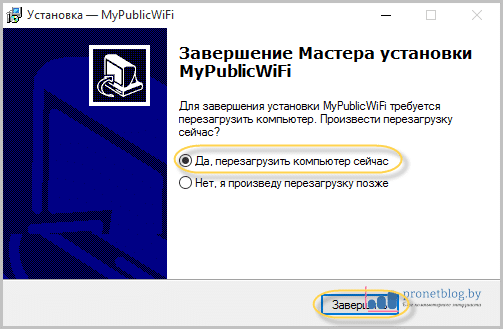
Once the download is complete, run installation file and wait for the installation to complete. This process is standard and there should be no difficulties. The only thing the program will ask at the end is to restart the laptop:
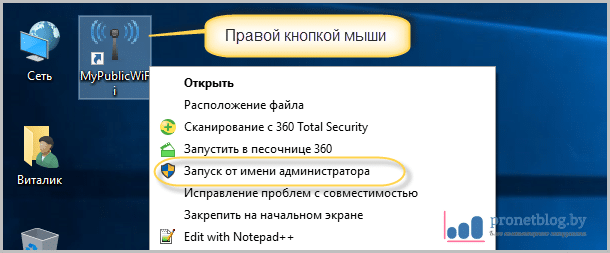
Now the corresponding shortcut will appear on the screen, right-click on it and select “Run as administrator”:
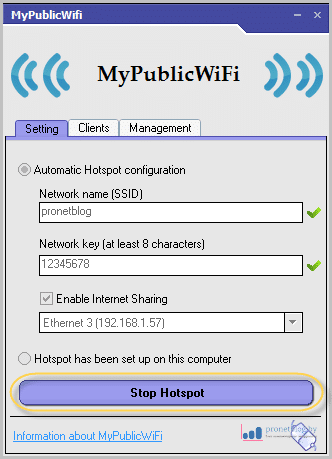
Now let's move on to the most interesting part, setting up our program for a laptop. Although, by and large, there is nothing special to configure here. See for yourself:
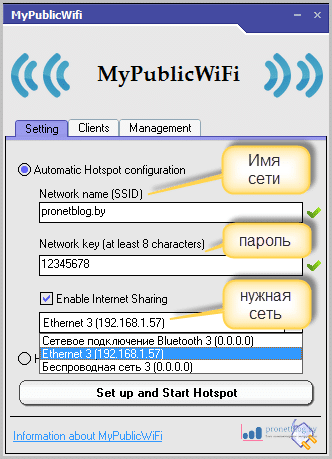
- First point: the name of your future network (optional);
- Second point: password to protect the network (at least 8 characters);
- Third point: the connection that we will distribute via WiFi. That is, the network connection that supplies the Internet.
- After all the settings, click on “Set up and Hotspot”. All.
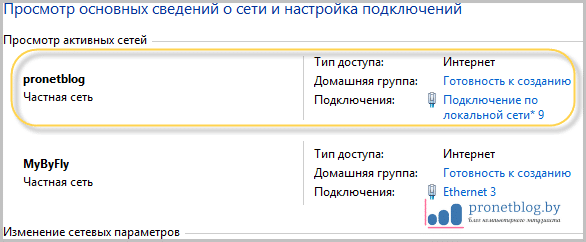
If you have set all the settings correctly, then at the end of your work you should see this picture:
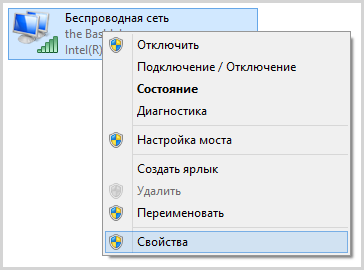
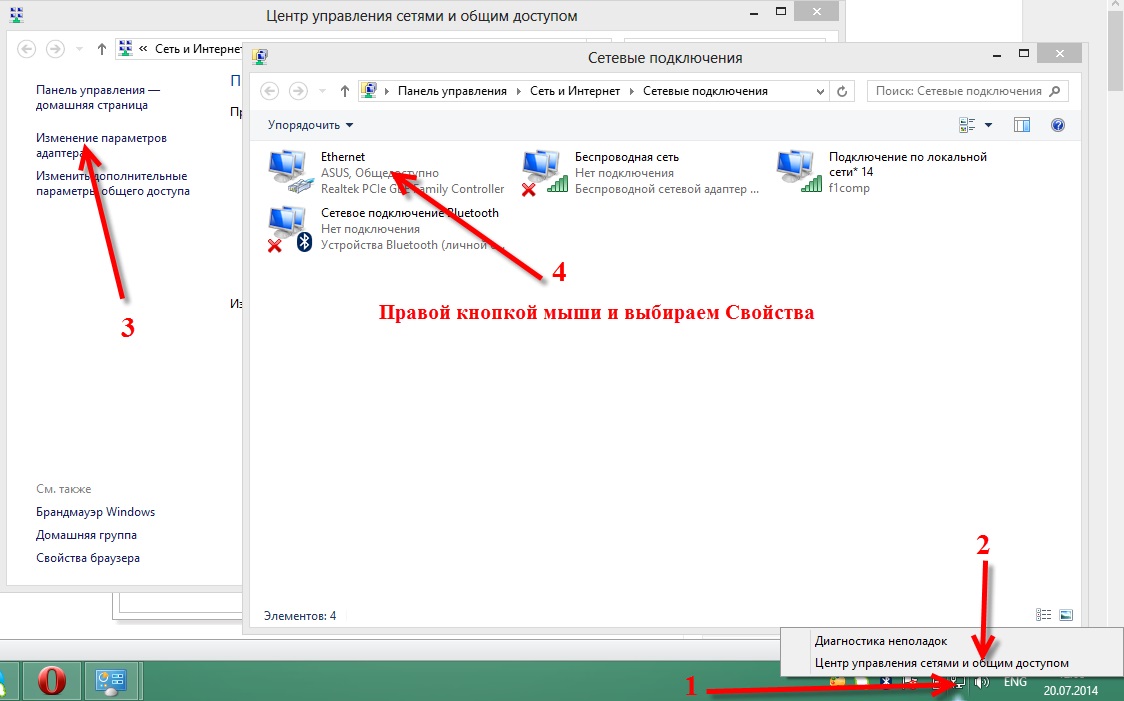
If suddenly your access point does not start, then the most common reason may be that your WiFi adapter as such is simply turned off. This is very easy to check. We go along the path “Control Panel-Network and Sharing Center-Change adapter settings” and look:

Personally, everything went smoothly for the author, so in the information about the network settings you can see the following picture. Hurray, comrades:
Now we can really distribute the Internet from a laptop via WiFi on Windows, using the small program MyPublicWiFi. That is, you can safely connect smartphones, tablets, and so on.
But let's return once again to the program itself. We still have two more settings tabs left unexplored:
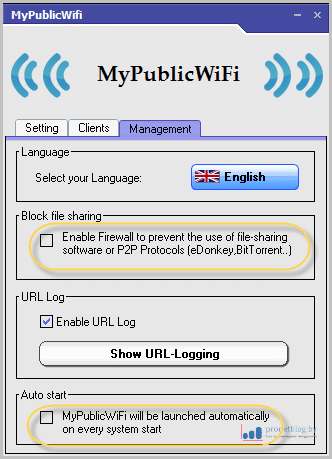
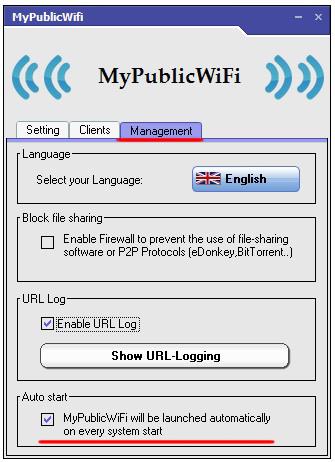
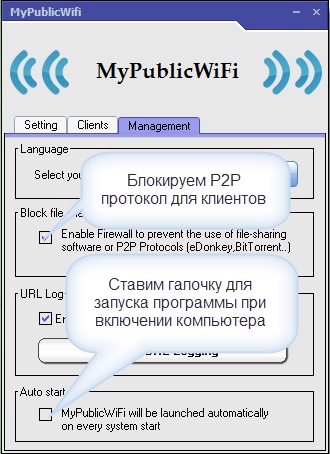
In the "Management" section you can select a language from the specified list, but Russian is not there. Also, as far as the author of the article understands, you can block the transfer of traffic from and put the application in startup.
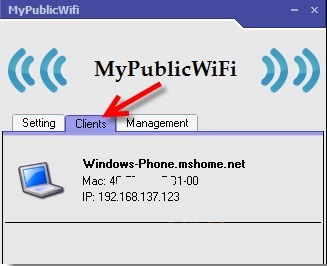
And on the "Clients" tab, all devices connected to the network should be displayed. Well, this article comes to an end. Now you know how quickly and easily you can distribute the Internet from a laptop on Windows 7, 8, 10 via WiFi.
If you suddenly have questions, as usual, knock in the comments. In the meantime, I suggest watching a short video about funny cats. It’s really hard not to laugh while looking at this.
Perhaps I will greatly surprise someone, but if you don’t have a router at hand, and you need to distribute the Internet, you can provide communication throughout the entire apartment or on small office directly from a laptop or from a desktop PC equipped with a simple wireless adapter. This can be especially useful if you bought a smartphone or tablet and would like to access the Internet from it without buying a router (for example, as an emergency connection test without purchasing additional equipment).
Under such circumstances, you will be able distribute Wi-Fi from a laptop connected to the network using both a conventional wired and wireless connection. The described method is suitable for any Windows versions, starting from seven. If you are a supporter of non-standard approaches, or prefer not to install additional software when installing products, you can immediately proceed to the method where Wi-Fi distribution will be established using a command command Windows strings. See also:, and.
Distributing Wi-Fi from a laptop using Virtual Router/Virtual Router Plus
Many users interested in distributing the Internet via Wi-Fi from a laptop have probably heard about an application such as Virtual Router Plus, or simply Virtual Router. I'll tell you in more detail about each of them.
Virtual Router Plus is a free application that is a slightly modified Virtual Router. This software is available under the GNU GPL license, as a result of which the open source product was slightly modified and redesigned, after which we received the Plus version. The product is also completely Russified. Main disadvantage this application– this is the fact that when installing a product, a lot of unnecessary software ends up on the user’s computer, which is not always possible to refuse. At the time of writing, a clean version of Virtual Router Plus without unnecessary utilities can be downloaded from the Softonic website.
The method for distributing a network using this product is quite clear and simple. The only drawback that you will encounter if you try to set up distribution using Virtual Router Plus is that for the connection to work, the laptop must be connected to the network not via Wi-Fi, but via a wire.
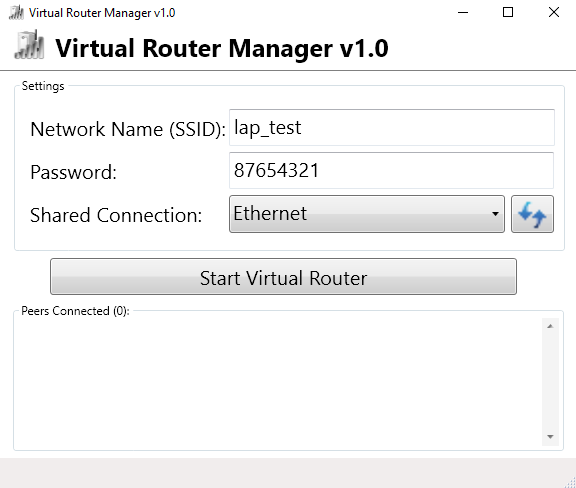
The operation of the program and the principle of setting up communication are simple and banal to the point of disgrace. When you launch the application, you will see the main modular window where you will need to set a number of parameters:
- network name (SSID) – the name of the connection that will be displayed in the list of available hotspots;
- password – a corresponding code word or set of characters with which your connection will be protected;
- general connection – here you should select the connection that your network adapter uses to access the network.
Once all parameters are set, use the button to launch the application at the bottom of the window.
After a few seconds, a notification will appear on the screen indicating that the connection has been successfully created and you can now connect to it using any portable device. As you can see, our connection is now visible in the list of hotspots.
If your laptop is connected to the network in a similar way, that is, through wireless connection, it will be quite possible to launch the program itself, but to establish a connection to virtual router will no longer be possible - when identifying an IP address, problems will arise. software glitch, which does not allow communication. Under all other circumstances, the program will be an excellent free solution for distributing Wi-Fi via a laptop.
Another analogue of the software product described above is Virtual Router. This utility is based on the same source, from which Virtual Router Plus was compiled, and it works in a very similar way. In addition, by downloading the utility from the official website, you do not risk adding a lot of clutter to your PC, such as an additional Internet browser, search bars and changes home page web browser.
The program has not been translated into Russian, which does not detract from its other advantages: lightness, simplicity and elegance. I recommend downloading this module from the official web resource of the project. Just like in the Plus version, you specify the name of the network, the password for it and select the active wired connection that provides access to the Internet, and then press main button“Start Virtual Router” and voila - you're done.
Using the Windows Command Line
Finally, I came to the last method of organizing distribution over Wi-Fi, without using auxiliary paid or free apps. The described technique works perfectly on both Windows 7 and 8/8.1 or 10.
To begin, press Win+R and enter the command “ncpa.cpl”. As a result, a list of network connections will appear on the display. Right-click on the wireless connection and go to Properties.
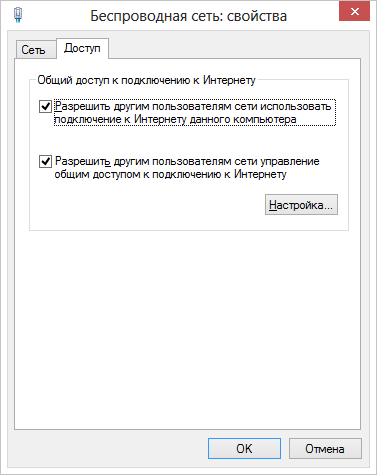
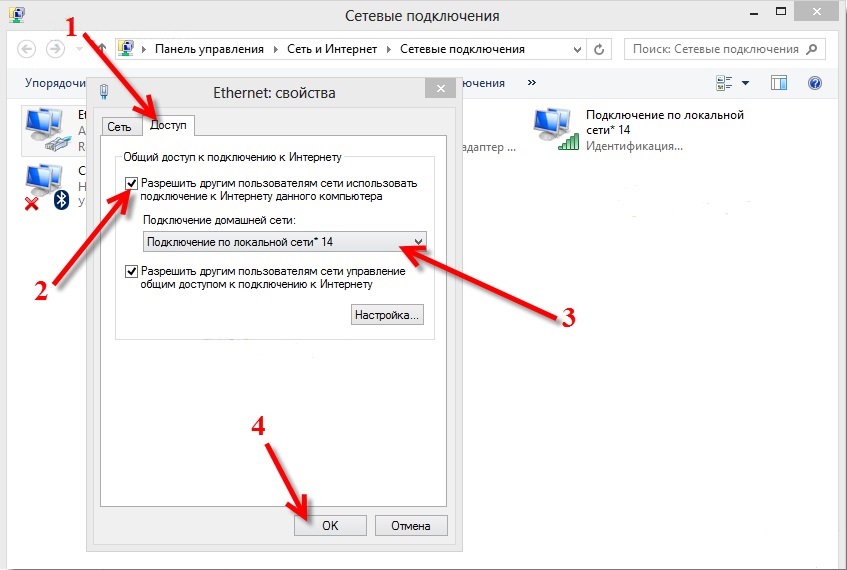
Now you need to go to the “Access” tab and check the box next to the option “Allow other users to connect to this PC’s network”
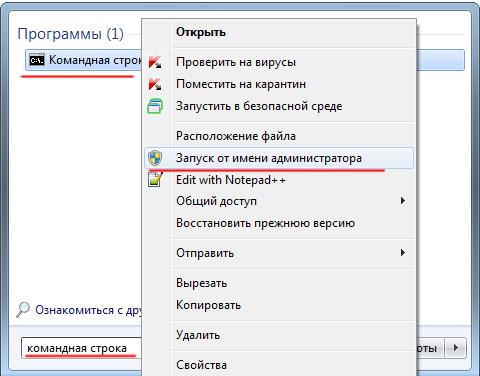
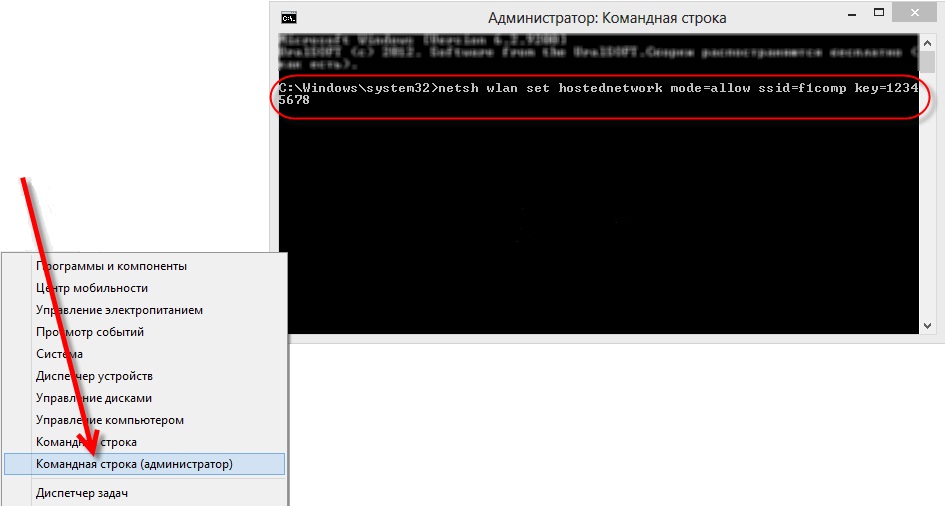
Let's launch. To do this, right-click on the Start button and select the “Command Prompt (Administrator)” option.
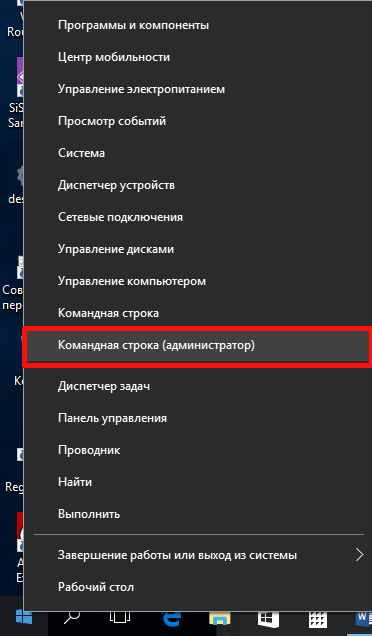
When working in Windows 7, click on the “Start” button, find “Command Prompt” in the list, and right-click on it. IN context menu Find the “Administrator” option.
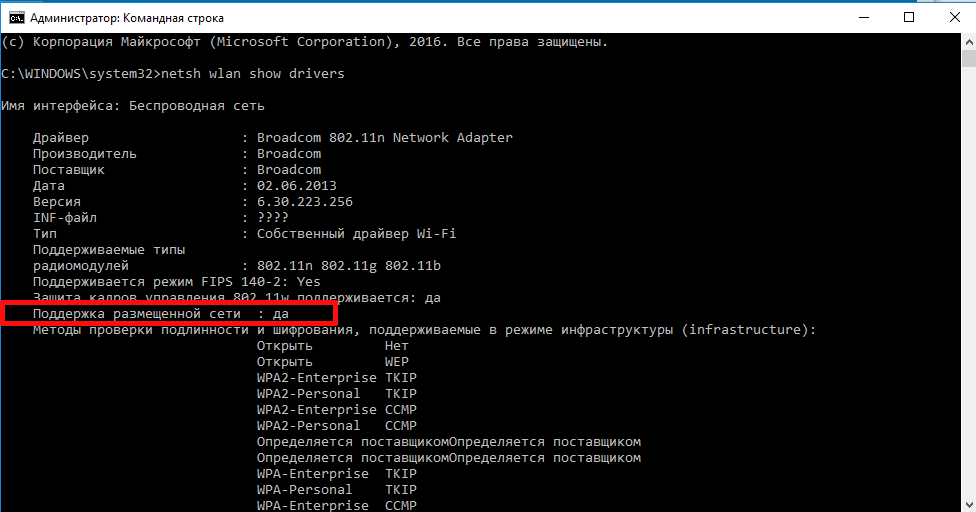
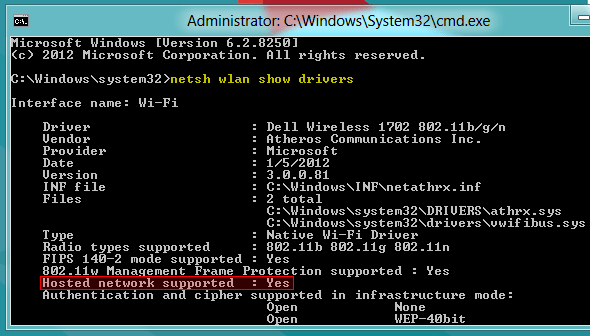
Now it's time to run the "netsh vlan shou drivers" command and see what this command tells us about the support of the hosted network. If this item is active, everything is in order, you can proceed further. If not, then either yours is too old LAN card on the laptop, or the adapter driver is installed incorrectly. In the latter case, you will have to reinstall it from the official website of the device manufacturer.
The initial command available to enter in order to turn our laptop into a router is as follows: netsh vlan set houstednetvork mode=allou ssid=lap_test key=87654321. You can change the name of the network (ssid) and its password (key) to something more convenient for you.
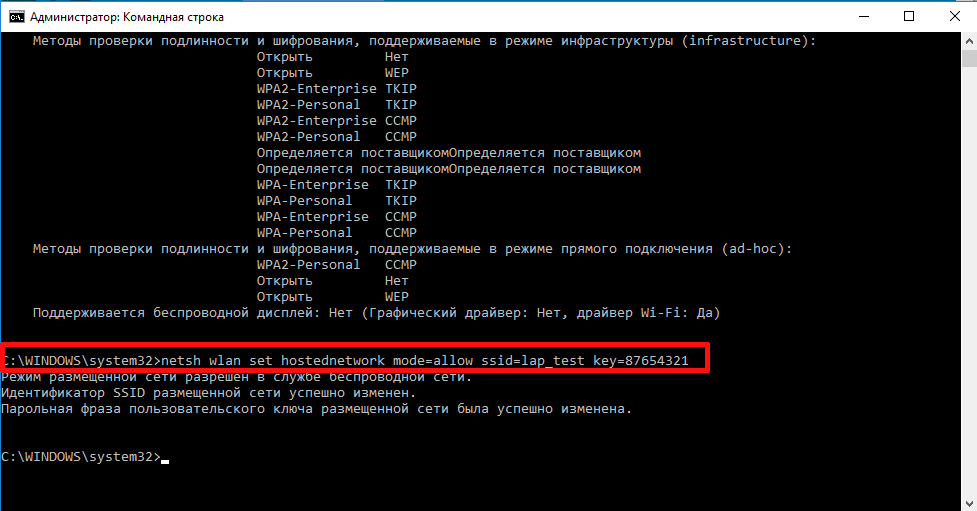
When the command is entered, you need to get visual confirmation that all the actions caused by the command we entered were performed correctly: wireless access was provided, the network name was accepted, and the key (in other words, the password) was also changed. You can enter the following query at the prompt:
- netsh vlan start houstednetwork
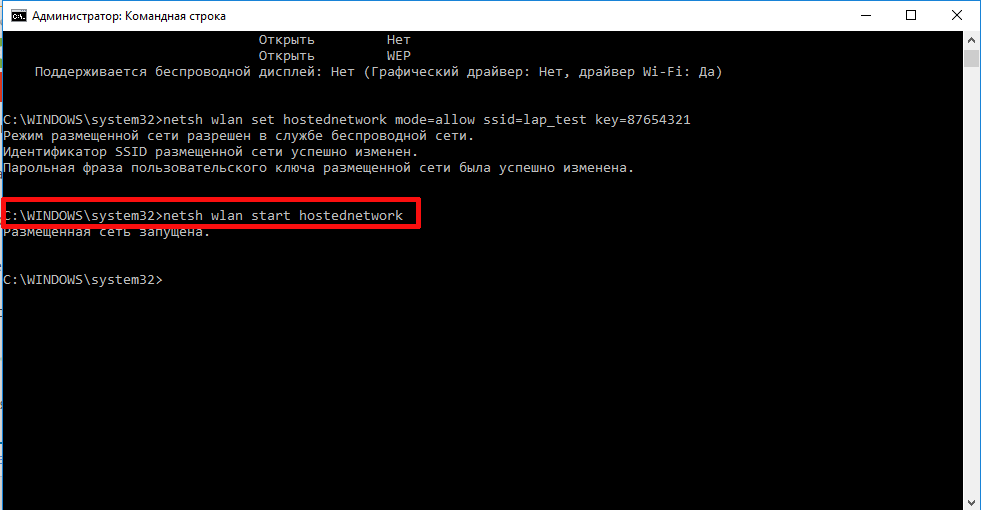
Having entered the last of the commands, an inscription should appear on the screen indicating that the launch of the hosted network was successful.
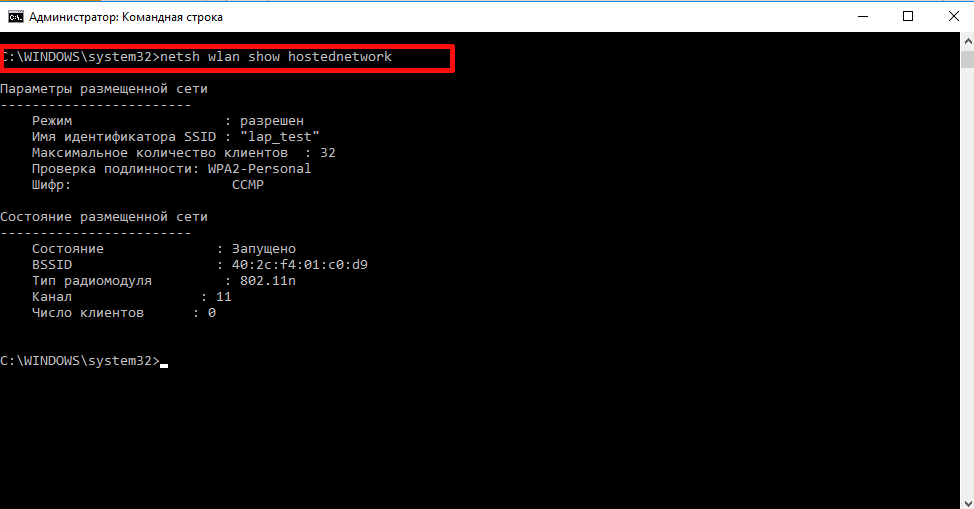
Finally, the last query that can serve you well, and which will certainly be useful for determining the status of your connection, the number of nodes connected to it, or the Wi-Fi channel, is netsh vlan show houstednetwork.
If you decide to pause the distribution, you may need a command like this:
- netsh vlan stop houstednetwork
The only significant drawback this method- this is that after each reboot of the PC, the distribution is suspended, and it has to be started again manually. To automate this process and not enter a request to start the network manually each time, you can create a bat file and add it to startup, or launch it manually if necessary.
As you can see, setting up Wi-Fi distribution on a laptop is absolutely not difficult. The whole process is described quite clearly and informatively, so you are unlikely to do anything wrong if you read the instructions presented above in full before setting up the distribution.
Thanks to the intensive development of new equipment and technologies, currently each user has several devices that provide the ability to connect to the Internet via Wi-Fi; you just need to enable this option on the device. Due to these circumstances, people are increasingly faced with the problem of the lack of a wireless network, for example, when visiting friends who have a laptop with fast access to the World Wide Web, but do not have a Wi-Fi router to provide connection to additional gadgets.
At the same time, the problem of WiFi distribution can be solved quite simply. Fortunately, the developers of Windows 7, 8 and 10 from Microsoft have provided the ability to use computers as a Wi-Fi source. Below are specific instructions on how to share WiFi from a laptop.
The problem can be solved in two ways: using Windows tools, as well as through applications of third-party programmers. The main condition that applies to all methods for using a PC to distribute Wi-Fi is the presence in the computer of a special wireless adapter, which manufacturers usually equip laptops with.
Method 1: using Windows tools
The attractiveness of the method under consideration is that there is no need to search for and install additional software on the computer, since everything can be provided using the built-in Windows tools.
The following sequence of actions must be performed:
Method 2: via command line
The algorithm of actions is as follows:
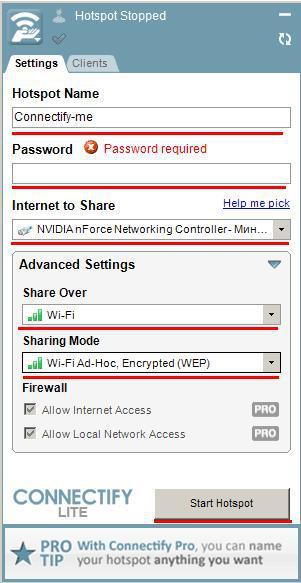
Method 3: using the “Connectify” application
If the user is too lazy to understand the OS tools, then they can effectively enable Wi-Fi distribution through the “Connectify” utility.
To set up WiFi distribution from a laptop using the program in question, you need to take the following sequential steps:
Method 4: through the MyPublicWiFi application
The utility is very similar to the application described in the previous method of distributing the Internet and also allows you to easily make your home laptop a Wi-Fi access point.
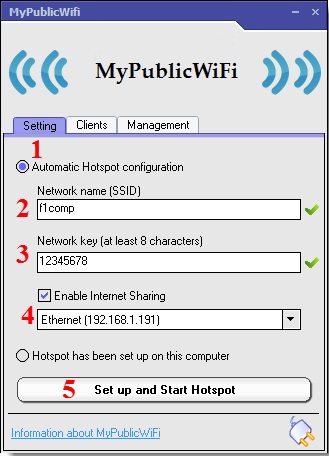
To create and configure a wireless network via “MyPublicWiFi” you will need to perform the following steps:
- Find the application on the Internet and install it on your laptop; its functionality is similar to Connectify and is quite sufficient to make your PC a Wi-Fi access point;
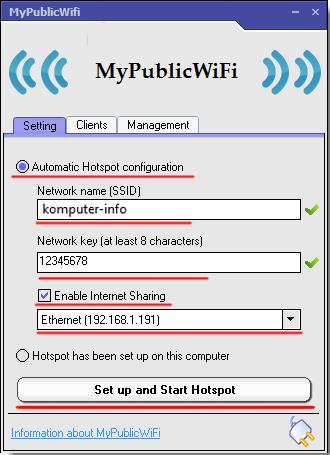
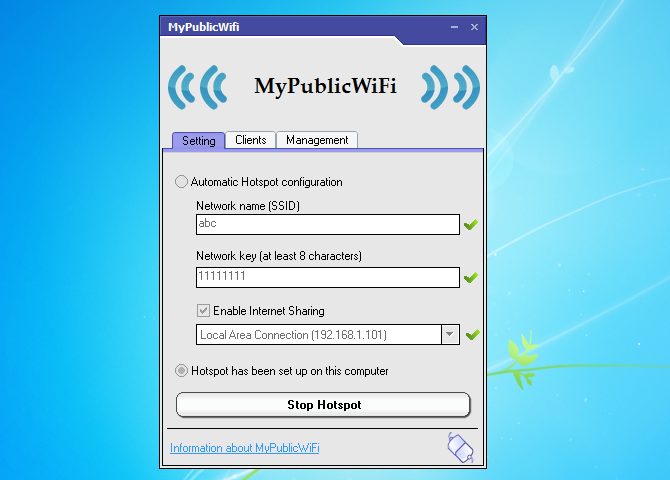
- Make a mark on the line “Automatic HotSpot configuration”;
- Then check the box “Enable Internet Sharing”;
- In the next field, indicate the PC’s connection to the World Wide Web and click “Set up and Start Hotspot”;
 Additionally, you can configure the simultaneous launch of the utility along with Windows. To do this you only need to follow a couple of steps:
Method 5: using the mHotSpot application
To organize access to wireless Internet, you can use the easy-to-use “mHotSpot” utility, which also does an excellent job of distributing Wi-Fi if you have a laptop with Internet.
To create a Wi-Fi network with the program in question, you can use the following simple instructions:
- Find the application on the Internet and install it on your laptop;
- Next, enable the application with system administrator rights;
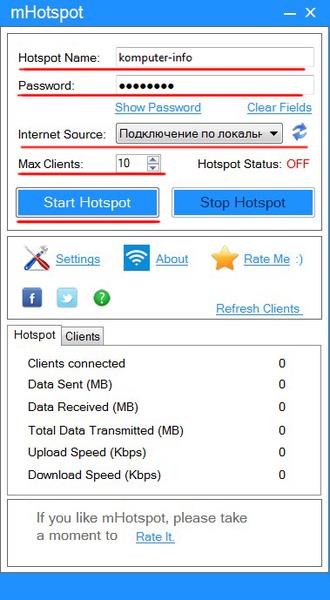
- In the next two columns, enter the Wi-Fi name and access code;
- Then, in the “Internet Source” column, indicate the PC’s connection to the global network;
- Then, in the “Max Client” item, write a number from 1 to 10, depending on the number of gadgets used in the Wi-Fi environment being created;
- Click “Start Hotspot”;
- Done, Internet distribution is working successfully and you can go online using devices connected to Wi-Fi!
Conclusion
The article presents 5 in various ways creating WiFi from a laptop. You can successfully use any of the methods the user likes and take advantage of modern advances wireless technologies without purchasing additional equipment for these purposes, for example, routers.
In our age of digital and modern technologies, it is impossible for the average city resident to imagine life without the Internet. One of her sons can be called WiFi. And the question naturally arises: how is it still necessary to distribute WiFi from a laptop if there is no possibility (or desire) to connect a router. Let's look at this in more detail.
Before distributing WiFi from a laptop
Before you start setting up WiFi distribution via a laptop, you need to make sure that your device is equipped with a built-in device for Internet distribution: a WiFi adapter or USB or PCL type. Their availability can be viewed in the Control Panel in the Network and Internet tab. If you found in Network connections item Wireless Network, then you can safely start organizing WiFi distribution.
WiFi is a trademark of the Wi-Fi Alliance. Provides connectivity via the standard IEEE 802.11 protocol. Overall is wireless network, which can be used by all devices that support a similar transmission standard.
Programs for creating a virtual WiFi distribution point
The first step is to create a virtual access point. It will be your laptop. To make a WiFi point from it, you can download free programs from official websites.
mHotspot
One such program is called mHotspot. This software does not require installation. After it is downloaded, you need to launch mHotspot. The necessary program settings will be indicated there. For example, a field called Mhotspot name enters the name of the future network. This is what will be visible in the list of points available for connection.
You can download the program from the official mHotspot website.
The next field is called Password. This is the password. It must be at least eight characters. It is important to enter it in order to secure the network from access to it by unauthorized people.
A field called Max Clients controls the number of gadgets that can be connected to the network at the same time. Their maximum number is ten. If one is indicated in this field, then no one except your computer will be able to connect to it. Click Start Mhotspot and proceed to creating an access point.
Video: how to use mHotspot
MyPublicWiFi
This is another program that can be downloaded on the Internet - MyPublicWiFi. By following the link to the downloader’s official website, you can download the software to your laptop. The program does not require installation and works immediately after downloading.
The MyPublicWifi program allows you to make a Wifi access point from your computer. Operating instructions:
- Download MyPublicWifi (preferably version 5.1).
- Install the program.
- Reboot your laptop.
- Launch MyPublicWifi (or run the MyPublicWifi program as an administrator, if it gives an error during normal startup).
- Specify the Automatic HotSpot configuration item.
- select the name of the network to be created in the Network Name (SSID) field.
- Specify the password in Network Key.
- Select (check) Enable Internet Sharing.
- In the list, select connecting your laptop to the Internet.
- Click the Set up and Start Hotspot button.
Creating an access point: three best ways
Distribution via existing Internet connection
Operations can distribute Wi-Fi through an existing Internet connection Windows systems 7 and 8.
In order to make an Internet distribution, you must follow these points:
- Start.
- Control Panel.
- Network and Internet.
- Network and Sharing Center.
- Change adapter settings.
- Wireless network connection 2. Rename it as desired. As you wish.
- We find our own active connection. Basically it is called connection by local network. May also be called Virtual WiFi.
- In the properties of the active connection, find the “access” tab and click on it. In this tab, check the boxes, that is, we agree with all the points. Namely:
- allow other users to use this network;
- Allow other users to manage connections to the selected network.
- Select your active connection from the list. That is: local network connection (or whatever name you renamed the connection to).
- Click the "OK" button and restart the computer.
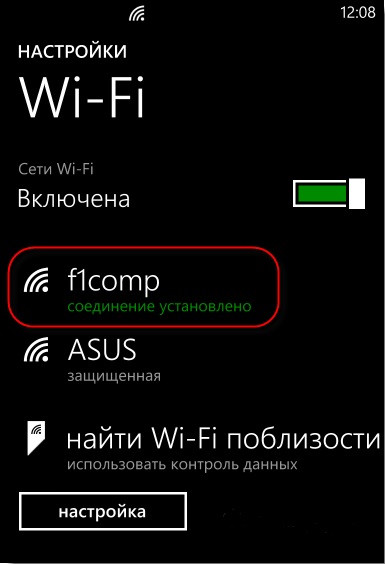
If you want your smartphone, tablet or laptop to be able to use this access point, you only need to run the Wi-Fi distribution program. And on the devices that will be connected, you must enter network access passwords.
A way to set up WiFi distribution using the command line
The above methods do not work well if you need to distribute WiFi from a computer on which Windows 10 is installed.
Steps to distribute wireless networks using the command line:
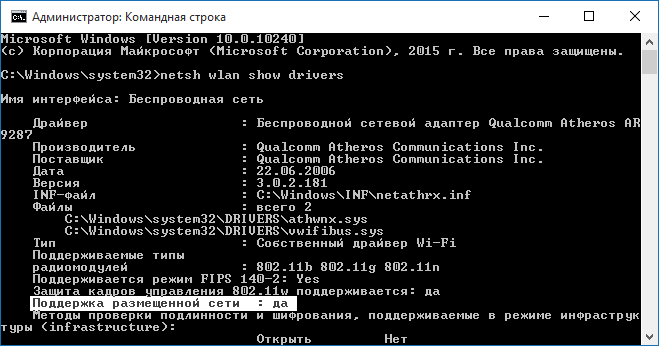
- Check the possibility of distribution. Must be run as administrator command line and enter the command netsh wlan show drivers.
- Read the “Hosted Network Support” item (if the settings are on English language, it will say Hosted Network). The word “yes” should be indicated there.
- Write the following item on the command line: netsh wlan set hostednetwork mode=allow ssid=remontka key=secretpassword. At the same time, the command contains such instructions as “remontka” - this is the name of the wireless network (you can write your own, spaces are not used). Secretpassword is the secret password for WiFi. You choose it yourself.
- After all the data has been entered, enter the command: netsh wlan start hostednetwork.
- Right-click on the Start menu on the desktop and select “Network Connections.”
- In this list, select the Internet connection that is currently in use. Right-click to open the “Access” tab. Allow access to other users.
Eventually, a notification will appear on the screen that the wireless network is running. If no errors or failures occur, then you can connect phones, tablets and laptops to this network. They will now have access to the Internet.
Access point with Windows 7: computer-to-computer network
Video on how to set up WiFi distribution from a computer via Windows 7
In order to organize wireless connection on Windows 7, you need to create a computer-to-computer network. In the lower right corner of the screen (where the clock, date, icons are located quick launch. This is called - tray) find “Internet connection”. Click on it, and then select “Network and Sharing Center”.
A window will appear. In it you need to select the “Set up a new connection” item. And click “Set up a wireless network “Computer-Computer” and “next”.
In the new window, fill in three fields:
- network name (come up with it yourself);
- security type (WPA2-ptersonal is best);
- security key.
By going to the "Network and Sharing Center" in the "Change" section additional parameters Sharing" checkbox "Enable" on all items. Don’t forget to check the box: “remember network settings”. Click the “next” button.
After the system configures Internet distribution via WiFi, in the window that appears, you will need to click “Enable general access to connecting to the Internet."
Security issues when distributing Wi-Fi without a router
Since as a result of organizing a virtual access point, an account is created with standard parameters, the name admin, any person who is at least somewhat familiar with the network can easily connect to it.
To prevent this from happening, it is important to know some points. Actions that are necessary to protect yourself and the network from intrusion by interviewed guests.
In the address bar of your browser (any) enter 192.168.0.1. A window will load on the screen in which you will need to enter the admin name and password. Go to the Maintenance tab in the section called Administrator. In the New Password field, enter a new, complex password. It must be remembered. You will need it when connecting other devices to the network. By clicking on Confirm Password we confirm that we are saving the written password. Using the same principle, we change the Login Name. At the end of each action taken, click Save Settings. This means: save the settings.
So we protected account. With this help you can change all network settings. Including connecting and disconnecting devices, as well as blocking gadgets so that they cannot connect to this network.
Let's move on to directly protecting the access point. In an already open tab in the browser, we find an item called Setup, that is, Settings. In it, select the Wireless Settings section. Will open a new window. It requires you to select a function called Manual Wireless Connection Setup. In the settings section, which is located in Wireless Network Settings, set a new network name (SSID). It should be quite complex.
If you want to prevent users of other gadgets from seeing the network you are setting up, then check the Enable Hidden Wireless box.
We connect the tablet, smartphone and laptop to distribution
After Wi-Fi distribution is organized, you will need to connect smartphones, planets and other gadgets with wireless connection support to the newly-minted “router” in the form of a laptop.
Devices running on the Android operating system have connection features. Of course, first of all, it is better to check whether other devices are allowed to access the network.
If this is the case, then you need to download the adb program. It is designed for the Internet from Windows to Android devices. The next step is to enable a mode called “USB Debugging” in the settings of your Android tablet or smartphone. And after that connect the gadget via USB cable to the laptop.
Unpack the folder with adb program and run AndroidTool.exe. A window will open in which you will need to click the Refresh Devices button. On the right there will be a list called Select Domain Name Server (Dns)... There you choose DNS server. After clicking the Show Android Interface button, the application will be installed on your tablet.
Give the USB Tunnel program superuser rights on the tablet. And feel free to press the Connect button.
Is it worth buying special equipment to distribute wifi in the house? Well, to be honest, it is advisable to organize a quality wireless Internet with the help of a well-built infrastructure. However, special configuration of the laptop and Windows will help solve this issue without unnecessary problems. Such an access point can cope with the everyday needs of any person. There are several ways to do this: manual and program. Of course, it’s better not to install third-party software, as it may contain viruses. But maybe you'll get lucky.
Preliminary preparation
The fact is that today there are a lot of devices that provide the Internet. These are cables network equipment, routers, computers with wifi adapters, 3G and 4G modems. The access point can be implemented on any device that has a wifi wireless data transmission module. The interaction occurs according to the following scheme: a laptop (or desktop computer) receives data via a cable or 3G (4G) adapter, then it distributes it via wifi channel for any devices. If the apartment is not yours, or you are visiting where the network infrastructure is not established, or you simply do not want to purchase additional equipment, then you can implement a similar method in practice, for example, through Windows.
It is very remarkable that on Windows of both the eighth and seventh generations, setting up the distribution of such necessary wifi is implemented almost identically. Let's start with the first obvious actions:
- We connect the cable to the computer to organize the Internet on the laptop. You can also use a 3G modem. You can determine whether everything is working by trying to open pages on the Internet.
- It is important that the laptop has working wifi. This is also very easy to determine; if you previously connected to a wireless network from a laptop, then everything is fine. Drivers are usually installed by manufacturers. If they are not there, then it helps Driver program Genius, which itself finds the missing elements on the network and installs them on Windows. Next comes the wifi setup.
Manual method
So, the laptop can be configured standard means the computer itself. Don't be scared that you'll have to work with the command line; in fact, there's nothing complicated about it. To launch your computer's command prompt, press the Win and X keys, then select Command Prompt. In this very command line you need to enter the command: netsh wlan set hostednetwork mode=allow ssid=f1comp key=12345678. There are two points in this code that the user can choose at will:
- f1comp is the network name that came to mind first. It can be done by anyone.
- 12345678 is a random password; of course, it can be made more complex.
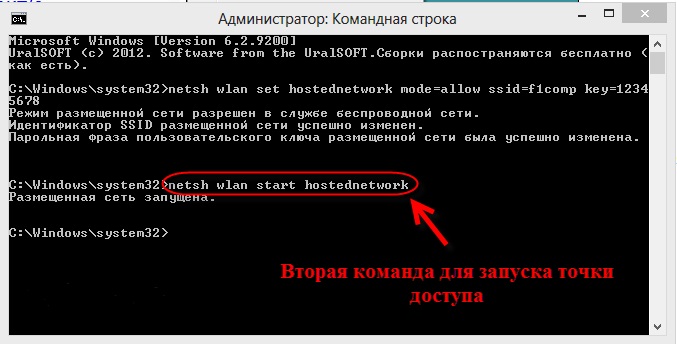
 The second step is to press Enter. The command line should then report that everything happened successfully. Then you need to enter next line: netsh wlan start hostednetwork – this command starts the access point. Press the Enter key again, after which the command line writes:
It happens that the setup at this stage is interrupted by an error. In this case, you should try entering two additional lines: netsh wlan set hostednetwork mode=disallow and also netsh wlan set hostednetwork mode=allow. Then you need to go to Device Manager (just open the Start menu and type this name there). It will contain a list from which you can select Network adapters, right-click directly above Hosted Network Virtual Adapter and select Enable. Next, re-enter the two lines that were described above: netsh wlan set hostednetwork mode=allow ssid=f1comp key=12345678 and netsh wlan start hostednetwork.
Opening access
Not only must the access point be started, but other devices must also be allowed to use the computer’s wireless network. You need to right-click on the Network and Sharing Center icon.
A window will appear, on the left side of which you need to select Change adapter settings. A list of connections will appear, in which you should select the method by which the Internet is connected. If it is a wired cable, then click on Ethernet. Select Properties in the context menu and go to the tab with the logical name Access.
On this tab, check the box next to Allow other network users to use the Internet connection of this computer. At the bottom of the tab there will be a list in which you need to select a network and click OK.
That's basically it, the access point has started its work. Now you can safely connect to the wifi that you managed to distribute from your laptop.
It also happens that we managed to connect, but there is no Internet. In this case, you should try closing antivirus and antivirus programs.
If operating system If the laptop had to be rebooted or turned off, the access point will also turn off. It needs to be started again. To do this, launch the command line and type in it: netsh wlan start hostednetwork.
Automatic method
Naturally, there is a program for a laptop through which wifi distribution is organized. It's called MyPublicWifi. It's simple and free program for Windows. Once on a laptop this program will be installed, you need to reboot. If errors occur, you should run MyPublicWifi as an administrator.
![]()
Let's make a few simple points:
- Let's select Automatic HotSpot configuration.
- We indicate the name of the network that we are going to create in the Network Name (SSID) field.
- Select a password for connection in the Network Key field.
- Check the box next to Enable Internet Sharing and select the connection.
- Click Set up and Start Hotspot.
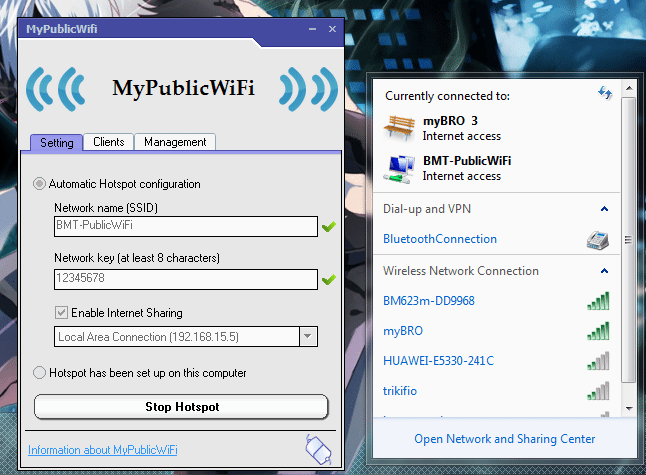
Now the wifi distribution is organized, you can safely connect. If the connection works, but the pages do not open, then you need to allow access, as mentioned above. Any program that administers the network can block the connection, so it is important to monitor the actions of antiviruses and other applications. MyPublicWifi, in the Clients tab, shows through Windows all devices that are connected to the created wifi network.
On the Management tab you can do additional settings network operation. If you check the box next to Enable Firewall, then connected devices will not be able to use Torrents and similar programs.
There is one extremely useful setting that helps organize the network automatically. If you go to the settings and check the box next to MyPublicWifi Will be launched on every system start, then wifi distribution will be launched automatically every time the computer starts.
In theory, no problems should arise in Windows, and the access point will function properly.
(Visited 16,129 times, 51 visits today)