After installing a new operating system on top of or parallel (in another section) to the previous one, the question arises of how to get rid of the remnants old version. Legacy Windows, if it is installed on the same partition, it gets the name Windows.old and does not interfere with the main system. If the old operating system is installed on another partition, then the folder name remains the same, but this also does not interfere with the new system. Everything seems to be fine, but there are two problems. Firstly, the old system takes up useful space and the volume can be more than impressive. Secondly, it is present in the boot menu, which we see when we turn on the computer. How to get rid of old Windows?
Why can't you just delete old files?
Old system files You can't just delete it. The user doesn't have access to the folder. current version Windows. Usually this message appears.
Attention! Proceed with deleting old Windows directories and Program Files only after you have transferred all their data to the new Windows!
If the new system is installed on the same partition as the old one
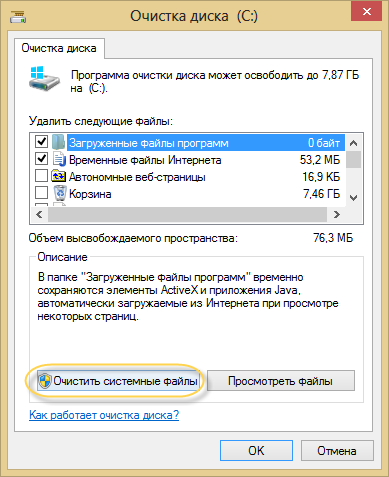
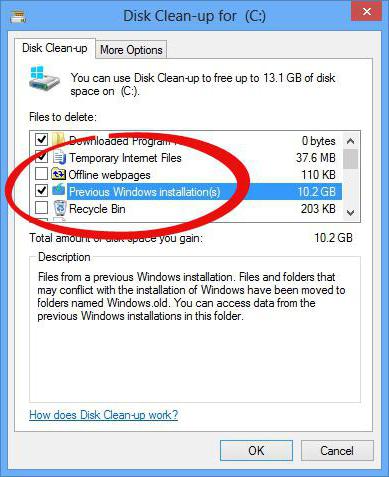
In this case, we just need to clean out the old system files, including the Windows.old folder. To do this, we use the Disk Cleanup program, which is included with the operating system. can be found on the Microsoft website.
By the way, you can delete a number of other service files in the same way.
If the new system is installed on a different partition
Removing old Windows from the boot menu
To restore order in the boot menu, open “ Extra options system" (to do this, click Win-Pause and select the item of the same name).
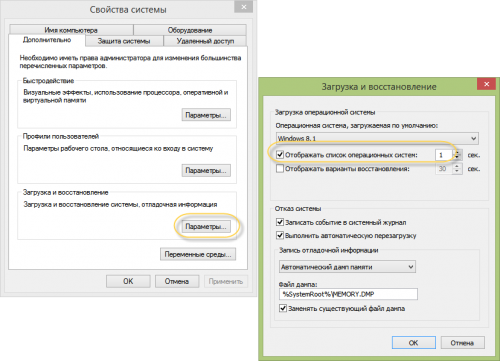
Now uncheck the “Display list of systems...” checkbox. All: the old operating system will not appear in the boot menu when the computer starts.
For those who like to control all launch parameters, we offer a method with direct editing of this menu. Press Win+R and write msconfig in the window that appears.
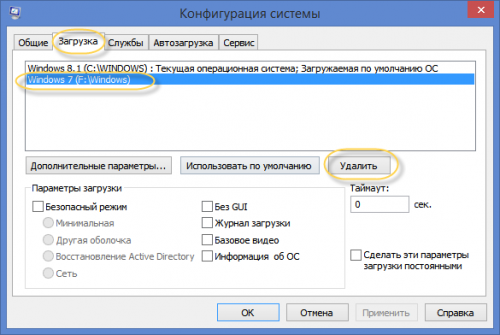
We simply remove the old system from the list.
Removing old system files
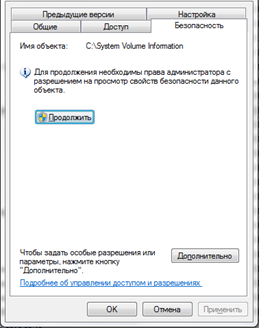
Now let’s move on to deleting the Windows directory of the old system itself. To do this, find it on the disk and open the folder properties.
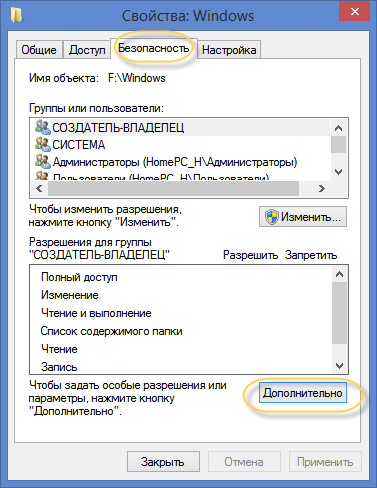
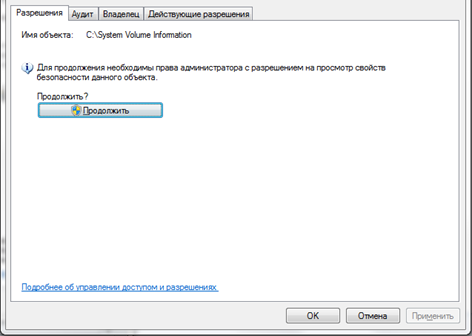
Here we select “Security” and click on the “Advanced” button.
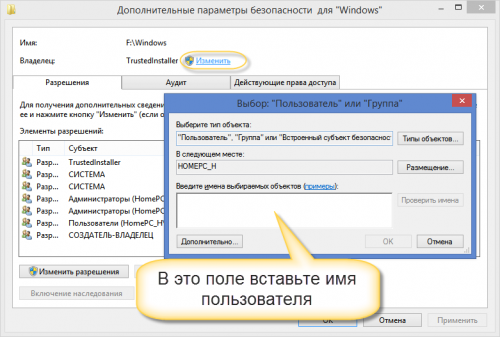
To become the owner of the folder, enter the username under which you work in the field indicated in the picture.
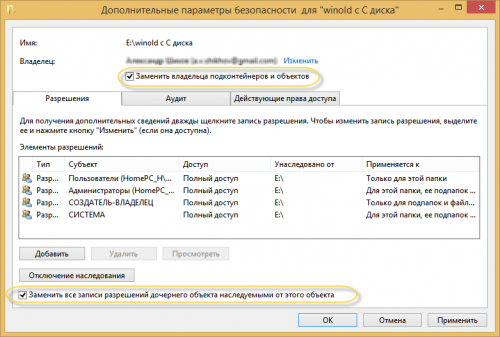
Don’t forget to check the “Replace owner of subcontainers and objects” and “Replace all records...” checkboxes, click OK.
You are now the owner of the folder and have the power to delete the directory. During deletion, a message like this may appear.
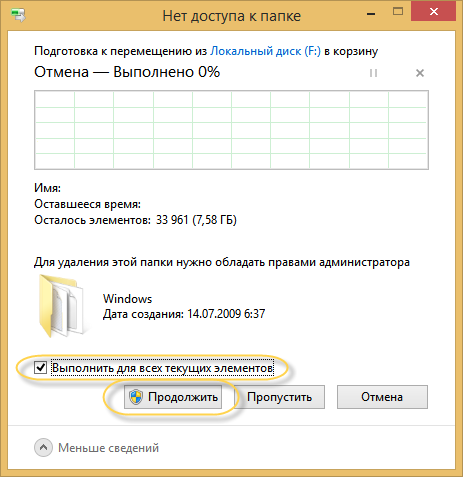
Check the “Run for everyone...” checkbox and click Continue.
Remember that after deleting old system files, there will be no way back. So don't rush into this. First, make sure that all the programs and data you need are transferred to the new system.
If you have done this on your computer Windows update or the system disk was not formatted during a clean installation, the Windows.old directory will appear in the file system. You can delete it standard means or third party utilities. The folder takes up more than ten gigabytes, which is why users want to get rid of it.
It must be said that the Windows.old directory should under no circumstances be deleted if you plan to return to the previous version of the OS. Therefore, it is recommended to leave it for at least a couple of months. During this time, it will be possible to test all the features of the new edition of Windows and evaluate whether it is worth rolling back the changes.
Built-in utility
Windows has a built-in utility that will help you erase an unnecessary directory. Moreover, cleaning the folder with its help is the simplest option for solving this problem. Windows.old without downloading third-party products?
- Press the Win + R combination on your computer keyboard.
- In the Run window that opens, enter the cleanmgr command and click OK.
- Wait while the system cleanup utility scans the files.
- Click on the button labeled "Clean up system files." Agree to grant administrative rights to the application.
- After completing all software processes A new window will appear on the display. It will contain a list of all OS files that can be deleted without violating the integrity of the operating system. Find the text “Files from previous Windows installations” or similar in the list and check the box next to it.
- Left-click on “OK” and wait until the utility completes.
After completing this instruction, the directory or its contents will be deleted. To check the result, open the properties of the Windows.old folder and pay attention to the numbers next to the "Size" label.
Command line
If the previous instructions did not help, you should try to get rid of the folder using the command line. This tool has absolutely no interface, and to perform any operations you must enter short text commands. using the command line?
- Right-click on the desktop.
- From the drop-down menu, select New > Shortcut.
- In the "Location" line, enter cmd and click on the "Next" button. Now all that remains is to specify the desired name for the shortcut. It can be absolutely anything.
- Right-click on the newly created element and select “On behalf of administrator” and answer yes to the operating system question.
- In the window that opens, enter the command RD C:\windows.old /S /Q and press the "Enter" key.
Task Scheduler
How to remove Windows.old using Task Scheduler?
- Expand the Start menu. Find “Control Panel” in the list and left-click on it.
- Click on "Maintenance and System" in the list that opens.
- Now select "Administration".
- In the window that opens, double-click on the “Scheduler” item.
- On the left side of the utility there is a task tree. In it, find a task named SetupCleanupTask.
- Right-click on it to open the context menu and select "Run".
The most reliable way
If none of the above instructions helped?
- In the Start menu, click on the Restart button while holding down the Shift button.
- In the list that opens, click on the inscription “Diagnostics”.
- Now go to the "Advanced Options" menu and click on the item named
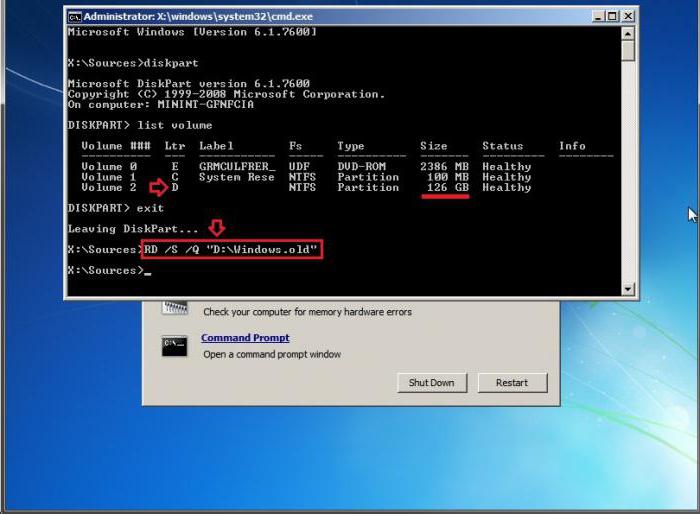
- After rebooting, the text interface will open.
- Type and then list volume. These actions will display a list of all existing sections and brief information about them. The main task is to determine which letter corresponds system disk, because in the recovery environment the literals are mixed up. The easiest way is to study the "Size" column to understand the correspondence between letters and sections.
- Enter the exit command to close the console utility.
- Now type RD /S /Q "X:\Windows.old. Replace X with the letter of the system partition.
- When the command has completed, exit " Command line" and select "Continue downloading".
CCleaner
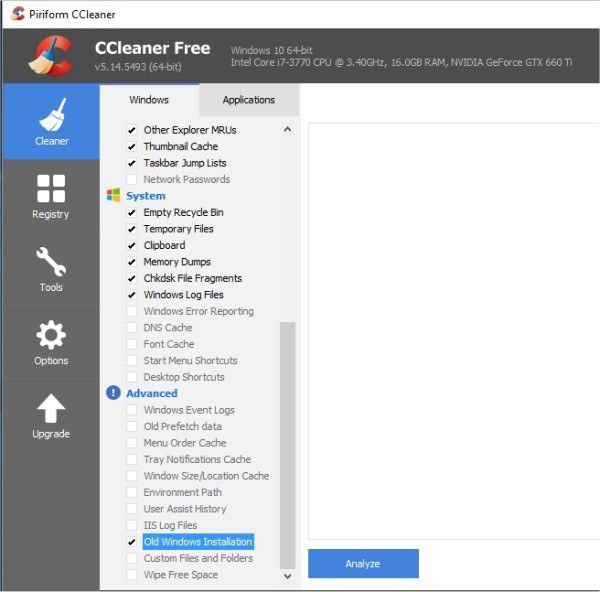
For inexperienced users, the instructions may seem complicated. To make things easier, you can use third party utility called CCleaner. It is absolutely free, and the interface is completely translated into Russian. How to remove Windows.old using CCleaner?
- Install and launch the application.
- Click on the "Cleaning" link in the main window of the utility.
- In the left list, uncheck all the boxes, leaving only one - opposite the Old Installation Windows item.
- If next to the words "Other" there is an icon with exclamation point V blue mug, click on it and agree to clear operating system logs.
- After this, click on the “Clear” button.
It should be noted that the use third party software- the most unreliable way to delete the Windows.old directory. Such utilities cannot always obtain the necessary rights.
Having installed the tenth version of the OS, think twice before uninstalling Windows 7. Old will help restore the “seven” if you don’t like the new edition or the computer’s hardware is not powerful enough for the new software.
Operating Windows systems Although they are incredibly popular, they still cannot boast of long-term stable operation. So, in some cases, the need to reinstall occurs several times a month - it all depends on the programs the user is working with. In light of this, it is not surprising that many are interested in the question of how to remove old Windows. The point is that the installation new system over the existing old one is highly not recommended, as this rarely allows you to eliminate software errors and failures, rather, add new ones. Starting with the Vista operating system, Microsoft developers took into account the wishes of users and added them to the installer special opportunity, thanks to which it has become much easier to figure out how to remove old Windows.
Advanced installation mechanism
Before we tell you how to remove old Windows, let's analyze the behavior of the installer in Win systems XP (or more) earlier versions), as well as Vista (and later).  When installing older systems on hard section disk where there was already a copy of the system, the installer prompted the user to make a choice - erase the existing Windows folder or start installation in a directory with a non-standard name. In both the first and second cases, all data from the “Documents” section, “Desktop” and other key folders were lost. I had to learn how to remove the old Windows while keeping necessary files. With the advent of Vista, the situation changed: the installer, having discovered a copy of the system, renamed it to Windows.Old and moved all related folders there. The significance of this small innovation for end users cannot be overestimated - it is revolutionary.
How to remove the old oneWindows 7
Depending on the system being installed, the preparation also changes. Let's consider a more complex option, when Win XP is installed on the hard drive. The easiest way to save any files from your previous system is to prepare media with a bootable version of the LiveCD.  There are quite a lot of these solutions, so there shouldn’t be any problems with choosing. You should download a LiveCD from the Internet. According to the instructions provided with it, write it to a disk/flash drive. Then boot into this mini-system and copy the necessary data. The next step is to delete the Windows, Program Files folders. If we are talking about Win 7, then you can also erase ProgramData, Users. All that remains is to reboot and start the installation. In case it is installed a new version system, then a LiveCD will not be needed: after installation is complete, there will be a Windows.Old directory on the disk, where all system data will be transferred. What you need from here must be copied, and what is unnecessary must be erased. Removing remnants of the previous system can be done through the "Disk Cleanup" function in the "Start" - "Accessories" - "System Tools" menu, indicating in the list " Previous installations"Sometimes people who want to use the system for free are wondering how to remove the old Windows 7 activator. To do this, you need to restart this program and select the uninstall option. Another method that is no less effective is to install a new solution simply on top of the old one. All key links will be automatically overwritten.
"(BSOD) and freezes, at times, can change its operation beyond recognition or stop functioning altogether. Therefore, it is not surprising that the number of requests from Internet users “how to remove old Windows” is constantly increasing.
Windows OS can last for years for those who limit themselves to working in office applications, viewing multimedia files, and the programs used are not even updated. It's a different matter for those who like to experiment with new programs. Exactly for them question about deletion old Windows most relevant.
When a new Windows OS is installed on top of the old operating system or in another partition parallel to it, it becomes very important that not a trace remains of the old version. The previous Windows system is called Windows.old, and does not interfere with the main system.
But there are two problems here:
- The impressive volume of the old system while occupying the right space;
- The presence in the boot menu of an inscription about the old Windows.
Or maybe you are simply planning to change the operating system, for example, to Linux. All this pushes you to get rid of the old Windows OS As soon as possible.
According to statistics, old Windows XP is uninstalled much more often than Windows 7. It is also worth knowing that deleting the Windows.old folder is an irreversible process. For different versions OS Windows windows and the sequence of actions may vary slightly, but, in general, the principle is the same.
To delete the previous Windows systems There are 3 main ways from your PC. Let's look at each of them in more detail.
Method No. 1

Widely used for Windows 7, but not suitable for Windows XP. You need to insert the disk with the installation distribution into the disk drive, and then begin the installation. A message will appear indicating that an old system has been detected that is stored in the Windows.old folder.
The process will not affect important data, because old system folders and the files will simply be moved. If something happens, you can easily restore them. If desired, the Windows.old directory can be completely deleted.
Method number 2
Not accessible to everyone due to its specificity. Try booting from another hard drive. There should be no problems with deleting the old version of Windows, since it is visible in Explorer and you can delete any of its directories. However, the presence of two stationary hard drives on one computer is extremely rare.
Method number 3
A universal option based on downloading a smaller version of Windows, called Windows PE. You can boot from a CD or, more popularly, from a flash drive.
But the functionality of the system is extremely limited, so it’s quite difficult to get video. However, work with file system possible in full. After loading the LiveCD, it is recommended to erase the old Windows. HDD may not be displayed in the PE system.
Therefore, simply change the operating mode of the disk subsystem in the BIOS to IDE with AHCI. If the erasing process is unsuccessful, then you just need to change the access rights using the commands “Folder Options” - “Security”, and then “Advanced”.
The easiest way to remove the old Windows 7 activator is through its installer. Don't forget to disable protection software using the “Control Panel” services, then “Administrative Tools” and finally “Services”.

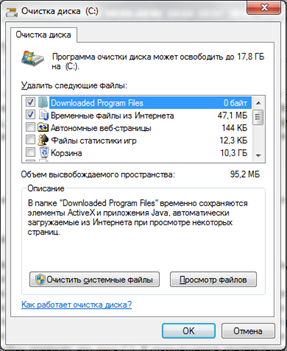
In general, to delete the Windows.old folder, you need to open the Disk Cleanup program using the Start button. In the search field you need to enter “Disk Cleanup”, then in the list of results select the item of the same name “Disk Cleanup”.
Then the Windows OS drive is selected, after which the “OK” button is pressed. Go to the “Disk Cleanup” tab and click the “Clean up system files” button. Be sure to check the “Previous Windows installations" for all files to be deleted, then click the "OK" button. A message box will then appear where you simply click on “Delete Files”.
Also for complete removal a second or older version of Windows from your computer’s hard drive, a simple but very effective program called NanWick Windows Uninstaller is suitable.
Suitable for Windows Vista, Windows 7 and 8. Effectively removes unnecessary files, Related previous versions OS and folders on all subpartitions of the disk and in the boot menu. After making copies of the necessary data, proceed to install the program through the installer.
Often after installing the operating system, a Windows folder old. This happens when the disk was not formatted during installation, and the new Windows version was installed on top of the old one. This causes old Windows files to be saved in the folder Windows old. This folder takes up approximately 10 GB of hard drive space and cannot be deleted by normal means.
In this article we will tell you how to remove Windows old.
Method number 1.
The first and most in a simple way To remove the Windows old folder is to use the Disk Cleanup utility. If you don’t know how to delete the Windows old folder, it’s better to use this method.
There are several ways to run this program:
- Launch the Start menu and follow the path: All Programs - Accessories - System Tools - Disk Cleanup. This method is not suitable for Windows 8.
- Open the Start menu or Start screen tiles (if you have Windows 8) and search for “Disk Cleanup.” After this, the system will prompt you to run this program. When the program starts, select the drive where Windows is installed (and the Windows old folder is located).
- Open the “Computer” window and right-click on the drive on which Windows is installed (usually drive C:). In the opened context menu select "Properties". After this, a window with disk properties should open; here you need to click on the “Disk Cleanup” button.
After launching Disk Cleanup, you will be asked to select files to delete. In this list you need to find the item “Previous Windows installations”. Check the box next to this item and click OK. After this, the system will perform a disk cleanup and the Windows old folder will be deleted.
Method number 2.
If the method using the Disk Cleanup utility does not work for you, you can delete the Windows old folder manually. To do this, you need to obtain rights to access it.
In order to manually delete the Windows old folder, you need to fulfill two conditions:
- You need to delete the Windows old folder from under account Administrator.
- The Administrator account must have full access to the Windows old folder.
First, we need to log in as an Administrator. Next, open the disk on which the Windows old folder is located and right-click on it. After that, launch the “Properties” menu. After the “Properties” menu is open, do the following operations:
Go to the tab called “Security”.
Click on the “Advanced” button.
Go to the “Owner” tab.
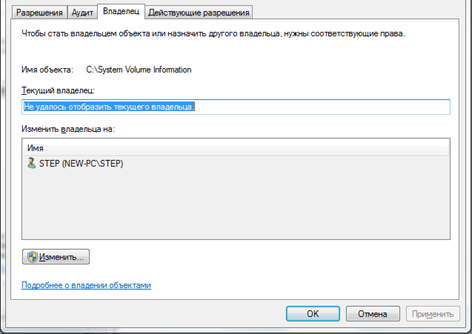
Click on the “Change” button.
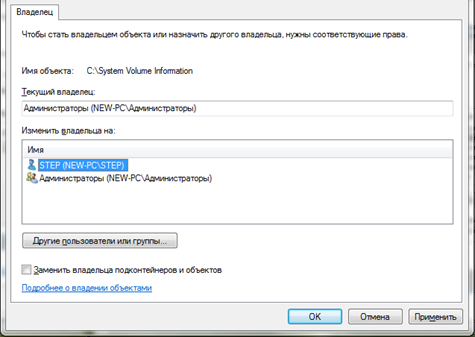
In the window that opens, click on the account of the new folder owner and check the box next to “Replace owner of subcontainers and objects.”
Close the last window by clicking on the “Ok” button. After that, go to the “permissions” tab and click on the “Change” button.
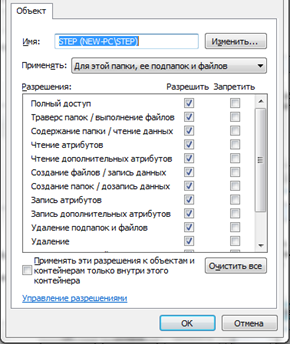
In the window that opens, select “apply for this folder, its subfolders and files” from the drop-down list and check the box next to “Full control”. Close the last window by clicking on the “OK” button.
After this you will return to the previous window. Here you need to check the boxes next to the items: “add permissions inherited from parent objects” and “replace all inherited permissions for all descendants with new inheritable permissions from this object.” After this, you need to close all windows by clicking on the “OK” button.
Once you have completed these manipulations with the Windows old folder, you can delete it by simply clicking on the “Delete” button.


