"(BSOD) and freezes, at times, can change its operation beyond recognition or stop functioning altogether. Therefore, it is not surprising that the number of requests from Internet users “how to remove old Windows"is constantly increasing.
Windows OS can last for years for those who limit themselves to working in office applications, viewing multimedia files, and the programs used are not even updated. It's a different matter for those who like to experiment with new programs. Exactly for them question about deletion old Windows most relevant.
Sometimes old software is not removed from your device. You can clean them, but there is always a risk. We will look at how to minimize this risk. There are so many possibilities and in general it will vary from supplier to supplier. And of course, knowing why probably won't help us answer the first part of the question.
General answer: yes, you can delete old versions that you know have been replaced by new ones installed updates and newer versions. Before we run off and start deleting folders and files and what not, we need to take care. Sometimes, for various reasons, it is not.
When on top of the old one operating system or a new Windows OS is installed in another partition in parallel with it, it becomes very important that not a trace remains of the old version. The previous Windows system is called Windows.old, and does not interfere with the main system.
But there are two problems here:
- The impressive volume of the old system while occupying the right space;
- The presence in the boot menu of an inscription about the old Windows.
Or maybe you are simply planning to change the operating system, for example, to Linux. All this pushes you to get rid of the old Windows OS As soon as possible.
So we need to be careful in what we do. Make sure you use reserve program or a strategy that includes all the files, registry settings, and everything else on your computer. This is what you should have as a regular strategy Reserve copy either way, but this is a case where we proactively take a snapshot before making major changes. Quite often, if an old version is left on the disk, it may not be deleted at all and may appear here. If so, this is by far the safest way to remove it. Look at the program-specific menu item in your system's Start menu. In particular, look in the "All Programs" menu and maybe even some submenus like "Accessories" or others. What we are looking for is again an uninstaller that is specific to the version you are trying to clean up.
- Perform a full backup of your machine.
- Look specifically at older versions of what you are trying to clean up.
According to statistics, old Windows XP is uninstalled much more often than Windows 7. It is also worth knowing that deleting the Windows.old folder is an irreversible process. For different versions OS Windows windows and the sequence of actions may vary slightly, but, in general, the principle is the same.
To delete the previous Windows systems There are 3 main ways from your PC. Let's look at each of them in more detail.
This is important because renaming the container of a file in use will often work without error - the file will still be in use. Sometimes the same is true for renaming the file itself. Run a test period for "at that time". Depending on how you use your computer and how hard you press it to clean, it could be hours or days. Rename it and reboot if renaming it in the first place caused errors or errors occurred during the test period. Based on these mistakes, you can decide how to proceed, but the obvious answer might be to leave him alone. Delete the renamed folder if no errors occur during the testing period. Most likely, the old version is no longer in use and can therefore be safely removed.
- Find the folder containing old version.
- It looks like you have already done this since you have determined that they are taking up space.
- Rename the folder.
- Reboot.
Method No. 1

Widely used for Windows 7, but not suitable for Windows XP. You need to insert the disk with the installation distribution into the disk drive, and then begin the installation. A message will appear indicating that an old system has been detected that is stored in the Windows.old folder.
If the new system is installed on the same partition as the old one
You can uninstall the old version before or after installing the new one. Nick Peers writes technology related articles as he has a Master's degree in information technologies at the University of East London. Basically, you see this option appear every time you turn on the machine.
Make sure you run command line as an administrator. Here is an example, everyone may have different results when entering the command. After you see the "Operation completed successfully" message and restart your computer, you won't see this boot option the next time you start it.
The process will not affect important data, because old system folders and the files will simply be moved. If something happens, you can easily restore them. If desired, the Windows.old directory can be completely deleted.
Method number 2
Not accessible to everyone due to its specificity. Try booting from another hard drive. Problems with deleting the old one Windows versions should not arise, since it is visible in Explorer, and you can delete any of its directories. However, the presence of two stationary hard drives on one computer is extremely rare.
You can not only clear unnecessary boot records, but also manually create new boot entries. But be more careful about what you do there, as any entry deleted using this command will be extremely difficult to recover. This model also defines preview development, where new builds are installed as updates.
Rollback to troubleshoot
One advantage is that if problems arise, you can revert to an earlier operating system status. Essentially, beta software is still buggy. Examples include errors that don't tell you why the update to the new build failed. However, one solution to be able to use the latest build would be to roll back the system to an earlier state and get the last update.
Method number 3
A universal option based on downloading a smaller version of Windows, called Windows PE. You can boot from a CD or, more popularly, from a flash drive.
But the functionality of the system is extremely limited, so it’s quite difficult to get video. However, work with file system possible in full. After loading the LiveCD, it is recommended to erase the old Windows. HDD may not be displayed in the PE system.
The process goes through several dialogs in the following, but you also have to select account user you want to use for it. The reset does not require downloading files for the previous build, so it can be turned over quickly. Installation - Tips and tricks: Switching.
With customization you can simply make the room again. The behavior of the Update Wizard depends on whether you want to keep the old version or completely disappear from the disk. Installation - Tips and tricks: Setup procedure. After entering serial number and the target directory the request is executed: If you do not want to interfere with the installation process, select the Standard button.
Therefore, simply change the operating mode of the disk subsystem in the BIOS to IDE with AHCI. If the erasing process is unsuccessful, then you just need to change the access rights using the commands “Folder Options” - “Security”, and then “Advanced”.
The easiest way to remove the old Windows 7 activator is through its installer. Don’t forget to disable software protection using the “Control Panel” services, then “Administrative Tools” and finally “Services”.
Filters for export and import can be tailored to your needs. This is especially important when you want to share documents with other people. Although the option saves a lot of disk space, it has significant speed disadvantages. Mass office suite will be correspondingly tough.
How to remove a previous driver version
In short: the disadvantages outweigh the advantages in this option. You should spend your time because it saves later rework. Installation: Perform a custom installation. Template files are archived there. If you've had success working with your book collection so far, there's no reason to uncheck the box before recording. Most office owners will want to install a spreadsheet. The same applies to table templates.

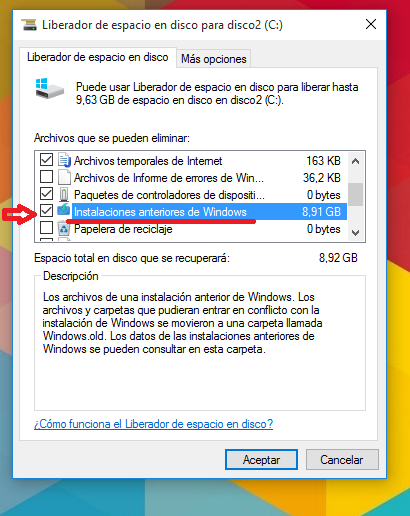
In general, to delete the Windows.old folder, you need to open the Disk Cleanup program using the Start button. In the search field you need to enter “Disk Cleanup”, then in the list of results select the item of the same name “Disk Cleanup”.
On the other hand, default values for add-ons make sense for most applications. Installation: wizards and templates. From the wizard and document templates, select the one that interests you. You shouldn't miss the spot correction tools as the options grammar is available at German, but disabled by default, i.e. quietly with a tick.
A single entry should be activated in the text converter, since it is good enough to have text with a layout. If you're not sure if you want to use it once, uncheck the box in front of it. However, if you want to take it now, you must scan various options that are important to you. Powerful users activate the option language directory for additional wizards and supporting themes, as some programming is often required. If, on the other hand, you are new to access, you should definitely leave the wizard selected because it helps you create new databases.
Then the Windows OS drive is selected, after which the “OK” button is pressed. Go to the “Disk Cleanup” tab and click the “Clean up” button system files" Be sure to check the " Previous installations Windows" for all files to be deleted, then click the "OK" button. A message box will then appear where you simply click on “Delete Files”.
Example databases also help make basic understanding easier. Perspective is a kind of control center. Read the descriptions carefully; usually you will only need a few of them. By default, the Quick Access Toolbar is disabled. Beginners should do without them; several icons on the desktop serve the same function. The last main point converter and graphics filter are related to accessing data points and are a little delicate: here, on the other hand, a lot of hard drive space can be allocated.
But on the other hand, you may be setting yourself up for making too harsh a choice for import and export. So you pay to go through all the formats point by point and select the ones that are needed in your daily work. Internet users should be more generous with graphic filters, since there is a large zoo format on the world wide web of the village.
Also for complete removal a second or older version of Windows from your computer’s hard drive, a simple but very effective program called NanWick Windows Uninstaller is suitable.
Suitable for Windows Vista, Windows 7 and 8. Effectively removes unnecessary files, associated with previous versions of the OS and folders on all subpartitions of the disk and in the boot menu. After making copies of the necessary data, proceed to install the program through the installer.
Removal using TakeOwnershipPro
This is the easiest way to work with a keyboard shortcut. There you have an area. In the left pane, you select "Recover" and the following window is displayed. The following option will be displayed. The following options are available. After this, an additional note appears about the removal of the latest feature update.
If the new system is installed on a different partition
Please, be patient. After the change: - Some applications and programs need to be reinstalled. - Fixed changes made after installing the latest build. Even if problems are unlikely, you must be prepared. You cannot log in without a password. Finally a message appears.
Which can take up several gigabytes of disk space. Moreover, in the boot menu previous Windows versions continue to “hang”, offering the user to boot from them. In addition, they clog the PC hard drive and slow down its operation. So, how to remove old Windows?
Via the disk cleanup menu
You can remove the old version of Windows using the Disk Cleanup utility, which is available in all Microsoft operating systems, including Windows 10
We will install the next preview release as soon as it becomes available. If you confirm this with "revert to previous build", the downgrade process will begin. Please be patient, the deletion process takes about the same time as the update.
Problems uninstalling developer updates
The message “Provisioning is working” is displayed for a few seconds. The image then disappears and the deletion process is terminated without any further messages or actions. Observing that there is less space on the hard drive. The types of files this folder contains vary depending on each computer and the programs you have installed.
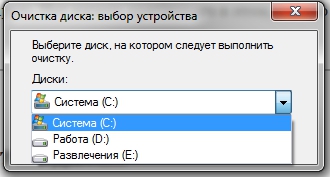
Go to “Computer” and right-click on the icon of the section where the previous version was. Select “Properties”, then “Disk Cleanup”.
The system will begin scanning this partition for trash files; Among them will be the item “Previous Windows installations”
In my case, 20 GB on another computer is less or more space. Open it and check everything it contains. There might be something in the "Users" or "Users" folder you're interested in. If yes, copy it to your My Documents folder. 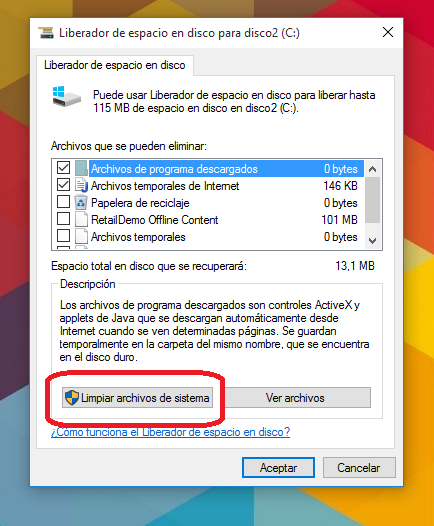
Now you know how to recover some space on your computer. Hope this tutorial helps you.
Restore the latest system state from a system backup
And the system freezes upon startup. Do you really want to leave the birthday update and return it to previous state? Check out software backup and restore you are using, and you can easily restore the latest system state point from the system backup image you created.
Make sure it is ticked.
Confirm deletion. Windows will ask you again if you want to continue the operation - click OK. After a few minutes, the utility will notify you that all trash files have been deleted.
The Disk Cleanup utility can be called in another way: left-click the “Start” manipulator and enter the word “Cleanup” in the search bar (works also for Windows 10/Windows 8.1). In the list that appears, select Disk Cleanup. Click the “Enter” button. The utility will prompt you to select the partition where the cleaning operation will be performed.
The previous version of Windows can be detected and removed using other cleaning programs. You can use, for example, CCleaner, latest version which was optimized for working with Windows 10. You can install other utilities – Glary Utilities, IOBit Advanced Care and so on. The main thing is that they support working with windows 10/8.1/7.
Removing the “windows.old” folder and adjusting the boot menu
It happens that neither a standard Windows cleaner nor a third-party one can find old files. This leads to the fact that the user has to look for the “windows.old” folder himself, delete it, and then, through the Windows boot configuration menu, disable the function of selecting a version that no longer exists. But for this you need to install system administrator rights
How to do it? It’s very simple: press the Win+R key combination, enter secpol.msc and click “Enter”. In the left menu that appears, double-click on “ Local policies", then - "Security Settings". After this, now in the right window, look for the item “Accounts: State “Administrator”. Double-click on it and switch from “Disabled” to “Enabled” and save the changes.
After this, you need to reboot and launch the new (not old!) version of the operating system. After the main stage Windows boot will prompt you to log in through two accounts, including an administrator account. We go through it. That's it, now you can play around with the system as a system administrator.
Now you need to use Explorer to go to the section where the “windows.old” folder is located and delete it. To do this, right-click on the icon of this folder and select “Properties”. Then you need to click on “Security” and then on “Advanced”. Among the proposed tabs, select “Owner”, click the “Change” button and select the account from which the deletion will be carried out. Save the changes with the “Apply” button and click “OK”.
A message will appear indicating that we have become the owner of this directory. Click "OK". You can now delete the “windows.old” folder (after moving it to the Trash) this catalog need to be removed from there too).
Now you need to go to the boot configuration menu. Press the Win+R key combination, enter msconfig and click “Enter”. Go to the “Download” tab and select previous versions Windows. Click the “Delete” button