Instruction
Open the Screen component. This can be done in several ways. Through Windows key or the Start button, open the menu and select Control Panel. Find the "Screen" icon in the "Appearance and Themes" category by clicking on it with the left mouse button.
Another way is faster: right-click on the desktop in any place free from files and folders. IN context menu select the last item - "Properties". A new "Properties: Display" dialog box will open.
Make the "Desktop" tab active and click the "Customize Desktop" button at the bottom of the window. In an additional window that opens, go to the "General" tab and mark the field "My computer in the Desktop Icons group. Save new settings - label"My computer' will be restored to the desktop.
To return the My computer” in the Start menu, call another component - “Taskbar and Start Menu”. You can also choose one of the methods for this. Through the Start menu, go to the Control Panel and select the "Taskbar and Start Menu Properties" item in the "Appearance and Themes" category.
Alternative option: right-click on the taskbar in any place free from icons and select "Properties" from the context menu. A new window will open, go to the "Start Menu" tab in it. Click on the "Settings" button next to the item "Start Menu".
Another window "Customize the Start Menu" will open, make the "Advanced" tab active in it. In the Start Menu Items group, scroll down the list until you find My computer».
Set the marker in one of the fields that suit you: "Display as menu" or "Display as link". Click OK, additional window will close automatically. Apply the new settings in the properties window and close it with the OK button or the [x] icon.
Any icon interface operating system can change. If the style of the operating system seems too boring to you, you can experiment and create something new. For example, changing the default icon"My computer» to something more interesting and unusual, you can update the interface of the operating system, create something more non-standard, to suit your style.
You will need
- Computer, TuneUp program
Instruction
System icons any operating system cannot be changed in a standard way. For this you will have to use special programs. One such program is TuneUp. Download it from the Internet and install it on your computer. With this program you will get additional features operating system interface visualization.
Launch Tuneup. Please note that the first time the program will run longer than usual. This is due to the fact that after the first launch, it will scan the state of the operating system. After scanning, click OK and the program will optimize all Windows settings. After that, you will be taken to the main menu of the program, in which you should study its interface. The main menu of the program is located at the top and is represented by only six components. From these components select " Windows Setup". In the window that appears, pay attention to the line "Change the appearance of Windows"
Below this line are components with which you can change the interface of the operating system. Select the Windows Personalization component. A window will open with additional options. Pay attention to the line "Select a task". Below this line is additional panel tools. In this panel, select "Change icons and names for system elements».
A list of system item icons will appear in the middle of the window. Select "Computer". On the right side of the window is a list of commands that can be used for the selected icon. Select "Replace icon". A window will appear with icons that you can put in place of the standard one. As a rule, all icons are from the general set of Windows. If you have your own interesting icons, click "Browse" and specify the path to them. If you wish, you can download additional icons "My computer" from the Internet.
Related videos
Sources:
- how to change my computer icon in 2017
Any PC user, after installing another program on his computer, may find that software not installed: an error occurred, but label preserved in panels management.
Instruction
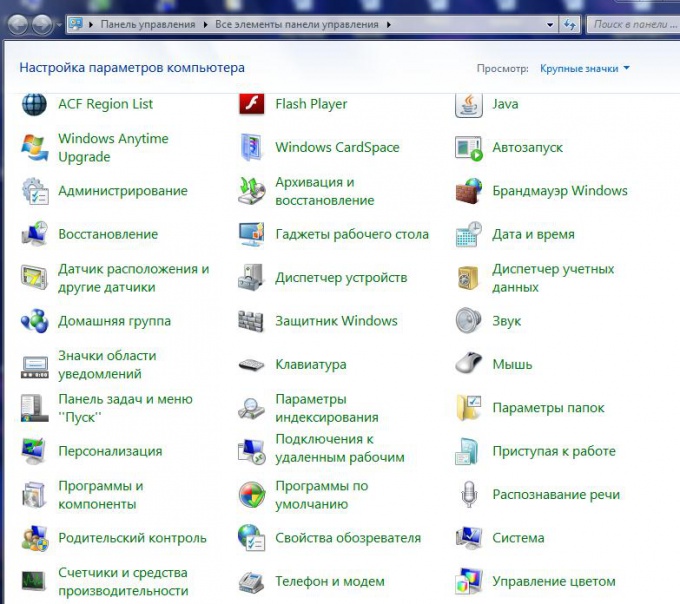
Open "Panel management» and find label the program that, due to an error, was not installed on Personal Computer. All label and in the panel management» as *.cpl files in the C:WINDOWSsystem32 folder.
Drag this shortcut to your desktop.
Right click computer mouse By label y by clicking "Properties". Then click Change Icon.
Read the file name like C:WINDOWSsystem32appwiz.cpl.
Take a file with a similar name in system32 and move it to another folder.
Related videos
note
Be careful when uninstalling programs! If you remove a program without fully knowing what its role is and why it is needed, this can cause a computer to malfunction, or even lead to the fact that it will be impossible to return to working capacity without the help of a specialist.
If it is necessary to remove some component installed on the computer, for example, a program, then the following sequence of actions is performed: first, open the "Add or Remove Programs" option on the "Control Panel". Then, in the dialog box that pops up, select " Installed programs” and click on the “Change” option. After that, select "Component Selection" from the menu and click on it. In just a few seconds, a list of programs installed on the computer will open. To remove one of them, left-click on the unwanted program and click "Delete". This will open a window asking if you are sure you want to uninstall the program. Click Yes or Next. After clicking "Yes", the program will disappear from the list of programs: this will indicate that it has been deleted.
Sources:
- An article about installing and removing programs.
The most common reason for the disappearance of the computer desktop and the main menu of the Start system is the impact of virus programs. There are also cases of system file failure account user or system registry failure.
You will need
- - A.V.Z.
Instruction
Boot the Windows operating system and press the Alt + Ctrl + Del function keys at the same time to launch the Task Manager tool.
Expand the "File" menu top panel application window and select " New task” to perform the restore operation of the computer desktop and the main Start menu.
Enter the value regedit in the text box of the utility and press the Enter softkey to confirm that the Registry Editor tool will launch.
Expand the HKEY_LOCAL_MACHINE\Software\Microsoft\WindowsNT\CurrentVersion|Image File Execution Options registry branch and find the explorer.exe subkey.
Call the context menu of the found subsection by clicking the right mouse button and select the "Delete" command.
Find the key iexplorer.exe in the same branch and call its context menu by clicking the right mouse button.
Select the "Delete" command and exit the "Registry Editor" utility.
Repeat the simultaneous pressing of the Alt+Ctrl+Del function keys to launch the Task Manager tool and open the File menu in the top bar of the program window.
Enter the value regedit in the manager test field to re-run the registry editor utility and expand the following branch:
HKEY_LOCAL_MACHINE\Software\Microsoft\WindowsNT\CurrentVersion\Winlogon.
Ensure that the value of the Shell parameter is Explorer.exe, or create a string parameter Explorer.exe if it is missing.
Quit the Registry Editor tool and restart your computer to apply the selected changes.
Run the application and open the "File" menu of the top toolbar of the program window.
Select the "System Restore" section and select the "Restore Desktop Settings", "Remove System Process Debuggers" and "Restore Explorer Launch Key" items.
Use the "Perform marked operations" button and restart your computer.
Related videos
Sources:
- Lost desktop
- XP boots without desktop and start menu
- how to get the start menu back
Desktop shortcuts computer are one of the most quick ways access to files or folders. As a rule, the folder shortcut "My Computer" is installed on the desktop automatically by the system. If you remove this shortcut, you can bring it back with a few steps.

Instruction
To get started, click on the "Start" button located in the lower left menu computer and find "My Computer". Click on it with the left mouse button and, holding it, drag the icon to an empty spot on the desktop.
Restore folder"My Computer" on the desktop can be done in another way. To do this, click on the "Start" button, then right-click on the "My Computer" menu and from the list that appears, left-click on the "Display on desktop" menu. After that, the shortcut "My Computer" will be displayed on the desktop computer.
To restore folder"My Computer", right-click on an empty space on the desktop. Select "Properties" from the menu that appears. Then go to the "Desktop" tab and click on the "Customize Desktop" button. In this "Desktop Icons" section, you can specify which folders you need on your desktop by checking the boxes next to the appropriate items. In this case, check the box next to the line "My computer" and "OK".
Using this operation, you can independently remove all or some shortcuts from the desktop, or vice versa - install. This is especially true for those who do not want the desktop computer labels were displayed. Or for those who value their time, because open folder, located on the desktop is much easier and faster than looking for it in other ways.
note
On some operating systems, the "My Computer" shortcut may appear on the English language and have the name My Computer, so carefully review all the shortcuts that are present on the desktop of your computer.
Helpful advice
You can enter "My Computer" without a shortcut. To do this, click "Start" and right-click on the line "My Computer".
Tip 6: How to restore the trash icon on the desktop
Basket in the operating room Windows environment carries out useful feature storage deleted files with the possibility of recovery. Usually its icon is present on working table for the convenience of working with files of any user. However, due to the action of programs or viruses, the icon Baskets may disappear from the desktop. To restore it, follow the steps below.
You will need
- - administrator rights.
Instruction
Open "My Computer". Go to the C drive partition and click on the "Organize" button in the upper left corner of the window. In the menu, select "Folder Options" and search and go to the "View" tab. Uncheck the "Hide protected system files and agree to this change. Then find the item "Hidden files and folders" located below, and check the box "Show hidden files, folders and drives.
Right click on the desktop background. In the menu, select "Create" - "Shortcut". The system will ask you to specify the path to the program to which the created icon will lead. Open the C drive and find the $Recycle.Bin folder - this is the system name of the Recycle Bin folder. This file is always stored in the operating system, as it is the main file that allows you to restore the basket to working table personal computer.
Click "OK" and working table a new icon will appear. The system will automatically substitute a basket image for it. There will also be a miniature arrow in the picture, which indicates that this icon is a manually created shortcut, and not a system icon. However, this will not affect the operation of the computer's operating system in any way. You can poison in the future without any problems junk files Add to cart.
If on working table no shortcuts are displayed at all, you can restore them with a few simple operations in the system. Right click on working at the table, in the menu, find the item "View", and in it check the box next to the item "Display desktop icons". Next, the system will automatically save these settings and display all the shortcuts that are in this moment time are on the personal computer.
Sources:
- restore trash on desktop
Label"My computer” is present by default on the Windows desktop. Its context menu contains links to launch important system components - the registry editor, device manager, program installation wizard, explorer, etc. If the display of this shortcut is disabled on your system, then you can enable it in the OS settings or create a copy of the shortcut.
Instruction
open windows explorer. To do this, just press the key combination WIN + E, but you can also launch Explorer through the "Start" button by going to the "Programs" section and selecting the "Explorer" line.
Click the "Desktop" item in the left pane of File Explorer, and then find the "My computer” and drag it with the mouse to a free desktop space from shortcuts. It does not matter whether you drag the shortcut with the left or right mouse button, in any case, a shortcut for this software component of the operating system will be created on the desktop.
Go to the "Desktop" tab, find the "Customize Desktop" button at the very bottom and click it. This will open the Desktop Items window.
In Windows Vista, this window opens differently. First you need to launch the Control Panel by selecting the appropriate item in the menu on the "Start" button. Then on the page " Appearance and personalization"You need to click the link" Personalization "And in the window that opens, select the line" Change desktop icons ".
In Windows 7, the way to open the same window is also slightly different - after starting the Control Panel by selecting the appropriate item in the menu on the Start button, you can enter the word "personalization" in the search field. In the search results, click the link "Personalization" and in the window that opens, click the line "Change desktop icons".
After opening the "Desktop Elements" window in any of the described operating systems, you must check the checkbox next to the inscription "My computer at the top of the General tab and click the OK button.
Tip 8: My Computer Folder: How to Recover Contents
On desktop operating systems Windows families labels of some system components are placed - "Network Neighborhood", "Recycle Bin", "Control Panel", etc. The user has the ability to turn their display on and off by changing the appropriate settings. This option is also available for the My Computer component, which is often referred to as a "folder".
Instruction
If the computer is running Windows version XP, right-click on the desktop background image and select "Properties" from the pop-up context menu. On the "Desktop" tab of the window that opens, click the "Desktop Settings" button to display the "Desktop Items" window. On its "General" tab there is a group of checkboxes, each of which corresponds to one of the system elements, whose shortcuts can be placed on the desktop. Check the box next to "My Computer" and click OK.
In later releases of Windows, the sequence of steps is slightly different from what is described. In Windows 7 or Vista, you also need to right-click on the "wallpaper" of the desktop to bring up the context menu, but the item that you should select in it is called "Personalization" here. In the left upper corner in the window that opens, find the link "Change desktop icons" - click on it and a window similar to that described in the previous step will appear on the screen. It also contains checkboxes indicating the corresponding labels of system components - check the box next to the inscription "Computer" and click the OK button.
The "My Computer" control can be attributed to one of the key ones, which gives access to most of the entire system without using auxiliary tools. Thus, you can get to the "System" tab, and then to the "Control Panel", to the "Computer Management" window and access any logical drive. So what do you do when the My Computer icon disappears from your desktop?
If you have already tried to restore an item by simply dragging the My Computer icon from Start, you most likely noticed that as a result you got only a shortcut.
The system perceives such an icon as a simple shortcut, although you can go to the corresponding menu through it, but you will lose quick access to the Computer Management and System tabs.
Many users who have gone hand in hand with Windows long time, they prefer to have this icon on the desktop, because it greatly helps to simplify the work with the system. However, not everyone knows how to get it back if you accidentally deleted this element from your desktop or it was the result of virus activity. most faithful and right ways to return everything to its place are the first 2 methods, the difference in them is related to different versions systems. The rest of the solutions to the problem are designed to solve more complex cases in which the first methods did not work.
Returning "My Computer" via the Start Menu
Due to the fact that Windows 8 does not have a Start menu at all, this makes it impossible to use this method.
- Open the Start panel;
- Find the "My Computer" control;
- Right click on it;
- Select the "Display on Desktop" option.
By default, the Windows operating system does not display the My Computer icon on the Desktop. For many users, this setting of the operating system is inconvenient for comfortable work.
Since the days of the Windows XP operating system, users have been accustomed to calling this icon "My Computer", although in Windows 7 the icon changed its name to "Computer", and in Windows 8.1 and Windows 10 to "This PC".
Using the My Computer icon (Computer, This Computer), you can open Explorer and quickly get into the management of the Windows operating system by right-clicking on the icon and selecting the appropriate item from the context menu.
In this article, we will analyze how to return the My Computer icon to the Desktop in Windows 7, Windows 8.1 and Windows 10 operating systems.
How to return the Computer icon to the desktop in Windows 7
1 way. In order to return the Computer icon to the Desktop in Windows 7, go to the "Start" menu, find "Computer" in the menu, right-click on it.
In the context menu, check the box next to "Display on desktop".
After that, you will see the "Computer" icon on the Desktop.
2 way. This method is universal for all versions of the Windows operating system.
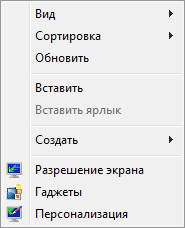
Right-click on an empty space on the desktop of your computer. In the context menu that opens, select "Personalization".
In the Personalization window, click on Change Desktop Icons.

In the "Desktop Icon Options" window, check the box next to "Computer", and then click on the "OK" button.
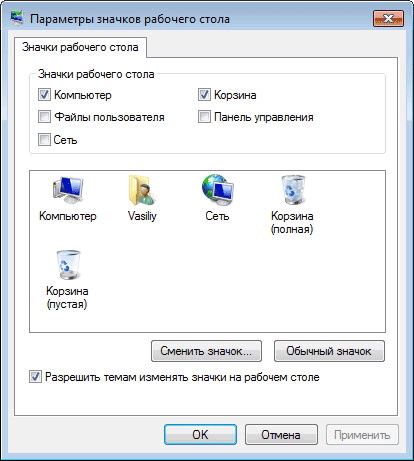
After that, the Computer icon will appear on the desktop.
3 way. If you drag "Computer" from the "Start" menu to the Desktop with the mouse, then in this case you will return the My Computer (Computer) shortcut to the Desktop, and not the system icon.
How to return the This PC icon to the desktop in Windows 8.1
Use personalization settings to return the "This PC" icon to the desktop in the Windows 8.1 operating system.
After right-clicking on an empty space on the monitor screen, select "Personalize" from the context menu.
In the "Personalization" window, select "Change Desktop Icons" (similar to Windows 7).
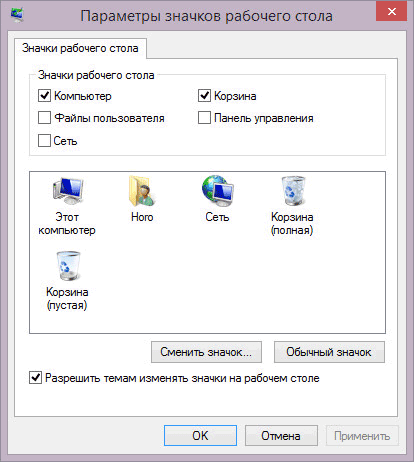
Check the box next to "Computer" in the "Desktop Icon Settings" window. Save your changes.
How to get my computer icon back in windows 10
In the Windows 10 operating system, you can return the This PC icon to the desktop through personalization options.
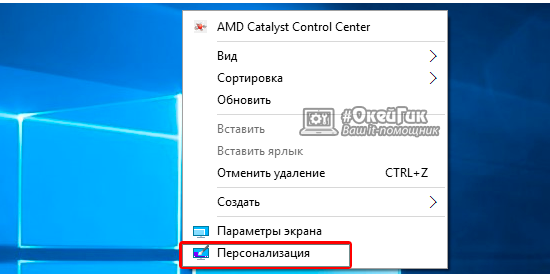
On the free space of the screen, click on the right mouse button, in the context menu, click on the "Personalization" item.
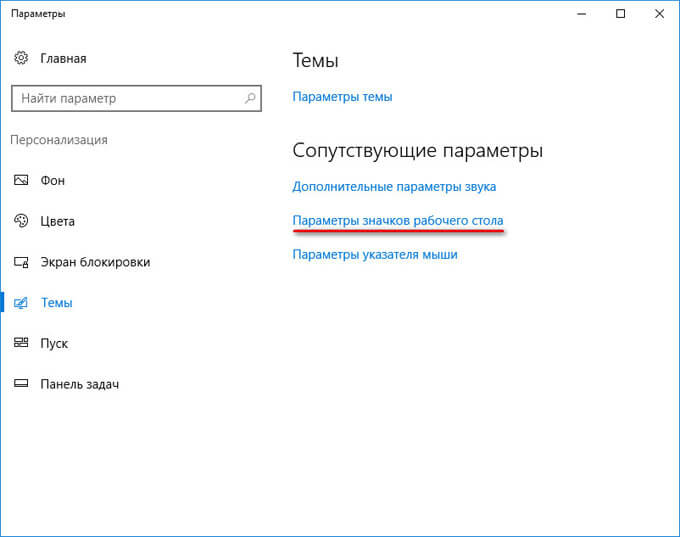
In the "Options" window, go to the "Themes" tab, in the "Related Options" section, select "Desktop Icon Options".
In the "Desktop Icon Settings" window, check the "Computer" item, click on the "OK" button.
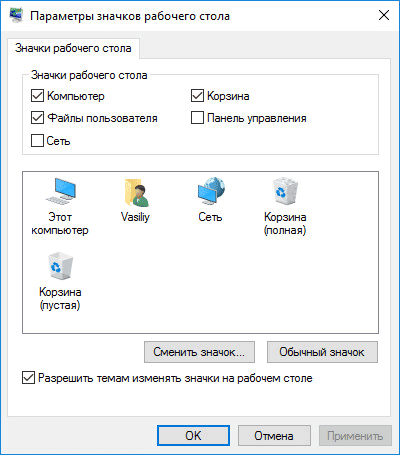
The This Computer (My Computer) icon will appear on the Desktop.
Conclusion
In the Windows operating system, at default settings, the My Computer icon is not displayed on the Desktop. After changing the settings, the user can return the My Computer icon (This PC, Computer) to the Desktop in Windows 10, Windows 8.1, Windows 7.
With new operating systems, Microsoft is looking to move beyond the standard user experience of Windows. In Windows 8, an American corporation has made main screen tiled, but in Windows 10 it returned to the familiar desktop. However, with all these manipulations from the desktops of computers under Windows control 10 the familiar My Computer icon is gone. There is a way to return the My Computer shortcut to the desktop in Windows 10. We suggest that you familiarize yourself with it.
Return the My Computer shortcut to the desktop in Windows 10 through the "Personalization" menu
The Windows 10 operating system provides an opportunity for every computer owner to customize literally everything, starting with background image and ending with the location of the mini tiles in the start menu. Including users can return the My Computer item through standard Windows tools 10. The fact that the familiar shortcut is disabled by default does not indicate a desire Microsoft force users to completely abandon it, she just decided that it would be more convenient.
In order for the My Computer shortcut to return to the desktop in Windows 10, you must:
After completing all the desired settings, the user will see that a standard shortcut My Computer (This Computer), familiar from the oldest versions of Windows, has appeared on his desktop.
How to return My Computer to the Windows 10 desktop when the system version is not activated
Microsoft allows everyone to install the operating system for free Windows system 10 to your computers. After installation, the user receives a non-activated version of the system, which can be activated by purchase license key. Do Windows activation 10 is not all, but on trial version some functions that the user may need are not available on the system. Including on Windows versions 10 without activation, you cannot start the Personalization settings using standard methods.
You can use the Control Panel to get to the "Show or hide common icons on the desktop" menu. To do this, right-click on the "Start" button and select "Control Panel" in the window that appears. In the menu that opens at the top right in the search, write the word "Icons", and following the results of the search, click on the desired item. 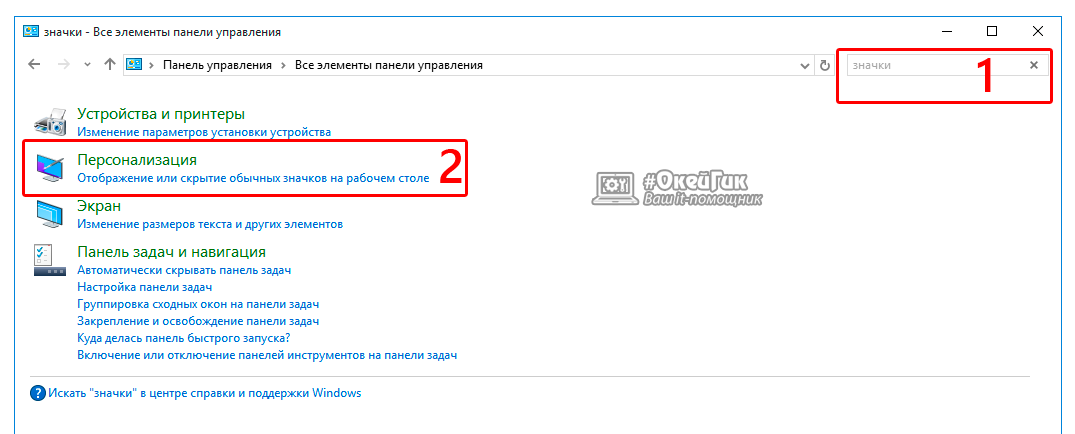
There is an even easier way to get to the settings that allow you to return My Computer to a working Windows table 10. To do this, you need to register a command in the "Run" menu that will immediately lead to the required settings page. To make this happen, do the following: press the key combination Windows + R on the keyboard, and in the Run menu bar that opens, write the command Rundll32 shell32.dll,Control_RunDLL desk.cpl,5 to go to the "Show or hide regular icons on the desktop" settings. 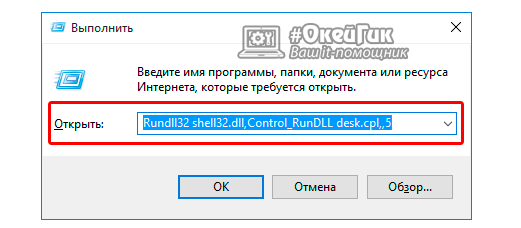
It takes literally a minute to bring the My Computer shortcut to the desktop in Windows 10 if you know where to look for the necessary settings. The described methods for an unactivated version of Windows 10 are also great for an activated version of the operating system, and through the Run window it is easiest and fastest to get to the required settings.


