Windows 8.1 blocks driver installation without valid digital signature (or changed after its application). This is done for security reasons, since the installation of unsigned or counterfeited drivers (possibly with the help of a virus) can lead to unpredictable consequences, up to reinstalling the system.
What is a signed driver?
Signed Driver is a device driver that is digitally signed. Digital signature is an electronic security label that can identify the publisher of this software, as well as the fact that the driver has been modified since it was signed. If the driver is signed by a publisher and the signature is validated by a CA, then you can be sure that the driver was released by that publisher and has not been modified.
Install drivers without a digital signature or with it?
In this case, it all depends on what you need to install unsigned drivers for. If you need to install drivers for an old device, such as a scanner, you can temporarily allow the system to install unsigned drivers.
How to disable signature verification?
To temporarily disable driver digital signature verification, do the following:
1. Move the cursor to the lower right corner of the screen, select the item "Options" or press the Win + I keys. Press the shift key, and keeping it pressed, select .
2. After the reboot, in the drop-down menu, select " Diagnostics"

3. In the window " Diagnostics"choose"

4. In the window "" select ""
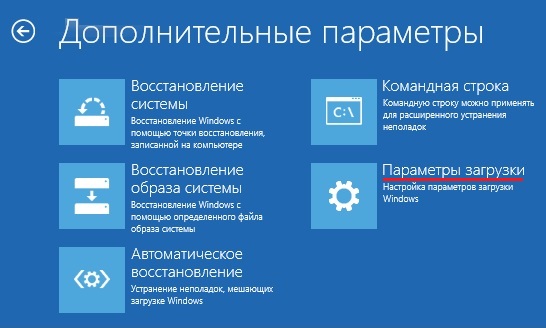
5. In the window "" click ""
6. Now the most important thing. In the window "" you need to select the desired key, in our case it is F7 or the number 7
Conclusion
At the next reboot of the system, the system for blocking unsigned drivers is automatically activated. Previously installed unsigned drivers will continue to work.
In such a non-trivial way, you can solve the problem of installing unsigned drivers by setting up the work of all devices connected to the computer.
As you know, in x64-bit platforms, a procedure was introduced for mandatory digital signature of everything that can get into the system core, namely drivers. One can argue for a long time about how effective and justified it is, but only one thing can be said for sure - the developers have definitely added gimor here, especially to those who have never dealt with signatures before. Also, for many, it has become extremely unclear how to develop a driver when there is no valid certificate on hand, but it needs to be tested somehow. Here, I will try to tell in a short and accessible form about how this is all done.
So, first of all, I would like to highlight two types of certificates that I will consider in this article - test and real. The difference is that the real certificate is signed by a trusted CA (Certification Authorities - trusted publisher), such as VeriSign, GlobalSign or Microsoft itself, and the test one is signed by a self-made certificate of the type from Vasya Pupkin.
Test Certificate
As you probably guessed, it is with the help of this type of certificate that you can safely develop a driver without having a real one in your hands, but everything is not so simple, before using it, you need to do some dull and tricky activities:
Real Certificate
Here, too, not everything is so simple. The fact is that not every CA can issue certificates for signing Windows drivers, but only those authorized by Microsoft itself, which means that the root certificates of these publishers must be signed by Microsoft - which is precisely what is expressed in the form of this cross-certificate. That's it because of the lack of a cross-certificate - a test signature will never work like a real one. A list of trusted CAs that have such cross-certificates is presented, and you can also download the cross-certificates themselves there.
After you pay a few hundred $$$ to a trusted certificate authority, they will give you a .pfx file that will contain the public and private keys. You run it and using a simple dialog (as in the figure below), install it into the system.
Driver signature
The signing process for a test certificate and a real certificate are similar in many ways, the only difference being that:
- cross-certificate is not required for test signature
- for the test signature, you can not do a timestamp
- Download the signature tool - signtool (also included in the WDK6000/6001 kit)
- We sign, with a test certificate:
signtool sign /v /s PrivateCertStore /n "TestCertforWDK" driver.sys
Where
PrivateCertStore- storage name
TestCertforWDK- test certificate name
driver.sys- driver nameWith this certificate:
signtool sign /v /ac MSCV-GlobalSign.cer /s PrivateCertStore /n "YourTrueCertName" /t http://timestamp.globalsign.com/scripts/timstamp.dll driver.sys
Where
MSCV-GlobalSign.cer- cross-certificate name
YourTrueCertName- the name of this certificate
timestamp.globalsign.com/scripts/timstamp.dll- timestamping center address, in my case global sign
Driver package signature
In real life, the signature of the driver itself is not enough, the fact is that device drivers usually come with an inf file that contains information about the driver and the devices it serves. In this case, it will be necessary to generate a cat file that contains information about all the files in the package, and then sign it in the same way as the driver was signed.
To generate a cat file and its signature, we need:
- Correct inf-file (stock up on tambourines guys)
- The tool that generates this cat-file from inf-files is inf2cat (this tool is included in the WDK6001/7600 kit, and, oddly enough, it is written in .NET)
- Then we generate a cat-file, for example like this
inf2cat.exe /driver:release\amd64 /os:Vista_x64,Server2003_x64,Server2008_x64
Where
release\amd64- the folder in which the inf file and drivers are located
Vista_x64,Server2003_x64,Server2008_x64- list of OS on which the driver should work - We sign it in the same way as the driver
signtool sign /v /ac MSCV-GlobalSign.cer /s PrivateCertStore /n "YourTrueCertName" /t http://timestamp.globalsign.com/scripts/timstamp.dll catalog.cat
the driver itself does not need to be signed. - We check that everything is well signed, for this we open the .cat property of the file (or driver) and look at the Digital Signatures tab - if there is, we can admire the result, if not, then we messed up somewhere.
You can also check more reliably using the command line
signtool verify /pa /v /c catalog.cat
EasySign
As a result of all my research on the subject of the subject, I didn’t roll out a quick and simple EasySign program that can sign firewood without additional gimmick with the command line and bat files. Perhaps someone will be useful.
You can download the program itself, and read the manual below:
- We drive into Inf Dir the path to the folder where the .inf file itself lies and that's it necessary files attached to it.
- Select the OS where the driver works.
- Cross Cert - specify the path to the cross-certificate if you need to sign the driver for real
- Cert Store - the name of the store where our certificate is located (for example, PrivateCertStore)
- Cert Name - the name of the certificate (for example, TestCertforWDK), if there is only one certificate in the store, then this field may not be filled in.
- Time Stamp - timestamping center address, for a test certificate - can be left blank
- Files that need to be signed, here you need to add the cat file (if not already created, then enter its name manually), and you can also add all the driver files
- Generate Catalog Only - if you do not need to sign, but only create a .cat file
- Click Sign - to create a cat file and sign it, click Log - to read what happened, there are often errors, for example, an inf file is incorrectly compiled, or signtool did not find something, etc.
Tags: drivers, windows, digital signature
73459Starting with Windows 7, for security reasons, Microsoft introduced mandatory driver certification. Each driver released by a third-party developer must pass a special test in the laboratory Microsoft. If the verification is successful, the driver receives the corresponding signature, due to which it can be installed in the system. As for unsigned drivers, you cannot directly install them, and if you try to do this, Windows will display a message that the file may be corrupted or tampered with.

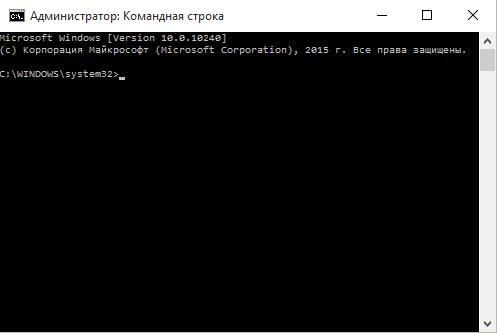
However, such protection is not a serious obstacle to installing drivers that do not have the appropriate digital certificate. So, just today we will get acquainted with in a simple way allowing you to turn off this very driver signature verification. in the eighth Windows versions this is done in the following way. First of all, we need to get into the boot options subsection. To do this, with administrator rights, open Windows console, and then type and run the following command:

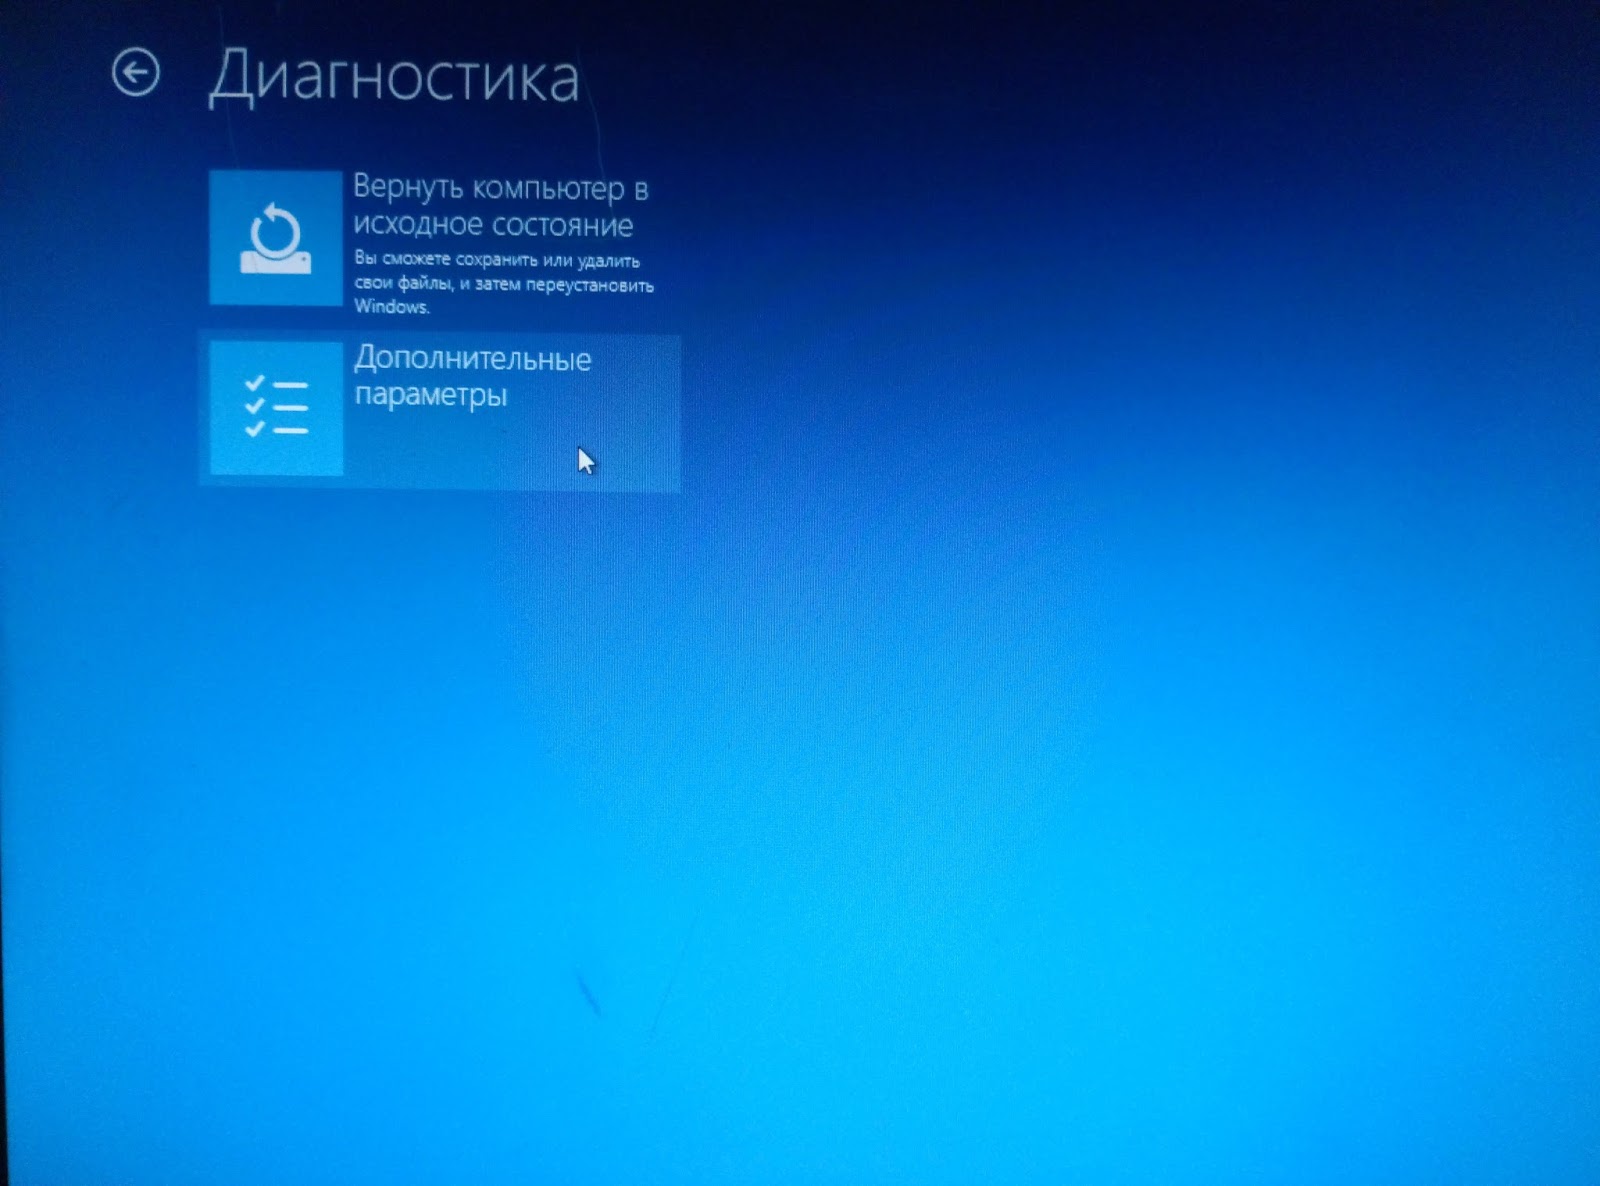
In this case, the computer will go to reboot, and you will be taken to the action selection menu. Click Diagnostics -> ;


Restart the computer again by pressing the button.

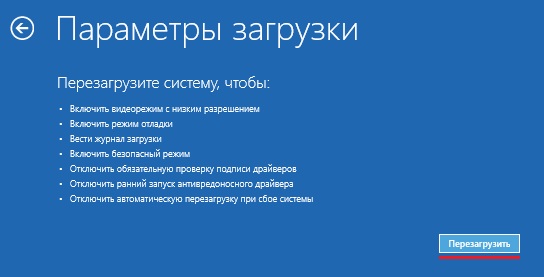
After the system restarts, you will see a menu with boot options. That's where the line should be. She is number seven.
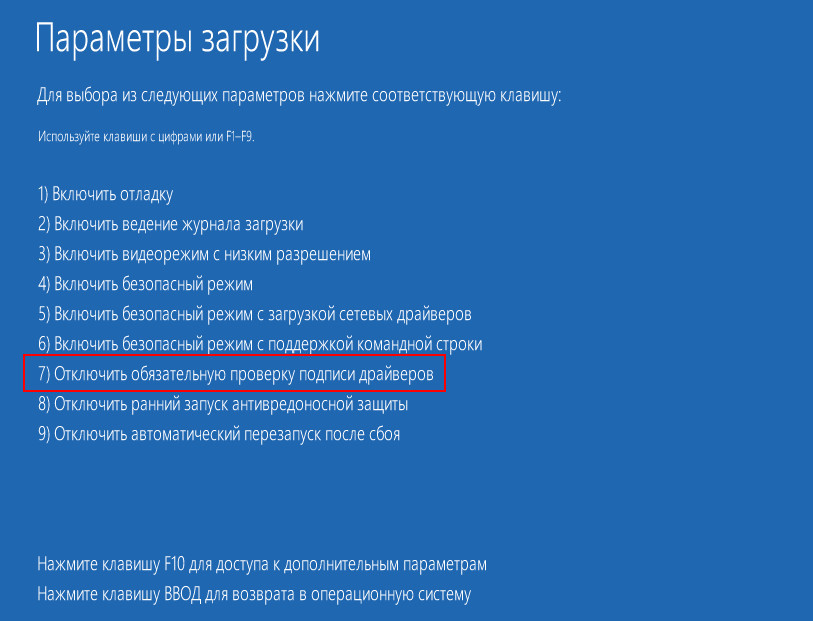
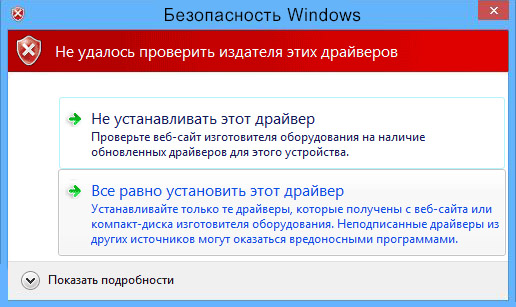
For Windows boot with this option, press the 7 or F7 key. Now if you try to run the installation of the left driver, the OS will also display a message, but this time it will be a simple security warning. Just choose and the stubborn driver will become normal mode, at least it should be, but you just have to reboot again and check its performance.
At the same time, however, it cannot be ruled out that installing a non-certified driver in this way will not work. In this case, you can try another method. Windows 8 has a special "test mode". Working in this mode, you can install almost any software, including those without a certificate Microsoft drivers. You can activate it as follows. open command line as administrator and run these two commands one after the other (for a 64-bit system):
bcdedit.exe /set nointegritychecks ON
bcdedit.exe /set testsigning ON
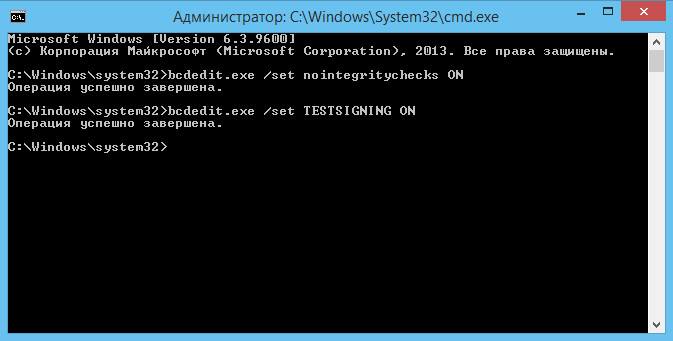
Each executed command must be accompanied by a message "Operation completed successfully". Now close the console, and restart your computer. If everything is done correctly, in the lower right corner on the clock you should see an inscription "Test mode". Now you can try installing the unsigned driver again. After installing and verifying the driver, do not forget to exit test mode. To do this, you need to run the same commands, but only the flag ON ( included) replaced by OFF ( turned off) .
Technically, working in an operating system running in debug mode is no different from working in the "normal", however, firstly, such a configuration is generally not supported by Microsoft, and secondly, it reduces the level of security and increases the risk of critical system errors.
If you need to connect any device (for example, a scanner, printer, camera) to a computer running Windows 10 (x86 or x64), you must also install the appropriate software (software) for its operation - a driver.
Microsoft tests drivers for all devices manufactured to work with personal computers(PC). On the drivers that have successfully passed all the tests, the company puts its signature (digital), that is, it includes a special file in the software in the form of a certificate. This digital document serves as a guarantee of the authenticity of the driver and the security of the OS on which it will be installed. Equipment with signed drivers can be easily synchronized with Windows system 10.
However, sometimes there are outdated devices that are in working order, which need to be connected to a PC and made to work. It is impossible to find software with a digital signature for such technical devices.
To deal with this problem, you can use one of three methods.
Method 1
Method 2
Attention! This option is only suitable for PCs with the Basic Input/Output System (BIOS) program.
If your computer has a Unified Extensible Firmware Interface (UEFI), you must first disable the Secure Boot option.
To return to the previous settings, enter bcdedit.exe -set TESTSIGNING OFF at the command line and confirm (Enter). When the specified operation is completed, restart the PC.
Method 3
Attention! This option will not work for Windows 10 Home.
Related videos
Imagine a situation where you, the happy user of "the most reliable, stable And safe» operating system Windows 10, happily bring home a brand new gadget, plug it into a USB port, and instead of the usual message that the new device is ready to go, you get this “Third-party INF does not contain signature information”:
So simple the Microsoft way tries to protect its customers from using non-kosher (according to Microsoft itself) devices. More precisely, drivers for them. Usually, the driver, like a regular official document, contains a signature. Only digital, certifying that it has been tested for compatibility with the system and is safe for the user's computer. But there are cases when the driver does not have this signature. Often this is observed in gadgets of Chinese origin or in slightly outdated devices.
But if you still did not heed Microsoft's warnings and firmly decided to install the driver, of course, this can be done "very simply" - just a few steps. Let's get started.
Installing Unsigned Drivers in Windows 10
1) Go to Start > Settings > Update and Security, open the Recovery tab and in the Special Boot Options section, click the " Reload Now«.

2) The system will ask us to wait a bit and will display the following menu where you need to select Troubleshooting.

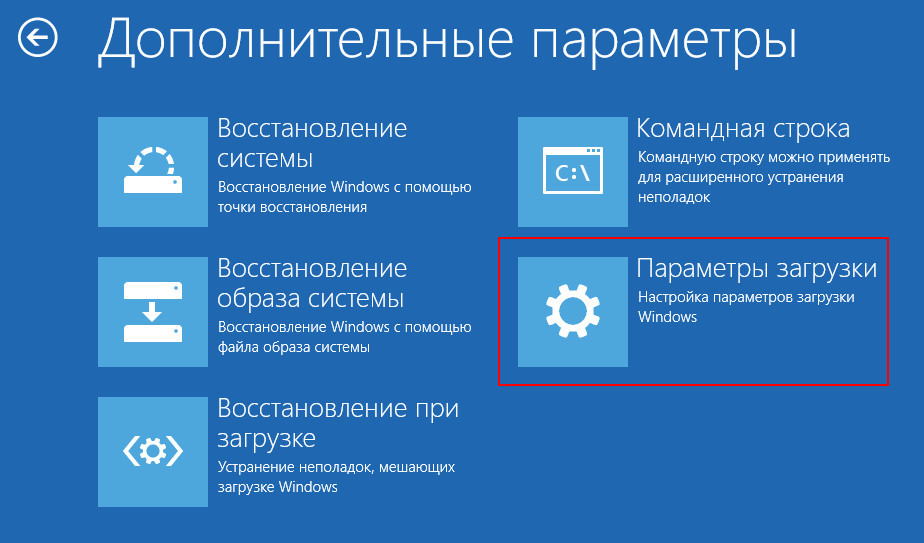
3) On the next screen, select the item Extra options.

5) After waiting for the computer to restart, in the menu that appears, select the item Download options.

6) In the next section, we are interested in item number 7, therefore, after carefully reading the instructions, press the key F7.
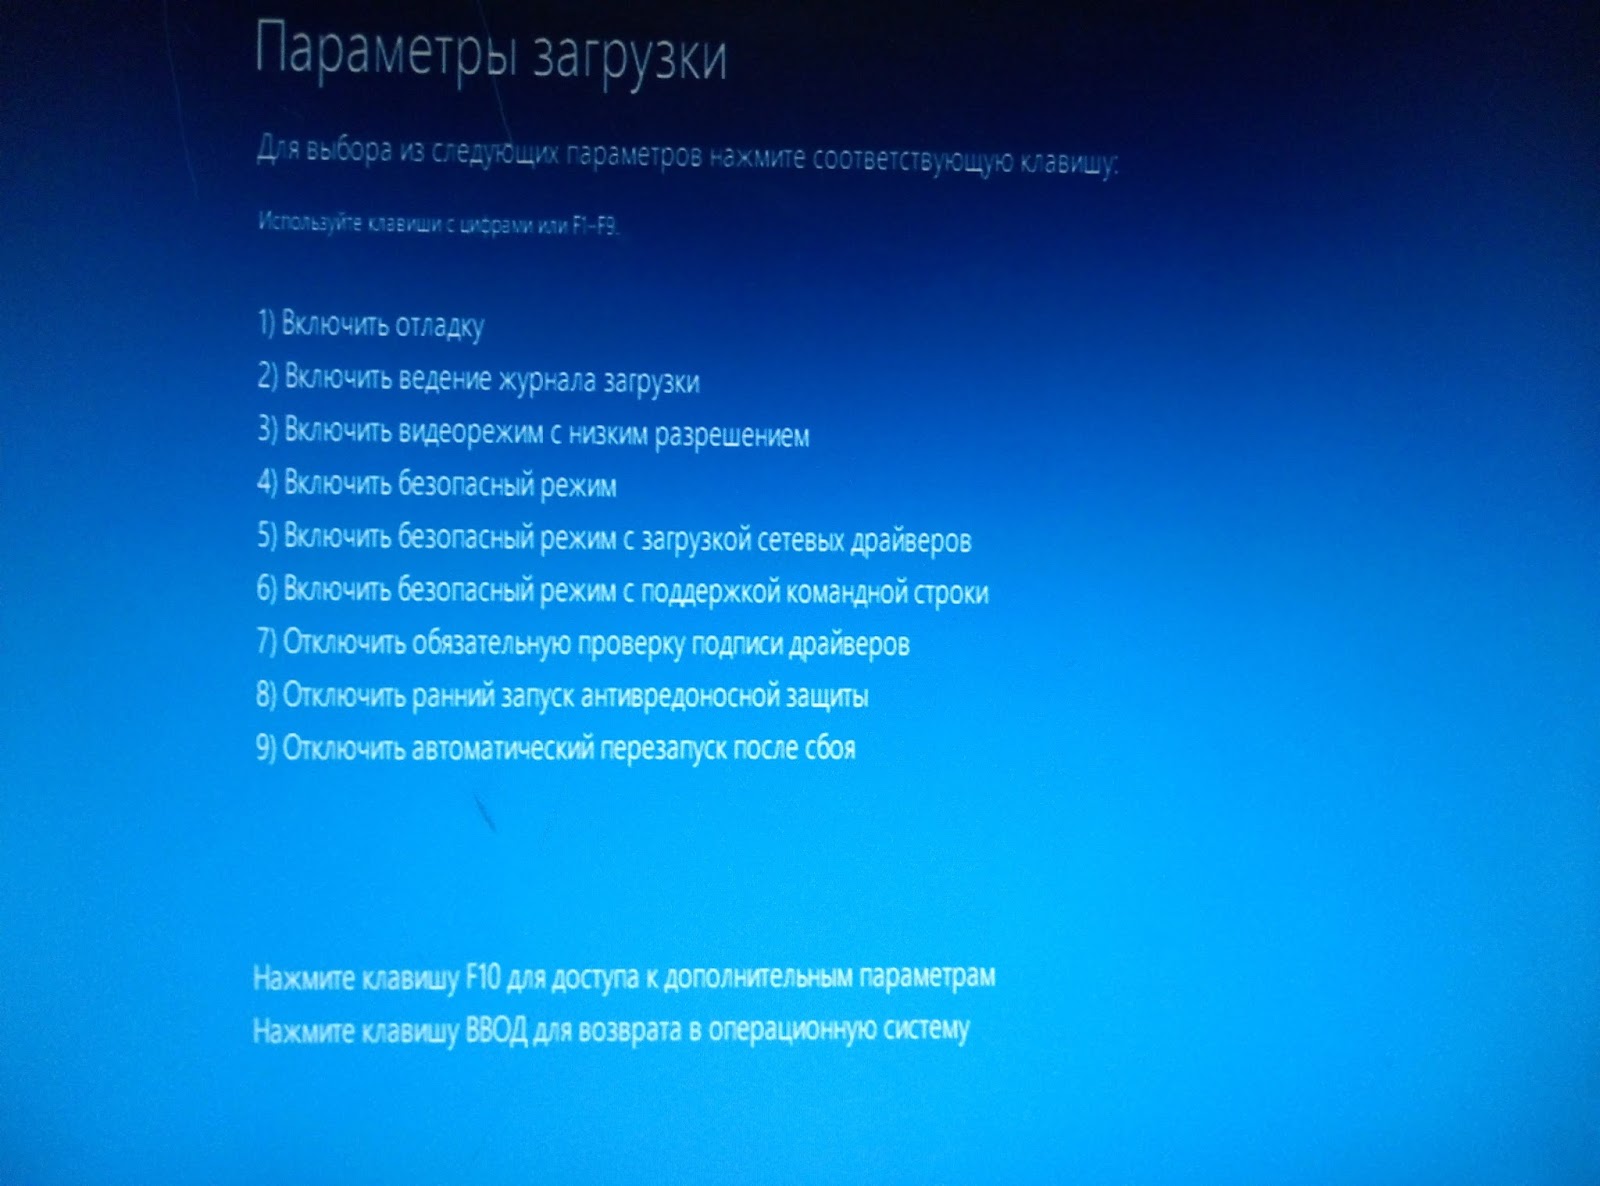
7) We are waiting for the system to fully boot and try to install the device driver again. The system is trying for the last time to make us change our minds.

But we do not succumb to provocation and choose the item " Install this driver anyway", once again confirming our irresponsibility with you. Hooray! Usually after that we can happily observe a message that the driver was successfully installed.
Conclusion
Permission to install unsigned drivers is valid until the system is rebooted. Then, when installing other "non-certified" equipment, the procedure will have to be repeated.
In principle, it is possible to disable digital signature verification completely (by editing the registry), but I do not recommend doing this, because. security suffers from this, and you are unlikely to have to install unsigned drivers often.