There should be plenty of free space on the system drive C.
This will guarantee that your laptop (computer) system will work stably. disks are faster than HDDs.
The only catch is that the price SSD drive not little. In this regard, after Windows is installed, there may not be enough space on the hard drive.
Therefore, the user often comes across the WinSxS folder; it is located in the . The size of such a folder can reach several tens of gigabytes.
In this regard, most users ask the question “Is it possible to clear the entire WinSxS folder from a computer (laptop), and also how can this be done?”
You will receive information about winsxs and how to clean it.
What is the WinSxS folder?

There is a specific path to find this folder: C:\Windows\winsxs . This file contains backup copies of various updates.
If they were not installed in the OS, they are still stored in the winsxs folder and take up HDD space.
When it happens Windows update, outdated copies also end up in the winsxs folder. After some time, their number increases, as a result of which the folder begins to weigh more.
The volume of such a folder can reach several gigabytes.
Of course, for the hard drives that we currently have, this amount of free space does not play a special role, but still it will not be superfluous.

In order to determine the weight of winsxs you need to do the following:
But! This method will not allow the user to find out the actual size of the folder, but it will be possible to find out how much free space is available.
Another important point in how to clean the winsxs folder is that you do not need to solve this problem using special ones that clean this folder.
The user will ultimately only have standard means, with which you can clean up a folder in Windows.
Important!!!
Windows takes up space system disk and how to clean the winsxs folder in windows. Pagefile.sys acts as the swap file. In case if RAM has large dimensions - size this file can be configured (changed) manually.
On the menu "Disk Cleanup" there is a point "Cleaning in hibernation mode". If you do not use this mode, you can proceed to cleaning.
If the laptop is constantly in sleep mode, then after cleaning the file, enter in the command line:
Powerrofg –h on && shutdown.
A user's personal folder (for example, my documents or desktop) can be moved to another location either through the property of the desired folder or through group policies How to clear the winsxs folder in Windows 7.
Why is the WinSxS folder constantly growing?
Many inexperienced users mistakenly believe that the WinSxS folder is a large disk space after the OS is installed.
It is necessary to take into account that there are files that are actually located in completely different places.
Their volume is taken into account only because Explorer has hard links.
Every user needs to know!
Do not enable display mode hidden files, before you plan to manually delete the entire contents of the folder.
After the hidden ones are removed, your computer will be a little slow and may experience occasional crashes.
Below are several options for cleaning winsxs on different Windows operating systems. They will be discussed below in more detail so that readers receive comprehensive answers to their questions.
Cleaning in Vista
Any changes can be returned back to the position they were before.
If the user wants to roll back everything back to 6.0.6001 (including the initial build), you must install Vista Service Pack 2.
To ensure that updates cannot be returned, 2 system utilities are used:
- Vsp1cln.exe– for cleaning up debris after installation;
- Compcln.exe– to perform similar actions with SP
This system allows you to create restore points on demand during the installation of necessary and important drivers.
This function can be installed either on demand or according to a schedule. This type of recovery consumes 15% of disk space.
You can disconnect such a disk using the function "Disk Cleanup". At the same time, on the tab "Additionally" keep the last restore point to save space.
Cleaning in Windows 7
Cleaning out the WinSxS folder is a complex process. You must follow the prompts of your PC. In addition to manually cleaning WinSxS, unnecessary files can be deleted "Task Scheduler" in Windows OS.
Click "Create task" in the Planner. After specifying the task name, click "Further".
Then select the frequency of running the task and follow the prompts. After all operations have been completed, reboot your computer.
Need to clean out the WinSxS folder in Windows 7? You must download and then install update KB2852386. You will see the required line in the utility.
For this operation you must press "Start" and enter "Update centre" into the search bar.
You need to choose "Search for updates" , it will be in the left menu.
There you will need to select "Optional Updates" upon completion of the scan.
In the proposed list you will need to find KB2852386, then install it and then restart the computer ().
After completing the above steps, be sure to type in the search engine "Disk Cleanup".
From the proposed options, mark "Backup Files" and press "OK".
Cleaning in Windows 8

There is one additional method for solving our problem - using the Disk Cleanup utility, its advantage is that it does not require decisions from users.
To empty the folder you should do some steps:
First you need to press the key combination Win+R and then enter "cleanmgr" . Then select drive C and click OK. As a result, the free space will be estimated, after which you have to select the option − "Cleaning system files".
Check the box "clean windows updates" and click OK. Then the process of cleaning Windows OS updates will start.
Another utility for cleaning Windows updates is the DISM utility..
The advantage of this utility is that with its help the user can also get rid of other garbage from the WinSxS folder.
First - open command line on behalf of the administrator. This can be done using a keyboard shortcut Win+X.
Select "Command line".
Dism.exe /Online /Cleanup-Image /AnalyzecomponentStore
It will inform you how much free space you have on your HDD
If necessary, you can clean the backups and . Be sure to study the line "Cleaning the component store is recommended" — "Yes".
Type the following command to remove unnecessary files:
After which the cleaning mode will become active.
Cleaning with a Scheduled Job

Windows cleans out the winsxs folder according to a specific and precise schedule. Do the following: Microsoft→Windows→Servicing→StartComponentCleanup .
Because the cleanup is done by the COM object handler, you will not be shown a specific command.
If there are no triggers, this may indicate that the task is being performed automatically.
By running a task contained in schedulers, the user achieves the same result as from the DISM command with the /StartComponentCleanUp keys.
However there are some differences:
- Those updates installed in the last month will be ignored;
- Due to a pause that lasts for an hour, files may not be completely cleared.
After performing a cleanup in Windows 8.1, the user can once again analyze the storage to evaluate the existing changes.
Cleaning in Windows 10
Use a command prompt with administrative rights, it will help clean out the WinSxS folder. For start this process you need to type:
Dism.exe /Online /Cleanup-Image /StartComponentCleanup

At this stage, the function is completed and the folder is considered empty.
In order for you to be able to determine how much smaller the folder has become, you need to analyze the component store, to do this you need to do the following:
Dism.exe /Online /Cleanup-Image /AnalyzeComponentStore
If you really need it, it is possible to reduce the file size further, because its parameter has an additional ResetBase key, which will help delete everything old and unnecessary.
To do this, enter:
Dism.exe /Online /Cleanup-Image /StartComponentCleanup /ResetBase
Automatic removal
To ensure that the size does not increase without your knowledge, you need to set up a self-cleaning function for data and documents that you do not need.
To configure this function, you need to use the task scheduler operating system.
You can find this program using the menu "Start". After starting the program, check the section "Create a simple task", which is located on the right side of the window.
After which you must generate the StartComponentCleanUp task. To do this you need to go to the thread Microsoft→Windows→Servicing . After that, click OK and restart (laptop).
Dism.exe
The Dism.exe maintenance system means that the system is a command line program, which is also an assistant in setting up and removing components Windows systems And . The Clean up image option is most often used by experienced users
You need to set the StartComponentCleanUp parameter in the Dism.exe program. It is necessary to take into account that previous versions such components will be quickly erased.
There will be no time limit here.
With administrative rights at the command prompt, enter
Dism.exe /online /Cleanup-Image /StartComponentCleanup
We hope that the above information in this article will help you clean up the winsxs folder of your computer yourself, clear free space on your computer, and yours will work properly.
Follow the above tips!
| operating system | WinSXS cleanup command |
|---|---|
| Windows Vista Windows Server 2008 Service Pack 1 | VSP1CLN.EXE |
| Windows Vista Windows Server 2008 Service Pack 2 | Compcln.exe |
| Windows 7 Windows Server 2008 R2 Service Pack 1 | DISM /online /Cleanup-Image /SpSuperseded |
| Windows 8 Windows10 | Dism.exe /Online /Cleanup-Image /StartComponentCleanup |
The WinSxS folder is located in C:\Windows\WinSxS, takes up a lot of space and continues to grow. This folder accumulates unnecessary files, such as old system components, and the longer you have the operating system, the larger the WinSxS folder.
Why is the WinSxS folder growing?
When you install any system updates, old files are replaced with new ones, and all old options are saved in the WinSxS folder in case of bugs.
Files from Windows folders get into WinSxS using hard links, and file managers they are taken as real volume. Therefore, the folder size may be displayed incorrectly, but in fact it usually weighs no more than 15GB.
However, if you want to clean your system from unnecessary files, there are several ways to do this.
Cleaning Windows Updates
At the command line, you need to type cleanmgr, and the built-in utility will show you how much space you can free up. You just need to check “Clean up Windows updates” and click OK.
If you've been using the same operating system for several years, you'll probably have a few gigabytes of free space freed up.
The next time you restart, Windows 7 will spend a few minutes cleaning up system files before you can see your desktop again. If you don’t have this option, you probably haven’t updated Windows for a long time. Install Latest updates system, and it will appear.
Unlike Windows 7, Windows 8 and 8.1 clear updates automatically in the Scheduler. Windows cleans the folder on a schedule using the Microsoft – Windows – Servicing – StartComponentCleanup task, which automatically runs in background and removes components 30 days after you install updates.

If you want to remove updates manually, open Disk Cleanup, check Windows Update Cleanup, and click OK.
Windows 8.1 provides even more options for deleting files yourself. There you can delete all previous versions, even when 30 days have not passed since the installation of new ones. To do this, you need to launch the command line as an administrator and enter the necessary commands.
For example, one command removes all update versions without waiting 30 days:
DISM.exe /online /Cleanup-Image /StartComponentCleanup
Another removes files needed to remove update packages. After entering this command you will not be able to delete installed packages updates:
DISM.exe /online /Cleanup-Image /SPSuperseded
Another command will remove all old versions of each component. After this, you will not be able to remove all installed service packs:
DISM.exe /online /Cleanup-Image /StartComponentCleanup /ResetBase
Removing components on demand
Modern Windows versions allow you to turn on system components on demand. The list of functions is located in the Windows Features window, which can be accessed from the Control Panel.
Even if you have not installed any of them, that is, they are not checked, the components are still stored on your hard drive in the WinSxS folder. If you want to install them, you don’t have to download anything, you can do it from the folder.

However, even unused components take up space on your hard drive, and if free space is very important to you, you can delete them.
Windows 8 has added a new option that allows you to remove all these files from WinSxS, and if you suddenly need them, you can download them from Microsoft.
To remove components, open the command line and enter the following command:
DISM.exe /Online /English /Get-Features /Format:Table
You will see the different components and their status.

To remove a feature from the system, you can use the following command, replacing NAME with the name of the feature you want to remove.
DISM.exe /Online /Disable-Feature /featurename:NAME /Remove

If you run the /GetFeatures command again, you will see that the feature status has changed to: "Disabled with Payload Removed" useful files") instead of just "Disabled".
Size of modern hard drives personal computers can reach several terabytes, which is good news, but no matter how you look at it, they cannot stretch. And when there is little disk space left, the thought of what to do next and where to put the content begins to worry the user more and more.
With the user section everything is simple. In the end, some of the files can be moved to some removable media. But what about the system partition? Alternatively, you can delete restore points, which is generally not recommended, as well as unused programs. The latter does not suit all users, and in addition, the program to be deleted must take up a lot of disk space.
In general, the logic is this: the larger the program, the more useful it is.

There is another way - to clean the “temporary” system folder WinSxS, located in the Windows directory. If you have been using the operating system for a long time, you will probably find that its size is several gigabytes. There were users whose WinSxS weighed two dozen gigabytes. Removing the “junk” that has accumulated in WinSxS is also an option, but you need to approach it with extreme caution.
Emptying this system directory is not the same thing as getting rid of the contents of the TEMP folder. Why is this so? First, let's find out what the WinSxS folder is and why it is needed.

WinSxS what is this folder
The WinSxS folder first appeared in Windows Vista and contained information about the operating system configuration and its components. In subsequent versions of Windows, the purpose of the WinSxS folder, by and large, has not changed.
Yes, it has been optimized, but the files it contains are still of considerable value to the system, and therefore deleting them with crooked hands can lead to dire consequences. The contents of the WinSxS directory are represented by old system update components that store information for system recovery, configuration files, and hard symbolic links or Hard Links.
Despite their apparent uselessness, old update components can even be very useful. If problems arise during the next Windows update, you can always roll back to older versions and thereby restore normal operation of the system.
Now it is not difficult to understand the reasons why the WinSxS folder takes up so much space on your hard drive. Its growth is directly proportional to the frequency of updates. Old system components are archived and copied to the WinSxS directory, which actually leads to its increase. In reality, its size rarely exceeds 15 GB. In addition, file managers, including Explorer, deceive you by overestimating the size of the WinSxS folder by about 40 percent.
This 40 percent consists of symbolic link files that do not contain actual data, but only link to it. The “real” files may be located in other system directories, for example, in Windows, ProgramData, etc. Firstly, deleting links to the size of WinSxS will not affect the size in any way, and secondly, this again can lead to problems.
If you're a Windows 8 user, it's also worth considering whether there's any point in cleaning out this folder at all. The fact is that, unlike Windows 7, in the eighth version, “extra” files are cleaned automatically according to the specified task scheduler settings.
Cleaning winsxs
Thus, it makes sense to clean out the WinSxS folder only in two cases. Either the WinSxS folder has really taken on a “threatening” size, which is more typical for the seventh version of Windows, or you value every gigabyte so much that you are ready to risk the performance of your system. There are several ways to clean up the WinSxS directory. The simplest, but not the most effective method is to use the system utility cleanmgr, also known as Disk Cleanup. To run it, in the “Run” window, enter the command cleanmgr and press enter. Do you recognize?


Program for cleaning winsxs - DISM
The other method is much more effective. This time we will use the DISM console utility. We will remove all versions of updates without waiting for the scheduled operation. To do this, in a command prompt running as an administrator, run the following command:

DISM.exe /online /Cleanup-Image /StartComponentCleanup

Another command is responsible for deleting archive files created during the installation of service packs. To do this, enter the following line on the command line:

Attention! After executing this command, you will not be able to remove already installed update packages and return to their older versions. By the way, you will receive such a message (as in the screenshot) if there is nothing to delete.
You can also remove old versions for each component. To do this use this command:
DISM.exe /online /Cleanup-Image /StartComponentCleanup /ResetBase

The consequences will be exactly the same as in the case of using the command DISM.exe /online /Cleanup-Image /SPSuperseded .

What else can you do to clean up the WinSxS folder? IN latest versions Windows has one useful feature like enabling/disabling system components on demand. If you open Control Panel and then go to Programs and Features, you'll see what we're talking about. Some of these components, even if unchecked, are still present on the drive. You don't need to connect to the Update Center to download them; you can install them directly from the disk. So, they are located just in the WinSxS folder.
If component files take up a lot of disk space, you can delete them. To do this, we will again use the already familiar DISM utility. Launch the console and enter the following command:
DISM.exe /Online /English /Get-Features /Format:Table

This will display a list of components, as well as their status. Enabled – enabled, Disabled – disabled. To remove a component from the system, use the following command:
DISM.exe /Online /Disable-Feature /featurename:NAME /Remove
Keyword NAME here means the name of the component. For example, we need to remove the Microsoft-Hyper-V-All module.

DISM.exe /Online /Disable-Feature /featurename:Microsoft-Hyper-V-All /Remove
Now if you run the Get-Features command again, you will see that the feature status has changed to “Disabled with Payload Removed.”
Result:
As you can see, there is nothing complicated about this. We tested all the options described above and found them to be quite effective and efficient. But the most important thing is that our actions did not lead to any negative consequences for the operating system.
Anything that remains in the WinSxS folder should not be deleted. And one moment. Do not use random utilities found on the Internet to clean out this folder.
Experience has shown that the use of such “cleaners” often led to complete reinstallation systems. And also pay attention to the fact that in none of the known optimizers you will not find a function for cleaning the WinSxS directory.
Volume of modern hard drives reaches several terabytes, but even such a disk can be filled to capacity over time. And when there is little free space left on the disk, the user begins to look for ways to increase it. Any methods are used, starting from transferring data to removable media and ending with deleting system ones, which, by the way, is not recommended. In general, freeing up disk space by deleting files created by the system is a delicate matter and requires considerable caution from the user.
So, on the Internet you can find tips on increasing disk space by cleaning system folder WinSxS. Since this directory tends to grow, there really is a point in cleaning it (there were users whose size reached several tens of gigabytes), but again, maximum caution must be exercised here and if you clean this folder, do it correctly. We will look at methods for such cleaning, but before that, let’s find out what kind of WinSxS folder this is and whether it is really needed.
What is the WinSxS folder for?
The WinSxS directory first appeared in Windows Vista. It contained configuration files system and its components, subsequently other system files were added to it, which, however, did not change its original purpose. In Windows 7, 8.1 and 10, the WinSxS folder stores backup copies of system files that are automatically created when installing major and cumulative updates, thanks to which the user can roll back to previous version Windows, if he doesn’t like the new one or if some bugs are found in it.
Since updates are installed regularly, WinSxS increases in size, which, of course, cannot but bother particularly meticulous users. And here the questions begin: is it possible to remove WinSxS, if so, how to do it, whether this will affect the operation of the system, etc. Let's start with the fact that you can remove anything, but the results of such cleaning can be disastrous. The WinSxS folder stores not only backup copies of previous versions of the system, but also the data necessary to reset it to its original state. It also contains shared files with the Windows directory, cache and temporary system files, and while the latter can still be cleared without any consequences, deleting the former may well result in Windows not booting at all.
How to clean WinSxS in Windows 7/10 without damaging the system and is there a need for such cleaning at all? The last question is quite reasonable, since the true size of WinSxS may differ from what is shown by Explorer or another file manager.

The reason for this is simple: approximately 40 percent of the contents of the WinSxS folder are symbolic links to objects in the Windows directory, which are displayed and identified as real files, but have no weight. Of course, you need to understand that this ratio is very conditional; it changes as the folder increases due to backup copies.
WinSxS optimization methods
Before you start cleaning WinSxS, it is highly advisable to establish its exact size - in case it does not take up as much space as it seems. Open a command prompt as administrator and run the following command:
Dism.exe /Online /Cleanup-Image /AnalyzeComponentStore
The analysis will take some time.

Upon completion of the operation, pay attention to the “Actual component storage size” parameter; its value will be the true size of the WinSxS folder. Moreover, the Dism utility itself will determine whether it needs to be cleaned or not. In the example presented here, cleaning is not required; your situation may be different. But let's return to the topic of how to clean the WinSxS folder.
Cleanmgr
The most obvious way involves using the built-in utility cleanmgr. Run it through the “Run” window and click the “Clean up system files” button.

Find and check "Clean up Windows updates" and click OK. If you don’t have this item, then there’s basically nothing to clean.
Task Scheduler
The WinSxS folder can also be cleaned through the Task Scheduler. Open this tool with the command taskschd.msc, and then expand the branch in the left column Microsoft - Windows - Servicing.

Highlight the StartComponentCleanup task and click Run. By the way, Scheduler-managed cleaning runs automatically every 30 days in the background.
Dism
The disadvantage of the above methods is that the estimate of freed up space can be very approximate and can vary up to several hundred megabytes in both directions. In addition, when cleaning through the Scheduler, updates installed in the last 30 days are ignored. If you want to get better results, use the utility Dism. With an elevated Command Prompt or PowerShell open, run the following command:
Dism.exe /online /Cleanup-Image /StartComponentCleanup

When run with these parameters, Dism does the same thing as cleanmgr, but it more accurately determines the amount of space to be freed.
To produce deep cleaning to delete archived update component files, use the following command:
Dism.exe /online /Cleanup-Image /SPSuperseded

Remember, however, that after running this command you will no longer be able to roll back to the previous version of Windows 7/10, as all backups will be deleted. By the way, if no saved update packages are found, you will receive a message as in the attached screenshot.
Instead of the above command, you can also use another one that cleans up old packages for each component:
Dism.exe /online /Cleanup-Image /StartComponentCleanup /ResetBase

Automatic cleaning via Scheduler
If necessary, cleaning the WinSxS folder can be automated using the Task Scheduler. To do this you need to create new task and on the “General” tab, check the “Run with highest rights” checkbox.

Next, in the action creation window, select the “Run a program” action, enter Dism.exe in the “Program or script” field, and insert the line (keys) taken from the above commands in the “Add arguments” field.

Finally, in the “Triggers” tab you will need to specify the time and frequency of the operation.

How else to reduce the size of WinSxS in Windows 7/10
In conclusion, we will look at another way to clean the WinSxS folder, however, the word “cleaning” is not entirely appropriate here, since we are talking about deleting not temporary data, but unused components supplied with Windows distribution. If you open the classic “Programs and Features” snap-in and click on the “Turn Windows features on or off” link there, you will see that not all system components are enabled.

But even when disabled, they are still on the disk, located exactly in the WinSxS folder. By deleting them, you can free up some extra disk space. To do this, we will again use the console utility Dism. Launch the command line as administrator and first run the following command:
Dism.exe /Online /English /Get-Features /Format:Table

A list of components indicating their status will be immediately displayed in the console. Disabled means disabled, Enabled indicates the component is enabled. To remove an unnecessary one, run the following command:
Dism.exe /Online /Disable-Feature /featurename:NAME /Remove
Here Name is the name of the component taken from the list obtained above.

If the utility asks you to reboot, enter Y, press enter and reboot. The component will be removed. The method is reliable, effective, and most importantly safe.
And one last thing. You should not abuse cleaning the WinSxS folder. If its size does not exceed 10 GB, then there is no need to rush with the revision, and the resulting 2-3 GB will not make a difference. If you really don't have enough system partition space, it is better to expand the volume and not let the disk become critically full with files.
To increase the performance of Windows 7, it is not enough to know and take measures to free up the occupied space; No less useful will be timely cleaning of the system hard drive. In particular, it would not hurt to delete temporary files from the WinSxS directory - as practice shows, up to several gigabytes of “garbage” can accumulate in it. Let’s try to figure out how to quickly and safely empty a folder.
WinSxS - what is this folder?
The WinSxS directory is used to store backup copies of various system data - from scheduled updates to drivers and individual applications. Thus, the more actively the computer owner uses the capabilities of the operating system, the more unnecessary outdated data accumulates in the directory - and the more significant the need to clean the directory becomes.
Important: ideally, only the penultimate versions of updates should be stored in the WinSxS folder (and this applies to both Windows 7 and later OSes). In practice, in the catalog you can find the oldest data, which has been lying there for several years and only clogs HDD.
In the vast majority of cases, reducing the size of the WinSxS folder can be completely painless for the operating system - fortunately, doing this is no more difficult than . The user only needs to carefully follow the instructions and not rush to delete data whose purpose he has no idea about.
How to empty the WinSxS folder?
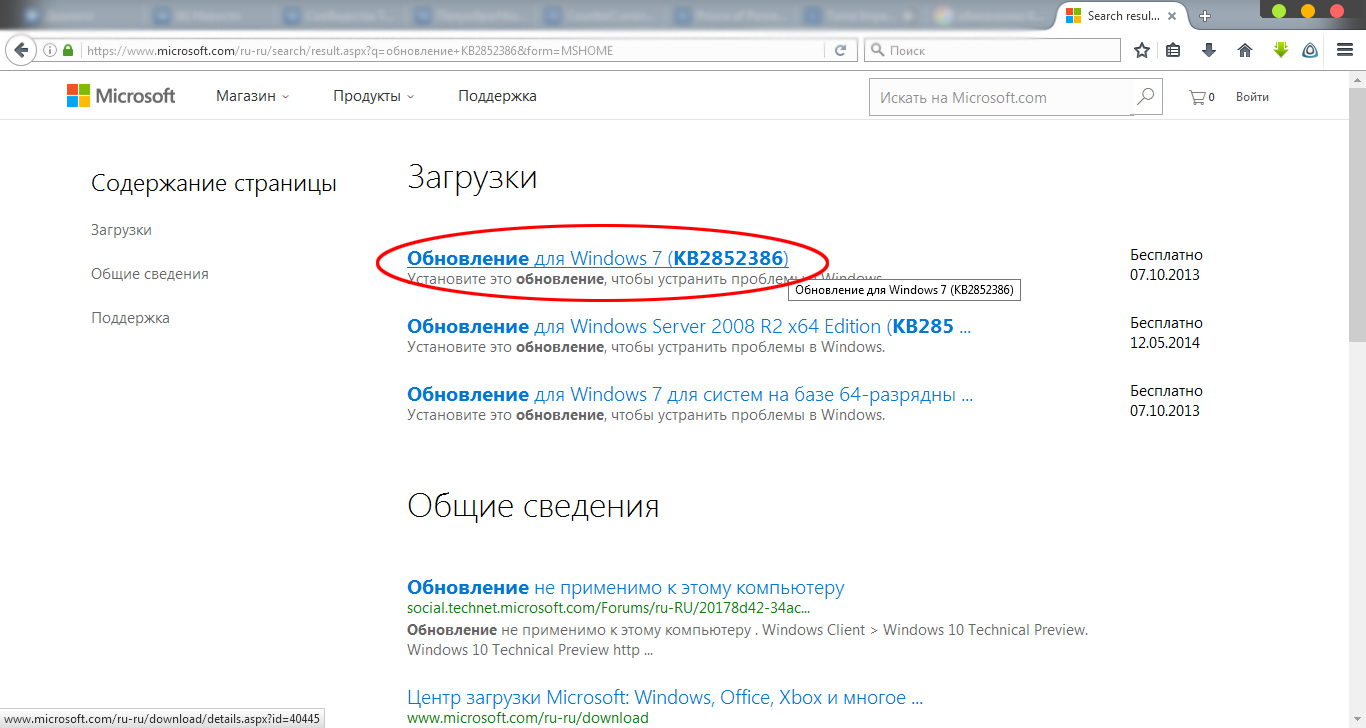
The WinSxS folder exists on the hard drive from the moment the user decides and implements his decision. Below are several simple and relatively safe ways to clean the system directory - but first you should check whether the OS contains the update with serial number 2852386 - its presence makes the task extremely easy.
To perform the test, the owner of a Windows 7 machine must:
- Open the Start menu and launch Control Panel - the button is in the column on the right.
- Proceed to the “System and Security” section.

- And the “Windows Update” subsection.

- Click on the link at the bottom left “Installed updates”.

- While the data is loading, enter the full name of the package you are looking for in the search bar: KB2852386.

- If the user eventually sees the update in the list of installed ones, you can immediately begin cleaning the WinSxS folder.

- And if not, search for available packages and install them as usual.

Advice: if, the package for working with the WinSxS catalog can be downloaded from the link - microsoft.com; To download, just select your language and click on the corresponding button on the right.

Deleting data in a directory
The simplest, crudest and most dangerous option for cleaning the WinSxS folder on Windows 7 is manually deleting junk data. In this case, the computer owner takes full responsibility both for possible failures as a result of the system accessing data that no longer exists, and for the inability to restore the OS from previously created backup points.
However, if you need to quickly free up several gigabytes on the system HDD, this method is optimal; the user will need:
- Open the "Computer" menu.

- Go to the system hard drive.

- Sequentially go to the Windows folders.

- And WinSxS.

- Select all the data contained in the catalog and right-click on the headings to call up the “Delete” option.

- Confirm your intention and wait for the WinSxS folder to be completely cleaned - depending on the volume and number of files located in it, the process may take up to half an hour or even more.

Important: to reduce the space occupied on the HDD in this way, the user needs to operate from under account administrator - a simple “guest” will not be able to delete data directly in the WinSxS folder.
Disk Cleanup
For this and subsequent methods of cleaning the WinSxS folder in a semi-automatic mode, the Windows 7 update mentioned above will come in handy. A user who is convinced that the KB2852386 package is present in the system then needs to:
- Open the “Start” menu and in the search bar (bottom left) enter the query “Disk Cleanup”, then click on the first result in the list of results found.

- Wait while the utility collects data about the system, including files from the WinSxS folder, which can be deleted without harm to Windows 7.

- In the new window, on the “Disk Cleanup” tab, check the “Backup files” checkbox - the rest can be left unaffected.

- And click on the “OK” button.

- After confirming the action, the computer owner will start cleaning the WinSxS directory - within limits that are safe for Windows 7.

Disk Cleanup from the context menu
A similar, but more convenient method from the point of view of the average user - in this case there is no need to launch the Start menu and look for the previously mentioned utility in it:
- You can open Windows 7 Explorer directly from the taskbar.

- Find the system hard drive in the “Computer” sidebar and right-click on the title.

- Select in context menu"Properties" item.

- Now, on the “General” tab, click on the “Disk Cleanup” button and repeat the previously described manipulations.

Cleaning the WinSxS folder via the command line
Like the previous (except for the first) options, this one will only help the Windows 7 user to reduce the size of the WinSxS folder, but not to empty it completely - as you might guess, for security reasons, and not because of inefficiency.
A computer owner who wants to quickly and immediately clean up the backup directory needs to:
- Open the Start menu and expand the All Programs sublist.

- Go to the "Standard" folder.

- Find the “Command Line” utility in the list and right-click on the title and run it as administrator.

- Enter and apply, by pressing the Enter key, the command dism /online /cleanup-image /spsuperseded, best - with an argument /hidesp, without adding extra spaces or excluding necessary ones.

- It, like all others, does not have to be entered manually: Ctrl combination+ V in the “Command Line” does not work, but you can paste text from the menu called up by the same right mouse button.

- Wait for a notification that the command has been successfully completed - as a rule, it takes no more than two to five minutes to process the request.

- Fabulous! Now all that remains is to enter and apply the command exit- and make sure that you managed to reduce the “weight” of the WinSxS folder by several hundred, or even thousands of megabytes.

A Windows 7 user who wants to free up as much hard disk space as possible using the WinSxS folder can enter and apply two more commands:
- dism.exe /online /cleanup-image/startcomponentcleanup- to clear current update installer backups.

- dism.exe /online /cleanup-image /startcomponentcleanup /resetbase- to clear the basic cache.

Important: depending on your computer settings Windows control 7, these two commands may either prevent further updates to the operating system, or may not lead to a positive result - then an error notification will appear in the “Command Prompt” window.

Disabling Windows Features
As already mentioned, the WinSxS folder stores not only the penultimate versions of OS updates, but also outdated versions system components. Therefore, reduce the directory size Windows user 7 maybe by deactivating some of them; The easiest way to do this is to run the command line as administrator again and follow a simple algorithm:
- Enter and apply the command dism.exe /online /english /get-features /format:table.

- Despite the absence of signs of life, do not close the window for the next few minutes.

- Read the table that appears, containing a list of system components and describing them Current state: whether they are enabled (Enabled) or disabled (Disabled).

- Remove (in fact, disable) unnecessary elements using the command dism.exe /online /disable-feature /featurename:NAME /remove, where NAME is the name of the component, written exactly the same as in the newly generated table. For example, to clean the Windows 7 gadget platform, which also clogs the WinSxS folder, the user should use the command dism.exe /online /disable-feature /featurename:WindowsGadgetPlatform /remove.

Important: Before disabling certain components, you must make sure that their deactivation will not affect Windows work 7 - changes made in this way are irreversible, and in the best case, the user will have to restore the OS using installation disk.
DISM++
A unique program of its kind that works directly with system utility dism.exe and allows you to quickly and effectively reduce the size of the WinSxS folder on your hard drive. A Windows 7 user who wants to clean their computer of junk files should:
- Download (link - softpedia.com) the archive, unpack it into any folder and run the executable file in accordance with the bitness of your operating system.

- Switch to the "Cleaning" tab.

- Click on the “Uncheck” button to remove the checkmarks from the checkboxes that are unnecessary for cleaning the WinSxS folder.

- Check the “Replaced WinSxS components” checkboxes.

- And the whole "Temporary files" section.

- Click on the “Analysis” button.

- And wait until the program calculates the size of temporary files that can be deleted without harm to Windows 7.

- Review the results and click “Cleanup”.

- And confirm your intention to clear the data.

- Once DISM++ is complete, you can safely close it - and, making sure that there is a little more space on your hard drive, start working as normal, not forgetting to restart your computer.
Automatic cleaning
A Windows 7 user can make their task a little easier by automating the cleaning of the WinSxS folder:
- The computer owner opens the “Start” menu, enters regedit in the search bar and, by clicking on the first result in the list of results, goes to “Registry Editor”.

- In a new window, the HKEY_LOCAL_MACHINE directories are sequentially opened.

- SOFTWARE.

- Microsoft.

- Windows.

- CurrentVersion.

- Explorer.

- VolumeCaches.

- In the folder located here Temporary Files find the StateFlags parameter, double-click on the title.

- And set it to "2".

- Do the same with the parameter of the same name in the Update Cleanup folder.

- Run command prompt as administrator, enter and apply the command schtasks /create /tn cleanupwinsxs /rl highest /sc monthly /tr “cleanmgr /sagerun:88”.

- Now, thanks to the granted permissions to clear the cache and the task created in the Windows 7 Scheduler, the WinSxS directory will be cleaned monthly; After waiting for a notification that the command has been successfully executed, the user can close the command line and proceed with his business.

Is it possible to delete the WinSxS folder?
Due to built-in system restrictions, it will not be possible to completely delete the user's WinSxS folder, and there is no need for this: the absence of the directory will lead to a critical system failure, as a result of which you will have to either restore Windows 7 using the installation disk, or reinstall the OS.
Let's sum it up
There are several ways to empty the WinSxS folder; the simplest is to use system utility"Disk Cleanup". Other options are through the command line or the DISM++ program. The user can automate the cleaning process by creating a monthly task.


