And again about the main thing - let's talk about cmd.exe, which is familiar to you. Even in the newfangled G8, the console has not gone away, and performs all the tasks you are accustomed to and even contains a few surprises.
1. ipconfig command
The most famous and therefore the least interesting in our review. This command is familiar to all “team” administrators and most users: when problems arise with the Internet, technical support staff ask the user to enter it.
The command allows you to view and work with TCP/IP information. You can use it to check a computer's IP address, release or renew the lease on an assigned IP address, and even destroy the local DNS cache.
If you simply enter ipconfig on the command line, the command will display information about the IP addresses of all network adapters. For each adapter, its description is displayed, for example, “Ethernet adapter” or “Wireless adapter” local network", so that it is clear which configuration is shown. A typical set of information contains an IP address, a subnet mask, a default gateway, and a couple of other not so good fields useful information. If you need to get more data, you must use the /all option. In this case, the command will output much more information, and the most useful thing in the expanded output is the “Physical Address” field, that is, the MAC address of the adapter.
In addition to the /all parameter of the ipconfig command, the /release, /renew, and /flushdns parameters deserve close attention. The first allows you to release an IP address assigned via DHCP. True, after this the network will refuse to work, since network interface will be unconfigured, so the second parameter is useful - /renew, which allows you to update all information assigned via DHCP. This option is very useful because it forces your computer to reconnect to the router or to the provider's servers. It happens that when loading the computer does not see wireless network(I periodically see this problem on my home computer under Windows control 7). Instead of rebooting the computer, it’s easier to enter ipconfig /renew, and the network will appear. The third option allows you to destroy the entire local DNS cache. Sometimes destroying the DNS cache allows you to solve some connection establishment problems, for example, when the DNS information on the server has already been updated, but the old one is still in the local cache.
2. sfc team
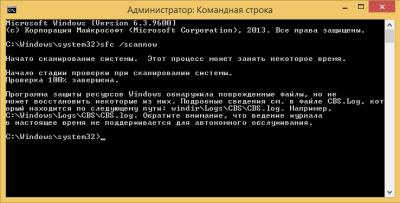
The sfc (system file checker) command allows you to check the system file system. This command should not be confused with chkdsk command(check disk). Using the latter, you can fix the file system at a lower level and even mark bad sectors. But the sfc command will come in handy if suddenly there is some kind of system Windows file damaged. It can detect this and replace the broken file without any user intervention. Very, very useful command. It compares thousands of base Windows files with the original versions that came with Windows and, if necessary, replaces damaged or missing files with using Windows Update. Depending on how Windows is installed, you may or may not need installation media. Usually it is not needed.
The following useful sfc parameters can be identified:
- /scannow - Performs an immediate system scan and replaces files if necessary. After running sfc, you need to restart Windows if problems are found.
- /scanonce - the scan will be performed the next time the system is restarted.
- /scanboot - the scan will run every time the system is restarted. The Revert parameter allows you to undo: after experimenting with the /scanboot parameter, you need to run sfc team Revert, otherwise the check will be carried out every time you restart.
3. chkdsk command
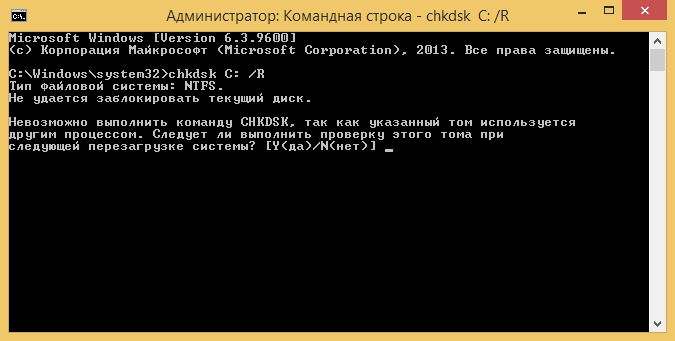
The chkdsk (Check Disk) command allows you to fix errors file system, detect bad sectors, restore readable information from bad sectors. Windows checks disks automatically, but you can also run chkdsk manually if you suspect something is wrong with the disk.
As parameters, the command needs to pass the volume name or file name (if you need to check one file or a group of files, in this case you need to pass the file mask). The /F parameter automatically corrects errors, the /R parameter allows you to detect bad sectors and restore information from them. If chkdsk cannot gain exclusive access to the disk, then a disk check will be performed the next time the system boots. This is a common occurrence when trying to check the C: drive. Example: chkdsk D: /R.
4. driverquery command
The command generates a list of all drivers installed on Windows. Good tool, which allows you to create reports. The command can be used to examine version numbers installed drivers. Based on its results, you can determine whether a particular driver needs to be updated.
The most useful options for this command are /s, /si and /fo. The first parameter allows you to specify the name or IP address of the remote host whose drivers you want to examine. The second parameter shows digital signature drivers. The third allows you to specify the report format: /fo TABLE - table (default), /fo LIST - list, /fo CSV - CSV format, which can be conveniently viewed in Excel or a similar program. Example:
/fo CSV > drivers.csv 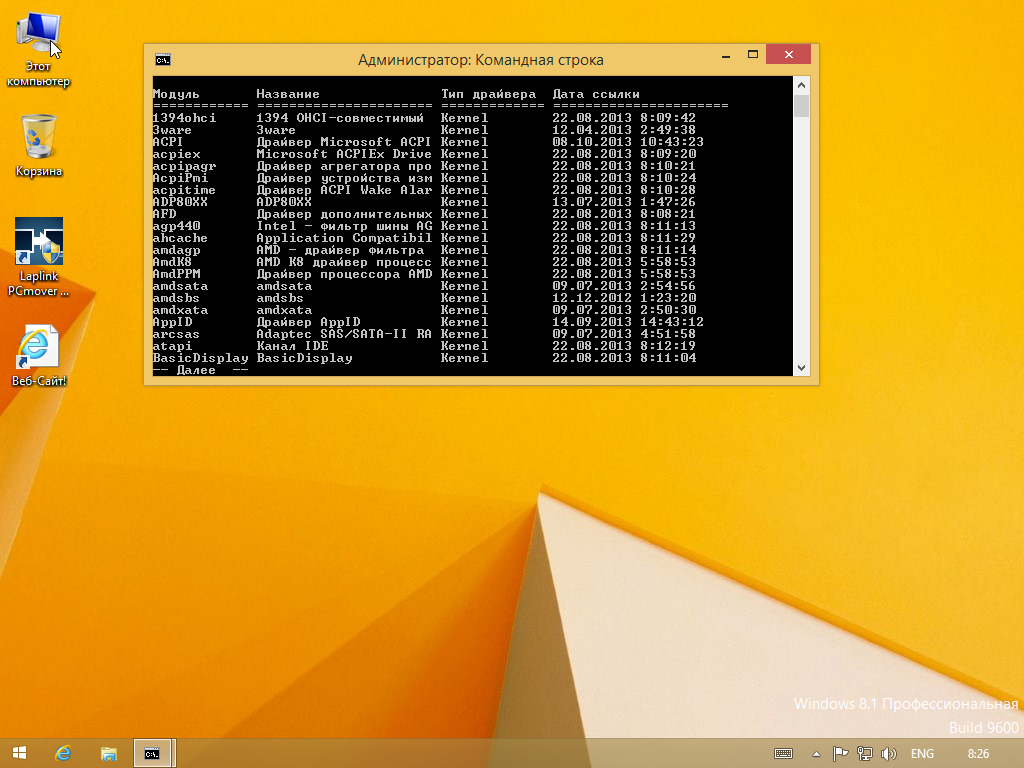
5. Cipher command
This command is used to work with encrypted folders and files on NTFS volumes. Typically, such folders and files are worked through a graphical interface (which is much more convenient), but the cipher command has a very useful /W parameter:
Cipher /W:path
The /W switch (for example, /W:C:) deletes data on unused portions of the volume and effectively erases data on the hard drive after it is deleted. In other words, this command can be used to physically remove data from a disk so that it cannot be recovered special utilities. It should be noted that this only applies to regular hard drives, not SSD drives. It is believed that files from SSDs are deleted immediately and without the possibility of recovery. Although I would recommend that interested readers read this.
6. powercfg command
The powercfg command controls power settings. It has a lot of parameters, and if you really need to control the power supply from the network, then it is better to use the /? for information about everyone. But most users will be interested in the /a and /batteryreport options. The first command displays a list of drivers that prevent the system from going to sleep, and the second displays a report on battery usage.
7. shutdown command
In UNIX, the shutdown command is used to shut down the system (shutdown, reboot). Few people know, but the command of the same name exists in Windows. Now UNIX fans can shut down the system with shutdown -s and reboot the system with shutdown -r. The -t option is also available to set the shutdown timer (in seconds), for example the following example will reboot the system after one minute: shutdown -r -t 60. The -f option provides force termination work with closing all running applications.
8. sc command
The sc command interacts with the service controller and installed services. In UNIX/Linux, you can manage services (services, daemons) from command line(in principle, I don’t know of such a thing that could not be done from the command line in UNIX). The sc utility allows you to manage services from the command line in Windows. You can start and stop services, change the startup type of a service, and so on.
So, to start and stop a service, use the start and stop parameters, respectively:
Sc start<имя службы>sc stop<имя службы>
The question arises: how to find out the name of the service? It’s very simple - to do this you need to use the query parameter, as a result a detailed list of all services will be displayed:
Sc query
Since the list is very large, to view it you can redirect the command output either to the more command (for pagination), or to the clipboard (clip command), or to a file:
Sc query | more sc query | clip sc query > services.txt
More information about this command can be found in the sidebar.
9. The recover command
Used to recover information from a damaged or defective disk. Let's imagine that we have a directory d:\reports\2014 and there was a jan.txt file in it, but bad sectors have appeared on the disk, and it is impossible to read the jan.txt file. To restore (partial) information from this file, you can use the command
The recover command reads the file sector by sector and recovers the information that is still readable. It is clear that the program will not be able to take information from bad sectors, so the recovery of information will be partial. Data from bad sectors will be lost. You also need to remember that using file masks like * and ? is not allowed in this command, you must specify an explicit filename.
10. Tree command
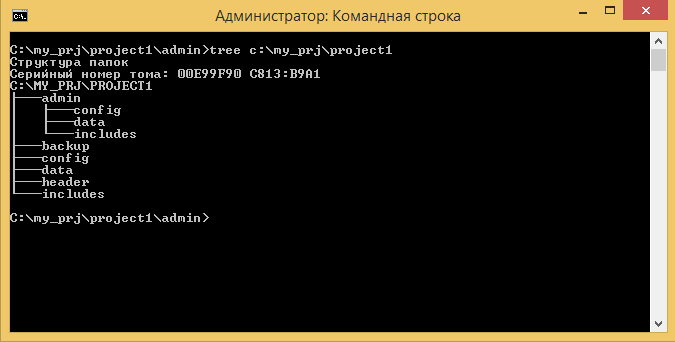
The tree command may seem useless to some, but it will be useful to developers software and technical writers. The tree command displays the directory structure at the specified path. For example, we have a project c:\my_prj\project1. We need to build the subdirectory structure of this directory. To do this, you can use the following commands:
Tree c:\my_prj\project1 | clip tree c:\my_prj\project1 > project1.txt
The first command copies the directory structure to the clipboard, and the second puts it into a file called project1.txt.
PowerShell
In 2012, Hacker published an article called “cmd.exe upgrades and alternatives,” which discussed possible replacements for cmd.exe. Let me remind you that the article discussed console, clink, cygwin, mintty, PowerCmd. All of them make working on the command line more efficient. Microsoft also understood that the standard cmd.exe was already hopelessly outdated, and instead of upgrading it, Microsoft worked on PowerShell. PowerShell is an extensible automation tool from Microsoft that consists of a command-line shell and an accompanying scripting language. The future of the team Windows strings behind PowerShell, so if you're not familiar with it yet, it's time to get started. We wrote about PowerShell in the February issue.
Nowadays there are not many users who have ever worked with the command line. For the most part, users are accustomed to convenient graphical utilities that can be operated with just a mouse. Command line utilities are console applications that appear as a black screen with white text on it. Such utilities are called together with parameters, and are located in the BIN folder of the InterBase server, by default:
C:\PROGRAM FILES\BORLAND\INTERBASE\BIN
You can call such a utility using the CMD window (for WinNT, 2000, XP or higher) or COMMAND (for Win95/98/ME). So, to find out the server version, click “Start -> Run”, and in the window enter cmd or command, depending on your OS. By the way, WinXP also has a command command, but it works in MS-DOS mode and does not support long file and folder names. Therefore, in XP (or higher) you need to use cmd.
A black window will open at the end last line The cursor will blink, this is the command line. Enter the following commands (assuming the default InterBase address), after each one click
cd program files\borland\interbase\bin gpre -z
Let us immediately make a reservation that the text in the window will have to be entered manually. If you copy text and then select the contextual "paste" command in CME, there is no guarantee that all characters will be copied correctly. In this case, you will receive an error when executing commands. But in CME you can repeat the last command without typing it. Just press and hold the right arrow key to re-enter the text of the last command. This can be useful when you have to type similar commands in a row: you can repeat and then edit the text previous command.
As a result of running the example, you will receive the following window:
Rice. 25.1. gpre.exe command line utility
For those who have used such commands for the first time, we will analyze them in more detail. Team
makes drive C: current (in case another drive was previously current).
The cd (Change Directories) command changes the current directory to the specified one, that is, with the command
cd c:\program files\borland\interbase\bin we go to the BIN folder of the InterBase server. If you have InterBase installed at a different location, you should make changes to this command. At the end we give the command
gpre -z which calls the gpre.exe utility with the -z parameter. This utility is a preprocessor for the C/C++ languages and is intended for developers who work directly with the InterBase API. Not the most used utility, but here the -z parameter is interesting for us, which displays information about the version of InterBase and the utility itself (the same parameter is also available for other utilities that we are about to get acquainted with).
As you can see, the *.exe extension can be omitted when loading the utility, and the case of the letters does not matter. You can close this window with the exit command. In the following, for brevity, it is assumed that the current folder in this window is the BIN folder of the InterBase server, where all other utilities are stored.
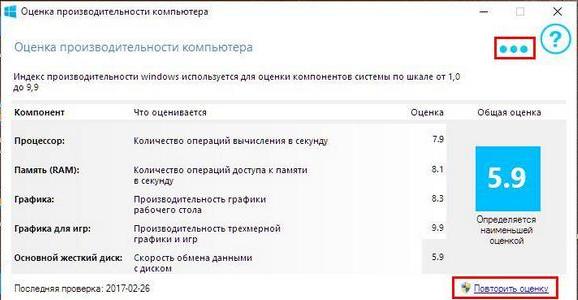
A useful and convenient feature has been transferred to the latest operating system from Microsoft performance analysis your his personal computer. Using this function, users can find out how well their system copes with the load in certain parameters. As a result, the user receives an overall score based on the analysis of each individual component. In Windows 8 and 10, the developers decided to abandon the implementation of the graphical interface for the performance index. However, the function itself remained built into the operating system. Let's figure out how performance measurement works in Windows 10 and where to find the analysis tool.
What parameters are used for analysis?
The operating system analyzes the computer's performance using several basic parameters:
- RAM performance;
- processor operation;
- performance of the graphics core, which at this point does not include games and programs for working with graphics, but only evaluates the work standard interface operating system and playback of videos;
- performance in gaming applications;
- storage device performance.
The final performance score is assigned by the program based on the lowest indicator. The maximum number of points is 9.9. If your PC received, for example, 5 points for the processor, then this score will become the final score.
In Windows 8 and 10, the developers decided to “hide” this opportunity from users, so you won’t find the necessary menu in the usual place, like in Windows 7. You can evaluate your computer’s performance in two ways:
- command line (built-in utility);
- third party software
Third-party programs perform the same actions as the standard utility, so there is absolutely no difference in the choice. Let's look at how it is calculated Windows performance 10 each option.
Using the built-in utility
When using the built-in utility, the analysis is launched via the command line:
As you can see, starting the performance testing process is very simple even without third-party software. If you don't want to use or can't run Command line, then download a third-party program.
Performance analysis through third-party software
At their core, such utilities only recreate the graphical interface, which was removed by the developers in new versions of the operating system. Windows systems. Examples of such utilities - WSAT And ExperienceIndexOK. Let's look at the use of the first one:
After testing starts, it will also open Command line. The final result will be displayed in graphical interface programs WSAT.
How to improve system performance
Setting up Windows 10 on maximum performance by using standard means possible if we are talking about the OS itself. The following tips for increasing productivity are recommendations only:
Now you know how to perform system testing in two ways, and also how to achieve maximum optimization of the operating system to improve test results.
Video on the topic


