In this tutorial I will show you how to take a screenshot of your computer screen. We will learn how to make screenshots standard using Windows and special programs.
What is a screenshot
A screenshot is a photograph of the screen at a specific point in time. Such a snapshot can be either the entire screen or a separate part of it. For example, a snapshot of only one window.
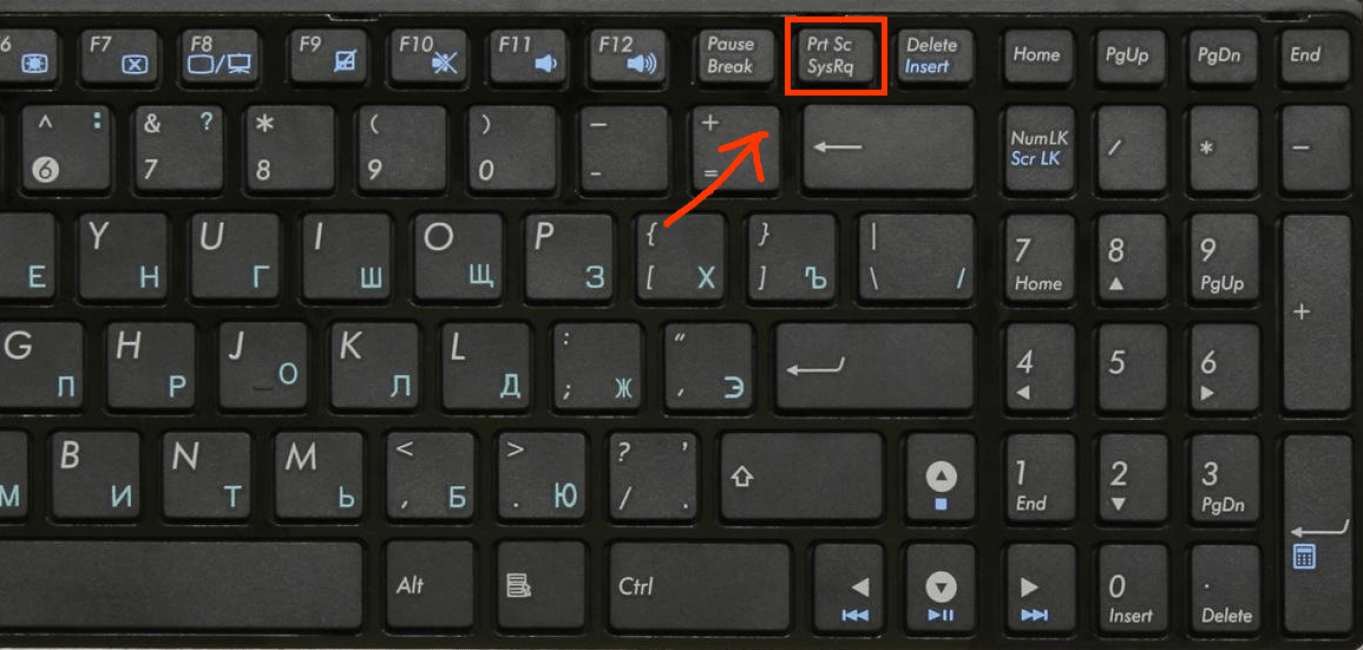
There is a special key on your computer keyboard to take screenshots Print Screen. It may also be called PrtScr, Prt Sc, PrtScn or PrntScrn.
Pressing Print button Screen, the computer screen will be photographed. But there will be no clicks or flashes - the picture will simply be recorded in the computer’s memory (clipboard).
Then this photo needs to be pulled out, and for this to be inserted into some program. The easiest way is in Paint, since it is standard Windows program, and it is on almost every computer.
Important! After clicking Print keys Screen you cannot copy anything before you paste the image into the program. Otherwise, it will be replaced by the copied information.
How to take a screenshot
Via Paint
1 . Press the Print Screen key on the keyboard once.
If you have a laptop, then you need to press the Fn and Print Screen key combination - first one key, then, without releasing it, the other.

2. Click on the Start button and select Accessories - Paint from the list.
Or type “paint” without quotes in the search bar and open the program.

3. In the program window, click the “Insert” button.
Immediately after this, a photo of the screen will be added inside. The photo will be taken at the moment when you pressed the Print Screen key.

4 . We cut off the excess using “Select” and “Crop” at the top.
First, click on “Select”.
Then press the left mouse button and, without releasing it, circle the part that needs to be left. After that, click on “Crop”.
If you fail to circle the first time, click outside the selected area once with the left mouse button - the selection will be reset.

5 . Save the picture to your computer. To do this, click on the save icon at the top of the program () or File - Save.

A file save window appears. First, you need to select the location on the computer where we want to record the screenshot.

Then you need to change the name of the photo and select the format. To do this, click on the “File name” field at the bottom and type a new name for the screenshot there. In the format field, select PNG or JPG. Then click “Save”.
That's all! The resulting snapshot is now recorded in the specified location (). If you selected the Desktop, then you need to look for it on the computer screen.
On a note . This way we photograph the entire computer screen. But if you need to take a picture of only one window, then you need to press not Print Screen, but the Alt + Print Screen key combination. On a laptop: Fn + Alt + Print Screen.
Via Scissors
Scissors are separate program to take screenshots. It's more convenient than Paint.
Windows either has Scissors or it doesn't. This depends on the system version. So if you cannot find this program through Start, it means that it simply is not on the computer.
1 . In the search bar on the taskbar or in Start, type Snipping Tool and launch the application.

A program window will appear.

2. Click on the “Create” button and select the part you want to screenshot. To do this, simply click on the left mouse button and, while holding it, circle the desired part.
If the window overlaps what you want to remove, move it with the left mouse button behind the header - where it says “Scissors”.
3. As soon as you release the left mouse button, the selected area will be photographed and added to a small program.

There are a couple of editing tools here. The pen is something like a pencil for underlining. Marker - for tracing.
4 . Save the image to your computer using the button. This one is done the same way.
Win + Print Screen
In Windows 8 and 10, you can take a screenshot automatically - without pasting it into the program and saving it. To do this, just press the key combination Win + Print Screen.

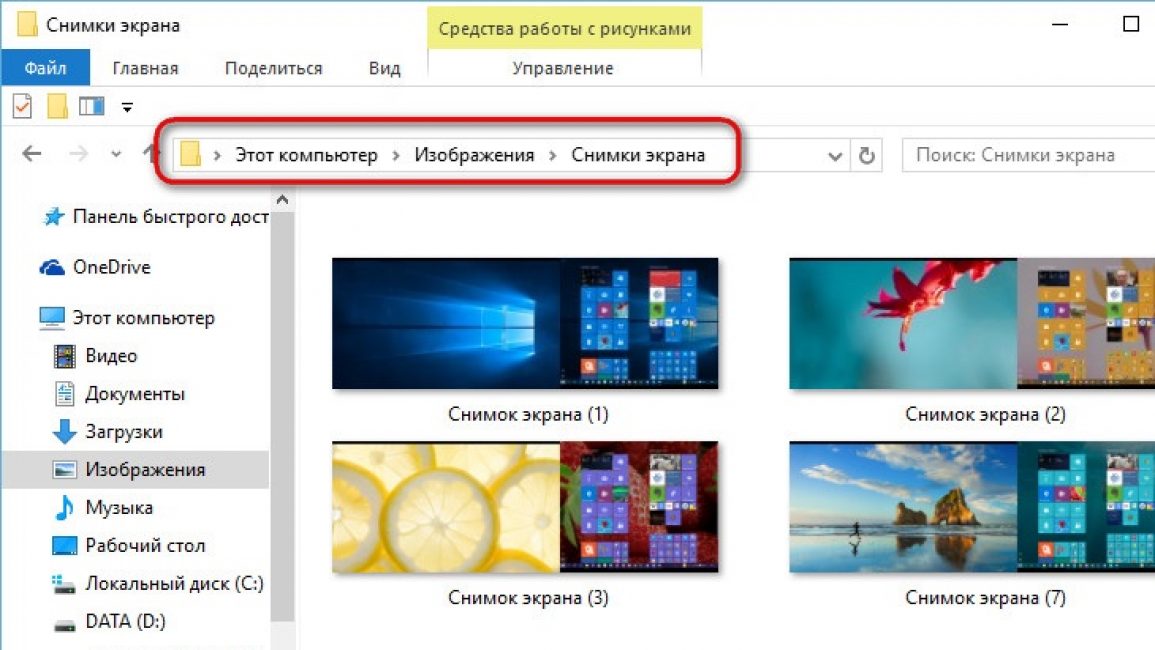
Immediately after this, the screenshot will be recorded in the folder. To find it, go to This PC, open Pictures and Screenshots.

Online services for creating screenshots
There are services on the Internet that help you take screenshots. Using them, you can not only take a picture of the screen and save the picture, but also edit it. Draw arrows and frames, add text, rotate, crop and much more.
PasteNow

Overview of PasteNow service tools
The + and - tools on the right panel allow you to zoom in and out of the photo. The “Center Image” button aligns the image to the center.
Buttons with arrow icons in the left panel save or cancel editing actions.
Crop image. Crops the selected area. Click the button and highlight the area you want to leave.

The selected area is highlighted, and a green button with a bird appears on the left. After clicking on it, the changes will be applied - only the cut out part will remain.
Rotate image. Will expand the image according to your requirements. Can be rotated 90° clockwise and counterclockwise and 180° counterclockwise.
![]()
Filled rectangle. Allows you to draw a colored rectangle directly on the screenshot. Click on the tool and you will see a colored rectangle in the bottom corner. Through it you can choose a color.
Hold left key mouse to start drawing. Release when the rectangle is ready.
Frame . Frames text or images. The drawing principle is the same as the Filled Rectangle tool.
Pencil . Allows you to draw on a photo.
Line and Arrow. Draws lines and arrows.
Text . Allows you to write text. To do this, click on the tool, click on an empty space and start entering text.
Censorship . Blurs information. Click on the tool, then hold down the left mouse button and select the fragment that you want to paint.
MakeScreen
- Open the website makescreen.ru
- Press the Print Screen key.
- Press Ctrl + V on your keyboard to upload the image to the site.
- If necessary, edit the photo and save it to your computer.

A window with saving options will then open. Click “Download Screenshot” and it will be in the “Downloads” folder on your computer.

Overview of MakeScreen service tools
Trim. Allows you to crop the image. Click on the tool and, holding down the left mouse button, select the desired area. To change the area, drag the white buttons on the sides. After clicking “Apply”, only the selected part will remain on the screen.

Size . Changes the image size. Click on the tool and a window will appear at the top with a choice of the width and height of the image. Enter the required parameters and click Apply.

Orient. Allows you to rotate the image.

Focus. Selects part of the image and blurs the background. Example:

Color . Changes the color of the photo. Example:

Brush. Allows you to draw on the screenshot.
Rubber . Removes drawn shapes.
Text . Adds text.
Blur. Spreads information.
snipboard.io
- Open snipboard.io
- To take a screenshot, press the keyboard shortcut Alt + Print Screen.
- Then press Ctrl + V to paste the image onto the site.
- Edit the image and save it to your computer.

The completed photo will open. Right-click on it, select “Save picture as” and .

Tool overview:
- Crop - crops the image.
- Pencil Tool - allows you to draw on a photo.
- Text Tool - adds text.
- View the Image in Full size - displays the screenshot in full size.
- Move - moves the image.
Free programs for creating screenshots
LightShot
You can download and install LightShot from the official website app.prntscr.com.
How to use. After launch, the program will be located in the system tray.

Press the Print Screen key. The program automatically activates a window for selecting an area and taking a photo.

Toolbar:
Cons: no latest software updates from the official website.
Joxi
You can download and install the program from the official website joxi.ru.
How to use. After installation, the program will be located in the tray. Click on it, and Joxi will ask you to enter your email to get started, that is, register.

Here's what the program itself looks like:

Tool overview:
- Fragment - selecting an area to save.
- Move and transform - move lines, text and other elements drawn on the photo.
- Pencil - drawing.
- Line and Arrow - drawing lines and arrows.
- Text - print text.
- Circle and Rectangle - Drawing a circle and a rectangle.
- Numbering - adding numbering to the photo.
- Blurring is blurring of information.
- Dimming - will leave only the selected area in the field of view, and will darken everything else.
- Color palette - select the drawing color and text color.
- Screen - capture the entire screen.
- History - will open a browser window with your pictures.
- Settings - program parameters.
To save the document, click on the arrow next to the blue check mark.

Pros: availability of a large number of tools.
- To work you need to register.
- Sometimes it crashes with an error message.
Yandex.Screenshots
The program is part of the Yandex.Disk package. You can download and install from the official website disk.yandex.ru.
How to use. Launch the program, a window will open asking you to select the area to capture.

The application interface will then open.

Tool overview:
- Arrows - drawing arrows.
- Text - adding text. You can change the font and color on the panel.
- Shapes - Drawing lines, rectangles, circles and stars.
- Marker - used for highlighting.
- Blur - blurs the selected area.
- Crop - cuts out an area.
The image will be saved to Yandex.Disk. You can find it through This Computer - Yandex.Disk - Screenshots.

- Convenient screenshot editor.
- Synchronization with Yandex.Disk.
Cons: you need to install the Yandex.Disk application.
Other free programs
In this review I will briefly talk about other free programs for working with screenshots.
Monosnap

Possibilities:
- Ability to capture video from the screen and web camera.
- An excellent image editor with all the necessary tools.
- Ability to take screenshots in games.
- Customizable keys for quick snapshots.
- Ability to record video from the screen.
- The application runs on OS no lower than Windows 8.1
- Small functionality for video editing.
Screen Shooter

Possibilities:
- A snapshot of both the entire screen and a selected area.
- Excellent functionality for editing screenshots.
- Ability to save both to your computer and to cloud services.
- Works with any version of Windows OS.
- Convenient editor.
Pick Pick

Possibilities:
- A snapshot of both the entire screen and a selected area.
- Huge selection of editing tools.
- Ability to save to computer office applications and to cloud services.
- Russian language support: File - Options - Languages.
- Quickly capture a selected area.
- An excellent set of basic tools.
- Possibility of uploading to cloud services.
Screenshot Captor

Possibilities:
- Built-in editor with great functionality.
- It is possible to capture from a web camera.
- Possibility of loading an image from a scanner.
- High quality pictures.
- Brightness settings.
- Big choice editing tools.
- Ability to compress screenshots.
Cons: no support for Russian language.
Clip2net

Possibilities:
- Screen video recording (only available in Pro version)
- Convenient editing panel.
- Ability to save a screenshot both to your computer and social media and to the cloud service.
- Sufficient functionality to work in the free version.
- There are versions of the application for Google browser Chrome, Mozilla Firefox
- Registration is required to get started.
- Video recording is available in paid Pro versions.
- Uploading files to your servers is available in the paid Pro version.
Screenshot Maker

Possibilities:
- Ability to add comments.
- Installing sound accompaniment for pictures.
- Screenshot quality and compression settings.
- Setting up hotkeys for screen capture.
- Ability to take a photo while games are running.
- There is an option called “Screen Scissors”.
- Availability of a compact menu for managing the utility.
- Support for the program has ceased.
- No built-in editor.
Paid programs
Movavi Screen Recorder

Possibilities:
- Record video from the screen.
- Editing in recording mode.
- Adjusting sound levels.
- Split video into parts.
- Adding additional audio tracks.
- Adding subtitles.
- Saving files in formats: AVI, WMV, MOV, MP4, etc.
- Burn to DVD.
- Export to cloud services.
- Recording up to 60 FPS - convenient for games.
- Simultaneous recording from several sound sources (music, microphone).
- Hotkey support.
- Small distribution size.
- Uploading videos to social networks and Youtube.
- The program puts watermarks on videos in the free version.
- To record video, you need a video card that supports OpenGl.
Snagit

Possibilities:
- Record photos and videos from the screen.
- Large set of tools and settings.
- Support for photo and video cameras.
- Possibility to print and scan the image.
- Conversion support.
- Record everything that happens on the screen.
- An excellent graphic editor with filter support.
- Hotkey support for capturing.
- Support for multimedia equipment.
Cons: large volume of distribution.
FastStone Capture
You can download the program from faststone.org.
Possibilities:
- Record photos and videos from the screen.
- Change color depth.
- Ability to add watermarks.
- Resize the image.
- Good set of editing tools.
- Ability to send a photo to office applications, email and saving to your computer.
- Possibility of adding a signature.
- Convenient video capture.
How to take a screenshot of a website page
Service snapito.com
1 . Go to snapito.com
2. In the Snapito field, enter the address of the site you want to screenshot. Click on the "Snap" button.
3. Save the screenshot by right-clicking on the image and selecting “Save picture as.”

Click on the extension icon in the right corner of the screen.
3. Select the area to save.
In computer activities, situations arise when you need to save an image from the monitor screen, or, as they say, take a screenshot of the screen. A screenshot is often also called a printscreen. They can be done either using the built-in functions of the operating system or using specially designed programs that may have additional functions and provide additional convenience in taking screenshots.
How to take a screenshot in Windows. On all operating systems Windows family(XP, Vista and Windows 7) the screenshot is created in the same way. To do this, you just need to press a button PrtSc on keyboard. PrtSc is an abbreviated version of PrintScreen, which in our opinion is read as a printscreen, or screenshot. On some types of keyboards, this button may be labeled Print Screen/SysRq.
When you press this button, the entire visible part of the monitor screen, that is, everything that you see on it, is transferred to the clipboard. If you are not satisfied with this and want to get an image of only the active window, without Windows menu and other unnecessary elements, you can use the key combination PrtSc+Alt. First, press Alt, and then PrtSc, and as a result, the image of only the active one will be copied to the clipboard. this moment window. Thus, we almost completed the task and received a screenshot, but for now it is in our special department random access memory computer - clipboard. To save it as an image, you need to open any graphics editor (you can use the built-in Paint), create a new document in it and insert the image from RAM into it by pressing the Ctrl+V key combination. First press the Ctrl button, and then V (English letter V). In modern graphic editors, the size of a new document when you copy an image into it will automatically adjust to the size of your screenshot. You don't need to specify them manually.
After you copy your screenshot into a new document, you can perform various editing operations. Resize, cut out the desired area, add the necessary signatures, change brightness, contrast and other parameters as needed. In conclusion, you only need to save the image by giving the file a unique name and choosing one of possible formats jpeg, gif, png, tiff or bmp. At this point, the question of how to take a screenshot of the screen using the built-in tools of the operating system can be considered closed.
In many computer games ah, the developers provide for creating screenshots by pressing a key F12. They will be saved in the My Documents folder.
There are also various options for taking screenshots. third party programs and utilities. The most famous of them: Paparazzi, Floomby, Magic Screenshot, Jing and many others. If you wish, you can familiarize yourself with the functions of each of these programs on their official websites and select the one you need based on your needs.
How to take a screenshot on a laptop.
As you know, laptop keyboards have an incomplete set of buttons. This is due to the lack of space allocated for the keyboard. Therefore, the PrintScreen button in them can be combined with another key. You can press it using the Fn button located at the bottom left of the keyboard. In all other respects, the process of taking a screenshot is no different from taking it on a full keyboard.
How to take a screenshot on Mac (Mac).
Over the past few years, Apple computers have become increasingly popular. When those users who have worked in Mac for a long time switch to Mac Windows environment, then they are horrified to discover that many things that they have already become accustomed to and brought to automaticity in Mac OS do not work. But this does not mean that they are not there at all. In practice, taking a screenshot on a Mac using the operating system is even easier than on Windows. To do this you do not need to use graphic editor, since the image of the eran is saved directly into the image literally in one step.
All you need to do is press the keyboard shortcut Shift+Cmd+3. First press the Shift button, then Cmd and then the number 3 on the keyboard. As a result, a print screen of the entire screen area will be saved on the computer desktop as a file with the name “Screenshot 2012-02-29 at 17.44.09” and the extension .png. The time and date in your file name will, of course, be different.

In order to take a screenshot of part of the screen in Mac OS, you must press a keyboard shortcut Shift+Cmd+4.

The cursor will look like this. You need to put it to the left top corner area from which you will take a screenshot, press the left mouse button and, without releasing it, select the required area. As soon as you release the left button, a screenshot will be taken and saved on the computer desktop.
In conclusion of the article, I would like to remind you that when creating screenshots and posting them online, you should always check that they do not contain private information that could be used by attackers. Happy shooting!
If you urgently need to show something to your interlocutor or save something, the user may not know how to take a screenshot on a computer. It's time to learn this!
Why take a screenshot
Read also: How to set a password for a Windows folder? | 7 Best Encryption Methods and Programs | 2019

It often happens that a screenshot is simply necessary.
For example, if you need to show your screen to your interlocutor or send this data somewhere, if you need to save something that cannot be saved by clicking the right mouse button, or if you just want to catch a good moment in a video.
And these are just some of the reasons to use such a useful function on your personal computer or laptop.
For example, you find yourself in a not very pleasant situation, say, when using a virtual wallet.
And in order to prove to the administration that you are right, you will have to provide them with evidence. And here, well, you just can’t do without a screenshot.
Or you have to contact the support service of your hardware or software with a problem.
Again, it’s impossible to explain in words, so what remains to be done? Of course, take the opportunity to show off your screen.
It even happens that you want to capture messages as memories, and “Ctrl+C” alone is clearly not enough.
Lots of little things that would seem easy to leave as an image on your personal computer or laptops, but doing this without taking a screenshot is simply physically impossible.
In fact, the ability to take screenshots can be useful at any time, and therefore it is important to know how to properly take a screenshot of your screen or a selected window, or maybe just some part of it. Yes, you can even select one phrase or picture.
Well, doing this is actually quite simple, and in order to take a screenshot, you need to put in a minimum of effort. It's very simple, done in a few clicks, and even a child can do it.
Print screen using a button
Read also: [Instructions] How to reinstall Windows (7/8/10) on a computer or laptop | 2019
To begin with, the print screen is the same, only with different letters. The name, by the way, comes from the first method of creating screenshots - the PrintScreen button.
This button may also sometimes be called PrtScr, and is usually located on the right side. Its location depends on the type.
So, this button is the fastest and easiest way to take a screenshot of your screen in a matter of seconds.
You just need to press it to save the screen image to the clipboard. That is, so that you can insert it literally anywhere.
Nothing extra, just one button, and then you can edit the screenshot in any image editor.
You can do this using Paint, Paint.net, GIMP, or any other editor you have.
It's important to remember that a screenshot taken using the PrintScreen button captures the entire screen, and if you send a screenshot to someone, that person will see all your browser tabs, running programs, absolutely everything. Therefore, editing the print screen can be very important if you do not want others to see more than necessary.
How to take a screenshot on a laptop
Read also:

As with any keyboard, the PrintScreen button on a laptop does not go away. It is in its place, which depends on the type of keyboard, and still performs functions.
But it happens that the user presses the button again and again, but nothing happens. So what then? Can't you take a screenshot on a laptop?
Not at all! This simply means that in addition to the key already known to the user, if you have a laptop, you need to use . And it looks like Fn+PrintScreen.
The button is labeled “Fn”, and it is located at the bottom left, not far from the space bar.
It's so easy and simple, just two buttons. Well, the screen, again, will be saved for further editing.
And if you are sure that you did everything correctly, and the screenshot still turned out, then it’s time to edit it. How to do this correctly?
How to edit a print screen
Read also: Windows Task Scheduler - how to configure and what can be disabled without damaging the system?

The easiest way is to call the Paint program and cut off everything unnecessary with its help.
As you know, this is the simplest “drawing tool”, and it’s just as easy to use it to adjust the size of a screenshot.
All you need is:
- Open the Start menu, this can be done using the “Win” key or by opening the menu on the left;
- Select the folder called “Standard”;
- Run the program from there
- By pressing Ctrl+V you can paste the screenshot into a new canvas.
- Then you need to select the “Select” tool, with which you mark the desired area, and “Crop”.
- All that remains is to save the image.
And the screenshot is ready!
Nothing complicated at all, just a few clicks and you can send it anywhere.
In the same way, you can edit with any available program that you have at hand. Using the “paste” keyboard shortcut, the resulting screen can be placed in absolutely any application.
What if, say, there’s something wrong with the print screen button? Or is it just that nothing is clear here? What to do in this case?
Printscreen using Scissors
Read also: [Instructions] How to connect a printer to a computer on Windows 10 and Mac OS

In Windows 7, the PrintScreen button can be omitted altogether. Instead there is very handy tool which is called "Scissors".
It is designed to create a screen without further processing, that is, you can make a print screen of absolutely any size and anywhere on the screen.
It's easy to find and use, and it only takes a few steps:
- Still the same “Start”, then in “Standard” you need to find a program called “Scissors”.
- It opens instantly, all you have to do is click on the tab called “Create” and select the size and shape of the field, that is, the future print screen.
- Then all that remains is to click on the “Save” button, or add an inscription to the print screen using the “Marker” tool.
Actually, nothing complicated, right?
Indeed, both ways to make a print screen are very easy and affordable.
True, in different versions of the operating system It’s not always possible to make screenshots the same way.
Printscreen on Windows 10
Read also: TOP 5 Ways to take a screenshot on a computer running Windows 10

There are many more ways to create and save a screenshot in the top ten.
Firstly, in some cases, screenshots are saved automatically, in a folder specially designated for this. By the way, it is located on the local disk.
Well, secondly, there are more built-in tools that allow you to take a screenshot without any problems.
And not only a screenshot, but even a video recording without additional programs, all this is provided in the operating system.
There are several tricks with the PrintScreen key. When you click on it, a screenshot (of the desktop, running programs, etc.) will automatically be transferred to the clipboard, from where it can be pasted into a document or any graphic editor.
If you press the key combination Alt+PrintScreen, you can make a print screen of only the working window.
Eg, open folder, browser or any windowed or even full screen mode. For everything to work out as it should, you must first make this window active, that is, click on it.
And finally, with the Win+PrintScreen key combination, screenshots will be saved automatically.
That is, they will immediately appear in the system. When you click on these buttons, the princescreen will not move to the clipboard, but will appear as an image in standard folder, which is called "Screenshots" and is located in the folder "Images".
But these are only keyboard shortcuts, what about other methods?
Are there other possibilities?
CreatorsUpdate: Game Bar and Scissors
Read also: TOP 4 Easy ways to change any file extension in Windows 7/10
The Windows 10 operating system, like its previous versions, is equipped with a tool called "Scissors". Yes, yes, exactly, in addition to key combinations, there are many built-in ways to take a screenshot.
This is a standard program, so finding it is very, very easy. You can find it through “All Programs” or simply type the name in the search bar and then launch the program.
In principle, the algorithm of actions does not change; it is very easy to make a print screen using this program.
As mentioned above, you just need to select the area and shape of the desired screenshot, mark this place on the screen, cut it out, add a signature if desired, and save it. Ready!
By the way, you can choose any folder for saving, and the “top ten” now has a delay function, that is, the program can count the required amount of time before taking a screenshot.
Another innovation was the CreatorsUpdate system, that is, improved and expanded key combinations and minor improvements to the operating system. One of these combinations can be used to make a screenshot, and this is Win+Shift+S.
Often the user gets lost when searching for a key called “Win”.
In fact, this is just a button with which you can go to the desktop or launch “Start”, and there is a flag on it.
And finally, the game bar. This is another way to take a screenshot on Windows 10 without using third party programs or applications.
Game Bar is a pre-installed program that is very easy to launch, especially when using various applications.
It was originally created for recording video from open applications and programs, but with its help you can also capture a print screen.
To do this, just first open any program you need for the print screen, and then press the key combination Win + G.
It also happens that the game bar is not installed, so you will need to turn to some drivers that are responsible for this extension.

Probably many already know how different these OS between themselves.
And if in Windows making a screenshot is as easy as shelling pears, in the case of Linux you may have to try more than one method until the right one works.
The thing is that not in all versions of this operating system the already well-known PrintScreen button works as it should.
And sometimes it doesn’t work at all, and even the usual key combinations for the same “windows” simply don’t work.
But it’s still worth trying this key, because sometimes when you press it, the system even automatically offers to save a screenshot. That is, it opens a window for selecting a save folder.
In the same way, you can try the key combination Alt+PrintScreen, which will allow you to take a screenshot of the active window, or Shift+PrintScreen, to pre-select the area of your future print screen.
Sometimes it works, sometimes it doesn't, but either way, it's worth a try. Here you don’t even need to use third-party editors or a clipboard, the system will save everything for you.
But what if the button and key combination don't get a response? In this case, you should use the built-in utility Gnome Screenshot.
It is located in the folder "Accessories", and is called by double-clicking the left one.
With this program, you can pre-select the size and area of the future screen, turn the pointer on or off, or even activate a delay to prepare the perfect print screen.
All this is very easy and convenient, and will not take much time or effort.
True, using the printer screen button is not always convenient, or the user may simply not have the opportunity to do it.
And the same “Scissors” or “Gnome Screenshot” may not be at hand, not to mention the ability to remember key combinations.
Then third-party programs will become very useful, which you can use, and which are not inferior to the ease of working with the PrintScreen button.
Print screen on a computer without a button
Read also: [Instructions] How to reset Windows 10 to factory settings: All methods | 2019
It would seem that making screenshots using a button is the easiest way. So I took it, clicked it, clicked it some more, pasted it, edited it... But it also happens that you can’t do this.
Therefore, various programs and applications will come to the rescue.
With their help, you can take a screenshot in a few clicks, save it in a predefined folder or select a location, immediately edit it or select a print screen area.
Most programs are free and take up very little space, are easy to install and are as easy to use as a button, and their choice is very, very large.
You can download a program that combines the functions of a photo and video editor; you can find an application from the manufacturer or from a developer who has included functions not only for creating a print screen, but also for recording video.
It all depends on the user, and, of course, on the choice of programs that are best suited for creating a screenshot.
The list of such most suitable programs includes Snagit, Greenshot, Snippy, Jing and others, which allow even the most inexperienced user to intuitively understand the work and easily make a screenshot.
You can find them using a search engine; there are different versions and program options. But how to use such programs correctly?
One of the most simple ways To take a screenshot of the screen is to use the PrtSc (Print Screen) button located in top row keyboards with right side. A screenshot of the information displayed on the monitor screen must be taken as follows:
1. Press the PrtSc key once, during which no peculiar sounds or clicks are observed, but the photo of the screen is recorded in the computer’s memory.
2. Open one of the programs that works with images (Paint, Photoshop or Microsoft Word).
3. Paint program is a standard Windows product and is available on every computer. To open it, you need to select the “All Programs” tab in the “Start” menu and go to the “Accessories” section. After opening the program in top panel select the “Paste” command in the “Edit” section. The photographed image will be displayed on the screen.
4. To insert a screenshot into Microsoft Word you need to enter the program, open the document, place the cursor at the place where you plan to display the image and use the “Insert” function.
5. In order for the screenshot to be used repeatedly, you must save it. To do this, in the “File” section of any program, you need to select the “Save As” command, give the file a name, select a folder and confirm saving the document.
If you need to take a screenshot of one open window, you need to press the Alt+PrtSc combination, then enter one of the proposed programs, insert a snapshot and save it.
Using the Print Screen key to capture images on the screen is universal for all computers running Windows.
Screenshot software "Scissors" for computers with Windows 7, 8 and Vista
If the operating system Windows 7, 8 or Vista is installed on your computer, then you can take a screenshot of the screen or a selected fragment in a more convenient way. This can be done using standard program Snipping Tool or “Scissors” as follows:
1. In the “Start” menu, go to the “All Programs” - “Accessories” section and click on “Snipping Tool”.
2. A window will appear on the screen in which, on the “Create” tab, you need to select the type of image: free-form, rectangle, window or entire screen.
3. Use the cursor to mark the area of the image, after which the selected fragment will be displayed in the program window.
In the program, you can edit the image accordingly and save it using the File - “Save As” command.
Other programs for taking screenshots
For permanent job with screenshots and the possibility of high-quality editing of captured images, functional programs are used, the most popular of which are:
1. Screenshot Maker – fast and convenient program to create screenshots, allowing you to take pictures of the entire screen, individual fragments, and also use many tools for image editing. The program can be downloaded from the Internet and installed independently.
2. Hot Key Screenshot is ideal for creating screenshots of fragments of computer games. By pressing the specified in the program hotkey You can quickly capture the necessary moments, which are saved in a special folder. The program does not require installation, and to work you just need to download it.
There are many other ways to take a screenshot on a computer, but the ones described above are the simplest and most accessible for every PC user.
In this material we will consider the fastest and convenient ways taking screenshots without the Print Screen key.
To take screenshots of the screen, place the Print Screen key on the keyboard. But some keyboards don't have it. It seems that no... The keyboard manufacturer could have called it differently:- Print Screen/SysRq,
- PrintScr,
- PrtSc,
- PrtScn,
- Psc.
1.1. Scissors app
For quick creation The screenshot is suitable for the program installed in the operating system Windows systems Vista / 7 / 8 / 8.1 / 10Go to the Start menu and find this application.
If you couldn’t find what you needed this way, then:
- In Windows Vista and Windows 7: “Start” → “Run…” and enter the word in the “Open” field snippingtool. Click OK.


- In Windows 8 and Windows 10, press the Win + R hotkeys and enter the word in the “Open” field snippingtool. Click OK.
Attention!
Button Win usually located in the lower left part of the keyboard between the Ctrl and Alt keys and most often depicts Windows icon. Key R in the fourth row, counting from the bottom.
+ means that you press these buttons at the same time.
In the “Scissors” application that opens, select the menu "Create" and the form of the future screenshot (Full screen, Rectangle, Freeform). I recommend using Rectangle. This way you will select only the desired part of the screen for the screenshot, which will eliminate the need for further cropping of the photo in some editor, for example, Paint or Photoshop.

After taking a screenshot in the application, you can make notes using the Pen and Marker tools. If you make a mistake, erase the marks with an eraser.
Attention!
Windows XP does not have such a program built-in.1.2. Screen keyboard
If the Print Screen key is not on the physical keyboard, then it can be found on the virtual keyboard.It can be found in the menu "Start" among standard programs.
Or through the window "Run...". Everything is the same as in the previous case, we just enter the OSK command.

Attention!
It will be visible on the screenshot screen keyboard, so before taking a screenshot, remove it to one of the corners of the screen. Then the screenshot can be cropped in Paint or a similar program.
Recommendation #3. Take a screenshot using a special program
Windows tools are good, but there is little replacement special program. There are a lot of such applications. Here everyone chooses for themselves. Let's look at three such programs: Lightshot, SnagIt, FastStone Capture.- SnagIt- has a rich inventory for editing screenshots. The application is paid.
- FastStone Capture- it is possible to edit a captured screenshot, although the functionality is narrower than that of SnagIt. Distinctive feature programs - creation long screenshots with screen scrolling. The application is paid.
- Lightshot- the ability to edit a screenshot is very modest, but you can write text, highlight it with a frame, an arrow or a marker. A distinctive feature of the program is convenient posting on a social network, uploading a screenshot to the Lightshot Cloud and receiving a link for further sharing of the screenshot. The application is free.


