"(BSOD) and freezes, at times, can change its operation beyond recognition or stop functioning altogether. Therefore, it is not surprising that the number of requests from Internet users “how to remove old Windows"is constantly increasing.
Windows OS can last for years for those who limit themselves to working in office applications, viewing multimedia files, and the programs used are not even updated. It's a different matter for those who like to experiment with new programs. Exactly for them the question of removing old Windows is most relevant.
When a new Windows OS is installed on top of an old operating system or in another partition parallel to it, it becomes very important that old version not a trace remained. The previous Windows system is called Windows.old, and does not interfere with the main system.
But there are two problems here:
- The impressive volume of the old system while occupying the right space;
- The presence in the boot menu of an inscription about the old Windows.
Or maybe you are simply planning to change the operating system, for example, to Linux. All this pushes you to get rid of the old Windows OS As soon as possible.
According to statistics, old Windows XP is uninstalled much more often than Windows 7. It is also worth knowing that deleting the Windows.old folder is an irreversible process. For different versions OS Windows windows and the sequence of actions may vary slightly, but, in general, the principle is the same.
To delete the previous Windows systems There are 3 main ways from your PC. Let's look at each of them in more detail.
Method No. 1

Widely used for Windows 7, but not suitable for Windows XP. You need to insert the disk with the installation distribution into the disk drive, and then begin the installation. A message will appear indicating that an old system has been detected that is stored in the Windows.old folder.
The process will not affect important data, because old system folders and the files will simply be moved. If something happens, you can easily restore them. If desired, the Windows.old directory can be completely deleted.
Method number 2
Not accessible to everyone due to its specificity. Try booting from another hard drive. Problems with deleting the old one Windows versions should not arise, since it is visible in Explorer, and you can delete any of its directories. However, the presence of two stationary hard drives on one computer is extremely rare.
Method number 3
A universal option based on downloading a smaller version of Windows, called Windows PE. You can boot from a CD or, more popularly, from a flash drive.
But the functionality of the system is extremely limited, so it’s quite difficult to get video. However, work with file system possible in full. After loading the LiveCD, it is recommended to erase the old Windows. HDD may not be displayed in the PE system.
Therefore, simply change the operating mode of the disk subsystem in the BIOS to IDE with AHCI. If the erasing process is unsuccessful, then you just need to change the access rights using the commands “Folder Options” - “Security”, and then “Advanced”.
The easiest way to remove the old Windows 7 activator is through its installer. Don't forget to disable protection software using the “Control Panel” services, then “Administrative Tools” and finally “Services”.

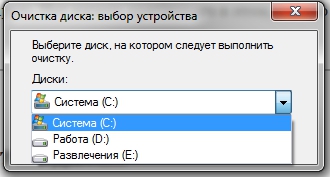
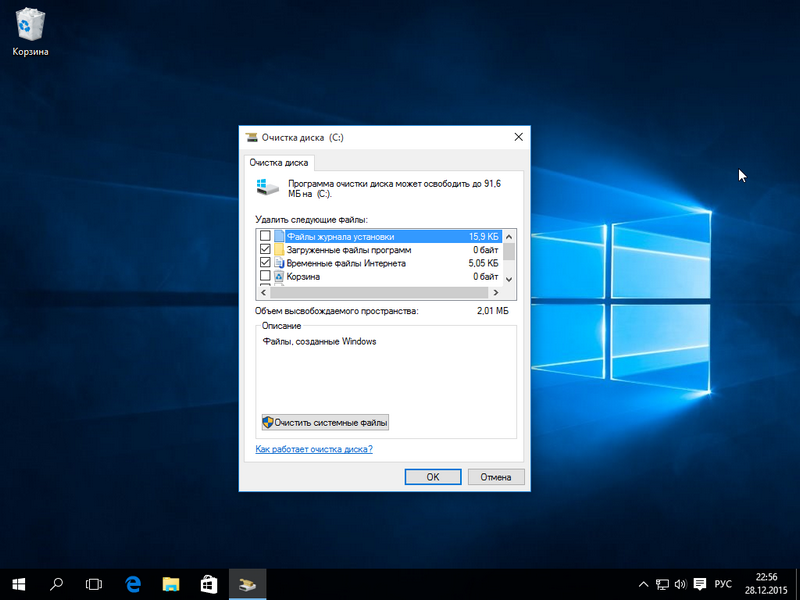
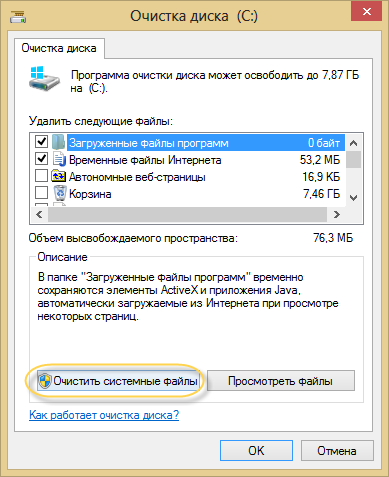
In general, to delete the Windows.old folder, you need to open the Disk Cleanup program using the Start button. In the search field you need to enter “Disk Cleanup”, then in the list of results select the item of the same name “Disk Cleanup”.
Then the Windows OS drive is selected, after which the “OK” button is pressed. Go to the “Disk Cleanup” tab and click the “Clean up system files” button. Be sure to check the " Previous installations Windows" for all files to be deleted, then click the "OK" button. A message box will then appear where you simply click on “Delete Files”.
Also for complete removal a second or older version of Windows from your computer’s hard drive, a simple but very effective program called NanWick Windows Uninstaller is suitable.
Suitable for Windows Vista, Windows 7 and 8. Effectively removes unnecessary files, associated with previous versions of the OS and folders on all subpartitions of the disk and in the boot menu. After making copies of the necessary data, proceed to install the program through the installer.
Which can take up several gigabytes of disk space. Moreover, in the boot menu previous Windows versions continue to “hang”, offering the user to boot from them. In addition, they clog the PC hard drive and slow down its operation. So, how to remove old Windows?
Via the disk cleanup menu
You can remove the old version of Windows using the Disk Cleanup utility, which is available in all Microsoft operating systems, including Windows 10
Go to “Computer” and right-click on the icon of the section where the previous version was. Select “Properties”, then “Disk Cleanup”.
The system will begin scanning this partition for trash files; Among them will be the item “Previous Windows installations”
Make sure it is ticked.
Confirm deletion. Windows will ask you again if you want to continue the operation - click OK. After a few minutes, the utility will notify you that all trash files have been deleted.
The Disk Cleanup utility can be called in another way: left-click the “Start” manipulator and enter the word “Cleanup” in the search bar (works also for Windows 10/Windows 8.1). In the list that appears, select Disk Cleanup. Click the “Enter” button. The utility will prompt you to select the partition where the cleaning operation will be performed.
The previous version of Windows can be detected and removed using other cleaning programs. You can use, for example, CCleaner, latest version which was optimized for working with Windows 10. You can install other utilities – Glary Utilities, IOBit Advanced Care and so on. The main thing is that they support working with windows 10/8.1/7.
Removing the “windows.old” folder and adjusting the boot menu
It happens that neither a standard Windows cleaner nor a third-party one can find old files. This leads to the fact that the user has to look for the “windows.old” folder himself, delete it, and then, through the Windows boot configuration menu, disable the function of selecting a version that no longer exists. But for this you need to install system administrator rights
How to do it? It’s very simple: press the Win+R key combination, enter secpol.msc and click “Enter”. In the left menu that appears, double-click on “ Local policies", then - "Security Settings". After this, now in the right window, look for the item “Accounts: State “Administrator”. Double-click on it and switch from “Disabled” to “Enabled” and save the changes.
After this, you need to reboot and launch the new (not old!) version of the operating system. After the main stage Windows boot will prompt you to log in through two accounts, including an administrator account. We go through it. That's it, now you can play around with the system as a system administrator.
Now you need to use Explorer to go to the section where the “windows.old” folder is located and delete it. To do this, right-click on the icon of this folder and select “Properties”. Then you need to click on “Security” and then on “Advanced”. Among the proposed tabs, select “Owner”, click the “Change” button and select the account from which the deletion will be carried out. Save the changes with the “Apply” button and click “OK”.
A message will appear indicating that we have become the owner of this directory. Click "OK". You can now delete the “windows.old” folder (after moving it to the Trash) this catalog need to be removed from there too).
Now you need to go to the boot configuration menu. Press the Win+R key combination, enter msconfig and click “Enter”. Go to the “Download” tab and select previous versions of Windows. Click the “Delete” button
Often after installing the operating system, a Windows folder old. This happens when the disk was not formatted during installation, and a new version Windows was installed over the old one. This causes old Windows files to be saved in the folder Windows old. This folder takes up approximately 10 GB of hard drive space and cannot be deleted by normal means.
In this article we will tell you how to remove Windows old.
Method number 1.
The first and most in a simple way To remove the Windows old folder is to use the Disk Cleanup utility. If you don’t know how to delete the Windows old folder, it’s better to use this method.
There are several ways to run this program:
- Launch the Start menu and follow the path: All Programs - Accessories - System Tools - Disk Cleanup. This method is not suitable for Windows 8.
- Open the Start menu or Start screen tiles (if you have Windows 8) and search for “Disk Cleanup.” After this, the system will prompt you to run this program. When the program starts, select the drive where Windows is installed (and the Windows old folder is located).
- Open the “Computer” window and right-click on the drive on which Windows is installed (usually drive C:). In the context menu that opens, select “Properties”. After this, a window with disk properties should open; here you need to click on the “Disk Cleanup” button.
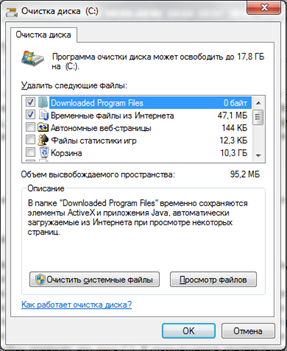
After launching Disk Cleanup, you will be asked to select files to delete. In this list you need to find the item “Previous Windows installations”. Check the box next to this item and click OK. After this, the system will perform a disk cleanup and the Windows old folder will be deleted.
Method number 2.
If the method using the Disk Cleanup utility does not work for you, you can delete the Windows old folder manually. To do this, you need to obtain rights to access it.
In order to manually delete the Windows old folder, you need to fulfill two conditions:
- You need to delete the Windows old folder from under account Administrator.
- The Administrator account must have full access to the Windows old folder.
First, we need to log in as an Administrator. Next, open the disk on which the Windows old folder is located and right-click on it. After that, launch the “Properties” menu. After the “Properties” menu is open, do the following operations:
Go to the tab called “Security”.
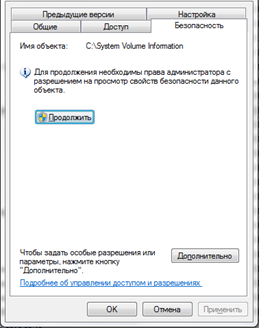
Click on the “Advanced” button.
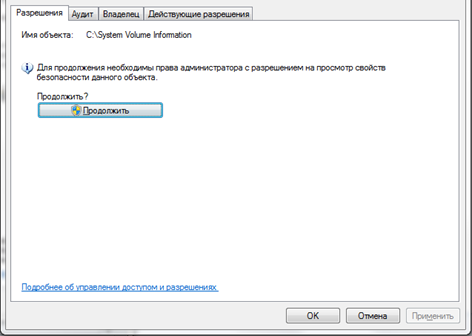
Go to the “Owner” tab.
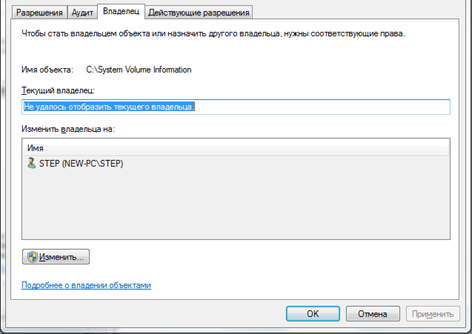
Click on the “Change” button.
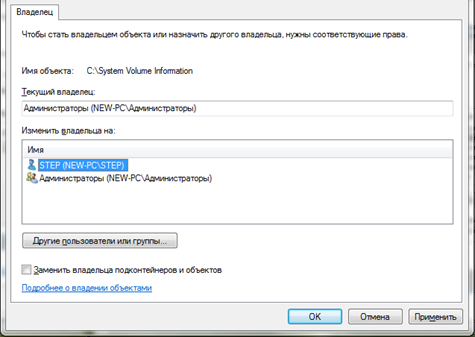
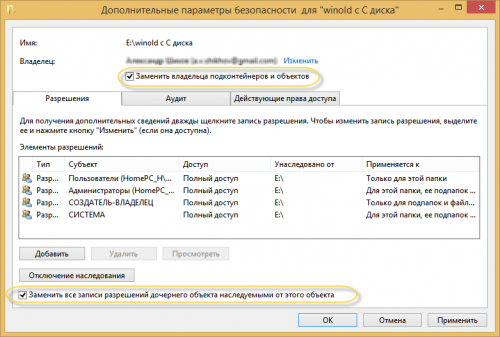
In the window that opens, click on the account of the new folder owner and check the box next to “Replace owner of subcontainers and objects.”
Close the last window by clicking on the “Ok” button. After that, go to the “permissions” tab and click on the “Change” button.
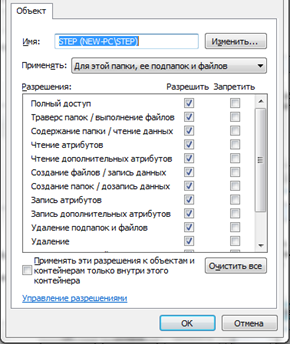
In the window that opens, select “apply for this folder, its subfolders and files” from the drop-down list and check the box next to “Full control”. Close the last window by clicking on the “OK” button.
After this you will return to the previous window. Here you need to check the boxes next to the items: “add permissions inherited from parent objects” and “replace all inherited permissions for all descendants with new inheritable permissions from this object.” After this, you need to close all windows by clicking on the “OK” button.
Once you have completed these manipulations with the Windows old folder, you can delete it by simply clicking on the “Delete” button.
For many PC users, often after updating or Windows reinstallation the "Windows.old" directory appears if, for example, you upgrade Windows 8 to Windows 10. This folder stores all files of the previous OS, as well as all user and program files. All this information takes up a lot of space on your hard drive. Depending on the amount of user data of the previous OS, in some cases this directory can reach tens of gigabytes. Therefore, we will try to understand this issue in detail.
The system saves previous version For further opportunity to return to her(perform the so-called Downgrade). As a rule, this opportunity is temporary, and if you do not use it, the folder will be deleted automatically.
Figure 8 removal process
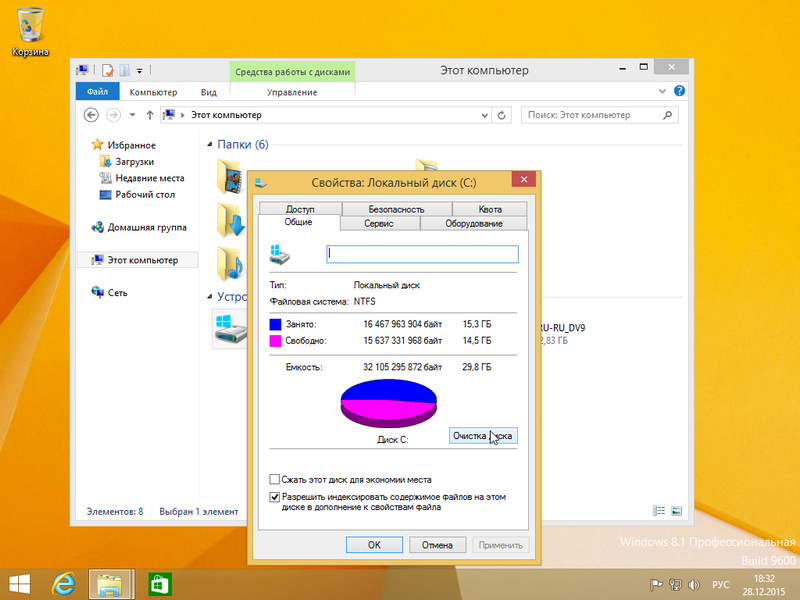
Let's look at an example of deleting the "Windows.old" directory after upgrading Windows 7 to Windows 8. To do this let's go to our local drives by pressing Win + E. Choose local disk With installed Windows and go to its properties, as shown in the figure.
In the disk properties window, click the button.
The Disk Cleanup analysis window should appear.
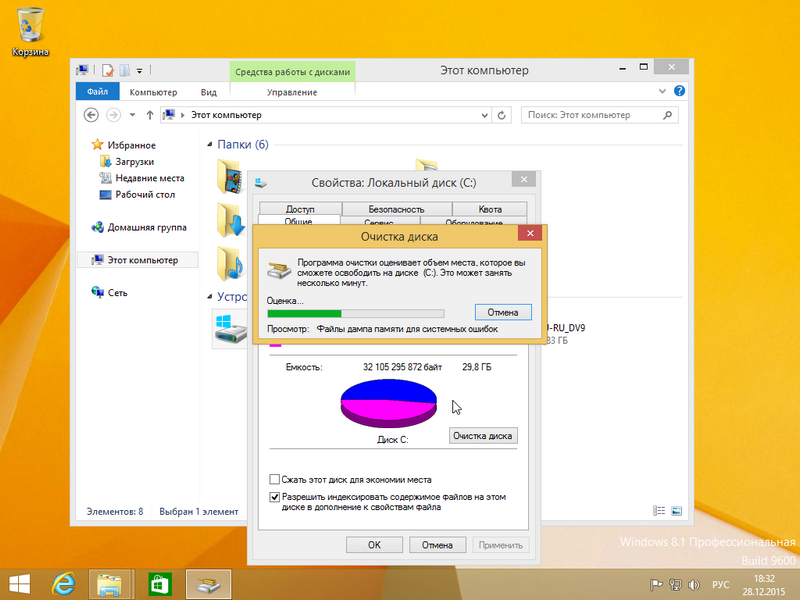
After this, the “Disk Cleanup (C:)” window will appear, where you should press the key Clean system files.

If you click this button, the system will estimate the volume of files being deleted, and we can move on to the next window. Here you need to check one box, as shown in the figure.
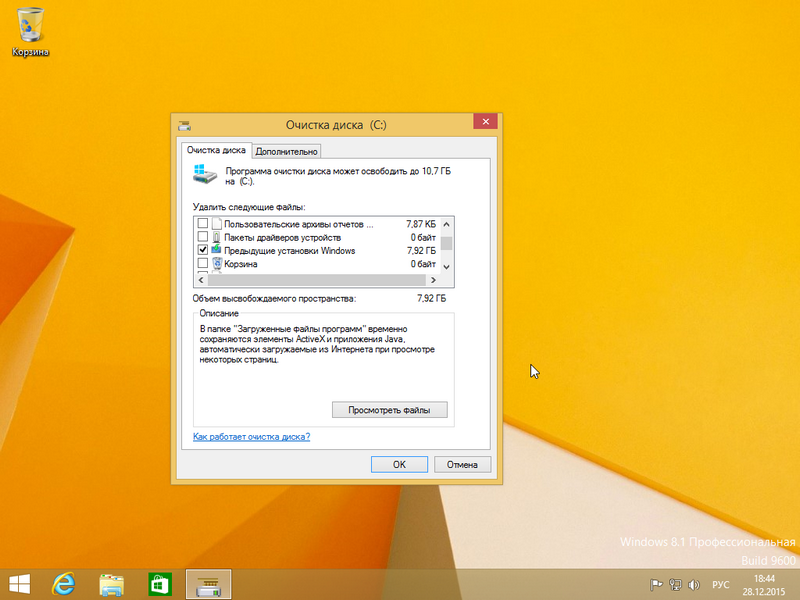
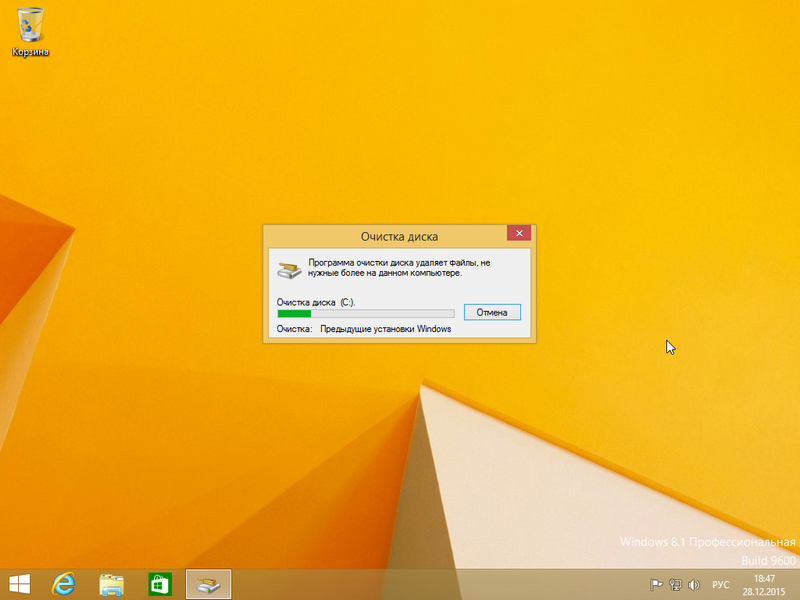
In our case, the files of the previous OS are 7.92 GB. Once the appropriate item is selected, you can safely press the OK button. Disk Cleanup will start, which will delete all files from the previous OS.
The process of deleting a folder in the top ten
Deleting a directory in 10 is very similar to the process of erasing a folder in 8. We also go to the explorer. Select the local drive “C:/” and go to its properties.
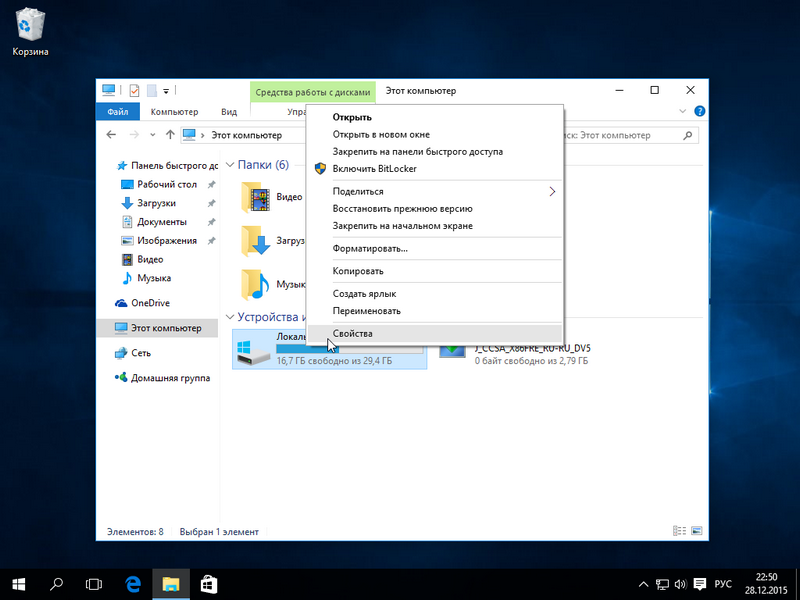
We also click on the button.

After clicking on the button, we will see the same window as on the figure eight, only a slightly different design.
Press the same key Clean system files and move on to the next window.
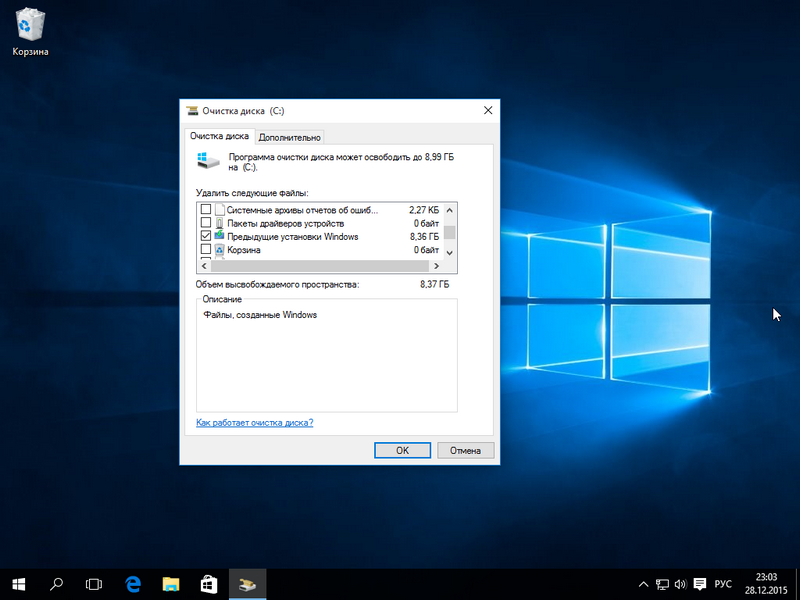
Select the same checkbox and click OK.
As you can see, the process is similar to the first one with the eighth version of Windows. In this example we have 8.36 GB freed, which is a good result.
You should also remember that when you delete the “Windows.old” directory, user data and files are erased installed programs. The structure of subfolders with files from the previous OS is shown below.
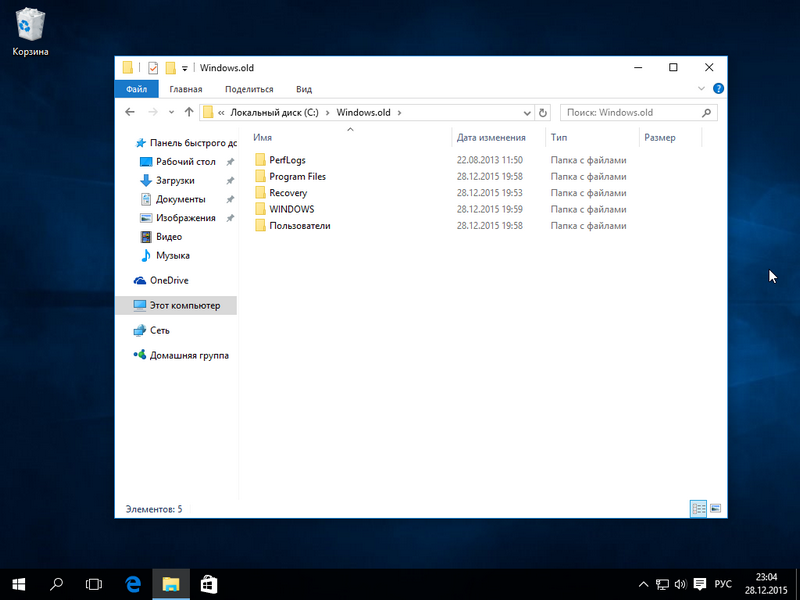
These files can be multimedia data, Word documents or Excel. Therefore, before deleting this folder, you should save the important data contained in it.
Removing the Windows.old folder using CCleaner
The best option is a system cleaning program CCleaner. This program can be downloaded for free from the official website www.piriform.com/ccleaner. Installing the program is quite simple and even a novice PC user can handle it. After starting the program, you should select the item “Cleaning” in the “Cleaning” tab. Old Windows installation " as shown below.

Now click the Analyze button. This is necessary for CCleaner to analyze the files that need to be cleaned and display them full list into the program window. In the figure below, the line containing files from the “Windows.old” directory is highlighted.
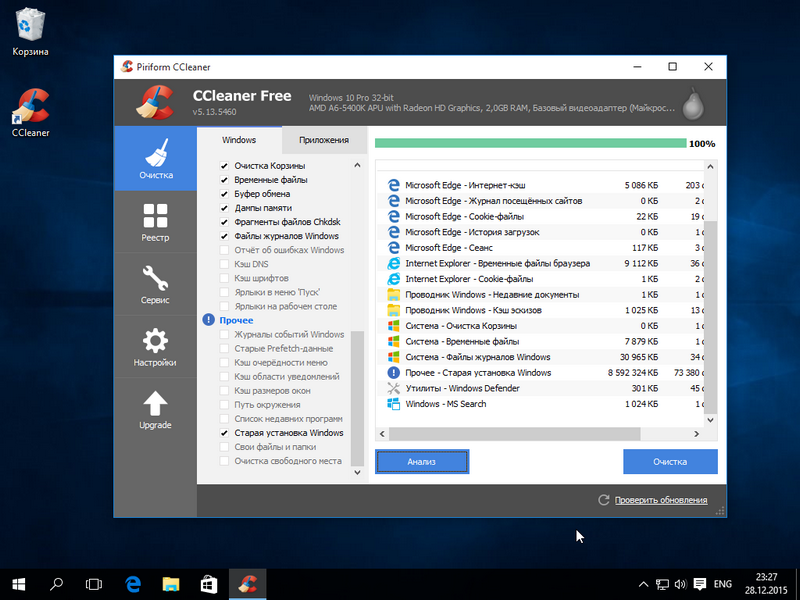
After clicking the Cleanup button, the program will completely delete the files of the old OS.
Manual removal
Now we will describe the manual deletion process, that is, if you deleted a directory using the Delete key. After deleting a folder using the Delete key, you can see the following message.
This message means that we do not have permission to delete this directory. To correctly set the appropriate rights, go to the folder properties on the tab " Safety».

Now click on the Advanced button. You should be taken to the Additional Security window for this folder.
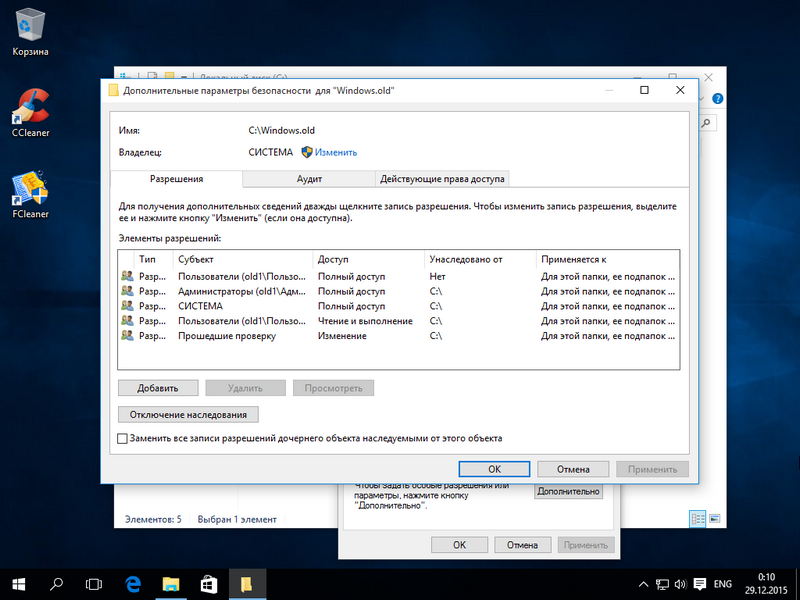
As you can see from the picture, the owner of our folder is “ SYSTEM" Therefore, you need to select the owner of the user with whom you logged into the system and click the Apply button. After applying the rights, you can delete “Windows.old” using Explorer with the Delete key.
Removal using TakeOwnershipPro
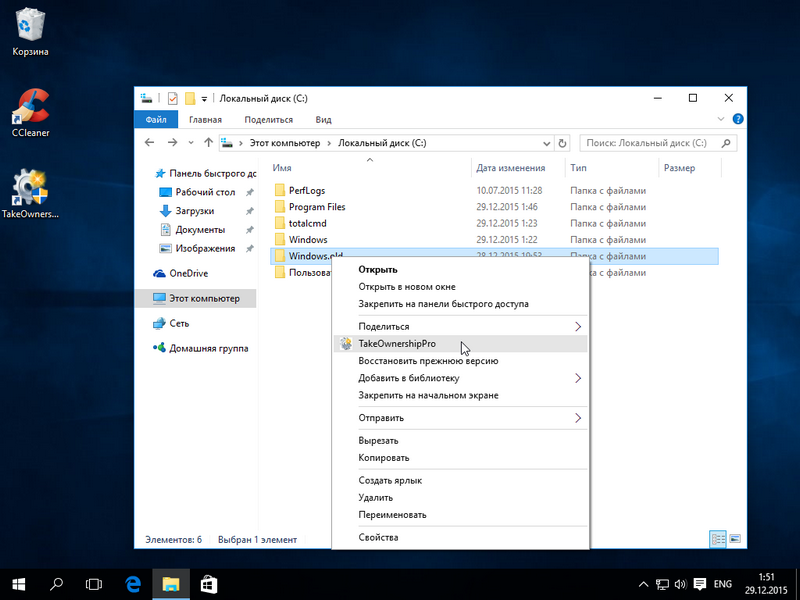
You can delete the “Windows.old” directory using a simple utility TakeOwnershipPro, which you can download from http://www.top-password.com/download.html. After installing the utility it will appear as a separate item in the Explorer context menu A. To delete a directory, go to context menu for the folder to be deleted and select the item “ TakeOwnershipPro».
After clicking, a program window will launch where it will scan and assign rights to files and directories in order to subsequently remove them.
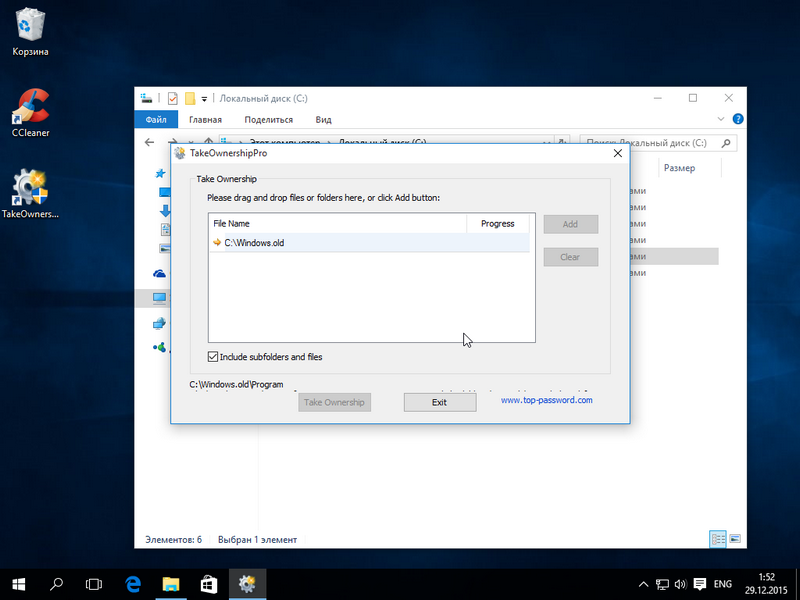
The scan may take two minutes or longer, depending on the size of the folder being deleted. After waiting for the scan to complete, click the Take Ownership button. After which the folder will be permanently deleted in about two minutes.
Conclusion
After reading this material, you should no longer be wondering why I can’t delete the “Windows.old” folder. By doing this, you will free up gigabytes of free space on your hard drive. I would also like to remind you that by deleting this directory, you delete all user data from the previous OS. Therefore, if necessary, you need to do backups this data.
Video on the topic
After installing a new operating system on top of or in parallel (in another partition) the previous one, the question arises of how to get rid of the remnants of the old version. Legacy Windows, if it is installed on the same partition, it gets the name Windows.old and does not interfere with the main system. If old operating system installed in another partition, the folder name remains the same, but this also does not interfere with the new system. Everything seems to be fine, but there are two problems. Firstly, the old system takes up useful space and the volume can be more than impressive. Secondly, it is present in the boot menu, which we see when we turn on the computer. How to get rid of old Windows?
Why can't you just delete old files?
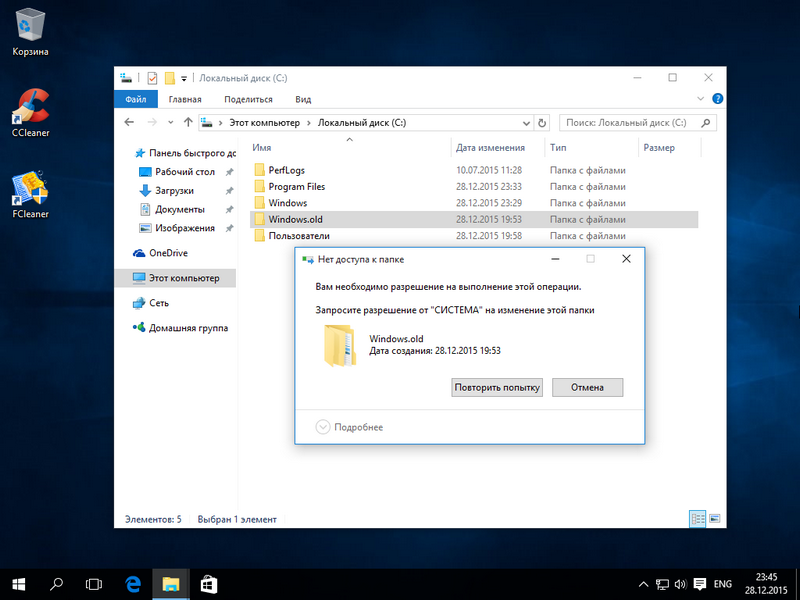
Old system files cannot be simply deleted. The user doesn't have access to the folder. current version Windows. Usually this message appears.
Attention! Proceed with deleting old Windows directories and Program Files only after you have transferred all their data to the new Windows!
If the new system is installed on the same partition as the old one
In this case, we just need to clean out the old system files, including the Windows.old folder. To do this, we use the Disk Cleanup program, which is included with the operating system. can be found on the Microsoft website.
By the way, you can delete a number of other service files in the same way.
If the new system is installed on a different partition
Removing old Windows from the boot menu
To restore order in the boot menu, open “ Extra options system" (to do this, click Win-Pause and select the item of the same name).
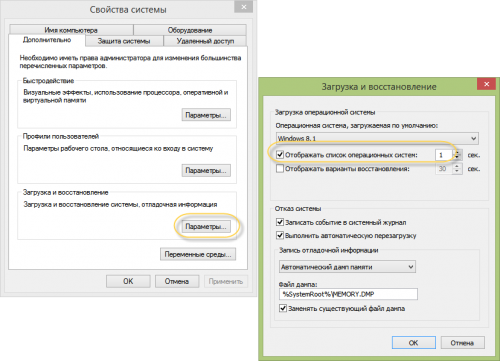
Now uncheck the “Display list of systems...” checkbox. All: the old operating system will not appear in the boot menu when the computer starts.
For those who like to control all launch parameters, we offer a method with direct editing of this menu. Press Win+R and write msconfig in the window that appears.
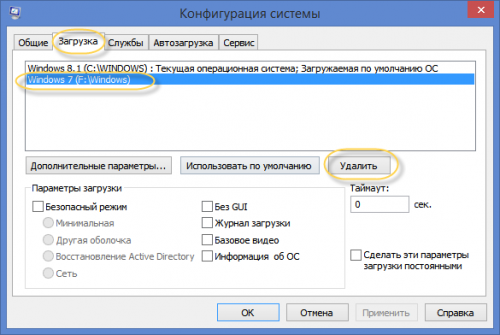
We simply remove the old system from the list.
Removing old system files
Now let’s move on to deleting the Windows directory of the old system itself. To do this, find it on the disk and open the folder properties.
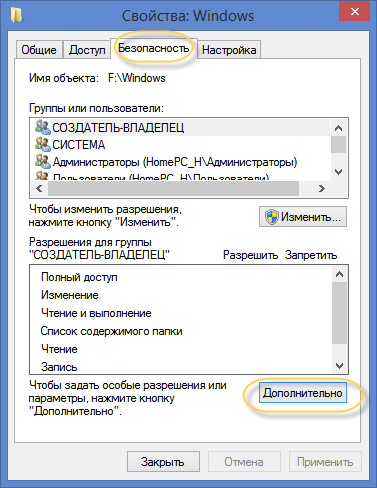
Here we select “Security” and click on the “Advanced” button.
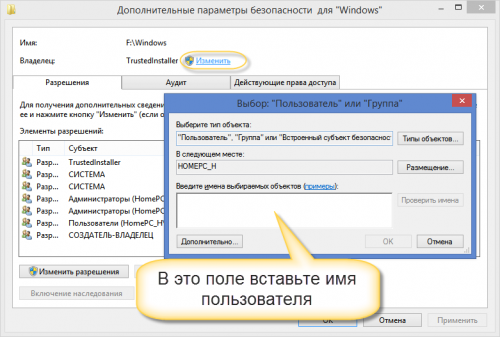
To become the owner of the folder, enter the username under which you work in the field indicated in the picture.
Don’t forget to check the “Replace owner of subcontainers and objects” and “Replace all records...” checkboxes, click OK.
You are now the owner of the folder and have the power to delete the directory. During deletion, a message like this may appear.
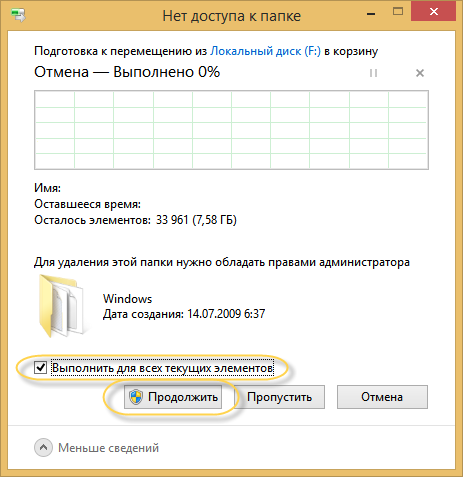
Check the “Run for everyone...” checkbox and click Continue.
Remember that after deleting old system files the way back will be closed. So don't rush into this. First, make sure that all the programs and data you need are transferred to the new system.


