Many newly minted laptop owners often wonder how to enter the BIOS on a laptop computer. In this case, the procedure is significantly different from that used for conventional system units. There, for this purpose, when you boot your computer, you just need to press the Del key.
On laptops, different options can be used.
They will depend not only on the manufacturer, but also on specific model. Therefore, if you need to adjust the BIOS settings, you will have to work hard. The situation is further complicated by the fact that entire key combinations can be used to enter BIOS mode. The most complex button combinations are used in portable computers manufactured Samsung.
They do not always have an extended keyboard. The set of function keys in such laptops ends with the F10 button, and to enter the BIOS, you must press F12. In this case, you can use the Fn key, which is designed to change the keyboard layout. Advanced users should be aware of this, but for beginners, this issue may cause certain problems.
There is another subtlety that should be considered when working with the BIOS. Before making any changes to the basic settings, it is best to first write them down on paper. If you set incorrect parameters, your computer may stop booting altogether, for example, if the list of devices to boot is empty. Using your records, you can easily return the system to its original state and restore the device to working order.
What is a BIOS?
Before entering BIOS system on a laptop, you need to figure out why it is needed at all. Literally, the abbreviation BIOS can be translated as "basic input / output system." If we talk about the physical implementation, then the BIOS is a microcircuit with volatile memory installed on the computer motherboard.
To keep this chip running, a battery is required. This chip stores information that is necessary for testing and booting the computer. If the laptop is working fine, then there is no point in changing BIOS settings. However, if a malfunction occurs or the operating system BIOS is simply not enough. The main section of the BIOS is the boot source menu or Boot Priority. This menu sets the priority of devices that can be downloaded. Therefore, when reinstalling the OS, it will not be possible to do without entering this section.
Main BIOS sections
Until recently, the BIOS menu structure consisted of a huge number of items. It will be quite difficult for an inexperienced user to understand the meaning of each item. In addition, many manufacturers prefer to change these items at their discretion. Today the situation has changed radically. The process of working with the BIOS has been standardized, which made it possible to significantly simplify the process of working with basic settings. Even a novice user can now easily cope with this task. In most cases today, BIOS items include the following sections:
1. MAIN - current time and date, list of connected media and their characteristics;
2. ADVANCED - advanced system settings (SATA, CPU, PCI). It is better to undertake the correction of this section, having certain knowledge and skills of working with a computer.
3. POWER - allows you to determine the value of temperature and voltage at the moment.
4. BOOT - this section establishes the procedure for using boot sources used when reinstalling the operating system.
5. SECURITY - contains passwords for accessing the BIOS and other PC resources. If you have set a password in this section, it is better not to forget it. Log in daily basic settings is not required, so the password can be easily forgotten. If you need to work with the BIOS, you simply will not be able to log in due to the lack of a password. To reset the password on a laptop, you need to perform quite complex technological operations.
6. EXIT - this section indicates options for exiting the basic settings. Also in this section, the possibility of returning all values to their original state is implemented.
The most important BIOS section among those listed is the ADVANCED section, it is recommended to be used only by well-trained PC users. If incorrect parameters are set in this section, a complete loss of computer performance may occur. Also, without basic preparation, it is not recommended to change anything in the BOOT section. Be sure to take this into account when working with the BIOS. A rather problematic item is also the SECURITY section. If you set a password in this section, then it is better not to rely on your memory, but write it down somewhere. The remaining sections of the BIOS should not cause any particular difficulties. Even an inexperienced user who has just begun to get acquainted with computer technology can work with them.
Notebook BIOS Features different manufacturers
Sometimes the way to enter the BIOS depends on the manufacturer of the device. To date, the main manufacturers of such products are:
— Award BIOS: was the main supplier of these products until recently, but lost its leading position and was absorbed by another development company - Phoenix BIOS.
- AMI BIOS: is the main supplier of BIOS chips today.
Phoenix BIOS.
The products of the manufacturers listed above can often be found on desktop computers. For laptop manufacturers, it is important to optimize the process of managing a laptop computer. Therefore, each manufacturer prefers to develop its own unique BIOS access procedure. There are even cases when the procedure for entering the BIOS is different for different models of laptops from the same manufacturer. As a rule, all information that may be of interest to the user appears in the first window during the download process. personal computer.
You need to find the phrase "Press ... to Setup". Most often, instead of three points, F10, F2 or Del is found. Function keys or various combinations can also be used for these purposes. Information of interest to the user may also be hidden behind the manufacturer's logo. This option is also set in the BIOS. To remove it, you need to press Esc. It is important to consider one feature: you can enter the BIOS only during the start of the download and testing. In a running OS, you will not be able to enter the BIOS.
Entering the BIOS on an HP laptop
Let's try to figure out how to enter the BIOS on an HP laptop. This company until recently held a leading position in the segment of portable computers. Today, it has been supplanted by Lenovo in terms of the number of products sold. But the quality of HP products remained on top. How to enter the BIOS on an HP laptop? To do this, use the function key F10. Most devices from this manufacturer use this function button to enter the BIOS.
Thus, to access the BIOS on HP laptops, simply press F10 at the start of the boot. If you want to change the boot order priority, press the F9 button at the same time. As a result, a menu with a list of available devices should open. IN this menu you need to select the device you are interested in and press "Enter". To quickly return to the main menu on HP devices, you must use the Esc button.
Entering the BIOS on a laptop Lenovo
Now let's see how you can enter the BIOS if you are using a Lenovo laptop. This manufacturer, unfortunately, does not pay much attention to standardization, so it is quite difficult to give an unambiguous answer to the question of how to enter the BIOS. IN different models the keys F1, F2 and Del can be used for this purpose. You can get information for each specific model by studying the instruction manual. As a last resort, you can try to use the selection method at the stage of testing the laptop.
Each key requires a separate download, otherwise it will be difficult to find the answer to the question of which key to press when booting Lenovo laptop to get into the BIOS. You can try to quickly press each key and access the BIOS, but in this case it will be difficult to determine which of the keys worked. Remember that you should only perform such actions when you restart or start your personal computer. During operation, it is impossible to get into the BIOS.
Entering the BIOS on a Samsung laptop
The most difficult will be for users using Samsung products. To enter the BIOS on a laptop from this manufacturer, you can use three key options - F12, F4 and F2. There should be no problems with the last two - they are all on the standard keyboard. But the first option can cause some difficulties. Not every laptop has a full keyboard. For optimization appearance The device manufacturer often uses a truncated version of the keyboard.
In this case, the device may only have function keys F1 to F10. The last two keys of the standard keyboard - F11 and F12 can be combined with F9 and F10, respectively. As a result, access to the BIOS is significantly more complicated. Thus, to enter the BIOS on a Samsung laptop, you need to press not one button, but a whole combination. In the message that is displayed when the download starts, we will talk about only one key - F12.
Experienced users should realize that to switch the input mode, you need to press the Fn function key. That is, to enter the BIOS, you must first press the Fn button, and then, without releasing it, press F12. The Fn key is usually located on the bottom row of the keyboard, not far from the Win key. The main purpose of this key is to switch the keyboard layout. When it is released, one input option works on the keyboard (symbols are shown in the right upper corner keys), and when pressed - the second input option (symbols are shown in the center or right corner).
To make it easier to work with the Fn key, the manufacturer usually uses the same colors in the design of the function button and the layout activated by it (this can be red or blue). Now we can draw some conclusions. To enter the BIOS on different models of Samsung laptops, when you turn on and an information message appears on the screen, press exactly the key or combination that is indicated in the device's instruction manual.
Entering the BIOS on a laptop Sony
Entering BIOS mode on a Sony laptop is not easy. Everything will depend on the age of the device. On older models, the F2 key is usually used, on new ones, F3. Try using these buttons to enter the BIOS. If at the stage of testing the system you press the desired key, then you will be able to enter the settings. If you do not know which key to use to enter the BIOS, try to study the operating documentation or look at the messages that appear when the PC boots up (pay attention to the phrase "Press ... to Setup").
The key you are interested in will be listed between the first and third word. On some devices, the company logo appears at this stage. To remove it, just press Esc. If you have time to press the desired button, you can enter the BIOS. Otherwise, you will have to reboot the system again and press the button to enter the BIOS when the manufacturer's logo appears.
Entering the BIOS on an Acer laptop
Let's figure out how to enter the BIOS on Acer laptops. By default, in the basic settings of devices from this manufacturer, an option is set that displays the company logo on the screen. This makes things a little more difficult. To remove the splash screen, press the Esc button. After that, you need to have time to notice the conditions for entering the BIOS. As a rule, on older models, the key combination Ctrl + Alt + Esc is used for this purpose, and on newer devices, the F2 key. From the first time you may not have time to press the desired combination. In this case, simply reboot your device and try again. After that, you will easily access the BIOS.
Studying documentation
Another way to find a way to enter the BIOS is to study the operating documentation. Usually, a laptop comes with a disk, which, in addition to all the necessary drivers, contains an instruction manual. This document should describe in detail the mechanism for entering the basic settings, indicating all the necessary keys and their combinations. This information you can write it down somewhere, in the future it will most likely be useful to you.
Searching on the Internet
This method is universal. Using it, you can easily learn how to enter the BIOS on a laptop, netbook or desktop computer. If it was not possible to find out the procedure for entering the BIOS with all the above methods, and the documentation set was lost, you can try to go to the official website of the device manufacturer and download the instruction manual from there. in electronic format. To study the manual, you will probably need a program for working with documents in PDF format, such as Adobe Reader.
You can also download it on the Internet from the official website of the developer company. After that, the program must be installed on your computer. Now you can easily open the user manual and find the section you are interested in. After performing all the necessary operations in the BIOS, you need to restart the computer.
Conclusion
In this review, attention was mainly paid to working with the BIOS on laptops from different manufacturers. Using simple recommendations, even an inexperienced PC user can cope with this task. the main problem in solving this problem is associated with the lack of unification. Each manufacturer imposes on the user their own procedure for entering the BIOS.
Replaced BIOS new generation of systems UEFI complicated the process of penetrating the holy of holies on laptops. Gone are the days when each user could easily get there by restarting the computer and pressing the Delete button. Or, if this did not help, press some other keys from the functional group - F6, F8 or others.
This article will discuss how on modern PCs or laptops with modern operating systems such as Windows 8 or Windows 10 enter BIOS. It looks like you are already desperate, asking yourself the question - is this even possible on your laptop? Maybe you don't have any BIOS?
Do not be afraid! Now you can easily and simply perform the necessary actions. We will do this using the example of a SAMSUNG NP350V5C laptop with Windows 8 installed on it.
We will also look at how you can update the BIOS, and at the end of the article there is a video on how to do it. setting before installing Windows 7 or 8.
Let's divide the BIOS startup process into 2 stages. So let's go...
Stage 1: how to enter the boot menu
There are two fundamentally different ways.
First- by using custom reboot laptop. This is the recommended way.
Second useful as a last resort if you cannot log in to complete the settings of the first method.
Correct reboot option
Just move your mouse vertically along the right edge of the screen - until a pop-up menu appears. You can also call it using the keyboard by pressing Win + C.
How far has the manufacturer dragged this option!
Now click " Recovery"and here it is - the cherished item" Special download options"- click on " Reload Now».
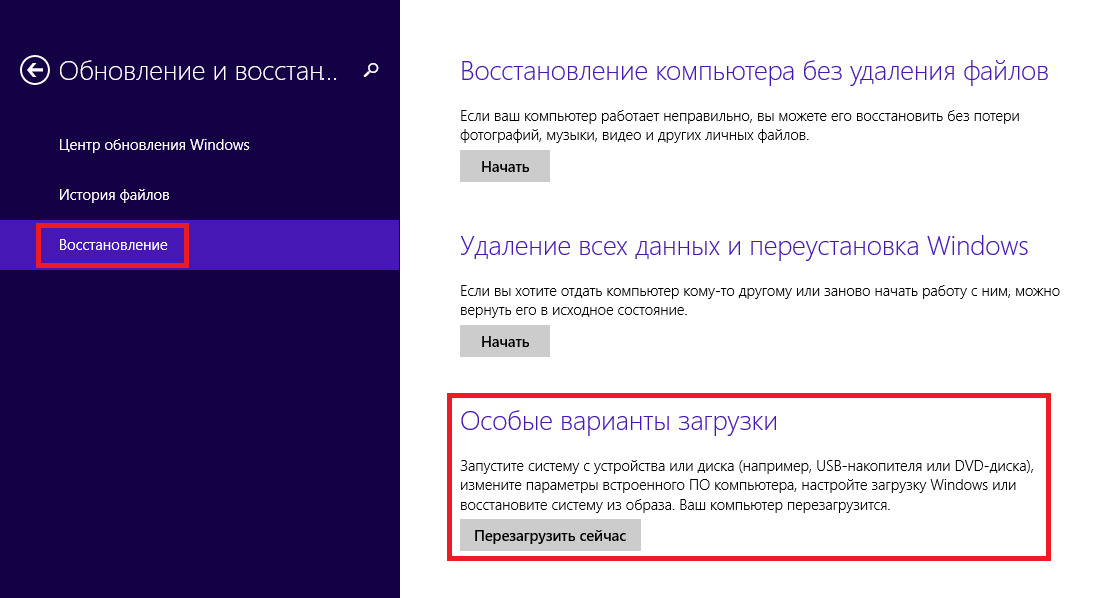
Your Samsung (or whatever you have) will dutifully reboot and end up in the boot menu.
extreme method
I used this method once when my laptop had a major crash after updating one of the apps. The laptop hung at the start and did not want to issue an authorization window. Therefore, I could not login to reload with specific options.
I needed to do this to restore the system, but if you have the same problem, it will help you enter the BIOS.
I warn you! Use this method only as a last resort, when there are no other ways.
It is done like this (I performed these steps on a Samsung product):
- You connect your laptop to the network
- You start the system.
- Turn off (remove) battery- the laptop continues to work.
- Disconnect your laptop from the network.
- Wait a little while.
- Connect the battery.
- Turn on the network.
- Start by pressing the power button.
- After these steps, you will find yourself in the system boot menu.
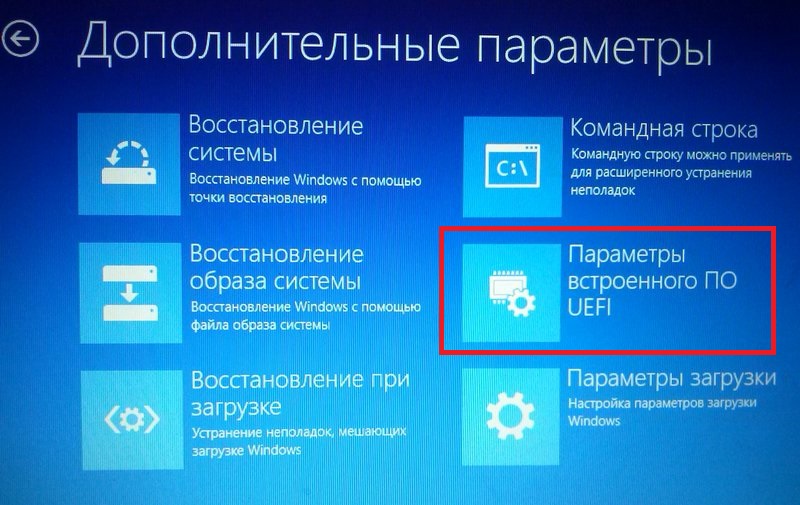
Stage 2: BIOS start
If you did everything correctly, then you will see the system boot menu, in which you should click on the "" item.
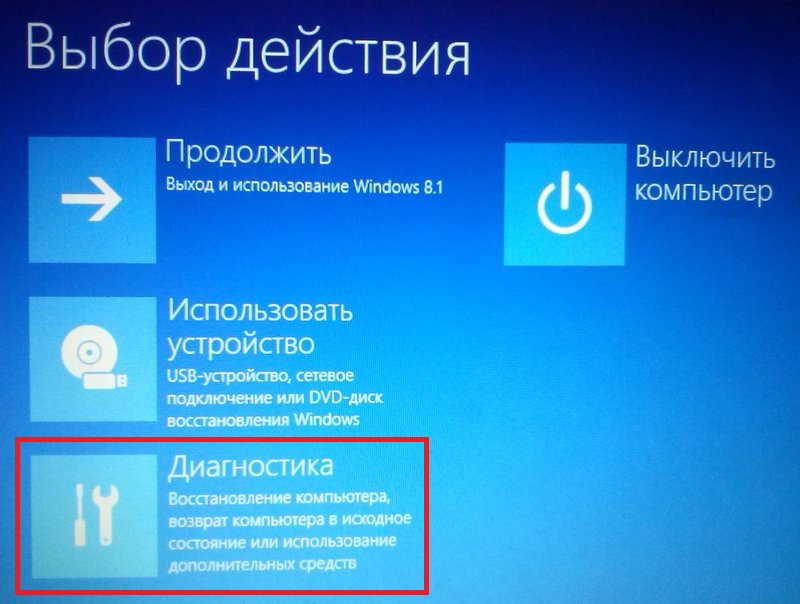

And then - on ""
We proceed to the final phase of the launch - click " Reload».

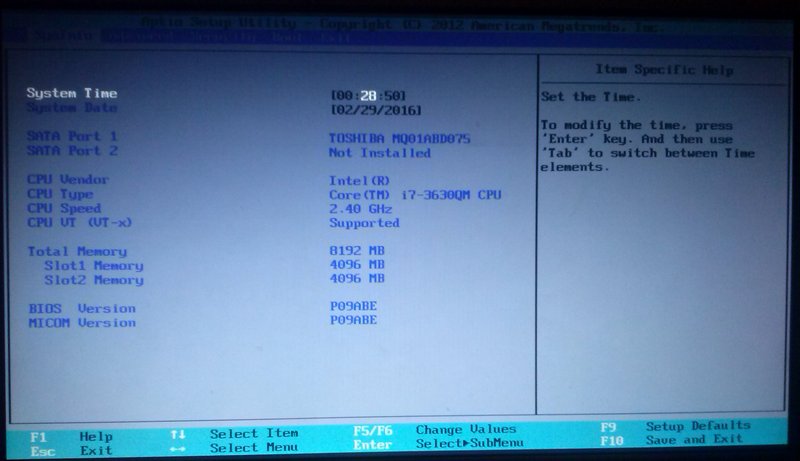
The screen will turn off and after a short (or maybe long) time you will see the BIOS screen:
BIOS update
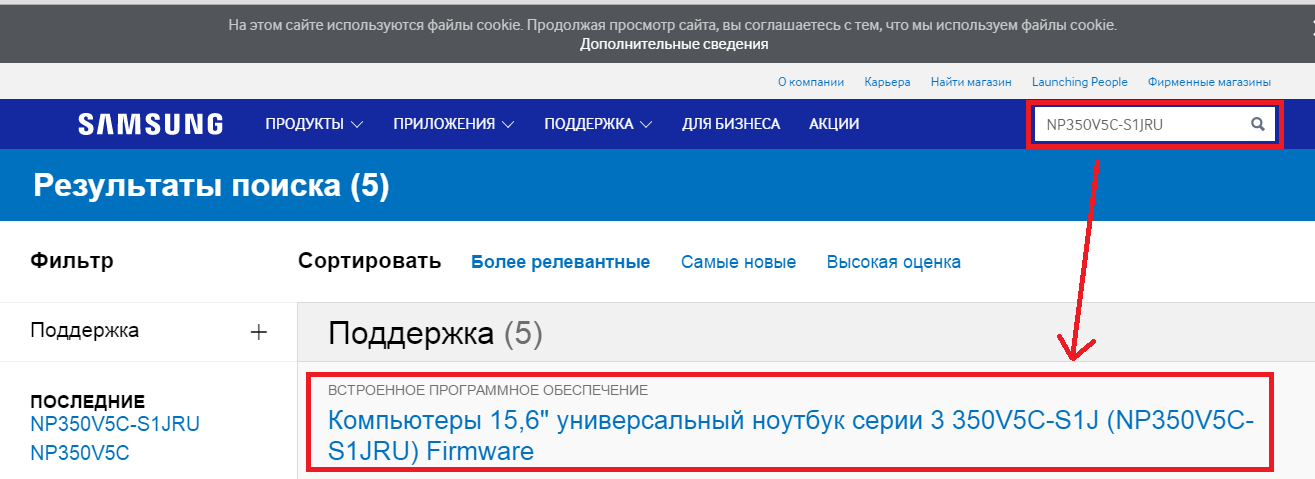
In my case, in the browser you need to go to the Samsung website and enter the full model name (written on the bottom of the laptop case): NP350V5C-S1JRU
After pressing the Enter button, a list appears in which we select an item from the category " Embedded software»
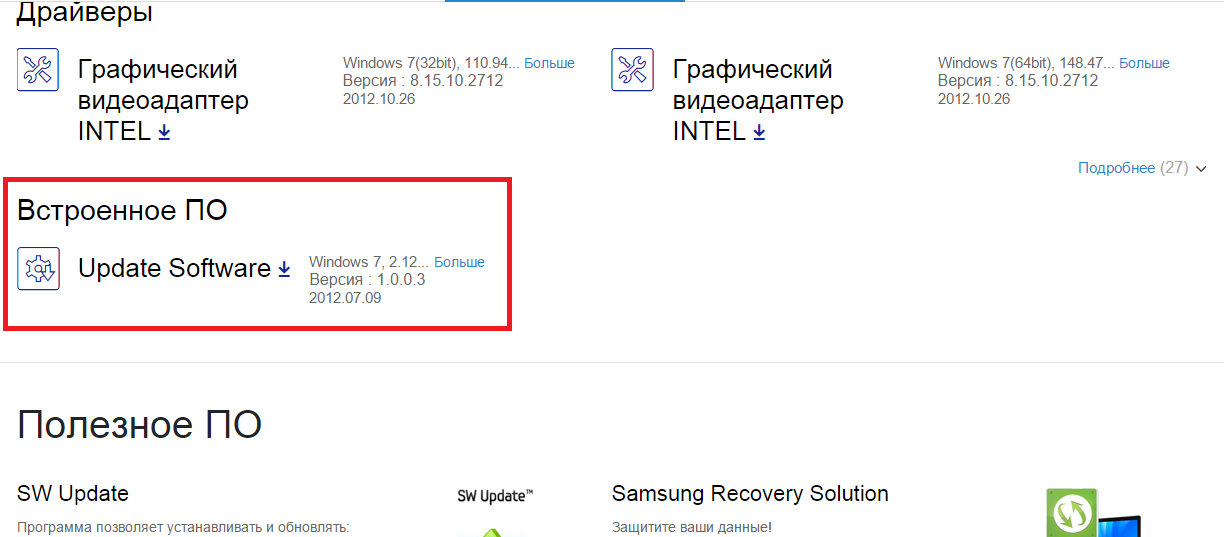
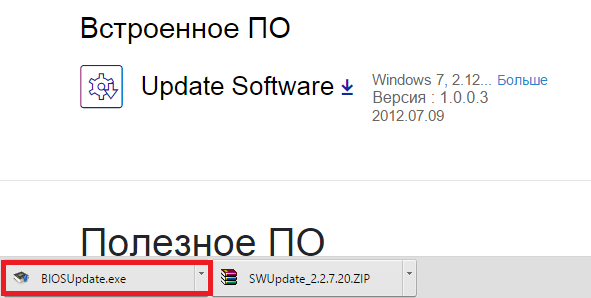
Since I downloaded it from the official Samsung website, I can safely run it
 and update the BIOS of the laptop:
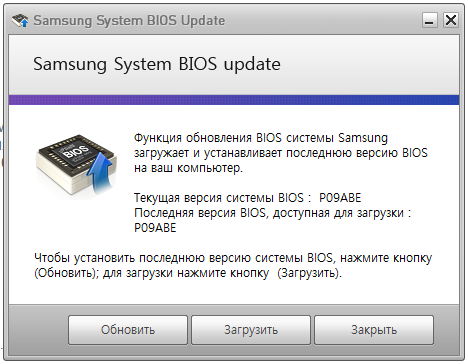
In my case already installed Last update. If you have available a new version you just have to press the last button to update the BIOS.
Related video BIOS setup for installing Windows 7 or 8
How to enter laptop BIOS Samsung?
Master's response:
Even for one laptop manufacturer, BIOS entry commands are completely different. This is due to the fact that they have various models motherboards.
When you turn on the laptop, press Pause to view the text on the screen. It is worth paying attention to the inscription Press F2 to enter setur. Of course, instead of F2, there can be almost any key or even a keyboard shortcut. The most widely used ones are F1, F2, F8, Esc, F10, F11, F12, etc. You can also use the selection method. To exit pause mode, press Enter.
Find out on the Internet all possible information about the model motherboard. And you can find out the marking by opening the properties of the computer by right-clicking on the Start menu item. Open the "Hardware" tab in the window that opens. Then open the device manager, in the list of configurations, find your motherboard. Write down its name and make a request for it in the browser, and do not forget to add to enter setur / Bios in the search bar.
Some older models have information about system board this computer on the sticker on which the laptop model is written, also check the back of the computer for such information. Also check the battery compartment by removing the battery first.
To navigate through the menu items in the BIOS program, use the arrow keys. To change any parameter value, the minus and plus buttons are usually used, but this depends on the motherboard model.
When making any changes to the BIOS settings, be very careful, because this program Responsible for all laptop operation. If, after the changes made, problems with the operation of the laptop began, then you can restore the initial value using the command written at the bottom of the BIOS system window.
More helpful advice you: do not change the BIOS settings if you have no idea what the consequences will be.
To install an operating Windows systems version 7 or 8, generally used as a distribution media installation CD, and more and more often nowadays USB Flash carrier.
Create a bootable flash drive for installation Windows 7, 8, XP , you can do it yourself, according to THIS instruction.
In order for the laptop to start loading initially from an optical media or flash drive, you need to make small settings in the BIOS, and this can be done by a user with absolutely any level of computer literacy.
Before starting the BIOS setup of the Samsung RV520 laptop, you need to insert the USB flash drive into the USB connector.
To enter the BIOS of a Samsung RV520 laptop, the same method is used as on most laptops from other models of this manufacturer, you need to turn on the laptop and press the F2 key.
Entering the BIOS of the laptop, we find ourselves on a page with general information about the system.
Then go to the tab responsible for the download - "Boot".
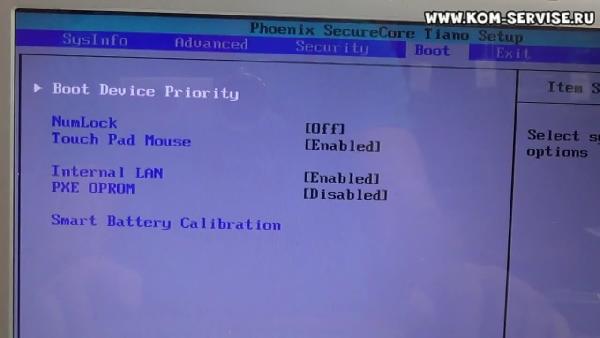
In this tab, we are interested in the first item "Boot Device Priority", where, in fact, we go by pressing the enter button.
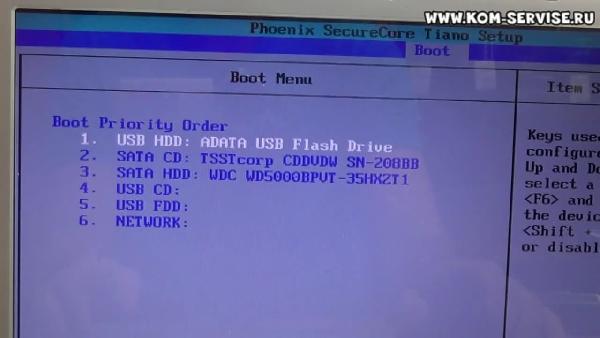
We find ourselves on a page with a list of devices installed in the system, including our flash drive, which was inserted into the laptop's connector before entering the BIOS, and using the f5 and f6 keys we rearrange the position we need to the first place.
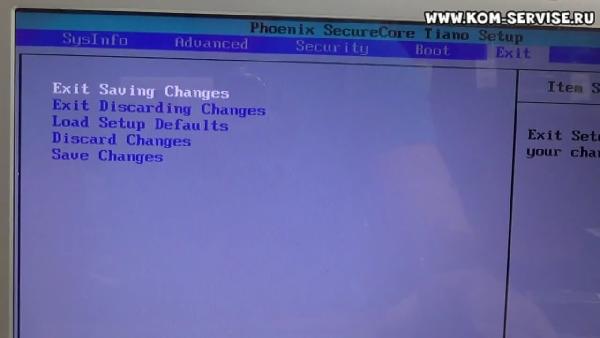
We exit the menu with the ESC key and go to the Exit tab where we save the changes we have made and exit the BIOS.
Video instruction on how to independently configure the BIOS of a SAMSUNG RV520 laptop for WINDOWS installations 7 from flash drive.
How is it happening? It's very simple friends! On latest Samsung laptops, there are several new BIOS options ("Fast BIOS Mode" and " secure boot"), which are directly related to the ability to boot a laptop from a USB flash drive or disk. Samsung suddenly decided to protect the boot of a new operating Windows systems 8 from some kind of virus or from the owners of the laptop themselves, that's how you like it. Naturally, many users immediately had questions.
A friend of mine wished to boot a Samsung laptop from bootable flash drive containing the program Reserve copy Acronis to backup Windows 8, but it didn't work. The other one decided and also got stuck at the very beginning, he just couldn’t find his flash drive anywhere, neither in the BIOS, nor in the laptop’s boot menu. After he tried five flash drives, he flew to me with bulging eyes and said that his new laptop could not be loaded either from a disk or from a flash drive. In short, I had to figure it all out, and if you also find yourself in the same situation, read our article.
Booting a Samsung laptop from a flash drive
If you suddenly want boot samsung laptop from flash drive, then you will try to enter boot menu laptop using the F10 key at boot and select your connected USB flash drive there, but nothing will work for you, because first of all, you need to make small changes in the laptop BIOS settings.We turn on the laptop and immediately press F2 at boot, enter the BIOS, go to the Advanced section and set the Fast BIOS Mode parameter to Disabled.

Then we go to the section Boot, we are interested in the option " Secure Boot»,

put it also in the position " Disabled"And press" Enter "

There is a warning about the possibility of loading a laptop with an error.
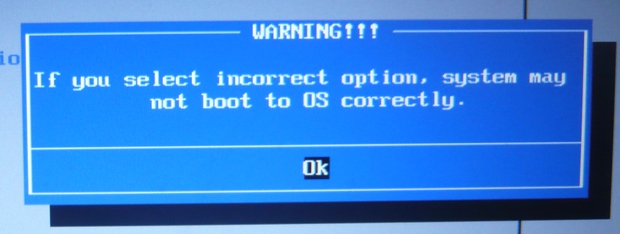
We agree, press " Enter». Below appears additional parameter OS Mode Selection,
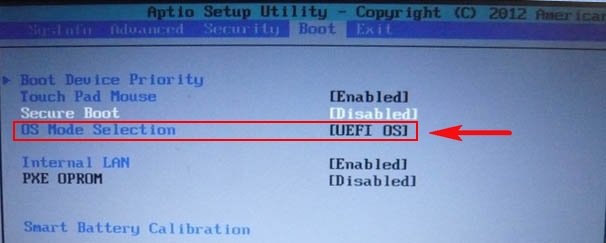
We put it in the position " CMS OS" Or " UEFI and Legacy OS"
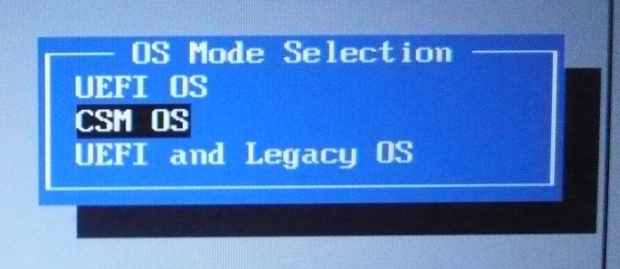
And press "Enter". Again, a warning appears about the possibility of loading a laptop with an error, "Enter".
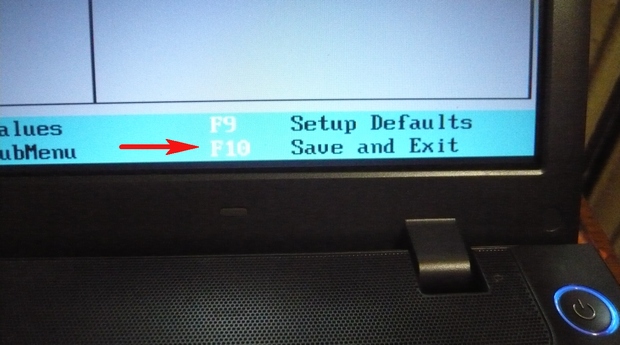
We save the changes we made in the BIOS, press "F10" on the keyboard. To the question "Save the changes and reboot?" press "Enter". Yes.

The laptop reboots, press F10 and get into the boot menu, select the USB flash drive, the Samsung laptop is loaded from the USB flash drive.
If you cannot get into the boot menu of the laptop, then you need to change the priority of the boot device directly in the BIOS. We enter the BIOS, go to the Boot section, then the Boot device Priority option,
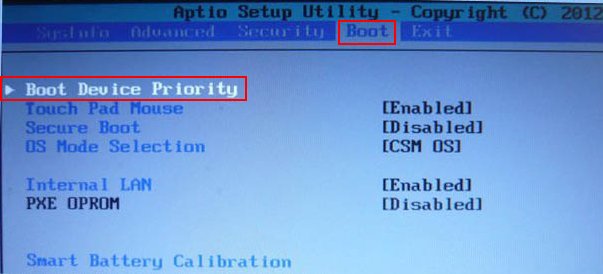
our flash drive should be here, set it as the first boot device, then press F10 (save the changed settings) and reboot. After rebooting, your laptop will boot from the flash drive.


