Hello, friends! While I was writing about Microsoft Security Essentials, I came across Windows Defender 7. I realized that I didn’t know anything about it and decided to write an article to make it a little clearer for myself why Windows Defender 7 is needed and when it is advisable to use it.
How to enable or disable Windows Defender 7

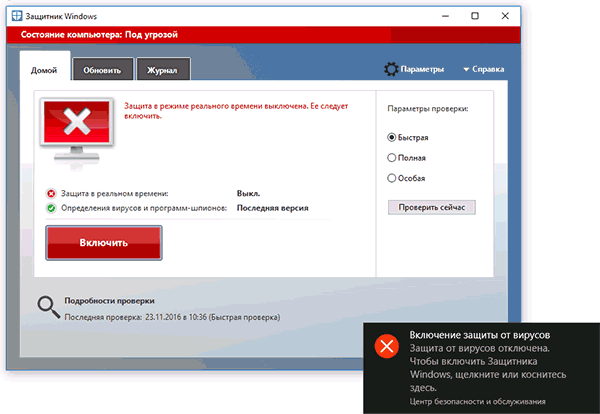
The main window of Windows Defender 7 is shown in the figure below.

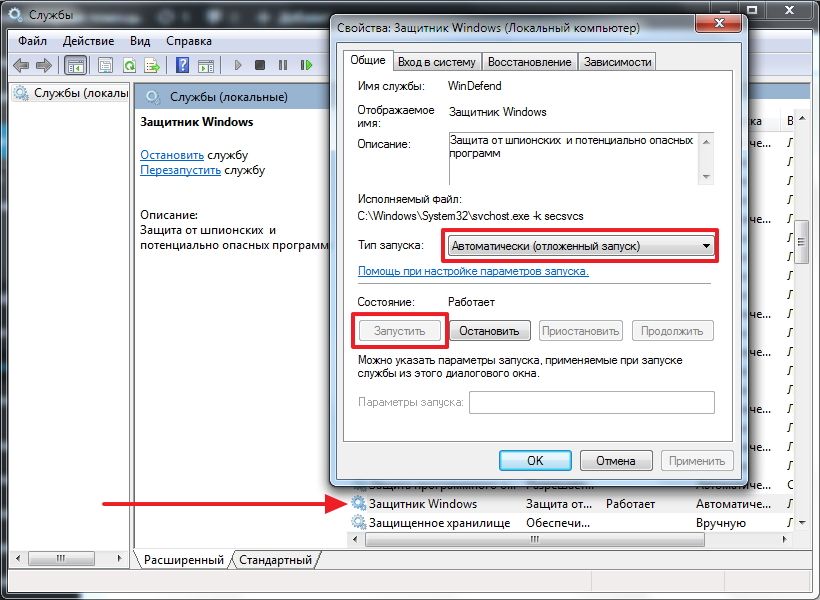
If Windows Defender does not start, then you may need to manually start the service of the same name. Also, by searching in the Start menu, launch the “Services” utility.

Finding a service Windows Defender and double click on it. In chapter Startup type select from the drop-down menu Automatic (delayed start) and press the button " Launch»
After this, we should launch Windows Defender without any problems. If the service, for some reason, failed to start, then I would check the computer for viruses with two different utilities (for example, Dr.Web Cureit and Kaspersky). Then I would check for Trojans using MBAM. I rebooted and tried to start the service. If the result is negative, then perform system file recovery. If the result is still negative, then I would think about reinstalling the operating system.
Hopefully, getting Windows Defender up and running will be easier.
How to disable Windows Defender
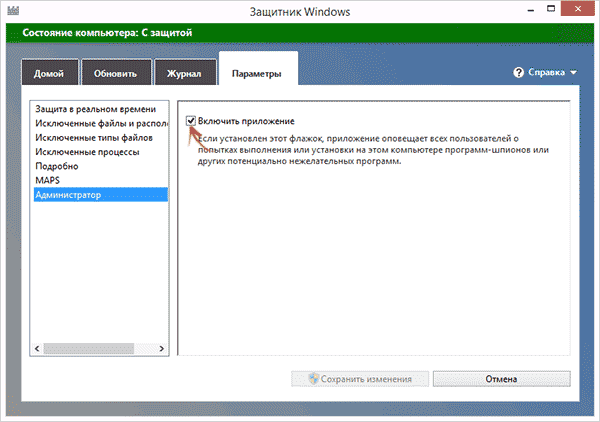
Everything seems to be clear with excluded files, folders and file types. If the defender, by mistake, reacts to a deliberate secure file, then you can add it to the exceptions.
On the tab in detail, Just like in Microsoft Security Essentials, I check the box to scan USB devices so that the defender scans connected flash drives, external hard drives and other storage devices.

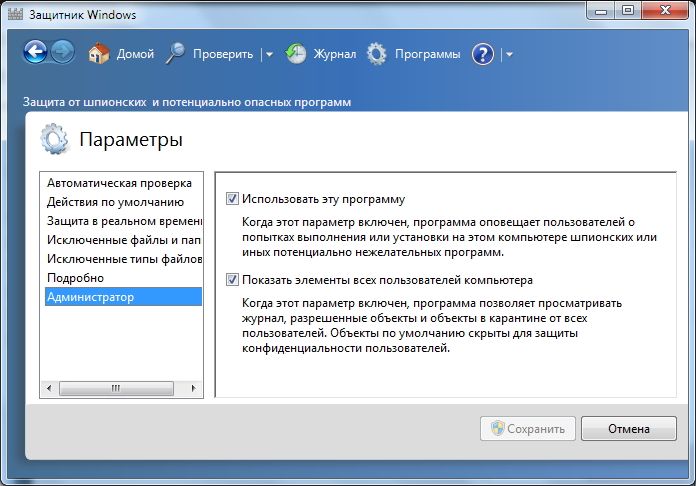
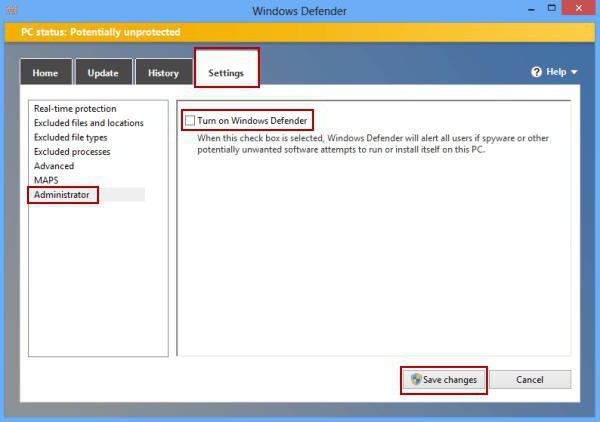
In chapter Administrator You can turn off the defender completely and allow the log to be shown to all users. If you have multiple users using your computer, you can allow them to see what Windows Defender 7 has detected.
Everything is done with the settings.
Windows 7 Defender Update
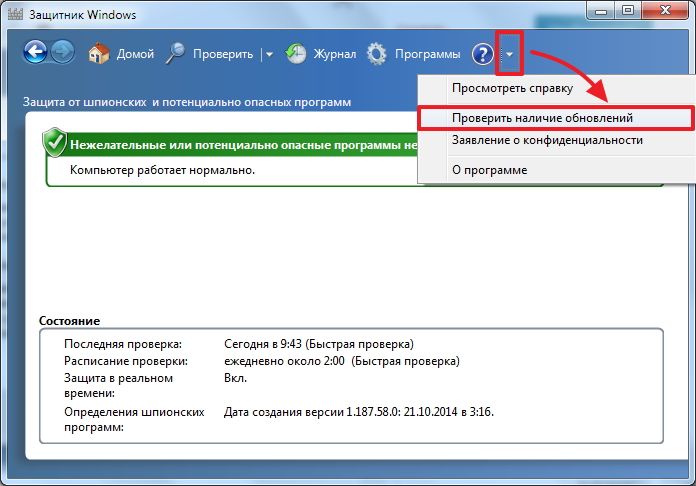
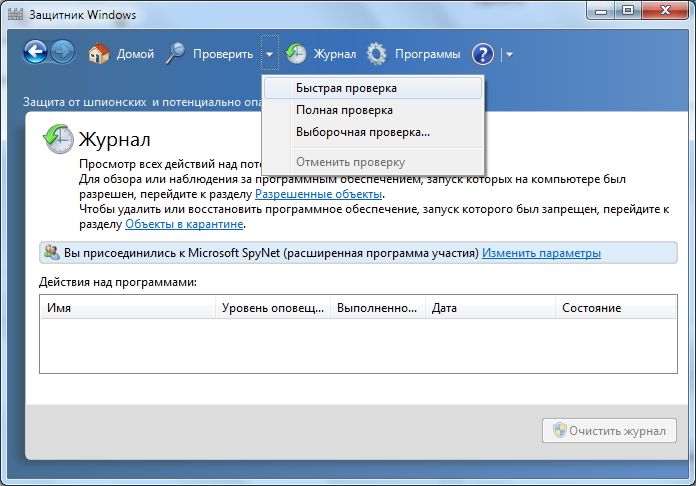
If you want, for example, to conduct a full scan of your computer, then it is advisable to check for updates before doing so. You can do this by clicking on Down arrow next to the help icon and selecting Check for updates
Magazine
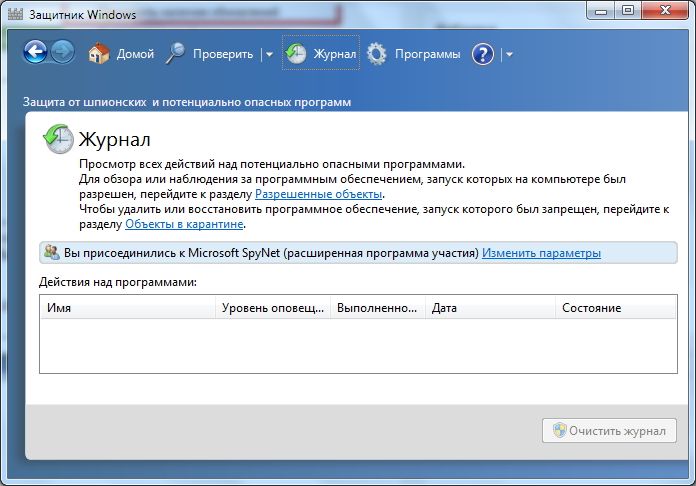
In chapter Magazine you can view what the defender did with the detected objects.
Microsoft SpyNet
In the Journal section you can join the Microsoft SpyNet community. That is, if unknown spyware is running on your computer and you are connected to Microsoft SpyNet, then the information from your computer will be sent to Microsoft. There they will be processed and the “Antidote” will be found. This “antidote” with new definitions will then be downloaded into Windows 7 Defender on all computers in the world and this spyware will be neutralized.
You can join as ordinary participant or in the role experienced participant. In the second case, more data will be transferred from your computer and, as I understand it, the efficiency of finding an antidote will become higher.

You can also join the Microsoft SpyNet community in the “Programs” section

I have chosen to join as an experienced member or as an advanced member.
It is advisable to update before performing the scan. For execution Quick check just press a button Check. If the computer begins to work unstably, then it is advisable to conduct a Full scan. You can launch it by opening the menu to the right of the Check button.
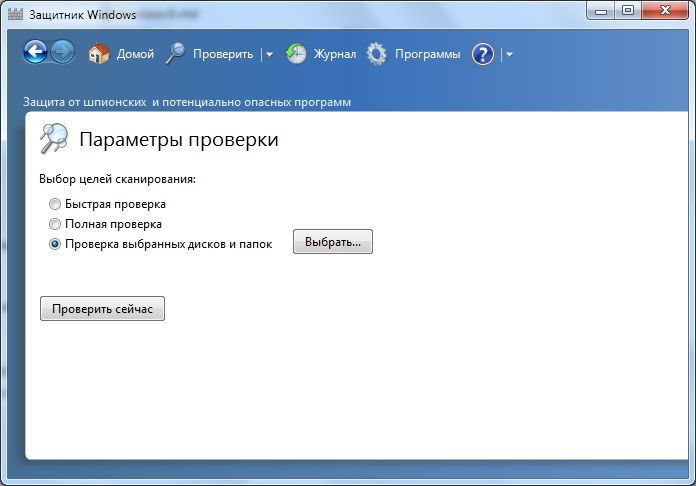
Custom scan Used to scan individual folders or external devices. Click Choose for selection separate disks or directories (folders) and then Check now
Everything about settings and use.
How to enable Defender in Windows 7 through the registry
Valentina shared this method in the comments to this article. Thank you, Valentina.
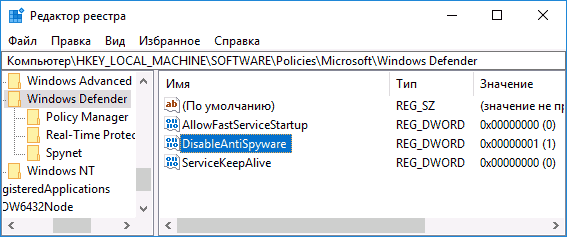
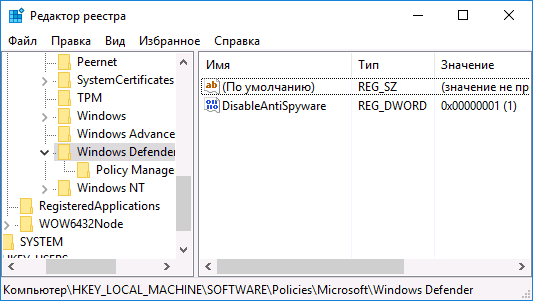
- Go to the registry branch: HKEY_LOCAL_MACHINE\Software\Policies\Microsoft\Windows Defender to the DisableAntiSpyware key, and change the value (1) to (0).
- We restart the computer and rejoice, Windows Defender is working.
Conclusion
In this article, we figured out what Windows 7 Defender is. It is not a full-fledged antivirus solution, but only protection against spyware and other potentially dangerous software. That is, protection from Trojans. I will use it on very old computers (for example, on my grandfather’s laptop), since the defender requires less resources than a full-fledged antivirus. My grandfather only communicates on Skype and looks at photos. That is, the likelihood of infection is minimal. I would be glad if you share your opinion on using Windows Defender. By the way, in Windows 8, the developers abandoned Microsoft Security Essentials and transferred all its functionality to Windows Defender 8, which also comes with the operating system. I wonder what will happen in Windows 10?
The Windows 10 operating system has a built-in security feature that prevents all kinds of threats or potentially dangerous software from entering your computer. This is Windows 10 Defender. How to enable it, configure it or deactivate it will be discussed further. But first, let’s look at the service itself, with an emphasis on reviews from users and specialists in configuring Windows systems.
"Windows 10 Defender": reviews leave much to be desired
As the official description shows, this service in the tenth version of the system has been completely redesigned and is capable of functioning no worse than any antivirus. But this or that?
If you read user comments, you can find a lot of unflattering reviews, indicating that the service cares about security somehow too much. Basically, this situation occurs when installing some software products that for some reason are recognized by the system not only as dangerous, but also as potentially unwanted. This can even include optimizers or specialized utilities that allow you to deactivate some unused or unnecessary system tools, for example, those related to tracking user actions. In addition, as reviews from dissatisfied people say, the OS installs Windows 10 Defender updates with enviable consistency, which most users do not need if standard antiviruses are installed. Good thing, conflicts between built-in and third-party software may also appear. But even here, not everything is so simple.
Should I disable the service?
Of course, the question of whether Windows 10 Defender is needed on local computers remains open for many. Okay, if these are network terminals, otherwise sometimes the protection is triggered to the point of absurdity when the user cannot install a completely legal software on his own PC or laptop, even if he is the system administrator.
Yes, you can disable the Windows 10 Defender product (reviews directly indicate this), however, provided that the system has a standard antivirus. This can be done in at least four ways. But first you should look at the configuration of the service itself. It is quite possible that you won’t have to disable it, having set the parameters that are acceptable to you.
How to setup
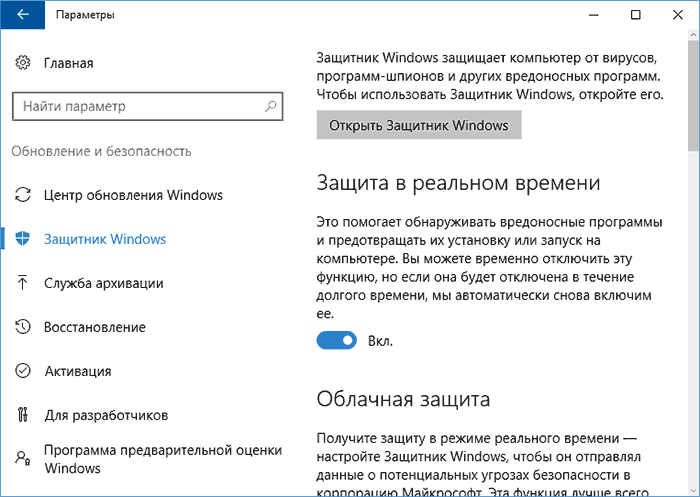
"Windows 10 Defender" after an update or a "clean" installation of the system is in the active state by default. Initial setup can be done in the parameters section.
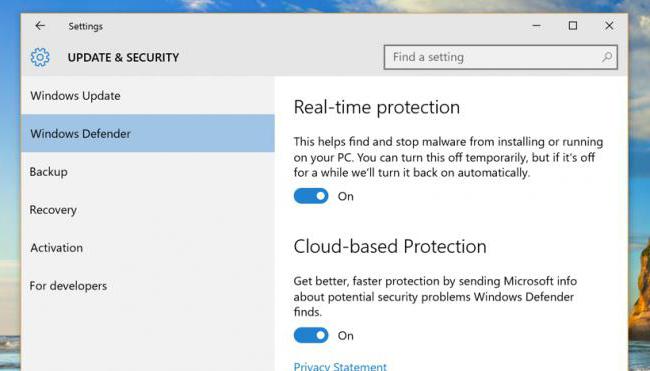
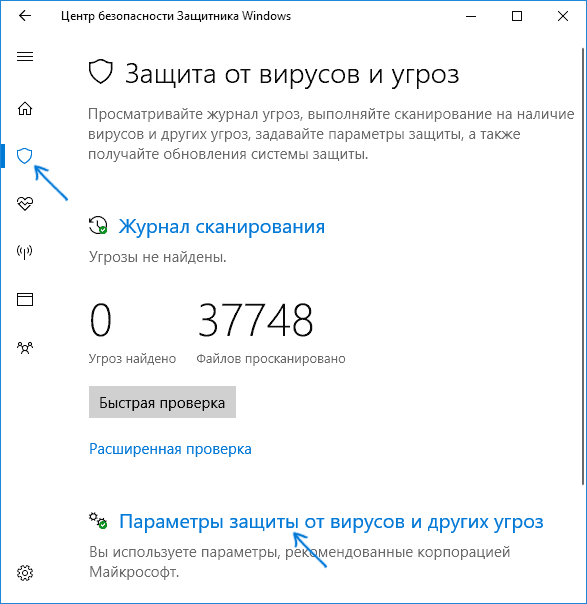
The section is accessed through the standard Start menu, and then the Update and Security item is selected. In the menu on the left there is a link to the service, and on the right there is a settings menu where you can set the activation of cloud protection, automatic sending of samples, etc. There is also another tool that helps activate the Windows 10 Defender service. How to enable it? Yes, just move the real-time protection switch to the on position.
You can also configure or enable it directly in the program by calling it, for example, through a search and setting the necessary parameters directly in the scanning window.
Installing antivirus software
Now a few words about disabling the service. The simplest method is to install any antivirus package. Built-in protection will be deactivated automatically.
But this is a temporary phenomenon, because after a certain period of inactivity, Windows 10 Defender will be activated again. How to enable it yourself? In principle, this is not required, since the service will be launched without user intervention (you can even read about this in the description under the protection enable slider.
Actions in the Group Policy section
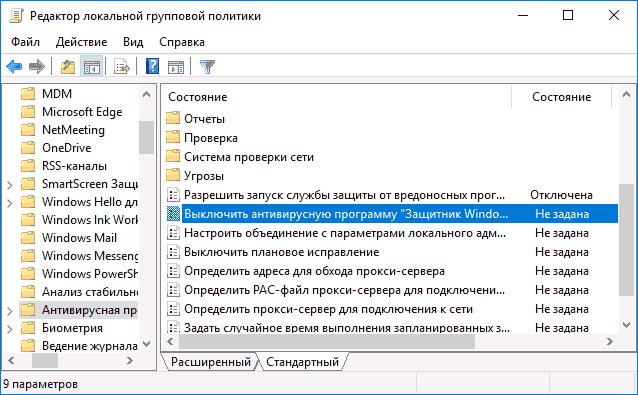
You can also disable it in the services section, which can be reached by entering the gpedit.msc command in the Run console.

In the Computer Settings and Administrative Templates section, you need to go to Windows Components and find the Endpoint Protection directory there. On the right there is a similar parameter, but with an indication to turn off. Next, you should enter its settings and activate the “Enabled” line, after which it will be disabled. Re-enabling is done by checking the “Not set” or “Disabled” lines.
Using the System Registry
Similar actions are performed in the system registry, the editor of which is called regedit command in the Run menu.

Here you need to use the HKLM branch, and then go through the SOFTWARE and Microsoft directories to Windows directories Defender. In the right side of the editor, you need to use RMB and create a 32-bit DWORD parameter (if it doesn’t exist), name it DisableAntiSpyware and assign the value 1. This is how “Windows 10 Defender” is disabled. How can I re-enable it after doing this? There are two options: either set the parameter to 0, or simply delete it.
Please note that the described procedures in the registry and in group policies duplicate each other, and after setting the parameters in the registry, actions in the group policies section are impossible (but you can do editing).
Additional Methods
In principle, you can disable or reactivate Defender using special programs like NoDefender or Win Updates Disabler.
Disabling or enabling system components is quite simple. In the first utility, configuration is carried out through system parameters; in the second, there are special tabs for this purpose, on which descriptions and settings of the corresponding services are located.
A few final words
Despite the negative reviews, Microsoft experts still do not recommend stopping using this service. If for some reason the user does not like it, in the settings you can disable the use of cloud protection and sending samples to improve this tool. But it’s better to leave real-time protection. By and large, it does not have much impact on the performance of the computer and only works at critical moments. If, when installing some software (even if the installer is run as a system administrator), a warning is issued, you can start the installation by using the button additional information in the notification with the option “Run anyway” selected, or in the settings, add files to the exclusion list.
Windows 10 Defender is a component built into the operating system that is a practically free antivirus. Why practically? The fact is that the OS itself is paid, and its component is as Windows Defender is distributed complete with it. That's why we decided to put it this way. Before we tell you how to disable Windows 10 Defender, we would like to explain why you need to disable it in the first place.
Is there any point in turning off the built-in Anti-Virus in Windows 10?
Let's say right away that yes, it makes sense. The fact is that this software only performs basic protection operating system. We simply cannot dare to call it full-fledged. Most shareware and paid antivirus programs will do a much better job of protecting your computer. That is why in using Windows Defender makes no sense if you make a conscious choice in favor of other antivirus software.The AV-Test laboratory tested all known foreign antivirus programs. So, according to the results, Windows 10 Defender of the latest version did not even make it into the top ten.
How to disable Windows 10 Defender: Installing a third-party antivirus program
If you have made a choice in favor of any other paid or free antivirus, which in your opinion will cope with protecting your computer much better, then we want to please you, because when you install anti-virus software, the defender is disabled automatically.Accordingly, it will turn on only when you delete the program or its activation key expires.
Temporarily disabling the defender
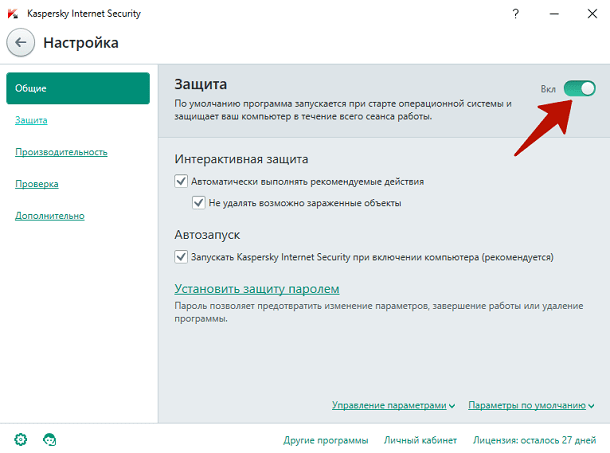
Defender does not always need to be turned off forever. Sometimes only a temporary solution is enough. As a rule, this is required to install games and programs. In particular, unlicensed ones. Because Windows 10 Defender often doesn't let them through. So, let's quickly look at the instructions for temporarily disabling it:We would like to draw your attention to the fact that in the screenshot above, the slider cannot be moved to the off position. The fact is that in this case it is blocked by a third-party antivirus application - Kaspersky Anti-Virus. That is, by default, Windows 10 Defender is already disabled, so further management of the computer’s protection and, as a result, its disabling is carried out using the above-mentioned program. To disable protection, you need to go to its settings and find the appropriate item.
Turning off Windows 10 Defender through the registry
I would like to immediately note that if you disable it through the registry, Windows Defender will not be restored after a reboot and your computer will be left without protection. In this regard, if you decide to use this method, we recommend that you immediately install third-party anti-virus software so as not to risk the safety of your data. Or don't disable it forever. Well, now let’s look at the shutdown process itself: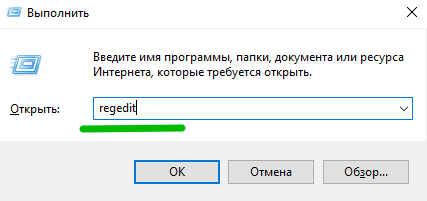
To make sure that this is indeed the case, you must do the following: 
Well, since you have disabled Windows Defender, do your thing and install another antivirus, otherwise you seriously risk the safety of your data. Viruses don't sleep!
Windows Defender (or Windows Defender) is an antivirus from Microsoft built into the latest versions of the OS - Windows 10 and 8 (8.1). It works by default until you install any third party antivirus(and during installation, modern antiviruses disable Windows Defender. However, recently not all) and provides, albeit not ideal, protection against viruses and malware(although recent tests indicate that he has become much better than he was). See also: (if it says that this application is disabled by group policy).
In this instruction - step by step description How to disable Defender in Windows 10 and Windows 8.1 in several ways, as well as how to turn it back on if necessary. This may be required in some cases when the built-in antivirus prevents you from installing a program or game, considering it malicious, and possibly in other situations. First, the method of disabling it in Windows 10 is described Creators Update, and then in previous versions of Windows 10, 8.1 and 8. Also at the end of the guide are alternative ways shutdown (not system means). Note: It might be more reasonable to use .
Notes: If Windows Defender says "Application is disabled" and you are looking for a solution to this problem, it can be found at the end of this guide. In cases where you disable Windows 10 Defender because it prevents certain programs from running or deletes their files, you might want to do the same (since it can also behave this way). Another material that may interest you: .
Additionally: in the latest Windows updates 10, the Windows Defender icon appears in the taskbar notification area by default. You can disable it by going to the task manager (by right-clicking on the Start button), turning on detailed view and turning off the Windows Defender Notification icon item on the Startup tab.
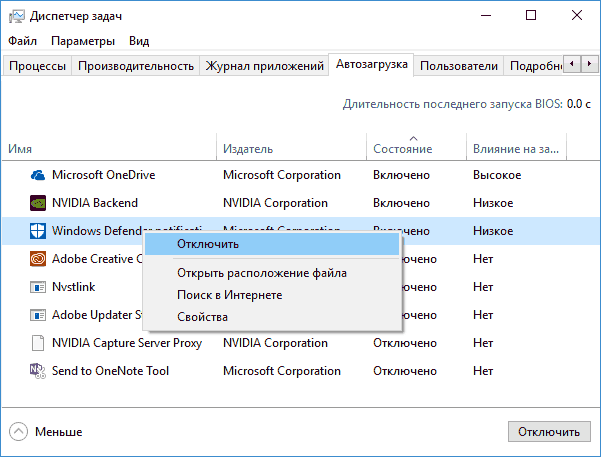
The next time you reboot, the icon will not be displayed (however, the defender will continue to work). Another innovation is .
How to disable Windows Defender 10 Creators Update
Beginning with Windows versions 10 1703 Creators Update disabling Windows Defender has changed slightly. As before, disabling is possible using the parameters (but in this case the built-in antivirus is disabled only temporarily), or using the local editor group policy(Windows 10 Pro and Enterprise only) or Registry Editor.
Temporarily disabling the built-in antivirus by adjusting settings
In this case, Windows Defender will be disabled only for a while and then the system will use it again. If you want to disable it completely, you will need to use the following methods.
Disable Windows 10 Defender in Local Group Policy Editor
This method is only suitable for Windows 10 Professional and Enterprise editions; if you have Home, the next section of the instructions shows a method using the Registry Editor.
After this, Windows 10 Defender will be completely disabled and will not affect the launch of your programs in any way (and also send sample programs to Microsoft) even if they are dubious. Additionally, I recommend removing the Windows Defender icon from startup in the notification area (see Startup Windows programs 10, the task manager method is suitable).
How to completely disable Windows 10 Defender using Registry Editor
The settings configured in the Local Group Policy Editor can also be set in the Registry Editor, thereby disabling the built-in antivirus.
The procedure will be as follows (note: if any of the specified sections are missing, you can create them by right-clicking on the “folder” located one level higher and selecting the desired item in the context menu):
Done, after this you can close the registry editor, the antivirus will be disabled. It also makes sense to remove Windows Defender from startup (provided you are not using other features of Windows Defender Security Center).
Disabling Windows Defender in previous versions and Windows 8.1
The steps required to turn off Windows Defender will differ in the two latest versions operating system from Microsoft. In general, it is enough to start with the following steps in both OS (but for Windows 10 the procedure complete shutdown defender is somewhat more complicated, will be described in detail below).
Go to the control panel: the simplest and most in a fast way To do this, right-click on the “Start” button and select the appropriate menu item.
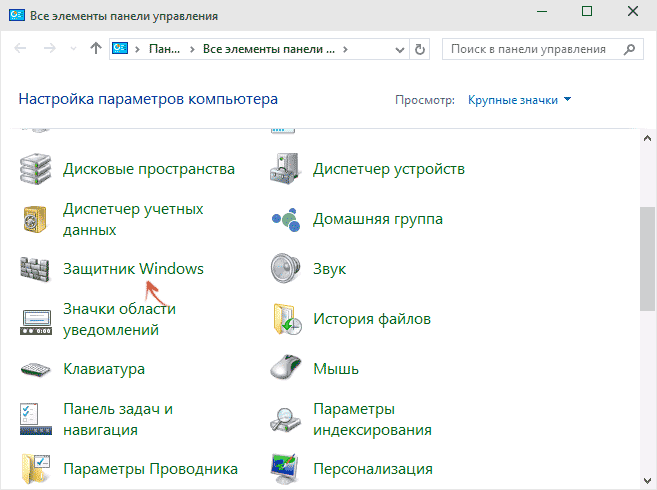
With Control Panel switched to Icons view (under View in the top right), select Windows Defender.
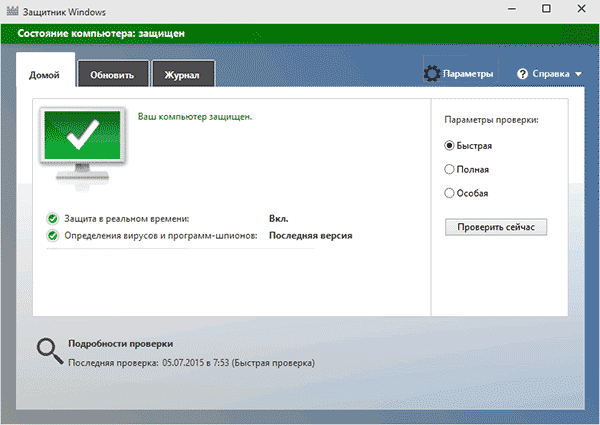
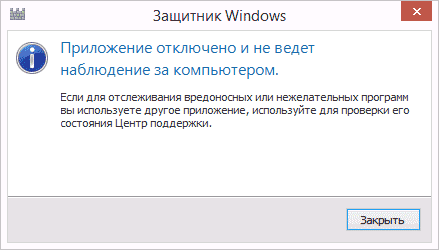
The main Windows Defender window will launch (if you see a message that “The application is disabled and is not monitoring your computer,” then most likely you simply have a different antivirus installed). Depending on what version of OS you have installed, follow these steps.
Windows 10
The standard method (which is not entirely functional) to disable Windows 10 Defender looks like this:
As a result, the protection will be disabled, but only for a while: after about 15 minutes it will turn on again.
If this option does not suit us, then there are ways to completely and permanently disable Windows 10 Defender in two ways - using the local group policy editor or the registry editor. The Local Group Policy Editor method is not suitable for Windows 10 Home.
To disable using the Local Group Policy Editor:
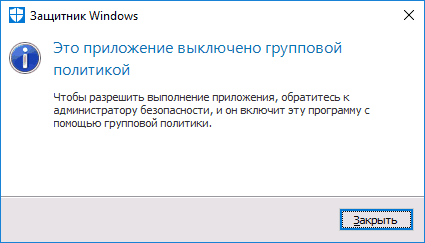
As a result, the Windows 10 Defender service will be stopped (i.e. it will be completely disabled) and you will see a message about this when you try to start Windows 10 Defender.
You can also perform the same steps using the Registry Editor:
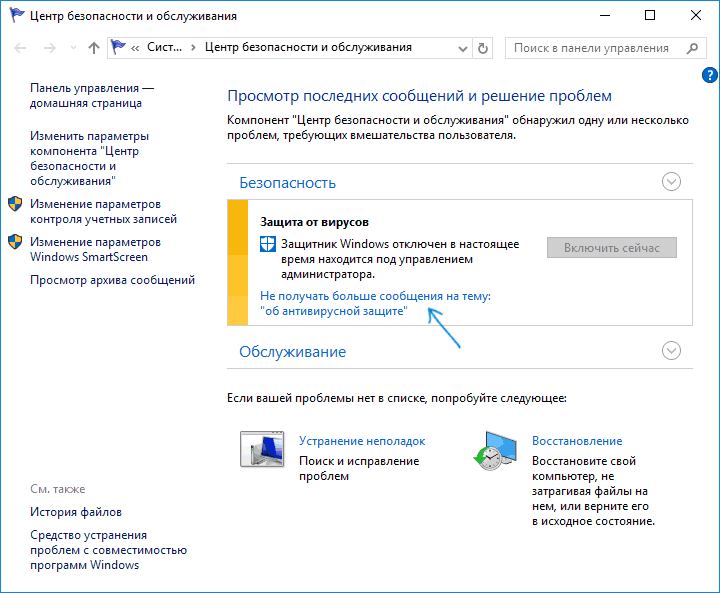
Done, now, if the built-in antivirus from Microsoft bothers you, it will only be with notifications that it is disabled. In this case, until the first reboot of the computer, you will see a defender icon in the notification area of the taskbar (after the reboot it will disappear). A notification will also appear indicating that virus protection is disabled. To remove these notifications, click on it, and then in the next window click “Don’t receive any more antivirus protection notifications”
If the built-in antivirus has not been disabled, then there is a description of how to disable Windows 10 Defender using free programs for these purposes.
Windows 8.1
Disabling Windows Defender 8.1 is much easier than in the previous version. All you need is:
As a result, you will see a notification that the application is disabled and is not monitoring the computer - which is what we needed.
Disable Windows 10 Defender using free programs
If for one reason or another you cannot disable Windows 10 Defender without using programs, you can also do this using simple free utilities, among which I would recommend Win Updates Disabler, as it is simple, clean and free utility in Russian.
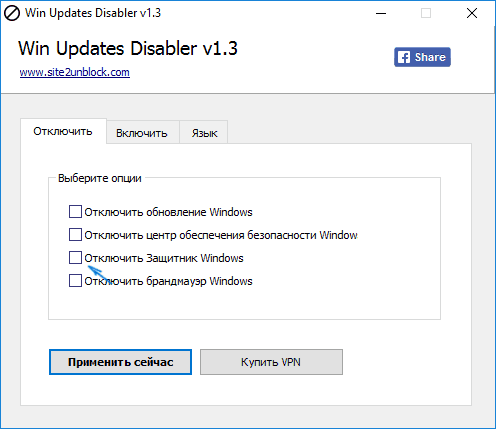
The program was created for, but can disable (and, what is important, enable it back) other functions, including defender and. You can see the official website of the program in the screenshot above.
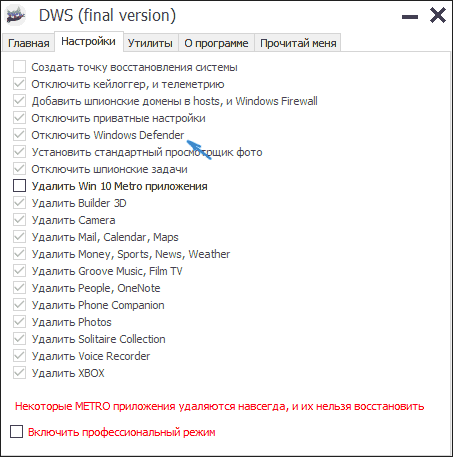
The second option is to use a utility or DWS, the main purpose of which is to disable the tracking function in the OS, but in the program settings, if you enable the advanced mode, you can also disable Windows Defender (however, it is disabled in this program by default).
How to disable Windows 10 Defender - video instructions
Due to the fact that the described action in Windows 10 is not so simple, I also suggest watching a video that shows two ways to disable Windows 10 Defender.
Disable Windows Defender using Command Prompt or PowerShell
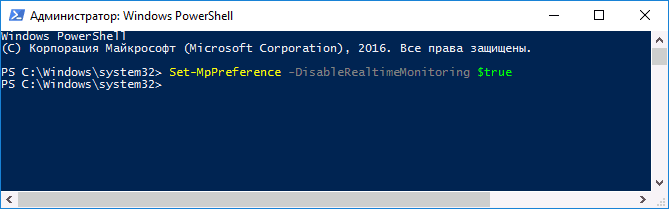
Another way to disable Windows 10 Defender (though not permanently, but only temporarily - the same as when using settings) is to use the PowerShell command. Windows PowerShell should be run as administrator, which can be done by using search in the taskbar, and then - context menu by right mouse click.
In the PowerShell window, enter the command
Set-MpPreference -DisableRealtimeMonitoring $true
Immediately after it is completed, real-time protection will be disabled.
To use the same command in command line(also running as administrator), simply type powershell followed by a space before the command text.
Disable the "Enable virus protection" notification
If, after taking steps to disable Windows 10 Defender, the notification “Turning on virus protection. Virus protection is disabled", then in order to remove this notification, you can follow these steps:

Done, in the future you should not see any messages indicating that Windows Defender is disabled.
Windows Defender says Application is disabled (how to enable)
Update: I have prepared updated and more complete instructions on this topic: . However, if you have Windows 8 or 8.1, use the steps below.
If, when you log into Control Panel and select Windows Defender, you see a message that the application is disabled and is not monitoring your computer, this could indicate two things:
- Windows Defender is disabled because another antivirus is installed on your computer. In this case, there is no need to do anything - after removing the third-party antivirus program it will turn on automatically.
- You turned off Windows Defender yourself or it was disabled for some reason, here you can turn it on.
In Windows 10, to turn on Windows Defender, you can simply click on the corresponding message in the notification area - the system will do the rest for you. Except for the case when you used the Local Group Policy Editor or the Registry Editor (in which case, you should do the opposite operation to enable the defender).
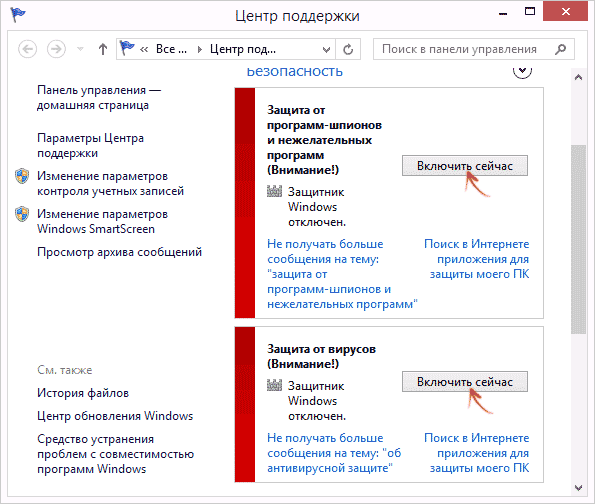
To enable Windows Defender 8.1, go to Action Center (right-click on the “checkbox” in the notification area). Most likely, you will see two messages: that spyware and unwanted software protection is turned off, and that virus protection is turned off. Just click “Turn on now” to start Windows Defender again.


