In order to install the Windows operating system, you need a boot disk or bootable USB flash drive. Almost everyone now has a flash drive, so it’s easier and more convenient to make a bootable flash drive. For creating bootable flash drive There are many methods and programs, for example Windows 7 USB DVD Download Tool. One of the most popular programs is Ultraiso. First, you need to download and install Ultraiso, download to HDD an image of the operating system that needs to be installed and insert the flash drive into the USB connector. When all this is done, you can proceed:
Launch Ultraiso |
||
|
Launch the Ultraiso program. Please note that it must be run with administrator rights. |
||
Opening the Windows image |
||
|
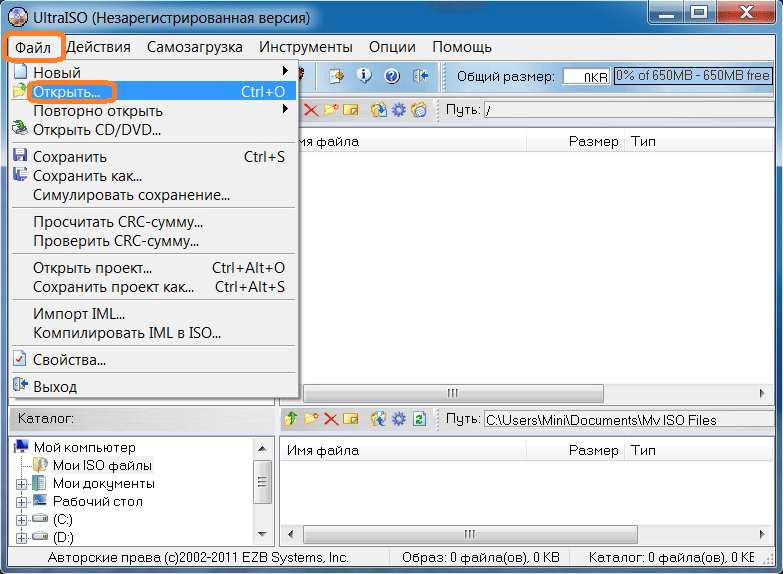
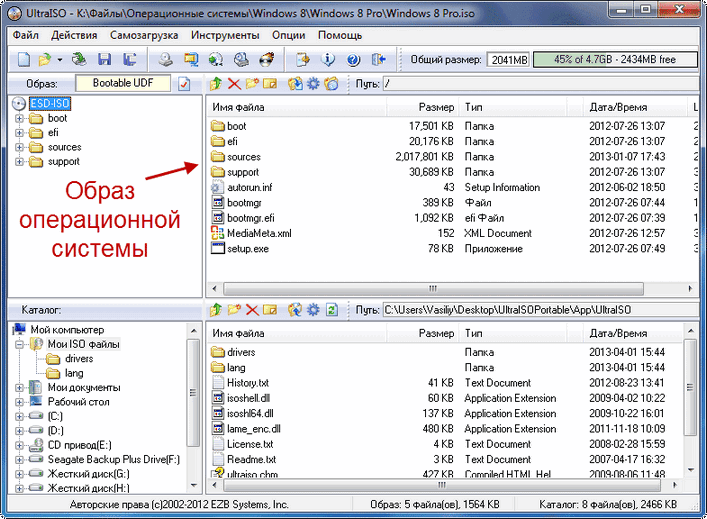
Now we need to open the image of the Windows operating system, which we will write to a flash drive. To do this, select Open from the File menu. You can also use the keyboard shortcut Ctrl+O. |
 |
|
|
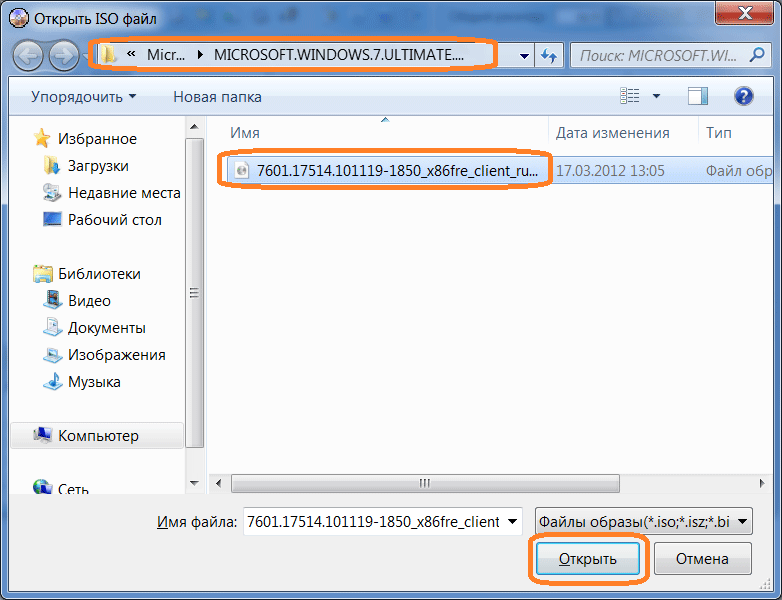
Open the folder with the Windows image, select it and click on the Open button. |
 |
|
Let's start recording the image on the flash drive |
||
|
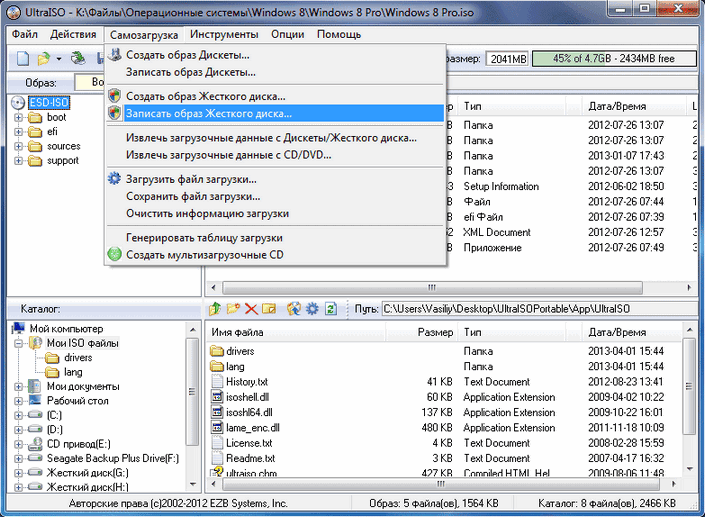
When the image file is open, select the item from the menu Burn a Hard Disk Image. |
 |
|
|
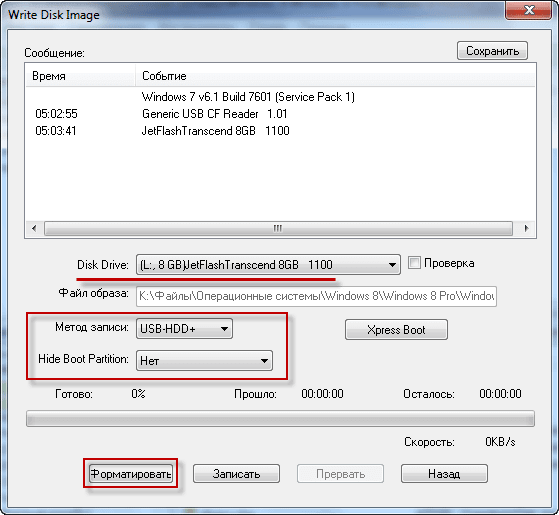
We select the flash drive on which we will write the Windows image (in my case (E:, 8GB) JetFlash Transcend 8GB), the recording method is usually suitable USB-HDD. When everything is selected, click on the Burn button. |
 |
|
|
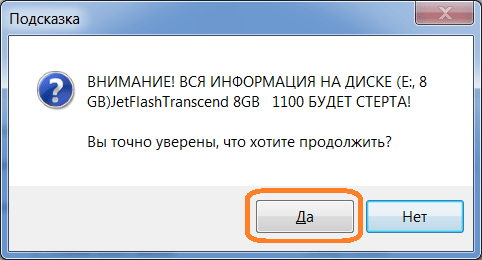
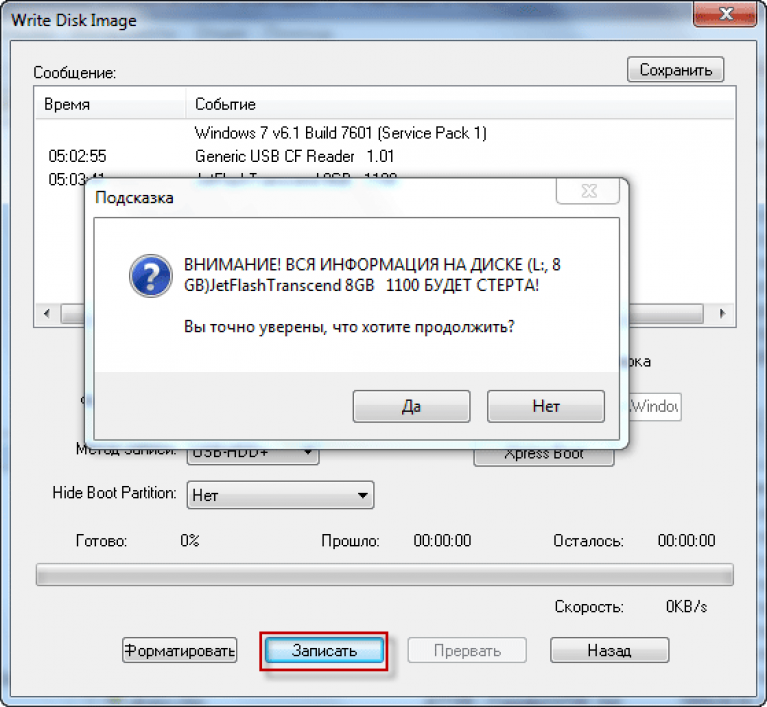
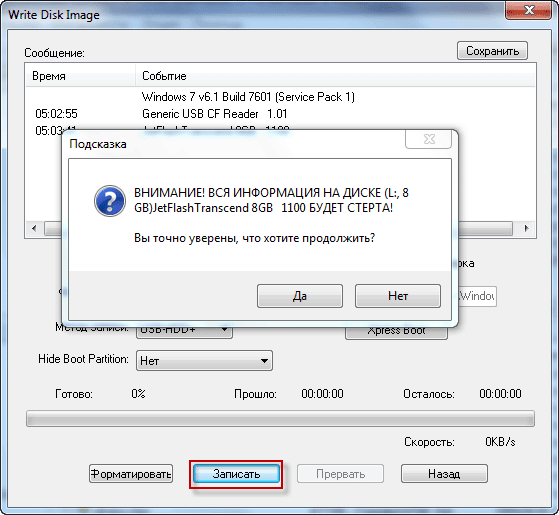
All information on the flash drive will be deleted. We confirm this and click on the Yes button. |
 |
|
|
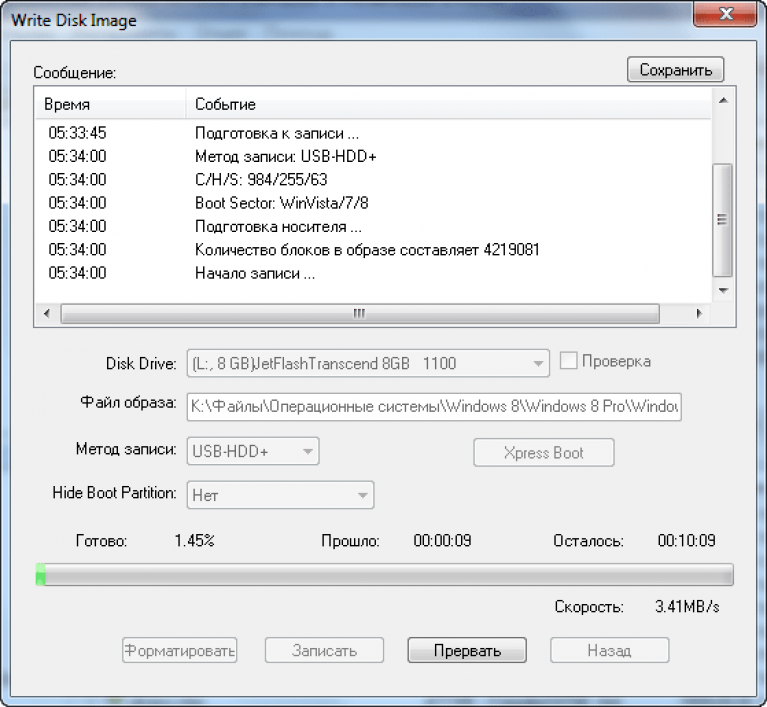
The process of writing an image to a flash drive takes several minutes. You can drink tea :) |
 |
|
Bootable USB flash drive successfully created |
||
|
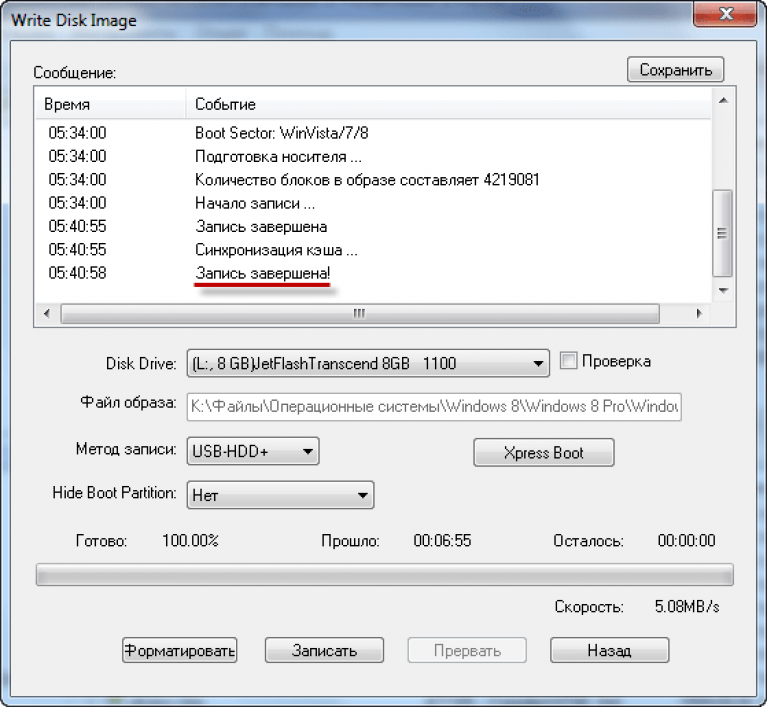
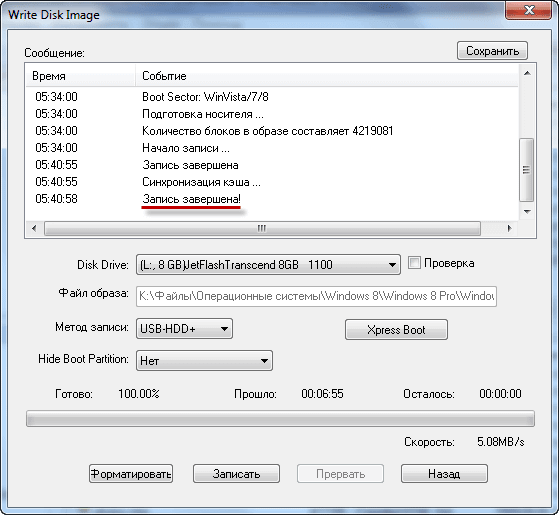
At the end, a message will appear indicating that the recording is complete. To close the window, click on the Back button, then you can close the program. The bootable USB flash drive has been successfully created. |
 |
|
You can also use regular using Windows, for example, by restoration, but this is not always possible, so it is much easier to remove the old system and install a new one. To restore you will need a disk or .
Let's look at the process of creating an image using an example Windows entries 8, although “seven” and other operating systems are written the same way.
Step 1. Beginning of work
To commit further actions You will need to run the program as Administrator, otherwise the system will simply not allow you to do anything.
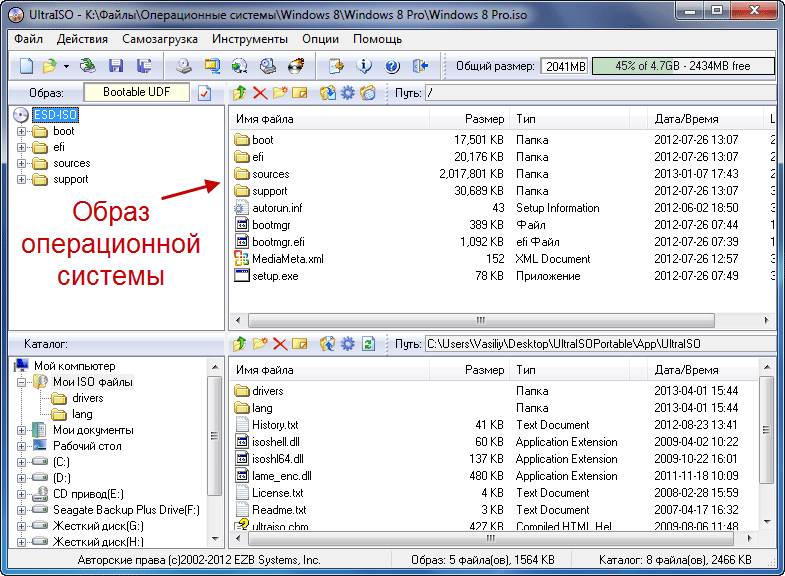
After you have opened the program, you need to click the “open” menu as shown in the first screenshot and start creating a bootable ultraiso flash drive.
The example shows a prepared . The files themselves are easy to find on the Internet, in particular on torrent trackers. The extension must be ISO, not EXE.
Once you have confirmed the choice of image by clicking the “open” button, a list of used files will be displayed in the right window of the program. Do not delete or rename anything to avoid any installation errors in the future.
Step 2. Preparing an image for recording
A pop-up window will appear again, once again warning that the data will be deleted. We agree with this and move on.
Now the fun begins - direct recording of the OS. Ultraiso multiboot flash drive started to be created , which will take some time.
The program itself works quite quickly and efficiently, but the system often slows down the entire creation process. Be patient.
Upon completion of the process, a “Recording complete” notification will be displayed in the logs! This means that our flash drive with Windows 8 is ready for use.
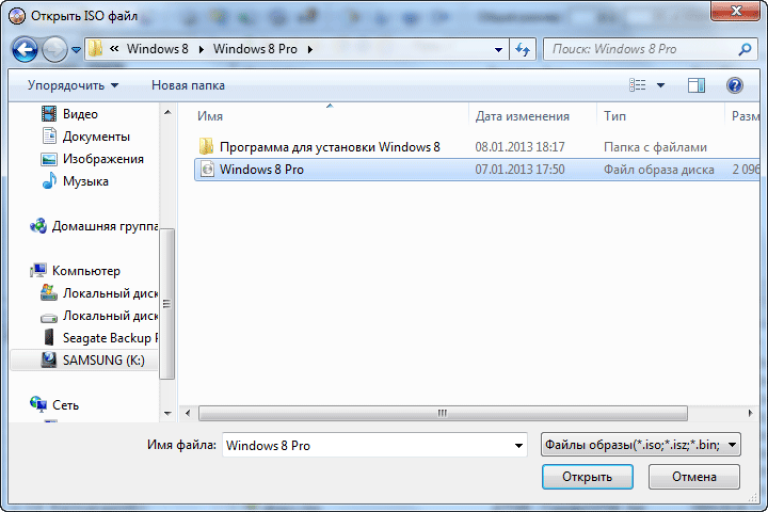
Since we no longer need UltraISO services, the program can be closed. When you connect the flash drive to the PC a second time, something similar to the one shown in the screenshot should appear.

Depending on the image, its name may differ from this. The picture shows just an example of the final version.

“Seven” is written in the same way, so the guide is universal.
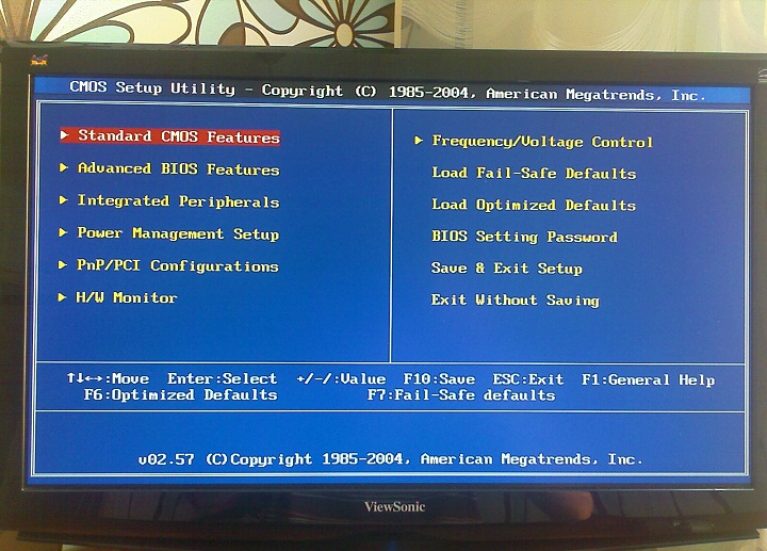
To run an image from a flash drive, you need to reboot the machine, log in and in the settings set the boot priority from a USB drive. To do this, restart the PC and press the Del key. In some BIOS versions it may be F1 or Tab.
We see the following menu:
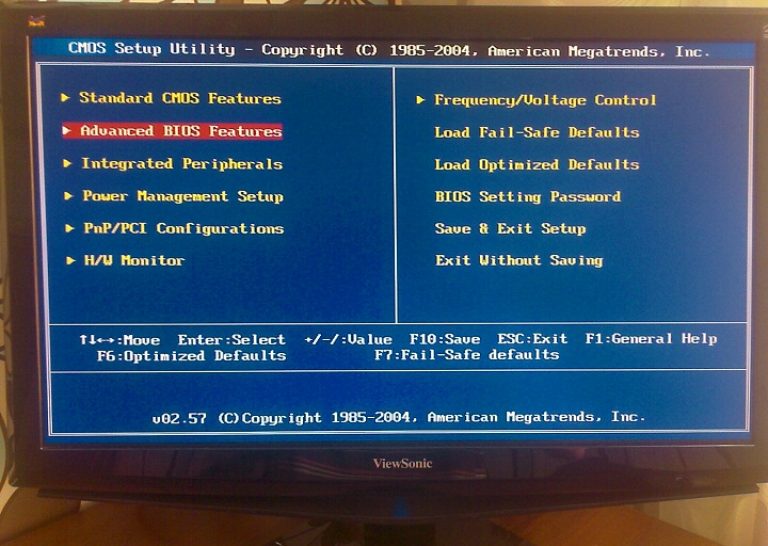
Select Advanced BOIS Features and press Enter:
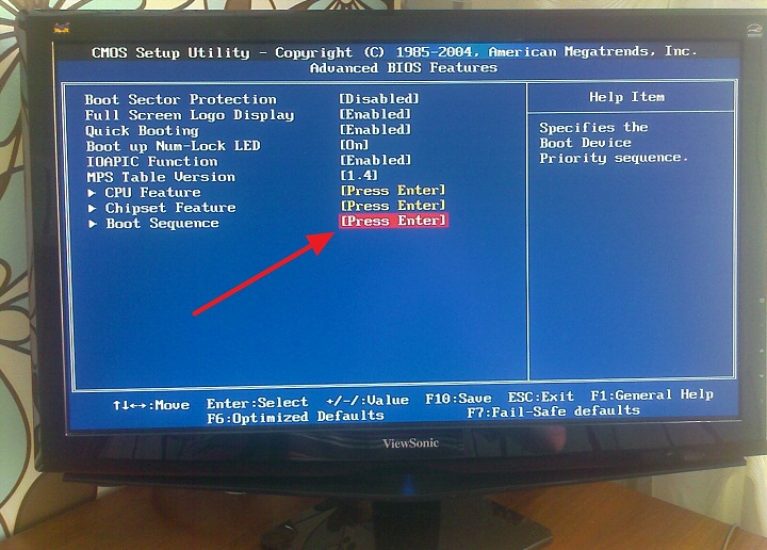
In the menu that appears, you need to open the lowest item from the list:
The “First Boot Device” category is the object that the OS will launch first. In this example, this is a DVD drive, but by pressing Enter you need to select a USB device. “Second Boot Device” - hard drive.
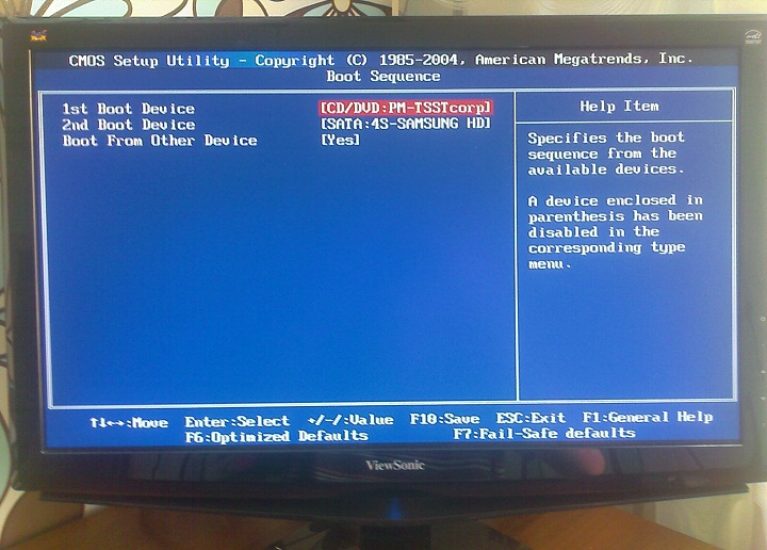
When everything is done, press F10, thereby saving the settings, confirm your actions and reboot the system again. Now the computer will boot from the bootable USB flash drive and the system installation process will begin.
A bootable USB flash drive with an image of the Windows operating system can be created using the UltraISO program. Why is it necessary to have such a bootable USB flash drive with an operating system image recorded on it?
Unexpected problems may occur when using the Windows operating system. The operating system may begin to work, at best, with malfunctions, and in the worst case, it will stop loading altogether. From such possible problems No one is insured; it is impossible to predict this in advance.
Sometimes there are problems with operating system, can be fixed using the Windows operating system recovery function. To do this, you will need to run, if, of course, this feature is functioning at the moment.
If you cannot start such a recovery using standard Windows operating system tools, then you can try to restore the system using a disk with an operating system image recorded on it, or use a bootable USB flash drive for this.
In most cases, serious problems can only be solved by reinstalling the operating system, if you have not done your data in advance. Therefore, it is always necessary to have a disk with an image of the Windows operating system. This disk can be used for new installation operating system, to restore the operating system, or reinstall it.
Typically, a distribution package with an operating system is recorded on an optical DVD disc. But storing an image with an operating system on such a disk is problematic due to the fact that optical disk DVD is subject to mechanical damage. Just one scratch can cause an optical disc to fail.
The way out of this situation is to use a bootable USB flash drive with an image of the Windows operating system recorded on it. Installing the Windows operating system with USB flash The drive is no different from the process of installing an operating system from a DVD.
A flash drive with an operating system recorded on it is more protected from mechanical damage than a DVD disc. In addition, it has a significantly smaller physical size and can be more easily moved without fear of mechanical damage.
You can create a bootable USB flash drive using the UltraISO program, which is designed to work with disk images.
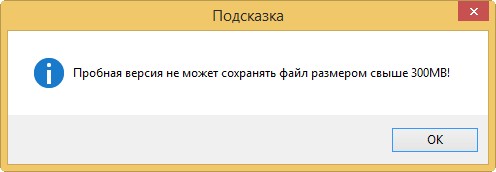
UltraISO is a paid program, but it has a trial period free use. you can use free version UltraISO programs with an image file size limit of 300 MB. You can find a solution to this problem on the Internet, where you can also find portable versions of the UltraISO program.
How to create a bootable USB flash drive in UltraISO
Now you will learn how to create a bootable USB flash drive onto which an image of the Windows 8 operating system will be written. In exactly the same way, you can use the UltraISO program to write an image of the Windows 7 operating system to a USB flash drive.
In order to create a bootable USB flash drive in UltraISO, you need to open the UltraISO program as an administrator. After opening the program window, click on the “Open” button on top panel in the UltraISO program window.
Then, in the Explorer window that opens, you need to select an image of the Windows operating system to subsequently write it to a flash drive.
In the "Open" window ISO file"You should select the operating system image file, and then click on the "Open" button. In this example, I chose to create a bootable USB flash drive with an image of the Windows 8 Pro operating system.

In the UltraISO program window, on the right side of the window, an image of the Windows 8 Pro operating system appeared.
Now you can insert the USB flash drive into the appropriate slot on your computer, if it was not inserted there before.
A flash drive that is designed to record an image of the operating system Windows 7, Windows 8, or Windows 10 must be at least 4 GB in size and formatted in file system FAT32. You can also format a flash drive immediately before recording an image of the Windows operating system using the UltraISO program.
Attention! If there is data on this flash drive that you do not want to lose, then you will need to copy it to a safe place. In progress USB formatting flash drive, all data located on a flash drive that has been formatted will be deleted.
After opening the “Write Disk Image” window, you will need to check that you have selected the correct disk to create a bootable USB flash drive. You will need to make sure that the flash drive disk is under the correct letter of the alphabet.
In the “Recording method” item, you need to select “USB-HDD+”, and then proceed to format the flash drive or record an image of the Windows operating system.
If the USB flash drive has already been formatted before the process of creating a bootable flash drive, then you will need to click on the “Burn” button.
If the flash drive has not been formatted in advance, then you should click on the “Format” button. Now let's look at the formatting process USB drive in the UltraISO program.
In the “Format” window, you need to select the file system - FAT32, and then click on the “Start” button.
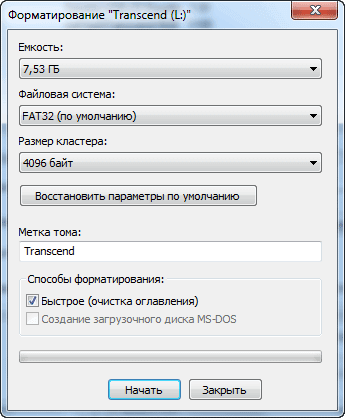
In the warning window, you must click on the “OK” button. After formatting, all data that was previously on the flash drive will be destroyed.

After formatting is completed, a window will open in which you will be informed that this operation was successfully completed. In this window, click on the “OK” button, and then close the “Format” window.
Now you will need to click on the “Burn” button in the “Write Disk Image” window to write an image of the operating system to begin creating a bootable USB flash drive.
A “Hint” window will open, warning you that all information is on USB drive will be erased. In this window, click on the “Yes” button.
After this, the process of writing the operating system image to the flash drive begins. A bootable USB flash drive is created for the Windows operating system.
![]()
The speed of creating a bootable USB flash drive will depend on the power of your computer. After some time, the image of the Windows operating system will be written to the USB flash drive.
In the “Write Disk Image” window you will see a message - “Recording complete!” A bootable USB flash drive for Windows 8 has been created.
Now you can close the UltraISO program, it has already done its job.
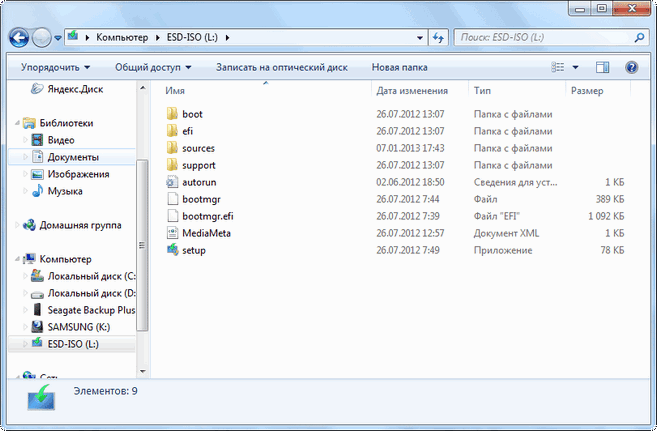
After this, you should open Explorer and make sure that the image of the Windows 8 operating system was written to the flash drive.

If you open the flash drive, you will see a recorded image of the Windows 8 Pro operating system there.
The process of capturing an image of the Windows 7 operating system is exactly the same, and it is no different from recording an image of the Windows 8 operating system.
To install the Windows operating system, you will need to enable the BIOS to prioritize loading the operating system from a USB flash drive.
Conclusion
The UltraISO program will allow you to burn Windows to a USB flash drive to install the operating system on your computer. It is necessary to have a bootable USB flash drive, because no one is immune from sudden failures of the operating system or equipment. Therefore, the operating system image is needed so that you can use it if unforeseen circumstances arise.
Creating a bootable USB flash drive in UltraISO (video)
- Hello admin! Such a question, I have a bootable USB flash drive with an operating Windows system 7, I don’t remember how I created it, and the image with “seven” is also not at hand now. Is it possible for me to somehow make an image of my bootable flash drive and deploy this image to the flash drive of my friend, who urgently needs a bootable Windows 7 flash drive , but I can’t give him my flash drive.
- Hello everyone and I have a question! quick and easy? For this purpose, I tried to use the ImgBurn program, but the image of a bootable flash drive with the Windows 7 operating system with a capacity of 8 GB is twice as large; moreover, the program also needs to extract the boot record from the flash drive, which also turns out to be more than 10 GB in size. For instructions, I used an article on the Internet, it seems that the author of the article himself has never created a bootable USB flash drive in this way, but he advises everyone.
How to make a bootable flash drive image
Friends! The fastest and easiest way to create an image of a bootable flash drive is with the UltraISO program. The ISO image created in this way can even be deployed to a completely different flash drive. Isn't it very convenient?
Program website http://www.ezbsystems.com/ultraiso/download.htm. Download and run the program.
Unfortunately, the program is paid ($29) and only allows you to work with files up to 300 MB for free.
Your bootable USB flash drive with your operating system probably weighs more than 3 GB, so draw your own conclusions. Personally, I purchased this program and have never regretted it, since it has no equal when working with ISO images. UltraISO can create a bootable Windows flash drive 7, make a bootable flash drive image, change the contents of the ISO image and much more.
Managing the program is incredibly simple, we drag our flash drive, in my case under the letter G: from the lower left window (list of PC disks) to the upper right window (list of contents of the new project).
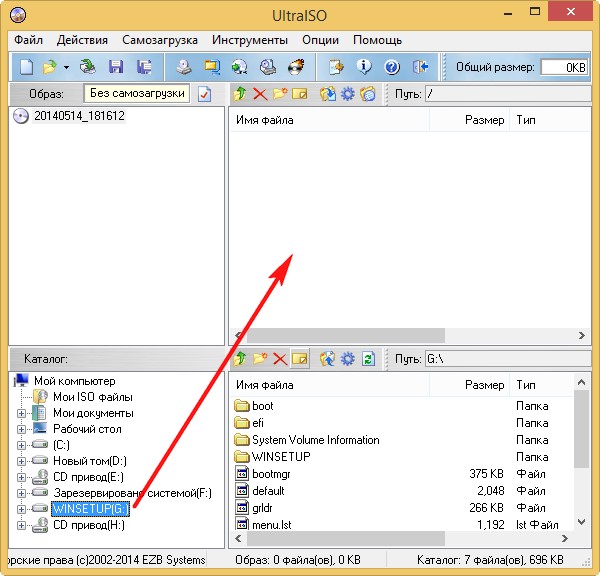
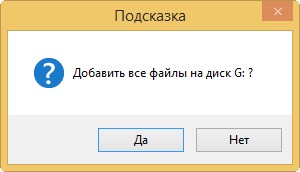
Add all files to drive G:? We answer Yes.

We save the file, for example, on drive D: and give the file a name, for example Windows 7 64 bit.
Creating a bootable USB flash drive with Windows 10, Windows 8, Windows 7 from iso image A
Installing Windows from a flash drive is much more convenient than from a disk. This not only speeds up the installation process itself, but also eliminates the possibility of erroneously reading files from the disk during Windows installations, and disk drives in Lately Not installed on all laptops and computers.
Thus, creating a bootable USB flash drive with any version of Windows is quite a pressing issue for many PC users.
In this article you will learn the simplest and most in a fast way Make a bootable USB flash drive from the downloaded ISO image.
Program for creating a bootable USB flash drive from an iso image
Let's say you already have the image you need downloaded from the Internet windows versions or it could be an iso image with several versions of windows.
The first thing to do is download free program. It is with its help that we will make a bootable flash drive from an ISO image in 4 mouse clicks.
The installation package downloaded from the site takes up just under 3 MB, so users with slow Internet can easily download this program.
After downloading, run the installation file and install it as a regular program by clicking the “next” button.
Having installed Windows USB/DVD Download Tool, we launch it, insert the USB flash drive, which will be bootable, after which the main window appears.
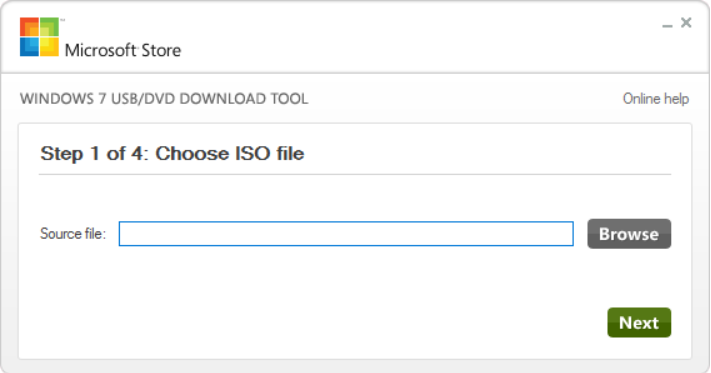
The main window of the program for creating a bootable USB flash drive from an image - Windows USB-DVD Download Tool
In it you need to click the “Browse” button and select the ISO file with installation files Windows.
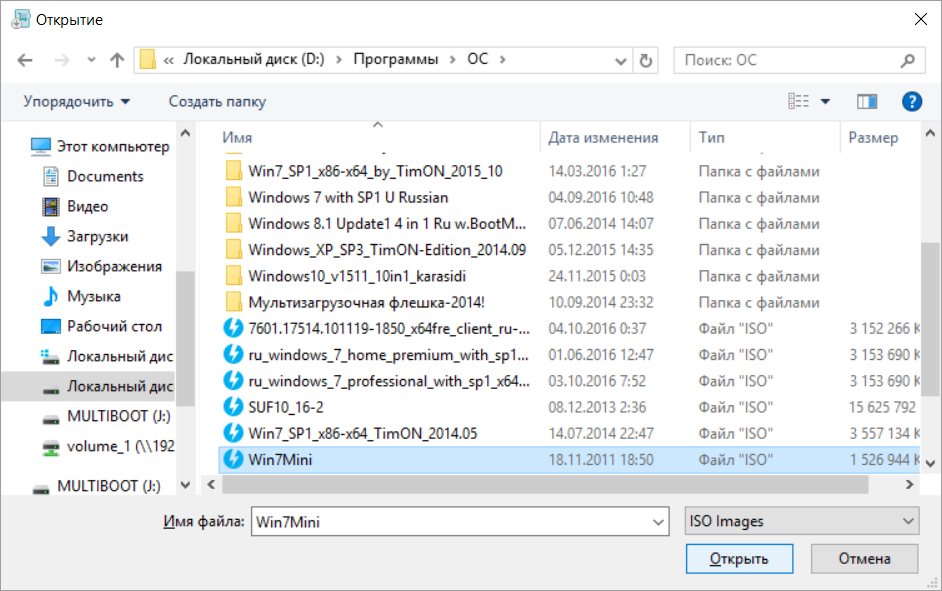
Selecting an ISO image
Click “Open” and “Next” in the lower right corner of the program.
In the second step, we need to select the media type - USB or DVD, since this program can record and boot disks including.
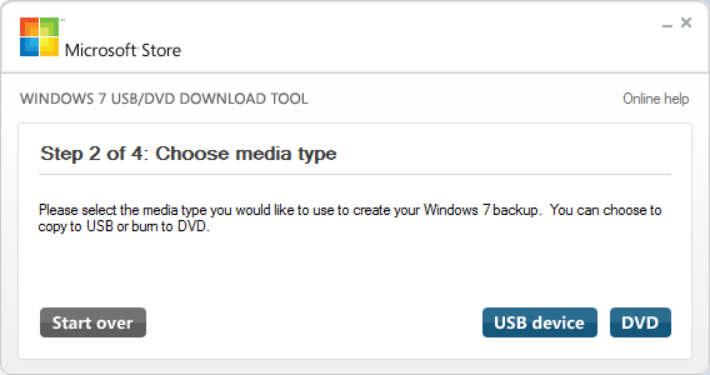
Type selection bootable media- flash drive or disk
Click " USB Device" and we get to the selection window USB devices, which will be bootable at the end of the program. Please note. that all data from the flash drive will be deleted.
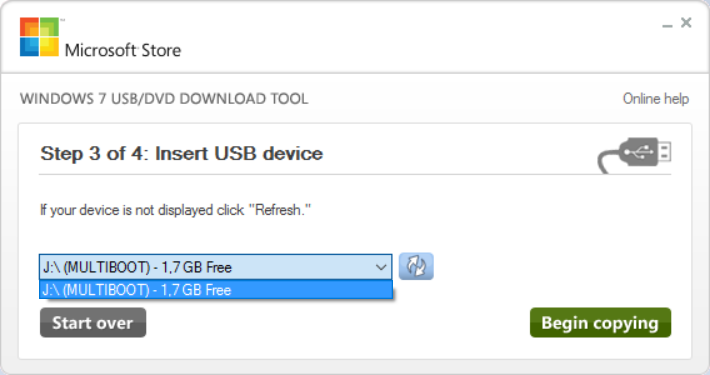
Selecting a flash drive
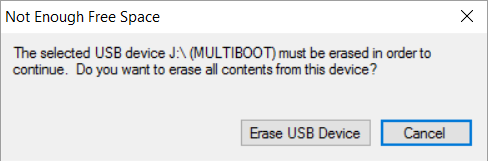
Warning about data destruction on USB storage device
After that, click “Begin Copying”, and in the window that opens, we agree to delete the data with the “Erase USB Device,” and copying files begins, after which it will say “Backup Completed”.
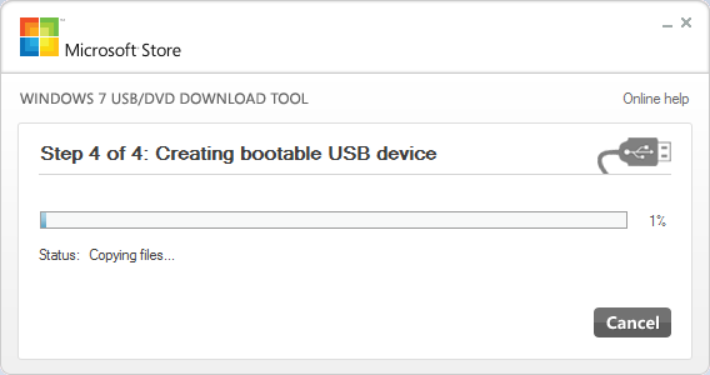
Displaying the process of creating a bootable USB flash drive Windows program USB-DVD Download Tool
This means that our bootable USB flash drive with Windows has been successfully created and is ready for use.

Completing the creation of a bootable USB flash drive from an ISO image


