Hello, friends!
Finding and installing drivers is a real headache for many novice PC users.
In this article, we will look at several examples of where and how to look for drivers for your computer or laptop.
Most often, the problem with finding drivers occurs after reinstalling the operating system. Windows systems. I wrote about how to reinstall Windows using a disk in this article, installing Windows from a flash drive
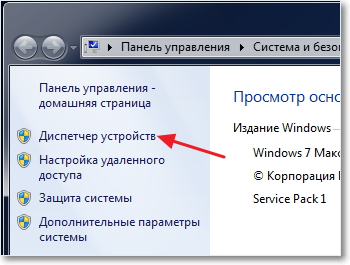
How do I know which devices need drivers installed? To do this, right-click on the computer icon → select the properties tab → Device Manager.
In this example, all drivers are installed correctly and work correctly. If one of the items shows question mark, which means we will need to search for a driver for this device.
Usually, when you purchase a laptop or assembled computer, it comes with a disk with the necessary drivers and utilities. The laptop comes with one disk with all the drivers, and the computer separately; usually these are drivers for the chipset, video card, driver sound card, lan..etc. Everything is simple here, install the disk and start installing the necessary drivers.
Before searching for device drivers for your system, I highly recommend that you familiarize yourself with the five hardware ones. If there is no driver disk, use method 2.
Download drivers from the manufacturer's official website
Let's look at an example Asus laptop K42f. We go to the official Asus website and in the search we ask this model. Select the tab → download and indicate your operating system(you can find out the system by going to → My Computer → (rpm) → Properties).
We are looking for all the necessary drivers. Most important drivers these are Chipset, Sound, VGA, LAN (network) drivers, etc. If this method does not help, use the next, third method.
Search for a driver by device code.
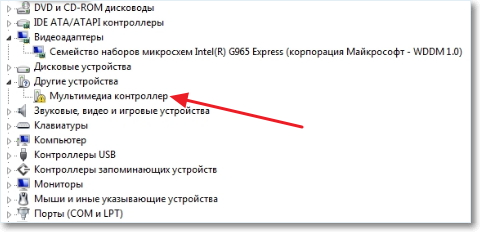
Let's go back to Device Manager. Computer → pcm → Properties. Let's say we don't have an audio controller driver...see the picture.
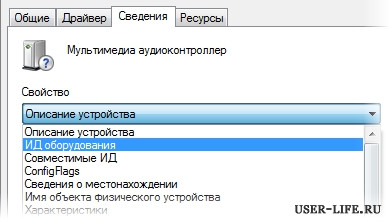
Right-click on it and select → properties. IN open window select the “Information” tab, and in the drop-down menu you need to select → “ Equipment ID" (in Windows XP " Device Instance ID»).
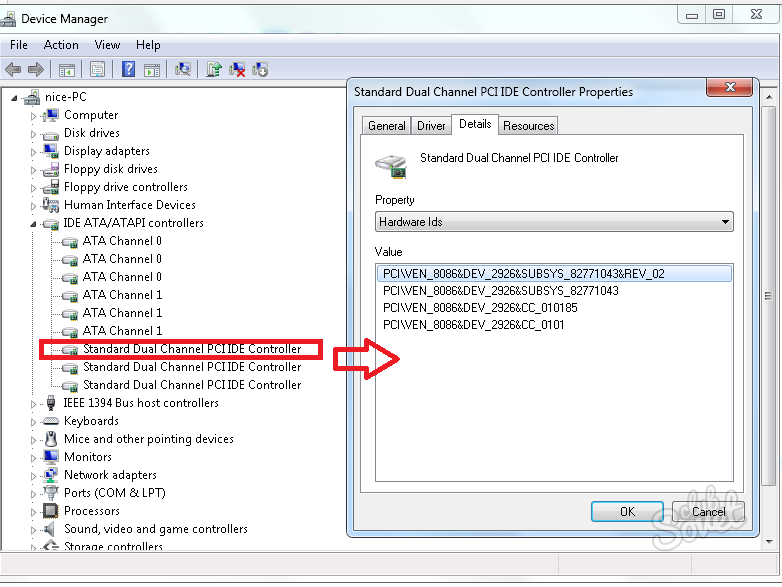
Example of such code VEN_8086&DEV_0046. Select it with the left key and copy it by pressing the key combination Ctrl+C. Now go to the website www.devid.info In the search field paste ( Ctrl+V) copied code.
Click “Ok”, after which a list of drivers for this device will appear → download and install. It didn’t work → use the 4th method.
Driver update program DriverPack Solution
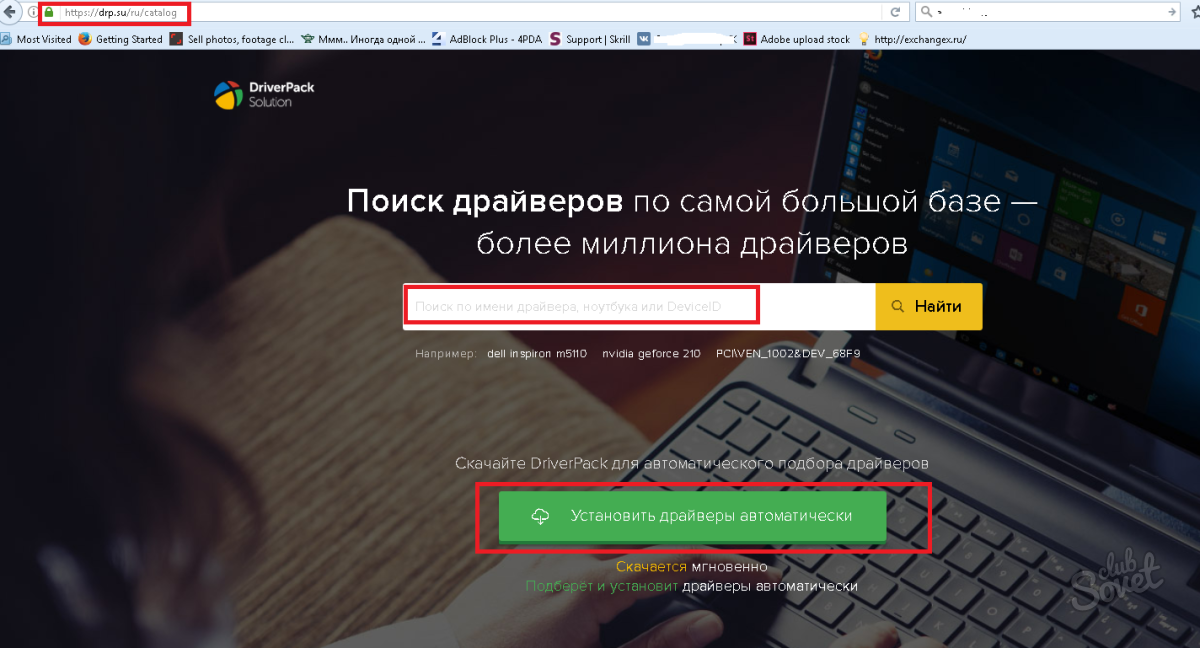
It's pretty popular program updating and searching for drivers. The main advantage of the program is the ability to install fresh drivers in the absence of the Internet. For more information, see the program website. Link to the official website http://drp.su/ru/.
That's all for today. See you in new articles. Don't forget to subscribe to the blog. Good luck!
Drivers are a necessary part software for a fully functioning computer. If you have difficulty finding and installing them, use our step by step instructions given below.
How to install drivers for Windows 7 on a laptop
If you know the model of your portable device(if you don’t know, look on the case, under the battery pack, or the wmic csproduct get name command), you should immediately go to the official website of the manufacturer of our PC. The same fact applies to branded system units produced by Dell, Asus, and other famous companies. All that will remain on the site is:
- enter the model name into the search bar;
- go to the page with a list of programs;
- open the list of available software;
- select the type of operating system - Windows 7 or another;
- download latest versions necessary files.
Installing drivers from official websites is always free and will reliably protect you from the tricks of attackers.
How to install drivers on Windows 7 - Driver Pack Solution program
If you are in no hurry and ready to give manual installation drivers for a while - the first method is, of course, preferable. Otherwise, you can use Driver program Pack Solution from the website https://drp.su/ru/, which automatically finds and installs the necessary software in a few clicks. This is a fairly reliable and fast utility that you can trust (unlike some similar programs). However, in rare cases, automatically installed drivers may not work correctly and require additional intervention. This will happen when the device is unknown to the program, which is why it will install not the best official driver, but a compatible one.
How to find out which drivers are needed to install on Windows 7
When installing Windows 7, a basic set of drivers is already present in the system itself and is automatically applied to existing hardware. For example, the OS will “see” NVidia video card, but not specific model NVIDIA GTX780. Therefore, in order to take advantage of all the benefits of connected hardware, you will have to search on official sites. To find out which devices require drivers:
- press Win+R and write the command devmgmt.msc;
- Device Manager will open;
- go to sections by clicking on the arrow icon;
- look at which devices are marked with a yellow question mark;
- right-click on this item and select “Properties”;
- go to the “Information” tab, in the “Properties” field select “Equipment ID”;
- copy the ID and go to devid.info to determine the hardware;
- We do not insert absolutely the entire value into the search line, but only numbers associated with the VEN and DEV indicators (for example, HDAUDIO\FUNC_01&VEN_10EC&DEV_0280&SUB);
- further, from the search you can download required driver, or go to the official website with the number of the desired model already recorded.
To avoid confusion in the installation sequence, first install the drivers associated with motherboard, and then everyone else. Previously, it is better not to use such popular collections of drivers from disk - this is an easy way to introduce unwanted and malicious programs onto your PC.
Hello dear visitors. After installing the operating system, in most cases this is Windows 7, the question arises, what to do next, what needs to be configured and installed? I can’t even count how many times I’ve installed Windows 7 and I’ve already developed a habit whereby I configure the newly installed operating system and install the most necessary ones to the average user.
Now I will tell you what you need to do first after installing the Windows 7 operating system.
So, you, everything works, everything is loaded, now let's start setting it up.
Activate the operating system.
First of all you need Activate Windows 7. It doesn't matter how you do it, the main thing is to do it :). So that after thirty days the operating system does not start issuing activation warnings. Of course, it all depends on what you choose. It may be that immediately after installation, Windows 7 is automatically activated.

Right-click on the My Computer icon on your desktop, and select Properties. At the bottom of the page there will be information on activating the OS. If you see the message that Windows 7 is activated, then everything is ok, you can move on to another item.
Well, if you see messages like “XX days left. to complete the activation." Then you need to activate the operating system. I think you know how to do it :). WITH Windows activation 7 There shouldn't be any problems now.
And one more thing, if a computer “wizard” installs your operating system, be sure to check whether it is activated. I have seen cases where no one activates anything, probably in order to get a client again after 30 days.
I also turn it off, but this is optional.
Checking and installing drivers.
Then I check if all drivers are installed on the system. Based on my observations, I can say that in Windows 7, problems most often arise with the video adapter (video card) driver. If the system itself was unable to select a driver for the video, then this is immediately noticeable. The quality of the picture on the screen is not very good, everything is big and there is no Aero effect (no transparent elements).
In order to check which drivers are installed and which devices are not recognized, you need to go to the device manager.
Right-click the My Computer icon on your desktop and select Properties. In the window that opens, go to “Device Manager”.
If everything is normal, and all devices are recognized by the system, then you will see something like this:

If there are unidentified devices, or problems with some drivers, they will be displayed with yellow exclamation marks.
 If you have such problematic devices, then you just need to install the driver from the disk that came with your computer. Or download the driver from the manufacturer's website.
One small nuance, it may happen (more precisely, it almost always happens) that Windows 7 will install a standard driver for the video adapter. It will not show up as an unidentified device. But in this case, your video card will not work at its full capacity. Therefore, you definitely need to install the video driver from the disk, or again download it from the manufacturer’s website.
In laptops, I also noticed problems with drivers for LAN, WLAN, etc. All of them can be installed without problems from the disk that comes with the laptop.
Install antivirus.
After you have figured out the drivers, it is advisable to install an antivirus. Which one should I install? Whatever you want, I install NOD 32, I like it the most. After installation, the antivirus also needs to be activated and updated. The keys can be easily found on the Internet.
Browser and Flash Player.
If the computer is connected, or will connect to the Internet, then you need to install a browser. For example, I prefer Opera, but you can install your favorite one. In principle, Windows has a standard Internet, but you won’t get far with it :).
In order for the video to be played on sites, and you can listen music VKontakte, need to . You can download it from the official website http://get. adobe. com/ru/flashplayer.
Installing additional programs.
Next I install the package Microsoft Office, everyone needs him. If you do not want to buy such an expensive product, and do not want to use an unlicensed product, you can install OpenOffice, it is free and decent Microsoft replacement Office.
Multimedia.
The standard Windows Media Player cannot play all video and audio file formats. Therefore, I immediately advise you to install a replacement for it. I install AIMP to play music, and KMPlayer to play video. These two programs do an excellent job, at least I have never had any problems with them. You can download them from the Internet, it won’t be difficult.
So this means: The operating system is activated, the drivers are installed, the antivirus is running, documents, videos and music open. Well, that's all, now we have a fully working and configured computer.
Perhaps you can still speed it up a little.
To do this, you can defragment the disk and clean the startup list, I already wrote about this. Good luck!
The most important thing to do after installing Windows 7 is to find and install drivers for all computer hardware. How it's done? What do you need to know for this? And where can I get them? We have prepared answers to these questions for you.
Where to find and how to install device drivers correctly
To figure out which drivers you need, look at the device manager. Open it through the control panel
or system properties:
- V context menu“Computer” folder, select “Properties”;
- Click "Device Manager" in the navigation bar.
Items marked with a yellow exclamation mark indicate that drivers for some devices are not installed.
The source of drivers should be:
- disks supplied when purchased complete with equipment.
- official websites of device manufacturers.
Most of the drivers for Windows 7 can be found on the motherboard manufacturer's website. If there is no documentation left, you can determine your model using free software for collecting hardware data. Take, for example, the CPU-Z utility. This information is located on the “Board” or “Motherboard” tab (in the English version).
Driver installers in .exe format are launched as regular programs. After you install the entire set, you need to restart Windows 7.
Drivers for other equipment are found and installed in the same way.
Installing drivers for older devices
If the system does not recognize any of the connected devices, you can use the wizard to install equipment that does not support Plug&Play.
- Open Device Manager. Open the "Action" menu and select "Install old device" from there.
- After launching the wizard, select automatic or manual search. Preferably automatic.
- Select your device type from the list.
- If the system has correctly identified the device brand and your model is in the list in the window below, click “Next” - the driver will be installed. If the brand of the device has not been determined, but you have it in your hands installation disk or the already downloaded driver is stored somewhere, click “Have from disk.”
- By clicking “Browse”, indicate the location where the required driver is located.
- If Windows 7 accepts it, the installation will proceed.
- After the wizard finishes, click “Finish” and restart your computer.
How to find drivers for an unknown device
If the device manager identifies the equipment as unknown, that is, it cannot even recognize its type, you will have to search for it yourself.
- Open properties of unknown hardware.
- Open the Details tab. From the “Property” list, select “Hardware ID (or ID)” Right-click on the top line and copy it.
- By using search engines identify the make and model. Then download the drivers you need from the device manufacturer’s website.
Driver backup
In order not to waste time searching for the necessary drivers every time reinstalling Windows 7, they can be reserved. If you installed the same version of the system on your computer, the same bit depth, but, for example, a different edition (instead of the home basic one - extended or maximum) - the old drivers will be quite suitable for you.
To search and backup (save in an archive) drivers, special applications are needed. Let's figure out how this is done using the example of Driver Genius.
Driver Genius is a commercial application, but of all its functions, we only need one that works in the trial version. The program scans connected drives for drivers and writes all that it finds into a user-specified folder. Or, optionally, creates a zip archive, a self-extracting archive, or an automatic installer in exe format.
- Let's download, install and run the program. Select the “Reservation” option from the menu (in the left half of the window).
- Select the drivers you want to reserve. You are unlikely to need the original ones, because they are included in the distribution. It is enough to mark only “Currently used”.
- Select the type of backup: saving to a folder, creating an archive, etc. By default, the “Driver Backup” folder is created, indicating the date and time of creation. Inside it, driver files will be located in separate directories.
- Specify location backup copy on the drive and click Next. If you are going to reinstall Windows 7 right away, do not back up the drivers in system partition, which can be formatted.
- Once the backup is complete, click “Finish.”
What to do if the driver does not install
Equipment installation information is stored in text files with the .inf extension, which are downloaded to the computer along with the drivers. It happens that manufacturers modify devices, replacing microcircuits of one brand with others, and “forget” to enter the relevant information into the driver. In this case, the device may not be recognized by the system and problems will arise with its installation.
There is a fairly simple way out of the situation - manually adding information about the device to the driver inf file. How to do it?
- Go to Device Manager, expand the properties of the problematic hardware and copy its ID (hardware ID from the “Details” tab).
- Open the inf file of the driver for this device with notepad.
- Inside it there is a list of supported hardware codes. You just need to add information about the devices you need there. And do this so that your line format does not differ from the previous ones. There is no need to copy the entire code, only the part that begins with VEN_****DEV_**** is important - this is the manufacturer and model of the microcircuit. The exact model code is written to the SUBSYS_**** parameter.
Most likely, the file will not contain the SUBSYS of the devices you need. Copy the line where the VEN and DEV values match yours, and add your SUBSYS value to it. The driver should now install.
A recently published article looks at installing Microsoft's latest creation. How to setup Windows 7 immediately after installation? You will learn about this in this article. You need to start setting up by displaying the necessary icons on the desktop. You can, of course, do without this by using the Start button menu, but I think it’s more convenient when they are on the desktop. To display icons, you need to click on an empty space on the desktop and select “Personalization” in the list that opens. In the window that opens, select “Change desktop icons.” In the window that opens, check the boxes next to the required icons and click the “OK” button. After this, the selected icons should appear on the desktop. Here, in the “Personalization” window, you can immediately select a theme for Windows and then close the window. When installing Windows 7, they usually create one partition and install the operating system into it, so you need to create  the remaining unallocated disk space, create other partitions. To do this, right-click on the My Computer icon and select “Manage” from the list. In the “Computer Management” window that opens, select the “Disk Management” option. In the Disk Management window we find HDD with the C: partition already created during installation and next to it, right-click on the area labeled “Unallocated”. After this, the “Creation Wizard” window will open. simple volumes“where we click “Next”, and in the next window we enter the required partition size if we want to leave some space for other partitions or immediately click “Next” if we are creating only one partition. You can also assign a letter to the partition or leave it as suggested by the system, which can be changed later. In the following windows, we leave everything as it is and at the end click ready, after which you can see the newly created partition in the Disk Management window. If you
 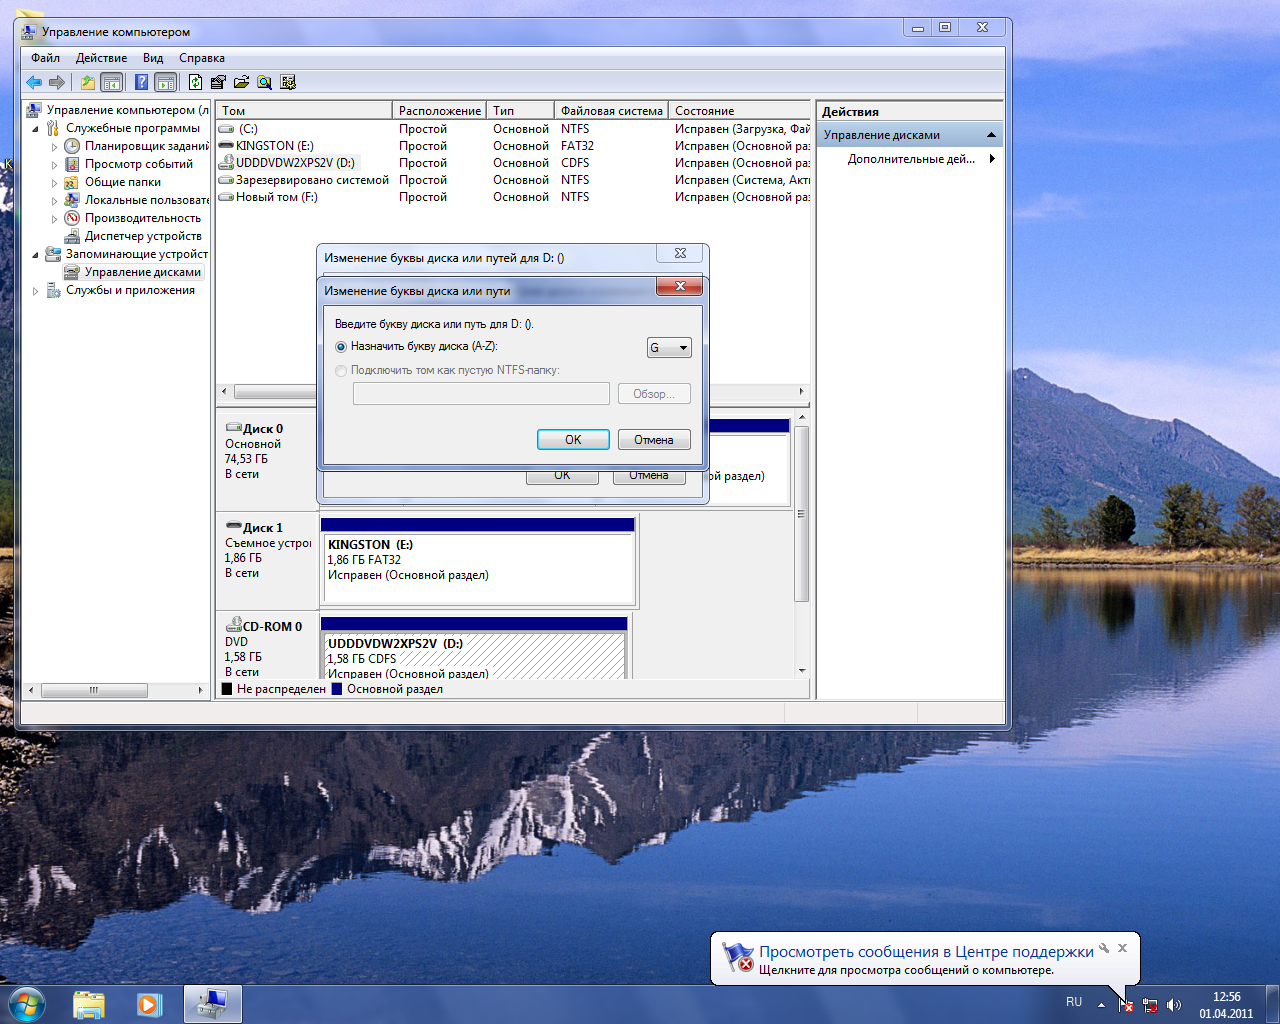 left space for other sections, then you need to repeat everything again to create the next section. More convenient and beautiful when sections hard drive are designated in alphabetical order, but it often happens that the letters are already occupied by other devices. In order to free up the necessary letters, you need to assign others to these devices. To do this, in the “Disk Management” window, you need to right-click on the disk whose letter you want to change and in the list that opens, select “Change drive letter or disk path...”. In the window that opens, click the “Change” button, then in the next window select the desired letter and click “OK”. A warning window will open saying, “Some programs that use this drive letter may stop working. Do you want to continue?" and if there are no programs installed on this disk, then feel free to click “Yes”. If there are programs on the disk, then when you change the letter you will have to reinstall them again.
 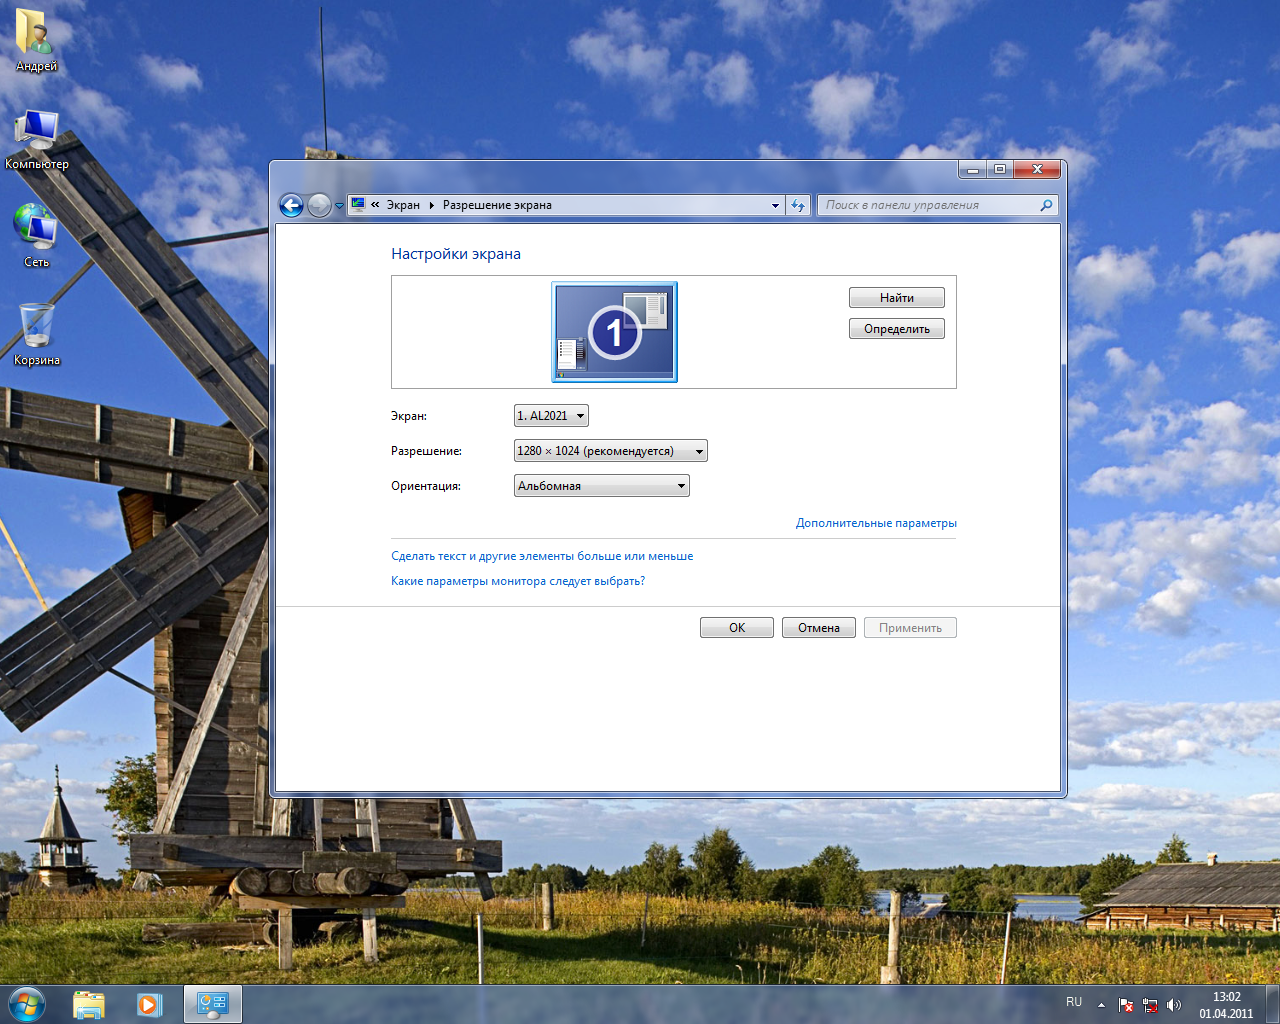 After freeing the necessary letters, you can assign them in the same way sections of hard disk. After installing Windows 7, you need to check if there are any devices with uninstalled or incorrect installed drivers. This can be done by right-clicking on the “Computer” icon or in the start menu on the “Computer” inscription and selecting properties in the list that opens. In the window that opens, click on “Device Manager”. If there are no icons with questions and exclamation marks, then we can assume that all devices detected by the system are installed correctly. The presence of question marks indicates that device drivers are not installed, and exclamation marks indicate that there are problems with the drivers or devices. For weaker computers, in order to improve performance, I also recommend turning off some optional effects. For
 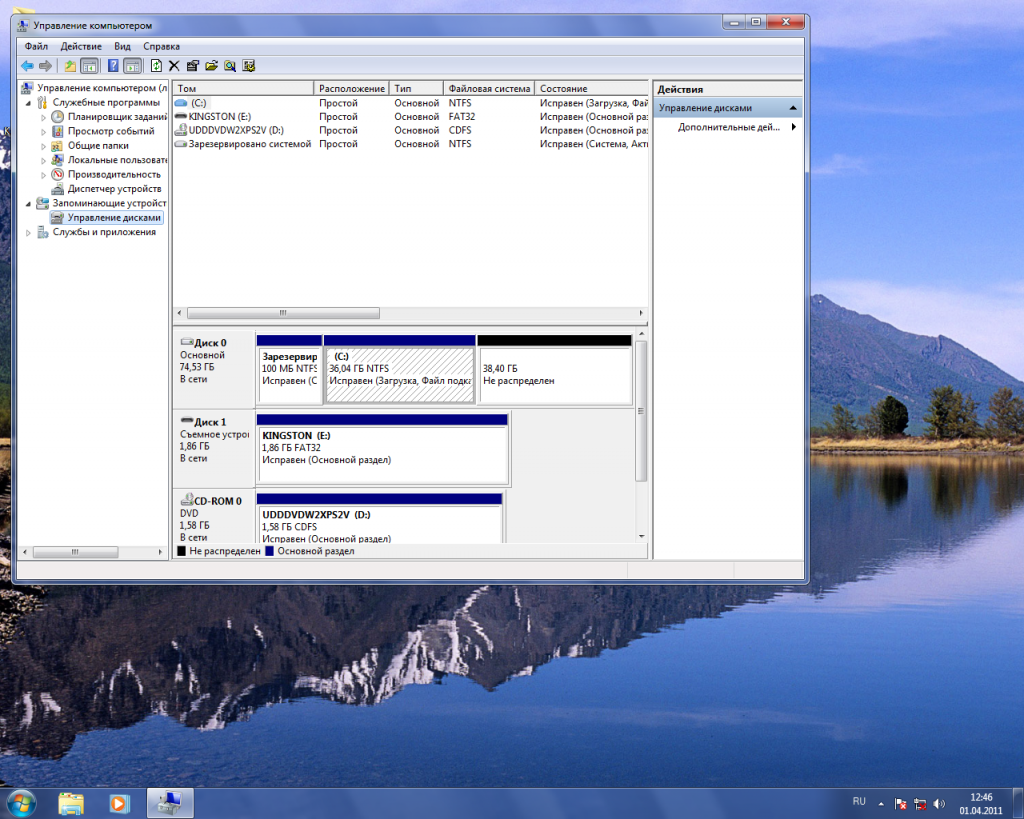 To do this, you need to right-click on the “Computer” icon, select “Properties” from the list, and in the window that opens “ Extra options systems." In the window that opens, click the “Options” button next to “Performance” and select “Ensure the best performance” in the next window. In order not to change the appearance of the desktop and panels too much, you can leave “Use display styles for windows and buttons”, “Casting shadows for icons on the desktop”, “Enable desktop composition” and “Enable transparency effect”. Click “OK” in the windows and close the “System” window. If you suspect that the image resolution does not match optimal resolution for a given monitor, you can check and adjust if necessary. To do this, right-click on an empty space on your desktop and select “Personalize.” In the window that opens, select “Screen” and then “Adjust screen resolution.” If the resolution is not optimal, you can change it using the slider and then close the window by clicking “OK”. This is the primary Windows setup 7 can be completed.


