After installing Windows (or after upgrading to Windows 10 recently), some novice users discover an impressively sized folder on the C drive, which is not completely deleted if they try to do this using conventional methods. This brings up the question of how to remove windows.old. If something in the instructions was not clear, then at the end there is a video guide about deleting this folder (shown on Windows 10, but also suitable for previous versions of the OS).
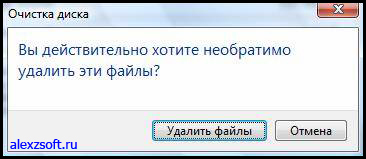
Tip: It is recommended to delete old setup files only if you are sure that you do not need to roll back to a previous version. Follow these steps to check how much disk space you can free up. Click "OK" after you have checked all the entries to start deleting the files. Confirm the "Are you sure you want to permanently delete these files" prompt.
- This immediately loads the elevated interface.
- Check out the download additional information about it.
- You can check other entries to free up even more disk space.
How to remove Windows.old on Windows 10
If you upgraded to Windows 10 from a previous version of the system or used a clean installation, but without formatting system partition hard drive, it will be on it Windows folder.old, sometimes occupying impressive gigabytes. The process of deleting this folder is described below, however, it should be borne in mind that in the case when Windows.old appeared after installation free update before Windows 10, the files located in it can serve in case of problems. Therefore, I would not recommend deleting it for those who have updated, at least for a month after the update. So, in order to delete the Windows.old folder, follow the following steps in order.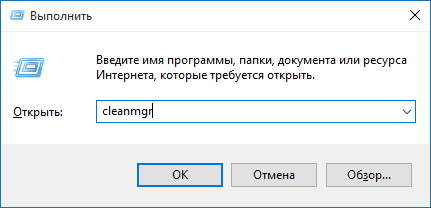 As a result of this, the Windows.old folder will be deleted, or at least its contents. If something remains unclear, then at the end of the article there is a video instruction that shows the entire removal process in Windows 10.
 If for some reason this does not happen, right-click on the Start button, select the menu item “Command Prompt (Administrator)” and enter the command RD /S /Q C:\windows.old(assuming the folder is on drive C) then press Enter.
The main advantage of this method is that it is automated. Install it once and you will no longer have to worry about clearing disk space manually. The downside is that previous installation files are deleted after exactly ten days. This means you only have ten days to test new version, and also that the disk space was not freed earlier.
Note. Backup is still only recommended to be prepared for all eventualities. If you are wondering where these files are located on the disk. Most of the time this is good, but sometimes you get an update that breaks everything.
Another option was also suggested in the comments:
- We launch the task scheduler (you can use Windows search 10 in the taskbar)
- Find the SetupCleanupTask task and double-click on it.
- Right-click on the task name and select Execute.
As a result, the Windows.old folder should be deleted.
Correct removal of windows.old in Windows 7
The very first step, which will now be described, may fail if you have already tried to remove windows.old simply through Explorer. If this happens, do not despair and continue reading the guide.
In this case, you need to uninstall that particular update. For the most part, this is a good thing, since too many people never bother installing updates - even critical security updates. There are several ways to prevent bad updates from ruining your day.
You can have them not download automatically. Unfortunately, none of these strategies help if you've already downloaded and installed an update that broke something. The catch is that these files are only kept for about a month. If the build you install is too unstable, you can revert to the one you were previously using. Also, note that rolling back a build is not a way to permanently discard future new builds.
So, let's begin:

Perhaps the steps already described above will be enough to make the folder we don’t need disappear. Or perhaps not: empty folders may remain, causing a “Not Found” message when you try to delete them. In this case, run command line as administrator and enter the command:
How to delete previous Windows installations or Windows old folders?
You will then see the familiar uninstaller interface showing the history latest updates, sorted by installation date. Each build is a new list with new minor updates applied to it. You don't need to keep them unless something went wrong with the update and you need to revert to your previous version. Don't try to delete a folder in Explorer either. To do this, go to the Start menu and type Disk Cleanup.
Launch it and select system disk as the drive you want to clean. You may find other files here that you want to delete to help solve your disk space problem, so you can select those as well. The disk space issue should be resolved.
Rd /s /q c:\windows.old
Then press Enter. After executing the command, the Windows.old folder will be completely removed from the computer.
Video instruction
I also recorded a video instruction with the process of deleting the Windows.old folder, where all actions are performed in Windows 10. However, the same methods are suitable for 8.1 and 7.
If nothing in this article helped you, ask questions and I will try to answer.
Why should you delete this folder?
Cleanup analyzes your computer. At the end, a list of “Files that can be deleted” will appear. Don't proceed unless you are sure you want to eliminate them, even if you know you do. Proceed with the removal by clicking the "OK" button below. Confirm the alert you want to issue. Follow these steps.
- Open it, carefully check everything contained in the subfolders of this folder.
- This is especially true for “Users” or “Users”.
- Then click on your categories on the right in System and Security.
- In the new window, right-click under Administrative Tools.
- Get a list of them.
- Double-click the Disk Cleanup icon.
- On the main screen, tap the "Clear" button system files" below.
- It takes up a lot of space on your hard drive.
- Get rid of it, leaving you free to use it however you want.
- It includes things that no longer serve you.
- Once you save what you're interested in, it no longer has a function.
Hello dear readers of the site site. Today I would like to tell you, and more specifically windows old folders. In the article I described a method for cleaning a computer, but did not describe how to remove previous Windows installations and now I'll fix it.
How to delete previous Windows installations or Windows old folders?
It’s actually very easy to delete, at first, when I just saw it again folders Windows old and naturally tried to remove them, but that was not the case, they did not remove them. And then I began to look for a solution that was right under my nose.
Advanced installation mechanism
Until you are sure there is nothing in it that you need. This version has already been around for some time, and has already spoken in detail about its strengths and weaknesses, and even the occasional privacy scandal. However, as much as some users may want to choose this, it may possibly prevent them from reinstalling everything from scratch, which is always advisable to avoid. Well, you can go back without reinstalling everything and cleanly, although obviously the option hard formatting disk and reinstallation will always be there.
How to remove windows old in Windows 7
The point is that remove Windows.old folder It doesn’t work because the system administrator is different, and the previous one still has the rights to delete. You can, of course, set administrator rights in the folder properties or delete as administrator, but why, when the system can do everything itself.
To do this, go to start - all programs - standard - utility
This method is exclusive to users who have updated previous version, which, as we already mentioned, eliminates the need for a clean install. To do this we will have to go to the Start menu and click on the configuration application. 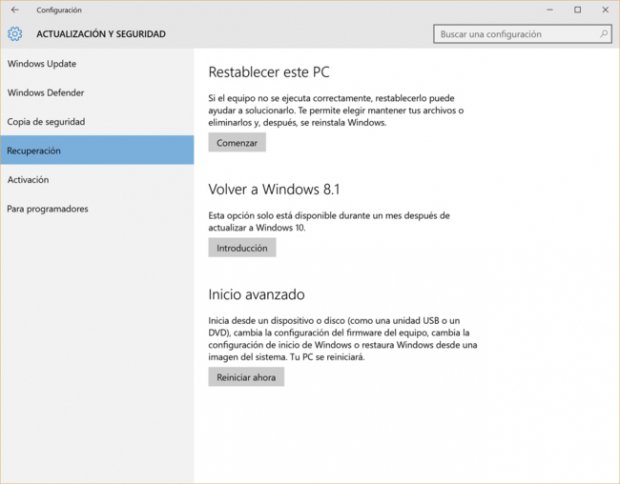
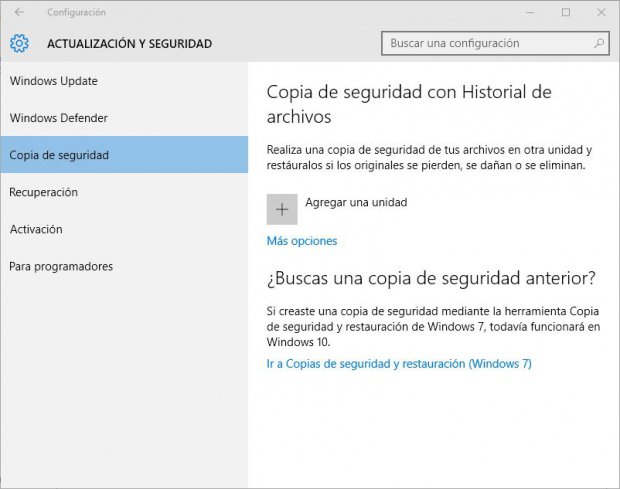
Having opened the configuration, we need to go to the “Update and Security” section, and in it - “Recovery”. Just click the Start button inside this section.
The downgrade program will recommend that you do backup copy before starting the process, but since we won't lose any user data when a return is not fundamentally necessary. It's important to clarify that this option is only available 30 days after your upgrade. If you have exceeded this period of time after updating or have performed a clean install, then read on.
Select the disk on which you have your previous operating system.
Mine is drive C.
Click OK.
The system scans what can be deleted.

The deletion list appears unnecessary files from a Windows perspective. I wrote about this in an article.
Restore factory settings

To do this, you will need a system installation environment. Each of the images has its own characteristics during loading. Restart your computer and from there we will follow the instructions provided to us on the screen. 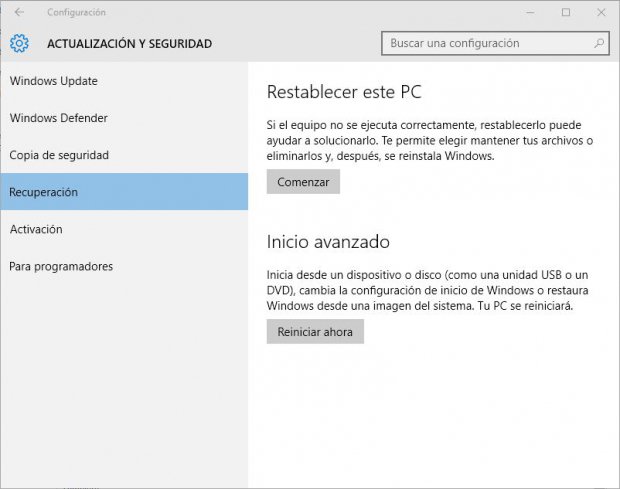
This is another option you have if you have updated your operating system and took more than thirty days to return.
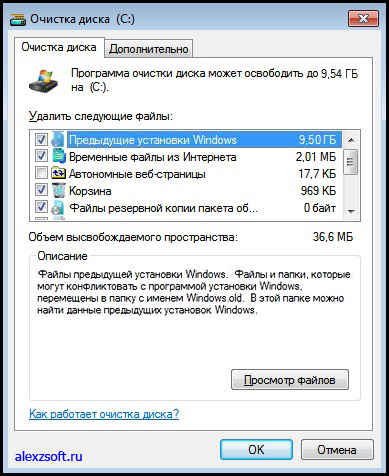
Choose previous Windows installations, Well, if you need to, go through the list and check the boxes that you need. And press OK.
A window will appear in which click delete files. After cleaning, restart your computer and preferably do .
A dialog will then appear with three options.
- Save my files.
- Delete everything.
- Restore factory settings.
The most modern is file history backup. Then we connect external drive with enough space and wait for the first backup to complete.
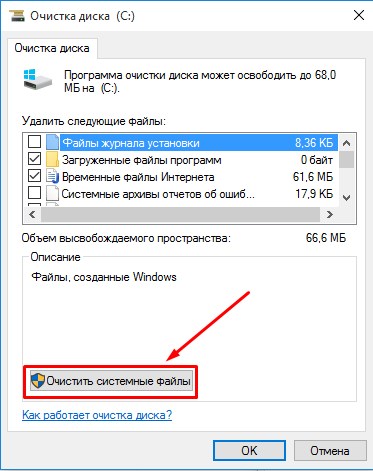
A Control Panel window will appear in which you must click on “Set Up Backup”. Finally, all that remains is to connect an external unit with sufficient space and follow the assistant's instructions until the backup is completed. You can delete it, but not in the same way you used to delete folders, so be careful. However, you shouldn't worry about this - this is not the way to get rid of this folder. Click Clean up system files.
Windows old how to remove on Windows 10 and 8
In Windows 8 and 10, the procedure is the same, only to launch the cleaning tool you need to open the computer, right-click on the drive on which this folder is located.

![]()
Removing old system files
Additionally, you can use this tool to remove other unnecessary files that are taking up space on your computer. Is it possible to return to latest version? Yes, in this article you will see another tutorial with all the steps to go back to the previous version.
There are 9 steps, so don't get lost! Although this operation may not affect programs or files on your computer, as the statement says, "insurance is dead of old," it is always recommended to back up the following, among other things.
- File backup.
- If it's a laptop computer, check the condition of the battery.
- Turn on the power if necessary.
- There is internet.
Don't be alarmed, the program will only begin analyzing the disk.

After analysis, it will suggest files for deletion. But we click clean system files.
Open Update & Security. Click "Recovery" on the left side. Click "Introduction" to "Revert to Previous Build". You have to be a little patient and wait, it takes a few seconds. The choice is yours, but you must choose one of the options presented.
- My apps or devices don't work on this build.
- Early builds seemed easier to use.
- Early builds looked faster.
- Earlier builds seemed more reliable.
- Other reasons.
The program will again analyze the files to be deleted and find Previous Windows installations in the list. We put a tick in this item and in other items if you need to delete something else and click OK.
All, previous Windows installation deleted, as well as the non-deletable windows.old folder too :)
To select Next, it is disabled first, but once the fields are automatically activated, continue the process. If you have any questions, you can contact support by clicking "Contact Support". A window will open from which you can contact support via chat, call or ask the community. When accessing the support, this blue window will be closed.
If yes, click "Back to previous build". You can even undo what has been done so far by clicking "Cancel" and everything done here will be undone, all in vain. Luckily, it is very easy to permanently remove these files from your system. Just follow the guide below.


