Most PC users are familiar with the terms Windows and BIOS. However, not everyone realizes that in some cases the operating system can be restored, and it does not necessarily need to be reinstalled. After all, reinstalling the OS in some cases can cause invaluable harm to existing data. And therefore, many will be interested in learning how to restore the system through BIOS. Read about this in our article.
System recovery via BIOS
Modern technologies are developing rapidly, but most of the principles and methods of operation of technology remain unchanged. Each new version of the Windows operating system family receives a more advanced set of functionality. For example, when software glitch When working or installing any drivers, the process of restoring the system in a newer OS will be much faster.
On this moment System recovery occurs through BIOS. Even other types of systems (like Linux) contain an OS recovery option. Therefore, it is very important to know how you can make Windows work after a virus attack or a critical crash. At the moment this can be done using installation disk(flash drive), a special resuscitator, and in more modern versions - from an SSD drive or a special hard drive partition of your PC or laptop.
How to restore the system through BIOS
Please be reminded that Microsoft has stopped supporting Windows versions XP since April 2014. However, even despite this, quite a lot of companies (including in the USA and Europe) continue to use the services of this OS. Therefore, the question of how to restore a Windows XP system through BIOS without a disk remains quite relevant. After all, even taking into account the good stability indicators of this system, it does not tolerate frequent installations and uninstallations. software(especially if it is not certified).
Before restoring the Windows XP system via BIOS, find the installation disk with this system, and then:
- insert it into the CD-ROM and reboot the device;
- When starting the system, press the DELETE, F1, F2 key to enter the BIOS;
- click the Boot Device menu item;
- choose first place optical drive, save the changes and restart your PC:
- after the line “Press any key” appears on the screen, press the spacebar - they are activated functionality installation disk;
- in the dialog box that appears, press the “R” button, then select the desired OS version (if there is more than one on the PC) and press Enter;
- now enter fixboot in Latin letters, press Enter, and then confirm with the “Y” key;
- the process may take some time, after it is completed, enter the fixmbr command into the line and press the keys, as in the previous step;
- entering the Exit command will reboot the PC, after which you can work as usual.
Thus, you were able to save yourself from a rather lengthy OS installation process. Also, do not forget to enter the BIOS using the method described above and change the method of booting the system from CD-ROM to hard drive.
As you can see, getting Windows XP back up and running is not that difficult. Use our tips on how to restore your system through BIOS and enjoy the smooth operation of your PC for as long as possible. In more modern versions of Windows (7 and 8), you can restore the OS in even fewer steps - don’t be afraid to use advanced products!
Most PC users are familiar with the terms Windows and BIOS. However, not everyone realizes that in some cases the operating system can be restored, and it does not necessarily need to be reinstalled. After all, reinstalling the OS in some cases can cause invaluable harm to existing data. And therefore, many will be interested in learning how to restore the system through BIOS. Read about this in our article.
System recovery via BIOS
Modern technologies are developing rapidly, but most of the principles and methods of operation of technology remain unchanged. Each new version of the Windows operating system family receives a more advanced set of functionality. For example, if there is a software failure or the installation of any drivers, the process of restoring the system in a newer OS will be much faster.

At the moment, system recovery occurs through BIOS. Even other types of systems (like Linux) contain an OS recovery option. Therefore, it is very important to know how you can make Windows work after a virus attack or a critical crash. At this point in time, this can be done using an installation disk (flash drive), a special resuscitator, and in more modern versions - from an SSD drive or a special hard drive partition of your PC or laptop.
How to restore the system through BIOS
It should be recalled that Microsoft stopped supporting the Windows XP version in April 2014. However, even despite this, quite a lot of companies (including in the USA and Europe) continue to use the services of this OS. Therefore, the question of how to restore a Windows XP system through BIOS without a disk remains quite relevant. After all, even taking into account the good stability indicators of this system, it does not tolerate frequent installation and removal of software (especially if it is not certified).
Before restoring the Windows XP system via BIOS, find the installation disk with this system, and then:
- insert it into the CD-ROM and reboot the device;
- When starting the system, press the DELETE, F1, F2 key to enter the BIOS;
- click the Boot Device menu item;
- select the optical drive first, save the changes and restart the PC:

- after the line “Press any key” appears on the screen, press the spacebar - the functionality of the installation disk is activated;
- in the dialog box that appears, press the “R” button, then select the desired OS version (if there is more than one on the PC) and press Enter;

- now enter fixboot in Latin letters, press Enter, and then confirm with the “Y” key;
- the process may take some time, after it is completed, enter the fixmbr command into the line and press the keys, as in the previous step;
- entering the Exit command will reboot the PC, after which you can work as usual.
Thus, you were able to save yourself from a rather lengthy OS installation process. Also, do not forget to enter the BIOS using the method described above and change the method of booting the system from CD-ROM to hard drive.
As you can see, getting Windows XP back up and running is not that difficult. Use our tips on how to restore your system through BIOS and enjoy the smooth operation of your PC for as long as possible. In more modern versions of Windows (7) you can restore the OS in even fewer steps - don’t be afraid to use advanced products!
Most PC users know that there is such a “Windows” and that you can install the system through BIOS. Naturally, over the past 10 years the number of advanced users has become much larger, but the quality of their knowledge often leaves much to be desired: it is often fragmentary, not supported by their own experience. For example, very often such a “specialist”, instead of restoring the system, simply reinstalls it. Not to say that this is completely wrong, but usually in this case data and user settings are lost. In organizations, this method is almost always unacceptable, since specific programs may be installed that require knowledge in their configuration that a “specialist” does not have. You need to understand that reinstalling the operating system is the last resort and that almost all problems can be solved by restoring the system using standard means.
Different versions of Windows - different recovery options
You need to understand that progress does not stand still; it is constantly developing both technology and methods of handling it. You need to understand that everything new, to one degree or another, is based on the old and well-studied. The general principles and methods remain the same as for Windows 95 and for Windows 8.1. Although each has the tools and reliability new version getting better and higher. So, if you need to restore your system after a critical error caused by installing poorly compiled drivers or crooked programs, a newer OS will provide more options and the process will be faster.
Since the revolutionary Vista OS, operating system recovery mechanisms have become more advanced and reliable. Any system recovery on a PC is performed from within the BIOS. Even modern ones, like Ubuntu and other versions, have boot menu"operating system recovery" item.
For all those who need to save their computer after an attack by viruses or other troubles, you need to know that from under the BIOS you can easily start the system recovery process, both using an installation disk and a special resuscitator. And in new editions, starting with Vista, it is possible to download from a special section hard drive or SSD media.
The era of Windows XP is ending
Beginning in April 2014, Microsoft discontinued extended support for this older operating system. Supporters of this system will say that there is nothing to worry about, antiviruses and all major programs, including browsers and flash players, still support this OS. But you need to understand that this will not last so long and progress “cannot be trampled on.” However, most corporations and large companies in the US and other countries continue to use this OS. And the question of how to restore HR after an accident is still quite relevant. Indeed, despite its high stability, this axis still has many security flaws and does not like frequent installations and reinstallations of software, especially if it is of dubious origin.
Naturally, systems like XP or Server 2003 require much less system resources, they are fast and stable on older PCs. When using them, it loads less HDD and other PC elements, in particular the motherboard, this is very important for laptops, the cost of which is quite high. However, manufacturers of computer hardware, especially laptops, have long abandoned XP due to its advanced age and the cancellation of support by the manufacturer. Since 2007, drivers for XP have almost ceased to be produced. And using driver packs is not always advisable, as it can lead to unstable operation of the PC and eventually damage it. Or you will have to decide how to restore XP after such dubious drivers. All experts advise using only drivers from the official websites of equipment manufacturers or the Microsoft developer website.
No matter how much we would like to extend the life of XP, it becomes a thing of the past every day. An alternative is more demanding hardware Windows Vista, 7; 8; 8.1. Many will object by saying that lightweight distributions Linux is better Total. However, it is difficult to find drivers for them; a lot of things need to be added and completed yourself, you need good preparation plus retraining for Linux programs. Moreover, many modern Linux systems are almost equal in requirements to the new Microsoft operating systems.
Restoring the legendary Windows XP after errors
But let’s return to the issues of the ability to restore Windows XP from the BIOS. To get started you will need boot disk with this system and good instructions.
So let's start, first:
- You need to insert the installation disk into the PC drive and restart it. When starting the computer, press the F2, F1 or DEL key.
- And here you need to find the menu responsible for the boot order from Boot devices Device.
- From the list that appears, you need to select the optical drive (the BIOS menu will tell you which keys to use to make the selection and how to save it). It is necessary to save all changes in the BIOS program.
- After this, the PC will reboot, and when you see the message Press any key... on the display, you will need to press any key on the keyboard and activate the installation disk. Next, you will be presented with a dialog box. In it you need to press the R key (for XP). In a new window you will need to select the OS to restore (rarely, but it happens that several OS are installed on the PC). If there is only one, the recovery system will show its folder C:\WINDOWS. Then you need to hold down the Enter key. Since anyone can restore the system, the reinstallation option should be considered as a last resort.
- Next you will see a line in which you need to enter fixboot from the keyboard and press “Enter” and “Y”. After all these combinations, the OS will begin setting up its boot sector on the hard drive.
- When the process is completed, a notification will appear indicating that the boot sector was successfully configured. Then you need to enter the fixmbr command from the keyboard, then press “Y”. These teams will create a new boot entry. Then you need to enter the Exit command, which will force the PC to reboot, and then it will work in its normal mode.

That's it, you saved the system and saved a lot of time. Anyone who wants it to start up can go into the BIOS again and switch boot from optical drive on hard.
Restoring Windows 8 OS
These OSes can be restored from an archived image or directly from the installation disk using the console menu items.
Dwelling on the example of the newest Windows versions, we note that the new Refresh Your PC functions are very convenient and easy to use.
In this edition of the "windows" it became possible to update the system via BIOS without losing files (Refresh Your PC) or deleting all user data and complete reinstallation systems (Reset Your PC).
Each method has its own advantages and disadvantages. But during the announcement of Win 8, they said that it would become very stable and almost “eternal,” with the ability to endlessly self-repair without losing user data and personal settings.
Refresh Your PC is much more interesting from any point of view; reinstalling the system is, of course, good, but Win XP and older systems also had a similar opportunity. We want to find out how to restore system functionality without losing data and settings. For many advanced users who have been working on Windows XP for a long time, this will seem almost impossible, but new editions of the Microsoft OS are capable of this.
Often users do not understand how to restore the system using the Refresh Your PC function and how does the Win 8 system restore occur? First, you need to clarify that in the Russian edition of the OS this function called updating a PC without deleting files, this is the same as reinstalling the system. This can be done using the installation disk, in which case the user will save personal files on drive C and applications for Metro, and all programs you have installed will be completely deleted.
If you created a WIM image of the system, then during recovery the OS returns to the state of the OS at the time the image was recorded. The image creation procedure itself is performed by the recimg utility. When you do not have an image, Refresh Your PC will require an installation disk with the system, in which case you can still automatically restore the system, even if it does not start.
Refresh Your PC is a new feature in Win8
The benefit of the function is simply colossal and lies in the fact that a not particularly trained user needs to make a minimum of physical movements to return the system to functionality.

In case of critical errors and inability to start, Win 8 itself enters the recovery menu. In this case, the user has the opportunity to boot from both a previously created recovery disk and an installation disk. In the second case, you will need to select the OS language and click “System Restore”. By clicking "Diagnostics" and then "Restore", you will start an automatic process that will ultimately restore your system to a fully working state. The only trouble is remote programs, but the OS will leave a list of everything deleted and provide you with links to the official sites of programs that were deleted.
The function has become no less simple Windows recovery 8 from archived image. The developers included the recimg utility in the OS, which will quickly create a system image and remember its location in order to quickly restore Windows functionality at the right time.
To create a backup image of Win 8 in a command prompt running as an administrator, enter the command: recimg /createimage D:\backup.
After which, your operating system will be restored from this image automatically, even when launched from the installation disk. Thanks to this archived snapshot of the system, a rollback is performed even without installation disks, immediately upon entering Windows environment RE.
In conclusion, it should be noted that even old versions of the OS allow you to restore system functionality at least for Reserve copy data or completely adjust the system in the case of new OSes, and there is no need to immediately go to extremes, rearrange systems and lose data.
Windows is a popular consumer operating system that powers millions of computers, laptops, and mobile devices.
The environment is different high performance and stability, but even that sometimes fails.
By knowing how to run System Restore, you will protect yourself from problems associated with such failures.
A restore point is a copy of the state of the system at a specific point in time. Windows is programmed to independently create restore points when changes are made to the configuration as a result of installing drivers, network components, programs, etc. (see).
Checkpoints are also created every week if no major changes have been made to the configuration within the previous 7 days.
If desired, the user can create a new restore point himself. This is done without the need to use third-party software, through the menu standard means called "System Restore".
To get to your destination, open Control Panel

Go to the System and Security tab.

In this menu, select the System category, from there go to Advanced system settings. Here, select the “System Protection” tab.

alternative path – “This PC” → “Computer” → “System Properties”


The procedure is the same for all current OS editions. In Windows 8.1 and later, you can additionally activate/deactivate protection here.
To create a restore point, click the button of the same name and set the desired name. Here they are entered Extra options: Space allocated for storing recovery points, etc.

The list of copies is available on the “System Restore” tab. If Windows begins to behave suspiciously, go to the specified dialog and roll back to the last working state.
System recovery through BIOS using a recovery disk
If the computer does not boot, perform a recovery through the BIOS. To do this, you will need a special recovery disk or with in an installation manner Windows.
Follow the procedure below:
- insert the disk/flash drive and reboot the device. As soon as the laptop/motherboard manufacturer's splash screen appears, click the Del key several times (popular). If Del doesn't work, try Esc or F2. If this does not work, check the button for entering the BIOS in the instructions for motherboard(cm. );
- in the BIOS go to the 1st Boot Device tab (the name may be different, but the essence remains the same). In the menu that opens, select the disk/flash drive as the first boot device. Click the F10 button or manually select the option to exit the BIOS and save the changes made. After turning on, the computer will prompt you to press any key to boot from a flash drive or disk (see). Do this and wait for the first dialog box to appear;
- The bootloader will offer or restore it by fixing the existing problems. Select the appropriate option and follow the installer's further instructions.
After waiting for the first dialog menu to appear, click the R button on the keyboard of your computer/laptop.
A window will open with a list of installed operating systems. If there is only one, you will be shown only the C:WINDOWS folder (the disk index may differ depending on which partition the OS was originally installed into). Click Enter.
A command prompt will open. You need to enter fixboot. Next, click Enter. After this, confirm your intentions by pressing the Y button. The system will begin the process of repairing the boot sector. After waiting for a message about the successful creation of the boot sector, enter command line fixmbr.
Confirm your actions again by pressing Y. The program will create a new boot entry. After waiting for notification that this process has completed, enter Exit at the command line. If everything went well, the device will reboot and it will start working normally.
If you do not do this, the computer will continue to try to boot from a flash drive/disk in the future, which will not have the best effect on its startup speed (see).
Features of Windows 10 system recovery
Having updated to the latest version of Windows 10, many users were unpleasantly surprised that the recovery function is disabled by default. If you encounter a similar phenomenon, first of all, activate the recovery function.
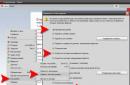
To do this, open the “Control Panel”, go to the “System” section. On the left side of the dialog box, select the "System Protection" link.
Going to “Protection Settings” (you can find it by opening Protection and in the Properties subcategory), select the system drive and click “Configure”. On the “Recovery Options” tab that opens in the “Protection” menu, activate the function by placing the switch in the appropriate position.

If a notification appears with text warning you that some old points may be deleted, confirm your intentions by clicking Yes/OK.
Otherwise, the procedure for restoring Windows 10 is no different from resuscitation earlier versions OS.
Use any of the appropriate instructions previously discussed.
Possible errors during system recovery
In the vast majority of situations, the described recovery methods allow you to bring Windows back to life. Along with this, various failures and errors cannot be ruled out.
If you use a special disk or flash drive, such problems do not arise: either Windows is restored and you continue to use the computer normally, or you simply forget about the failures that occurred and reinstall the OS (see).
The user has to deal with errors (they are indicated by a certain index consisting of the letter “x”, zeros and additional letters/numbers or a text description) mainly in cases when Windows is loaded and attempts to restore the system are made through the corresponding section of the Control Panel.
Under such circumstances, before resorting to drastic measures (reinstalling the OS), you can normalize operation through Safe Mode.
Do the following:
- press the computer's power button, and then click on the F8 key several times until the menu appears additional ways downloads. If before this the computer prompts you to select a device to boot, select the hard drive and then click F8 until the mentioned menu opens;
- highlight the line “Troubleshoot computer problems” and click Enter;
- wait until the recovery program starts;
- in the menu that opens, click Next;
- in the section that opens, enter the name of the computer administrator and click Ok. By default, has administrator rights Account, created by Windows installation and the first boot of the system;
- in the section for selecting the appropriate method, double-click on Restore OS image;
- wait until the console opens, then press 1;
- wait until the system prompts you to press Y as confirmation of consent to clear and return initial state disk storage. Confirm your choice. If nothing happens, change the keyboard layout to English (see);
- wait for the process to complete, reboot the device and try turning it on in standard mode.
If this does not help, use the previously discussed recovery method from a disk/flash drive.
Now you know how to normalize Windows operation. The information obtained will help you not only to navigate correctly if failures occur in the OS, but also to save on the services of third-party computer tuners (see).
BIOS- a basic information input/output system, in other words, a microcircuit that allows you to start a computer even if there is no operating system installed on it. The BIOS stores the basic configurations of the computer and allows you to change them in a special system menu. Among these configurations are those that are necessary to successfully launch an operating system recovery.
If restoring the operating system using built-in programs is impossible due to the inability to start it, recovery through BIOS comes to the rescue. By using this method your main files will be saved and your computer will be able to start successfully again.
Recovering the system using BIOS settings
To begin recovery, you must have a boot disk with Windows preinstalled on hand. Alternatively, you can use a bootable flash drive.
Attention! The SETUP system menu stores configurations that are best not changed by an inexperienced user. Changing settings without knowing their functions can lead to improper operation of the computer and, as a result, irreparable damage.
Step 1: Setting device boot priority in BIOS

Stage 2: Recovering the system using a boot disk


- Startup recovery.
If there are hardware failures or improper operation of the operating system due to viruses, this function is useless. But, in the absence of the above, you can try. - System Restore.
This is the right option for us because it uses boot files on the recovery media. - Restoring a system image.
This option is used by users who restore the system using a backup.
This completes system recovery using BIOS. If you don't have it on hand boot image operating system, unfortunately, such a recovery will not suit you. If both the boot image and the recovery checkpoint are missing, you will have to reinstall the operating system. All files located on system disk, in this case they will be completely destroyed.
Note! To avoid losing files that are important to you in emergency situations, save them on a second logical drive, separate from the system one.
Never be lazy to copy the operating system image, at least once a month. One hour spent a month can save your valuable files and, most importantly, your nerves.