What is the meaning of the word "priority"? Oh, weak? It's a privilege, just like there was a hierarchy in Egypt: pharaohs and slaves, you know the difference? Some stones are dragged for the pyramids, while others command - democracy!))
So processes have priorities, oh, you don't know what processes mean!
An active process is any running application: a browser, a game, a program, and the like. This is the priority and allows us to allocate all the resources to support the process, or vice versa, limit the process in capacity.
Why change process priorities?
Imagine that you are playing a computer toy, but other applications take some of the resources, especially those that also like to consume.
So, to the operating windows system understood that all possible capacities should be given to one single process, that is, the game - we need to set the highest priority to this process (in our example - computer game).
Phew, I hope you understand my message. And now let's talk about the main thing ..
What are the priorities in windows
- Real time priority - in fact, Windows now considers this process the goal of its nature, all possible resources are allocated only to this process.
- High priority - Other applications get a bit of resources, but the main pie is still given to one process.
- Above Average - A small advantage is given to the selected process.
- Medium priority - usually, all processes initially have the status “medium”, so it can be said that the process is working normally.
- Low - Windows completely blocks the process and does not allow it to manifest itself in all its glory.
How to change priority?
I will now talk about windows 7, because this is the one I have on this moment system.
1. You need to press the combination of buttons Alt -Ctrl - D and a list will open, you need to select "task manager".
2. If you want to change the priority of bulky and visible applications, say, a browser, then you need to select the “applications” tab and right-click on the appropriate active application, and then click “go to process”.

3. Next, you will see that the desired process is highlighted in the processes tab, usually it is called like the specified application itself, all that remains is to blurt out the process with the right mouse button and hover over the priority, and then select the appropriate one.
As already mentioned, it is better to give high priority to applications that consume a lot of resources and that you are using at the moment - this can be anything: games, programs, browsers, etc.

Thanks for watching, leave a comment if you have any questions!

zavlekyxa.ru
Managing Process Priorities in Windows Vista and Windows 7
Surely, almost everyone knows what a process priority is, but if not, I will try to briefly explain. This concept, in a certain sense, is the same for windows, and for Linux, as well as for some other operating systems. Now we will talk about the operating systems windows Vista and windows 7. windows Vista and Windows 7, however, like previous versions, are multitasking systems, i.e. they can execute many programs in parallel, moreover, they are also multi-threaded, but this is already a deviation, more precisely, an unnecessary deepening into the topic. Each program running in windows is a process or several processes. For each process, when it starts, memory is allocated in the system, and a default priority is also set, unless the program itself mentions the priority with which it must be started. The higher the priority of the process, the more processor time is allocated to it, the lower the priority, the less processor time is allocated to the process. Or if plain language- the higher the priority, the more often and more the processor "pays attention" to the process and its operations, and the lower the priority, the less "pays attention". Accordingly, this affects the speed of the execution of a program. In windows 7, I was initially surprised by the fact that, in fact, purely decorative processes, like sidebar.exe (gadgets on the desktop), are given exactly the same amount of processor time as the rest of the processes. At the same time, sidebar.exe itself does not perform any super important and super necessary functions. So why should it devote as much CPU time as, for example, to a heavy resource-intensive application, like a 3D game or a 3D editor with a large scene? Based on this question, I began, as they say, to play with process priorities. The main thing I understood is that the priority is Normal (Medium) user programs it is better not to rise, because then windows Vista / 7 may begin to incorrectly allocate processor time and some important system processes will begin to “slow down”. In the most extreme case, you can set the priority of the user process you need to AboveNormal (Above average), but this in very rare cases adds a noticeable difference in the performance of the program. But at the same time, no one forbids lowering the priority of other, little or not so important processes, so that they do not eat up valuable processor time, for example, from a game. Often such manipulations really allow you to win 5-10FPS. The disadvantage that is known to many is that when changing the priority through the "Task Manager", it is saved only until the process ends, then the process starts again with the default priority. Those. your priority settings are not remembered. Because of this, a lot of programs have appeared on the Internet that remember your choice of priority, and the next time you start the program, change it for you automatically. Initially, I did not believe that windows did not have any tool for managing and remembering the priority of the process and began to dig documentation on Microsoft sites. I will not breed controversy on the topic of poor documentation windows features but I was right. Any process in windows can be manually specified through the registry priority and some other properties with which it will be launched. Path to the registry key: HKEY_LOCAL_MACHINE\SOFTWARE\Microsoft\windows NT\CurrentVersion\Image File Execution Options press Enter =) In order to specify the priority for the process with which it should always start immediately, you need to create a section with its name in the above registry branch.Next, create another section in it, i.e. already a subsection called PerfOptions, and already in it create a DWORD (32bit) parameter called CpuPriorityClass and set it to one of the decimal values - 1, 2, 3, 5, 6.
1 - Idle priority (low); 2 - Normal priority (medium); 3 - priority High (high); 5 - Priority BelowNormal (below average);
6 - priority AboveNormal (above average);
Let's take sidebar.exe as an example.
In the HKEY_LOCAL_MACHINE\SOFTWARE\Microsoft\windows NT\CurrentVersion\Image File Execution Options branch, I create a sidebar.exe section. In it I create subsection PerfOptions. And in this subsection I create a DWORD (32bit) parameter called CpuPriorityClass with a decimal value of 1.

Thus, sidebar.exe will now always start with a low priority (Idle).
Also, all the above operations can be done through the command line (cmd).
I wrote a small universal batch file that does all this for the user. Link to the batch file: save_process_priority.cmd In the batch file, all items are written in Russian. The user will only need to enter the desired process name and select a priority. In order for your priority settings to take effect, you must restart the process. If you have added several system processes at once, reboot the system, it will be easier. This is necessary because data from the registry is read only when programs are loaded and launched, but not when they are running. That's all, thanks for your attention =) If you notice a mistake, be sure to let me know, I will be very grateful.
Copyright © 2011 Tsiryuta G.N.
stopgame.com
Managing process priorities in windows
Let's talk about windows process priorities. In most cases, there is no need to “play around” with setting priorities, but, sometimes, competent System Administrator can help the system more properly allocate CPU time between running tasks. There is no single recipe, but by "selection and enumeration" it is quite feasible. Where might it be needed? For example, in a 1C-SQL bundle, you can give more processor time to 1C and SQL, as the most resource-critical processes.
In general, look and change the priority running process it is possible through Task Manager
windows NT/2000/7/2008
 In windows 2012, this is “buried” a little deeper
 As you can see from the examples above, there are a total of 6 priorities available to you (as it turns out later, these are priority classes). Enough? Microsoft thinks so. But let's remember the "legendary" phrase of Bill Geist, who said that "640 KB of RAM will be enough for everybody". But time has shown that this is far from the case. :)
Now let's see how it really is.
There are actually 32 priority levels in windows, from 0 to 31.
They are grouped like this:
- 31 - 16 levels of real time;
- 15 - 1 dynamic levels;
- 0 is the system level reserved for the zero-page thread.
When a process is created, it is assigned one of six priority classes:
- Real time class (value 24),
- High class (value 13),
- Above normal class (value 10),
- Normal class (value 8),
- Below normal class (value 6),
- or Idle class (value 4).
You can view the priority of the process, as described above, using the Task Manager.
The priority of each thread (the thread's base priority) is the sum of the priority of its process and the relative priority of the thread itself. There are seven relative thread priorities:
- Normal: same as process;
- Above normal: +1 process priority;
- below normal: -1;
- Highest: +2;
- Lowest: -2
- Time critical: sets the base thread priority for the Real time class to 31, for other classes to 15.
- Idle: Sets the base thread priority for the Real time class to 16, for other classes to 1.
The following table shows the process priorities, relative and base thread priorities.
| Thread Priority | Process class | Process class | |||||
| Idle class | Below normal class | normal class | Above normal class | high class | real time class | ||
| 1 | Idle | Idle | Idle | Idle | Idle | ||
| 2 | Lowest | ||||||
| 3 | below… | ||||||
| 4 | Idle class | Normal | Lowest | ||||
| 5 | Above… | below… | |||||
| 6 | Below normal class | Highest | Normal | Lowest | |||
| 7 | Above… | below… | |||||
| 8 | normal class | Highest | Normal | Lowest | |||
| 9 | Above… | below… | |||||
| 10 | Above normal class | Highest | Normal | ||||
| 11 | Above… | Lowest | |||||
| 12 | Highest | below… | |||||
| 13 | high class | Normal | |||||
| 14 | Above… | ||||||
| 15 | Highest | ||||||
| 15 | Time critical | Time critical | Time critical | Time critical | Time critical | ||
| 16 | Idle | ||||||
| 17 | |||||||
| 18 | |||||||
| 19 | |||||||
| 20 | |||||||
| 21 | |||||||
| 22 | Lowest | ||||||
| 23 | below… | ||||||
| 24 | real time class | Normal | |||||
| 25 | Above… | ||||||
| 26 | Highest | ||||||
| 27 | |||||||
| 28 | |||||||
| 29 | |||||||
| 30 | |||||||
| 31 | Time critical |
Now that we know all this, what can we do with it all? Well, for example, start using.
How else can a process be started with a "non-standard" priority or changed?
Method 1. Start a task/process and change the priority via the Task Manager.
Cons of the method:
- Only 6 priorities available
- Switching priorities is done with the mouse, not automated.
Method 2. You can use the START command with the appropriate switches
The available priority keys are as follows (I deliberately omit the keys command line START commands not related to the described process of working with priorities):
C:\>start /? Starts a separate window to run a specified program or command. START["title"]
LOW Start application in the IDLE priority class.
NORMAL Start application in the NORMAL priority class. HIGH Start application in the HIGH priority class. REALTIME Start application in the REALTIME priority class. ABOVENORMAL Start application in the ABOVENORMAL priority class. BELOWNORMAL Start application in the BELOWNORMAL priority class.
As you can see, the START command makes it possible to start the process with the same 6 priorities that are available through the Task Manager
Minus the method:
- Only 6 priorities available
Method 3: Using the wmic.exe utility
As shown above, the Task Manager and the START command are rather clumsy for the task of prioritizing. Let's see how to apply this more flexibly. We will use the wmic.exe utility.
Command line:
wmic process where name="AppName" CALL setpriority ProcessIDLevel
wmic process where name="calc.exe" CALL setpriority 32768
wmic process where name="calc.exe" CALL setpriority "above normal"
Priorities (predefined):
- idle: 64
- below normal: 16384
- normal: 32
- above normal: 32768
- high priority: 128
- real time: 256
Here is a short example of running wmic.exe to get the information you need
We use the command:
wmic process list brief
You will get a list of processes running on your local computer. Now run the command:
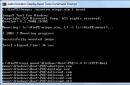
wmic process list brief | find "cmd.exe"
Result:
I specifically ran several copies of cmd.exe to make the illustration more complete.
Now the list of processes is limited to only those processes whose executable name contains the string "cmd.exe". Pay attention to the PID of the process(es).
Now let's try to select processes of interest to us using WMI directly and without resorting to standard means command line. To do this, simply write:
wmic process where description="cmd.exe" list brief
Result:
Compare your results. Take note of the PID of the CMD.EXE process.
Command line to run wmic.exe
wmic process where processid="XXXX" CALL setpriority ProcessIDLevel
Well, now we can change the priority of a particular process (for example, with PID=8476):
wmic process where processid="8476" CALL setpriority 32768
wmic process where processid="8476" CALL setpriority "above normal"
winitpro.ru
Tuning and improving the performance of windows 7.
The speed of the computer is of interest to each user, to a greater or lesser extent. In order to squeeze the maximum out of windows 7, you can resort to a number of known ways, both the simplest and the more complex regular user.
In this article, we will look at methods manual setting system, and we will not resort to the help of special programs designed to increase system performance.
Startup cleanup
Many programs that you install are written to autoload when windows starts. They automatically start when you turn on your computer. By checking the list of these programs, and removing those that you do not use often (or do not use at all), you can speed up the system.
To do this, you need to run the system configuration management tool:
Start -> Control Panel -> System and Security -> Administrative Tools -> System Configuration
or type in the command line "
msconfig" and press Enter.

On the "Startup" tab, you will find all the programs that automatically start when windows starts, and you can remove unnecessary ones. This can also be done manually by deleting the corresponding values from the system registry. The list of programs that are in startup is located in the following branches of the registry:
HKEY_LOCAL_MACHINE\SOFTWARE\Microsoft\windows\CurrentVersion\Run
HKEY_CURRENT_USER\Software\Microsoft\windows\CurrentVersion\Run
Disabling unnecessary services (services)
Disabling unnecessary or rarely used services will allow you to unload a little RAM, which will allow other applications to run faster. Before disabling any services, we recommend creating a system restore point in case of any complications (especially for non-experienced users): Control Panel -> System -> System Protection -> Create... So, the list of services is here: Start -> Control Panel -> System and Security -> Administrative Tools -> Services 
Here you can disable little used services. It is safe to disable the following:
Tablet PC Input Service Computer Browser IP Helper Service Remote Registry Program Compatibility Assistant Services (for advanced users)
Process priority setting
In order for running applications to work faster, you need to give them a higher priority than background processes. In this case, active applications will be allocated more CPU time. By default, the system is configured this way, but the balance between resources for active, and for background processes can move even more. The Win32PrioritySeparation value, which lies in the HKEY_LOCAL_MACHINE\System\CurrentControlSet\Control\PriorityControl registry branch, is responsible for this. To open the system registry, type "regedit" at the command prompt.
The default is hex value– 2 (hex) Recommended value – 6 (hex) Valid value range: 1 to 26 (hex)
You can try other values to make your system run as fast as possible. Attention: you cannot use the value 0, your computer will immediately freeze!
In addition to changing the overall balance of processor resources, you can set a higher priority individual programs. You can do this through the Task Manager.
 Sometimes this is useful. For example, if a program is doing a very long operation and you need it to do it faster, then setting its priority to a higher one might help.
Changing "Performance Options"
operating system windows 7 gives you the ability to tweak some settings that can speed up your system. To open the Interaction Options dialog, go here: Start -> Control Panel -> System and Security -> System -> Extra options systems -> Options (on the Advanced tab).

Here, on the Visual Effects tab, you can turn off animations in the Start menu, turn off Aero Peek, turn off window transparency, and other options. If you select the "Ensure the best performance" option, all visual effects windows Aero, and the system will run faster, however, you will sacrifice all the beauty that windows 7 gives us.
Acceleration of the Aero Peek function
Aero Peek is a feature that makes all windows transparent when you hover over the little square to the right of the clock. To reduce the response time of this function, you need to change the DesktopLivePreviewHoverTime DWORD key, which is located in the registry branch HKEY_CURRENT_USER\Software\Microsoft\windows\CurrentVersion\Explorer\Advanced
If there is no such key in this branch, you need to create it and then just change its values. A decimal value of 1000 equals a delay of one second, 500 equals half a second, and so on.
Disabling User Account Control (UAC)
User Account Control (UAC) notifies the user of system changes that require administrator rights. This service notifies you when you try to install new program, when making changes to file system etc. This can be useful for beginners, but for experienced users it often gets in the way. To turn off notifications from user account Control you need to do the following:
· Run System Configuration ("msconfig" without quotes on the command line). · Go to the "Service" tab and in the list find the item "User Account Control Settings" · Select this item and click the "Run" button. · A dialog will open in which you need to adjust the notifications with the slider. 
The changes you have made are activated after you restart your computer.
mydiv.net
How to change the priority of running programs
In the course of work, the computer solves at the same time many tasks. By the way, at the same time, this is not entirely true, just the processor switches between several tasks, running applications by doing them one by one. This happens so quickly that it gives the impression of simultaneous work. Those programs that the computer considers more important have a higher priority than the rest, and therefore more processor time is allocated to such programs. As a rule, the base priority is set by the program code. The priority level is determined by the parameters: real time, high, above average, medium, below average and low. Using the Task Manager, the user can change the base priority of an already running program as needed, if he considers that the program needs to give more processor time. Or lower the priority in a situation where, when several applications are running at the same time, some particularly resource-intensive programs take too much CPU time, thereby slowing down the execution of other processes. These changes made by the user will only be in effect for the duration of the running process. The next time the process is started, it will run with the base priority value. To change the priority, you need to open the task manager by right-clicking in the taskbar area and select: Go to the "Processes" tab and select the name of the process to be changed. Then right-click on this process, select the "Priority" item in the menu and specify a different priority level.
  It should be remembered that running programs with a high priority may lead to a decrease in system performance, since in this case the remaining running programs get less time for I/O operations.
 tipskettle.blogspot.ru
The topic is not new, but maybe it will be useful to someone. How to start processes automatically with high or low priority without left programs and with your own hands? I'll tell you on Windows example 7, but the steps will be the same for Windows 8 and 10.
Congratulations to the contestant
This text was submitted to the writing competition that we launched in the spring. We dealt with a large number of incoming materials, summed up the results and awarded the winners. The author of this note received a prize - a three-month subscription to "Hacker". Congratulations!
First, select the program or game that we want to set priority. Let's take, for example, Google browser Chrome. Click the right mouse button on Chrome shortcut and select the location of the file in the context menu.
Don't forget to check "Show file extensions". To do this, in the "Explorer" select "Organize → Folder Options → View" and uncheck "Hide extensions for known file types", click "Apply" and "OK".

Now copy the name chrome.exe by double-clicking on the name, and press Ctrl + C or select "Copy" from the context menu.

We go to the registry, for this we press Win + R and write regedit.

Press Enter, the Registry Editor will open.

Go to the path HKEY_LOCAL_MACHINE\SOFTWARE\Microsoft\Windows NT\CurrentVersion\Image File Execution Options . Right-click on the “Image File Execution Options” section and select “New” and “Section” from the context menu.

We name the new section chrome.exe .

If it does not work to rename the section and it is called "New Section # 1", then right-click on it and select "Rename" in the context menu.

In the same section, we create another section. Let's name it PerfOptions and create a DWORD (32 bit) parameter in it. To do this, right-click on the PerfOptions section and select New → DWORD Value (32-bit) from the context menu.

We set the calculation system "Decimal" and in the value we indicate the priority in the form of a number - for example, 3. Click OK.

- 1 - Idle priority (low)
- 5 - Priority BelowNormal (below average)
- 8 - Normal priority (medium)
- 6 - Priority AboveNormal (above average)
- 3 - priority High (high)
Close the registry, launch the browser and the task manager (Ctrl + Shift + Esc, Ctrl + Alt + Delete or right-click on the taskbar and "Start Task Manager" in the context menu). In the task manager, go to the "Processes" tab and look for the chrome.exe process. Right-click on it and select "Priority" in the context menu to check if the priority you set is set.

In this way, you can optimize processes by giving high priority to the programs that you use the most, and low - to programs that are not important to you.
Competition continues
We decided to extend the competition and turn it into a permanent promotion. By sending us a description of the hack, helpful advice or the description of a cool unknown program, you can still get a subscription for a month, three months or, if you try, a year.
 If you set a high priority for an application, it will start working faster. I personally have a script that sets the priority of all processes to High. And you know - everything really works faster, pages open faster. True, and Chrome at the same time loads the processor even more.
So, I will now show you how to manually set a high priority program / process in Windows 10. For example, I will take .. ICQ (ICQ). ICQ is a program for communication, messenger, which was very popular before. But now it has been replaced social media, Viber, well, that's all .. and although it was very popular, and convenient, everyone had their own number, and it was possible to write to each other. Yes, and today it is possible - only few people use it now. So, okay, launch the dispatcher - right-click on the taskbar and select this item:

Then we are looking for the program that we want to set a high priority, I have it as ICQ, it is called here as ICQ (32 bits):

Right-click on it and select Details:

After that, the Details tab is automatically activated, where the program process will be highlighted, in my case it is icq.exe. Right-click on it and set the priority:

We confirm:

Everything, after that the priority of the program process will be high. I do not recommend setting real time - there may be wild brakes if the program itself freezes, and it still has real time priority .. then the whole computer may freeze tightly. To return the priority back, you do the opposite, well, I think it’s clear.
Should I prioritize the game? If at the same time you close all programs, as much as possible, then yes, it’s worth it. And the effect will be better if you also turn off the Internet and antivirus. The more you disable, the better the high priority will work. But don't put a real priority on the game, unless you have a top processor. If the top one, then you can try, but again, everything can freeze. The fact is that by setting a real priority .. you indicate that the game needs to be processed in the first place. In terms of processor instructions. Well, well, what to do with the rest of the processes, among which there are important and system ones? So they may not receive resources .. and as a result, the computer may freeze once, twice, and for the third time it won’t hang down ..
Some tasks (for example, almost all those working with DVDs) have an unpleasant property: they tend to grab as much memory as possible and load the entire processor with them. This is famous, for example, Freemake Converter. After that, of course, all (other) work on the computer stops.
At one time, I solved this problem with the help of a very convenient Process Explorer process manager, which allows you to change the priorities of processes and even “kill” them. However, for a certain time in 10-ke, the system cheerfully reported to me: "It is not possible to set a priority."
And the priority of the task in the regular Windows 10 task manager changes like this:
- Go to the "Details" tab.
- Calling context menu on the name of the task whose priority we need to change.
- We select the priority we need from it (they correspond to Process Explorer).
We breathe a sigh of relief and do other (necessary) things.
By the way. Calling the task manager in 10 is very simple. We call the context menu on the taskbar and select the "Task Manager" item from it.
However, there are other options, although - given the simplicity of the previous one - their application is doubtful. But still...
You can (and should) call the task manager with "three fingers", but personally I still prefer a more elegant version of calling the dispatcher - with a mouse click. Find the dispatcher load module, which is located here: c:\Windows\System32\Taskmgr.exe and drag its icon to the desktop or, for example, to the user panel Total Commander how I did it:

Process Explorer
As already mentioned, earlier I solved the problem of changing the priority using the Process Explorer process manager, which did not perform the required action for a certain time in 10-ke. However, with the advent of version 16.1 (so far, by the way, not Russified), the functionPriority changes work again.And this is done very simply.
- We call the context menu on the name of the task whose priority we want to change.
- Select "Set Priority" from the menu.
- Select the desired priority from the list of priority settings:
- Below Normal
- Background (background)
- Idle (Hidden)

I note that for resource-intensive tasks, for example, when downloading and converting video files, I setBackground (background), after which all other processes work without any delay.
So we download a free program that does not require installation, for example, from here http://soft.softodrom.ru/ap/Process-Explorer-p1203 and work with it.
See also:
- All of my most popular pre-Windows 10 blog posts.
- Customizing the Explorer window in Windows 10.
- How to enter secure windows mode 10.
- How to restore Windows 10 using restore points if the system does not boot.
- How to uninstall programs and apps in Windows 10.
- Where is the startup folder in Windows 10.
- How to delete the Windows.old folder in Windows 10.
- How to enable god mode in windows 10.
- How to download the official Windows 10, update to it early versions and install from scratch without a product key.
- Generating a new key when upgrading to Windows 10.
- How to rollback from Windows 10 to previous version systems. What account use in Windows 10 - local or Microsoft?
- What is the .ESD format and how to convert an .ESD image to .ISO.
- Turn off automatic updates in Windows 10.
let's talk about priorities Windows processes . In most cases, there is no need to “play around” with setting priorities, but sometimes a competent system administrator can help the system more correctly distribute processor time between running tasks. There is no single recipe, but by "selection and enumeration" it is quite feasible. Where might it be needed? For example, in a 1C-SQL bundle, you can give more processor time to 1C and SQL, as the most resource-critical processes.
In general, you can view and change the priority of a running process through the Task Manager
WindowsNT/2000/7 /2008
In Windows 2012 it was "buried" a little deeper
 As you can see from the examples above, there are only 6 priorities available to you (as it turns out later, this priority classes). Enough? Microsoft thinks so. But let's remember the "legendary" phrase of Bill Geist, who said that "640 KB of RAM will be enough for everybody". But time has shown that this is far from the case. :)
Now let's see how it really is.
There are actually 32 priority levels in Windows, from 0 to 31.
They are grouped like this:
- 31 — 16 real time levels;
- 15 — 1 dynamic levels;
- 0 is a system level reserved for the zero-page thread.
When a process is created, it is assigned one of six priority classes:
- Real time class (value 24),
- High class (value 13),
- Above normal class (value 10),
- Normal class (value 8),
- Below normal class (value 6),
- or Idle class (value 4).
You can view the priority of the process, as described above, using the Task Manager.
Note: Above normal and Below normal priorities have been introduced since Windows 2000.
The priority of each thread ( base thread priority) is the sum of the priority of its process and relative priority the flow itself. There are seven relative thread priorities:
- Normal : same as process;
- Above normal : +1 process priority;
- Below normal : -1;
- Highest : +2
- Lowest : -2
- Time critical : Sets the base thread priority for the Real time class to 31, for other classes to 15.
- Idle : Sets the base thread priority for the Real time class to 16, for other classes to 1.
The following table shows the process priorities, relative and base thread priorities.
| Thread Priority | Process class | Process class | |||||
| Idle class | Below normal class | normal class | Above normal class | high class | real time class | ||
| 1 | Idle | Idle | Idle | Idle | Idle | ||
| 2 | Lowest | ||||||
| 3 | below… | ||||||
| 4 | Idle class | Normal | Lowest | ||||
| 5 | Above… | below… | |||||
| 6 | Below normal class | Highest | Normal | Lowest | |||
| 7 | Above… | below… | |||||
| 8 | normal class | Highest | Normal | Lowest | |||
| 9 | Above… | below… | |||||
| 10 | Above normal class | Highest | Normal | ||||
| 11 | Above… | Lowest | |||||
| 12 | Highest | below… | |||||
| 13 | high class | Normal | |||||
| 14 | Above… | ||||||
| 15 | Highest | ||||||
| 15 | Time critical | Time critical | Time critical | Time critical | Time critical | ||
| 16 | Idle | ||||||
| 17 | |||||||
| 18 | |||||||
| 19 | |||||||
| 20 | |||||||
| 21 | |||||||
| 22 | Lowest | ||||||
| 23 | below… | ||||||
| 24 | real time class | Normal | |||||
| 25 | Above… | ||||||
| 26 | Highest | ||||||
| 27 | |||||||
| 28 | |||||||
| 29 | |||||||
| 30 | |||||||
| 31 | Time critical | ||||||
Now that we know all this, what can we do with it all? Well, for example, start using.
How else can a process be started with a "non-standard" priority or changed?
Method 1. Start a task/process and change the priority via the Task Manager.
Cons of the method:
- Only 6 priorities available
- Switching priorities is done with the mouse, not automated.
Method 2. You can use the START command with the appropriate switches
The available switches for priorities are as follows (I deliberately omit the command line switches of the command START not related to the described process of working with priorities):
C:\>start /?
Starts a separate window to run a specified program or command.
START["title"]
LOW Start application in the IDLE priority class.
NORMAL Start application in the NORMAL priority class.
HIGH Start application in the HIGH priority class.
REALTIME Start application in the REALTIME priority class.
ABOVENORMAL Start application in the ABOVENORMAL priority class.
BELOWNORMAL Start application in the BELOWNORMAL priority class.
As you can see, the START command makes it possible to start the process with the same 6 priorities that are available through the Task Manager
Minus the method:
- Only 6 priorities available
Method 3: Using the wmic.exe utility
As shown above, the Task Manager and the START command are rather clumsy for the task of prioritizing. Let's see how to apply this more flexibly. We will use the utility wmic.exe.
Command line:
wmic process where name="AppName" CALL setpriority ProcessIDLevel
wmic process where name="calc.exe" CALL setpriority 32768
wmic process where name="calc.exe" CALL setpriority "above normal"
Priorities (predefined):
- idle: 64
- below normal: 16384
- normal: 32
- above normal: 32768
- high priority: 128
- real time: 256
Retreat. What if there are several processes with the same name? The priority of a process can be changed either by the process name or by using the PID (Process ID) of the process.
Here is a short example of running wmic.exe to get the information you need
We use the command:
Note: I will not give an example of executing this command. The list of processes is too big. Do it yourself if you wish.
You will get a list of processes running on your local computer. Now run the command:
wmic process list brief | find "cmd.exe"
Result:
 I specifically ran several copies of cmd.exe to make the illustration more complete.
Now the list of processes is limited to only those processes whose executable name contains the string "cmd.exe". Pay attention to the PID of the process(es).
Now let's try to select processes of interest to us, using WMI directly and without resorting to standard command line tools. To do this, simply write:
wmic process where description="cmd.exe" list brief
Result:
 Compare your results. Take note of the PID of the CMD.EXE process.
Command line to run wmic.exe
wmic process where processid="XXXX" CALL setpriority ProcessIDLevel
Well, now we can change the priority of a particular process (for example, with PID=8476):
wmic process where processid="8476" CALL setpriority 32768
wmic process where processid="8476" CALL setpriority "above normal"