Instructions
To clear the system registry and there are a number of programs for eliminating unnecessary records. The most popular ones have a Russian-language interface and are quite easy to use. Let's look at the process of removing unnecessary records from registry and using the free and powerful CCleaner utility. First of all, you need to download and install it on your computer.
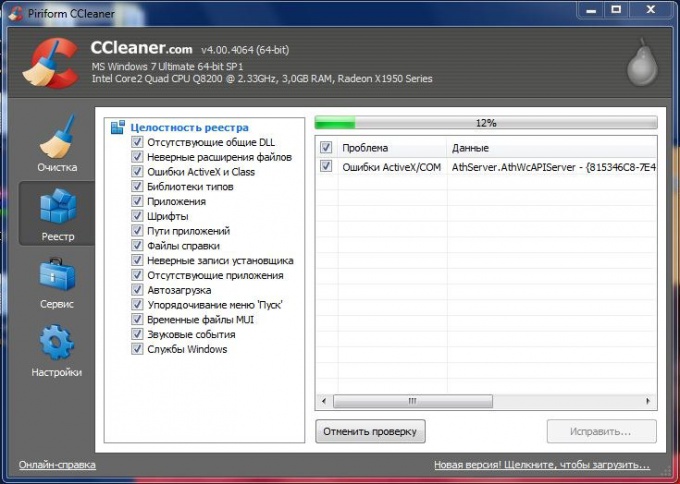
During the installation process, select Russian language. After installation, launch the application and see the main window. In this window, on the left, select the “Registry” menu item. If not, check the boxes next to each menu item and click “Search for problems.” The program starts scanning registry for errors.
Scanning progress is displayed at the top of the main window programs, in the form of a filling bar. As the scan progresses, erroneous entries begin to appear in the list below. registry A. In this list you can see the type of error and the program that committed it. After the scanning process is completed, click the “Fix” button. After clicking this button, the program will prompt you to save backup copies of the changes made. Click OK. Thanks to this, it will be possible to restore registry if, after cleaning, the computer will work worse.
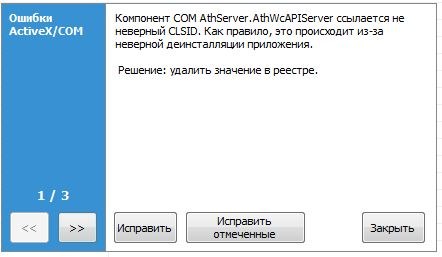
In the next window, the program will offer you options for solving the problems found. “Fix” button - corrects one item from the list at a time. Button “Fix marked” - automatically corrects all found errors marked in the list. By default, all items in the list are checked; you can change this if you wish. By clicking on the checkbox, uncheck those that you wish to leave unchanged. In normal cases, it is recommended to click the “Fix marked” button. When finished, click the “Close” button.
After the completed procedures, your registry gets rid of unnecessary and erroneous entries, which improves system performance. Once you're done, you can close CCleaner.
The Windows Registry is a hierarchical database that contains information about system settings, hardware and software, user profiles, etc. When uninstalling a program, in theory, its settings should be deleted from the registry, but this does not always happen - due to user errors or incorrectly written uninstaller utilities.
Instructions
Activate Registry Editor. To do this, enter the regedit command in the program launch window (called by the Win+R key combination or the “Run” option in the Start menu). In the "Edit" menu, click "Find" and in the search box, write down the name of the program you want to clear the registry from. This window can also be called up using the hotkey combination Ctrl+F. Use the Find Next button to start the search.
If an entry with the same name is found, right-click on this line and select the “Delete” option in the drop-down menu. You can also use the Delete key or select Delete from the Edit menu. After the first file found, press F3 to find other entries related to this program and delete them using one of the described methods.
This method can be time consuming if the remote program was a complex structure - e.g. Adobe Photoshop. To speed up the process, you can use third-party registry cleaning utilities. Download and install the free RegCleaner program.
Select "Search" from the main menu. In the search bar, enter the name of the application you want to get rid of and click the “Search” button. If an entry with the same name is found, a “Delete” button appears in the lower right corner of the screen. Use it to clear the registry of outdated data.
Instructions
Expand the main menu of the operating system if you need to remove from it the partition that remains after uninstalling the application programs s. Go to this section and right-click on it. In the dropped context menu select the “Delete” line, and answer in the affirmative when asked to confirm the operation - click the “Yes” button.
Launch a file manager if you need to clean it up HDD from unnecessary files remaining after removal programs s. In Windows, this can be done by pressing the Win + E key combination. Go to the Program Files folder on system disk- it is in it that application applications are applied by default programs We host our catalogs. Find a folder whose name matches the name of the deleted programs s, and click it once with the mouse. To delete a directory with all its contents to the Recycle Bin, press the Delete button, and for permanent deletion (bypassing the Recycle Bin), use the keyboard shortcut Shift + Delete.
Go to the folder called ProgramData - it is located at the same level of the directory hierarchy as Program Files. It contains applied programs They store temporary files with data used during operation. As in the previous step, find and delete the folder belonging to the non-existent programs e. If your version of the operating system does not have a ProgramData directory, then the corresponding folder with temporary data should be looked for in the directory called Application Data. It is placed in a folder whose name corresponds to your account (by default - Admin), and this folder, in turn, is located inside the Documents and Settings directory of the system drive.
Launch the editor Windows registry, if you also want to remove unused entries from the uninstalled programs s. This can be done by pressing the Win + R keyboard shortcut followed by typing regedit commands and pressing the Enter key. Use the hotkey Ctrl + F to open the search dialog and then enter the name of the remote programs s or part of it and click the “Find Next” button. When the editor finds entries in the registry related to the area you are interested in programs That is, before deleting them, be sure to make sure that this is exactly what is required - there is no undo operation in the registry editor.
Use specialized registry cleaners programs s - they have functions for searching and deleting entries that do not belong to any of the installed programs. Finding such an application on the Internet is not difficult - for example, it could be free version programs s Uniblue RegistryBooster (http://uniblue.com/ru/software/registrybooster).
Working on a computer and especially on the network involves the use of various programs as tools to achieve a particular goal. Some of them programs may be subsequently deleted, but traces of them still remain on your system.
You will need
- Registry cleaning programs
- Programs for cleaning temporary files
- Programs for system optimization
Instructions
It’s most logical to first go the simple route: through the “Start” menu button, go to installation and removal programs and perform deletion in normal mode. If traces of the deleted programs you still have left, take specialized programs s that help clean the system of unnecessary logs, temporary files and old reports. The most famous and widespread of them: Your Uninstaller, Auslogics BoostSpeed, CCleaner, Regseeker. Outdated versions these programs, as a rule, are distributed free of charge or shareware. But most programs, which work with new systems, require registration and payment, but you can pay immediately, through the network.
Some files may not be deleted due to blocking: the system, when trying to delete them, constantly reports that the file cannot be deleted because it is involved in the system. It happens that an attempt to delete such a file “hangs” the entire operation of the system for a long time. In this case it may help you programs and type Unlocker. It will unlock the file and remove the "hidden" and "read-only" icons from it, and then delete it.
note
Just in case, preview the list of items marked for deletion by the cleaner and make sure that you do not erase something you need, such as a list of Internet addresses or autofill forms. This may cause the browser to “forget” your passwords or delete your browsing history.
Before using the program, be sure to backup your system. Be careful with key files.
Sources:
- Adviсe system administrator. How to completely remove a program
When a file is deleted normally, it is usually placed in the Recycle Bin. At the same time, until the latter is cleared, it remains on the hard drive. Sometimes circumstances require you to delete a file without going to the trash can.

Instructions
To delete a file without placing it in the Recycle Bin, use the keyboard shortcut Shift+Delete. To do this, use the mouse or keyboard to select the file that needs to be deleted and press this key combination. Instead of the standard dialog box: “Are you sure you want to move this file to the trash?” – you will see another window: “Are you sure you want to permanently delete this file?” Confirm your desire by clicking the “Yes” button. The file is now deleted without placing it in the trash.
If you want to delete files in the usual way, but, nevertheless, do not put them in the Recycle Bin, make changes to its properties. To do this, right-click on the Recycle Bin icon on the desktop and select the “Properties” menu. Check the box next to “Destroy files immediately after deletion, without placing them in the trash” and save the changes. Now, when deleting files using the Delete button or the “Delete” function, they will not be placed in the trash.
In addition, there are special programs that allow you to completely delete files from hard drive. In this case, they are not placed in the Recycle Bin, and the possibility of their subsequent recovery using programs for recovering deleted files is excluded. This result is achieved by repeatedly rewriting the memory cells in which the deleted file, according to special algorithms. Examples of such programs include Active ZDelete, Clean Disk Security, CCleaner, etc.
note
Deleting files without putting them in the trash is undoubtedly very convenient. And the impossibility of restoring them is a good bonus if you do not want a third party to be able to view the files you deleted. However, before deleting a file permanently, think again about whether you will regret it after a while.
Sources:
- how to rename the cart
One of the reasons for computer failures is the result of improper removal of programs from the hard drive. There are several simple procedures that can be followed to avoid unwanted consequences.

Instructions
Do not delete applications by moving the folder from the disk to the trash. This removal method is acceptable only if you installed this program in the same way - by copying the folder with the program to your hard drive.
If you installed the application using a special installation program (installer), then remove it using a special uninstaller program - an uninstaller. It is located in the same folder as the application itself. Find the file “uninstall.exe” or “uninst.exe” in the folder and run it. The removal process will begin. Follow the instructions step by step, and the program will do everything for you.
Another way to launch the uninstaller program is through the Start menu: “All programs - Name of the application to be removed - Uninstall”.
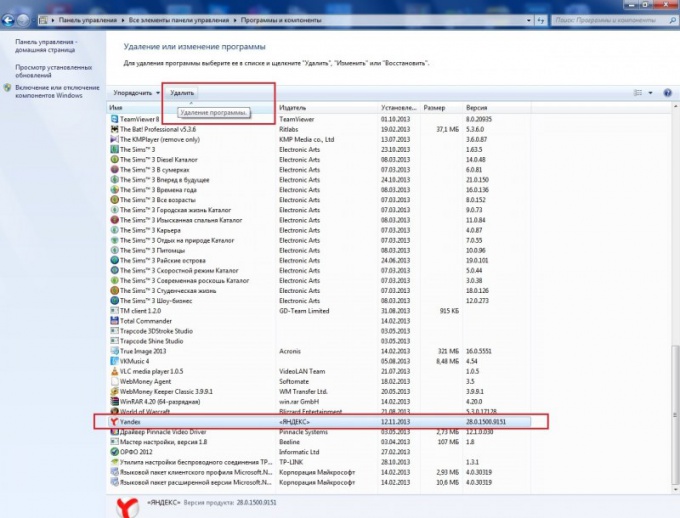
Sometimes you come across applications that do not have an uninstaller program. In this case, use standard program installation and removal from the operating room itself Windows systems. Open it through the menu "Start - Control Panel - Add or Remove Programs".
In the window that opens, select the one you need from the list of programs and click the Remove button. Confirm that you really want to remove the selected program and start the uninstallation process. Then follow the instructions again.
If for some reason unknown to you you cannot remove this or that application, use special uninstallers. They effectively remove not only the applications themselves, but also the so-called “tails” in the registry. True, these programs have a number of disadvantages. They require special knowledge and skills in their use, most often the interface is in English, they take up a lot of space, improper handling of them may not free up, but rather clog the hard drive.
Video on the topic
When the “Delete” window appears Yandex browser", be sure to check the box next to "Delete all browser settings." After this, the uninstallation of the program will begin. You will learn about its completion from the window that opens. Internet Explorer with a strange sad ghost and the inscription “Yandex.Browser has been deleted.”
Like most programs, Yandex.Browser leaves “tails” in your operating system. They also need to be cleaned. For this you can use free utility CCleaner, which needs to be downloaded from the Internet.
Launch CCleaner, select “Registry” and click the “Search for Problems” button at the bottom. Wait while the utility scans the registry entries in your operating system. By default, opposite all “tails” from Yandex.Browser and others remote programs the boxes are already ticked.
Click on the "Fix" button in the lower right corner. If the program asks whether to save backups of your changes, click No. Also click the “Fix marked” button, wait for the process to complete, and then close the program. Restart your computer. Now you can be sure that Yandex.Browser has been correctly and completely removed from your operating system.
Helpful advice
By using CCleaner programs You can not only remove the “tails” of programs, that is, clean the registry, but also clear browser caches, and also manage startup.
Related article
Sources:
- how to remove Yandex browser password
Internet Explorer is a web browser designed for viewing Internet pages on the Internet. Like all applications on a computer, Internet Explorer goes through three main stages of “life”: installing the program on the system, using the program, and uninstalling it.

Basic ways to remove Internet Explorer in Windows 7
Most often, Internet Explorer is the default Windows program, which is installed on the computer along with the system. You can delete it like this: mechanically- by using special programs, and manually.Mechanical removal method
There are two main types of special applications designed to remove programs. The first type includes standard Windows uninstallers, the second includes uninstallers that the user himself installed.To use the first type of application, go to the Start menu, All Programs, Internet Explorer and click remove or in some cases uninstall. A window will appear, click “Next” until a progress bar appears, which indicates the start of the removal procedure. Almost the same algorithm can be used if you delete the browser through the “Control Panel”. Enter the panel, click on the “Programs and Features” icon. A window will open with a list of programs installed on the computer. From them, select “Internet Explorer”, click delete. As in the previous case, click on “Next” in the lower right corner and the browser will be deleted.
Before using the second type of uninstaller, install one of them on your PC. After installation, restart your device and open the application. It will display all programs that the user has installed. From them, select “Internet Explorer” and click “Uninstall”. The advantage of such a program is that it not only erases the application from the computer, but also cleans up the so-called “tails” in the registry. There will be no trace left of the deleted application, as if it had never been installed. This, of course, has a positive effect on the system. Less chance of errors. The main disadvantage is that basically all these programs require introduction license key and many on English language. If the language can be somehow understood, then searching for a free key on the Internet is a labor-intensive task, and its absence reduces the program’s working potential by half, or simply makes it inoperable.
Manual removal method
You can manually remove the web browser through “My Computer” or file manager. To delete via “My Computer”, open the folder, go to drive (C:), then to “Program Files”, find the folder called “Internet Explorer”, select and hold down the shift+delete key combination. Removing through a file manager includes the same steps as previous method, it just looks a little different visually.In the process of working with personal computer many often use fly-by-night programs. Availability third party utilities can greatly slow down the performance of your PC and operating system.

Now open the Registry menu and click the Search for Problems button. This procedure is necessary to correct incorrect keys, the presence of which slows down the computer. After preparing a list of errors, click the “Fix” button.
Cancel creation backup copy by clicking the “No” button. Select the "Fix marked" option. Restart your computer after completing the described operations.
Where are the remains of deleted programs stored and how to remove them
According to Microsoft requirements, working program files must be stored in folders %appdata% And %localappdata% profile Windows user. Accordingly, you need to look for the remains there.
You can stock up on a little patience, sit down and figure out which folder belongs to which application. But you can do it much simpler - create new profile and transfer all work files to it (documents, music, videos, photos). In the end, all that remains is to delete the old profile, and with it all remnants of programs that were deleted earlier.
This will save a significant amount of time. Plus, you will save yourself from accidental mistakes, because the system itself will create a profile in the required form. Of course, it will delete the old profile correctly. Your task is to completely transfer personal files from one profile to another.
After a few days, only those programs that you already have installed and use will retain their settings in the new profile.
Removing residues
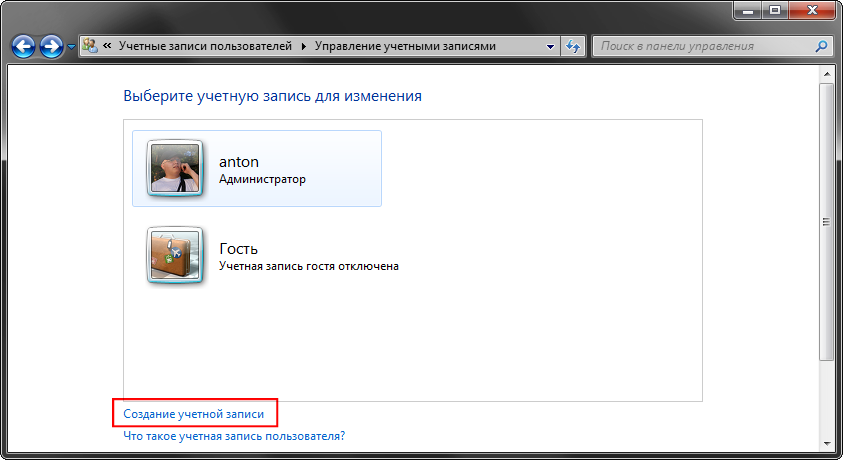
To begin the work of cleaning up the remains, you need to create a fresh account, which will not contain any settings. To do this, you need to open the “Control Panel” and select “User Accounts” in it.
A window will open with a list of available accounts. There you need to click on the “Create an account” link.
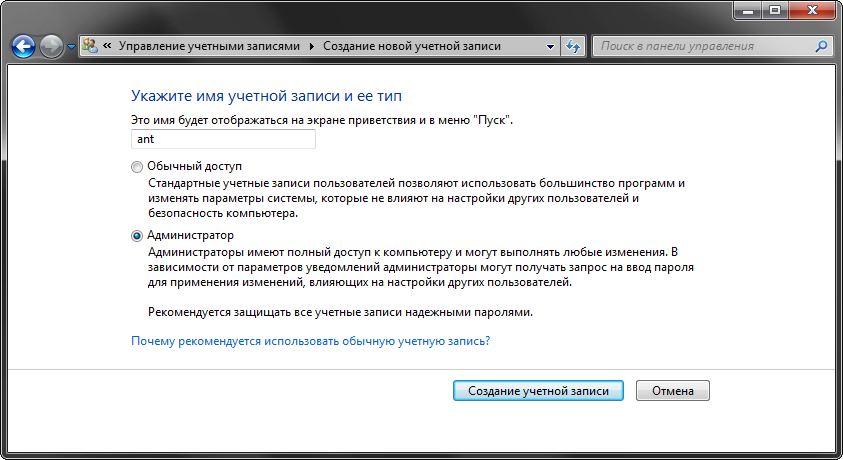
Having set a name for the new account, select its type (User or Administrator) and click on the “Save account” button.
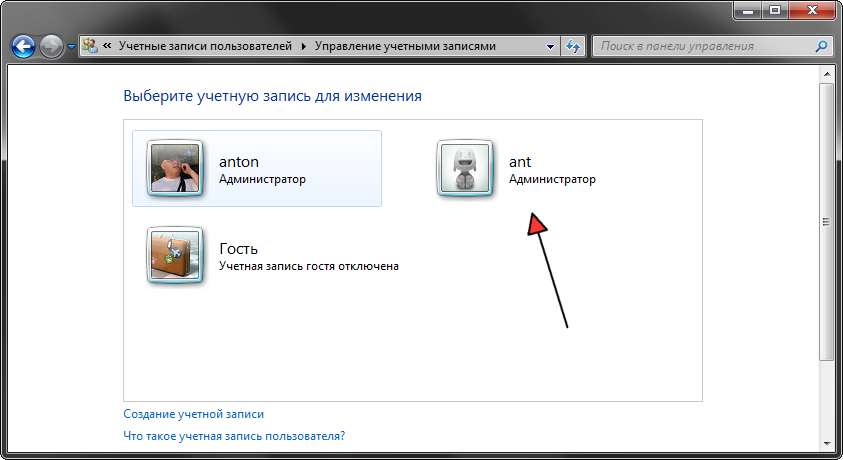
After this, the list of accounts will be added to by one. You can proceed to the next step - data transfer.
Transferring data to a new account
Before you begin transferring your personal data, you must switch to the new account. When switching operating system will create a new profile from scratch and place all the basic elements into it.
To switch to a new account, click “Start” - the arrow to the right of “Shut down” - “Log out”. In the user selection window, you need to click on the new account.
To start transferring data between accounts, you need to open two Explorer windows and place them next to each other. In the left window, open the folder with the old profile, and in the right window, open the folder with the new profile. The old and new profiles are located on the system drive in the “Users” folder. It's hard to miss.
Consistently transfer data from personal folders from the old profile to the new one. First “Documents”, then “Images”, then “Videos” and “Photos”.
If you store personal data in other folders outside the user profile, then there is no need to transfer it.
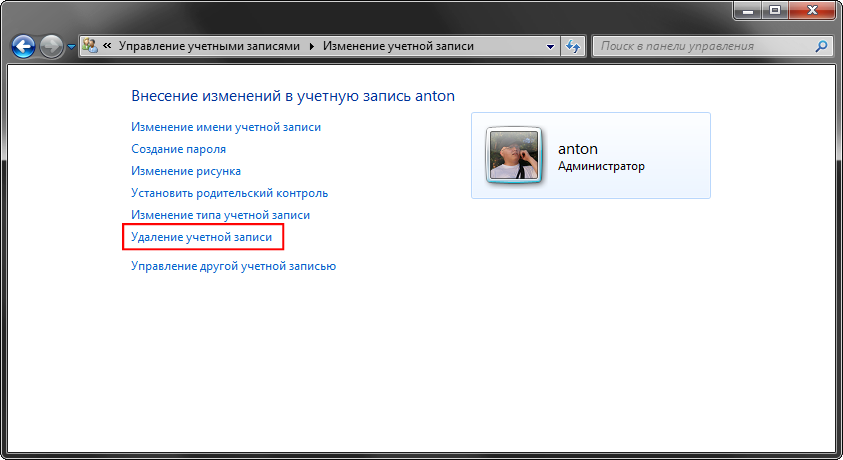
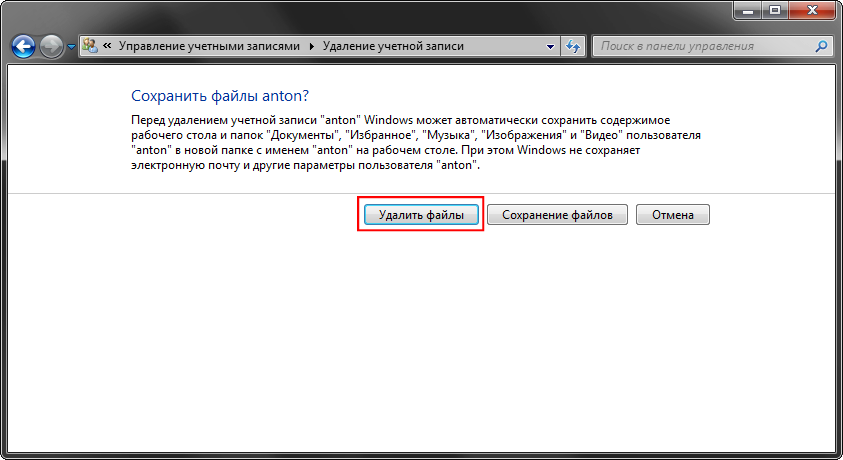
To delete your old account, you must once again make sure that all data has been transferred to the new profile. After this we do the following:
- Open “Control Panel” - “User Accounts”
- Managing another account
- Select the old account
- Deleting an account
In the confirmation window, click on the “Delete files” button
This completes the process of removing residues. Now you need to set up a new profile for yourself and work as before, but with a clean account.
What to pay attention to
When using this method of removing leftovers from deleted programs, you should pay attention to a number of features that can be extremely important.
- Some programs (for example, Dropbox) are installed in the folder %appdata% entirely, so they will have to be reinstalled again.
- The settings of some programs may be reset or data saved to the old profile. Therefore, it is recommended to check the settings and change the paths to indicate the path to the new account.
- After switching to a new account, you may need additional customization switch layouts (if you do not use the standard option).
Otherwise, everything works as normal and no additional movements are required.
Conclusion
After all the manipulations with my computer, I managed to free more than 20 GB of disk space, which I am incredibly happy about.
It is also worth noting that there is also an All Users folder, which stores application settings for all users (shared folder). To understand the data in it, I had to sit down and go through all the folders manually, deleting unnecessary ones. What saved me was that in my case there were very few of them.
Similarly, you can remove residues in other Windows versions(XP-10).