Every novice user android tablet and or phone, traveling through thematic sites and forums, sooner or later comes across a mention of the mysterious, which is especially often mentioned in the instructions for firmware, replacing the system core and other "hacker" things.
So what is it, what is it intended for, and how to properly handle it? I will try to answer these questions in this article, which contains complete instructions for working with ClockworkMod Recovery.
In a nutshell, or ClockworkMod or simply CWM is an alternative recovery for Android devices. The instructions for working with ClockworkMod Recovery contain the following sections:
What is recovery?
Every Android tablet or phone has a factory recovery that can be loaded when the device is turned on by pressing a specific key combination. Factory recovery, usually able to install system updates from the update.zip file and clean up the system.
Introduction to alternative recovery ClockworkMod
- this is a much more powerful system recovery utility (menu) than the factory one, which allows you to make full backups of the entire system of the device, install software, firmware, kernels and much more, which usually does not allow you to do factory recovery. ClockworkMod, installed in a special system partition internal memory of the tablet or phone, in place of the factory recovery menu.
ClockworkMod Recovery can help you out in some seemingly hopeless situations. Even if your tablet or phone fails to boot, in many cases with CWM you can restore the system with all its settings and applications.
Here is a rough list of what you can do with ClockworkMod Recovery:
Install custom firmware and unofficial kernels
Install factory system updates, add-ons and patches
Connect to a computer via USB in removable storage mode
Connect to a computer via USB to work with the ADB program
Create a full backup of the current firmware and its individual parts (system, settings, applications)
Restore a device from a previously created backup
Wipe - data/factory reset, wipe cache, wipe Dalvik-cache, wipe battery stats
Create partitions on the memory card and format them
Created by developer Koushik Dutta (also known as Koush) and CWM versions exist for most Android phones and tablets.
Install ClockworkMod Recovery
For many smartphones and some tablets, installing ClockworkMod Recovery is a very simple procedure, you just need to install the program from the Market ROM manager and the first item in its menu will be the ClockworkMod installation item. For other devices, there may be separate utilities like the application Acer Recovery Installer for tablet Acer Iconia Tab, or ClockworkMod Recovery is installed on them using the program adb .
Launch ClockworkMod Recovery
There are several ways to upload a tablet or phone to ClockworkMod Recovery.
1.
Using the ROM Manager program, selecting the "Load Recovery Mode" item in its menu.
2. By pressing a specific key combination when turning on the device. This combination depends on the device model. On many devices, you can get into recovery by pressing the volume down and power buttons at the same time when you turn them on.
Install firmware, updates, kernels and more on an Android device using ClockworkMod
All alternative firmware, custom kernels, cracks, add-ons, decorations, application packages that can be installed on a tablet or phone using ClockWorkMod recovery are packed as a zip file.
Before installing anything on your device, do not forget to make a full backup of the current firmware, so that later you can safely return your tablet or phone to its original state.
Make sure your device's battery is fully charged and disconnect it from your computer and charger.
Copy the file you want to flash to a memory card, best in its root, DO NOT UNPACK IT. Make sure that the file name consists only of Latin letters and numbers and does not contain spaces or special characters.
If you are installing a new firmware, be sure to do a full cleanup using the " wipe data/factory reset"
Getting Started with Firmware :
Insert a memory card into the device
Reboot the device in ClockWorkMod recovery
Select the item " install zip from sdcard".
Open the " choose zip from sdcard".
In the window that opens, we find our file, it will be located below, after the list of folders (if they are on the memory card)
Confirm your choice by going to " Yes".
As you know, operating android system provides the user with a huge functionality, using which he can realize the full potential of his smartphone: from advanced settings using engineering menu and ending full reset factory settings using a special mode - Android System Recovery 3e. What to do in this menu with a smartphone, you will learn from this article.
This setting mode was designed to work with system files and system settings. With it, you can activate or block almost all the functions of an Android device. Here you can carry out such complex manipulations as a complete cleaning or restoring the system in just a couple of clicks. Due to the fact that this menu plays an important role, getting into it is not so easy, but more on that below. In order not to harm your device, you need to know the mode items, their meaning in Android System Recovery 3e and what to do to carry out certain actions.
Launch Android System Recovery 3e
As mentioned above, launching this menu is not so easy. To get here:
- Turn off the gadget;
- Simultaneously hold down the volume rocker, the home button and the power key.
After a few seconds, the Android logo will appear on the screen, and then the Android System Recovery 3e menu will start. What to do in it and what values the menu items have - we'll talk about this later.
Assigning items in the mode
The very first and most important item is Reboot. It allows the user to restart the device.
To use the device's memory card as external drive connected via USB, select Toggle USB strage.
There is also work with the CWM package. It is used to install native Recovery on the device.
By selecting "Instal from sdcard" (installing CWM from a memory card), you will find yourself in a subsection with items:
- Installation CWM Recovery, which is preloaded on the memory card - Choose zip from sdcard;
- Check md5sum sum – Check md5sum a file;
- Find out the signature of the CWM package - Toggle Signature Verification;
- Check CWM for compatibility with the device - this can be done by clicking on Toggle Sclipt Assert.
How to use Android System Recovery 3e for flashing, what to do on Lenovo or other gadgets? Use only proven features that you understand!
- Reset all smartphone data - Wipe data / factory reset;
- Wipe Cache allows you to completely clear the cache;
- Wipe dalvik cache is used to clear the Dalvik cache;
- To clear your battery usage history, use Wipe battery stat;
- Format System completely removes all system files;
- Format Date formats the data section;
- Format cache deletes the cache data, but the files themselves remain in it;
- Clearing cache core data - Format boot;
- To completely format the device, use Wipe all partitions.

All the meanings of the menu items that we are talking about are completely identical for all gadgets running Android.
Backup / Restore - one of the most important sections, which is responsible for backing up and restoring data. It contains items:
- Backup - creates a backup copy of data;
- Restore - used to restore the factory firmware;
- Advance Restore - used to restore individual data partitions;
- Advanced Backup - can be used to copy partitions.
The next item is responsible for converting formats in Android System Recovery 3e. What to do in this menu? Here you can choose different kinds converting to EXT4 and EXT3. Here's what this section allows you to do:
- Convert/change a backup converts the device system;
- Use Convert Data to convert data;
- Change one of you backup is used to translate backup sections;
- Convert Cache converts the cache;
- Wipe data/factory reset is used to convert all partitions;
- System formatting - format system, data - format data, cache - format cache.
Extra menu

In the Advanced section, you can perform such actions using the following commands:
- File System Check checks the validation of system files;
- Print Partition Info displays log information;
- Copy recovery.log to sdcard is used to save copies of the recovery log;
- Opening ext and ext2 formats on an SD memory card - Partition SD Card;
- No - save my fat32 partition! stops partitions;
- Use Fix Permission to fix permissions in /data/data.
And finally, the last item - Power Menu. It is used for power management:
- Reboot Recovery reboots;
- In Bootloader mode, use Reboot into Bootloader;
- A simple reboot is done using Reboot;
- Power Off - ordinary shutdown.
Thus, using this menu, you can perform a huge number of functions that are not available in visual settings. If you have any questions, you can always ask them in the comments!
Hello everyone We are studying the Android smartphone further, today we will think about what is apply update from ADB. So, after digging around on the Internet, I came to the conclusion that apply update from ADB is an item in the Android system recovery menu. But what does this item do? I went looking ... So the apply update from ADB item is needed in order to install the firmware
Well, what is the translation into Russian, that's how apply update from ADB is translated then? Hmm, let's break it down! The first word apply is translated as apply or use. The word update I think is clear, this is the update itself, in our case the firmware. Well, from ADB is a type from ADB. In short, the apply update from ADB item is translated as how to apply an update from ADB, well, sort of like this
By the way, I found a picture of what this item looks like in the menu:

So look what else I learned about apply update from ADB. There is such a command as adb sideload, well, this command is for updating the firmware. It works like this, you enter Recovery mode on your smartphone, then select the apply update from ADB item with the volume button, confirm with the power button and then enter the following command:
adb sideload update.zip
Where update.zip is, then there you specify the name of the firmware. Well, is it a little clear? The Apply update from ADB item is needed to install the firmware from ADB. True, there is only one incomprehensible moment, on another site I found information that this command needs to be entered into command line. But where is the command line itself? On a smartphone or on a computer? So far this question remains incomprehensible to me. Yeah, I dug up a picture, look here everything seems to be clear:

Apparently all the same, the command must be entered on the computer! And I thought that in a smartphone ... Well, I found out, I was just very interested ..
By the way, after the command is entered, the entire firmware process can take about 15 minutes, which is somehow long .. When everything is over, select reboot system now with the volume button (this is a reboot) and press the power button. And the power down point is like turning off the smart, well, like this
Hello, please explain how to use the Android System Recovery 3e mode, there is such a huge menu that half of the items are not clear.
Answers (2)
- be sure to charge the battery by 80-90%;
- turn off the device;
- simultaneously hold down the “on / off” buttons, volume control “louder”, sometimes even the “home” button (depending on the model);
- wait until the manufacturer's icon appears;
- release, the recovery menu will appear.
- “reboot system now” - reboot, through it you can exit android system recovery, depending on the device, the menu may contain this item in the “power menu” section;
- "wipe data / factory reset" - reset to factory settings, deleting all information from the device, after which the smartphone will be like after purchase;
- "wipe cache partition" - this item is responsible for deleting the cache of the system and applications, that is, cleaning junk files;
- "install from sdcard" - installation of archived files from a flash drive.
- "backup" - created backup copy operating system, which is stored on a flash drive;
- "restore" - backup installation, opening the item, a list of firmware will appear;
- "advanced restore" - restore part of the operating system, the command works with the same partitions as the next function.
- "mount / system" - system;
- "unmount / data" - for storing user information;
- "mount / sd-ext" - mounting part of the operating system on a USB flash drive to expand capabilities;
- "unmount /cache" - cache, temporary files;
"mount / sdcard" - sd card. - "wipe dalvik cache" - cleaning unnecessary files of the dalvik machine in which programs are launched on the phone;
- "wipe battery stat" - clear information about battery usage;
- "restart adb" - boot into adb mode, which is needed to control the device via the command line from a PC;
- "fix permissions" - the command returns file permissions to their original state.
- not unlocked bootloader (bootloader);
- experiments on installing custom recovery, as a result of which the native failed;
- broken volume or power buttons.
- download zip archive;
- open it, find the ADB.exe file;
- in the menu that appears after clicking on it with the right mouse button, select the item "run as administrator";
- a blue window will appear next;
- we write "y" and press "inter" repeat this 3 times, so we agree to install the program and drivers;
- go to the ADB folder, it should be in the root of drive C;
- copy the downloaded recovery here and rename it to recovery.img;
- press "shift" and the right mouse button;
- select "open command line";
- enter "fastboot flash recovery recovery.img" this is the command that will install the downloaded recovery;
- by pressing "inter" we launch it;
- we write "reboot".
This comment is edited.
Recovery (it's also the recovery menu) is a separate small operating system that has a minimum of functions and works independently of the main one. Distinguish between stock and custom recovery. The first is "native", the second is modified and improved, it must be installed independently.
Of the custom ones, the most common are CWM and TWRP, they are supported by most devices.
To enter the recovery on android you need:
To move along it, the volume control carriage is used - “louder” up, “quieter” down. To enter the sub-item, you must press the "on / off" or "home" button.
Return to the previous menu in is carried out by the “go back” item. After selecting any command, a list appears with sub-items “no” and one “yes”, which must be pressed to run. 
The number of items depends on android system recovery. Instructions for use are as follows:

Some items have additional sub-items, so I will talk about each of them. Chapter " backup and restore":

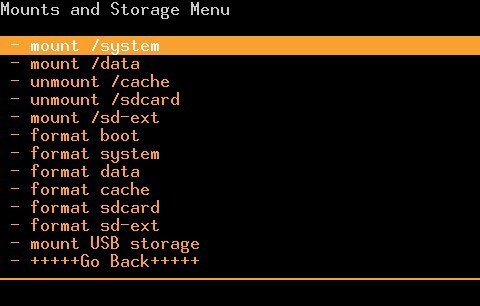
You need to be very careful with the "mounts and storage" item, as it can disable the device. It is used for formatting - permanently deleting all information and mounting, that is, connecting to the system. This item works with the following sections:
The "format" command works on the same topics, but only clears all content. Applying this item to "system" or "data" will kill the smartphone.
There is an "advanced" submenu in recovery which includes additional features. Here is their list:

This comment is edited.
Rarely, but a situation arises when android system recovery 3e does not respond. What to do with this problem and how to solve it depends on the causes:
The most common reason why android system recovery 3e may not respond is a locked bootloader. Its unlocking occurs in different ways and depends on specific model devices.
An unsuccessfully delivered recovery must be “rolled back” to the native one. First you need to find a stock recovery for desired model- it is best to search on our and American forums.
The recovery is being stitched through adb program, which is installed on the computer as follows:
After that, you can go into the updated recovery.
If the buttons fail, you need to connect the device to the computer, as described above, enter "reboot recovery" and press "enter".
Mobile devices have already become a part of our lives. Now a person cannot imagine existence without a smartphone or tablet. Devices based on the Android operating system are very popular. This OS was developed by Google, and now its market share is incredibly high. Apple's iOS and Windows phone an insignificant percentage of presence in mobile markets compared to Android. However, like all technology, devices on this platform tend to "fail". Various system crashes - distinguishing feature any operating system. No matter how advanced she is. Very often devices have to be reflashed. But not everyone knows that you can do without such drastic measures. Indeed, in any gadget on "Android" there is Android System Recovery 3e. How to use it and what is it all about? We will talk about this.
What is this animal?
What does Android System Recovery 3e mean? This is a kind of BIOS mobile device. Any operating system has its own BIOS - a basic input-output system that can work even if the main OS is damaged. Sometimes the BIOS is different from the standard one (as, for example, in Android devices). It serves to restore the functionality of a smartphone or tablet, apply critical updates, or reset to factory settings. The Android System Recovery 3e menu has many items that correspond to one or another action. But the trouble is that the names are written in English language. Therefore, many do not even know how to properly use the recovery.
That is why this article was written. Android System Recovery, the instruction for which is absolutely necessary, is a powerful tool for setting up and resuscitating a smartphone. You need to know everything about how to use this recovery in order not to spend money on masters. Doing everything yourself is much easier and cheaper. We will analyze each item of the recovery menu and tell you everything we can about it. So let's start.

How to enter the recovery?
It depends on the specific device model. In some devices, you need to hold down the power button and the "Volume +" key. But sometimes there are smartphones for which this is not enough. Old models from mechanical button"Home" require pressing this button. Some devices require the simultaneous pressing of the power and "Volume" buttons. There are those who need to hold down the power key and both volume buttons. This applies only to original devices from well-known manufacturers.
But there are also frankly "Chinese" gadgets with an incomprehensible operating system and a "crooked" translation. The standard methods for entering the recovery in these cases may not work. There are several options here. First: study the documentation of the smartphone (if any) and find the key combination you are looking for. But this option is not for everyone. Most of these devices either do not have any documents at all, or there is no Russian language in the documents at all. The second option: find the desired combination by pressing all the buttons in turn. And now let's move on to the Android System Recovery 3e menu items.

Reboot system now
This menu item performs a full reboot of the device. After selecting this option, the smartphone will load the standard operating system "Android" without any changes. Usually this item is used upon completion of all manipulations in the recovery. Or in the event that you booted into this mode by accident. Although how this can be done by chance is unknown. Be that as it may, Android System Recovery 3e, whose instruction manual is simply vital for the user, has such an item. And this has to be taken into account.
The menu item should be used last. That is, when all operations are completed, all components are updated, factory settings are reset and firmware is installed. This is the essence of the reboot: let the device apply all the changes made. True, after some of them, the smartphone may not boot at all. But that's a completely different story.

Apply Update from External Storage
This menu item allows you to apply the update that is on the memory card. By the way, new firmware is also installed through this item if the main OS is not loaded. There are several sub-items in this Android System Recovery 3e menu. How to flash a new OS? For this you need to go to this menu and select Choose ZIP from SD Card if the firmware is in ZIP format. If it's just an update file, then you should select Apply Update From SD Card. This is how any device is flashed with the help of recovery. Simply copy the firmware file to the root of the memory card, go into the recovery and select the desired item.
There are other sub-clauses in this paragraph that apply in non-standard situations. It is possible to check the MDSUM of the firmware file. This option checks the file for integrity and if something is wrong, immediately issues a warning. You can also check the firmware file for compatibility with the device. These are the informational options of Android System Recovery 3e. Instructions as such are not required. If there are errors, then you do not need to install this firmware. That's the whole story.

Wipe data. factory reset
Here is a very important point. This option is able to restore the device without any firmware. This tool resets the operating system of the gadget to factory settings. Naturally, everything that was on the smartphone will be deleted: applications, photos, music. In general, everything that was in the internal memory of the phone. Android System Recovery 3e, whose instruction manual is discussed here, was created just to revive the device without serious interference with the firmware. And this option allows you to perform this operation.
This function is also used before installing any firmware. It is necessary to reset the phone to factory settings before flashing. Otherwise, the new operating system will be unstable. But that's not the worst. If you do not return to the factory settings, then the firmware may not be installed at all, and then the user will receive a completely "dead" smartphone. There is no instruction in Russian, but the one that is, clearly says that it is necessary to use the Wipe Data & Factory Reset item before each device firmware.

Wipe Cache Partition
Another one useful command in Android System Recovery 3e. The instruction for the recovery says that you need to use this option in tandem with Wipe Data. If the previous paragraph clears internal memory device, then this one clears its cache. Namely, the working files of applications are stored there. Of course, if this is not done before the firmware, then nothing bad will happen. It's just that in the future, when installing new programs, the cache of the device will grow to incredible sizes. As a result, the smartphone will work very slowly. But this is not so scary, since there are many programs for cleaning the cache of the Android OS. And they work great.
It is also recommended to select this function after a factory reset has been done. This will help the smartphone become even "cleaner", which will positively affect the performance of the operating system. The instruction in Russian for Android System Recovery 3e recommends performing this procedure after the reset. Until the device is rebooted. Then everything will be as it should be.
Wipe Battery Stats
This feature helps to refresh the battery of the device. After clicking on this item, the battery cache begins to be cleared, into which Current state battery, its nominal capacity and other desired parameters. Resetting usage statistics battery, it will be possible to slightly extend its life. Yes and new firmware will work better with the battery. For some reason, many "gurus" of "Android" dismissively refer to this option. But it's actually very helpful. However, it is not recommended to use it too often. Just before flashing the device.

Mounts. Storage
Here are the controls for the internal and external memory smartphone. This item allows you to clear the memory card or built-in memory, format it or attach it as a drive directly from the recovery. This section can be used if you forgot to transfer the firmware file to the memory card, and there is no desire to reboot the smartphone into the operating system. In order to mount the device's memory card as a drive, select the Mount USB Storage item. As soon as the connection is established, the computer itself will install the necessary drivers for operation.
After the connection is established, you can do anything with the memory card: format, clear, copy required files and so on. In order to unmount the USB flash drive, you should select the Umount USB Storage item on the smartphone screen in the recovery. After that, it will be possible to move on to other recovery points and perform further resuscitation of the device on its own.
Recovery errors
Sometimes there is such a common error in Android System Recovery 3e as canceling the installation of a firmware or package. It can occur for several reasons: the file with the firmware is damaged, incorrect information in the binary file, or the firmware simply does not fit this device. But there is another option: a factory reset was not performed before the firmware. It's good that they can be easily fixed in the same recovery. There are several ways to do this.
So, if an error occurs due to a broken firmware file, then you should download it, connect your smartphone to your computer, go to the Mount & Storage menu item and select Mount USB Storage. After that, you can re-copy the firmware to the root of the memory card. If you forgot to make a "wipe", then there is nothing easier than moving up a few levels and selecting the appropriate menu item. And here android error System Recovery 3e "No command" is very rare. It only appears when the user tries to install an ADB update. Usually this method does not work. As a result, this error appears. So it doesn't make sense to use this method. Still nothing will work.
Conclusion
So, let's sum up. We have tried to describe android features System Recovery 3e. The instruction that resulted from this attempt will help novice users of the Android operating system learn how to restore the health of their smartphone with their own hands. Which will ultimately lead to broadening your horizons and good money savings.


