Today, an operating system such as Windows 8.1 Pro is the latest distribution from Microsoft. Despite the high popularity of the OS, it has both a lot of fans and a considerable number of opponents. In this article we will look at all the nuances operating system, and also learn how to install this software.
Adding information to protect your account
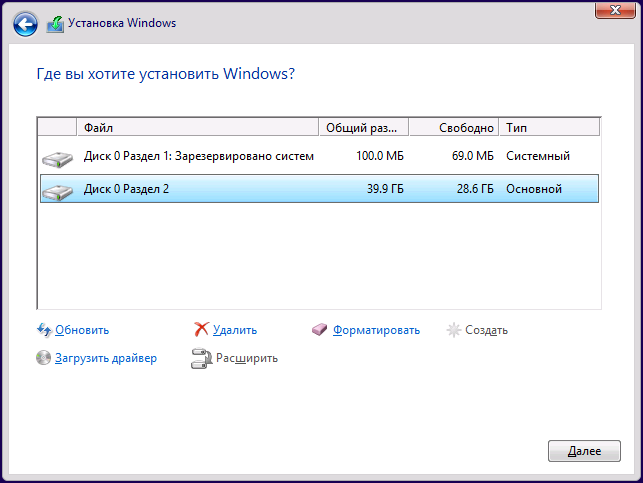
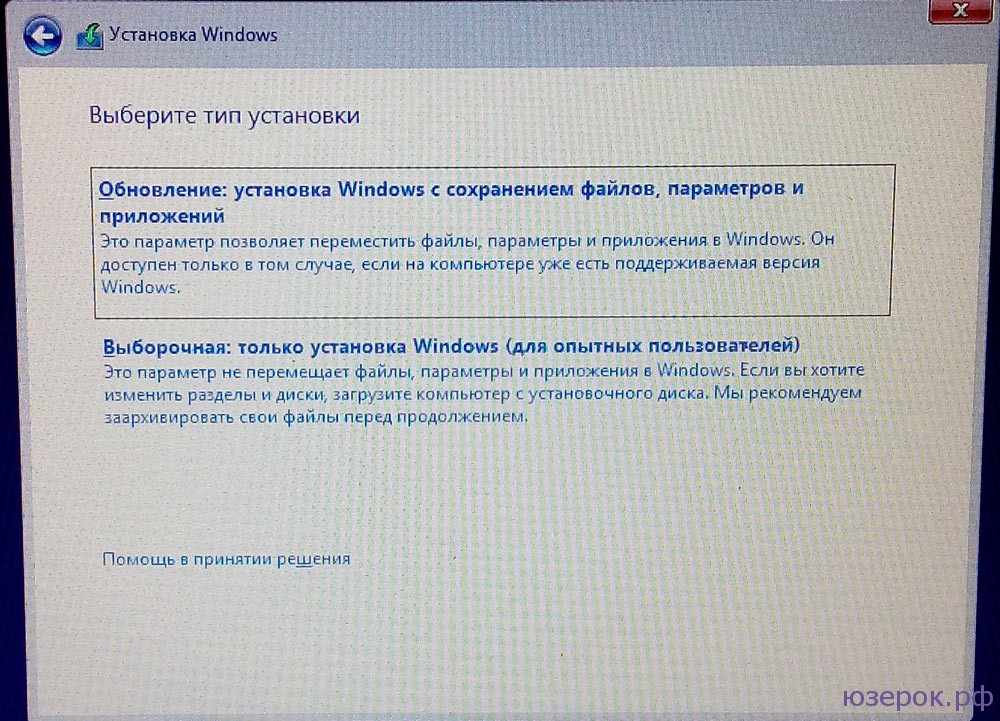
This is the first step, the screen where you just need to click on the link will display: “Install Now”. If you are not satisfied, then it will be necessary to start the installation from scratch. The versions are as follows. Version with full functionality. In this case, the user's files and settings are saved. ✓ Customizable. This is in the best possible way, since the installation is created from scratch, but if you need to make changes to the partitions and drives you need to do it with installation disk. The step where you need to select the disk and partition where to install.
Benefits of Windows 8.1 Pro
Return of the familiar Start button.
![]() It is important to note that the developers of the operating system Windows systems 8.1 heard the wishes of their users, and returned the familiar one for everyone.” The updated “Start” button received new features, in the form of a location on the taskbar, and also instead of the usual menu, opening the “Metro” interface. At the same time, the developers have significantly improved and optimized the new tiled interface.
It is important to note that the developers of the operating system Windows systems 8.1 heard the wishes of their users, and returned the familiar one for everyone.” The updated “Start” button received new features, in the form of a location on the taskbar, and also instead of the usual menu, opening the “Metro” interface. At the same time, the developers have significantly improved and optimized the new tiled interface.
You can also delete a section, create and format. Let's click the "Next" button to begin the installation process. At this stage, drivers and the necessary drivers for devices connected to the computer are installed: video cards, modems, sound, etc. eventually the computer reboots again.
Exchange of application information. device sharing and discovery are enabled. If the Customize option is used, you can enable or disable each option individually. Once the installation is complete, use the application store and look at “My Applications” that you previously used.
Return to the desktop.
Many Windows 8 users complained that after restarting the PC, the system automatically enters the “Metro” interface. In version 8.1 this wish was fully satisfied.
Home screen improvements.
Many Windows 8 users have drawn analogies to the fact that the Start screen is very similar to the Start menu of version 7. The developers have fixed this bug by disabling installed applications appear on the home screen. 
Also Windows user 8.1 Pro introduced an alternative Start screen interface. Now the computer owner has the right to choose between “Metro” tiles and the usual lists.
Converting a disk to GPT while preserving data
The installation may take 15 minutes or more, depending on the speed of your Internet connection, in the meantime you can use your computer to perform other tasks. Before installing a new update, it is recommended to create backup copy systems. Please use the links for information. You can do any of the following ways. Installation in all cases is done automatically.
Eventually the computer will restart, after which the system will take some time to update necessary files. Applications, including an updated system without changing our data. several new and useful applications, which we missed are also added. The main ones are. Now it is included in the system to facilitate communication with our contacts via voice or video. It shows notifications on the lock screen, improves snap mode and more high quality video. Previously, it was necessary to install an application to upload and download files, now it is integrated into the system and has new features.
Returning a combined search.
Search is one of the most requested features by most users. At the same time, many criticized 8 because of the division by file type search engine. In Windows 8.1, combined search returned as an optional feature.
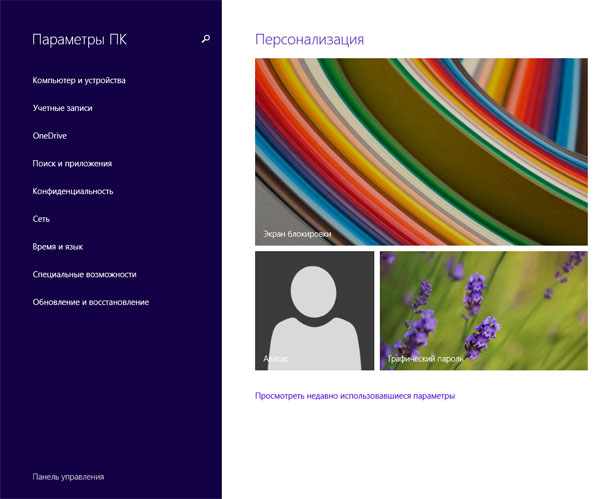
Deep customization.
The developers of Windows 8.1 took care of customizing devices. Now the user has a huge range of additional parameters, which he can change depending on his own wishes. Also, in addition to the classic look of the parameters panel, it was added and completely redesigned modern look. Of course, the similarities between the two setup interfaces remain.
Alarm is an app that hasn't been around, but it can be very useful for several users. Includes timer, countdown, ability to set music as tone, ability to use tablet as night time, etc.
An application for storing articles and news that we find while surfing the Internet in order to read them later. Unfortunately, Reading List doesn't save a copy of the article, but it does send us directly to the web page, so it doesn't work offline.
With the app we can create our own shopping lists, bookmark our favorite recipes or even create our own. Application to track our diet and exercise and help us stay fit. It has an extensive database of food and exercise information.
Changes in IE 11.
Everyone's unloved browser from Microsoft has undergone a lot of changes. The updated IE 11 received a modern interface in addition to the classic one. It is worth noting that the developers were completely able to optimize the operation of IE 11, due to which the native browser became the best solution for touch screens. 
Installing the update manually
Calculator is a must-have app for many. It is possible to connect it to one side of the screen for use without leaving our work area. A simple application that can be significant if we have a scanner or printer that includes it. Make it easy to make digital copies of documents and photos.
Includes several tutorials and tips to help users use the system. It now includes a drop-down menu that makes searching easier. Not everything is beneficial in a 64-bit environment. Also, many devices do not have 64-bit drivers. Greater security because it helps protect pre-processing at the start against Bootkit attacks.
Disadvantages of Windows 8.1 Pro
Incompatibility of programs and drivers.
For many users updated Windows 8.1 Pro was a surprise absence correct operation favorite applications. This drawback of the system arose due to the fact that the driver model of the operating system was radically changed. To a greater extent, the problem of incompatibility with version 8.1 Pro affected gamers. To a lesser extent, the problem has frayed the nerves of antivirus software consumers, but there is always a fear that the program may stop responding along with the update.
Starting and coming out of hibernation is faster. The drive supports more than 2.2 terabytes. Compatible with modern 64-bit system firmware device drivers, can be used to address more than 17.2 billion gigabytes of memory at startup. This option allows you to maintain the existing section style.
Freeing up disk space
Reformatting a disk with a different partition style. In this case, you will have no choice but to do so. Many users usually do not follow any type of planning during formatting, leaving the operation until the last moment or when the computer reaches extremes that do not allow it completely, or in other words, deciding to format when there are no protections. That's why, now that we try to explain the topic of formatting in more detail hard drive, we will do the previous two steps before setting the task.
Update interruptions.
After the official release about the appearance of the updated Windows versions 8.1 Pro, millions of users rushed to immediately receive the new product. As a result, few people managed to achieve the desired result the first time. Firstly, the update weighed as much as 4 GB on disk. Secondly, a prerequisite for downloading was the presence of broadband Internet. Well, thirdly, the update can only be downloaded onto one computer, that is, if you have the update, you cannot download it for installation on another PC.
Preparing to format your hard drive
It is always recommended to consider the latest installation date of the operating system to format the hard drive. Knowing this will help us plan the next ideal date for this operation, which should be a maximum of six months. Press Enter and a lot of information will appear on the screen.
Get and reset operating system image
When we enter, we will need to go to the boot screen and find the section corresponding to boot device priority or boot device priority.Despite a lot of contradictions, the decision to install Windows 8.1 Pro always remains with the user.
Creating installation media
In order to reinstall Windows 8.1 Pro, there is one method, but two different media. The Windows operating system media can be either a disk or a flash card. Of course, it would be good if there is a licensed version of the OS, but in this case we will consider installing and creating a Windows image ourselves.
In either case, the task to be performed is the same in both cases. We will need to find the device where we download the operating system image and place it as the first device in the list so that the system boots from that location and not from our local hard drive.
Formatting the disk: installing the operating system
When formatting a hard drive, you must take into account which operating system we are going to install, since the file system of each is different, as well as the method in which the formatting option is provided during installation. On this screen we will have to select the drive that we want to format, after which it will automatically create a partition table and send us to the next screen.
First, let's look at how to burn the Windows 8.1 Pro operating system directly to a CD. For us we will need:
- Availability of an OS image of Windows 8.1 Pro (can be downloaded from any torrent tracker).
- Availability of a computer with a working disk drive.
- Installed UltraISO program.
- 15 minutes of free time.
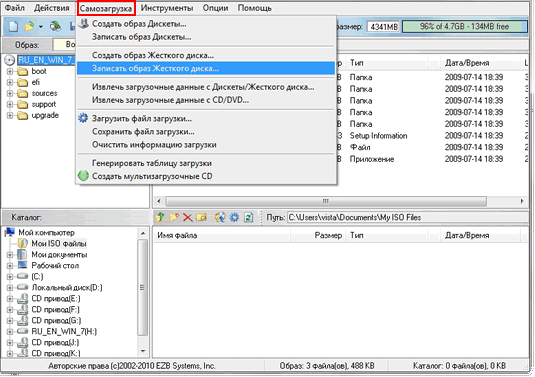
It is important to remember that a system image can be written using any program for burning files to disk. In this case, we consider recording through the UltraISO program, since this method is the most understandable for a novice user.
On this screen we will need to select the partition in which we will format, in which the operating system will run. We can act in several ways. Here the installer is responsible for resizing and hard formatting disk and everything else. If we select "Something else", we will have access to the splitting and formatting tool, for which we will have to have advanced knowledge. These three phases have one common feature: Once the installer completes, it automatically automates disk formatting and does everything necessary to make the operating system usable.

Let's look at burning an image to disk in the form of step-by-step instructions:
- First, insert a blank DVD into a DVD-ROM writer. It is important to use DVD-R and DVD-RW format discs as they have the maximum storage capacity.
- Open earlier installed program UltraISO.
- IN context menu go to the “File” - “Open” tab.
- In the window that appears, find the image required to install the system and click the “Open” button.
- Then go to the “Tools” tab - “Burn CD image”.

Returning a combined search
As you can see, the formatting method differs very little from one operating system to another. It has many steps in common, and the only thing that really changes is the presentation of the operation to the user. It's a fairly simple process, and now that you have the information, you no longer have an excuse for not doing it.
If you follow the steps we've provided for you, plus the ones that give you the installation, you shouldn't have a problem formatting your hard drive and reinstalling the operating system. Daily use of the same thing, which in my case usually consists of opening and closing office applications and Internet browser, becomes a real pleasure.
A new window will open on the surface of the work area, where you will be required to confirm the previously selected parameters for recording. Please note that in the “Drive” tab there should be the name of the burner drive with a blank disk located there. It is important to remember that the lower the disc writing speed, the more likely it is that the information will be written to the CD intact.
But it's not all roses. This small capacity has a lot to work with, many aspects must be taken into account when installing one of these. If you need to do this after installation, you will need to do this manually in the operating system by changing the value from 3 to 0 in the following registry key. However, defragmentation entails a lot of write and read operations that will revive the disk. To make sure it is activated, you should enter the following as an administrator.
- Remove the page file by transferring it to the second drive.
- Disable superprefetching and prefetching.
- To save space, disable disk indexing.
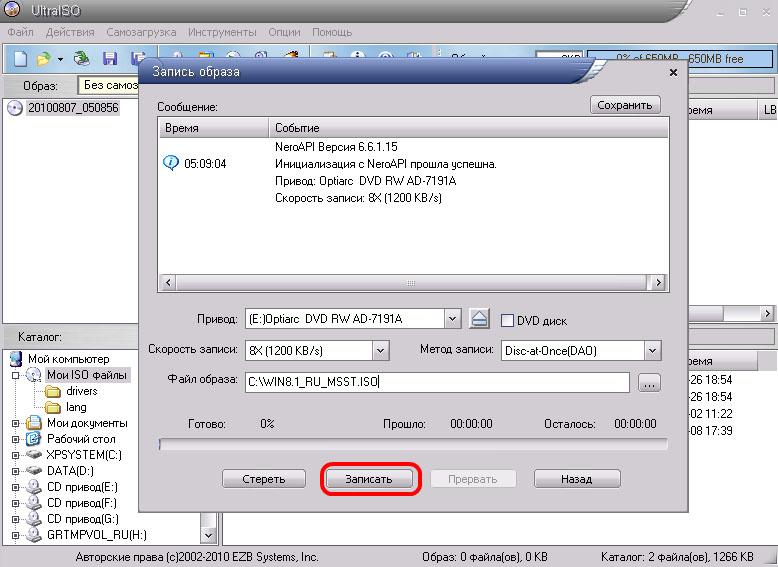
After confirming all parameters, click on the “Write” button. As a rule, burning continues for several minutes, after which we obtain ready-made media for installing Windows 8.1 Pro.
Writing an OS image to a flash card.
 Over time, CDs are becoming a thing of the past, which is why most new computers and laptops come without disk drives. That is why we will consider a method for creating a bootable flash card.
Disable operating system hibernation as it will consume space and actually boot from disk as fast as booting from hibernation so it is not necessary. This is done by right-clicking on each folder in the Location tab. This allows you to perform customization before the system uses the default configuration settings. After pressing the key combination, the shell script should run in Administrator mode by entering the following.
This method of system provisioning allows you to automate the installation and creation of specific environments for desktop virtualization in corporate networks, where sharing user profile files with the rest of the operating system is essential to ensure proper functioning of the overall system images. Systems for recruiting users, for example.
In this method, we will consider writing the operating system to a flash card using the previously familiar UltraISO programs. This method is the simplest and most practical, since writing a flash card via third party programs or command line It will be a difficult task for a novice user.
To record a Windows 8.1 Pro image we will need:
The System Preparation window appears. On line 6, specify the drive and folder where you want to have the user profile. Open a shell prompt as administrator and enter the following. When finished, exit audit mode and restart. Login to your desktop again.
In this case, click OK. Obviously, the system must download many files from this folder. However, thanks to this we reduce uncontrolled growth system unit. Although it is not possible to install an unformatted drive, for security and convenience, it is recommended that you back up your most important files before starting the migration.
- Blank flash card with a capacity of 8 GB (USB 2.0).
- Previously pre-installed UltraISO program.
It is important to remember that the files on the flash card will be completely deleted after formatting. For correct recording, it is recommended to set the type in advance file system"NTFS".
In order to write down Windows image 8.1 Pro, you must follow the following instructions:
The next step is to select the parameters of our country or region: installation language, time format and currency, as well as keyboard configuration. And now we are ready to install. Then we will only need to follow the instructions of the installation wizard and complete the configuration of the last aspects of the system.
But rest assured: simply by moving the cursor in the lower left corner of the screen, we can find a panel with direct access to the old desktop. When we are familiar with new system, it's time to start reinstalling device drivers to make sure your peripherals are working perfectly.
- Download the operating system image.
- Open the UltraISO program.
- In the context menu, execute the command “File” - “Open”.
- In the window that opens, select the previously downloaded image of the Windows 8.1 Pro operating system.
- After opening the image, we will see all the available files that will be located on the flash card after recording.
- In the context menu, perform the following actions: “Boot” - “Burn hard disk image.”
In the window that pops up, it is recommended to leave the values unchanged and click the “Write” button. In a new window that pops up, we confirm the formatting of the flash card and monitor the recording process. Upon completion of burning, we receive a ready-made Windows 8.1 Pro OS for installation.
Reinstalling Windows 8.1 Pro
To install the operating system, insert the DVD/flash card and press the restart button.
When the computer boots for the first time, press the F2/F10/F12/Delete key to enter the BIOS and change device boot parameters. IN BIOS system You need to set loading DVD/flash card first. It is important that after changing the settings, save the new settings.

When the computer boots, when you see the message “Press any key to boot from CD or DVD,” press “Space.”
After loading the system files, select the interface language and click the “Next” button.

In the window that appears, enter the product key or skip this step.

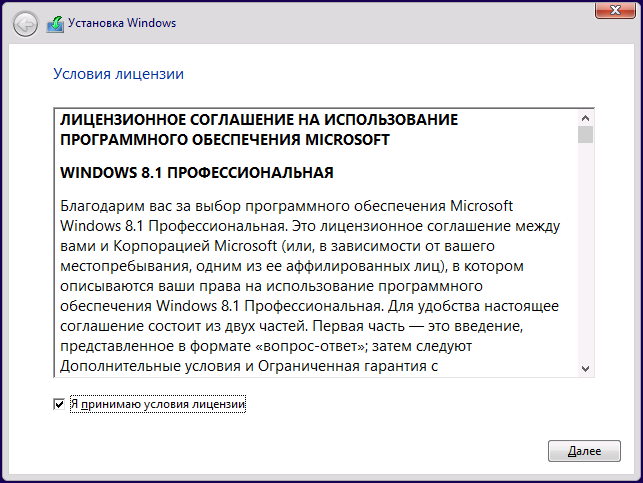
Click the “Install” button and proceed to selecting the installation method. After reading the license agreement, check the box next to “I accept the terms license agreement" and click "Next".
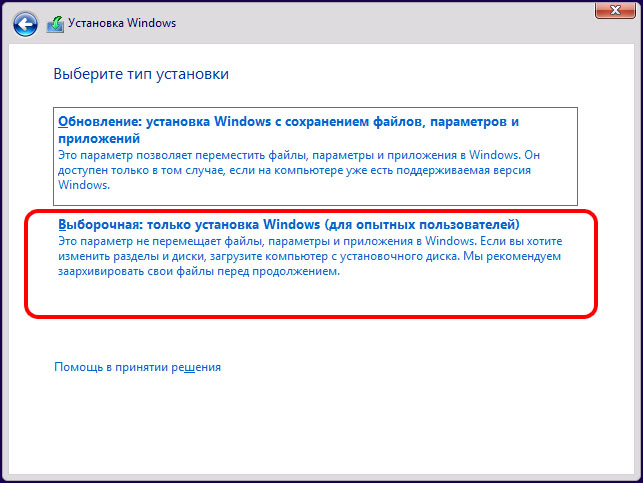
In the window that appears again, select “Custom installation type”, since you will need to format system disk to install Windows 8.1 Pro.
Having selected the formatted partition, click the “Next” button and wait for the system installation to complete.
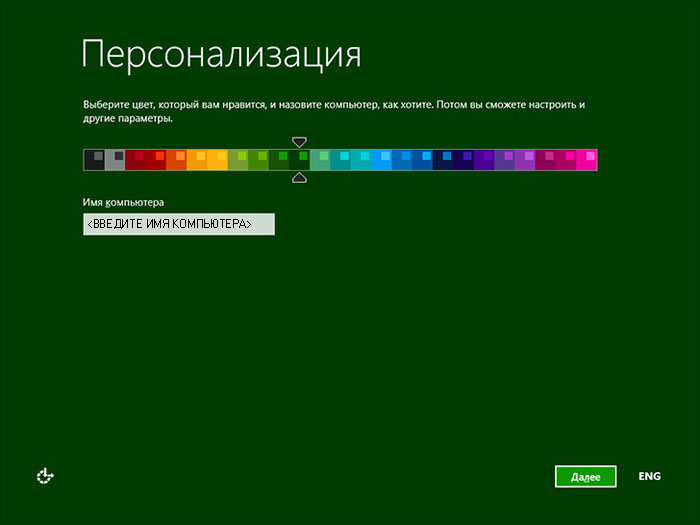
Once installation is complete, you must select color scheme, enter your username and set the current date and time.
The need to install or reinstall the operating system may be for various reasons. In my case, this is a failure of the hard drive ( HDD fell down). It was purchased to replace it new SSD- a disk and, accordingly, it required an operating system. The installation took place on Acer laptop ASPIRE V3-771G-736b8G1TMaii.
System requirements
First, let's look at the basic requirements for a computer or laptop to install Windows 8 and Windows 8.1.
Windows 8
If you want to use it on your Windows computer 8, you will need:
Graphics card:
Windows 8.1
If you want to use Windows 8.1 on your computer, you will need:
Processor: 1 GHz or higher supporting PAE, NX and SSE2
RAM: 1 GB (32-bit) or 2 GB (64-bit)
Free hard disk space: 16 GB (32-bit) or 20 GB (64-bit)
Graphics card: Microsoft DirectX 9 with WDDM driver
Preparing the image
Microsoft has taken care of the users and now you can download a clean image of the Windows 8 and 8.1 operating system. This is very convenient and now you don’t need to download any fraudulent assemblies from torrents and other sites, so as not to infect your computer with viruses.
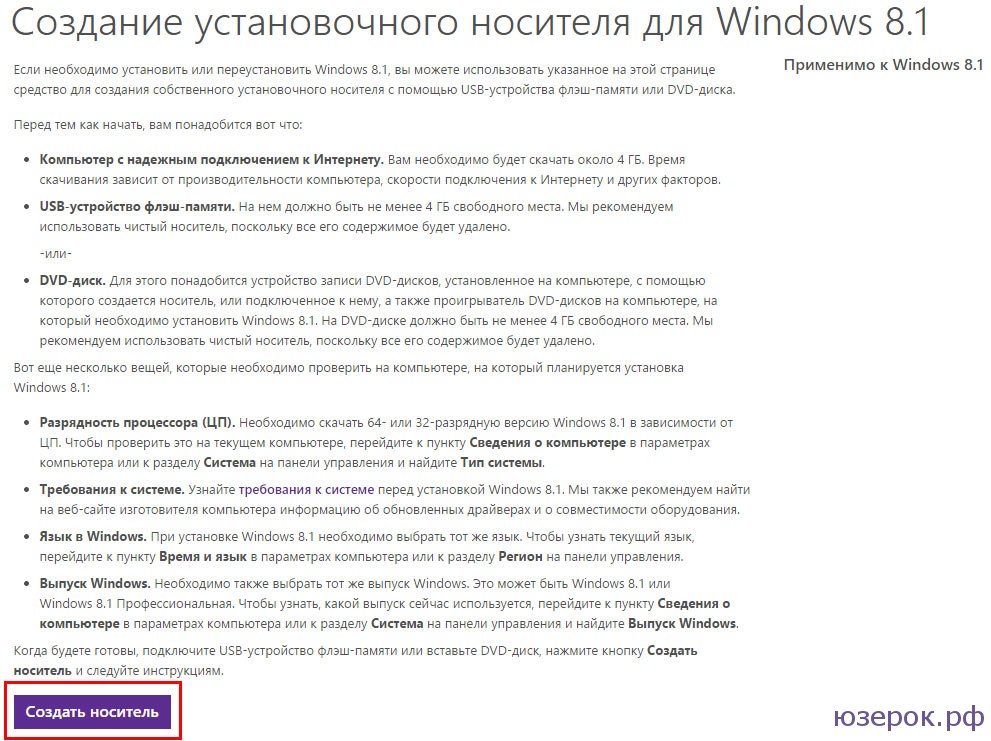
Let's start preparing an image of the Windows operating system. Follow the link to the Microsoft website and click “Create media.”
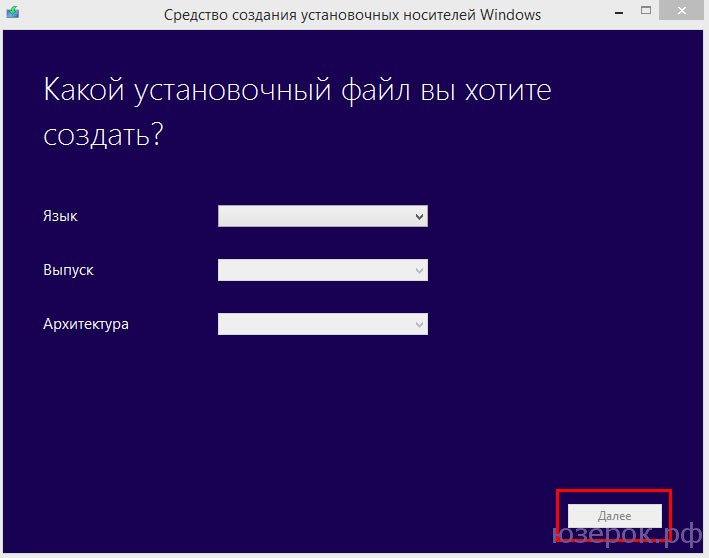
To start downloading you need to save this file on computer. After downloading, launch the mediacreationtool utility and select the language, operating system release - Windows 8, Windows 8.1, Windows Professional, architecture - 64 or 32 bits. Click “Next”.
Creating a bootable USB flash drive or disk
The next step is to select a boot device - a USB flash drive or a DVD disk.

Selecting a location to save the installation file
- If you select a USB flash drive, the program will require a blank flash drive of at least 4 GB. If there are any files on the flash drive, they will be deleted! The utility itself will create and write a system image to your flash drive without any additional programs.
- If you want to do boot disk, then select the second item ISO file. The program will first download ISO image and will then require a blank disk in order to make it bootable and burn the system image.
Here you go. The boot devices are ready and you can begin installation. I will use an 8GB bootable USB flash drive.
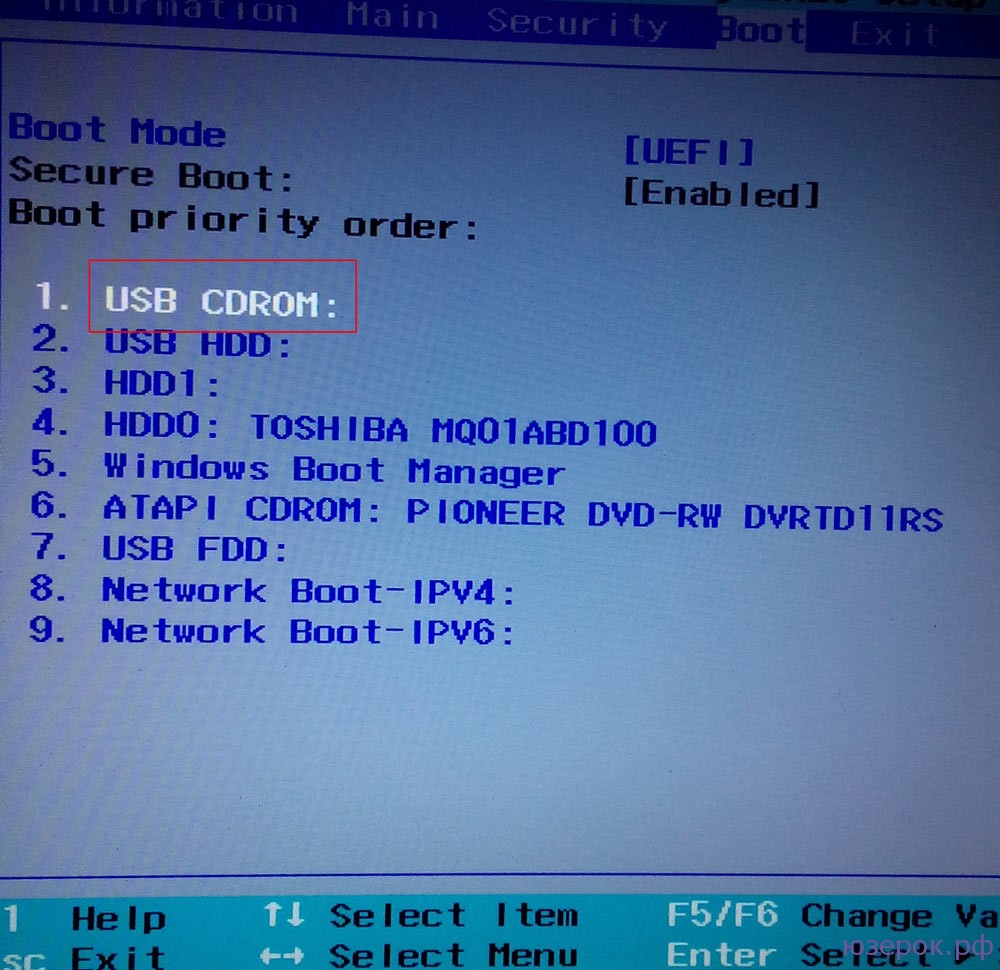
BIOS setup
In BIOS you need to set the boot priority so that it does not come from the hard drive, but from a flash drive or disk. To do this, we need to go to the “Boot” tab. Now the most interesting and most important.
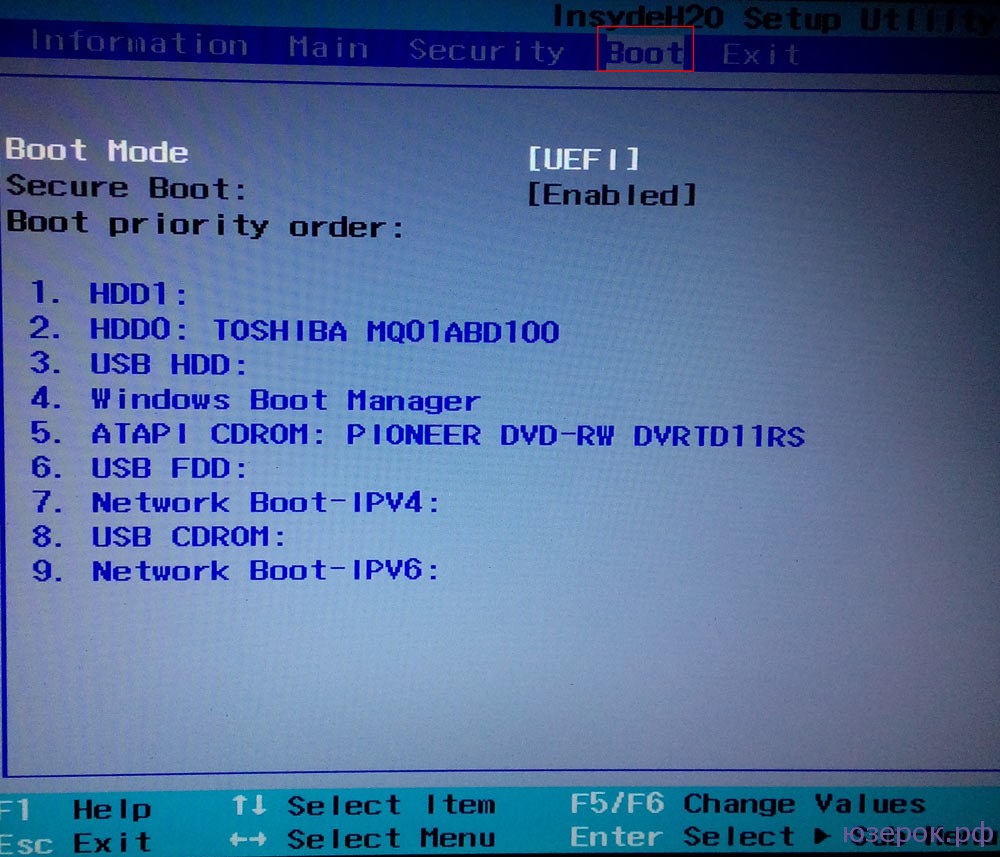
If you have a boot disk with an operating system, then put it in first place (USB CDROM).
If you have bootable flash drive, then we put it in first place (USB HDD) using the F6 key.
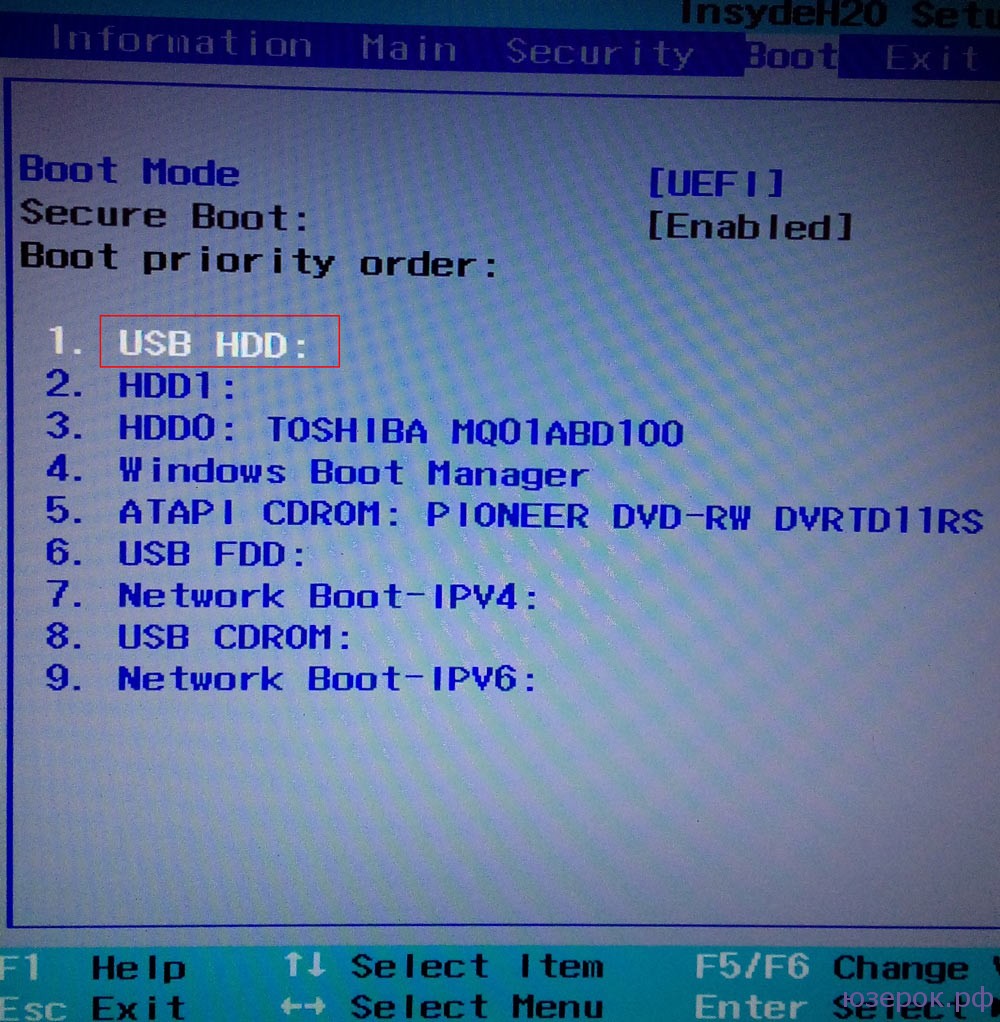
After that, save the settings and exit the BIOS by pressing the F10 key.
Installation

Check the box “I accept the license terms” and click “Next”.
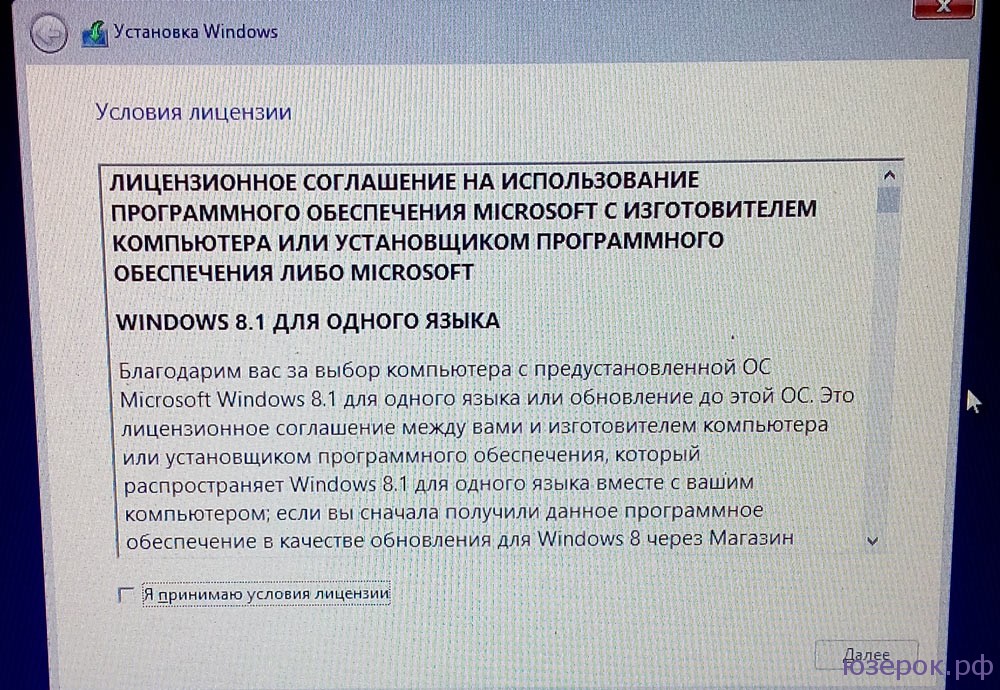
License agreement
Select “Update: install Windows while saving files, settings and applications.”

Compatibility Report
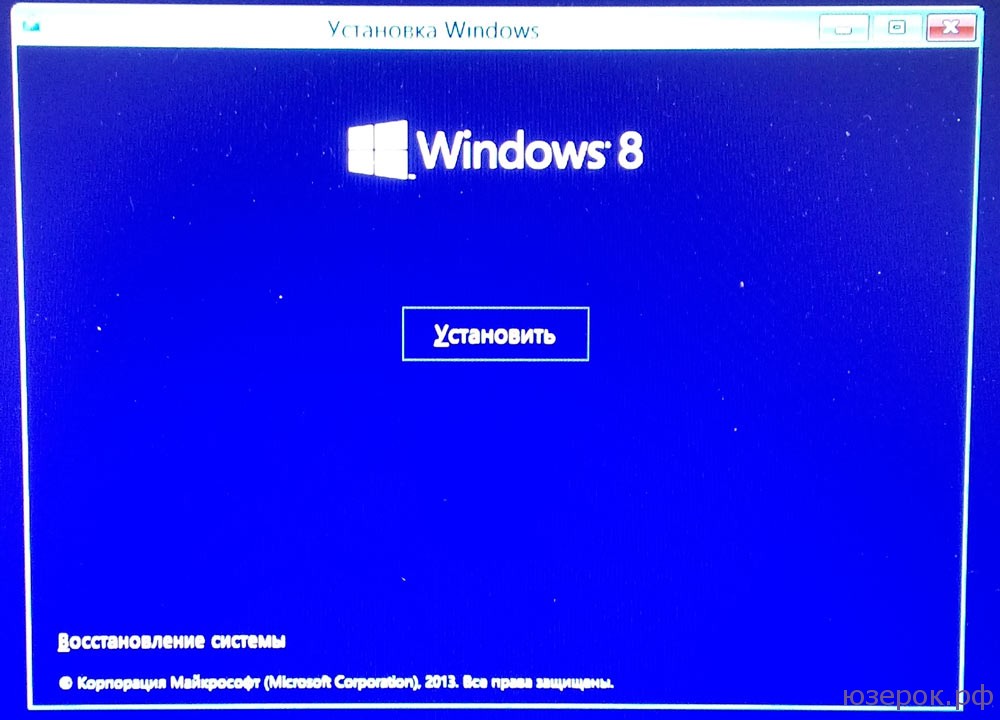
After this, you will see the “Install” button on your computer, click on it.
Installation error
Attention! If at this stage an error occurs and the installation of Windows 8 requires a driver, then connect the boot device with the OS again and reach the point where you select the installation. Select “Custom: Windows installation only”!
Next, you need to select the partition on which the installation will be performed. Click “Ok” and the operating system begins to install. In the process she may ask license key, but in my case this did not happen.
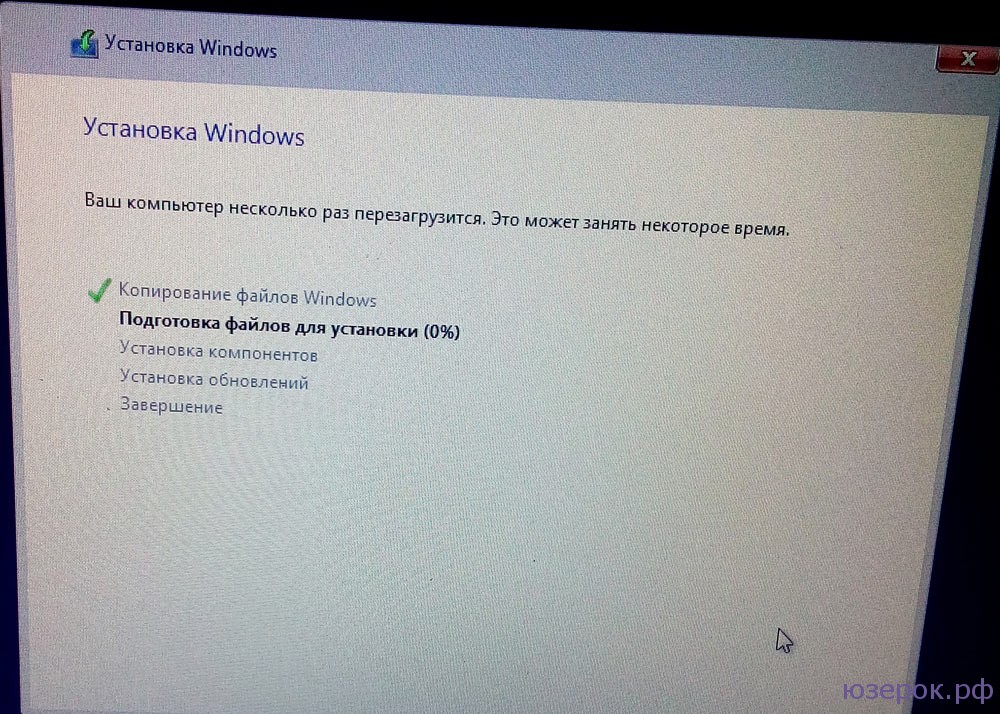
We wait for the installation to finish, connect to Wi-Fi, enter all the data that Windows 8 asks for and that’s it! Installation completed.
Don't forget to return your BIOS settings! You need to put your hard drive in first place so that the operating system is loaded from it.
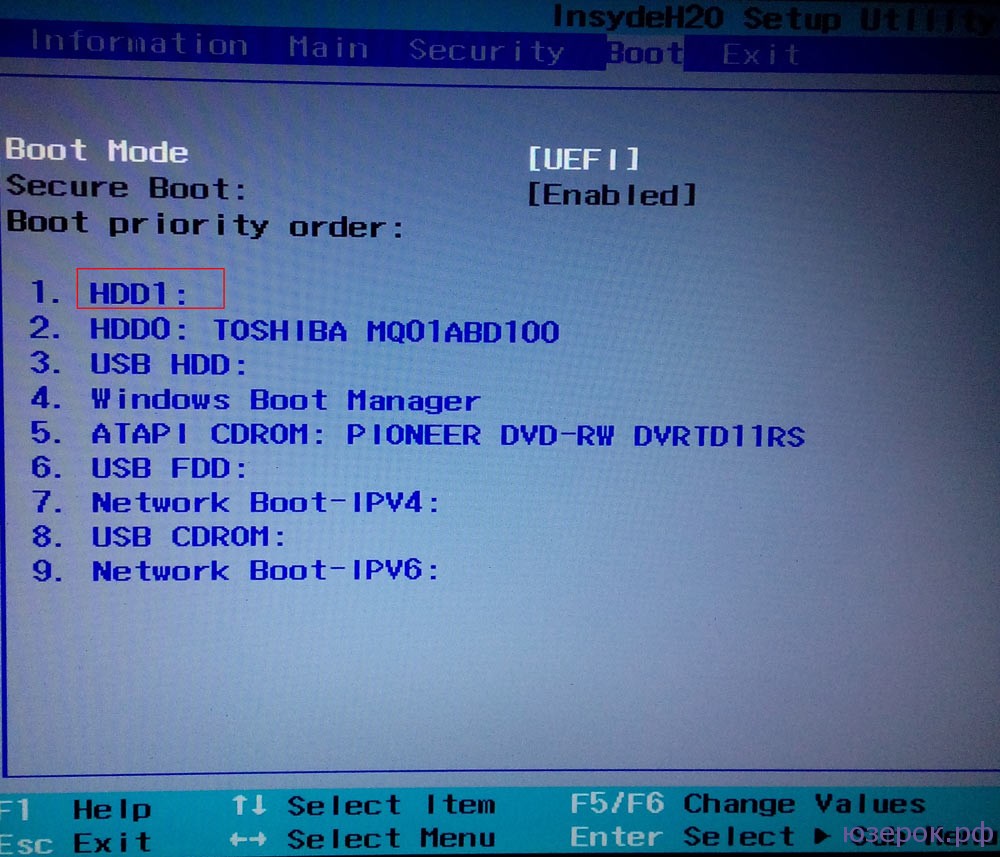
Set to boot from HDD
At this point, the installation of the Windows 8 operating system is complete and you can start using it!