Nowadays, more and more people are moving away from using wristwatches, preferring smartphone watches. However, the phone date and time may get lost when the device is rebooted or due to a system error. In such cases, you have to change the settings yourself. To do this correctly, let's look at some features of date and time settings on Android.
Inaccurate date and time on Android may cause some apps to stop or function incorrectly. This happens because programs automatically check the expiration date of their license with the date set on the phone. And if something doesn’t add up, then they simply stop working.
How to change date and time on Android
Now let's move on to manually setting the time parameters.
Video: How to set time and date on Android
Possible problems when setting the time and their solutions
After setting new time settings, you may encounter two problems:
- time settings are constantly reset;
- The message “An error occurred in the Settings application” appeared on the device screen.
The following methods will help you correct these misunderstandings.
Reboot
First try restarting your smartphone. This action will start all processes again, and perhaps the errors will disappear, and the time settings will be saved.

Auto-sync
If rebooting the device did not work properly, you need to enable auto-sync. This feature allows the phone to automatically update its time settings when connected to the Internet. To enable auto-sync, follow these steps.

Installing 360root and ClockSync applications
If your phone does not have an auto-sync feature, you will need to follow these steps.

Factory reset
However, even after automatic synchronization is enabled, the time may still change on its own or generate an error. In this case, you will have to reset your phone to factory settings.

How to select, set, or add a new time zone
To find out the time zone of your region, go to the website http://www.gmt.su/city-time/country/Russia/ and find the city closest to you in the list. On the right side of the page you will see time zone information. For example, in Kaliningrad it is GMT +02:00. You will need to select this information in the settings of your phone.

If no changes have been made to the Android device, then the date and time will be set automatically, synchronizing with a mobile operator. These settings can be changed, which we will discuss below.
Setting the date and time manually
If the time is on android doesn't sync, then you can make the following changes manually:
We are interested in changes that can be made manually, so uncheck the automatic update box and go to settings. It is worth noting that as long as the phone is synchronized with a mobile operator, the points for changing the information we are interested in will be not available.
Let's consider available items. The first two points allow you to use automatic synchronization, i.e. The smartphone itself will receive data from the mobile operator and will constantly verify it.
If you uncheck these items, the following 3 settings will become available: installation date, time, and time zone.
The hour format allows you to set display style time: in 12 hour or 24 hour format.
Well, the last point will allow you to change display dates everywhere on your smartphone. 
For manual remove changes first two checkbox and click sequentially on the items for setting the data of interest. In the window that appears, just set the numbers we need and save the changes. 
Automatic synchronization
As mentioned above, on Android you can use automatic synchronization.
To do this, go to the same menu that we mentioned above and checking presence of checkboxes for auto-sync. You don't need to do anything else; after a while, the information will automatically change.
In addition to the standard method, there is another one - install a special application. You can find such programs in the play market.
For example, here is the popular application ClockSync.
To use it, go to Google Market and enter in the search ClockSync.
Open the found link and launch installation process. 
After installation let's go in in the application, click on ellipsis above. In the menu that opens, select auto-sync.
There is no need to perform any further actions; after a while, the date and time will be synchronized and will be periodically checked with the server. Internet access is required for the application to work.
Let's imagine that you have just received a brand new smartphone based on the Android operating system, but the date and time on it do not match the real ones. This is where the question arises - how to install or change this data?
It should be noted that by default, the date and time are synchronized with the server automatically as soon as you connect to the Internet. Therefore, we recommend that you turn on either Wi-Fi or mobile Internet, after which the data will be synchronized and you will not need to configure anything.

If after connecting, automatic synchronization does not work or you are unable to connect to the network, we will change the data manually. To do this, go to the settings of your smartphone by clicking on the icon of the same name on the desktop.


But on Xiaomi and MIUI firmware you need to look for it in the “System and devices” - “Advanced settings” section.


We go to the section, here by default the “Automatic detection of date and time” should be checked. In this case, the data is synchronized with the server.

If you want to specify other data, uncheck the “Automatic detection of date and time” item and then the “Set date” and “Set time” items will become active.

By clicking on “Set date”, enter the required data and click OK.

You repeat the same thing over time.

By the way, if you have problems with automatic data detection, it may be due to the wrong time zone (the clock may be an hour or more behind or too fast). Click on the “Select time zone” line.

Select the required time zone.

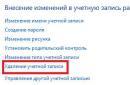
- Option “Automatically set date and time”. It is usually used in mobile devices running the Android operating system with an Internet connection. It allows you to synchronize the clock of your mobile device with the clock located on the server of your Internet provider. When enabled, it will be impossible to change the date and time manually. Therefore, you need to uncheck this option.
- Many Android devices have a function for automatically selecting a time zone (network or GPS synchronization). To access manual configuration, it must also be disabled.
- Selecting a time zone. When you click the button, a list of cities with different time zones opens. If there is no settlement in which you live, you just need to choose one that is closer to your place of residence.
- Setting the date. Clicking on this item will open the calendar. To change the date, you just need to select a specific date, month and year. Click on the “Ok” (“Done”) button.
- Display format (24- or 12-hour). When using the 12-hour format, time after noon will be counted starting from one (instead of 13 - 1 hour, etc.).
- Setting the time. This option allows you to set the time by selecting the appropriate values from the bars indicating hours and minutes. Then click on the “Finish” button (Ok).
- To return to the desktop after completing the procedure, just click on the up arrow. It is located at the bottom of the page.
Having purchased a new mobile gadget, users may encounter problems with incorrectly set time zones and the current date and time. However, it can be solved quite simply, and in this guide we will tell you how to set the date and time on a smartphone running Android.
To set the time on Android, you need to follow a few simple steps:
Step 1. Run Settings, go to the category " System and device" and select the section " Additionally».
Step 2. Click the button date and time».

Step 3. In the window that opens, you can set the time, change the date, select the format for displaying the time and date, set the time zone, and also set automatic receipt of settings.

note: Date and time options may be hidden in other subsections, such as advanced settings. It depends on the Android version.
You can also access the date and time settings in another way - through the application Watch:
Step 1. Launch the application Watch.

Step 2. Click the options button.

Step 3. Click on the button Date and time settings».

Why does the time go wrong on Android?
Date and time synchronization on Android smartphones can sometimes not work correctly, causing settings to crash. To fix this issue, you need to disable the " Network date and time" And " Network time zone", and then set the settings manually.

If the issue is not resolved, you should run and reinstall all the parameters.