It happens that turning on the computer after an incorrect shutdown, a power outage, or installing a second operating system, a message appears on the screen stating that the boot disk or bootloader cannot be detected. In order to start the computer in this case, you need to restore the Windows 10 bootloader. But you should immediately find out what it is, and also consider the reasons for the appearance of such errors.
The OS operating system loader is a program that allows the OS to start after successful completion of the computer's self-test when turned on. This very testing of PC hardware components is carried out by a set of BIOS microprograms, after which it transfers control of the system to the bootloader, which already launches the operating system. This scheme is relevant not only for computers and laptops; it is used in many devices: simple logic controllers, smartphones and other mobile devices.
The bootloader performs several functions besides starting the OS:
- prepares the hardware to load the operating system kernel;
- launches the OS kernel stored on HDD, SDD or transmitted over the network;
- transfers control of the device to the operating system kernel.
Causes of the problem
The error message occurs after the step bootstrap computer has completed, and the boot loader, which needs to transfer control of OS startup, is not found in the specified location (first sector boot disk). Reasons for missing errors boot entry, some:
- Availability bad sectors on disk;
- absence of a bootloader file, which in the top ten is called bootmgr;
- careless handling of programs for creating multiboot configurations (EasyBCD);
- installing an older operating system on top of a new one and generally installing a second OS.
Solution
Restoring the Windows 10 bootloader is carried out using several methods using command line. If the user is new or unfamiliar with this system tool, there is no need to worry. There is absolutely nothing complicated here, and even a beginner can cope with resuscitating the bootloader by strictly following the given instructions.
Before you begin recovery, you need to perform a few simple operations:
- disconnect all external storage media from the computer (flash drive, camera, eBook, smartphone), and when
- capabilities, and all other USB devices except the mouse and keyboard;
- go to the BIOS section, most often called “Boot” or “Boot priority”, and select as the 1st boot device
- hard drive where Windows 10 is located.
If after a reboot the problem does not disappear, we move on to more drastic solutions.
Method No. 1
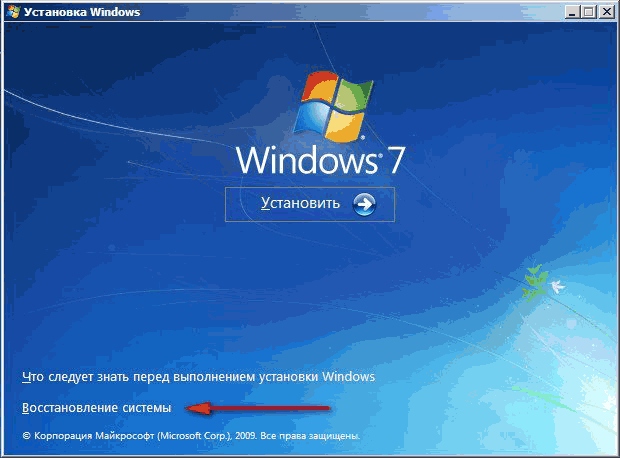
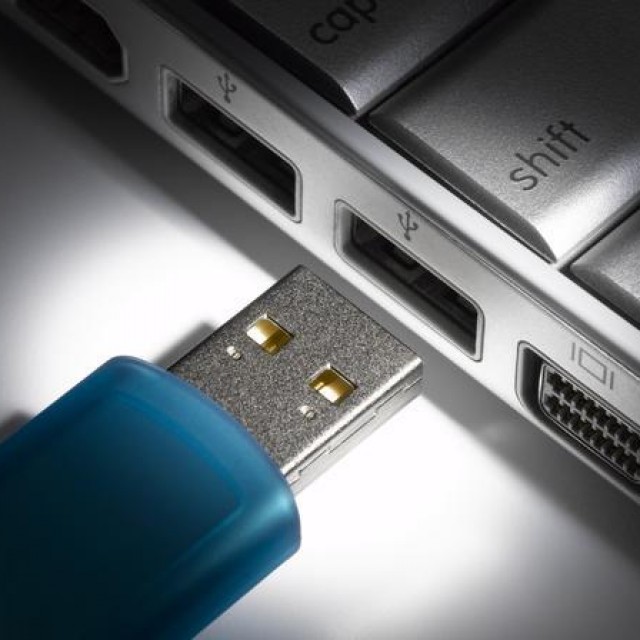
To resume the bootloader in the "ten" (and any other Windows, starting from the "seven") you will need a distribution kit with installation files operating system. Most likely, it will be a bootable USB flash drive created from an ISO image. The disk is also suitable for Windows recovery 10.
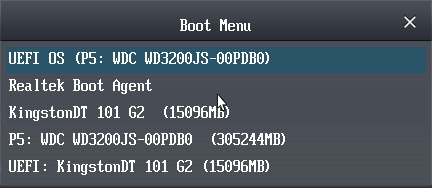
1. Connect bootable USB flash drive, reboot the computer and boot from this drive using the “Boot menu”.
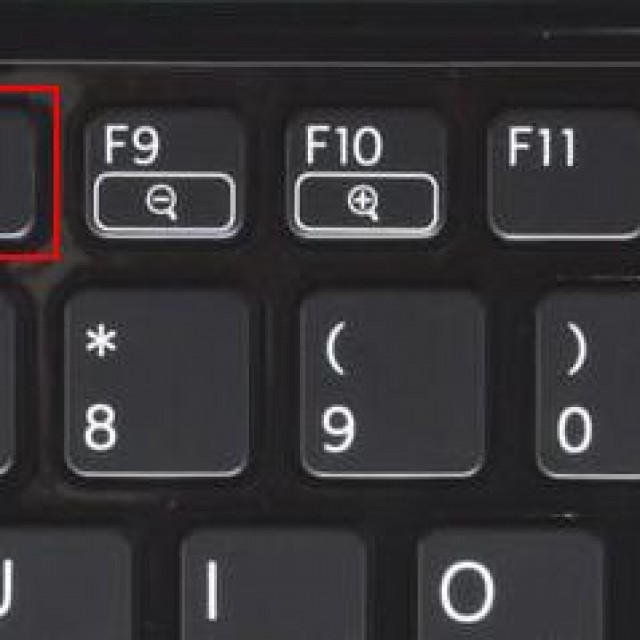
It is usually called up using the F9, F11 or F12 key. In any case, information about this is displayed at the time of self-testing of PC hardware components.
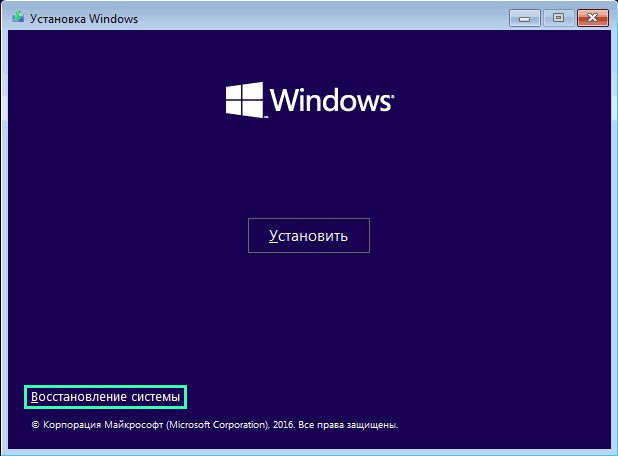
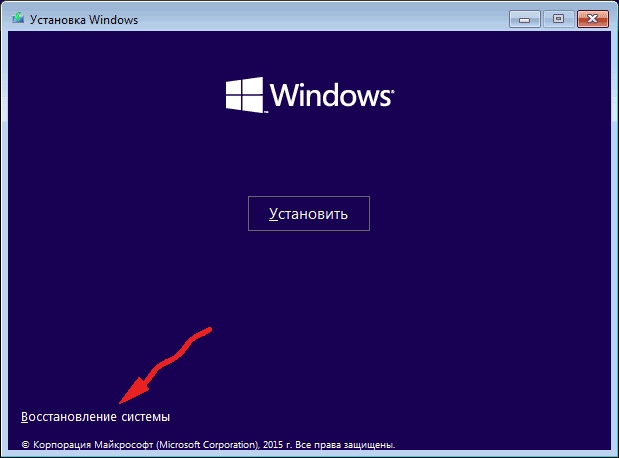
2. Go to the “tens” recovery environment by clicking on the link of the same name on the screen with the “Install” button.
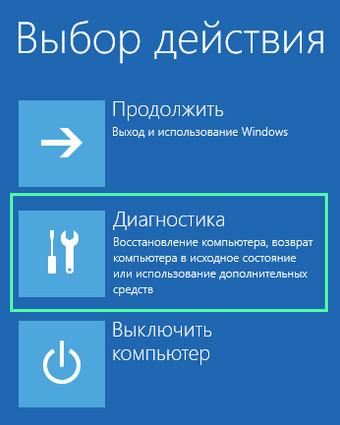
3. Go to click on the icon with the inscription: “Troubleshooting” and call up additional parameters.
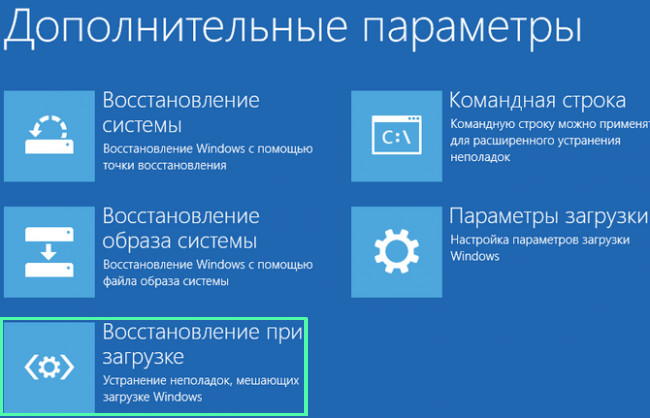
4. Launch the command line.
By the way, by selecting the “Startup Repair” option, the steps below can be automated, but the method does not always work.
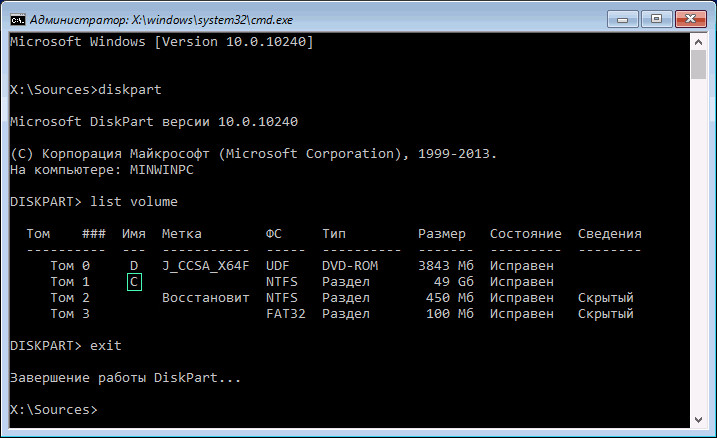
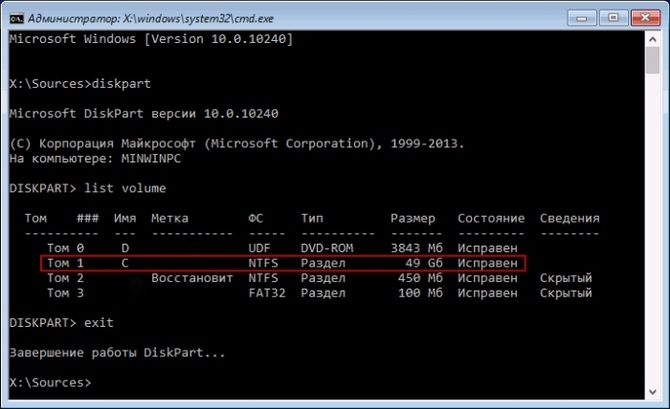
5. Enter a sequence of system commands, executing them by pressing the “Enter” key:
- diskpart - to launch a utility that allows you to work with disk partitions;
- list volume - visualizes data about the partitions of your hard drive (remember the letter label of the volume on which Windows is located);
- exit - exit from the Diskpart program.
6. Execute the command “bcdboot x:\windows”, where x is the letter of the partition with OS files.
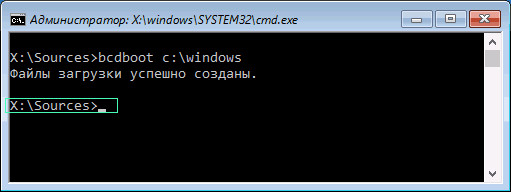
7. After a message appears about the successful creation of the download files, restart the computer.
Method number 2
If restoring the Windows 10 bootloader using the proposed method failed, repeat all the steps given in the first section, up to the 4th step.
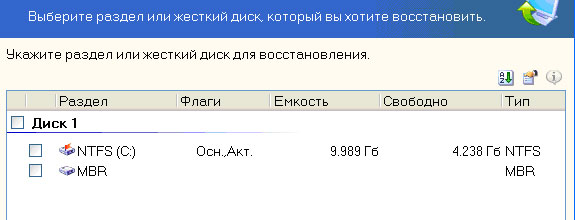
If you are using a PC with a new UEFI interface and a GPT partition scheme, look for a hidden volume formatted in FAT32, the size of which ranges from ~300-500 MB. When using the old one motherboard with BIOS we are looking for a volume ~450 MB in size with the same file system.
2. Remember the section number, for example, “Volume 3”, and its letter label.
3. Execute the chain of commands below:
select volume X, where X is the drive letter;
format fs=fat32 or format fs=ntfs, depending on the file system;
assign letter Y - assign a letter label to the disk;
exit - unload diskpart from RAM;
bcdboot C:\Windows /s Y: /f all, (C:\ - system partition):
diskpart
list volume
select volume X;
remove letter=Y - disables display of the service disk in Windows;
4. Close the command line and reboot.
Method No. 3
Restoring the bootloader using the above methods is impossible without bootable media with installation Windows files 10, so let’s consider the simplest (but not the most effective) option for restoring the “tens” bootloader. To do this, we launch “Special download options,” which is not always possible. IN additional parameters call the command line, execute the command “bootrec.exe /fixboot” and reboot the computer. This concludes the methods for restoring the Windows 10 bootloader.
Bootmgr and ntldr are standard boot loaders, but they are designed for different OSes. Bootmgr- that's more latest version bootloader, which is used starting from Windows 7. It characteristic faster data processing and the ability to load the maximum version of the operating system. Also, bootmgr is new generation implementation of the interface between computer hardware and operating systems, and in the near future, will completely replace the BIOS model that has existed for several decades.
In its turn, ntld used on old OS versions (Vista and XP). This bootloader was different slow data processing and the ability to process simple tasks.
New boot manager bootmgr oriented to use a special BCD (Boot Configuration Data) boot configuration store, as well as specially developed applications and specification data EFI. For compatibility with Windows versions Before Windows Vista, the new BOOTMGR manager provides support for booting previous generation BIOS-based computer operating systems.
Restoring the bootloader in Windows XP
Today, many more users use on their personal Windows computers XP and due to the fact that this version of the OS is already outdated, the bootloader may malfunction, to correct which can be done as follows:
If, upon repeated booting Windows displays a message NTLDR is missing, then the cause of the problem is due to the fact that the boot record was completely deleted. To solve this problem required:
If similar problems occur on Windows Vista, the actions are similar, since the same type of bootloader is used.
Fixing the bootloader in Windows 7
Windows 7 uses a new type of bootloader, which is why there is several ways its restoration.
We use boot from disk or flash drives:
But, this method, can only help if the damage to the bootloader is minimal. At more serious problems, you should use the boot.ini editing process.
Usage bootrec:
Troubleshooting Windows 8, 10
Windows 8 and 10 use the same type of bootloader (although in Windows 10 it has increased processing speed for various operations). Therefore, the restoration of this element occurs in a similar way.
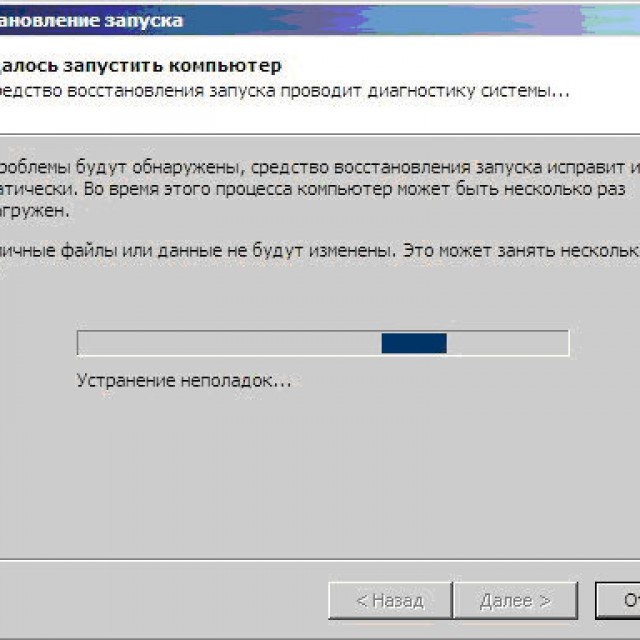
Automatic recovery
Usually, automatic recovery enough to normalize the operation of the entire operating system.
As you can see, this method is in many ways similar to a similar recovery on Windows 7, with the exception of a few elements.
Manual recovery
If automatic troubleshooting does not bring the desired result, you will have to resort to manual recovery using the console:
A secure, high-quality computer opens up a wide range of possibilities for us. But even in the rare case when a licensed version of the operating system and an excellent antivirus are installed, there is always the possibility that one fine day, instead of the usual greeting, a notification about damage to the OC bootloader will appear on the screen.
The reasons for this are different, but they are not the ones that initially concern the user. He panics because there is no way to gain access to the necessary files. All this may not happen if the user knows how to restore the OS bootloader. Systemic ailments cannot be treated with just one reinstallation.
OS won't start
There are exactly as many sources that provoke the occurrence of computer errors as there are problems themselves. A lot of them. This version loves to scare users with various blue screens with plenty of English-language information. Having learned the origins of such unpleasant phenomena, effective “therapy” can be prescribed.
The main reasons are:
The appearance of messages about a damaged boot record may also indicate that an inquisitive administrator - a PC user - incorrectly specified information about the active partition hard drive.
What can be done
You can troubleshoot problems with the bootloader using system methods or by using information from external media. It all depends on the severity of the changes that have occurred.
The problem can be resolved most quickly only by special programs, the image of which would be useful to record and always store near the PC. Manual reconstruction requires a clear knowledge of the causes of problems and the algorithm of actions for each situation.
Video: Returning Windows to normal
Recovery using Windows
A user who has problems loading PC software should try the following methods of restoring the operating system:

Each of the above actions corresponds to a specific stage and cause of the problem. If you restore standard means fails, you can resort to recreating the boot record using special programs.
Options
Windows is equipped with a fairly powerful recovery option.
You need to work with it according to the following algorithm:
Sometimes after pressing F8 you may not see the line “Troubleshooting...”. This means that all the necessary information is stored in the root of the hard drive and other methods must be used to return to a working state.
Using the command line
The command line is a standard assistant for correct resumption of work. It is considered one of the additional launch options that are offered by all versions of operating systems.
It's also a good idea to try to recreate the last known good configuration. If the deviation is minor, restoring the Windows 7 boot loader from the command line will be quick and inexpensive.
The resumption of work using it is carried out according to the following plan:
Windows remembers the operating parameters and enters them into the registry.
Booting from a flash drive
If system methods for recreating the working state do not produce any results, you can try restoring the Windows 7 boot loader from a flash drive or other portable storage medium. Of course, they cannot be clean.

If you have a recorded Windows installer image on a flash drive or disk, you can use it to resume booting.
The action plan is as follows:

Everything can be done without an installation disk. You just need to record the recreating image. However, you will need a little time and access to a computer running a similar operating system.
Programs for work
Purchase a license or burn the media on which it will be located special program Resuming the OS boot will never be a bad idea. Such things quickly and without spending money restore working PC parameters. You also do not need to have any special applied knowledge.
The following are used software in the following way:
Programs for resuming the Windows boot record have a fairly large range of useful utilities. Therefore, you will not have to use any additional information from the Internet or media with the operating system when working with them.
Multiboot
One of the assistants for a PC user can be the Multiboot program.
It has the following features:
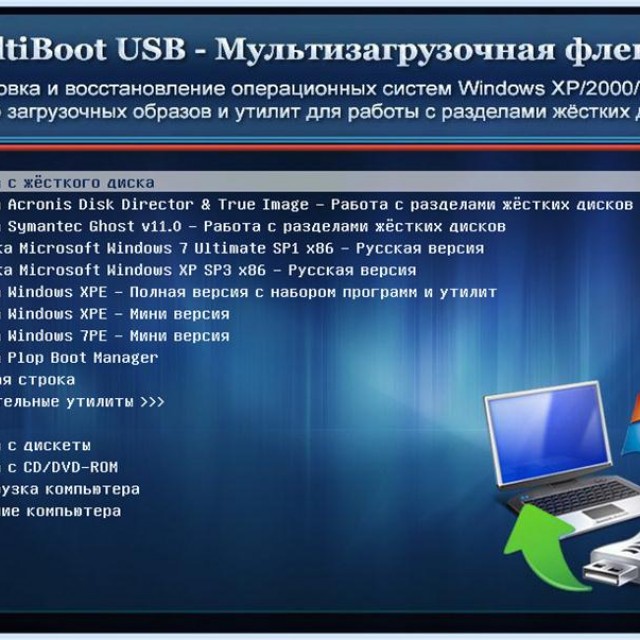
You should work with it according to the following algorithm:

After all operations are completed, the computer will reboot on its own. System reconstruction details are displayed in the additional information tab.
Bootice
This utility has similar capabilities to the Multiboot reconstructor, so we will not repeat the list.
The algorithm is as follows:
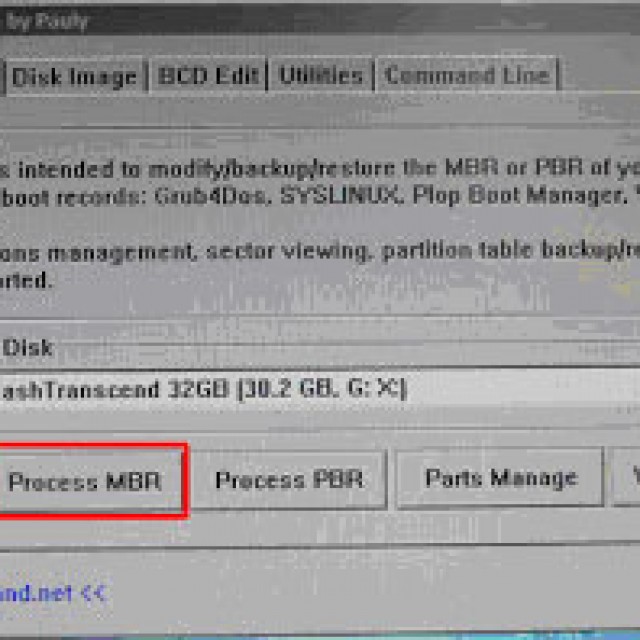
In a similar way, you can restore the settings of any operating system.
Acronic
Software Acronic has quite powerful functionality. It is one of the best for Windows. It’s extremely easy to work with, so it’s worth recording its image in advance.

The plan for reviving the PC's working condition is as follows:
This software has a very simple interface. In addition, it allows you to reconstruct various elements of the operating system, not just the boot record.
The appearance of black and blue windows notifying us that Windows cannot be started is, of course, an unpleasant phenomenon, but it can be eliminated. Windows 7 has its own powerful resume options. In addition, they can always help troubleshoot such problems installation disk with OS and a number of special programs.
There shouldn’t be any particular difficulties in working with them the way everything is done in automatic mode. If manual editing is necessary, the utilities can provide mini-tips. It is advisable to burn an image with such data to a disk or flash drive in advance.
When the computer goes under Windows control 7 in sleep mode or hibernation mode a snapshot is taken of it current state. When you enter sleep mode, the photo is saved in memory, and when you enter hibernation mode, it is written to disk. Snapshot writing and reading are performed Windows Resume Loader.
There are many reasons why your computer may have trouble resuming, including snapshot errors, memory errors, and disk errors. If there is a problem waking up your computer, you will receive a warning from the Windows Resume Boot Loader that says something like this:
Windows Resume Loader
A previous attempt to restart the system from a previous source failed. Want to try again?
Continue to restart the system. Delete recovery data and go to the system boot menu
Enter=Select
To try resuming the system state again, select the option Continue to restart the system. To delete the saved computer state and restart the computer, select the option Delete recovery data and go to the system boot menu. The full restart option usually resolves the problem, but it can lead to data loss if work on the computer was not saved before going into sleep or hibernation mode.
Fixing startup errors
A computer running Windows 7 requires access to certain system files to start. If your computer does not start due to damage or lack of certain system file, use the tool Startup recovery. Restoring a damaged or missing file does not always solve the problem, and you may need to do more in-depth diagnostics to resolve a more serious problem.
Typically, other startup problems are related to changes made to the system, such as a device that was not installed correctly, or an incorrect system configuration or registry update that led to a conflict. Often, to troubleshoot startup problems, you use Safe Mode, which loads the system only with essential files, services, and drivers for the mouse, monitor, keyboard, storage devices, and video. The monitor driver ensures that the monitor operates with basic parameters and modes; The basic video driver specifies general settings for the graphics card. Network services and drivers do not start unless Safe Mode with Network Driver Loading is explicitly selected when the computer boots. IN safe mode A limited set of configuration information is loaded to assist in troubleshooting.
To produce starting the system in safe mode do the following steps:
2. During boot, press the F8 key to open the screen Additional options downloads. If your computer has multiple operating systems installed or the Recovery Console is installed, the Windows Boot Manager window will appear on the screen. Select Windows 7 as the boot operating system and press F8.
3. Use the arrow keys to select the type of safe mode and press Enter. The appropriate type of safe mode depends on the type of fault. The main options are:
- System Restore Download the Startup Recovery tool, which will be discussed later in the article.
- Safe mode During system initialization, only the basic files, services, and drivers are loaded: mouse, monitor, keyboard, storage devices, and basic video. Network services and drivers are not loaded.
- Safe Mode with Boot network drivers Download basic files, services and drivers, and the services and drivers required for networking.
- Safe Mode with Command Line Support Download basic files, services and drivers. Instead of graphic Windows interface 7 The command line opens. Network services and drivers do not start.
Advice! In safe mode with command line support, you are also free to launch an Explorer shell. Open Task Manager by pressing Ctrl + Shift + Esc. From the File menu, select the command New task. In the New Task window, enter explorer.exe and click OK.
- Load Logging Record all startup events in the boot log.
- Enable low resolution video mode Run the system in low resolution monitor mode (640 x 480). This is useful if the system display is configured to operate in a mode that is not supported by the current monitor.
- Last Known Good Configuration Start the computer in Safe Mode using the registry information saved from the last shutdown. Only the HKEY_CURRENT_CONFIG (HKCC) section is loaded. It stores information about the hardware configuration with which the computer was previously successfully launched.
- Disable automatic reboot on system failure Prohibition of restarting Windows after a failure. Rebooting Windows multiple times may cause a problem with the boot and startup configuration firmware.
- Disabling mandatory driver signature verification Start the computer in safe mode without applying the digital driver signature policy. If the cause of the failure was a driver with an incorrect or non-existent digital signature, you will temporarily fix the problem and be able to start your computer and resolve the problem by installing a new driver or changing driver signature verification settings.
4. If after starting in safe mode the problem is not detected, you can exclude it from the list possible reasons standard parameters and drivers of main devices. If the problem is caused by a recently installed device or updated driver, while working in Safe Mode, remove the device, roll back the update, or install a different version of the driver.
5. If you continue to experience problems during normal system startup and suspect a problem with your hardware, software, or settings, reboot into Safe Mode again and try reversing the changes in System Restore as described in this article.


