Hello.
Almost every user sooner or later is faced with reinstalling Windows (viruses, system errors, buying a new disk, switching to new equipment, etc.). Before installing Windows, the hard drive must be formatted (modern Windows 7, 8, 10 operating systems offer to do this right during the installation process, but sometimes this method does not work...).
In this article I will show you how to format a hard drive in the classic way via BIOS (when installing Windows OS), and an alternative option - using an emergency flash drive.
1) How to create an installation (bootable) USB flash drive with Windows 7, 8, 10
In most cases, the HDD hard drive (and SSD too) is easily and quickly formatted during the Windows installation stage (you just need to go to the advanced options during installation, as will be shown later in the article). This is where I propose to start this article.
In general, you can create both a bootable USB flash drive and a bootable DVD (for example). But since DVD drives have been rapidly losing popularity lately (some PCs don’t have them at all, and some laptops install another disc instead), I’ll focus on a flash drive...
What you need to create a bootable USB flash drive:
- bootable ISO image with the desired Windows OS ( where can I get it? Probably no need to explain? 🙂);
- The bootable flash drive itself, at least 4-8 GB (depending on the OS you want to write to it);
- Rufus program (office site) with which you can easily and quickly write an image to a flash drive.
The process of creating a bootable USB flash drive:
- First, launch the Rufus utility and insert the flash drive into the USB port;
- then in Rufus, select the connected flash drive;
- specify the partition scheme (in most cases, it is recommended to set MBR for computers with BIOS or UEFI. You can find out the difference between MBR and GPT here:);
- then select the file system (NTFS recommended);
- The next important point is choosing an ISO image with the OS (specify the image you want to burn);
- in fact, the last step is to start recording, the “Start” button (see the screenshot below, all the settings are indicated there).
Options for creating a bootable USB flash drive in Rufus.
After 5-10 minutes (if everything is done correctly, the flash drive is working and no errors occurred), the bootable flash drive will be ready. We can move on...
2) How to configure the BIOS to boot from a flash drive
In order for the computer to “see” a flash drive inserted into the USB port and be able to boot from it, you must correctly configure the BIOS (BIOS or UEFI). Despite the fact that everything in Bios is in English, setting it up is not that difficult. Let's go in order.
1. To set the appropriate settings in the Bios, you must first enter it. Depending on the manufacturer of your device, the login buttons may be different. Most often, after turning on the computer (laptop), you need to press the button several times DEL(or F2). In some cases, the button is written directly on the monitor on the first loading screen. Below is a link to an article that will help you enter Bios.

How to enter Bios (buttons and instructions for different device manufacturers) -
2. Depending on the BIOS version, the settings can be very different (and, unfortunately, there is no universal recipe for how to configure the BIOS to boot from a flash drive).
But generally speaking, the settings from different manufacturers are very similar. Need to:
- find the Boot section (in some cases Advanced);
- first turn off Secure Boot (if you created the flash drive as described in the previous step);
- then configure the boot priority (for example, in Dell laptops this is all done in the Boot section): in first place you need to put the USB Strarage Device (i.e. bootable USB device, see screenshot below);
- then press the F10 button to save the settings and restart the laptop.

Setting up BIOS to boot from a USB flash drive (using a Dell laptop as an example).
For those whose Bios is slightly different from the one shown above, I suggest the following article:
- BIOS setup for booting from flash drives:
3) How to format a hard drive with Windows Installer
If you correctly burned the bootable USB flash drive and configured the BIOS, then after restarting the computer the Windows welcome window will appear (which always pops up before the installation starts, as in the screenshot below). When you see this window, just click next.
Start installing Windows 7
Then, when you reach the installation type selection window (screenshot below), select the option complete installation(i.e. with setting additional parameters).
Next, you can actually format the disk. The screenshot below shows an unformatted disk that does not yet have a single partition. Everything is simple with it: you need to click the “Create” button, and then continue the installation.
If you want to format the disk: just select the desired partition, then click the “Format” button ( Attention! The operation will destroy all data on the hard drive).
Note. If you have a large hard drive, such as 500 GB or more, it is recommended to create 2 (or more) partitions on it. One partition for Windows OS and all programs that you will install (50-150 GB recommended), the rest of the disk space for another partition (partitions) - for files and documents. This makes it much easier to restore the system in the event, for example, that Windows refuses to boot - you can simply reinstall the OS on the system disk (and the files and documents will remain untouched, since they will be on other partitions).
In general, if your disk is formatted through the Windows Installer, then the task of the article is completed, and below will be a method of what to do if you can’t format the disk this way...
4) Formatting the disk via
AOMEI Partition Assistant Standard Edition
A program for working with drives with IDE, SATA and SCSI, USB interfaces. It is a free analogue of the popular programs Partition Magic and Acronis Disk Director. The program allows you to create, delete, merge (without losing data) and format hard drive partitions. In addition, in the program you can create a bootable emergency flash drive (or CD/DVD disk), after booting from which you can also create partitions and format the disk (i.e., it will be very helpful in cases where the main OS does not boot). All major Windows operating systems are supported: XP, Vista, 7, 8, 10.
Creating a bootable USB flash drive in AOMEI Partition Assistant Standard Edition
The whole process is very simple and understandable (especially since the program fully supports the Russian language).
Format an entire hard drive (HDD) is not as easy as it might seem at first glance. All the problems boil down to the fact that this procedure cannot be performed due to the installed operating system. Accordingly, it will not be possible to use its tools for these purposes, so you need to use other methods. It is about them that will be discussed in this article.
There are three radically different methods: using a special application launched directly from a flash drive, using Windows Installer tools, and formatting via another computer. All this will be discussed further in the text.
Method 1: AOMEI Partition Assistant
As mentioned earlier, in order to format the hard drive completely using AOMEI Partition Assistant, this program must first be written to a disk or USB drive.
- Install the application on your PC and then open it.
- Insert the Flash drive into the USB port.
- Click the button "Make Bootable CD Master", located on the left panel.
- If you do not have the Assessment and Deployment Kit (ADK) software package installed, it will not be possible to write the AOMEI Partition Assistant program image to the USB flash drive, so you will need to install it. First, open the ADK download page. You can do this either by following the link below or by clicking on the link indicated in the program window itself.
- Start downloading the package by clicking the button "Download".

Note: do not pay attention to the fact that the download page says “... for Windows 8”, you can install it on both Windows 7 and Windows 10.
- Open the folder where the downloaded installer is located and run it as an administrator.
- In the installer window, set the switch to "Install the Assessment and Deployment Kit on this computer", specify the path to the directory into which the software package will be installed, and click "Further".
- Agree or refuse to participate in improving the quality of the software by placing the switch in the position you choose and clicking "Further".
- Click the button "Accept" to confirm that you have read and accept the terms of the license agreement.
- Check the boxes next to the items shown in the image below and click the button "Installation".
- Wait for the selected ADK components to complete the installation process.
- When finished, uncheck the box. "Starting the Getting Started Guide" and press the button "Close".
- Switch to the AOMEI window and open the Bootable CD Builder again.
- Click "Further".
- Select an item "Burn to CD/DVD", if you want to make a boot disk, or "USB Boot Device", if a bootable USB flash drive. Select the appropriate device from the list and click "Go".
- In the next window, click the button "Yes". After this, the creation of the boot drive will begin.
- Wait for the creation process to complete.
- During the installation process, a message will appear asking you to reload the drive properties. To ensure that the file recording is successful, answer in the affirmative.
- Click the button "End" and close the program window.


Now the drive is ready and you can start your PC from it. To do this, press the key during loading F9 or F8(depending on the BIOS version) and in the list of detected disks, select the one on which the program was recorded.
After this, the formatting application will launch on the computer. If you want to restore it to its original form, you must first delete all sections. For this:
- Click on the section with the right mouse button (RMB) and select the item in the context menu "Deleting a partition", by the way, you can perform the same action by clicking on the button of the same name on the panel "Operations on partitions".
- In the window that appears, select "Delete partition and delete all data to prevent data recovery" and press the button "OK".
- Do the same steps with all other sections, so that in the end you have only one point left - "Unoccupied".
- Create a new partition by right-clicking on the unallocated space and selecting the option "Creating a section", or by performing the same action through the panel on the left.
- In the new window, specify the size of the partition to be created, its letter, and file system. It is recommended to select NTFS, as this is what Windows OS uses. After all the steps, click "OK".

Note: if when creating a partition you did not specify the entire amount of hard disk memory, then do the same manipulations with the remaining unallocated area.
- Click "Apply".


After the process is completed, all changes will take effect, therefore, the computer will be completely formatted.
Method 2: Bootable Windows USB flash drive
If the previous method seemed complicated to you or you encountered difficulties in performing it, perhaps the second method, which involves using a flash drive with a Windows image recorded on it, will suit you.
It’s worth saying right away that absolutely any version of the operating system will do. So, here's what to do:
- After starting the PC from the flash drive, at the stage of determining the localization, select Russian and click "Further".
- Click "Install".
- Accept the license terms by checking the appropriate box and click "Further".
- At the stage of selecting the installation type, left-click (LMB) on the item "Custom: Windows installation only".
- A list of partitions that were created before will appear. You can format them each separately by selecting the one you need and pressing the button of the same name.

But to bring the hard drive back to its original form, you must first delete each partition. This is done by pressing the item "Delete".
- Once all partitions have been deleted, create a new one by selecting "Unallocated disk space" and pressing "Create".
- In the field that appears "Size" specify the amount of memory that the created partition will occupy, then click the button "Apply".
- In the window that appears, click the button "OK" so that Windows creates additional partitions for system files necessary for the correct operation of the operating system.
- After this, new partitions will be created. If you did not specify the entire amount of memory, then do the same actions with the unallocated space as given in paragraphs 6 and 7.


After this, the entire hard drive will be completely formatted. If you wish, you can continue installing the operating system by clicking "Further". If you need formatting for other purposes, then remove the flash drive from the USB port and close the installer window.
Method 3: Formatting via another computer
If the previous methods of completely formatting the HDD are not suitable for you, then you can perform this operation through another computer. To do this, you first need to remove the hard drive from your device. It is worth saying that this can only be fully done with a personal computer. If you have a laptop, it is better to use the above methods, since their drives have different form factors.

Now you need to insert it into another system unit, connecting it to the motherboard and power supply. As a result, partitions of your hard drive should appear on the second computer; you can check this by opening "Conductor" and selecting a section in it "This computer".

If in the area "Devices and drives" If additional partitions have appeared, you can proceed to full formatting of your HDD.
- Open the window "Disk Management". To do this, click Win+R to launch the window "Run", and in it enter diskmgmt.msc and click "OK".
- Next, you will need to identify the inserted disk and its partitions. The easiest way to do this is based on the file system and the amount of memory occupied. In the image below, as an example of a connected hard drive, a flash drive with three partitions created on it is used.
- You can format each section one by one by opening its context menu and selecting "Format".

Then in the window that opens, you need to select the name of the new volume, file system and cluster size. Finally, click the button "OK".
- If you want to restore the hard drive to its original form, then all partitions must be deleted. This can be done from the context menu by selecting "Delete volume".

After clicking, you need to confirm your actions by clicking the button "Yes".
- After all the partitions have been deleted, you need to create one new one. To do this, select the item from the menu "Create Simple Volume".

In the Create Wizard that opens, you need to click "Further", specify the volume of the partition, determine its letter and the file system itself. After all this click "Ready".


After completing all these steps, you will completely format your hard drive, returning it to its original appearance.
Conclusion
As a result, we have three ways to completely format a computer drive. It is worth noting that the first two are universal for a personal computer and laptop, implying the use of bootable flash drives. The third method is more suitable for PC owners, since removing the hard drive will not cause any big problems. But only one thing can be said for sure - they all allow you to cope with the task, and it’s up to you to decide which one to use.
Question from a user
Hello.
I want to completely delete all content on the disk, and then reinstall the system. I have two drives ("C:" and "D:") - I was able to format one, but there is a problem with the "C:" drive. Can you tell me how I can format the system hard drive (on which Windows 8 is installed)?
Good day to all!
In general, on today’s modern system, formatting a disk is not a difficult operation, I would even say simple (not like it was 20 years ago). Perhaps, questions arise only in cases where Windows does not see the disk, errors appear during formatting, or when trying to format the system disk (as in your case).
In the article below I will discuss several formatting methods - depending on your tasks and the specific problem, choose the one you need. So...
Important: After formatting the drive, all information on it will be deleted! Make a copy of the necessary files from the disk to third-party media in advance.
From under Windows
Via My Computer
Probably the classic and easiest way to format a disk is to go to “My Computer” (or “This Computer”, depending on the version of your OS), and find the desired disk partition in it. Then select this section, right-click on it - and select the required one in the context menu (ie formatting, see screenshot below).
Note: if the "My Computer" icon is not on the desktop, and you do not know how to open it, press the button combination WIN+E- Explorer will open: in the menu on the left, select the link to “My Computer/This Computer”.

Format disk // This PC // Windows 10
- file system: FAT 32, NTFS, exFAT, etc. In most cases, the best option for a hard drive is to use NTFS;
- allocation unit size: 4096 bytes (optimal);
- volume label: disk name, you can enter any (I recommend using the Latin alphabet, as some programs do not read Russian font correctly).

In general, the default settings will usually suit most users - you can immediately click the "Start" button. In a few minutes you will receive a “clean” disk...
Via Disk Management
In cases where you go to “My Computer” - and it simply does not show your connected disk (this often happens with new disks that have not been formatted) - then you need to use either special utilities or use the “disk management” tool , built into Windows.
To open Disk Management you need to:
- press a combination of buttons WIN+R to open the Run window;
- enter the command diskmgmt.msc and press Enter. The Disk Management application should open.
Next, you will see not only all connected disks, flash drives, memory cards, etc., but also what partitions were created on them - i.e. the entire structure. Select the desired section and right-click on it - in the context menu, click on the item "Format..." (see red arrows in the screenshot below).


Via command line
In cases where Explorer freezes (for example), also in the event of various types of errors, you can try formatting the disk via the command line.
First you need to open it as an administrator. For this:

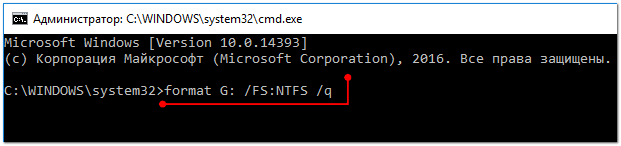
format G: /FS:NTFS /q
G: - letter of the drive to be formatted (specify carefully!);
/FS:NTFS - select a file system;
/q - quick formatting.
Basically, the disk must be formatted.
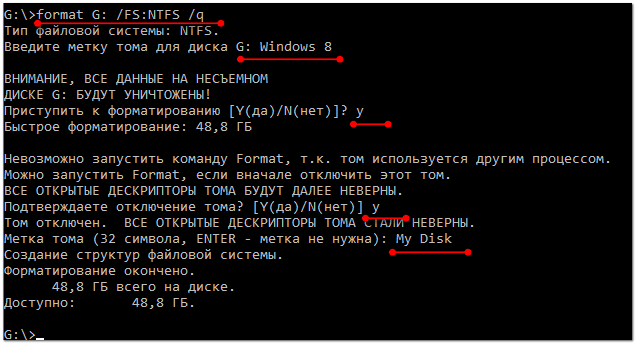
In Windows 10, by the way, a small “error” may appear - the system will ask you to specify the volume label for the disk, and then write that “The specified disk label is invalid” (although you seem to have specified everything correctly, example below).

In this case, do the following...
First, open the drive you want to format in a command prompt, for example, drive G: (see screenshot below).

Team VOL- look at the volume label
Next, enter the formatting command again, and in the disk label field - the label that we found out in the previous step (in my case - Windows 8). Next, you will be warned that all data will be destroyed during formatting (you agree by entering y and pressing Enter ).
In the next step you will be prompted to enter a volume label - now you can enter any name (32 characters). You can simply leave the field empty by pressing Enter. Actually, that’s it - the disk will be formatted (screenshot below).
With the help of special utilities
The best programs and utilities for working with a hard drive:
There are now hundreds of different programs and utilities for working with hard drives. Operations such as formatting, partitioning, defragmentation, etc. can be done in more convenient programs than those built into Windows. The link to the article with the best of them is given above.
In my opinion, one of those that deserves attention is AOMEI Partition Assistant.
AOMEI Partition Assistant
It allows you to quickly, safely, and easily carry out the most necessary operations with disk drives:
- change their partition size (including without formatting);
- move partitions;
- merge sections;
- format drives;
- change labels and much more!

What’s also captivating is that the program has many different step-by-step wizards - they will help solve the problem even for those users who have only recently become acquainted with a PC. Well, for example, you can convert the FAT 32 file system to NTFS without losing data, transfer Windows from a hard drive to a newfangled SSD, etc.
Via BIOS
(for formatting system partitions, for example, on which Windows is installed)
If you want to format a partition on which Windows is installed, you won’t be able to do it just like that. The bottom line is that you need to boot from another medium - for example, from another hard drive (on which Windows is installed) or from a bootable USB flash drive, and then format your disk.
Naturally, you need to prepare such media in advance (for example, an installation flash drive with Windows) - since after formatting the system partition of the drive, Windows will no longer boot from it (don’t install it again yet. I explained it chaotically, but in general terms, I think it’s clear ☻).
Using a Windows installation flash drive
The easiest way to format the system partition of a disk is to use a Windows installation flash drive. You can learn how to create and prepare it (if you don’t have one) from my previous articles (links are provided below).
Utilities for creating bootable USB flash drives with Windows -
Creating a bootable Windows 10 USB flash drive -
Creating a bootable USB flash drive for installing Windows XP, 7, 8, 10 (UEFI and Legacy) -
The easiest way to boot from a flash drive is to use a special boot menu - BOOT MENU, which can be called up immediately after turning on the computer/laptop (or by changing the boot priority in the BIOS). In order not to repeat myself here, I will provide a couple of links to detailed articles about this.
Hotkeys to enter the BIOS menu, Boot Menu, restore from a hidden partition -
How to configure the BIOS to boot from a flash drive or disk (CD/DVD/USB) -
Next, after booting from the installation flash drive, you need to go to selecting a partition for installing Windows. In this step, you can format the entire disk (delete all partitions and create them again), as well as its individual partitions.

If you have difficulties and you don’t know how to get to this step when installing Windows, I recommend reading this article:
With the help of special programs
Take the same AOMEI Partition Assistant that I recommended using when working under Windows, just above in the article. She has an excellent tool in her arsenal for creating a special emergency flash drive from which you can boot when your system crashes (or it is not installed on the disk at all).
I have an article on programs for working with hard drives on my blog:(including information about AOMEI Partition Assistant).
To create such a flash drive, you need to run the program on your working PC "Master/Make Bootable CD Master".


To boot from such a flash drive, use also Boot Menu, links to instructions were given above in the article, in the previous step. When you boot from the emergency flash drive, the menu and operation of the program will be similar to that running under Windows. Also click on the desired disk and perform the necessary operation (screenshot below).

AOMEI Partition Assistant - formatting a partition
That's all, a separate merci for additions.
WITH disk, which is supposed to be formatted. During the formatting process, all information on the media will be destroyed. Therefore, if it contains files of value, it makes sense to move them to another drive. Use a file manager or Windows Explorer. Create a temporary directory on , which will not be formatted. Make sure there is enough space on the destination media for the . Copy the necessary files to a temporary directory.
Open the Management snap-in. Right-click on the "My Computer" icon located on the desktop. In the context menu, click on the "Manage" item. You can also open the Start menu, select Settings and Control Panel, click on the Administrative Tools icon, and then click on the Computer Management icon.

Open Disk Manager. In the left pane of the Computer Management window, expand the Computer Management (Local) and Storage Devices nodes. Select the "Control" element disk mi".

Open the formatting dialog disk. In the right pane of the Computer Management window, which is the disk manager interface, find the item corresponding to the logical that you want to format. Select it by left-clicking on it. Display the context menu by right-clicking on an element. In the context menu, select "Format...".

Format the disk. Click "OK" in the formatting options dialog. A window will be displayed asking you to confirm the transaction. Click "OK". Wait for the formatting process to complete. The progress of the process will be displayed in the control manager window disk mi.
Sometimes the user needs to format the disk partition on which the system is installed. In the vast majority of cases he wears the letter C. This need may be associated both with the desire to install a new OS, and with the need to correct errors that have arisen in this volume. Let's figure out how to format a disk C on a computer running Windows 7.
It must be said right away that it will not be possible to format the system partition by starting the PC from the operating system located, in fact, on the volume being formatted. In order to complete this procedure, you need to boot using one of the following methods:
- Through another operating system (if the PC has several OS);
- Using LiveCD or LiveUSB;
- Using installation media (flash drive or disk);
- By connecting the formatted disk to another computer.
Please remember that after completing the formatting procedure, all information on the partition will be erased, including operating system elements and user files. Therefore, just in case, first partition it, so that if necessary, you can later restore the data.
Method 1: "Explorer"
Section formatting option C by using "Conductor" suitable in all the cases described above, except for loading via an installation disk or flash drive. Also, of course, it will not be possible to complete this procedure if you are currently working from a system that is physically located on the partition being formatted.

Method 2: "Command Line"
There is also a way to format the disk C by entering the command in "Command line". This option is suitable for all four situations described above. Startup procedure only "Command line" will differ depending on the option you chose to log in to.
- If you booted your computer from a different OS, connected a formatted HDD to another PC, or are using LiveCD/USB, then you need to run "Command line" in the standard way on behalf of the administrator. To do this, click "Start" and go to the section "All programs".
- Next, open the folder "Standard".
- Find an element "Command line" and right-click on it ( RMB). From the action options that open, select the activation option with administrative rights.
- In the window that appears "Command line" enter the command:

You can also add the following attributes to this command:
- /q– activates quick formatting;
- fs:[filesystem]– formats for the specified file system (FAT32, NTFS, FAT).
For example:
format C: fs:FAT32 /q

After entering the command, press Enter.
Attention! If you connect your hard drive to another computer, the names of the partitions on it will probably change. Therefore, before entering the command, go to "Conductor" and look at the current name of the volume you want to format. When entering a command instead of a symbol "C" use exactly the letter that refers to the desired object.
- After this, the formatting procedure will be performed.


If you are using a Windows 7 installation disk or flash drive, the procedure will be slightly different.

Method 3: Disk Management
Format partition C can be done using a standard Windows tool "Disk Management". Just keep in mind that this option is not available if you are using a boot disk or flash drive to perform the procedure.
- Click "Start" and go to "Control Panel".
- Follow the inscription "System and safety".
- Click on the item "Administration".
- Select from the list that opens "Computer Management".
- On the left side of the shell that opens, click on the item "Disk Management".
- The Disk Management tool interface opens. Find the section you need and click on it RMB. From the options that open, select "Format…".
- The exact same window that was described in Method 1. In it you need to perform similar actions and click "OK".
- After this, the selected partition will be formatted according to the previously entered parameters.


Method 4: Format during installation
Above we talked about methods that work in almost any situation, but are not always applicable when starting the system from installation media (disk or flash drive). Now we will talk about a method that, on the contrary, can only be applied by starting the PC from the specified media. In particular, this option is suitable when installing a new operating system.
- Start your computer from the installation media. In the window that opens, select your language, time format, and keyboard layout, and then click "Further".
- An installation window will open where you need to click on the big button "Install".
- The license agreement section appears. Here you should check the box next to the item "I accept the conditions..." and press "Further".
- A window for selecting the installation type will open. Click on the option "Full installation...".
- Then the disk selection window will open. Select the system partition that you want to format and click on the inscription "Disk Setup".
- A shell opens, where among the list of various manipulation options you need to select "Format".
- The dialog box that opens will display a warning that if you continue the operation, all data located on the partition will be erased. Confirm your actions by clicking "OK".
- The formatting procedure will start. After it is completed, you can continue installing the OS or cancel it depending on your needs. But the goal will be achieved - the disk is formatted.


There are several options for formatting the system partition C depending on what computer startup tools you have on hand. But you won’t be able to format the volume on which the active system is located under the same OS, no matter what methods you use.


