When installing the operating Windows systems when used as a scan software an anti-virus utility loaded from under DOS, as well as when removing a password using the Microsoft OS distribution kit or implementing a “rescue mission” to extract data that was on the system section of the hard crashed OS disk", it is more practical to use USB Flash-carrier. Which, in principle, in most cases, is the place to be in modern life both a novice user and a professional in their field. If you do not understand why your BIOS does not see the flash drive, read this article and you will understand how to make your electronic friend “see the light”!
Today we will look at:
Why does the computer refuse to work with a flash drive and if this is the fault of the BIOS (a)?
First of all, it should be understood that when inserting USB media in the corresponding connector of the computer, the operating system accesses the software functionality of the BIOS. Let's skip some algorithmic explanations of what happens there and how. Let's clarify only one thing - Windows receives instructions for working with the device from the BIOS of the microsystem.

That is, if the optional USB functionality in the BIOS (e) was not activated, then the OS will not notice at all that the process of introducing a “foreign” object in the form of a flash drive has taken place as such. Therefore, the first thing to do in those moments when the computer does not respond to connecting a flash drive is to and see what's wrong with the settings.
Turn on the "visibility" of the flash drive in the BIOS
Depending on the version of the basic microsystem, the optional sections in which the activation / deactivation of USB devices is performed may differ both in designation and in terms of their location.
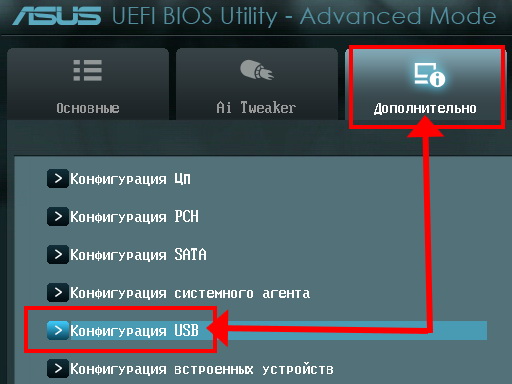
For example, in new UEFI systems, the interface of which most often has a Russian-language interface, the search process for the item in which the “working” switching of the USB functionality is carried out is located in one of the items in the “Advanced” section.
In older versions of BIOS (a), you can change the "flash drive visibility" parameter after the user goes to the "Advanced" tab. In any case, the instructions from the manufacturer will help you find the section you are interested in. motherboard(technical passport of the computer).
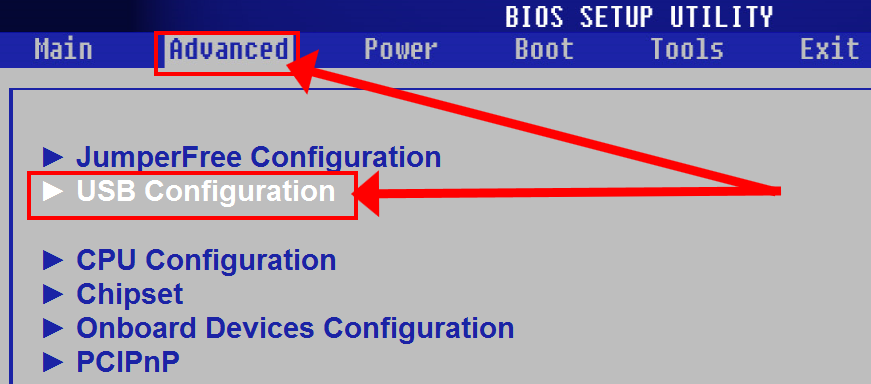
Well, the most universal method is to independently search for the necessary section for setting up “USB functionality”. In the case of the last method, just pay attention to the abbreviation "USB" and make sure that the item parameter corresponds to the "Enablade" state.
Software inconsistency of the boot device with the immediate moment of application
The second most important reason for the situation when the BIOS does not see the flash drive is an incorrectly used software script for further use of the storage area of the flash drive. In other words, at the time of interrogation of a removable device of the type known to us, the microsystem is not able to start the connected memory device, since the flash drive does not have a specially implemented code that makes the flash drive bootable.

In order not to be introduced into the terminology and the rather difficult to understand technical algorithm “what and how happens in the process of creating a bootable device”, let's look at a practical example of creating a bootable “uizbishka” using a specific example. Naturally, pictures are attached.
How to make a flash drive bootable?

In principle, this can be described in detail . However, for you, dear reader, in order not to distract you at various points of the transition, so to speak, it is enough to enlist the instructions below, and everything will work out for you!
- Download this program (Rufus) - http://rufus.akeo.ie/?locale=ru_RU .
- In the checkbox "Create boot disk”, activate the button in the form of a disk and a drive.
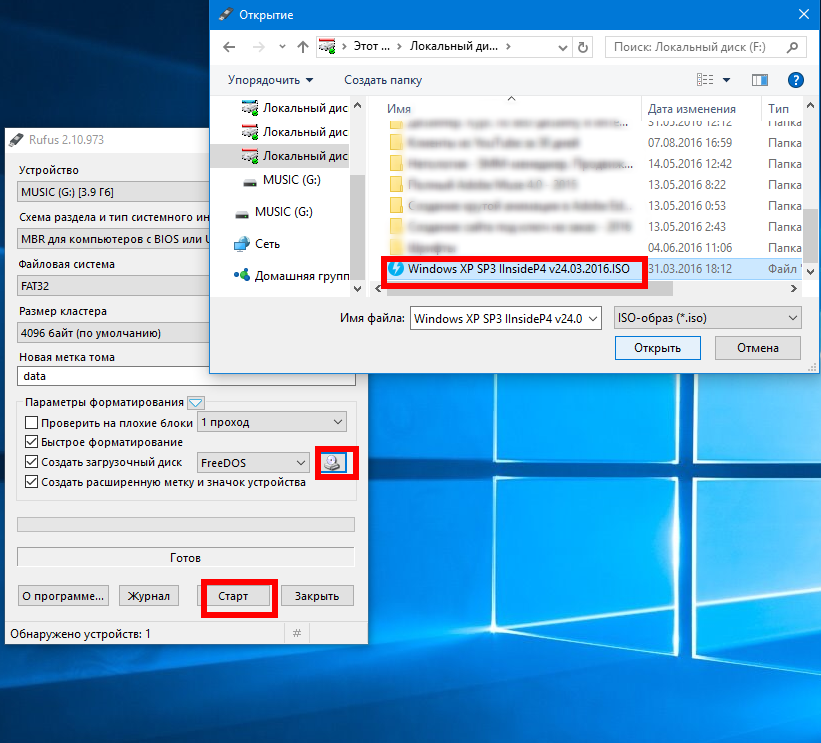
- Next, through the explorer, we indicate the image that we want to burn (utilities, programs or OS distribution).
- Now, press the "Start" button.
Upon completion of the process of recording a software image - use the item context menu"Extract ..." (system tray, icon in the form of a removable device "flash drive"). We reboot the system. Press the "F8" button several times to call the "Additional boot methods" menu and specify the device from which we want to boot - USB stick. All!
Physical malfunctions of a removable storage device, or, What to do when a flash drive does not work as it should ...
Often the BIOS does not see the USB flash drive, because the “Uzbishka” itself is technically not working (details on diagnosing and troubleshooting a USB Flash Drive device ). You should not lose sight of the moment when, as a result of a slight staggering of the body frame of the storage device, the flash drive is periodically, so to speak, briefly recognized computer system. This may indicate that one of the hardware elements is faulty: directly USB port computer or the connector itself (daddy) yuizbishki.
Driving troubles
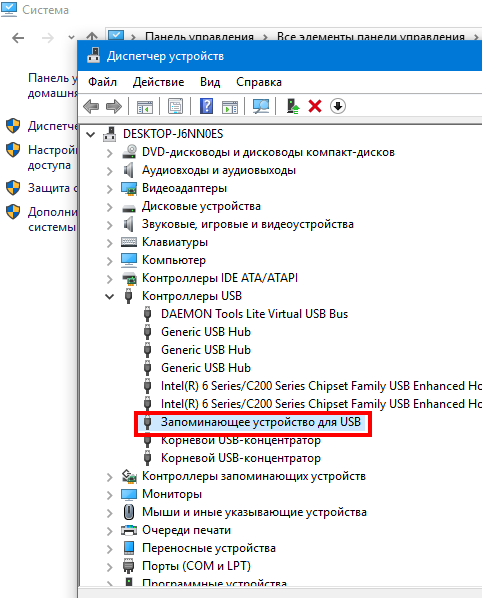
It is quite possible that such a scenario is also possible: when you insert a flash drive, an inscription appears on the screen in the form of an error message (more details here). The fact is that the system does not always have exactly the right version of the drivers that is needed for the correct control process. USB device. Update the drivers (it is recommended to install the original version of the control software, which can be downloaded from the official source - the manufacturer's website).
Instead of summarizing

Well, with the main points of "why" - we figured it out. However, one should not lose sight of another not infrequently occurring harmful factor - . In the event that the flash drive is not recognized by the computer system, swipe antivirus program full scan of your hard drive for "digital infection". Last but not least, update the BIOS as needed. That is, always check if there is more a new version corresponding software on the manufacturer's website. All you expedient and only effective solutions!
Every System Administrator should know how boot computer from usb stick. Most often, this skill is necessary when installing the operating system. After all Windows distribution does not have to be on a CD. And, for example, installing Windows on a netbook in a different way will not even work, because. it usually does not have a floppy drive.
Today I will tell you how to set the boot from a USB flash drive in the BIOS of various manufacturers. Regardless of which version you have, the procedure will be as follows:
1. Insert our bootable flash drive into the computer's USB port. It is advisable to insert it into the port located directly on the motherboard, i.e. from the back of the system unit.
2. Turn on the computer and press the key Delete(or F2) to get into the BIOS. Depending on the manufacturer and BIOS version, other keys (Esc, F1, Tab) can be used, so you need to carefully watch the prompts on the screen.
In Bios, we can navigate through the tabs and rows only using the keyboard.
Next, I will describe in detail this process on the example of different BIOS versions.
Configuring Award Bios to boot from a USB flash drive
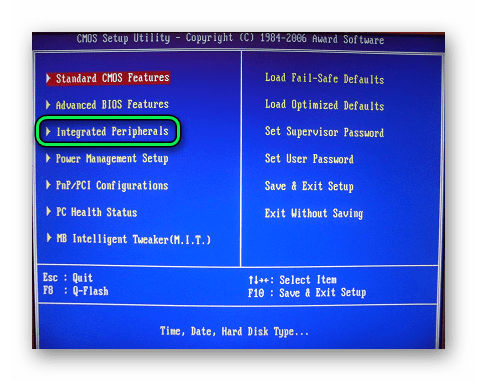
Award Bios: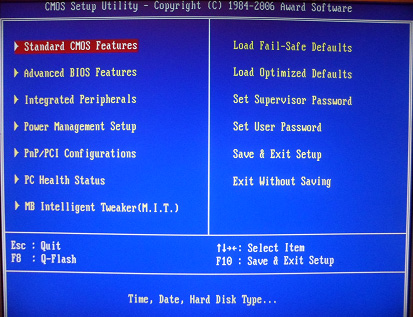 First, let's check if the USB controller is enabled. We go to "Integrated Peripherals". We go down with the arrow on the keyboard to the item “USB Controller”. Press the “Enter” key and in the window that appears, select “Enable” (also using “Enter”). Opposite “USB Controller 2.0” should also be “Enable”.
  Exit this tab by pressing Esc.
Then go to "Advanced BIOS Features" - "Hard Disk Boot Priority". Now in my example, the hard drive is in the first place, and the flash drive should be.  We stand on the line with the name of our flash drive (Patriot Memory) and raise it to the very top using the “+” key on the keyboard.
  Exit here by pressing "Esc".
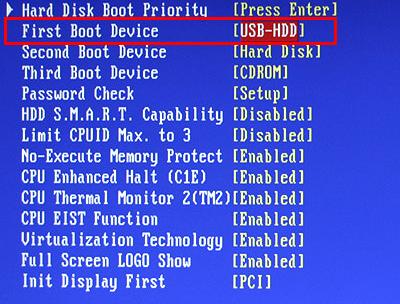
Now on the line “First Boot Device” press “Enter”. We have selected “CD-ROM”, but you need to set “USB-HDD” (if suddenly the boot from the USB flash drive does not work, come back here and try to set “USB-FDD”). Let the second device be “Hard Disk”.  Exit this tab by pressing Esc.
Now exit the BIOS, saving the changes. To do this, click "Save & Exit Setup" - press the key "Y" - "Enter". 
Setting AMI Bios to boot from flash drive
If, upon entering BIOS, you see such a screen, then you have AMI Bios: First, let's check if the USB controller is enabled. Go to the tab "Advanced" - "USB Configuration".
  Opposite the items “USB Function” and “USB 2.0 Controller” should be “Enabled”.
 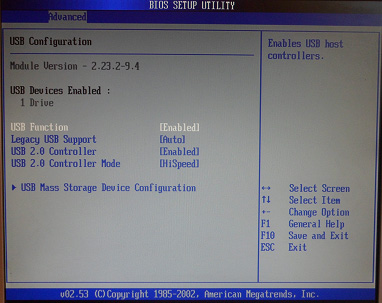 If this is not the case, we stand on this line and press the “Enter” key. From the list that appears, select “Enabled” (also using “Enter”).
Then exit this tab by pressing “Esc”.
Go to the tab "Boot" - "Hard Disk Drives".  Now I have a hard drive in the first place, but I need to put a USB flash drive here. We become on the first line, press “Enter” and in the window that appears, select our Patriot Memory flash drive.
  It should be like this:
 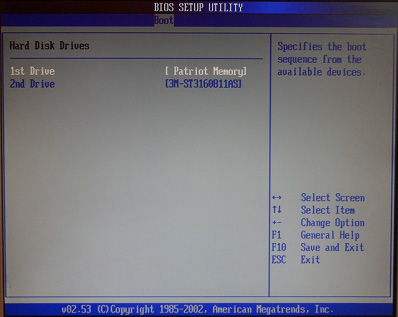 We leave from here through "Esc".
Select "Boot Device Priority". Here, the first boot device must be a USB flash drive.  Press Esc.
Then we exit the BIOS, saving all the settings made. To do this, go to "Exit" - "Exit & Save Changes" - "OK". 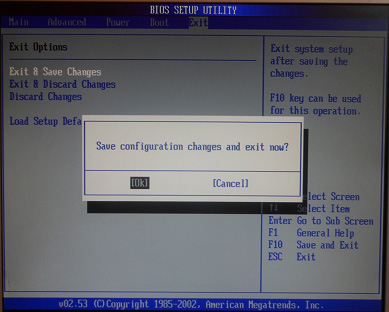
Setting up Phoenix-Award Bios to boot from a USB flash drive
If, upon entering BIOS, you see such a screen, then you have Phoenix- Award BIOS
: First, let's check if the USB controller is enabled. We go to the “Peripherals” tab - opposite the items “USB Controller” and “USB 2.0 Controller” should be “Enabled”.
 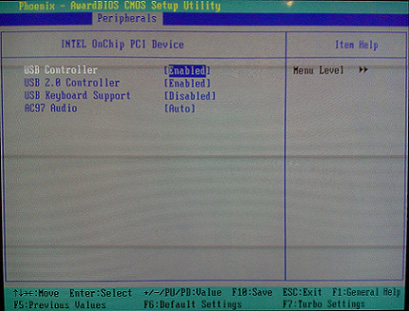 Then we go to the “Advanced” tab and opposite “First Boot Device” we set “USB-HDD”.
 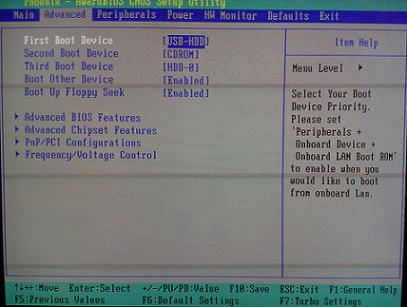 After that, exit the BIOS, saving the changes. To do this, go to "Exit" - "Save & Exit Setup" - press the key "Y" - "Enter"
 ![]() That's practically everything you need to know in order to boot from a USB flash drive. In my article, I described the process of setting up the BIOS of the most popular versions: Award And AMI. The third example shows Phoenix Award Bios, which is much rarer.
That's practically everything you need to know in order to boot from a USB flash drive. In my article, I described the process of setting up the BIOS of the most popular versions: Award And AMI. The third example shows Phoenix Award Bios, which is much rarer.
IN different versions BIOS described procedure may be slightly different. But the main thing is that you understand the principle of tuning itself.
By the way, I would also like to add: in order to choose which device to boot your computer from, it is not necessary to change the settings in the BIOS. You can call up a special menu immediately after turning on the computer to select boot devices (this can be done by pressing F8, F10, F11, F12 or Esc). In order not to guess with the keys, we look carefully at the monitor immediately after turning it on. We need to have time to see an inscription like this: “Press Esc to selest boot device”. In my case, it was necessary to press “Esc”.  If on your computer BIOS UEFI, and you need to boot from a USB flash drive - you can familiarize yourself with.
If you need reset forgotten password user using a bootable USB flash drive - how to do it.
Modern laptops are getting rid of CD / DVD drives one by one, becoming thinner and lighter. Along with this, users have a new need - the ability to install the OS from a flash drive. However, even with a bootable flash drive, not everything can go as smoothly as we would like. Microsoft specialists have always loved to throw curious puzzles at their users. One of them - the BIOS may simply not see the media. The problem can be solved by several sequential actions, which we will now describe.
In general, there is nothing better for installing an OS on your computer than a bootable USB flash drive made with your own hands. You will be 100% sure of it. In some cases, it turns out that the carrier itself is made incorrectly. Therefore, we will look at several ways to make it for the most popular versions of Windows.
In addition, you need to set the correct parameters in the BIOS itself. Sometimes the reason for the absence of a drive in the list of disks can be exactly this. Therefore, after we deal with creating a flash drive, we will look at three more ways to configure the most common BIOS versions.
Method 1. Flash drive with Windows 7 installer
In this case, we will use .
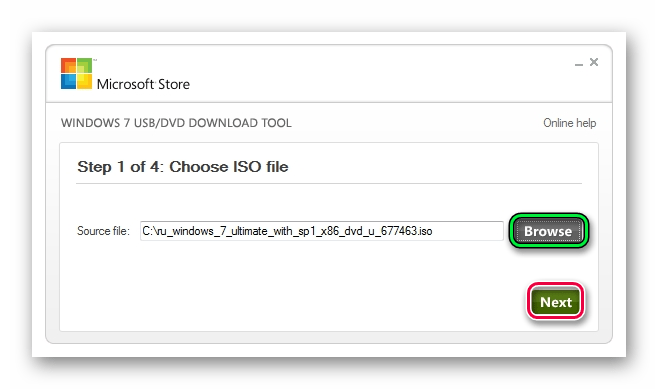
This method Suitable for Windows 7 and older. To burn images of other systems, use our instructions for creating bootable USB flash drives.
In the following instructions, you can see ways to create the same drive, but not with Windows, but with other operating systems.
Method 2: Setting the Award BIOS
To enter the Award BIOS, press F8 while the operating system is loading. This is the most common option. There are also the following combinations for entering:
- Ctrl+Alt+Esc;
- Ctrl+Alt+Del;
- delete;
- Reset (for Dell computers);
- Ctrl+Alt+F11;
- insert;
- Ctrl+Alt+F3;
- Ctrl+Alt+Ins;
- Fn+F1;
- Ctrl+Alt+S;
- Ctrl+Alt+Esc;
- Ctrl+Alt+Ins;
- ctrl+s.
Now let's talk about how to properly configure the BIOS. In most cases, this is the problem. If you have an Award BIOS, do this:
Booting the computer from external drive may be required to reinstall or restore the operating system in case of any failures or the appearance of virus software.
If the bios does not see the flash drive
BIOS may not see the flash drive in several cases: broken usb drive, wrong entry bootable flash drive or simply not produced correct setting BIOS or UEFI.
Flash drive not written correctly
Incorrect boot drive writing is one of the most common causes of problems when trying to boot from a memory card. For the record better use program " Rufus”, it will allow you to load absolutely any operating system onto a USB flash drive, which most other programs have problems with.
Instructions for preparing a flash drive through Rufus:
Checking the boot from the flash drive
If the flash drive is not detected when you turn on or restart the computer, you need to set the correct one in the BIOS download priority.
After entering the BIOS, you will need to go to the tab " Boot»; 
Next, go to the item " Boot Device Priority» (on some motherboards there may be a different menu name); 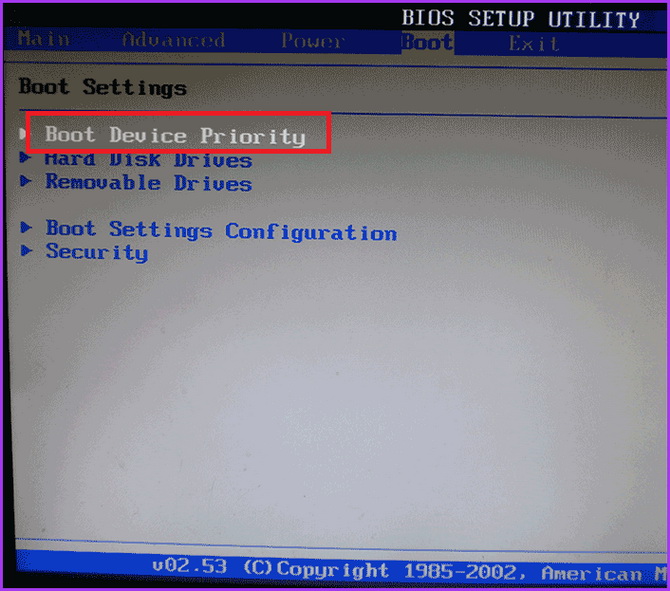
In the window that appears choose the desired storage. 
Methods for booting from a USB flash drive in UEFI
When working with UEFI, it is still easier, although in some cases unforeseen problems may arise. Ways to start from a flash drive under UEFI will be shown on the example of an Asus motherboard:
If you need a computer constantly booting from external storage, indicate desired device V download priority. After that, the computer will turn on from the USB flash drive until you remove it or change the boot priority again; 
For single boot from flash drive worth discovering boot menu and choose desired disk
. After restarting the computer, it will boot from hard drive in normal mode; 
If nothing helped
old OS(Windows 7 and older), as well as some linux distributions do not support boot to UEFI. To remedy the situation, turn on operating mode with unsupported operating systems. You can do this in the following way:
First you need to go to additional settings
;
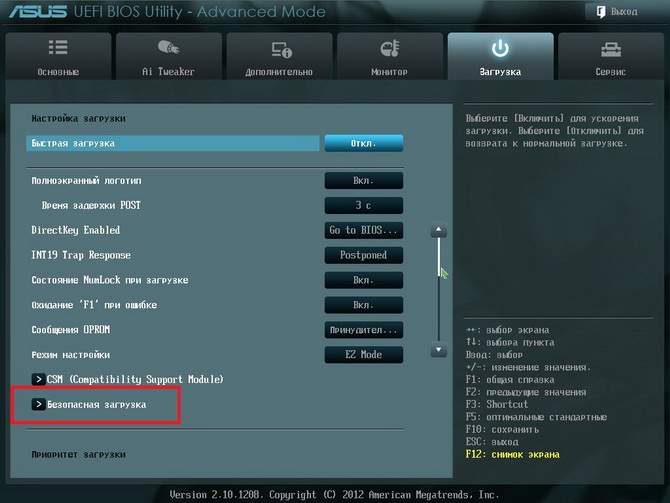
In point " OS type» should be selected « Other OS". After that, all operating systems will boot normally, both the newest (Windows 10) and outdated (Windows XP, 7). 
Why the BIOS or computer does not see the flash drive - video
You decide to install Windows: you write a digital copy to a USB flash drive, configure the BIOS, restart your computer or laptop, and for some reason the installation does not start. What the heck? Why BIOS does not see the bootable flash drive? Everything seems to be done right...
There are 2 most likely reasons for this. The first is that the BIOS does not see the USB flash drive, because it is not bootable. The second is that you have not configured the BIOS correctly.
Although there is one more nuance - your BIOS is too old. It does not support USB media, and therefore does not see them. In this case, you can install Windows from a disk.
As for the first two reasons, we will consider them in more detail.
Did you burn the bootable flash drive correctly?
Questions like “why the BIOS does not see the bootable flash drive” are probably asked by every second user. This is especially true for those who install Windows for the first time on a computer or laptop. There are usually no such problems with a disk, but with a USB flash drive they happen all the time.
The fact is that it is not enough just to copy files from it. In this case, it will not be considered bootable. That is why the BIOS does not see the flash drive. You only need to write it down with special programs. There are plenty of them, but personally I use UltraISO. Why? Because she:
- Free (with a trial period of 30 days).
- Records both Windows 7 and Windows 8.
- Easily writes images to a 4 GB flash drive (some programs only support USB drives of 8 GB or more).
And most importantly: create a bootable USB flash drive in UltraISO is easier simple. First you need to install the program (link to the developer's website) and connect a USB flash drive to a laptop or computer. After that, there are only a few steps left:
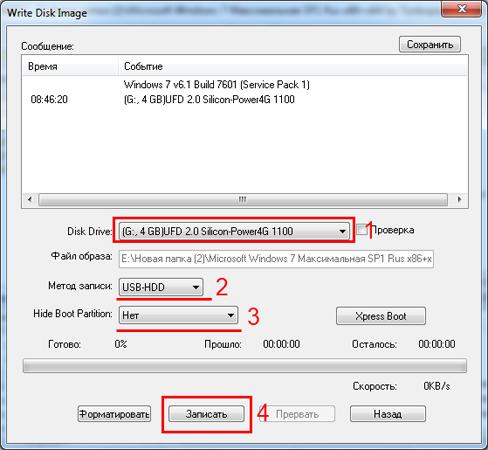
During recording, all information from the USB flash drive will be deleted. The program will also warn you about this. Therefore, if it contains important data, copy it to another location.
Proper BIOS setup
If you did everything according to the instructions, then be sure that the USB flash drive was written correctly. And now it's really bootable. Try it - it might work Windows installation. Still the BIOS does not see the bootable flash drive? Then in this case the problem lies in its parameters. And this needs to be checked.
Therefore, restart your laptop or computer and enter the BIOS. To do this, you need to press a certain button several times. Most often it is Del or F2, although it may be different (depending on the model of the motherboard and the brand of the laptop).
Next, you need to go to the tab, the name of which contains the word "Boot". It is here that the boot priority of devices is configured when the PC or laptop is turned on. By default, the first (First Boot Device) is loaded HDD, followed by the drive. In this case, you need to put a flash drive (USB-HDD) in the first place, and temporarily lower the hard disk (Hard Disk) to the second.
 Example BIOS settings on the computer
When you exit the BIOS, be sure to save the new settings! To click the button that is responsible for the "Save and Exit" item.  An example of BIOS setup on a laptop
That's all. Now, if the USB flash drive is connected to a computer or laptop, and the BIOS is configured correctly, Windows installation will begin.
P.S. If this is all too complicated for you, then you can go to the Boot Menu. This is one of the BIOS options, which is designed just to quickly set up booting from a USB flash drive. This option is much simpler and more convenient, and you definitely won’t have questions like “why the BIOS does not see the bootable USB flash drive”.
P.S. If the BIOS stubbornly refuses to recognize the USB flash drive, then it may be corrupted. But before you throw it out, read it. Perhaps everything will work out, and it will last a couple more years.


