Automatic and manual tuning digital channels DVB-T2 can be done independently; for this it is not necessary to seek help from specialists.
How to set up DVB-T2 on your TV? The setup process is suitable for almost all receiver models. The design of windows, the names of buttons and menu sections may vary, but the general algorithm is approximately the same for everyone.

Connecting a device that supports the DVB-T2 standard to digital television and setting it up is not at all difficult. To do this, just insert the cable into the appropriate connector and perform some simple manipulations to configure the channels. If you are using an outdated TV model that does not support receiving this type of signal, you will need to purchase a special set-top box.
The TV must have a special input for connecting an antenna, as well as a tulip-type connector and an input with a video output (scart). If your TV has an HDMI input instead of a SCART connector, then this is a better option.
If you can make a double connection – both via the “tulip” and via HDMI, you will be able to switch from one cable to another. It is best to watch via HDMI, because... In this case, a higher quality image is obtained.
The distance to the transmitting station (tower) matters. Most often, to effectively tune a TV, it is recommended to install an outdoor antenna with an amplifier, and in city houses on the 4th-5th floor you can use an antenna with a “mustache” or in the form of a frame without an amplifier, but with the “signal amplification” option on the TV set-top box.
A receiver is a device designed to receive a signal and transmit it to a TV. The signal source can be satellite dish, antenna, internet. Connecting a digital set-top box to a TV can be done either directly or via DVD or via a monitor. But in this case you may need a special adapter.
How to connect to a TV and set up a receiver (digital receiver)
- Remove the device from the box and remove the protective film. The film must be removed, otherwise the device will constantly overheat.
- Cut off the protective sheath from the TB cable approximately 1.5 cm long from the end (both ends). Stripping the sheath must be done very carefully so as not to damage the shielding film that protects the central conductor.
- Carefully peel back the shiny protective film and screw the “F” connectors to the wires.
- Connect the cable to the TV and set-top box.
- Insert a bunch of “tulip” wires into the connectors of the TV and set-top box.
- Connect the antenna to the TV. The antenna must be installed on an external wall of the house or on a balcony. After this, you need to move on to the actual setup.
To configure the DVB-T2 set-top box, you need to click on “Menu” on the control panel, and then go to settings. If the country is not specified by default, you must select it. You also need to select the region, language, image format, search mode.
After that, select the signal standard. By default, DTV-T/T2 is installed - this is analog and digital television. If this setting is not changed, the TV will search for both channels.
The program will prompt you to select automatic or manual setting. You need to select automatic and click on the “Ok” button.
After this, the TV itself will search for all available paid and free channels. After completing the search, click on the “Save” button.
If “DVB-T/T2” is set in the “Search mode” item, then the device will independently find all those channels that are available in your region. But this is only possible if you already have a working antenna installed, which is directed towards the transmitter.
Digital terrestrial television channels of the DVB-T2 standard
If you bought a TV, antenna and set-top box just now, then when you open the welcome window, you need to click on the “Menu” button on the control panel. Next: “DVB-T setup” -> “Channel search” -> “Search mode”. Here you can both find the channels themselves and set the frequency.
To simplify the search process, you can first go to a special website with information to find out what frequencies the channels are broadcast on in your city.

If the antenna is directed correctly, then after a few seconds the “Signal Strength” and “Signal Quality” scales will be filled. If the level is good, then you need to click on “Search”, and the device will perform the adjustment itself.
If you do not know the correct direction of the antenna, you can rotate it very slowly and smoothly. In this case, you need to carefully look at the scales of intensity and quality. Once these scales are full, secure the antenna in this position and perform a search.
This is one of the most simple ways set up your digital TV yourself. If automatic setting turned out to be ineffective - the set-top box found few channels (or even did not find them at all), then you need to use manual tuning.
To do this, you need to delete all those channels that were found earlier. After that, select the manual search mode in the same way. A window will appear on the screen. In it you need to set the frequency on which all channels in your city are broadcast. You can find out the frequency on the Internet or from your service provider.
After the channels of the first multiplex have been found, you will need to find out the frequency for the second multiplex and start the manual search again. You can find many channels this way.
Checking the signal quality
To make sure that everything is done correctly, you need to find the “INFO” button on the receiver. (In some models, this button has a different name. To determine which button is intended for checking the signal quality, you need to look at the instructions.) This button must be pressed 3 times, as a result of which a window should appear on the screen with information about the signal quality, number channel, frequency and encoding. If the first two parameters are greater than 60%, this means that the signal level is acceptable.
If the signal is of poor quality (constantly changes its level) and shows 30% of the full signal, then the image quality will be very poor. In such cases, it is necessary to either raise the antenna higher, or install it in another place, or simply strengthen the signal.
If the TV can receive several multiplexes, you need to check the signal quality on each of them, because they work with different transmitters. It may well be that the signal will be good in one multiplex, but not in another.
This is the simplest terrestrial DVB-T2 receiver that connects to TVs or monitors (some types) for viewing digital television. It has HDMI, YPbPr (component) video output, composite RCA output, digital coaxial audio output, USB 2.0 port to which you can connect external drives for playing (as a media player) and recording (including scheduled) television programs. As a media player, the receiver supports popular video and audio formats, and has a Timeshift delayed viewing mode (if there is a connected drive).
Attention traffic.
Let's see in what form they send it.
A gray box with a picture of the TV and logos of supported standards. 
Everything inside is divided into bags. 
Package Included:
- DVB-T2 receiver,
- remote control,
- user manual (in English),
-cable for transmitting composite analog audio and video signals. 
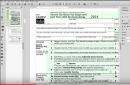
Instructions in English (four pages). 
You can look at the scan.
Perhaps it will be useful to someone.
There are no specifications in the instructions. Therefore, we look at what is written on the store page. 
Made an automatic translation. Not everyone understands English:
DVB-T2 MPEG4 HD digital terrestrial television setI provided both options in order to eliminate the indignation of one of the “halves” of readers who also understand not very English :)
This digital receiver DVB-T2 HD offers many useful and exciting features that enhance your enjoyment, including a 7-day EPG and the ability (with a connected external USB memory device) to Record and Live Pause. It can also play multimedia files.
Fully compliant with DVB-T2 and H.264, MPEG-4, MPEG-2 standards
Maximum traffic flow rate up to 50.1 Mbps
Support PVR function and multimedia playback (MP3/BMP/JPEG/AVI etc.) via USB2.0
Various functions program editing (favorite, move, lock, skip, delete)
Video output resolution: 480p / 576p / 720p / 1080i / 1080p 50Hz
Video decoder up to 1080p@30fps (Full HD, support up to 1080p)
7 days EPG support (Electronic Program Guide)
Storing up to 1000 channels of TV and radio programs in memory
Logical Channel Network (LCN) support
4-digit LED indicator on front panel
Automatic/manual channel search function
OSD language support
Support teletext/subtitle/audio language selection
Outputs include HDMI (V1.3C), YPbPr, CVBS, coaxial
Automatic PAL/NTSC conversion
Note: 1. This set-top box does not support Dolby surround sound TV programs.
2. This set top box CANNOT be used in France and Germany, please note when placing your order.
Specification:
Model: DVB-T2
RF input frequency: 48~862MHz
RF Input Level: -20~-82dBm
IF bandwidth: 7 MHz and 8 MHz
Modulation: QPSK, 16QAM, 64QAM, 256QAM
Video decoder format: MPEG4 AVC/H.264 HP@L4; MPEG2 MP@ML/HL
Video output: 576P/720P/1080I/1080P 50Hz
Aspect Ratio: 4:3, 16:9, Auto
Video output port: HDMI (V1.3C), YPbPr, CVBS
Audio decoder format: MPEG-1 (layer1&1&2&3), WMA
Audio output: S/PDIF (coaxial), RCAx2 (L/R)
Supported Capacity: Unlimited
Supported media files: WMA, MP3, JPEG, BMP, AVI
Supply voltage: 100-240 V 50/60 Hz
Maximum power consumption: 10 W
Standby power consumption:<0,8 Вт
And here is the receiver. The case was covered with a protective film, partially blocking access to the ventilation holes.

Weighed it. 291g.

The front panel is made of plastic and contains a USB connector, an IR sensor, an LED indicator (two-color: red in standby mode, green in operating mode), as well as buttons for switching channels and turning on the receiver. 
The display had a protective film. I've already taken it off.
The rear panel contains antenna input and output connectors (the receiver supports pass-through), a coaxial digital audio output connector, an HDMI connector, three YPrPb component video output connectors, and three RCA connectors for transmitting composite video and stereo audio.

The purpose of each pin is described in the instructions. 
The kit included a cable for connecting analog video and audio signals (RCAx2 (L / R)). 
The remote control was in a separate package. 
An ordinary remote control, nothing special. It fits comfortably in the hand.
See the instructions for the purpose of the buttons. 
There is some confusion about the purpose of the buttons. But more on that at the end of the story.
The remote control is powered by two AAA batteries. 
Batteries are not included.
I took it apart just in case. Nothing interesting inside. 
I'll see what's inside the receiver.
I unscrew 4 screws. 
Everything is very compact. The power supply and receiver are located on the same board. There are cuts between the primary and secondary circuits in the board. There is a fuse at the entrance. 
Power supply with galvanic isolation.
The MSTAR MSD7T01 processor serves as the “brain”. 
It's time to see what he (the receiver) can do.
The device was connected to a LETV X3-40 FHD LED Smart TV.
When turned on, you are asked to select the menu language, country and start searching for channels. 
I chose Russian as the language and Russia as the country.
There are two multiplexes broadcasting in Tambov. 
TV (LETV) allows you to take screenshots. That's why I joined him. All photos with original resolution. Didn't change anything. 
This is what the main menu looks like (press the “MENU” button). 
The controls are intuitive. We move the arrows. Confirm with the OK button. 
When you select “Channel Editor” it asks you to enter a password. To edit, enter zeros (as a password).

Channels can be moved, skipped, blocked, deleted, added to favorites and renamed. 
This is the next line of the menu (TV guide). 
You can schedule both recording and viewing. 
I move on to the next section of the Menu - “Video” contains settings for screen proportions, resolution (1080P 60HZ, 1080i, 720p, 576p, 576i) and a choice of PAL and NTSC standards. The choice of standards (PAL and NTSC) when transmitting a signal via HDMI does not affect the image in any way. 
Users have a choice of different screen formats:
-Auto
- 16:9 PillarBox
- 16:9 Pan&Scan
- 4:3 Letter Box
- 4:3 Pan&Scan
- 4:3 Fullscreen
- 16:9 wide screen.
I move on to the next section of the Menu. In the “Search for channels” section, you can repeat the automatic search for channels, turn on or off additional antenna power, and filter out encrypted channels (if relevant).

You can use a manual search.
Now the next menu item.
Here you can select your time zone and region. The region can only be selected Moscow (in auto mode). In manual mode, select the time zone correction (the DVB-T2 standard supports time transmission). 
You can also configure auto-shutdown (from 1 to 12 hours with an interval of 1 hour) and the time to turn on/off the device. 
The next menu is language. 
System settings allow you to activate parental controls, 
Set password, 
restore factory settings (password is still the same zeros), 
get information about the software 
and update the software. 
I did not do this procedure. So far everything is fine. 
Last menu item. 
To play and record video files, you must connect a USB device.

Records with MTS extension.
The MTS extension is associated with video files that are used in the AVHCD (Advanced Video Coding High Definition) video format. AVHCD video format was developed for tapeless camcorders. Video can be recorded with a camcorder that records files to a DVD, hard drive, solid-state drive (SSD), or memory card (SD, Memory Stick). The AVHCD MTS format was developed by Sony and Panasonic and was introduced in 2006. The AVHCD video format is now used by camcorders from such manufacturers as Sony, Panasonic, Leica, Canon, Hitachi and JVC (JVC uses AVHCD and its own video format with the TOD extension).A recording lasting 1 minute takes 23-24MB of space.
The MTS file uses MPEG-4AVC/H.264 (AVC) video encoding. Maximum video resolution 1080i. Audio is encoded with Dolby Digital AC-3 audio codec. Some professional camcorder models support audio in uncompressed linear PCM format. AVHCD video format is designed to be fully compatible with Blu-Ray video format. AVHCD videos can be played in Blu-ray players without using encoding.
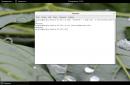
You can look at an example entry:
Characteristics of the recorded file:
Video: MPEG4 Video (H264) 720x576 (20:11) 25.00fpsTo record programs and use the Timeshift delayed viewing mode, you need a USB drive connected to the USB port, and it is absolutely not necessary to go to the Menu. There are specially dedicated buttons on the remote control for this purpose. We count from left to right, from top to bottom.
Audio: MPEG Audio 48000Hz stereo 192Kbps
Subtitle
The first “USB” button opens the menu item of the same name. The second button enables video recording.
The fourth button activates Timeshift. The image on the screen freezes (pause mode) and recording to the USB drive begins.

After drinking tea or coffee, press the same button and continue watching the program you like.
The third button turns off video recording/disables Timeshift.
Rewinding a track (the first two buttons in the second row) allows you to increase the viewing speed (x2, x4, x8, x16, x32) by sequential pressing.
The next two buttons provide access to the previous or next video file.
Use the green and yellow buttons to change the screen resolution and proportions.
The receiver also allows you to receive teletext signals.

At the end there is some information for extras.
The receiver does not heat up much during operation. Power consumption from the network is only 5.4 W. In standby mode 1.1W.
Connected an external hard drive as a storage device. Not enough power. SSD works fine.
It's time to move on to the final part. I'll highlight what I liked and didn't like. The point of view is subjective.
Pros:
Fully compatible with DVB-T2 format:
built-in power module (no adapter required);
metal case;
Availability of Timeshift delayed viewing mode (if there is a connected drive);
availability of on and off timers;
HDMI output for viewing high-quality images;
recording TV programs to external USB drives;
convenient multilingual menu;
support for teletext and subtitles.
Minuses:
lack of display;
absence of any hints about the manufacturer.
And one more thing at the end.
I told about the device that I hold in my hands. He pointed out all the pros and cons. Everything I noticed, I wrote about everything.
If something is unclear, ask questions. I hope it helped at least someone.
That's it.
Good luck!
The product was provided for writing a review by the store. The review was published in accordance with clause 18 of the Site Rules.
I'm planning to buy +59 Add to favorites I liked the review +34 +83 Hello! The review will focus, as you probably already guessed, on the digital DVB-T2 set-top box K2. The set-top box has mediocre functionality, but copes with its direct responsibilities of receiving broadcast data with a bang. The review will include testing, disassembly, modification of cooling, as well as several examples of making simple but effective receiving antennas, so if you are interested, you are welcome to cat.General form:
TTX:
- Model name – K2
- Processor – MSTAR MSD7T01
- Memory – DDR2 1066MHz (built into the processor)
- Tuner - Rafael R836
- Operating frequencies – 48 MHz - 866 MHz
- Compatible with broadcasting standards - DVB-T/T2, MPEG-2/4 H.264
- Interfaces:
- - - HDMI 1.3 (Full HD 1080p)
- - - AV port (RCA cable)
- - - USB 2.0 (drives)
- - - miniJack (external IR sensor)
- Supported video resolution - 480i / 576i / 480p / 576p / 720p / 1080i / 1080P
- Supported functions – EPG, PVR, TimeShift, 3D, firmware update and playback of popular media formats
- Control – IR remote control
- Power supply - DC adapter 5V/2A
- dimensions – 120mm*111mm*30mm
- weight – 110g
More detailed characteristics:
The equipment is as follows:
- digital DVB-T2 set-top box K2
- composite cable, length 1m
- adapter/power supply unit with Euro plug with 5V/2A output
- IR remote control

The receiver is supplied in a colorful cardboard box: 
The box is quite durable, on the back there are basic specifications: 
Unfortunately, there are no instructions, but since setting up and controlling the console is very simple, it is not really needed.
Dimensions of TV set-top box:
Dimensions are small, about 120mm*111mm*30mm: 
The weight is also small, about 110g: 
I forgot to weigh the console before modifying the cooling system, so 135g is the weight of the console with a glued aluminum radiator, without it the weight is about 110g.
Here is a comparison of the set-top box with the thousandth banknote and the Eneloop AA battery: 
Appearance:
The appearance does not shine with any special features and is a standard black plastic case with rounded edges: 
By the way, most TV set-top boxes (TV boxes) are supplied in just such cases - cheap and cheerful. On the front there is a tinted glass, under which there is a digital display, a power/signal reception indicator and an infrared sensor for the remote control. On the back and sides there are connectors for connecting to equipment. The ventilation holes are located on the bottom of the device, on the left and right sides: 
The main connection connectors are located on the back of the case:
- RF IN/ RF OUT - socket for connecting a coaxial cable with a characteristic impedance of 75 Ohm (male connector for TV)
- HDMI – digital HDMI output for connecting the set-top box to modern TVs, allowing you to transmit high-definition images along with sound (all in one)
- CVBS / R / L – analog signal outputs for connecting old CRT TVs via a composite cable. One video output and two audio outputs (stereo)
- DC 5V (left) – power input for DC Port 3mm connector
- IR IN – socket for connecting an external IR sensor for the remote control
- USB – socket for connecting USB drives
When power is applied, the display “ON” lights up and after the system boots, the last channel being viewed is activated, the number of which is duplicated on the display: 
When reading information from USB media, the display shows “USb”: 
When you press the “Power” button on the remote control, the set-top box goes to sleep (standby mode). “OFF” briefly appears on the display and a red LED lights up, which is very visible: 
Unfortunately, in sleep mode the display does not show the current time, only a bright LED, although the display can show the time.
Power supply with Euro plug, rated at 5V/2A. DC Port 3mm plug: 
To connect old CRT TVs, the kit includes a composite RCA cable, 1 m long: 
There is no HDMI cable included, but with constant promotions on them, I think many people already have a few in stock.
The IR remote control is quite convenient (2xAAA power supply), there are quick access buttons: 
Disassembling the TV set-top box and modifying the cooling:
In order to disassemble the console, you need to unscrew 2 screws from the bottom side of the case: 
Since the cooling is passive, there are ventilation holes at the bottom and sides. And as you can see, on the so-called legs, there are protrusions for attaching the set-top box to a vertical surface, for example, on the back of a TV. It is for such cases that there is a connector for an external IR sensor, because being behind the TV, the set-top box cannot receive a signal from the remote control to the built-in sensor.
After removing the top cover, the intestines become accessible: 
As you can see, the processor has a pitiful semblance of a radiator, namely a thin aluminum plate (0.4 mm thick) coated with paint. Normal cooling is out of the question.
Board revision – K2 20160412 V10.1, there is an FD-650B LED controller, 25L3205D flash memory and several other components: 

Here is the same display (you can see the colon for the time), a combined LED and IR sensor: 
Since the original radiator could not cope with its tasks (the temperature exceeded the pain threshold of a finger), so it had to be replaced. It rests on a kind of sticky base, which softens well when heated, so it’s better to remove it from a hot chip, which is what I did. The set-top box has an MSTAR MSD7T01 processor installed: 
More branded devices built on the same chip have a full-fledged radiator, so it was decided to use the first radiator that came across. Since I didn’t have hot glue, we will attach the radiator the old fashioned way, using superglue and KPT-8 thermal paste: 
“Why this particular set?” - you ask. Yes, because it’s been sitting there for a year now, but I don’t know where to use it. The essence of the idea is incredibly simple - apply thermal paste to the main area of the chip, and drip glue around the edges. At the same time, rigidity is guaranteed. As a former overclocker with experience, I can say one thing - this is one of the cheapest and most effective solutions. Previously, there were problems with hot-melt adhesive, so in order to somehow cool the memory, many people sculpted the radiator this way. And it worked for years.
So let's get started. First of all, squeeze a drop of thermal paste onto the center of the chip. Then we press the radiator and, using back-and-forth movements, sometimes turning, level the layer of thermal paste. Apply moderate force so as not to break the chip/board. As soon as the radiator “sticks”, remove it with the same rotational movement. This will be immediately noticeable, since it will seem to be stuck and it will be difficult to tear it off. This operation is necessary to level and minimize the layer of thermal paste, otherwise heat transfer will be worse. Ideally, thermal paste should fill only microcracks and irregularities on the chip and heatsink. Next, take a cotton swab or match with cotton wool, moisten it with a light solvent (alcohol/acetone) and clean the sides of the chip from thermal paste. The end result should look something like this: 
Next, add 3 small drops of superglue to each side of the chip and press the radiator. Remember, there is only one try. It turns out something like this: 
As a radiator, I took the remnants of a processor radiator that was sawn for similar needs. We wait 10 minutes and start the device. If the radiator heats up quickly, then everything was done correctly :-). During operation, my radiator heats up to 70-80°C.
Control of TV set-top box K2:
When the device starts, the following screensaver appears: 
The default language is English, but changing to Russian will not be difficult. The Russification of the menu is complete, everything is intuitive and understandable, so we’ll just briefly go over some points.
Let's start with “Channel settings”: 
There is a channel editor that allows you to delete, block, rename, and add channels to favorites. An integral part of digital broadcasting and set-top boxes in particular is the presence of a TV guide - Electronic Program Guide (EPG). It is an on-screen menu that displays the schedule of TV and radio programs with the ability to interactively navigate content by time, title, channel, genre, etc. using the remote control. There is also a short annotation for each item in the TV program. This is what the TV guide looks like: 
I will say one thing, the thing is really convenient, especially if older people plan to use the console. Now you don’t need to go for a newspaper with a TV program :-).
Next up is “Video”: 
Standard settings: format, resolution, standard. There is also a checkbox for 3D output, which allows you to output a horizontal or vertical stereo pair.
Next comes “Search for channels”: 
It only needs to be run once, the range will be scanned and the channels will be stored in memory. There is also a manual search on a specific frequency/channel, if you suddenly missed the auto search (this happens when reception is uncertain): 
There you can also evaluate the quality of antenna reception. Next are the “Time” settings: 
I still haven’t found an item that allows you to display the time on the screen in standby mode :-(.
Let's move on. Language settings": 
Everything here is simple and clear, except for the last item “digital sound”, which allows you to output unpacked sound to TV. Unfortunately, movies with sound in Dolby Digital (AC3) format are not supported by the receiver. With different settings, there is either silence or crackling, so to view it you either need to convert the audio track or download another file. By the end of the month I’ll try to see what the sound situation looks like on old TVs. Perhaps my monitor does not support audio output.
Next are the “System” settings: 
Here you can see the firmware version and update it if necessary: 
Well, the final “USB” settings: 
A good file manager is built in, there is a preview: 
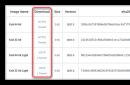
Not all of the “heavy” test videos were sent from the site, but this is not surprising, because the K2 console simply does not support 2048x1152 and 4096x2160 resolutions. Videos 1080p-25p-high5.1.mp4 and 1080p-50p-5.1.mp4 run without problems: 
There is a function to record a video stream to a USB drive. Here is a fragment of the recording from the NTV channel and its properties: 
Direct video:
Oh yes, I completely forgot, it only sees memory cards up to 32GB, i.e. There is no support for SDXC (64GB or more). The problem is solved by formatting the card in FAT32 or NTFS.
And most importantly, watching TV shows. No freezes, noises or other crap. The picture is either there or it’s not, there’s no middle ground. The photo shows a fragment of the series “Kitchen” from STS (the smartphone does not like to shoot dark tones, the picture in reality is much better): 
And some series from NTV: 
In total, the set-top box copes with watching TV perfectly well, but with watching videos from external media it is not satisfactory. And all because AC3 support seems to be stated, but in fact it is not, or I’m missing something, since I tested it on an LG IPS236V monitor with an audio output. At the end of the month I will add a report on working with old TV, if, of course, the topic is interesting to someone.
Now, as promised, a short guide to making a simple antenna for receiving a digital signal:
I admit, when I first connected I was a little surprised, because with the collective antenna connected, the receiver did not catch anything. The culprit was the restriction on two channels in the meter range (only the first and second were shown, the rest were jammed). Yes, yes, there is such a bad cable television association that blocks the entire UHF range on collective antennas throughout the city. I hoped that since the first and second channels had excellent reception, this should be enough for the set-top box. Not so. I had previously heard that the number can be easily caught on a wire pin, so I looked on the Internet and quickly built an antenna. I am not the author of the manual for making an antenna, but since many people have no idea about such a simple manufacturing method, like me, I will describe it here. Perhaps it will be useful to someone. If you are interested, go under the spoiler.
So, first we decide which antenna to make. If you live in a city, not far from a TV tower (transmitting station), then such an antenna will suffice (ideally on a high floor): 
Don’t be surprised, this little one catches perfectly at a range of 20-25 km (tested), unless, of course, the stone jungles in the direct line of sight are not too disturbing. To make an antenna you will need an F-connector, an adapter for an old TV plug and a piece of coaxial cable: 
This is what the connectors look like: 
We strip the cable sheath by 15mm, bend the shielding conductors and cut off the core insulation: 
Take the F-connector and screw it all the way, the copper core should stick out 2-4mm: 
We click on the television tower closest to you and record the operating frequencies of this station. In my case, these are channel 32 (562 MHz) and channel 36 (594 MHz). In order not to get bored, just divide 7500 by the frequency and get the required cable length, for example 7500/562 = 13.4 cm or 7500/594 = 12.6 cm. This is the length we will need an unshielded conductor. Everything is banal and simple, :-). If there are two channels (the first and second multiplex), then we find the arithmetic average, for example (13.4 + 12.6) / 2 = 13 cm.
So, having calculated the length, we remove the insulation and screen from the other part of our core to this distance. In my case, it is 13 cm. For fun, I changed the length from 11 to 15 cm, I didn’t see much of a difference, so you don’t have to calculate the millimeters: 
It turns out something like this. The distance from the F-connector to the receiving part of the antenna can be any. I left about 5 cm to be able to bend the antenna if necessary: 
And now the second option for remote areas: 
As I mentioned earlier, the higher the antenna is located, the fewer obstacles there are for reliable reception. It is clear that 20 km away inside an apartment near a TV, the antenna will not receive much. Therefore, we need some kind of “extension cord”, which will be the same wire. This option is good because you can bring the receiving part to the very top of the apartment/balcony/roof. Made in the same way.
In total, you don’t need to spend half a ruble/ruble on a much-hyped antenna. Perhaps all the components are in your stash...
Pros:
+ good sensitivity
+ USB connector
+ presence of analog and digital video output
+ excellent picture quality on analog TVs
+ support for additional functions (TV guide, recording)
+ support for most video formats
Minuses:
- no AC3 support
- installation (replacement) of a radiator is desirable
Conclusion: An excellent workhorse for receiving over-the-air digital signals. The price is the same as offline
Digital television is not so long ago, but has already firmly entered our lives. However, not all of us have managed to acquire televisions with built-in digital receivers. There are two ways to solve this problem - buy a new and modern TV or install a small DVB-T2 receiver in your home.
The second option is the most profitable and acceptable, because receivers cost an order of magnitude less than a new “TV box”. However, some difficulties may arise here if you don’t know what to look for when purchasing.
DVB-T2 receivers
Today, TV towers broadcast both analog and digital signals in the same range. Therefore, to receive high-definition video channels, there is no need to install a new antenna - ordinary decimeter “horns”, which each of us probably has, will do.
It is also important to remember that not all TVs are capable of “reproducing” a digital signal. Of course, by connecting a DVB-T2 receiver to an old TV box, you will be able to watch your favorite channels, but you will not notice any differences in image quality.
Modern digital receivers are small devices that look very similar to DVD players. Most models have a simple liquid crystal display on the front panel and control buttons.
On the back wall of such a device there are connectors for connecting to an antenna and to a TV, additional slots for flash cards, adapters and other devices, as well as a power switch. When choosing a DVB-T2 receiver, you need to focus on the rear panel.
Receiver characteristics
The first important characteristic of a digital receiver is the supported video resolution. This setting must match the resolution of your TV. So, if the screen only supports SDTV, then there is simply no need to buy a set-top box that supports high-definition HD video - the TV will still broadcast as before. The same applies to the built-in 3D function.
The presence of the necessary connectors to connect the set-top box to the TV is the second most important parameter. The vast majority of equipment uses an RCA cable, or “tulips,” for connection. Some DVB-T2 over-the-air receivers use SCART cables along with RCA ports.
In addition, you can use one of the built-in interfaces to connect to your TV. As a rule, this very often serves as an HDMI port. The presence of all the listed connectors will allow you to connect two TVs to one receiver at the same time.
Built-in Interfaces
You can often find equipment on the market with a built-in USB interface, thanks to which you can connect a flash drive, phone, and in some cases even a laptop to the receiver. However, such a DVB-T2 receiver is slightly more expensive than a conventional installation. Most often, the described capabilities are used to record a TV show on a flash card or to play audio and video files stored on a flash drive.
The built-in CI slot for connecting a conditional access card, which allows you to view paid channels, has a significant impact on the price. Today, almost all channels broadcast in Russia are free, but in the future such an opportunity may turn out to be very useful.
Additional functions
The receiver may have a large number of built-in functions that the owners are not even aware of. The most popular is the ability to “stop time” - TimeShift. But this feature is just a trick that makes the DVB-T2 digital TV receiver more expensive.
The fact is that such a function is only available for “antenna” devices, when “time is stopped,” a screenshot is taken and the sound is turned off, but the transmission itself continues to go.
Another popular feature, the TV guide, which allows you to view the program guide, works slightly better. Its functionality depends on the specific channel. Setting a timer to automatically turn the channel on or off are the only additional features that work flawlessly.
Connecting the set-top box to the TV
You can connect in two ways. If your antenna has a ready-made coaxial cable, then you just need to insert it into the DVB-T2 digital TV receiver, and then start setting up channels. In some cases, you have to buy the coaxial cable yourself, especially if your antenna has a built-in amplifier.

In this case, you will also need a screw-on f-type connector. To install it on the cable, you need to cut off the insulation layer, distribute metal foil and mesh along the contour and get to the copper core. Then you can screw the connector into the receiver.
There are many more ways to connect a TV to a set-top box. You can use tulip, RCA, SCART or HDMI cables. There will be no difficulties here. After combining the devices, all that remains is to configure the DVB-T2 digital receiver in the same way as setting up a channel search on a TV.
Budget models
The cost of budget models is in the range of 1-2 thousand rubles. Their functionality is sufficient for comfortable viewing of TV shows.

Our list opens with the VVK SMP240HDT2 receiver costing up to 1.5 thousand rubles. There is a built-in USB interface, which makes it possible to record TV programs and view media files. The HDMI connector can be used to connect an HD TV. Among the disadvantages, it should be noted the poor response to the remote control and the coincidence of commands with the signals from the TV remote control.

The D-COLOR DC1302 set-top box has all the same built-in functions as the previous representative. But this digital DVB-T2 receiver is more user-friendly - it responds better to remote control commands. Buyers also noted the stylish metal case with plastic inserts. Among the disadvantages is the delayed channel switching.
The receiver is less functional than previous representatives - there is no HDMI. Users especially liked the simple channel setup - it can be done in just a couple of clicks. But the menu is not very convenient and understandable - you will have to figure it out.
Special Representatives
These consoles presented below can be called special for some additional features that are not available in the models already described. In addition, the cost of these devices also does not exceed 2 thousand rubles.
SUPRA SDT-94 is a digital DVB-T2 receiver with HD resolution support and a USB interface for viewing data from flash cards. Separately, users noted good signal reception, regardless of the type of antenna connected, as well as simple channel search. A special feature is the parental control function, which blocks certain channels until a password is entered. The main disadvantage is the reduction in image quality when connected via a composite output.

A more original model is the Rolsen RDB-532. The receiver is compact in size and has low power consumption, which allows it to be used as a portable receiver. All you need to do is buy a power cord. It lacks an HDMI connector, but the ability to view multimedia remains. TV DVB-T2 has no complaints from users. Its functionality fully corresponds to the price.
SMART receivers
This group of devices is the most expensive. However, they are more functional and are able to access the Internet, and also have a number of other features.

The Dune HD Solo 4K receiver, in addition to watching TV channels directly from the Internet in 4K format, playing multimedia, recording video, accessing the global network, a convenient menu and functions already described for other models, can be used as a wireless access point to a Wi-Fi network. Fi. At the same time, providing high speed to several users simultaneously. Of the minuses, the high price should be noted - about 24 thousand rubles.

IconBIT XDS94K is a much less functional DVB-T2 digital terrestrial receiver. But it also costs 4 times less than the previous representative. In addition to browsing Internet resources and playing multimedia, the device can be used to make video calls; you just need to buy a webcam. Additionally, you can connect a mouse and keyboard to the receiver. Among the disadvantages is the rather long loading of channels.
The modern world can no longer be imagined without digital TV. This signal transmission has been used for quite some time to broadcast television and radio channels in many countries in Europe, America and Asia. In Russia, the process of transition from analogue to digital TV has been delayed.
The digital signal arriving through the receiver antenna allows you to watch more TV channels throughout the country without loss of quality or interference. The signal itself can be sent either to an antenna, which is attached to a set-top box, or directly to the TV. It all depends on how modern the model of this device you have.
With devices that support DVB-T2, everything is simple. In order to connect to digital TV, just insert the cable into the appropriate connector and do a simple task. If your TV is outdated and does not support receiving this type of signal, then in order to view it you should purchase a special set-top box. It is inexpensive, but some people may have problems connecting and setting it up, so today we will talk about how to do this.
What is needed for this
To connect digital TV you will need:
- TV;
- Set-top box (receiver);
- Antenna.
Your TV should have an input into which you can insert an antenna, a tulip-type connector, and an input with video output (scart). If you have an HDMI input along with the scart connector, then don’t worry. It is also suitable for connecting a receiver. It's just that your model is newer.

Before buying a receiver, you should figure out which one is better and find out what parameters you should pay attention to in order to choose the most optimal model. If you don’t understand much about technology, and don’t want to spend your free time studying all these nuances, then you can contact a company that provides television broadcasting services in your city and get advice from their specialists. In addition, you can take advantage of promotional offers from the service provider. Often, if you connect to their services, you can receive a receiver as a gift.
A receiver is essentially an adapter that allows you to receive and transmit a signal to your device. He can receive it through the following sources:
- Satellite dish;
- Antenna;
- Through the Internet;
- Using other sources.
Connecting a digital set-top box
To connect the receiver directly, you should follow these steps:
- Take the TV box out of the box and remove the protective film from it. It is necessary to remove the film. Otherwise, the receiver may overheat and break.
- Take the TV cable and cut off the protective sheath, thus exposing 1-15 millimeters of the cable on both sides. The sheath should be stripped very carefully so as not to damage the shielding film, which is designed to protect the center conductor.
- Carefully peel back the shiny protective film and screw the f-connectors to the wires.
- Connect the TV to the set-top box using a cable.
- Insert the wires into the tulip-type connectors on the TV and set-top box.
- . The antenna itself should be installed on the external wall of the house or on your balcony, if it is not glazed. At the same time, make sure that it is not touched by tree branches or power cables.
This completes the process of connecting the TV set-top box. Next, to watch the TV channels available in your region, you should configure it.
In our country, many people still use televisions that were produced back in the Soviet years or in the early 90s. Connecting a receiver to such devices is not so easy - they do not have tulip-type connectors. Additionally, some models have scart outputs, but these only accept component signals.
These problems can be solved in two ways:
- Find a circuit for an adapter from the A/V input to scart and solder it yourself;
- Purchase a special adapter from the store to which you can attach an RCA cable from the set-top box or an adapter cable.
There are even more ancient models of TVs of the “Electron” type that do not provide any inputs at all, except for an antenna connector. Through this connector, a modulated high-frequency signal enters the TV, so in order to watch digital TV on a device of this type, you will need to additionally purchase a modulator that will be equipped with RCA connectors.
Receiver setup
In order to set up digital channels on your TV, after connecting the set-top box to it, you will need to perform the following steps:
- On your remote control, press the Menu button.
- In the window that opens, go to the settings menu.
- You need to select Russia as the country if it is not the default.
- Now you need to select the signal standard. By default, DTV-T/DTV-T2 is installed, that is, analog and digital TV, respectively. If you leave it this way, the TV will search for both channels.
- You will be prompted to perform automatic or manual setup. Select Automatic and press the “OK” button on the remote control.
- Now you need to wait a while until all available free and pay TV channels are detected. When you complete your search, click “Save.”
This is one of the easiest ways to set up digital TV at home. If the TV finds few channels or does not find them at all, then you should use manual tuning.
To do this, you need to delete all the channels that were found for this. After the channels have been deleted, you should repeat the same steps as for automatic search, but instead of auto-tuning, select manual search. A window will appear in front of you in which you should set the frequency on which digital channels are broadcast in your city. You can find out this frequency on the Internet or by contacting your service provider. You may also need to change the search range for the search to begin.
After the TV channels of the first multiplex have been found, you will need to find out the frequency for the second multiplex in your city and start the manual search again. Thanks to this, you will be able to watch more channels.
Checking the signal quality
To make sure that you did everything correctly and everything is working well, you should check the quality of signal reception. This is not difficult to do. The receiver must have a button called INFO. By clicking on it three times, a window will appear on the screen with information about signal quality, channel number, frequency and encoding. If the two existing indicators are above 60%, then everything is fine and the signal level is quite acceptable.
Perhaps in your model of TV set-top box this button will be called something else. To find out what this button is called for you, look at the instructions and read the purpose of the buttons.
If your TV receives several multiplexes, be sure to check the signal quality on each of them. This is due to the fact that each of them is transmitted and received using different transmitters, so it is quite possible that the signal will be good in one multiplex, but not in the second.
Note.