And take advantage of it. After all home network It is in no way inferior in functionality to its office counterparts, providing Internet connectivity and peripheral devices such as a printer.
How to connect a printer over a local network?
In order to answer the subtitle question, preparatory work should be carried out:
Set up the printer on other computers
We will notice that the "printer" option is checked, we give "next" and we enter the previously specified password. In "Control Panel", "Hardware and Sound" and "Devices and Printers" we will go to "Add a printer". Finally, give us the option to print a test page.
Network printer does not print: possible problems
If it works, you've done everything right. Do you have doubts about how to do this in your company? Do you want to create a more complex cable network that will allow you to have a faster network? We invite you to contact us through our contact form.
Sharing the printer
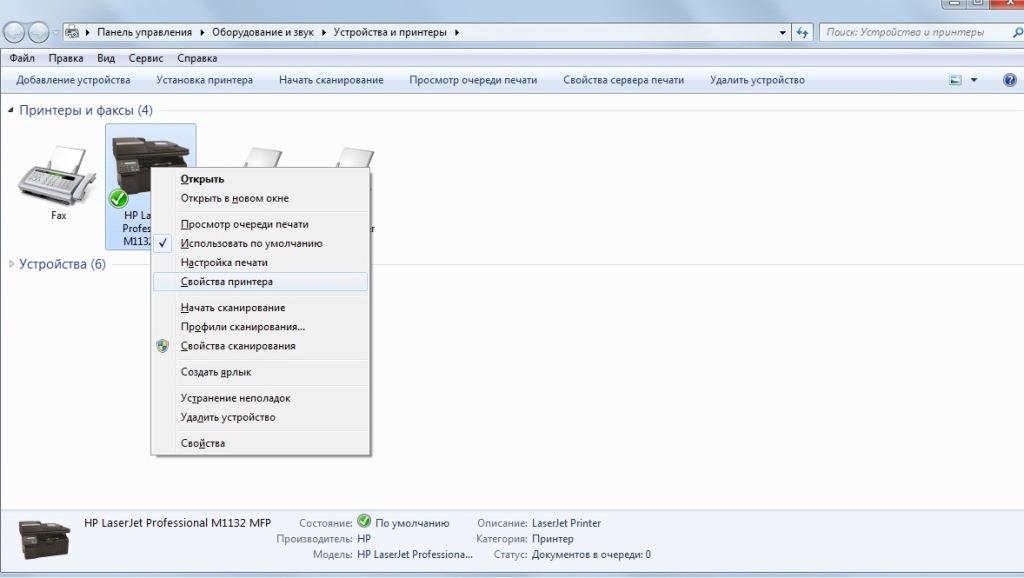
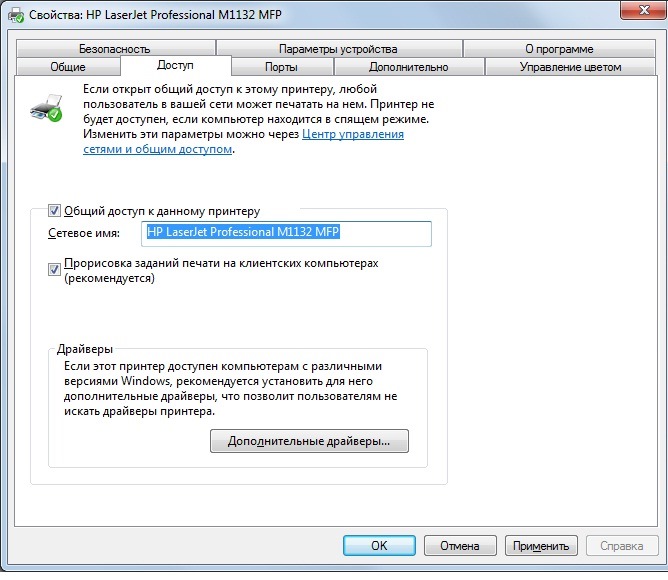
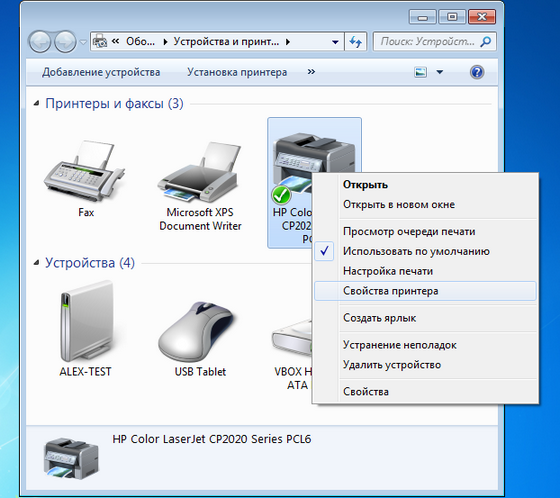
As for the network, we have checked and configured it, it’s time to turn to the printer. To do this, go to “Control Panel” and find the “Devices and Printers” section. Right-click on the icon of your active printing device and select “Printer Properties”. In the dialog box, go to the “Access” tab and allow network sharing.
In addition to the unpredictability of the server, the computer acts as a web server. The process is actually simple, so let's get to it. First we will open System Settings. Click the button at the bottom of the printer window. In the window that opens we can select the printer source. At this point we can take two routes.
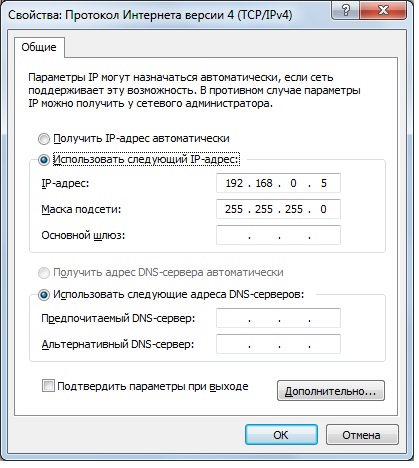
Manual IP assignment
If the print server is running an operating system, we will do the following. We will check the scan window to the printer we are looking for. When we connect to a specific computer we will be asked for a username and password, but usually connecting as a guest will cost.
Printers connected directly to a network or to a dedicated print server
We will select the server protocol, add the name and location we want and finally, in the Usage section we will select our printer software. One of the most innovative aspects we can implement in our teams is the ability for other users to access and use resources. One of the most commonly used and shared objects is undoubtedly printers.
The ability to share a printer allows us and our staff to be able to manually use the resource when we are away, as it sometimes prevents us from traveling unnecessarily. Thanks to the fact that we are online, we can, if we need to send some information, in this case it is an impression.
Once sharing is open, you can move on to the second computer. Also open the “Devices and Printers” window and click on “Add a device”.
The Wireless Connection Wizard window will open. network devices. If the network is configured correctly and the printer is in this moment is enabled, the wizard will display it, and all you have to do is click “Next” to connect the found printer.
For example, we are on the second floor and a colleague asks us for information, but he is on the 45th floor, it is enough to have network printer to send the print to that printer so he can receive it without having to go to the floor. With this option we will connect the printer directly without setting up sharing, and additional computer not required.
We are opening home group using any of the following methods. From the Control Panel, select the Network and Internet option and we will select the Main group. The following window will open. There we click on the "Join" button and we will see the following. Click "Next" in the next window.
Note! At the connection stage through the wizard, you may need to install drivers, so prepare installation disk, supplied with the printer (or download the latest drivers from the developer’s website).
Once the equipment is connected via the network, you will see your printer icon in the list of the “Printers and Faxes” section. If you right-click, you can set the default printer by selecting “Use as default” from the context (this is if a local printer is not connected to the second PC).
Click Next and we will see that it starts the verification process. If the printer is not visible, we must right-click on it, select the Printer Properties option, go to the Share tab and select the Share this printer option.
First we have to share the printer so that other users have access. After sharing we will go to the option Devices and Printers and there we will select the option Add a printer located at the top. The following window will appear.
Now we will see the following where we will see that we have the following options. My printer is a little outdated. 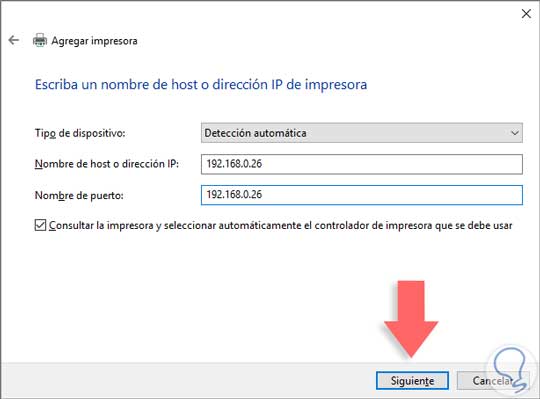
Clicking “Next” will show the system starting the printer search process. Once the printer is located, we will see that it has been added correctly. There we can define it as the default printer or run tests to verify its operation. Click "Finish" to complete the process.
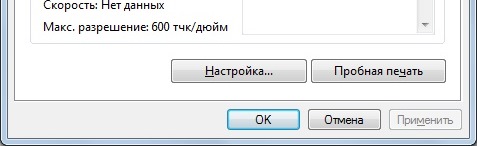
To check the functionality of a connected network device, right-click on the printer icon and select “ ”, and then in the window find the “Test Print” button, which will print a standard device test sheet.
This way, you will always have a printer ready for members of your network without having to install one for each user. Did you enjoy and find this tutorial helpful? You can reward the author by clicking this button to give him a positive.
Overwhelming majority small offices have multiple computers connected to a network so they can share resources between them via a wireless network. One of its main functions is to share a printer so that it can be used by more than one computer.
P.S.
Summing up the work done, it is worth noting that different versions Operating systems may have minor differences in settings and item names. You, as a user, are required to set up a local network - everything else will not take much time.
If you have any questions about connecting a network printer at home or have anything to add to the article, please write in the comments form below.
The first thing to check is correct setting local network. Once we have verified this, we can start setting up the network printer. To do this, follow these steps: The first thing to consider is that other computers can access this printer. For this, we have to work on the configuration of the same and indicate that we want it in public mode. Now we need to make sure that the above option is enabled. The next step is to connect the printer and install drivers.
In both cases, the printer should show as installed. To do this we will need to access the printer properties and change its settings. The following steps are the same for both cases: Right-click on the printer and select Properties. A window with several tabs will appear, we must select " General access”, and we will click on “Share this printer window”.
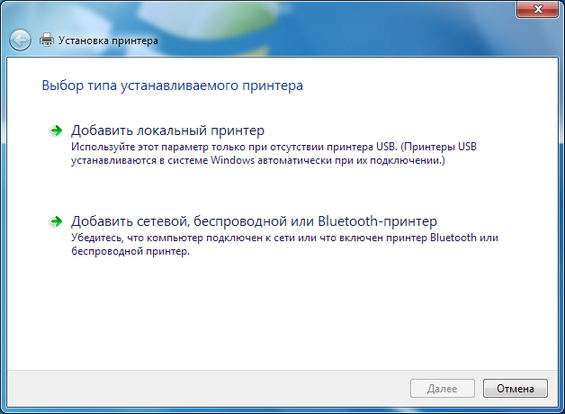
When designing a local computer network in the SOHO segment (Small Office Home Office), the question always arises of how to install and configure a printer on a computer running the Windows 7 operating system. There is more than one solution to this issue:
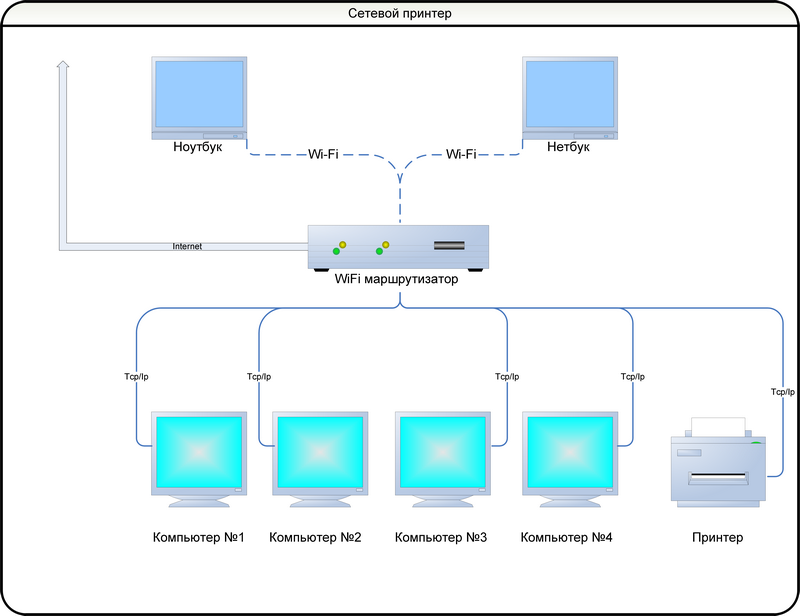
Network printer
Modern printing device(or MFP - a multifunctional device that combines Printer, scanner and even Xerox), as a rule, provides for connection to a local network via a UTP cable and supports the TCP/IP protocol. Such devices are usually called network. The built-in software of such devices allows you to distribute the load between all users, organize queues for sending data for printing, maintain statistics, set printing priorities between users, and much more.
Installation on other equipment. Now we are going to configure the printer for another network computer. Then a list appears in which the equipment with the printer is connected. Double-click the icon representing it and the shared resources will open, including the printer. We double click on it and the installation will begin.
How to connect a network printer through a router?
We will place it in the network element and find the computer that has the printer connected. Once we see this in the window, we will double click on it to begin the installation. Unfortunately, this process is not yet fully automatic, and there may be many driver problems in one or more earlier versions operating system. For most users, adding a printer is a very simple process, but for others it is not so much.
This solution is the most technologically advanced, allowing rational use of its resources by all network users, but such printing equipment, with all other characteristics being equal, is more expensive. An additional cost will be the need to lay an additional cable between the MFP and Wi-Fi router . Portable devices– a laptop or netbook can be connected either via cable or via a Wi-Fi interface. The topology of such a network is shown in the figure:
First, you will need to go to your control panel. This can be done in different ways. You can access it through the search bar and right-click on the bottom left corner of the screen in work mode and select it from the hidden control menu.
Once you get to the Control Panel, you will have to go to the printer settings. You'll find this in the Hardware and Sound section. Click View Devices and Printers. Now that you are in the Devices and Printers menu, you will see a set of icons for various peripherals and connected printers. You can even see fax or documents in Printers. Don't be fooled, these are not real physical printers, and print options based on software. At this point, you'll want to select "Add a Printer," located in the top-left area of the window just above the "Devices" section.
Local printer
The available complex does not provide for connection using TCP/IP, but only via USB or even older connection options, such as (LPT/COM). This printer must be connected to one of the local computers, and then use the services provided by the Windows 7 operating system and provide access to this equipment to everyone who needs it. Portable devices - a laptop or netbook can be connected either via cable or via a Wi-Fi interface. The topology of such a network is shown in the figure:
The next thing you will be asked to do is select drivers from the list of printers. If you don't find your printer make and model listed, you may need to download the appropriate drivers from the manufacturer's website. Often this is all you need. My advice would be to go with the recommended item in this case. At this point, you will be asked to provide a name for your printer. This will simply be the reference point for the system when you need to select a printer for a specific task. Once you do this, you will see another dialog box that will tell you if you want to share the printer with other users on the network.
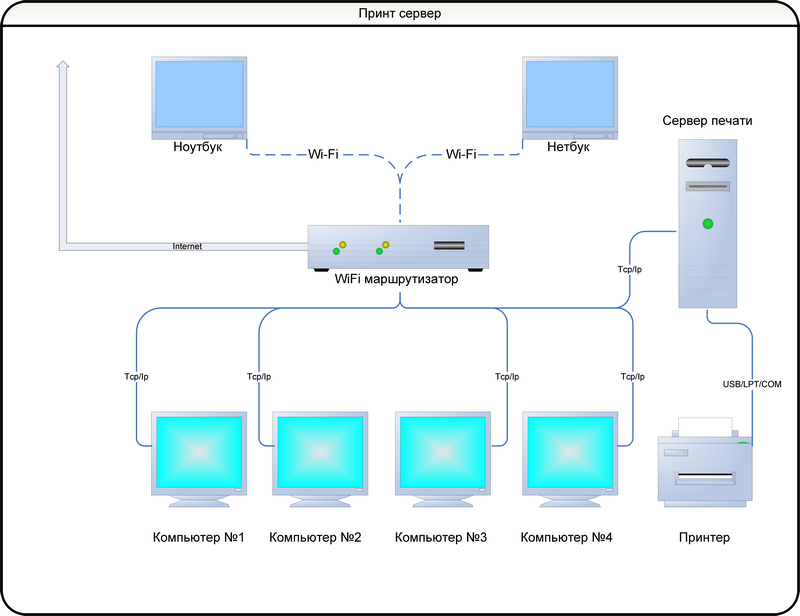
Print Server
Solution used in large offices and large computer networks. Printing device(usually MFP) connects to a separate computer on which specialized software is deployed, collectively called a print server.
The network printer should not be used on separate systems. So you can start printing, you must distinguish what type of printer you have. You may have purchased a model that receives files by wireless network, and if not, don't worry, you can still complete this task.
Case 1: Wireless Printers
A compatible printer must be turned on and operating in wireless mode. Usually you have a button like the one you see in the image and you just need to press it to activate it. You should also make sure that the printer is connected to the same wireless network that your phone is connected to.
Industrially produced individual devices, where the print server is implemented at the microsoftware level. Physically, it is a small box that is connected to a local network and receives information from printing devices via its existing connection interfaces. Portable devices: a laptop or netbook can be connected either via cable or via a Wi-Fi interface. The topology of such a network is shown in the figure:
The application is downloaded and installed like any other. When you open it, you will see a section where you can find printers nearby; Now you have to select the device of your choice if more than one printer is available. Simply select a file type and add it to your print job; You can preview it if you wish, and once done, submit it for printing.
Now go to the Configuration menu and from the lower options select Show Extra options" Here, select "Manage" and then "Add Printers." When you're ready, open the app and select the top icon to send your document to print.
Local installation
How the installation works local printer on Windows 7, is written in detail in the accompanying documentation supplied with the equipment. But since reading documentation is considered bad form, we will describe a typical situation.
When you choose required file, a new screen will appear to select the printer; Click the device name and the document in the path. After a few seconds, you will see the printed sheet appear on the tray. It's simply an alternative to printing from tablets and smartphones. If you have any other tips, feel free to leave them in the comments section.
Sharing a printer on a local network helps you print from any computer on the network to a printer connected to one of them. You will need a printer that will be connected to the computer and will be "shared" for this purpose. In these cases, you can also change the default printer settings, but let's continue with our own.
Network printer and print server
Installing a network printer in Windows environment 7 from the point of view of the user of any computer (be it a stationary desktop or laptop), the local network looks exactly the same and is done through “ Control Panel», « Devices and Printers", but the difference is that you need to add new printer(we assume that the network device is already installed on the local network):
Add the printer to the computer you want to use it from. Click Next and follow the instructions to complete the installation. Folder and file sharing is very useful for browsing and sharing among all computers on a local network.
Or, faster and therefore you will make sure that they are all packages, writes in the terminal. Share catalogs. Folders you want to share. And decide the options for sharing the folder. And at the same time, when you open the network, you should find shared folders and files to view and copy your files.
The system will independently scan the network, detect installed network servers, or print servers, and report their names. All that remains is to select the ones you need from those found.
Unlike a local printer, for which drivers are searched on the Internet, Manufacturers of network devices store them in the device itself. Installation of the necessary drivers occurs automatically, which the system informs about with messages similar to those displayed when installing a local printer.
In case of unforeseen situations, it is described in detail how to install a network printer in the operating room. Windows system 7on the software provider's website. Configuring an already installed network Windows printer 7 is done in the same way as setting up a local printer via “ Control Panel», « Devices and Printers», « Properties» This configuration of a remote printing device is carried out on a PC network with Windows 7, regardless of the territorial remoteness of the printer itself. For this, any computer with access to the network can be used: desktop, laptop and even tablet.
If the question arises of how to install a printer on a Windows 7 laptop or netbook, then we follow the same methods as when installing device drivers on a regular computer.
We install local printing equipment according to the method of installing a local printer, and a network printing device - as a network one.
If the printer is connected locally via Bluetooth or infrared port, then its installation is carried out in the same way as in the network version. Such a device must first be turned on so that when scanning nearby devices, operating system could identify him.
Drivers are installed automatically from the Internet, or from the installation disk supplied by the device supplier. The network administrator can allow or deny the connection of existing network printing devices, or devices included in the workgroup as local (via a wireless interface) for specific laptops under Windows control 7.
Video on the topic


