And now it's time for you and me to learn do bootable USB flash drive through command line
so that it can later be used to reinstall the system.
How to make a bootable USB flash drive via the command line?
First, connect to the USB connector system unit USB flash drive that you are going to make bootable. I want to warn you in advance that this flash card will need to be formatted, so take care of the safety of important data by transferring it to your computer.- The first is by entering “Win + R” on the keyboard and entering “cmd” in the window that opens;
- The second is by opening the start menu → all programs → standard and finding the utility “ command line».
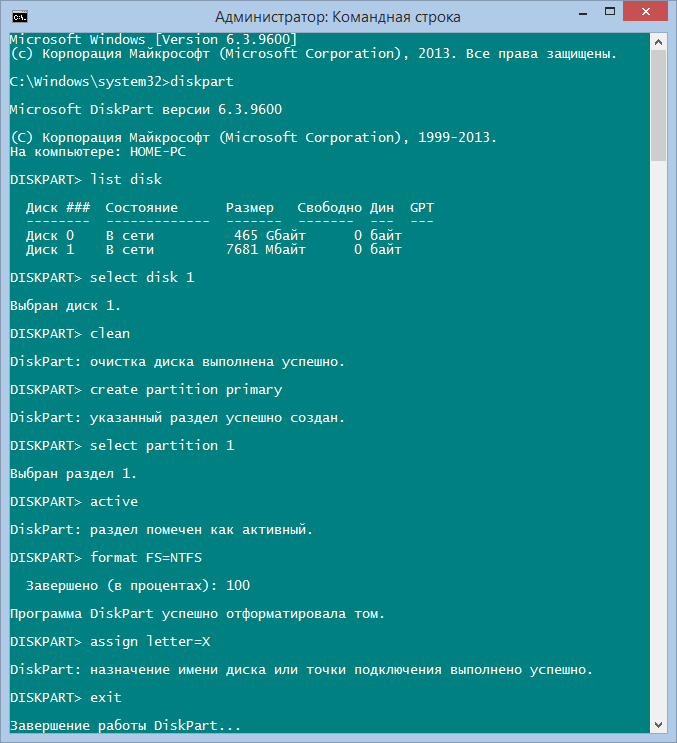
- By entering the command diskpart, run the program that manages disks and partitions;
- Display a list of all drives by entering list disk;
- Select your flash drive from the list that opens. If it is displayed under the name "disk 1", then you need to enter select disk 1;
- Now, to clear it, write clean;
- Next, create a primary partition from which the boot will be made, to do this, enter create partition primary;
- Select the primary partition you just created by writing select partition 1;
- Activate it with the command active;
- Now format the flash drive using the command format fs=ntfs. Formatting the flash card will take time, so you will have to wait a bit;
- If you want, you can assign a letter to your flash card using the command assign letter=Z, where “Z” acts as a letter;
- And after the completed operations, all that remains is to close the command line by entering exit.
Attention! If you are going to reinstall your computer system using this flash card, then the files operating system should be placed on it unpacked. Under no circumstances should you move the entire image onto it, first mount it; I wrote about how to do this in the article: .And this is where my post comes to an end, today we learned how to make a bootable USB flash drive using command line, if you still have questions, then the comment form is at your service.
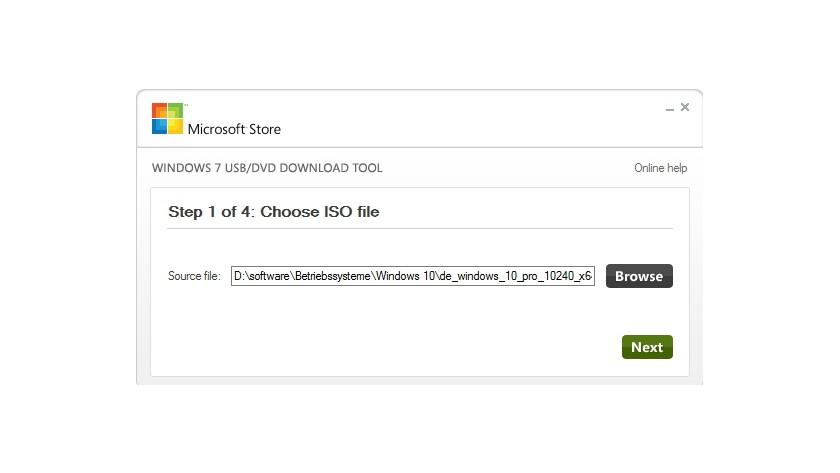
I understand that the easiest way to create a bootable (installation) USB flash drive with Windows 7, 8 or 10 is to use Microsoft's Windows 7 USB/DVD Tool, Rufus, or another similar tool that automates the entire process. However, you can do the same thing using Windows itself, without resorting to third-party tools.
And anyone who knows the suffering of burnt blanks and spontaneously unreadable discs is unlikely to cry tears over optical media. Booting is not only faster, but also more reliable - if you use the right tools when migrating your system to bootable media data.
The idea came from Geza Kovacs, now a graduate student in computer science at Stanford, who still cultivates the program from time to time. With the multi-charge handle, you always have all your important tools in your hands. Access time is also decisive for the practically achievable speed. When hard drives this is usually around nine milliseconds.
In this guide (which will be of interest primarily to the technically savvy user, or simply to those who like to learn about hidden possibilities operating system) I will describe the creation process step by step installation flash drive With Windows system 7/8/10 using the command line.
1. The first thing you need to do is get Windows ISO image 7, or if you haven't already done so.
In general, drives with large amounts of memory are faster than smaller ones. The stick costs about 80 euros. After clicking “Next”, the alarm system is written to the selected storage medium. Run batch file! A simple text menu will appear from which you select the installation source. This does not require any preparation as the tool uses a rescue system on the hard drive.
You can simply remove unnecessary utilities or add new ones to the catalog. The free tool does not require installation. Click the disk selection command. You can recognize a stick by its size. Use a clean one to remove the contents of the stick. Enter the assign command to assign a drive letter to the device in File Explorer. 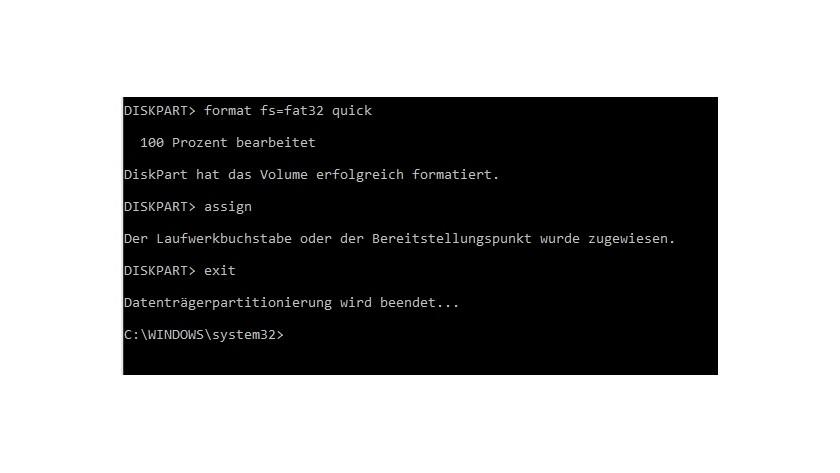
Download the tool and run the installation.
2. Mount the image. If you're using Windows 7, which doesn't have a built-in tool for mounting disk images, use one of the third-party tools that does. I would recommend you download free program, which copes with this task perfectly.
3. Make sure your USB drive is at least 4GB in capacity. Also make a backup copy of all the files on the flash drive, because they will all be erased during the process. Then connect the USB drive to your computer.
Copying files to a flash drive
Starting a copy starts the process. Make sure again that no important data is stored on the stick. This is how the program of the same name begins, with which you prepare the stick. Pay attention to its number, for example “storage medium 1”. Then enter the following commands at the command prompt.
To do this, use the following command. Most computers today are sold without installation media. Instead, the manufacturer delivers the files in a powered-off state, usually in a special recovery or recovery partition. It's up to you to create boot disk recovery from files that you need to perform to get your computer back in case of failure hard drive, system failure or other emergency, again.
4. Go to the Start menu (or Start screen if you're on Windows 8), type cmd, right-click and select Run as administrator. In Windows 10, you can enter this command into the search box on the taskbar.
5. In the Command Prompt window, type the following command and press Enter:
DISKPART is a disk management tool that comes with Windows, and we will use it to prepare a USB installation disk and transfer all the operating system files to it.
Download your free guide. The business continuity plan should include information that the company must be able to continue its systems in the event of a crisis. Thus, a business continuity plan can also be called an emergency plan.
- You forgot to enter your address Email.
- This email address is not valid.
- You have reached the maximum number of characters.
- Enter your company email address.
The command below will show a list of all active drives:
With this command you will be able to select the USB disk that you plan to use as installation media - in my case it is disk 1:
With this command you will clear the USB drive:
This command will create a primary partition on the flash drive:
create partition primary
This command will select a new partition:
Notice the list that opens in the top left column that shows "Device Mode" by default. The tool then asks where to save the file backup copy. You can also use one or the cloud. After clicking “Yes,” the recovery process began, which took about 40 minutes.
The surface guides you through the four steps necessary to achieve your goal. Kim Lindros is a full-time content developer and project manager. For example, they are widely used for storing important data and protecting system images. One of the most important advantages is portability when they are put into use. Personal data can be easily and easily transferred between computers and other removable storage devices. They also really played an important role in your life.
select partition 1
This command will make the partition active:
The following command will format the USB drive to file system NTFS, which is what we actually need:
Now enter this command to assign a name to the USB drive. X is just my example. You can specify a different letter that is not already used for any of the drives on your computer:
Then you can see all your hard disks. The process may take some time. To get the best and convenient solution, ask for help. Of course, you can also select "Create Section" in the left panel. Specify the size and drive letter for the new partition.
Click "Run". Adviсe. You can get more partitions by repeating the above steps. You can easily find which is simpler and clearer. However, nothing will change unless you download it and start using it, so just enjoy it. Therefore, it is usually easier to clone such flash memory rather than recreating it from scratch. There are several free tools, but they do not always solve this problem easily.
assign letter=X
This concludes our work with DISKPART. Enter the following command to close the tool:
We are now halfway to our goal.
6. Before copying files to a flash drive, you should make it bootable. To do this, we will use the Boot Sector Registration Tool, also known as bootsect.exe. You can find it in the "boot" folder inside installation image. So, go back to the command line to make the USB bootable.
Although you don't need separate program for duplicating flash drives that only contain data, because there is enough simple copying, the master boot record must also be passed correctly for boot sticks. Therefore, it is recommended to use all tools as an administrator to prevent this process from crashing.
Now let’s create a bootable flash drive for Windows XP
None of the clones created with the following tools loaded or received error messages such as "hypervisor not found". Due to such looming complications, it is probably easier to maintain regular ones. They offer the possibility, in a more or less intuitive interface, to store the contents of a stick in an image on the hard drive and write it back to one or more storage media.
At the command prompt, run the following command:
bootsect/nt60 X:
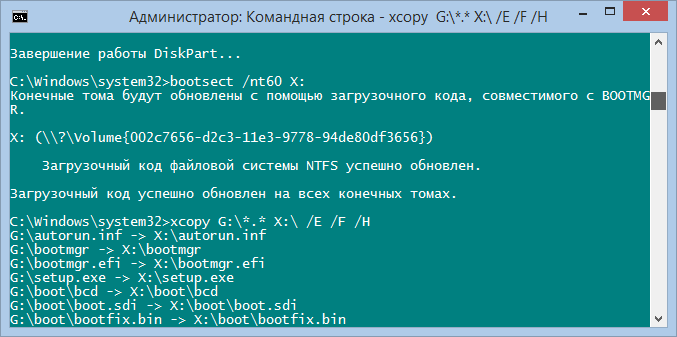
The command you just entered will make the USB drive bootable. note that X in the command is the letter you assigned to the drive in the steps above.
7. You're almost there! Now you just need to copy all installation Windows files to the storage device that we have been preparing all this time. In my example, the Windows 8 ISO image is connected to virtual drive G, and the USB drive has the letter X. Knowing this, run the following command and wait for the file copying process to complete.
None of the programs presented here are required. As usual, the intermediate step is to first write the source contents to an image file, which can then be transferred to multiple flash drives at the same time. However, the author plays down unnecessary expectations by noting that the memory card should not work on all operating systems.
The tool allows you to record an image on a volume that is smaller than the source. However, there is no verification of the result and it should be expected that the clone will not be used. Therefore, in this situation, the size of the source data storage medium must be reduced to such an extent that it is suitable for the target environment.


