Create a Visual Studio Windowed Application
Introduction to creating windowed applications
API functions for working with the console
Window Application Structure
Window controls
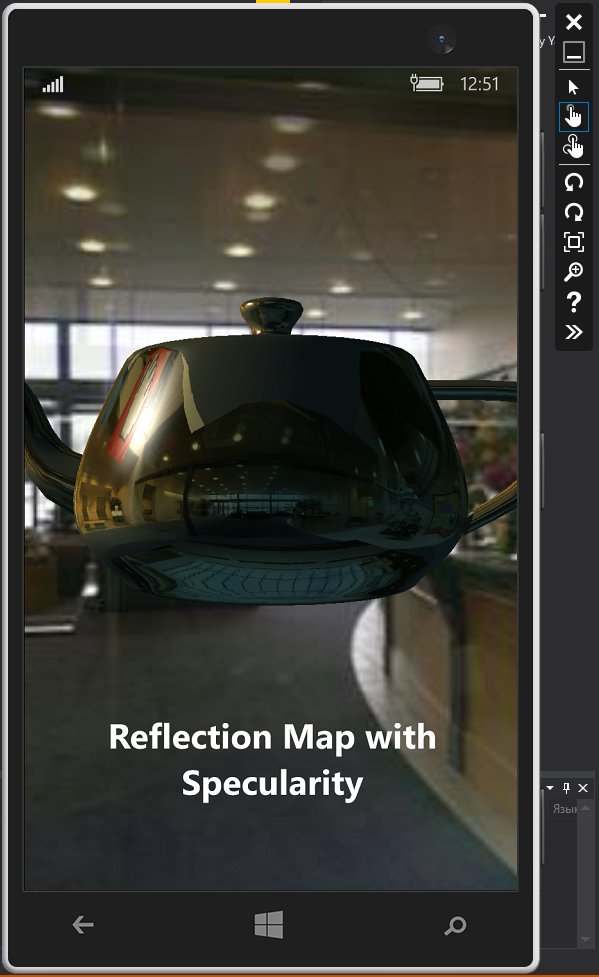
Graphics in windowed applications
In the Windows operating system, 3 types of program structures are possible:
- dialog (main window - dialog),
- console, or windowless structure,
- classical (window, frame) structure
Dialog Applications for Windows have a minimal user interface and convey information to the user through standard dialog boxes (eg MessageBox() ). The program works "blindly".
Non-window (console) applications is a program that runs in text mode. The operation of a console application is similar to that of an MS-DOS program. But this is only an external impression. The console application is provided with special Windows features. Console applications are a system of means for user interaction with a computer based on the use of a text (alphanumeric) display mode or similar ones (MS-DOS command line, Far). Console applications are very compact not only in compiled form, but also in text form, and have the same ability to access Windows resources through API functions as window applications.
Window (wireframe) applications are built on the basis of a special set of API functions that make up GUI user (GUI, Graphic User Interface). The main element of such an application is the window. A window can contain control elements: buttons, lists, editing windows, etc. These elements, in fact, are also windows, but with special properties. Events that occur with these elements (and the window itself) result in messages being sent to the window procedure.
The difference between windowed and console Windows applications is the type of information they work with.
It is believed that in real life, smartphones with Microsoft OS are as common as people with the patronymic "Artyomovich". The strange (to put it mildly) policy of the "Evil Corporation" in relation to the seventh and eighth families of mobile operating system turned away many users from experimenting with "windows" for smartphones, and now the corporation has seriously taken up correcting its image in this user niche. As an underground fan of Microsoft, I hope that they will succeed - the "ten" is walking the planet, its main trump card is one core for all platforms, and therefore it has every chance to pull over a good part of the mobile market. And as a programmer, I will be happy to make an introductory article for you on developing for this mobile axis, so that you are always ready for the growth of its popularity :).
Architecture overview
Thanks to a common core and runtime system for UWP apps, an app once written will run on all devices under Windows control 10. This range includes:
- desktop computers;
- server systems - OS Windows Server 2016;
- laptops - MS Surface Book;
- tablets - MS Surface Pro;
- smartphones - Lumia;
- game consoles - Xbox One;
- augmented reality glasses - MS HoloLens;
- wall tablets - MS Surface Hub;
- smart watch - MS Band 2.
The list is impressive. In addition, UWP is not limited only to the execution of application programs, it also supports the operation of drivers at the kernel level. This allows you to create drivers that function on various devices, provided that the specific component for which it is intended given driver, the same.
UWP supports both kernel-level and user-level drivers. The subsystem includes the Device Driver Interface (DDI) interfaces that the UWP driver can use.
But all this does not save the developer from adjusting the interface to certain platforms and screen resolutions. In some special cases, this may not be necessary.
Developer tools
To write, debug, deploy, and test apps for Windows 10 Mobile, you'll need Visual Studio 2015 (no doubt). The third update came out this summer. I strongly recommend! Its main bugfix is the reduced memory consumption compared to the second update.
Also you will need Windows 10 Anniversary Update SDK: it includes all the necessary tools to develop applications for the entire fleet of devices running on Windows 10. If you are using VS 2015 with the third update, then the latest SDK is already included.
One of the main innovations is Windows Ink. Using this API, you can add pen support in two lines of code. There are two control objects for this: InkCanvas and InkToolbar.
The new Cortana API simplifies the implementation of voice control. The Cortana Actions component in the new API allows you to create new phrases/expressions.
Windows Hello biometric authentication is now available to web developers in the Edge browser.
The Blend for Visual Studio 2015 user interface modeling tool provides more advanced interface building capabilities than VS. With it, you can create layouts in XAML for all supported applications: application, web, universal, mobile, and so on. It also contains constructors for additional tasks, among them creating animation and controlling the behavior of elements.
Ways to create apps for Windows 10 Mobile
The main way to create applications for Windows 10 Mobile smartphones is to develop universal (UWP) apps(scroll Visual C# → Windows → Universal project creation wizards).
However, he is not the only one. As you know, Xamarin is built into Visual Studio 2015, it can also be used to create applications for Windows 10 Mobile, both for Android and iOS, changing the interface and leaving the program logic in C# (Visual C# → Cross-Platform).
In addition to the Visual C# language, Visual Basic or Visual C++ can equally be chosen. VS 2015 allows you to create universal apps with JavaScript(JavaScript → Windows → Universal Applications). They can also be deployed to a Windows 10 Mobile device.
Tools for working with legacy projects
For a long history of operating Windows systems a huge number of different applications have been created for it. With the release of Windows 8 and WinRT (and later Windows 10 and UWP), old desktop applications are a thing of the past, as only Win 8 and Win 10 desktop applications support classic Win32, COM, .NET applications. This made Microsoft sad. But the guys realized that they could develop a converter that would convert old applications for the new advanced UWP subsystem. Born from this Desktop App Converter.
Converting an Xcode project is a two-step process. First you need to add Objective-C syntax highlighting to Visual Studio: install the objc-syntax-highlighting.vsix extension from the winobjc\bin folder. Then using the utility command line vsimporter.exe needs to convert an Xcode project to a VS project. After that, the resulting sln file can be opened in the studio, where the Objective-C syntax will be highlighted. You can build and run the application and it will run just like any other Windows program.
Break me down, how amazing it is to see correctly highlighted Objective-C code in Visual Studio!
A free compiler is used to compile Obj-C code Clang. Since the output is a standard UWP application, it can be run on mobile device V Windows environment 10 Mobile. One program can have both C++ and Obj-C code.
If you have a project for the last Windows versions Phone, that is, 8.1 (or 8.0), then when you open it in VS 2015, the studio will automatically update the project so that it meets the requirements of the universal Windows applications(UWP). Not only the user interface markup in XAML will be converted, but also the program logic in JS/C++/C#/VB along with it. If there were calls to the WinRT subsystem in the code, then they will be converted to UWP calls.
There is another common type of application - games. iOS and Android render through the low-level OpenGL interface. On the other hand, on Windows 10 Mobile, DirectX 11 is used to display images in games. This results in incompatibility. But there is a solution - the open project ANGLE . ANGLE (Almost Native Graphics Layer Engine) - almost native graphics layer engine - allows Windows users run OpenGL ES applications seamlessly on DirectX 11 hardware. This is achieved by converting calls from the OpenGL ES API to the DirectX 11 API. ANGLE fully supports the following three types of applications:
- universal applications for Windows 10 (Universal Windows apps);
- apps for Windows 8.1 and Windows phone 8.1;
- classic apps for desktop Windows desktop(Windows desktop applications).
The issue is discussed in more detail in my book “ The magic of the moment of rotation"(Again you are promoting your book! Well, okay, you deserve it. - Approx. ed.).
Continuation of the article is available only to subscribers
Option 1. Subscribe to "Hacker" to read all the articles on the site
The subscription will allow you to read ALL paid materials of the site, including this article, during the specified period. We accept payment bank cards, electronic money and transfers from the accounts of mobile operators.
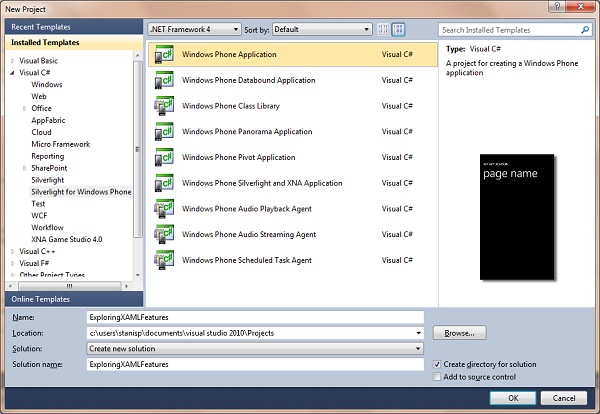
In the New Project Visual Studio dialog, select Visual C#, Silverlight for Windows Phone, and a simple Windows Phone Application template and name it ExploringXAMLFeatures.
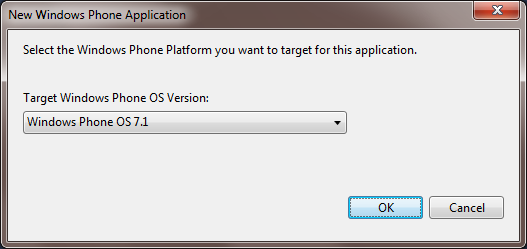
In the target operating system selection dialog, select Windows Phone OS 7.1
After creating the project, the Visual Studio window will look like this

Consider the project structure in the Solution Explorer window:

| File name | Purpose |
| AppManifest.xml | Manifest file required to generate the XAP file into which the application is packaged for deployment on the phone. |
| AssemblyInfo.cs | Another configuration file that defines some metadata of the main assembly (Assembly) of the application. |
| WMAppManifest.xml | Metadata file that contains various application settings: title, setting the first page, paths to icons, defining necessary system capabilities etc. |
| app.xaml | This is an application resource file. This is where global resources are located (this will be discussed when using styles) or global events (occurring when the application starts). This file is also the entry point of the application. |
| App.xaml.cs | Code file (code-behind) for App.xaml. Here you can handle application-level events and errors, including its tombstoning. This concept will be covered later when multitasking is discussed. |
| ApplicationIcon.png | A picture that will be the application icon on the phone. This is a really important file as it is the first thing users will see while using the application. |
| Background.png | This picture is used when the app is pinned to the phone's start screen. In fact, this is a large application icon. It makes sense to make it visually similar to ApplicationIcon.png. |
| MainPage.xaml | This is part of the chosen application template. The name MainPaige is not very good, but that's what the default project template uses. This page represents the interface that the user sees when the application starts. |
| MainPage.xaml.cs | MainPage.xaml page code file. |
| SplashScreenImage.jpg | This picture is displayed during the download + application. You can set your own picture with animation to inform that the application is loading. There is a technique for creating very dynamic loading pages in XNA, but it is far beyond the scope of this article series. |
XAML files define the interface of an application. Actually, it's just XML files with the XAML markup language.
Although this is the simplest project, it contains all the key elements that all other project templates and types contain.
Please note that some of the settings presented in the form configuration files, can be edited in the visual interface for editing application settings.
Adding Controls to a XAML Page
Note that Visual Studio renders both the design and XAML of the page by default.
If you have navigated to other solution files, double-click on the MainPage.xaml file.
In the XAML code of the MainPage.xaml file, inside a Grid element named ContentPanel, insert a Button control:
In the design window, the button will immediately appear approximately in the center of the interface. Notice the attribute Name? This is the element's unique identifier to help you refer to it in your code. Think of this ID as an attribute of the control. Let's now add some actions when this button is clicked. There are two ways to bind an event to a Button (or any other control). In XAML, right in the Button definition, we can add the Click attribute and the InteliSense system will automatically ask if we want to generate a new event handler:

You can bind the event handler directly in the Home.xaml.cs page code without specifying it in the XAML file:
Public MainPage() ( InitializeComponent(); MyButton.Click +=new RoutedEventHandler(MyButton_Click); )
Both methods work. You can use any of them. For simplicity, the XAML method definition will be used here. Now, in the MyButton_Click function, you can write managed code that will change the interface or call other functions. Let's complete our sample application by adding code that will change the text in the TextBlock PageTitle (PageTitle is a Name so you can refer to it directly in code) to "hello wp7". To do this, add the following code to the function:
Private void MyButton_Click(object sender, RoutedEventArgs e) ( PageTitle.Text = "hello wp7"; )
Select in the project settings Windows device Emulator
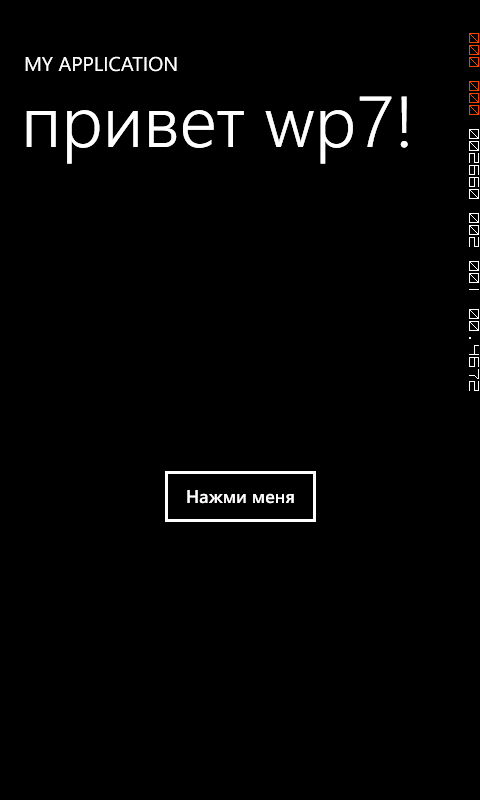
And run the application by clicking on the green triangle or the F5 button. After launching the app and clicking on the "Click me" button, the screen should look similar to the screenshot below:
Adding new pages to the project
Only the simplest application consists of one page. We want to learn how to write complex multi-page applications. We can use the Pivot, Panorama templates, we can use the MVVM (Model-View-ViewModel) design pattern, but first we will learn how to add new pages to the project and navigate between them.
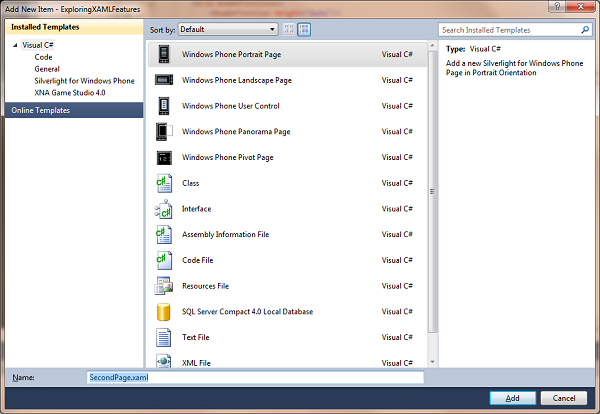
In the Solution Explorer window, right-click on the project name, and in the menu that appears, select Add, then New Item, in the dialog box that opens, select Windows Phone Portrait Page and name it SecondPage.xaml:
We now have a blank XAML page, an exact copy of the MainPage.xaml page before we edited it.
To better distinguish the pages, let's go to the XAML code of the SecondPage page and edit the TextBlock element with the Name PageTitle Text property as below:
Navigation between app pages
So, we have two pages in the project, when the application starts, the MainPage.xaml page is displayed. How do I navigate from MainPage.xaml to SecondPage.xaml now?
Let's try two simple ways, how to do it.
In the XAML code of the MainPage.xaml file, after the Button code we added earlier, add the HyperlinkButton code as shown below:
The HyperlinkButton control has a special NavigateUri property that allows you to specify the Uri to navigate to. Let's add this property with the value /SecondPage.xaml as shown below:
Let's start the application (F5).
When the application interface is displayed, if we click on the Second Page link, it will navigate to the second, previously created SecondPage.xaml page. If after that we press the hardware Back button, then we will return to the main (previous) page - by default, this button allows you to go to the previous active page.
Now let's take advantage of the programmatic transition. First, add the following code to the using section:
Private void MyButton_Click(object sender, RoutedEventArgs e) ( NavigationService.Navigate(new Uri("/SecondPage.xaml", UriKind.Relative)); )
Run the application (F5) and make sure the button works the same as the link.
Let's add controls and code to the second page (SecondPage.xaml) that would allow us to return to the previous page.
In the XAML code of the SecondPage.xaml file, inside a Grid element named ContentPanel, insert Button and HyperlinkButton controls as shown below:
To create a handler Click events the MyButton button on the SecondPage, right-click the MyButton_Click text in the XAML editor and select Navigae to Event Handler.
Run the application (F5) and verify that the "First Page" link on the second page returns the application to the MainPage.
Now let's take advantage of the programmatic transition. In the SecondPage.xaml.cs page code, add the following code to the using section:
Using System.Windows.Navigation;
And then, replace the MyButton_Click handler code with the following:
Private void MyButton_Click(object sender, RoutedEventArgs e) ( NavigationService.GoBack(); )
Run the application (F5) and make sure the Back button on the second page returns the application to the MainPage.
Please note that in the code that is launched on clicking the button, we did not use the name of the page we need to go to, but asked the navigation service, represented by the NavigationService class, to go to the page that was in the navigation stack before the current one.
Page transition events can be handled programmatically, for example, to ask the user if they really want to leave the current page.
Add the following code to the SecondPage.xaml.cs file right after the MyButton_Click handler:
Protected override void OnNavigatingFrom(NavigatingCancelEventArgs e) ( base.OnNavigatingFrom(e); // If the navigation can be canceled, ask the user if he wants to stay on the current page if (e.IsCancelable) ( MessageBoxResult result = MessageBox.Show("May will you stay?", "Transfer Confirmation", MessageBoxButton.OKCancel); if (result == MessageBoxResult.OK) ( // User decided to stay e.Cancel = true; return; ) ) )
The code is simple enough that you can figure it out on your own.
Run the application (F5) and notice that a clarifying dialog is displayed regardless of whether you are going to return to the MainPage by clicking on a button or by clicking on a link.
Now it remains to learn how to pass parameters between pages.
Double click on MainPage.xaml to edit the main page. In the MainPage.xaml code, let's add a TextBox control, above the Button control, as shown below:
Double click on SecondPage.xaml to edit the main page. In the SecondPage.xaml code, let's add a TextBox control, above the Button control, just like on the MainPage page:
Now, in the MyButton_Click event handler of the MainPage page, add parameters to the Uri of the transition to the second page by the button:
Private void MyButton_Click(object sender, RoutedEventArgs e) ( NavigationService.Navigate(new Uri("/SecondPage.xaml?text="+Uri.EscapeDataString(MyTextBox.Text), UriKind.Relative)); )
And, finally, in the SecondPage.xaml.cs page code, immediately after the OnNavigatedFrom handler, add the OnNavigatedTo page arrival handler and process the incoming parameter in it and display it in MyTextBox:
Protected override void OnNavigatedTo(NavigationEventArgs e) ( base.OnNavigatedTo(e); if (NavigationContext.QueryString.ContainsKey("text")) ( MyTextBox.Text = NavigationContext.QueryString["text"].ToString(); ) )
Run the application (F5) and check how it works, for example when following a link from MainPage to SecondPage.
Summary and next steps
So, we figured out what needs to be installed for development under Windows Phone 7, got acquainted with the available templates and learned how to create a new application from a template. We also learned how to add controls directly to the XAML code, add new pages to the project and organize a transition between them by link and in the code with the ability to pass parameters.
In the next step, we'll take a look at some of the markup options available in Silverlight, look at the basic controls, and learn about input context for text fields.
Hi all! You have probably already heard the news that in the first 4 weeks Windows 10 has already been installed by more than 75 million people. In this context, we are particularly pleased to share with you an introductory article by Arseniy Pechenkin from DataArt on how to get started developing top 10 apps.
For those who doubt whether or not to bet on their favorite Windows machine 10, offer small review materials about the platform, development tools and new features available in application development.
I think everyone already knows where and how to get their copy of Windows 10 - we will not dwell on this moment. Installation is carried out in the same way Windows installation 8. If you are going to update the system, I strongly recommend that you backup files from the system disk.
Tools
What development tools can be used? You will need the new MS Visual Studio 2015. The free Visual Studio 2015 Community Edition and the paid Professional and Enterprise editions are now available.
Some time ago, almost all sections on developing under Windows 10 led to sections on developing under Windows 8.1, but after the release, the documentation is gradually updated (taking into account that the UWP platform for Windows 10 is a development of WinRT).
Online course at Microsoft Virtual Academy
For those who prefer the audio-visual format of getting to know the platform, there is an introductory course: A Developer's Guide to Windows 10.The course describes the main features of the platform, models and tools available for creating Windows applications. Several main scenarios that are implemented in the application are considered: working with a small amount of memory, background task execution, communication between devices, file and data management, and user interaction methods.
License and device unlock
As with Windows 8/8.1 development, a developer license is required. It is obtained in the same way as the Windows 8/8.1 developer license when creating the first project directly in Visual Studio (this is not the same as a store publishing account). To install applications on devices, do not forget to unlock them:
Universal Applications
What's new for the developer? It is announced that the universal application can be run on any Windows 10 platform. This is implemented through a system of various APIs. That is, there is an API layer common to all platforms (Universal Windows Platform, UWP). If an application uses only its features, it will work on all UWP platforms.
If you need to use platform-specific features (for example, working with hardware buttons on a smartphone), then you can use the appropriate APIs through platform extensions. This functionality will only work on platforms that have these APIs, so you need to embed accessibility checks for the corresponding methods and classes in your code.
Templates
Out of the box in Visual Studio, only one Blank App project template is available to us.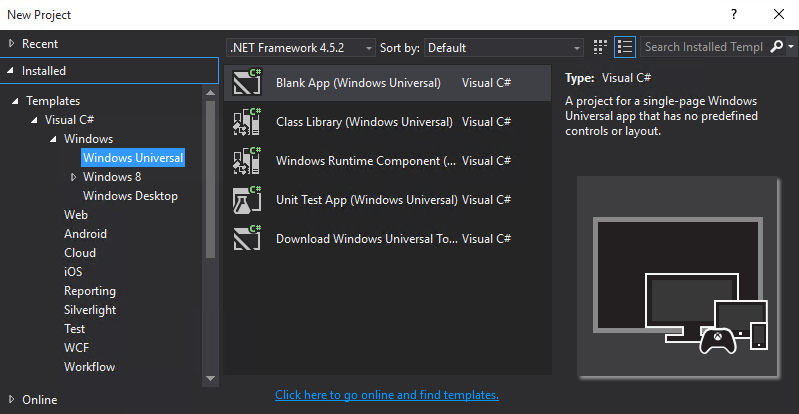
This is a project for a Single Page Universal Windows Application that does not have any predefined controls and structure.
In addition to the standard template, you can find templates from the developer community.

The collection currently includes the following project templates:
- Blank App, the main XAML project with one page. Similar to the standard Blank App included in the Windows 10 SDK, but without the Application Insights telemetry.
- SplitView App, multi-page application project with responsive SplitView control.
- Composition App, a project that does not use the standard component library, instead using the Windows.UI.Composition API,
- Composition XAML App, a project using XAML and the Windows.UI.Composition API.
Examples
To make it easier to get into the UWP platform, Microsoft has prepared a growing collection of examples:It is believed that in real life, smartphones with Microsoft OS are as common as people with the patronymic "Artyomovich". The strange (to put it mildly) policy of the "Evil Corporation" regarding the seventh and eighth families of the mobile operating system turned away many users from experimenting with "windows" for smartphones, and now the corporation has seriously taken up correcting its image in this user niche. As an underground fan of Microsoft, I hope that they will succeed - the "ten" is walking the planet, its main trump card is one core for all platforms, and therefore it has every chance to pull over a good part of the mobile market. And as a programmer, I will be happy to make an introductory article for you on developing for this mobile axis, so that you are always ready for the growth of its popularity :).
Architecture overview
With a common core and runtime for UWP apps, an app once written will run on all devices running Windows 10. This range includes:
- desktop computers;
- server systems - OS Windows Server 2016;
- laptops - MS Surface Book;
- tablets - MS Surface Pro;
- smartphones - Lumia;
- game consoles - Xbox One;
- augmented reality glasses - MS HoloLens;
- wall tablets - MS Surface Hub;
- smart watch - MS Band 2.
The list is impressive. In addition, UWP is not limited only to the execution of application programs, it also supports the operation of drivers at the kernel level. This allows you to create drivers that work on different devices, as long as the specific component for which the driver is intended is the same.
UWP supports both kernel-level and user-level drivers. The subsystem includes the Device Driver Interface (DDI) interfaces that the UWP driver can use.
But all this does not save the developer from adjusting the interface to certain platforms and screen resolutions. In some special cases, this may not be necessary.
Developer tools
To write, debug, deploy, and test apps for Windows 10 Mobile, you'll need Visual Studio 2015 (no doubt). The third update came out this summer. I strongly recommend! Its main bugfix is the reduced memory consumption compared to the second update.
Converting an Xcode project is a two-step process. First, you need to add Objective-C syntax highlighting to Visual Studio: install the objc-syntax-highlighting.vsix extension from the winobjcbin folder. Then, using the vsimporter.exe command line utility, you need to convert the Xcode project to a VS project. After that, the resulting sln file can be opened in the studio, where the Objective-C syntax will be highlighted. You can build and run the application and it will run just like any other Windows program.

Break me down, how amazing it is to see correctly highlighted Objective-C code in Visual Studio!
A free compiler is used to compile Obj-C code Clang. Since the output is a standard UWP app, it can be run on a mobile device in a Windows 10 Mobile environment. One program can have both C++ and Obj-C code.
If you have a project for a previous version of Windows Phone, i.e. 8.1 (or 8.0), then when you open it in VS 2015, the studio will automatically update the project so that it meets the requirements of the Universal Windows App (UWP). Not only the user interface markup in XAML will be converted, but also the program logic in JS/C++/C#/VB along with it. If there were calls to the WinRT subsystem in the code, then they will be converted to UWP calls.
There is another common type of application - games. iOS and Android render through the low-level OpenGL interface. On the other hand, on Windows 10 Mobile, DirectX 11 is used to display images in games. This results in incompatibility. But there is a solution - the open project ANGLE . ANGLE (Almost Native Graphics Layer Engine) - an almost native graphics layer engine - allows Windows users to seamlessly run OpenGL ES applications on DirectX 11 hardware. This is achieved by converting calls from OpenGL ES API to DirectX 11 API. ANGLE fully supports the following three types of applications.


