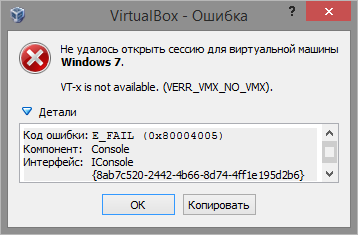
Is a mistake 0x80004005. It is unpleasant because it does not allow a virtual machine (or all machines) to start.
For myself, I identified three main reasons for this error:
- virtualization hardware disabled;
- another virtualization system is running that does not give VirtualBox access to hardware resources;
- VirtualBox cannot write machine state to vbox file.
In this article, we will look at methods for fixing the error in all three cases.
Virtualization hardware
The first reason is rather trivial. There are hardware virtualization technologies that allow the use of isolated guests (you can read more about the differences between software and hardware virtualization on the web). If the hardware virtualization features are disabled in the BIOS of the computer, VirtualBox will give an error 0x80004005.
 Error 0x80004005 in VirtualBox.
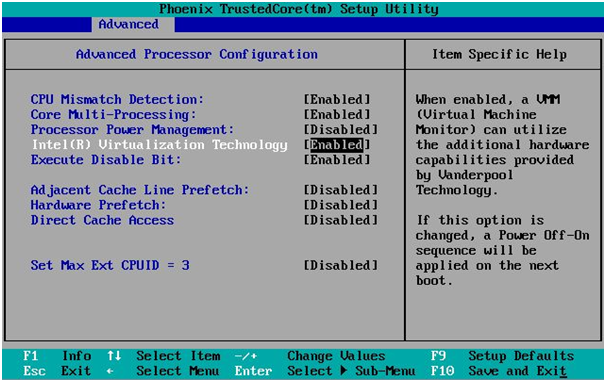
 To enable hardware virtualization, you need to go into the BIOS and find the items Intel Virtualization Technology or AMD-V depending on the chipset.
The names may be different. For example, Intel VT, Virtualization Technology or simply virtualization. Parameter value must be Enabled .
There is no strictly defined location for this item in the BIOS. It might be on the tab Advanced, System Configuration, Processor or some other.
 Enable hardware virtualization in the BIOS.
 If enabling hardware virtualization did not help, let's go through the following steps.
Conflict with other virtualization systems
VirtualBox, of course, is far from the only virtualization solution, and it can conflict with other virtualization software for access to the hypervisor. The way out in this case is to remove other virtualization software.
Consider an example with Hyper-V, which is built as a role in the OS Windows Server 2008, Windows Server 2008 R2, Windows Server 2012, Windows Server 2012 R2, Windows Server 2016, as well as Professional and Enterprise editions of Windows 8, Windows 8.1 and Windows 10.
To disable the Hyper-V role, open Server Manager, go to section Roles and press Delete roles.
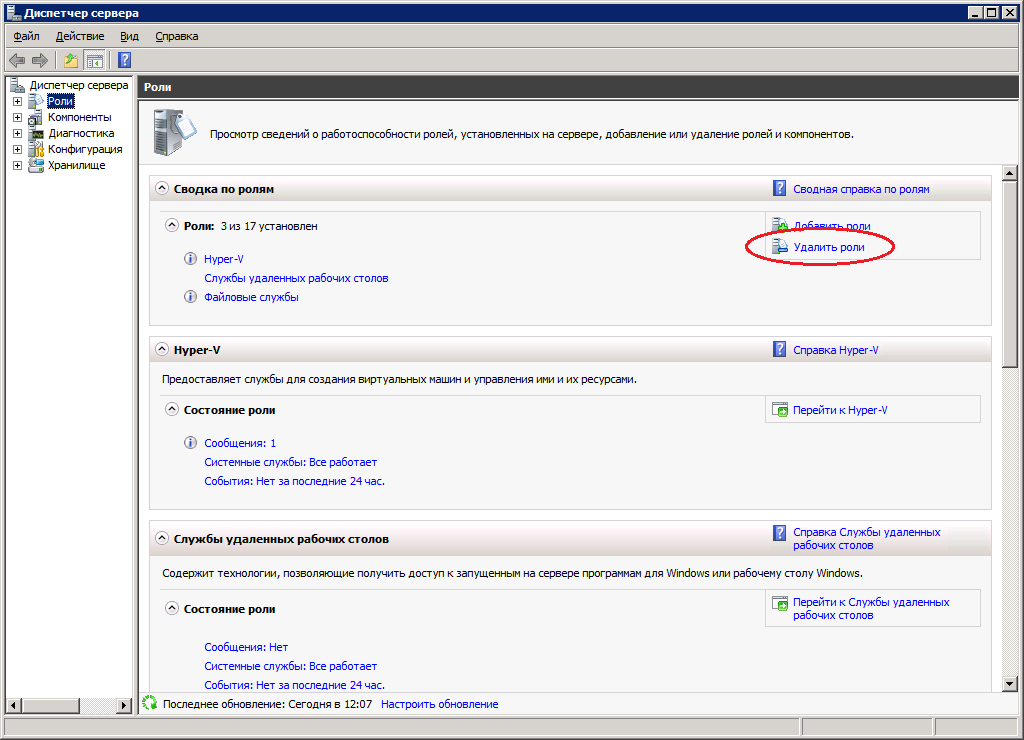
will start Remove Role Wizard. The roles assigned to the server will be marked with checkmarks. You need to uncheck Hyper-V.

After removal, the server will require a reboot.
Those who like to tap their fingers on the keys will appreciate the ability to disable roles through.
To do this, run Windows PowerShell with administrator rights and load the Server Manager module:
Import-Module ServermanagerAfter that, you can work with Server Manager from PowerShell. In particular, delete roles. To remove the Hyper-V role, type:
Remove-WindowsFeature Hyper-V -restartThe -restart option is needed for automatic restart and can be omitted.
An alternative to PowerShell can be the command line, which also needs to be run as an administrator. The following command will help remove Hyper-V:
ServerManagerCmd.exe -remove Hyper-V -restartAs with PowerShell, the -restart parameter is optional.
If you want to keep the Hyper-V settings, or for some reason the Hyper-V role is not removed from the system (it happens, unfortunately), then you can go the other way and disable the use of the hypervisor at the time of Windows boot.
This can be done by editing the Windows bootloader. Unfortunately, gone are the days when editing the bootloader was done through changes to a simple text file boot.ini. Now you need to go to the command line and use the utility bcdedit.exe.
Attention!
For any operations with the OS bootloader, it will be reasonable to first make a backup copy of the bootloader, and only then make changes.
Run command prompt as administrator. For creating backup use the command:
bcdedit /export C:\BackupBCD\BCDfileYou can specify any path to the file and file name here. The only clarification is that the directory where it will be uploaded must already exist. So first create a folder (or use an existing one) and then run the command.
If there are spaces in the file path, quotes must be used:
bcdedit /export "C:\My BackupBCD\BCDfile"In which case, the bootloader can be restored with the command:
bcdedit /import C:\BackupBCD\BCDfileNow that the bootloader backup has been created, you can disable the use of the hypervisor by the system through it.
bcdedit /set hypervisorlaunchtype offAfter that, you will need to reboot the system. This will cause the Hyper-V role in Windows to be preserved, you will be able to enter the Hyper-V shell, but you will not be able to start the virtual machines created there. But it will turn out to run virtual machines in VirtualBox.
To enable the use of the hypervisor, use the command:
bcdedit /set hypervisorlaunchtype autoAfter this command, you also need to reboot the system.
If the conflict between virtualization systems is not our case, let's turn to another possible reason.
Error when trying to save virtual machine state
Sometimes VirtualBox fails to save the state of the machine to a file. This may be if the file is corrupted or is being occupied by another process. In this case, VirtualBox tries to save the state of the machine to files with the same name, but with the file extension appended -prev or -tmp at the end. Therefore, if the virtual machine does not boot, you can try to load its state from these files.
Go to directories:
C:\Users\[username]\VirtualBox VMs\[machine name]
C:\Users\[username]\.VirtualBox\
The path to the directory with machines may differ from the default if you changed it yourself.
In the machines directory, you may find files with .vbox-prev or .vbox-tmp at the end.
If there are any, copy somewhere the file with .vbox at the end, and remove -prev from the file with .vbox-prev, thus replacing the machine state file.
Also, check both folders for files with .xml-prev and .xml-tmp at the end. If there are such, perform the same operation with them as with files with the .vbox extension.
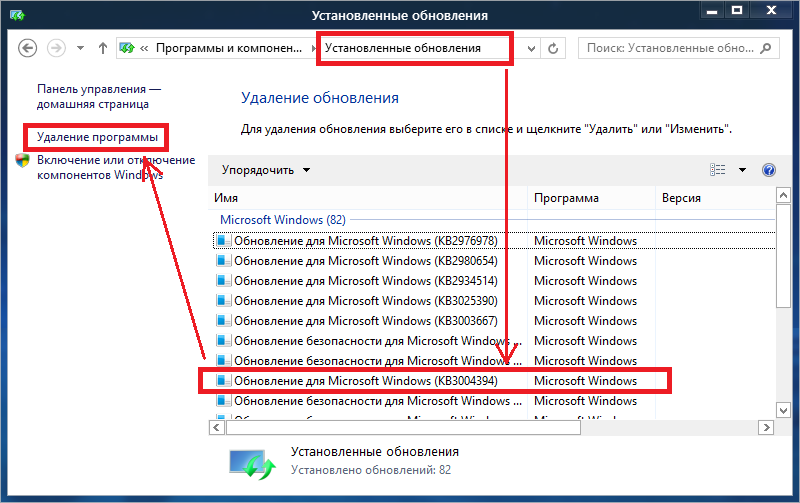
P.S. And finally, it happens that VirtualBox conflicts with a Windows update. KB3004394. You can try uninstalling this update via Control Panel → All Control Panel Items → Programs and Features → View installed updates (in different Windows versions the name of the menu items is slightly different) or through the command line as an administrator with the command:
wusa /uninstall /kb:3004394After that, you need to restart your computer. It may be that the root of the problem lay in such a trifle.
Error code e fail 0x80004005 occurs when trying to start a virtual machine in a program Oracle Virtual Box. It occurs for almost any reason, only the program modules in which the failure occurs differ.
Most common error text
Failed to open session for virtual machine <ИМЯ ВИРТУАЛЬНОЙ МАШИНЫ>.
Most common cause and remedy
In the most common case given error Indicated when VirtualBox was unable to write the state of the machine to the vbox file. This leads to an error when trying to start the machine next time.
When VirtualBox for some reason failed to write the state of the machine to the vbox file (it was occupied by another process, damaged, etc.), the program nevertheless tried to save the state of the virtual machine to files with the same name, but added to the extension *.vbox prefix -prev or -tmp.
All these actions take place in folders:
C:\Users\<имя пользователя>\VirtualBox VMs\<имя машины>\
C:\Users\<имя пользователя>\.VirtualBox\
In order to correct this injustice:
- Need to open a folder C:\Users\<имя пользователя>\VirtualBox VMs\<имя машины>\
- Move File machine_name.vbox somewhere in another directory (just in case) or delete.
- And here is the file machine_name.vbox-prev rename to machine_name.vbox, those. just erase "-prev" from file extension.
If the folder contains files with the extension *.xml-prev or *.xml-tmp, then they must be treated as described above.
Do all the same operations in the second folder C:\Users\<имя пользователя>\.VirtualBox\
Case two
In the second case (according to some reports), the normal start of the virtual machine is hindered by windows update entitled KB3004394. For normal operation of the virtual machine, we need to remove it.
To do this, press the button "Start" and in the search bar enter cmd.
In the search results we will see the program cmd on which we need to right-click and select "Run as Administrator".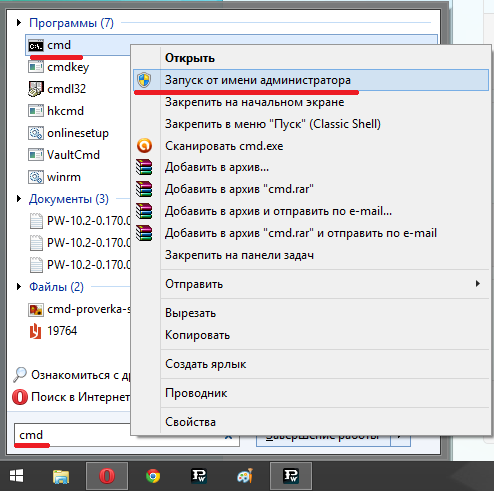
In the opened window command line enter:
wusa /uninstall /kb:3004394
and press

If this update is present on your system, it will be removed. You just have to restart your computer and try to start the VM again.
Decision three. Enable virtualization in the computer's BIOS.
Another option: in the BIOS of your motherboard, virtualization support using Intel Virtualization Tecnology technology may be disabled.
Intel Virtualization Technology (VT) is also known under the code name Vanderpool. The meaning of VT is that one computer built on a single central processor can act as several virtual PCs. Thanks to virtualization technology, several devices can run simultaneously and independently on a single platform. operating systems or applications.
Unfortunately (and maybe for the better), the BIOS on different motherboards- also different. But the principle is the same. We need to find virtualization support in it and enable it. 
It is worth remembering that the wrong BIOS settings computer, may affect the performance of the system as a whole. The BIOS requires careful and conscious user action. Ask a BIOS savvy person for help if you're unsure
Decision four. The most efficient.
Updates. Most of us run after them. Still would! Indeed, in the updates something has been improved, accelerated, fixed, completed, redone, etc.
This statement is correct. But in practice, everything is not quite so good.
If all of the above did not help you get rid of the e-fail 0x80004005 error code, there is still a way. This is to install an older version of VirtualBox.
Virtualization- interesting opportunity modern computers, which allows you to use part of the device's resources to run any operating system inside the main OS. This technology reached its maximum relevance in Windows 10 due to the increased need to run programs that are compatible only with older versions of this OS.
Programs of this kind for servers and desktop computers began to appear a long time ago, but over time, Oracle has succeeded the most in this field. Her product is called virtual box made it easy to configure and use similar features even simple user while being very stable.
But even in such a long debugged and stable program, a situation often arises when the user was unable to open a session for the virtual machine due to an error 0x80004005.
When the problem appears
The occurrence of the problem has been noticed on all versions of the operating system kernel. Microsoft systems with version 6.1 and older. In other words, an error when launching an image already installed on a virtual machine occurs on operating systems from Windows 7 to latest Windows 10. The appearance of the problem does not depend on the type of system that you installed on your PC and the version of the VirtualBox program.
Such an error becomes especially unpleasant when the user has already managed to install, configure and even use the virtual machine for some time. A banal restart of the result in this case no longer gives, that is, further operation of the OS on VirtualBox is impossible without taking urgent measures.
First option
After, during an attempt to activate the virtual machine, you see on the screen error code 0x80004005, close the program.
Let's go to system disk, usually denoted by " WITH».

Next, we are looking for a folder with information for your account. You can see it at the login window, launch the menu " Start» in Windows 7/10 or activating the tiled menu at the top of the screen when using Windows 8.
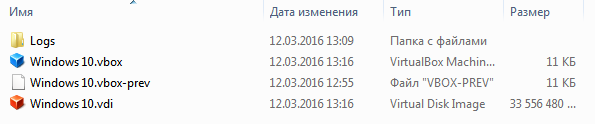
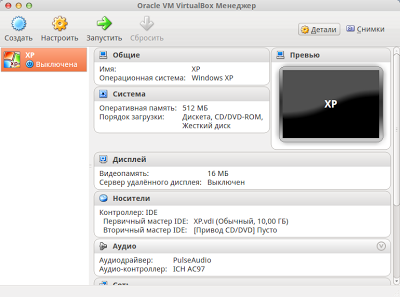
We go there and find the folder " VirtualBoxVMs”, in which we are looking for the directory of the non-starting virtual machine. There you will see three files, the list of which will look like this:
- example.vbox.
- Example.vbox-prev.
- Folder "Logs" (we ignore it, we won't need it).
Pre-copy Example.vbox" And " Example.vbox-prev” to any other location on the computer, for example, to the “D” drive.
Then we perform a simple combination:
- We return to the folder with the non-working virtual machine.
- Delete the Example.vbox file.
- Rename the Example.vbox-prev file to Example.vbox by calling the options on a right-click.
In new versions of the program, the contents of the folder may be somewhat different, for example, it may contain the files " example.xml" And " Example.xml-prev».
For all of them we perform exactly the same operations:
- We make a backup copy.
- We erase the file with permission.xml.
- Change the name "Example.xml-prev" to "Example.xml".
The procedure described above takes no more than five minutes, and it is worth trying it initially. It will work almost always, except in another case.
Another solution to the problem
There are a number of situations where the user receives the message " Failed to open session for virtual machine» due to a single Windows update labeled KB3004394. In this case, it is possible to fix the problem by removing this update from the system. There are two ways to do this at once:
Third option
If you tried both solutions, but the above error code still appears instead of the system boot window, then you should roll back to old version virtual box.
The list of stable versions of the program can be found at this link.
Before installing the old version, uninstall current version from the system, while leaving the data. The list of actions is:
- Enter Control Panel, and then in the menu " Installation and removal of programms».
- Choose a program there virtual box.
- When prompted to delete the program's user data, click No.
- Download and install another stable version programs from the list above.
It is possible that if you cannot install an older version, you will have to completely uninstall the program along with all the data, since old version may not be compatible.
Outcome
So, we have indicated several ways to solve the problem of opening a virtual machine session. If you know any other ways - feel free to leave them in the comments, and we will definitely add them to the main text of the article.
Related videos
In certain cases, you can see the error code e fail 0x80004005. This failure occurs when trying to start using the Oracle VirtualBox program.
Causes
As a rule, fail 0x80004005 can be seen if the application failed to write the state to a file. The material may be occupied by another process or damaged. In such a situation, the program tries to save data about the virtual machine. Moreover, the files receive a similar name and the prefix -tmp or -prev.
elimination
If the error code e fail 0x80004005 is visible on the screen, go to drive C. Open the Users folder. We enter the directory with the username. Open the VirtualBox VMs folder. We go into the directory with the name of the machine. At the next stage of troubleshooting e fail 0x80004005, we move the file from vbox to any convenient location. It can also be removed. This is a file with the name of the machine. We remove the prefix from the extension of the vbox-prev element. If the directory contains xml-tmp or xml-prev files, we proceed with them according to the algorithm described above.
operating system
 In a less common case, e fail 0x80004005 could be caused by a Windows update. To be more precise, the KB3004394 component sometimes interferes with the start of the virtual machine. To normalize the position, delete it.
Let's go to the Start menu. Enter cmd in the search bar. In the results we find a program with the appropriate name. Click on this element with the right mouse button. In the menu that appears, select run with administrator rights. A command line window opens. In it we enter the task of removing the component KB3004394. We press Enter. If this update is present on the system, it will be removed immediately. After that, we reboot the computer. We start the virtual machine again.
If the error code e fail 0x80004005 occurs, there is another way to fix it. We need to enable virtualization in BIOS personal computer. This is a technology called Intel Virtualization. She is also mentioned in various sources under the code name Vanderpool. The meaning of the technology lies in the ability of one computer built on a single central processor to operate as several virtual devices. Virtualization allows you to independently and simultaneously run multiple applications or operating systems on your chosen platform.
The BIOS on different motherboards is different. However, they all work on the same principle. Wrong settings BIOS platforms can affect the performance of the entire system. BIOS requires conscious and careful user actions. It is best to entrust the setting to an expert. If all else fails, install an older version of VirtualBox.


