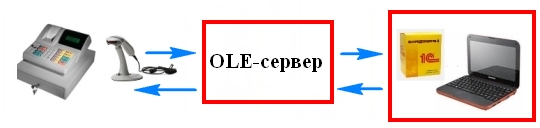
The cash register is connected to a PC via an RS-232, USB or Ethernet port. To exchange information between the cash register and 1C: Enterprise 8.2 Retail for Ukraine, you need to install an intermediate program (driver), for example, an OLE server, on your PC.
Can work in several modes.
Off-line mode. All product data is stored in the cash register memory. At the end of the day or shift, a statement of goods sold is uploaded. To receive a report on the state of the warehouse, it is necessary to exchange data between 1C:Enterprise and EKKA.
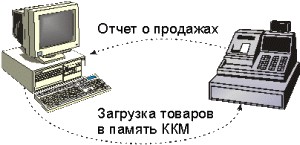
On-Line mode. The cash register does not store anything in its memory, but constantly exchanges data with 1C. Each time a barcode is read or a product code is entered, the cash register accesses the OLE server, and the OLE server accesses 1C:Enterprise. When closing a receipt (sale), goods are automatically written off from the warehouse. The cash register itself is not directly connected to 1C:Enterprise, but is connected through a so-called “intermediary” (OLE server).
An excellent example: on a train, the controller sells tickets, and in the evening (at the end of the shift) dumps the report on the PC or prints it out on a receipt. Information is filled into the cash register before leaving for the route.
A cash register is necessary for transmitting reports to the tax service and issuing fiscal receipts.
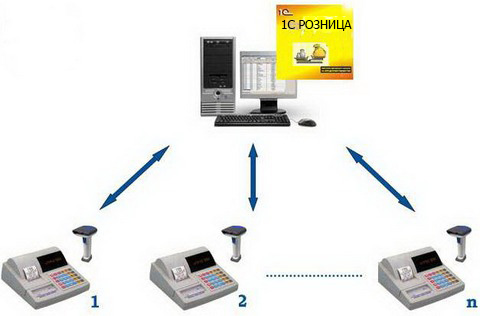
Cash register with 1C:Enterprise required for internal accounting. One working computer with an accounting program allows you to connect several workstations for cashiers. For example, three cash registers are remotely connected to one PC running 1C:Enterprise.
With little expense you can automate your point of sale. There are several automation options.
1. Cash register. Enter product codes manually.
2. EKKA and barcode scanner. Automatic entry of goods.
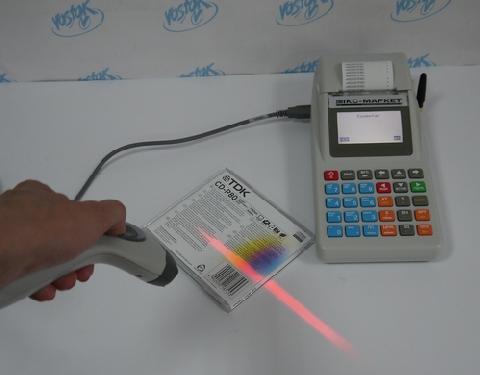
3. EKKA, barcode scanner and scales. Using a scanner, select a product. If the product is weighted, by connecting the scales, you can automatically receive the weight and cost.
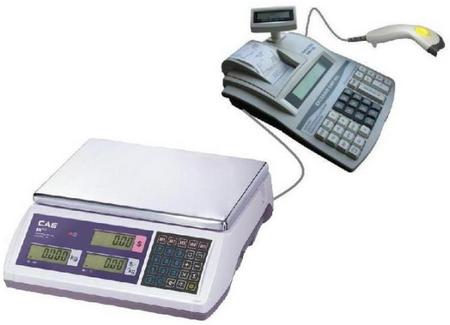
This solution for retail trade reduces the number of errors and eliminates distortions in weight readings.
![]()
4. Cash register and 1C:Enterprise allows you to quickly receive sales reports and statements of inventory in warehouses. With the click of one button, all information about sales for the day is transferred to 1C.
5. Video surveillance can be connected to commercial equipment. This eliminates the human factor and prevents theft by staff.
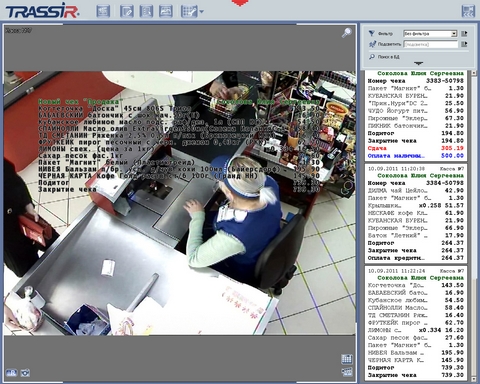
The cashier can sell one thing, but choose something completely different in the cash register, and neither 1C nor the cash register will make it possible to detect this. TRASSIR video surveillance allows you to receive sales information from accounting program and display it on the screen, superimpose it on the image from CCTV cameras.
Connecting a cash register (CCM) to 1C:Hotel is carried out in several steps:
1. Download the device driver from the manufacturer’s website or from the included disk and install it.
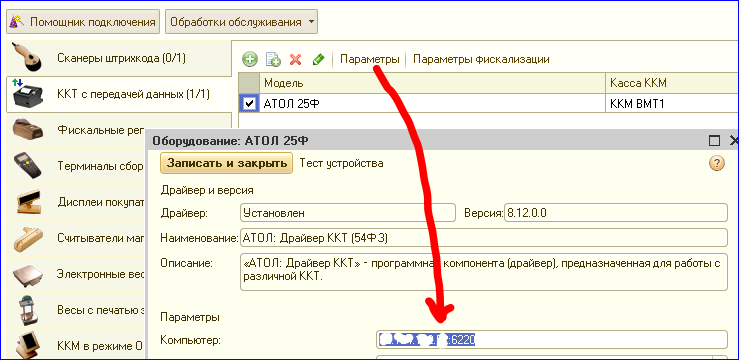
2. If you use a USB-COM port adapter to connect to a computer, you may need to additionally install a driver for the adapter. If necessary, contact your system administrator for assistance. As a result, the device should appear in the device manager:
3. Find the testing program in the POS printer driver installation directory and run it. In setting properties, search for equipment and make sure that the OS sees the cash register. Also remember the COM port number and device connection speed.
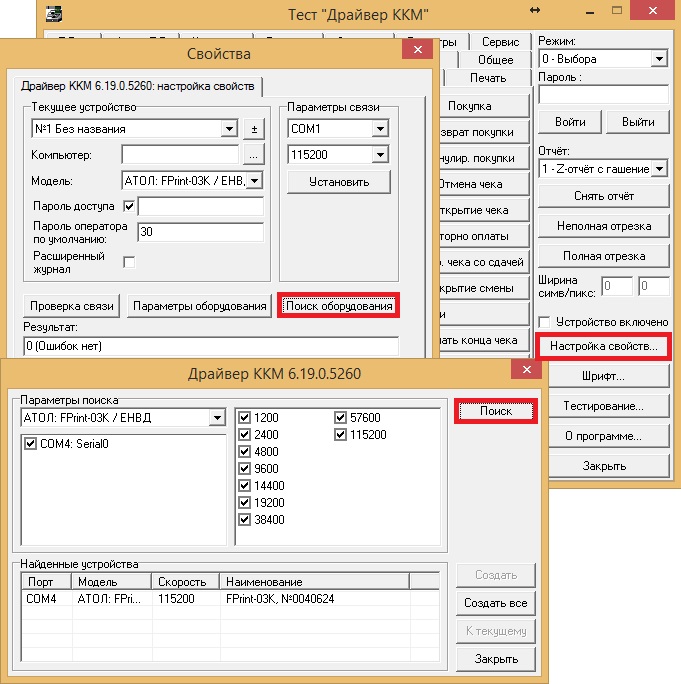
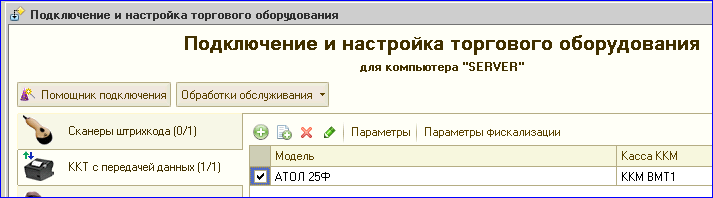
4. Next, you need to configure the connection parameters of the cash register on the configuration side. To do this, you need to run the configuration from account system administrator and go to the section Mutual settlements/Directories/Settings/Cash registers.
5. Here, add a new cash register, fill in the registration data and connection parameters (available after checking the “Connects to the program” checkbox).
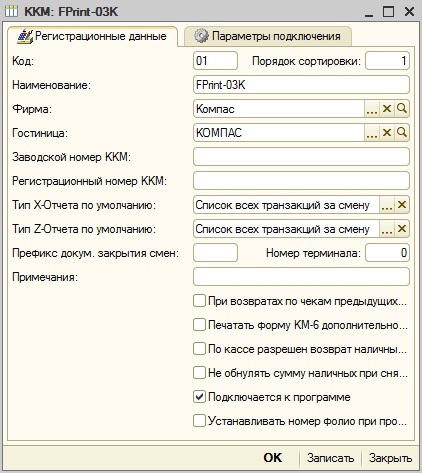
![]()
On the connection parameters tab, specify the driver used, select the POS printer model from the drop-down list, specify the POS printer access password (the communication password is specified in the operating instructions), the port used and the baud rate. Note: when connecting the cash register PRIM-08TK communication password aerf .
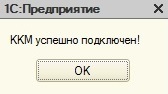
To check the connection, press the appropriate key.
To connect fiscal registrar in accordance with the requirements of the updated 54-FZ (FFD 1.05), it is necessary:
1. Update the 1C: Hotel configuration to version 8.3.1.8
After updating in the KKM parameters, the driver type will be automatically switched from “Atol: General KKM driver (version 8.x)” to “Atol: General KKM driver (version 8.x 54-FZ RU)”
2. Update the KKT driver version to 8.14.2.2 or higher
Without updating the KKT driver to the required version, using the driver type "Atol: General KKM driver (version 8.x 54-FZ RU)" in the configuration settings will be impossible
3. Update the cash register firmware (recommended version 4555 or higher)
Without the latest firmware for the cash register, correct transfer of data to the receipt will be impossible
4. After updating, go to the “VAT Rates” directory and indicate the tax group code for each rate. The tax group code can be obtained from the fiscal registrar driver. To do this, just connect to the fiscal registrar in the driver and open the table of tax rates. The line number (from top to bottom) will be the tax group code, which must be entered in the directory settings.
5. In the settings of the cash register machine on the 1C: Hotel side, on the “Connection Options” tab, you must disable the checkboxes “Print the VAT amount on the receipt” and “Print the VAT line on the receipt is enabled”.
It is important to understand that after updating the configuration to the latest release with support for work under 54-FZ, payment refunds in the configuration will be accompanied by printing only the guest’s statement, since according to the new amendments to 54-FZ, refunds are always accompanied by a broken check, therefore using the RKO form is not advisable.
6. To withdraw services on a check in accordance with the requirements of FFD 1.05, you must:
- In the hotel settings on the "Parameters" tab, set the flag "Maintain balance of personal accounts by services and prices" (the form of the "Payment" document will change)
In the company settings on the "Document Parameters" tab, in the "Default taxation system" field, indicate the one used legal entity tax form
FFD 1.05 defines the following requirements for check execution:
1. Indication on the check the name of the subject of payment
2. Indication of the taxation system on the receipt
4. Indication of the VAT rate on the receipt
5. Indication of the payment method on the receipt
The name of the settlement item in the check is set in the service settings on the "Parameters" tab in the "Name of the settlement item in checks" field, or in the folder settings (service group). If the field is left empty, then the name of the settlement item will be taken as “Service” by default.
It is important to understand that specifying the name of the subject of calculation in nested groups (folder within a folder) is NOT ALLOWED. Specifying a tax system is only possible in the root folder.
The taxation system is set either in the company settings on the "Document Parameters" tab, or in the settings of the payment section (relevant when applying), or in the settings of the service itself. If a hotel uses one taxation system, then it can only be specified in the company settings. If there are several systems, then it should be specified either in the service parameters, or in the section parameters (relevant when using), or in the parameters of the group (folder) in which the service is located.
VAT rate - taken from the tax group specified when in the "VAT Rates" directory.
The tax group code can be obtained from the fiscal registrar driver. To do this, just connect to the fiscal registrar in the driver and open the table of tax rates. The line number (from top to bottom) will be the tax group code, which must be entered in the directory settings.
Payment method - indicated in the "Settlement method attribute" field either in the parameters of the payment method (only if the "Post check by FR" checkbox is enabled), or in the parameters of the payment section (relevant when using ). If the payment method attribute is not explicitly specified, then when making a payment it is automatically accepted as “Full payment”.
In situations where the configuration has been updated to the latest release, but the hotel continues to use old-style fiscal registrars (without transferring data to the OFD), it is necessary:
1. In the settings of the cash register on the 1C: Hotel side, on the “Equipment connection parameters” tab, check the boxes “Print the VAT amount on the receipt” and “Print the VAT line on the receipt is included”, switch the driver type from “Atol: General cash register driver ( version 8.x 54-ФЗ RU)" to "Atol: General driver of cash register printers (version 8.x)"
2. In the settings of the cash register on the 1C: Hotel side, on the "Registration data" tab, disable the checkbox "Refunds are allowed at the cash register directly from the cash drawer"
3. Disable right 035 for all users in the set of rights
As a result of making these settings, when processing returns, the RKO will also be printed
Checking the operating mode of the fiscal registrarusing ATOL FPrint 22K as an example
The fiscal registrar of the Atol FPrint family can operate using both the USB and RS232 protocols. FPrint fiscal recorders must be switched manually to the required operating mode.
To check the operating mode of the FPrint fiscal registrar:
1. Turn off the fiscal recorder.
2. Press and hold the receipt tape rewind button (on the switched off fiscal recorder).
4. The FPrint fiscal registrar will produce a short sound signal(“squeak”) once when turned on, and after a while it will stretch 2-3 mm of the receipt tape.
5. Wait until the fiscal recorder (with the receipt tape rewind button held down) emits another short beep.
7. A check of information about the fiscal registrar will be printed.
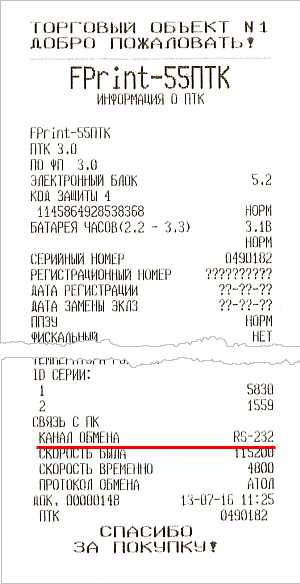
8. In the printed receipt, in the “Communication with PC” section, in the “Exchange Channel” item, the fiscal registrar mode will be indicated.
Switching the operating mode using the example of ATOL FPrint 22K
1. Turn off the fiscal recorder.
2. Press the button for rewinding the receipt tape (on the switched off fiscal recorder).
3. Turn on the fiscal recorder.
4. The fiscal recorder will emit a short beep: once when turned on, and after a while it will extend 2-3 mm of the receipt tape.
5. Wait until the fiscal recorder (with the check tape rewind button held down) emits four more short beeps.
6. Release the receipt tape rewind button.
7. The fiscal registrar will go to service mode, the following information will be printed:
![]()
8. Go to the “Exchange Channel” menu by double-clicking the receipt tape rewind button on the fiscal registrar.
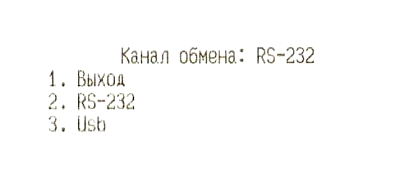
9. Select the USB protocol operating mode by pressing the receipt tape rewind button on the fiscal recorder three times. If you did everything correctly, the following will be printed on the receipt tape:

10. To get out service menu press the check tape rewind button on the fiscal recorder once.
11. Reboot the fiscal recorder: turn it off, then turn it on again.
15.03.2017
Here is a list of problems that we have to face and short description their decisions. More detailed description with screenshots below.
1. Computers with Windows 10 Home cannot install the Atol TO driver correctly. The solution from the CTO is to buy and use the pro version of the operating system for +15 tr. Solution - enabled in the OS and BIOS the ability to install unsigned drivers (does not crash when rebooting).
2. When working through a terminal and from forwarding COM ports, the check comes out with a colossal delay and a delay of 13 seconds. The solution from the central service center is to work locally, install 1C locally, bring the server to the local area with a computer and a cash register. The solution is to abandon the classic forwarding of COM ports in the terminal and use the ATOL cash register driver service, which can be connected to from the terminal via the Internet. Works instantly.
3. When starting work, the system reports that the shift is not open. There is now a log of cash register shifts in UT 10.3. You need to open and close shifts there. The shift does not open automatically.
Now, in order.
Connecting the cash register to operating system Windows 10 Home
1. The whole problem is that on this operating system you cannot install unsigned Microsoft drivers. Therefore, you need to enable this option additionally
2. Disable driver signature verification permanently - using the command line to edit boot parameters.
2.1 In BIOS needs to be disabled Secure Boot(it is necessary).
2.2 Run command line Windows string 10 on behalf of the administrator. IN command line Enter the following two commands in order:
bcdedit.exe -set loadoptions DISABLE_INTEGRITY_CHECKS
bcdedit.exe -set TESTSIGNING ON
Disabling driver signature verification on the command line
Once both commands are completed, close the Command Prompt and restart your computer. Examination digital signatures will be disabled, with only one caveat: in the lower right corner you will see a notification that Windows 10 is running in test mode (to remove the message and re-enable the test, enter bcdedit.exe -set TESTSIGNING OFF at the command line).
3. If, when connecting to the cash register via a COM port, you see an error like “No connection -1”, then you need to reboot everything (and the cash register), if that doesn’t help, then you need to install the drivers from the directory with the COM ports instead of the standard Windows Drivers installed driver KKT.
Installing drivers
1. Install Atolov drivers on the local computer and on the terminal server
2. We assign the local computer a permanent static IP address, for example 192.168.1.4
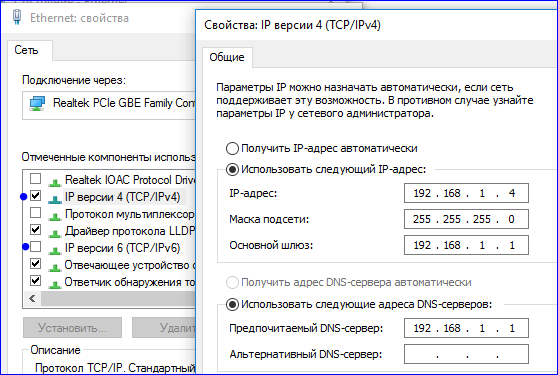
3. Must be disabled IP v6
4. You also need to disable the firewallWindows or add the desired port to the exclusion list
![]()
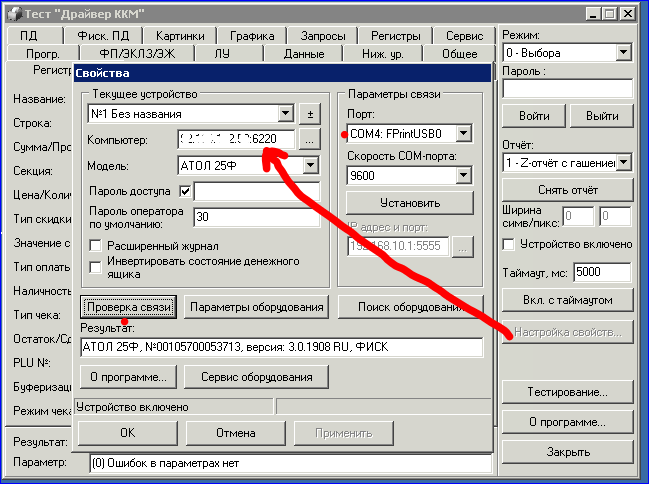
5. On the router in local network forward port 6220 with the cash registerto the cashier's computer

6. THIS ITEM IS NOT REQUIRED, it is for verification. Let's move on to the settings on the terminal server. In the cash register driver we make a test connection via port 6220 by specifying external IP subnet address with our cash register
7. We check the connection, everything should work instantly
Connecting the cash register to 1C
1. It is important to remember that no cash register shifts are opened automatically (it says that the cash register shift is not open), because this is written on the Internet, it needs to be opened in 1C additionally daily (every shift).
2.In the settings of retail equipment, add our cash register with data transfer by downloading the driver from the ITS website
3. In the connection parameters, you must remember to specify the computer (external ip address) and port
4. We're done with the settings, let's move on to shift openings
To work in the terminal of a keyboard (in USB-HID mode) ShK scanner
Refusing to forward COM ports, we will implement pressing the F7 key again after the first scan of goods into the KKM Receipt document. The scanner does not need to be connected at all as a commercial equipment.
Procedure for the KKM check document form:
Function SSHKNomenclature (Nomenclature, Characteristics, Series, Quality,
Unit, Quantity, SShK) Export
Result = True;
CurrentPageName = FormElements.ProductsPanel.CurrentPage.Name;
Selection Structure = Work WITH Trade Equipment. Create Selection Structure (Date, Nomenclature, Characteristics,
Series, Quality, Unit,
Quantity, mCurrency of Regulated Accounting,
Undefined, mIndication of HFW Warehouses,
PriceType, Sales Condition, Warehouse);
If PageName = "Products" Then
ProcessingSelection(Products, SelectionStructure);
Otherwise
Warning("On page """
NameTechPage
+ """ nomenclature selection is not provided.");
endIf;
//!press F7 again
CommandPanelProductsSearchByBarCode(FormElements.CommandPanelProducts.Buttons.SearchByBarCode) ;
Return Result;
EndFunction // SSHKNomenclature()
Connecting retail equipment via RDP for a specific user
In the TOServer processing module in 1C, we will replace the code in the procedure for binding to the user
Function GetComputerNameTO() Export
//If mComputerName = Undefined Then
//mComputerName = VReg(ComputerName());
//EndIf;
//Return mComputerName;
//add the user name to the computer name, then the trading equipment will only be connected to it
If mComputerName = Undefined Then
mComputerName = VReg(ComputerName());
If Constants.TradeEquipmentUsedOnTerminalServer.Get() = true then
mComputerName = mComputerName + "_"+glVariableValue("glCurrentUser");
endIf;
endIf;
Return mComputerName;
EndFunction // GetComputerNameTO()
Cashier operation (full interface)
1. We start processing Cash shifts from the menu of retail equipment, working with cash registers
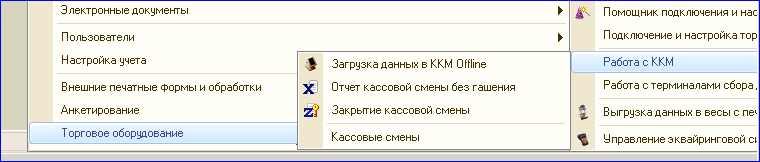
2.Select our cash register and click open shift
3. Now, when conducting cash register checks, everything will be printed
4.The close shift button works in a similar way.
Number of impressions: 14929


