The Windows 7 operating system has such a file through which you can regulate your visits to sites on the Internet. Mostly people do not know about such a file, and those who know try to ignore it so as not to “perform miracles.” This file is called hosts. Let's look briefly at why it is needed.
Let it be known that when you enter the address of a website in the browser line, a special DNS server located on the Internet immediately changes it to a certain sequence of numbers. This digital series is unique for each site, and site names are needed only for ease of remembering. The hosts file is used to quickly work on the World Wide Web, bypassing requests to DNS server. In other words, if you write a number string in the hosts file corresponding to the name of the site, then you will be taken to it directly, bypassing the DNS server. You just need to register it correctly, otherwise the site won’t load, and even if it does, it won’t be the one you want.
“Computer pests” willingly use the hosts file for their personal interests. A virus, penetrating a computer, very often changes the hosts file. Therefore, if you suddenly encounter restrictions on access to certain sites, first scan your computer to see if viruses have entered it, and only then convert the hosts to its original form.
Where is the hosts file located in Windows 7?
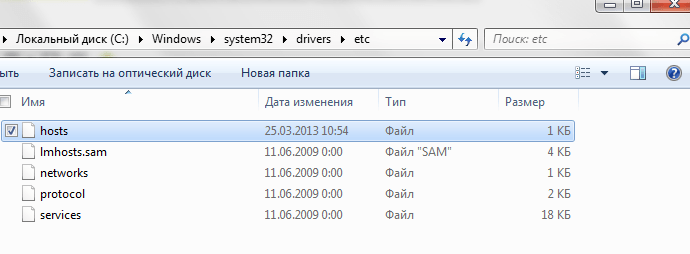
So, let's look at where hosts is located in Windows 7. You can find it in the Windows system folder. It is located on drive C, that is, where the system is installed. Next, find the “System 32” folder, go to “Drivers” and, finally, to “Etc”. The file we need is saved in this folder.
It also happens that you did not find the hosts file, most likely it is simply hidden and the “Do not show” option is indicated in the settings hidden files, folders and disks." In this case, you need to open the “Computer” folder and press “Alt”, it will appear at the top of the window extra menu, in it select “Service” and “Folder Options”.  In the new window, select the “View” tab and find the item “Show hidden files, folders and drives”, put a checkmark on it. Accept the changes by clicking the “Ok” button. Now go to the “Etc” folder, the hosts file should be displayed.
Now let's look at how you can change the hosts file. Let's proceed as follows:

Where is the hosts file in Windows 10?
The hosts file in the Windows 10 operating system is located in the same place as in Windows 7, that is, on system disk. In the “Windows” folder, then go to the “System 32” folder, go to “Drivers” and, finally, to “Etc”.
To change a file in Windows 10, you must:
- Double-click on the hosts file;
- In the window that appears we find “Open with”;
- We find among the proposed programs “Notepad”;
- Click “Ok”;
- Make changes and save them.
- If you are a layman in this matter, then it is better not to do anything, but ask for help from a qualified specialist.
- If something prompts you to make changes yourself, then first make a copy of the file and move it to another folder. If something doesn’t work out for you, you will return a copy of the file.
- If you did not copy this file and have already made changes, and then your computer starts acting up, then the Internet will help you. Download a similar file from the site and replace yours.
- Before you change something, think about whether you really need to do it and how important it is for you.
The hosts file is a rather vulnerable place in the Windows operating system. This file becomes the number one target for almost all viruses and Trojans that manage to infect a computer. In this article we will talk about what the hosts file is, where it is located, what it is used for, and how to restore it after your computer is infected with viruses.
The purpose of this file is to store a list of domains and their corresponding IP addresses. The operating system uses this list to convert domains to IP addresses and vice versa.
Every time you enter the address of the site you need into the address bar of your browser, a request is made to convert the domain to an IP address. Currently, this translation is performed by a service called DNS. But, at the dawn of the development of the Internet, the hosts file was the only way to associate a symbolic name (domain) with a specific IP address.
Even now, this file has a direct impact on the transformation of symbolic names. If you add an entry to the hosts file that will associate the IP address with the domain, then such an entry will work perfectly. This is exactly what developers of viruses, Trojans and other malicious programs use.
As for the file structure, the hosts file is normal text file buse expansion. That is, this file is not called hosts.txt, but simply hosts. To edit it, you can use the regular text editor Notepad.

The standard hosts file consists of several lines that begin with the “#” character. Such lines are not taken into account by the operating system and are simply comments.
Also in the standard hosts file there is an entry “127.0.0.1 localhost”. This entry means that when you access the localhost symbolic name, you will be accessing your own computer.
Fraud with the hosts file
There are two classic way benefit from making changes to the hosts file. Firstly, you can use it to block access to sites and servers antivirus programs.
For example, having infected a computer, the virus adds in the hosts file the following entry: “127.0.0.1 kaspersky.com”. When you try to open the kaspersky.com website, the operating system will connect to the IP address 127.0.0.1. Naturally, this is an incorrect IP address. This leads toAccess to this site is completely blocked.As a result, the user of the infected computer cannot download antivirus or antivirus database updates.
In addition, developers can use another technique. By adding entries to the hosts file, they can redirect users to a fake site.
For example, having infected a computer, the virus adds the following entry to the hosts file: “90.80.70.60 vkontakte.ru.” Where “90.80.70.60” is the IP address of the attacker’s server. As a result, when trying to access a well-known site, the user ends up on a site that looks exactly the same, but is located on someone else’s server. As a result of such actions, fraudsters can obtain logins, passwords and other personal information of the user.
So, in case of any suspicion of virus infection or site substitution, the first thing you need to do is check the HOSTS file.
Where is the hosts file located?
Depending on the version of the Windows operating system, the hosts file may be located in different folders. For example, if you use Windows XP, Windows Vista, Windows 7 or Windows 8, then the file is located in the WINDOWS\system32\drivers\etc\ folder.
In operating rooms Windows systems NT and Windows 2000, this file is located in the WINNT\system32\drivers\etc\ folder.
In very ancient versions of the operating system, for example in Windows 95, Windows 98 and Windows ME, this file can be found simply in the WINDOWS folder.
Restoring the hosts file
Many users who have been hacked are interested in where they can download the hosts file. However, search and download original hosts the file is not needed at all. You can fix it yourself, to do this you need to open text editor and delete everything except the line except “127.0.0.1 localhost”. This will allow you to unblock access to all sites and update your antivirus.
Let's take a closer look at the recovery process hosts file:
- Open the folder in which this file is located. In order not to wander through directories for a long time in search of the desired folder, you can use a little trick. Press the Windows key combination + R to open the Run menu" In the window that opens, enter the command "%systemroot%\system32\drivers\etc" and click OK.
- After the folder in which the hosts file is located opens in front of you, do backup copy current file. In case something goes wrong. If the hosts file exists, then simply rename it to hosts.old. If the hosts file is not in this folder at all, then you can skip this item.
- Create a new one empty file hosts. To do this, right-click in the etc folder and select "Create a text document".
- When the file is created, it must be renamed to hosts. When renaming, a window will appear with a warning that the file will be saved without an extension. Close the warning window by clicking OK.
- Once the new hosts file has been created, it can be edited. To do this, open the file using Notepad.
- Depending on the version of the operating system, the contents of the standard hosts file may differ.
- For Windows XP and Windows Server 2003 you need to add "127.0.0.1 localhost" .
- Windows Vista, Windows Server 2008, Windows 7 and Windows 8 you need to add two lines: "127.0.0.1 localhost" and "::1 localhost".
Inconspicuous hosts file in operating systems Windows can cause a lot of trouble for computer users who are not aware that simple changes to this file capable of completely changing the way websites are requested through browsers. This opportunity has been adopted by various scammers on the Internet, who, by making changes to the hosts file, block the work of the most popular sites among users, such as Vkontakte and Odnoklassniki. To restore their operation, just open the hosts file and delete unnecessary entries from it.
As the comments to previous articles on our website called and VKontakte showed, many users have problems opening the hosts file. And the point here is not only that many users lack computer knowledge. Also, attackers are improving their methods by keeping the real hosts file hidden and leaving its fake counterpart in plain sight. In addition, in Windows Vista and Windows 7 operating systems, it is important to open the file correctly in order to be able to save changes made to it.
Let's look at how to correctly open the hosts file in the form of simple step-by-step instructions.
- On Windows Vista and Windows 7 operating systems, sign in with . Otherwise, it will be impossible to save changes made to the file.
- In the search field that appears in Windows Vista/7 just above the Start button after you click it, enter the command
notepad %systemroot%\system32\drivers\etc\hosts
and press the Enter key on your keyboard. - As a result of the previous action, the hosts file will open in the Notepad test editor, which you need to carefully review and delete unnecessary entries.
- When viewing, be sure to pay attention to the presence of horizontal and vertical scroll bars in the window, as there are cases where malicious entries are taken away from the visible part of the screen by numerous spaces or line breaks. If scrollbars are detected in open window, then move the sliders and look carefully at the screen so as not to miss lines that block the operation of sites.
If for some reason the previous method seems complicated to you, then you can open the hosts file in the usual way. You just need to do a few extra steps.
- Login with .
- hidden files on the computer.
- Go to the folder C:\Windows\system32\drivers\etc\
- Right-click on the hosts file icon and select “Open” from the context menu that appears.
- In the window for selecting the program with which to open the file, select “Notepad” and click the “Ok” button.
- Review the file and remove anything unnecessary from it.
- If there are two hosts files in the folder, this means that one of them is false. To determine the real one, you need to open both files. The one in which additional records will be found will be the real one.
- After clearing the hosts file, delete the false file and make hidden files invisible again.
This article will talk about the “long-suffering” system file hosts, which often suffers from network “malware” leaked onto the computer. Hosts has no extension, but essentially it is a regular text file and the built-in Notepad is enough to edit it. The purpose of the file is to store a list of domains and their corresponding IP-addresses. This is the list that the browser first accesses after entering, say, a domain name in the address bar Yandex.ru to find out that it corresponds to the address 77.88.21.11.
![]()
Now imagine that an attacker program has changed the hosts"IP" Yandex.ru to the address of the “weed” site she needs. Now every time after typing in the browser Yandex.ru you will find yourself on some XXX.com. Of course, this disgrace must be quickly stopped, for which you will have to go directly to the file hosts. In the article I will outline a guaranteed way to do this, because... V latest versions Windows the developer has strengthened the security of the OS, which in practice has made life more difficult for users: the desired folder may not be visible or the file itself cannot be edited.

So, to bring hosts should be opened into a “divine” view Notepad as administrator. To do this, go to the menu "Start"→ next," All programs" → "Standard" → right-click on Notebook and in context menu let's choose "Run as administrator ".
In the appeared top panel click " File " → "Open" → in the address bar indicate the path to the desired folder – C:\Windows\System32\drivers\etc . If the folder is empty, in the “File name” line write hosts and click " Open" (next screenshot).

The contents of the file can be compared with the original in Windows 7 and, in case of discrepancies, copy for yourself.
# Copyright (c) 1993-2006 Microsoft Corp. # # This is a sample HOSTS file used by Microsoft TCP/IP for Windows. # # This file contains the mappings of IP addresses to host names. Each # entry should be kept on an individual line. The IP address should # be placed in the first column followed by the corresponding host name. # The IP address and the host name should be separated by at least one # space. # # Additionally, comments (such as these) may be inserted on individual # lines or following the machine name denoted by a "#" symbol. # # For example: # # 102.54.94.97 rhino.acme.com # source server # 38.25.63.10 x.acme.com # x client host # localhost name resolution is handle within DNS itself. #127.0.0.1 localhost
In principle, you can leave only one entry - 127.0.0.1 localhost or even leave nothing - in any case, this is better than the disgrace as in the screenshot below (a real example of the editors hosts villain-virus).

As you can see, the “malware” blocked the update of anti-virus programs and access to social networking sites. To prevent the situation from happening again, it is recommended to protect the file with the " Only reading" by clicking on hosts right click → " Properties" → on the first tab "General" check the box next to the corresponding attribute.

About what else useful can be done with system file hosts I'll tell you in ours.