Creating a fully customized image operating system With installed apps often necessary in a corporate environment, and home users will not give up installation disk, in which a favorite set of programs and tweaks is embedded. In modern Windows operating systems, creating such an image is much easier than in Windows XP, and you can get by with the help of an automatic installation package.
This article explains how to prepare and deploy a fully customized system image, and covers how to back up an operating system to a WIM image.
On this page
You will need
- Deployment Tools from the Windows Assessment and Deployment Kit (ADK)
Of course, you will need a computer to install and configure the OS, as well as a place to save the system image. The installation computer can be a virtual machine (for example, Hyper-V from Windows or VirtualBox). You can save the customized image to the non-system partition of this computer.
For example, during system installation, you can create two partitions - install the OS on one, and subsequently save the image on the second. Also, in a virtual machine, you can always connect one more virtual disk. Finally, the customized image can be saved to a network share or a USB drive. As you can see, there are many options - there are plenty to choose from.
Advantages and disadvantages of using a customized image
In my opinion, the advantages of a fully customized image seem to outweigh the disadvantages.
Advantages
- Quick installation of a system with a set of applications, since it does not take time to install them. However, compared to the standard image, it takes slightly longer to unpack the customized image.
- You can further customize the operating system by using an answer file that is used in conjunction with the customized image.
- It becomes possible to deploy the image using the utility ImageX. The default image can only be used in conjunction with the installer because not all options (such as language) are configured.
Flaws
- Increasing the size of the image. The final size depends on the number and volume of installed applications. If you plan to install further from DVD, be aware of the 32-bit version's .wim file size limit of 4 GB (2^32 bytes).
- The versions of the applications included in the image may be out of date. To keep up-to-date versions of applications, you will have to build the image again. Applications that are updated regularly probably don't make sense to include in an image. They can be installed separately, automating this process.
Steps to create a customized image
Creating your own WIM image can be divided into the following steps:
- Application installation and system setup
- Preparing the system using the utility sysprep
- Booting into Windows PE and saving the image using a utility ImageX
The resulting image can then be included on the installation disk, installed from a network share, or deployed using ImageX.
A note about setting user parameters
In addition to installing applications, audit mode allows you to configure user settings. There are two ways to apply settings to an image.
You can:
- Configure only system settings, and import user settings using REG files into the configured WIM image (or into the original image before starting the installation described here).
- Configure both user and system settings, and then use an answer file to copy the built-in account profile Administrator to the standard user profile.
Import registry settings
The principle itself is discussed in detail in the article Applying registry tweaks. I believe that you have read it and have a complete understanding of importing user and system settings.
Copying a profile using a response file
To copy a customized account profile to a standard user profile, you can use an answer file that contains the setting
Microsoft-Windows-Shell-Setup | CopyProfile
If this setting is set to true, the profile is copied.
You need to use this opportunity when installing a customized image by including this parameter in the answer file. In this case, profile copying will occur on the pass 4 Specialize.
Sample Universal Answer File for 32-bit and 64-bit OS
Why does this article recommend copying the profile during installation instead of pointing to the sysprep answer file when generalizing the image?
Copying the profile in any case occurs during installation at the Specialize stage. If you use the /unattend option of the sysprep utility, the answer file is cached and then used during installation. At the time of writing the first version of the article, this did not work, despite the documentation.
If you are using MDT or SCCM, the method described in the article is required for reasons stated in KB973289:
Now about everything in order.
Starting the installation of the operating system from the installation disk and entering the audit mode
The first step in preparing a customized image is to start the OS from the installation disk. Installation can be done manually, or you can automate this process using a response file.
Manual installation
Manual installation is not fraught with any tricks. If you plan to store the customized image on a non-system disk partition, use Windows Setup to create the partitions.

Advice. When installing the system on a virtual machine, you can connect a second virtual disk and later use it to save the image. This will make it easier to copy the image to your production environment, since VHD(X) can always be mounted on a physical machine.
Continue with the installation up to the OOBE stage. It is easy to recognize by the offer to choose an account name and a picture for it.

At this stage, Not when choosing an account name, press CTRL+SHIFT+F3. This key combination will put the system into audit mode with the rights of the built-in account Administrator.
Automatic installation
With an answer file, you can automate all steps of Windows Setup, including managing hard disk, entering the audit mode and even installing applications in it, as described in the article. You can follow the instructions in it up to the section "Putting the system into oobe mode" (this article covers a complete automation of the installation).
Install updates, applications and system setup
After entering audit mode, you can start installing updates, applications, and configuring operating system settings. Do not close the utility window sysprep- you will need it at the end of the setup phase.
If a system restart is required to install an application or update, you can do so. After a reboot, the system will return to audit mode. As mentioned above, the process of installing applications can be automated using a response file. You can configure any system and user settings in the Windows GUI. You can also import registry settings from pre-prepared .reg files.
On Windows 8 and later, do not update apps from the Windows Store as this will cause problems when generalizing the image. You also need to delete modern applications according to science. See the warning in the TechNet Library and KB2769827 .
Once you have finished installing applications and setting up your system, you should prepare it for future use.
Preparing the system with the sysprep utility
After the installation of applications and system setup is completed, preparation is performed using the utility sysprep. Depending on which installation method you choose, the steps will be slightly different.
Manual installation
At manual installation system utility sysprep runs when you enter audit mode. To prepare the system for further use (in this case, to create a customized image), you need to set the utility parameters, as shown in the figure below.

With the specified parameters produced (in parentheses equivalent parameters command line sysprep):
- Prepare the system (/generalize) - remove unique system settings, clear event logs, reset the security identifier (SID), etc. This setting is absolutely necessary to create a customized image.
- Putting the system into OOBE mode (/oobe) - this mode will be activated the next time the system starts.
- Shutdown the system (/shutdown).
Sample Universal Answer File for Saving 32-bit and 64-bit OS Drivers
Automatic installation
If you are automating audit mode entry and application installation using a response file, as described in Installing applications in audit mode, you need to add the following synchronous command with the highest sequence number. This command can also be used during manual installation, after closing the utility window sysperp.
%SystemRoot%\system32\sysprep\sysprep.exe /generalize /oobe /shutdown /quiet
The first three command line options are listed in the same order as the above options. GUI utilities. Parameter /quiet- provides quiet operation and is necessary for automation.
After sysprep finishes, the system will shut down. Now it is fully configured, and you can create its image using the utility ImageX.
Booting into Windows PE and saving the image using the ImageX utility
Note. Image size install.wim, included in the installation disk of a 32-bit operating system, must not exceed 4 GB (2 ^ 32 bytes). Otherwise, the installation will fail. This limitation does not apply to deploying an image using the utility imagex.
If setup files Windows are hosted on a network share, you can copy your customized image and answer file there, and then boot into Windows PE and connect to the network share and run the installation from the command line.
Net use y: \\network_share\distrib y:\setup.exe /unattend:unattend.xml
Deploying a customized image using the ImageX utility
Using Windows PE and the utility ImageX, you can deploy the customized image to your computer.
The sequence of actions is as follows:
Note. Deploying an image with ImageX only possible on a volume that has the same drive letter as the volume saved in the image. In addition, with the help ImageX cannot deploy standard (source) image Install.wim.
Let's look at an example of deploying a customized image. It is assumed that HDD computer is not formatted. After booting into Windows PE, you need to use the utility diskpart create a partition on the hard drive and format it. I will demonstrate the creation of a single partition on a disk.
Diskpart select disk 0 create partition primary select partition 1 active format fs=NTFS label="System" quick assign letter=c exit
Additional information about utility commands diskpart you can get it by running it with the key /? , or from the article Diskpart CLI Description . If desired, the process of creating a section can be automated.
It remains only to apply the image.
Imagex /apply E:\custom.wim 1 c:
In this command:
- /apply- application of the image
- E:\custom.wim- the way to the image. When placed on network drive first you need to connect it with the command net use E:\\network_share\images.
- 1 is the index of the image saved in the .wim file.
- c: is the letter of the volume to which the image is applied.
By applying the image, you can make sure (with the command dir) that is on the section C there were files unpacked from the image. This partition now hosts the operating system in the state it was in when the image was created. If the image was saved after the audit mode settings were made, the next time the computer is turned on, the system will enter OOBE mode, allowing the user to complete the initial configuration settings.

If the customized account profile was copied during image preparation, all new accounts will have exactly the same settings.
Deploying a customized image using WDS
As with a standard image, you can use Windows Deployment Services (WDS) to deploy a customized image. A detailed account of this method is beyond the scope of the article, so I will limit myself to a link to the WDS manual posted on Microsoft Technet.
Backing up the operating system to a WIM image
The article focuses on installing applications and configuring the system in audit mode and saving the image at this stage of the installation. The advantage of this approach is that the saved image is neutral - it does not contain any accounts (other than built-in), personal files, and sensitive data.
You may be wondering if it is possible to save the system image after complete installation, i.e. after the OOBE stage, the first login and subsequent configuration. This question is relevant if you want to install the system, work in it for a while - install applications, configure various settings, etc., and then create an image.
Mention that imagex does not know how to use hard links (I checked - it can).
So, after applying the image:
- File extended attributes are lost. These are NTFS attributes that are only needed for backwards compatibility with applications... OS/2.
- Sparse files (sparse files) are captured, but after application they are no longer such.
- Symbolic links and connections are automatically updated. In some scenarios (eg SIS) this causes links to go to the wrong place.
In my opinion, in typical scenarios for using a client OS at home, these restrictions can be neglected. But restoring such an image on another PC (even with the same hardware configuration) can lead to serious hardware conflicts.
However, there are several points to which I would like to draw your attention.
- Installed programs and personal files can take up a lot of disk space, which will affect the size of the backup WIM image. You may need a dual-layer DVD or high capacity USB to store the image.
- You can reduce the size of a WIM image by excluding files and folders from its composition when capturing a volume with a utility ImageX. The file is used for this. wimscript.ini, which is briefly discussed in the article on creating boot disk Windows PE. His detailed description is in the help file "Manual Windows user PE", which is part of the ADK.
Recovery
Restoring from a backup WIM image is performed as described in the article section. However, the sequence of utility commands given there diskpart needs to be corrected.
For example, if there are several partitions on the disk, and the system is installed on the first one, the sequence of commands to prepare this partition for recovery will be as follows:
Diskpart select disk 0 select partition 1 active format fs=NTFS label="System" quick assign letter=c exit
You can include a customized WIM image as part of the Windows PE boot disk, thereby creating a one-stop system recovery solution - recovery environment and backup image.
Conclusion
Creating and deploying a fully customized Windows system image using the tools included in the ADK is a fairly straightforward task. Such an image can be made neutral (that is, it does not contain personal files and personal data) by installing applications and configuring settings in audit mode.
This approach allows for further customization of the image during installation using a response file, and also retains the end user's ability to set personal options during the OOBE phase when the system is first started. You can also use WIM imaging technology to create backup operating system.
In this guide we will show you how to use PowerShell and Windows System Preparation Tool (sysprep) to prepare a highly customized, personal Windows 10 install image.
What is Sysprep?
Let me remind you that the Sysprep.exe utility is used to prepare the reference image and its depersonalization. Sysprep allows you to delete all information related to a specific operating system, including unique identifiers (SID, GUID, etc.), resets the Windows activation and to install apps and drivers in the Audit mode.
Everything configured in the operating system before you run Sysprep (installed software, desktop, system personalization and network settings, File Explorer, installed and pinned on the start screen Metro apps and other parameters) will remain untouched.
In Windows 10 and Windows Server 2016, the Sysprep.exe utility is located in folder C:\Windows\System32\sysprep directory.

The Sysprep utility greatly simplifies the installation and configuration of the operating system in a large company. Once prepared reference Windows 10 image installed and configured in the right way (with a certain installed software, with the operating system settings, with the specified permissions and restrictions) can be deployed to all computers of the company using MDT, WDS (take a look at ), SCCM or manually.
Sysprep Windows 10 Guide
You need to notice that in this guide we are using Build 1607 (Anniversary Update) of Windows 10, so maybe all bugs found in this guide will be fixed in later builds. Let's start to sysprep Windows 10.
Step 1 – Boot to Windows 10 Audit Mode
First of all you need to perform clean Windows 10 installation on your physical computer or a virtual machine. Start Windows installation normally. After reboot or two Windows is installed and process stops waiting for your input. At this point we need to click on the Use express settings button. On next dialog you should not type a username, so don’t enter it (this stage of OS setup has a name OOBE - out-of-box experience for the end user). In OOBE mode, the user must complete the installation of Windows 10 and configure personal settings such as keyboard layout, account, privacy settings.

Instead, press and hold down the CTRL+SHIFT+F3 keys combination. OS will now reboot to a special customization mode, the . Windows 10 will boot in this mode no matter how many times you reboot your computer, until sysprep is running.
As no user profiles exist yet, Windows will use its built-in administrator account to automatically sign in to Audit Mode (this account will be further disabled). There is only one visible sign to mark that you have entered the Windows 10 Audit Mode desktop, the Sysprep dialog in the middle of the display. Do not close the sysprep utility window - you will need it at the end of the configuration step. Just minimize it.
Custom Windows settings can be configured in the Audit Mode. There are two ways to apply the settings to the image:
- You can configure only system settings, and import custom user settings using .reg files into a customized WIM image;
- You can configure both user and system settings, and then use the answer file to copy the profile of the built-in Administrator account to the default user profile.
Until now the installation was done without a network connection. So, you can connect your PC to network and configure Internet now.
Step 2 – Download and Install the Windows 10 ADK
What are we going to do next is to download and install the Windows 10 Assessment and Deployment Kit (ADK). First of all we need to install the Windows System Image Manager (WSIM), a part of the Windows ADK. You can download it from the links below:

Once it is downloaded, run the installation file. Here you don't need to change the location, so click on Next. After that accept the license agreement and go ahead.
Now you need to select the features you want to install. In our case, we just need to install only WSIM, so put the mark only on Deployment Tools and click on Install.

Step 3 – Install OEM information and logo
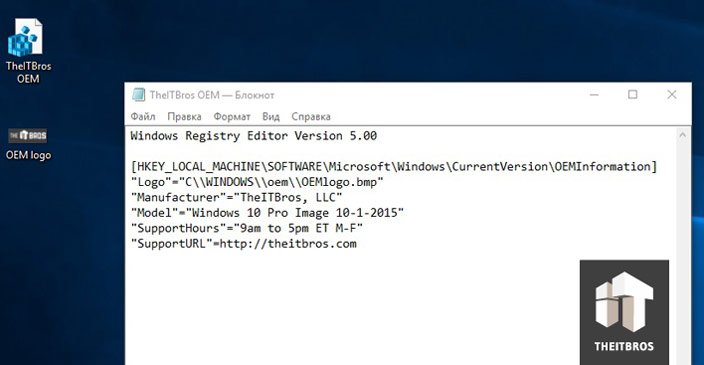
It's very easy to install OEM information and logo. You just need to create the . reg file and put information that you want. In our case we put in the following code:
Windows Registry Editor Version 5.00 “Logo”=”C\WINDOWS\oem\OEMlogo.bmp” “Manufacturer”=”TheITBros, LLC” “Model”=”Windows 10 Pro Image 10-1-2015” “SupportHours”=”9am to 5pm ET M-F” “SupportURL”=http://website
Now, you need to create the oem folder in the folder C:\Windows and put there your company logo image file. Once it is done, just open up the .reg file that we have created earlier and it will automatically add these settings to the registry.

Step 4 – Begin customization in Windows 10 Audit Mode
After entering the audit mode, you can start installing, updating applications and configuring the operating system settings. All these apps and settings would be present in the default user profile. Default profile is used as base profile when you create new users on your Windows PC.
To install default all user apps we will use PackageManagement (aka OneGet), an integrated module of PowerShell. We cannot just go to the Start Menu and to the Search, because they are disabled in Windows 10 Audit Mode. So we need to start PowerShell manually by browsing deep into Windows folder and starting it from there.
Go to C:\Windows\syswow64\WindowsPowerShell\v1.0 and then run powershell_ise.exe application.

First thing we need to do is to allow you to run PowerShell scripts, in order to be able to install software from a package provider later on.
All we need is just type Set-Executionpolicy Unrestricted command.
Now we need to use the package manager or provider. The package manager we will use now is called chocolatey. It needs unrestricted script execution policy, which is why we set it first thing after the PowerShell had started.
To add a provider we need to type Get-Packageprovider Chocolatey command.

Step 5 – Install the software you need
To install all the software that we need, we just have to use the PowerShell cmdlet – Install-Package.
Let's say we want to install Opera, Google Chrome, VLC, Adobe Reader, 7Zip, K-Lite Codec Pack Full and Zoomit.
To do it, you need to use the command:
Find-Package -Name Opera, GoogleChrome, VLC, AdobeReader, 7Zip, Zoomit. k-litecodecpackfull | Install-Package
If you need to reboot the Windows to install the application or update, you can do it. After reboot, the system will return to audit mode.
You can also install drivers for all computers and laptops models on which you want to deploy this reference Windows 10 image. Download and unpack the driver packages to a specific directory, then search for all *.inf files and add all the drivers described in them to the Windows image using the command:
For /f %i in ("dir /b /s *.inf") do pnputil.exe -i -a %i
You can use our script to .
Configure background, Start Tiles, desktop icons, Taskbar Pinned Items, homepage and search options ad over options as required. Then grab current Start Tiles setting using the PowerShell command (to apply these setting to all users):
Export-StartLayout -Path $ENV:LOCALAPPDATA\Microsoft\Windows\Shell\LayoutModification.xml
Step 6 – Disable Telemetry and Data Collection in Windows 10
The Windows 10 collects information about the operation of users on the computer. Examples of handwriting and voice samples, location information, error reports, calendar contents – all this can be sent to Microsoft servers
If you do not want your OS to automatically send data to MSFT servers, you can disable the Telemetry and Data Collection.
Run the elevated command prompt and execute the following commands:
Sc delete DiagTrack sc config DcpSvc start=disabled echo "" > C:\ProgramData\Microsoft\Diagnosis\ETLLogs\AutoLogger\AutoLogger-Diagtrack-Listener.etl reg add "HKLM\SOFTWARE\Policies\Microsoft\Windows\DataCollection" /v AllowTelemetry /t REG_DWORD /d 0 /f sc delete dmwappushservice
Also you can disable Window 10 tracking using the DisableWinTracking tool from GitHub.
Step 7 – Installing Windows Update in Audit mode
Starting with Windows 8.1, in the auditing mode, you cannot install updates using the windows update Center in Settings panel.
The Windows Update Center checks to see if the system has completed the OOBE stage (from which you are logged in). If not, the update is not performed.
To automatically update the system from the console, you can take on a very handy PowerShell module - the PSWindowsUpdate Module from TechNet Gallery.
Save the PSWindowsUpdate.zip archive to a USB drive and (this is important!) right click on it -> Properties -> Unblock.
Create file PSWindowsUpdate.cmd on the USB drive with one command:
PowerShell -ExecutionPolicy RemoteSigned -Command Import-Module PSWindowsUpdate; Get-WUInstall -AcceptAll -IgnoreReboot
Unpack the PSWindowsUpdate.zip to the folder: C:\Windows\System32\WindowsPowerShell\v1.0\Modules.
Run PSWindowsUpdate.cmd as administrator.
That's all! Available updates will be downloaded from the Windows Update servers and installed automatically.
When the update is complete, you can delete the PSWindowsUpdate module that was previously copied to the Windows folder.
Step 8 – Uninstall built-in apps
Also you can uninstall built-in apps, but it's really up to you. So, if you don't want to uninstall built-in apps, just skip this step.
Paste the following scripts onto the PowerShell command prompt and press Enter.
Get-AppxPackage *3dbuilder* | Remove-AppxPackage Get-AppxPackage *windowsalarms* | Remove-AppxPackage Get-AppxPackage *Appconnector* | Remove-AppxPackage Get-AppxPackage *windowscalculator* | Remove-AppxPackage Get-AppxPackage *windowscommunicationsapps* | Remove-AppxPackage Get-AppxPackage *windowscamera* | Remove-AppxPackage Get-AppxPackage *CandyCrushSaga* | Remove-AppxPackage Get-AppxPackage *officehub* | Remove-AppxPackage Get-AppxPackage *skypeapp* | Remove-AppxPackage Get-AppxPackage *getstarted* | Remove-AppxPackage Get-AppxPackage *zunemusic* | Remove-AppxPackage Get-AppxPackage *windowsmaps* | Remove-AppxPackage Get-AppxPackage *Messaging* | Remove-AppxPackage Get-AppxPackage *solitairecollection* | Remove-AppxPackage Get-AppxPackage *ConnectivityStore* | Remove-AppxPackage Get-AppxPackage *bingfinance* | Remove-AppxPackage Get-AppxPackage *zunevideo* | Remove-AppxPackage Get-AppxPackage *bingnews* | Remove-AppxPackage Get-AppxPackage *onenote* | Remove-AppxPackage Get-AppxPackage *people* | Remove-AppxPackage Get-AppxPackage *CommsPhone* | Remove-AppxPackage Get-AppxPackage *windowsphone* | Remove-AppxPackage Get-AppxPackage *photos* | Remove-AppxPackage Get-AppxPackage *WindowsScan* | Remove-AppxPackage Get-AppxPackage *bingsports* | Remove-AppxPackage Get-AppxPackage *windowsstore* | Remove-AppxPackage Get-AppxPackage *Office.Sway* | Remove-AppxPackage Get-AppxPackage *Twitter* | Remove-AppxPackage Get-AppxPackage *soundrecorder* | Remove-AppxPackage Get-AppxPackage *bingweather* | Remove-AppxPackage Get-AppxPackage *xboxapp* | Remove-AppxPackage Get-AppxPackage *XboxOneSmartGlass* | Remove-AppxPackage
Step 9 – Create Windows 10 Sysprep Answer file
Now we need to create an Answer File. An answer file is a set of instructions in an XML file. When sysprep is run, it reads these instructions, what changes it should make to the Windows image.
At first we need to create a catalog file. For that we need the install.wim file from a Windows install disk or ISO file.
note. Windows 10 Build 9926 install.wim file for some reason cannot be used for the catalog file. This will be fixed in future builds, for sure. But for now we have a workaround.
To get an answer file for our Build 9926, at first we have to create the catalog using Windows 8.1 or Windows 10 Builds 9841, 9860 or 9879 install.wim file, and later edit the answer file.
Find the install.wim on any install media for above mentioned Windows versions and copy to the desktop of the PC you are using for this process now.
The install.wim can be found in Sources folder in any Windows install media. We are using the install.wim from Windows 8.1 Update 1.
open Windows System Image Manager.
Location of the Windows System Image Manager is:
C:\Program Files (x86)\Windows Kits\8.1\Assessment and Deployment Kit\Deployment Tools\WSIM\imgmgr.exe

Now, create a new answer file, and select the install.wim we just copied to the desktop.
Creating the catalog will take quite a long time.

Once it is done, we need to do the most important thing, set the CopyProfile value to TRUE. This setting is telling Sysprep to copy all our customizations to the default user profile.

In the answer file you can configure any other system options that you want to use, for example, the Windows product key (if you are using or MAK keys), time zone, organization and owner info, default language and region settings, input locales , etc.
Once it is done, let the Windows SIM validate your answer file and check it for errors. click on Tools -> Validate.
In our case it is nothing to be worried about, only warnings about some deprecated settings no longer possible to change, and notices that because we did not change some settings, they will be left out.
Now, we can save the answer file and name it as we want to. But the file extension must always be .xml. Save the answer file to root of any drive other than C:.

After that you can delete the install.wim and catalog files from the desktop.
Because the install.wim file that we have used is not belonging to the version of Windows we will Sysprep, the answer file must be edited. So, open it in Notepad.
Change the path to your Windows 10 install.wim file at the bottom of the answer file. In our case we need to change drive and Windows version to Windows 10 Pro. Now, save this file as CustomImage.xml on the drive D:.

Step 10 – Run Sysprep in Windows 10
After you create your answer file you can run sysprep. Open up Command Prompt as admin.
Go to Sysprep folder and type in the following command:
Sysprep.exe /generalize /oobe /generalize /shutdown /unattend:D:\CustomImage.xml
In our case the answer file is on the root of the drive D:. Change the command according to where your answer file is located.
tip. If you run sysprep with the /copyprofile option, the local user profile will be copied to the default user profile, and then will become the default profile in the Windows 10 image.

Sysprep will apply you answer file and shutdown the computer. Now this image ready to be deployed on other devices with your default user profile using your choice of imaging software (you can capture and deploy this image using MDT).
tip. If during running Sysprep an error appears: Sysprep Was Not Able to Validate Your Windows Installation, read carefully the following .
When the computer has booted to imaging and recovery tool, create a system image according to instructions for the program you are using. Once it is done, shutdown the computer.
You have created a generalized, highly customized Windows install image which can be restored to any computer instead of installing. Restoring takes only half of the time needed for installation.
Start PC normally to finalize the installation.
The Welcome phase first boot is a bit different in a Sysprepped Windows. You will be asked to enter the product key. This is of course not necessary, you can skip it.

Let me remind you that in the first part we installed the ADK, you can see the link on the left. Now we will prepare Windows 10 itself, everyone will of course do it for themselves, I will just tell you how I get a clean and updated top ten, which differs from MSDN, only with fresh updates, which is very important when reinstalling the system, in view of saving a huge amount of time, which you would spend one hundred percent on installing software and updates.
And so I remind you that we will make ISO based on the original MSDN Windows 10 threshold 2 (you can download the original windows 10 image from the link on the left from the Yandex disk). Further, to create your image, you will need either a separate laptop, and best of all, a virtual machine on vmware workstation, the convenience is that everything will be done on one computer and easily accessed, and the dozen installed inside the virtual machine will not affect your main system.
And so we do a clean installation of Windows 10, in my case this is the Professional edition, you can have any other. Now you need to let's put MS Office and other programs. After that, you need to install windows 10 cumulative updates, so that when you try to find new ones, they are missing. After the update, be sure to reboot so that you do not have glitches and problems, the most common ones are
- windows 10 restart problems
- Windows 10 start button not working
If everything is OK with the system, then you can now begin to prepare it for the reference image. A built-in utility called sysprep will help us with this.
Sysprep in Windows 10
And so the sysprep utility helps to depersonalize the Windows system, what does this mean
- Removing Unique GUIDs and SIDs
- Removing drivers installed for the current operating system
As I wrote above, the utility is built-in and is located along this path.
C:\Windows\System32\Sysprep
Let's launch it.
First of all, you need to audit the system and prepare it for use, set everything as in the picture, if you get Sysprep failed to check Windows installation error, then read how to fix it.

The utility will begin to run, it may take from a minute or more, it all depends on the speed of the disks.

After working out the utility, your operating system will reboot and automatically log in under the Administrator account.


Now, so that you do not have an old account, the next time you install it, you need to delete it. To do this, go to Control Panel > User Accounts.

Click Manage another account

As you can see, I have an account Iva, I will delete it

Choose a complete removal without saving data

This documentation has been archived and is no longer maintained.
Applying the Sysprep tool to Windows installation(preparation for use)
Use the tool Sysprep to prepare the Windows installation. To deploy a Windows image to different computers, you must first prepare the image. You can use the System Preparation Tool (Sysprep) or you can specify a setting in a response file to prepare the image as part of an unattended installation. To prepare an image, you must remove information about a specific computer from it. This process is called preparation image.
In most Windows 8 deployment scenarios, it is no longer necessary to use the SkipRearm answer file option to reset the Windows activation clock when you run the command Sysprep on the computer several times. In Windows 8, the SkipRearm parameter is used to indicate the licensing status of Windows. If you provide a retail product key or a volume installation key, Windows will automatically activate. team Sysprep can be run up to 8 times with a single Windows image. After running Sysprep 8 times on a Windows 8 image, you must reimage Windows. additional information about the components and Windows settings that you can add to your answer file, see the Windows Automated Installation Reference .
Attention
Do not use the Windows Store to update the Windows Store app before running sysprep /generalize. Sysprep cannot prepare the image in this scenario. This issue also affects Windows Store apps that are included with Windows 8 (such as Mail, Maps, Bing Finance, Bing News, and more). This can happen when you are configuring an audit mode installation as a built-in administrator, or when using a special Account. The following error appears in the sysprep log files (%WINDIR%\System32\Sysprep\Panther):
For work Sysprep /generalize all applications are required to be provisioned for all users. However, when you update an app from the Windows Store, that app becomes unprovisioned and account-bound.
Instead of using the Windows Store to update apps, you should download unpublished updates to line-of-business apps or prompt users to update apps on target computers using the Windows Store. In managed environments where access to the Windows Store has been disabled by your IT administrator, you won't be able to update Windows 8 Store apps.
If your Network Policy Server (NPS) configuration defines RADIUS clients or external RADIUS server groups, you must remove this information before deploying to another computer. See the section for more information.
In this section
Preparing the image for use
When preparing an image Windows program Windows Setup handles the settings during the configuration pass. Even if the technician computer and the reference computer have the same hardware configuration, you must run the command Sysprep with parameter /generalize. Team Sysprep /generalize removes unique system information from a Windows installation, making it safe to use the image on another computer. However, you can save the drivers during the provisioning setup pass.
Important
When you set up a reference computer, Windows Setup installs drivers for all detected devices. By default, Windows Setup uninstalls these drivers when the system is ready for use. If you are deploying the image to computers with the same hardware and devices, you will need to have Windows Setup install the same drivers again. To leave these drivers on the computer during system preparation, set the Microsoft-Windows-pnpsysprep | PersistAllDeviceInstalls value true. Learn more about Windows-related components Sysprep that you can add to your answer file, see the Unattend Windows Setup Reference .
When executing the command Sysprep Windows only replaces the computer security identifier (SID) on the operating system volume. When Sysprep prepares the image, only the general partition is prepared. Therefore, if several operating systems are installed on the same computer, you must run Sysprep for each image separately.
Preparing the image for use
Use the Microsoft-Windows-Deployment | Generalize . Set Mode to OOBE or audit, and for ForceShutdownNow the value true. The computer will automatically prepare the image for use and exit.
Add the setting Microsoft-Windows-Deployment | Reseal in the setting phase. Set Mode to audit. After booting the computer in audit mode and displaying the window System Preparation Tool use one of the following methods:
In the window System preparation program select Preparation for use and click Shutdown, and then click OK.
Close the window System Preparation Tool %WINDIR%\system32\sysprep. Use command Sysprep with parameters /generalize, /shutdown And /oobe. For example:
The computer will prepare the image for use and exit.
Add one of the following options to your answer file.
Dism /capture-image in the Deployment Image Servicing and Management Tool ( DISM).
See the and sections for more information.
If you need to customize Extra options, you can enter audit mode manually and complete configuration before provisioning and deploying the image.
Optional action. Entering audit mode manually before preparing an image for use
When the startup screen appears when you turn on your computer for the first time, press CTRL+SHIFT+F3. Windows will restart the computer in audit mode and a window will appear System preparation program.
Attention
The Ctrl+Shift+F3 keyboard shortcut prevents you from skipping all the steps in the startup process when you turn on your computer for the first time, such as running scripts and applying answer file settings in the configuration pass.
Add any settings you want to enable.
In the window System preparation program select Preparation for use and click Shutdown, and then click OK
Close the window System Preparation Tool, open a command prompt window as an administrator and navigate to the directory %WINDIR%\system32\sysprep. Use command Sysprep with parameters /generalize, /shutdown And /oobe. For example:
Sysprep /generalize /shutdown /oobe
The computer will prepare the image for use and exit.
After the computer is shut down, capture the image using Image Capture. For this you can use the command Dism /capture-image in the facility DISM.
Deploy this image to the reference computer. When booting up the reference computer, the startup screen will appear when you turn on the computer for the first time.
For more information about audit mode, see the topics.


