DirectX is a huge set of functions that developers use when creating programs in Windows environment. They are most often used during video game development. Without direct installed in Windows, audio and video playback is impossible. The question is how to remove DirectX is not often heard from regular user. This kind of cleaning may only be necessary for people who use their computer for gaming.
In this article we will try to analyze in detail the procedure for complete uninstall DirectX from OS Windows XP, Vista, 7, 8.
How to determine the installed version
As a standard, specific direct modifications are already integrated into the operating system. The most famous of them:
- DirectX 9.0c. The main systems on which the version is installed are Windows XP, Server 2003.
- DirectX 10. The version also includes the components of its predecessor. Supports Vista and Server 2008. Windows XP does not.
- DirectX 11. The most common version, including components of earlier editions. Supports Windows Vista, 7, 8, 10.
- DirectX 12. The most latest version, only supports Windows 10.
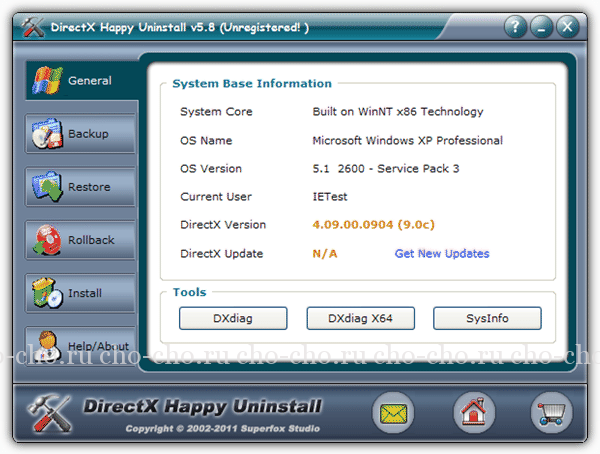
To accurately determine the version, you need to call the “ Execute» using the key combination Win + R. Then enter the dxdiag command into the line
In the window that appears, in the last paragraph will be indicated installed version . For example, I have Direct version 11 installed.

To obtain more detailed information about the version of the installed directive, you must use special programs. The most popular among them: Everest And Aida 64.
How to remove DirectX completely on Windows
This method will work in Windows XP, Vista, 7, 8.
It rarely happens that removal is necessary - updating a component almost always solves problems.
But there are still times when it is necessary complete removal and a clean installation of Direct.
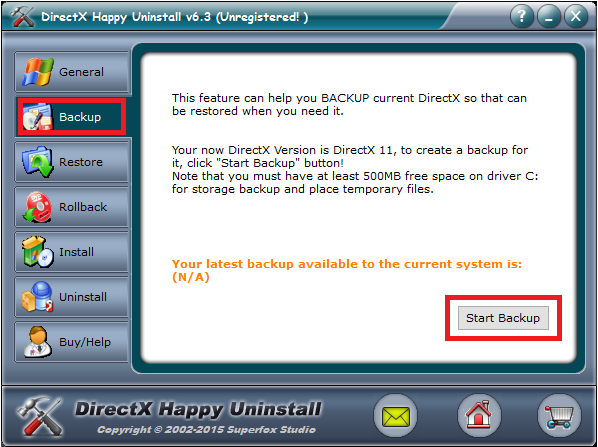
According to official statements by OS developers, the components are initially built into the system, and their no deletion possible. Therefore, you will have to resort to third-party developments. There are quite a lot of uninstallation programs on the Internet. The utility is considered the most popular and effective DirectX Happy Uninstall.
It will most reliably remove direct messages of any version, including 11, from every system Windows family. At the time of writing, the program did not work on Windows 10, but it is possible that this OS is now also supported.
A useful function of the program can be called Backup, in case of failure, it is possible to restore DirectX to its previous state.
DirectXHappy Uninstall shareware. You can download the program from the developer's address: http://www.superfoxs.com/download.html
Removal algorithm
The only drawback of the utility is that it is paid; without a subscription, you will not be able to uninstall it.
Other programs to uninstall
You can use programs distributed free of charge: DirectX Eradictor(works only with direct version 9.0c and older), DirectX Killer(only Windows 2000, 2003 and XP are supported). The operating principle of these programs is similar, so there should not be any difficulties.
You can download the installation directive from the official Microsoft website. For automatic installation and updates can be downloaded from the web installer.
In conclusion, I note that there is not always a need to remove Direct components. First, you can try to solve the problems with an update. Remember, removing components from the system can harm the full functioning of the PC.
Video on the topic
DirectX is a whole set of ready-made classes, structures, procedures, functions and constants necessary for working under the operating system Microsoft system Windows. Most often used when writing computer games. To be honest, I have a hard time imagining a situation where you would need to uninstall DirectX. Why? Yes, if only because there is no point in removing it. So, if you want to update DirectX to a more recent version, you do not need to remove it at all. Be that as it may, today I will tell you how to do it correctly.
Uninstalling DirectX on Windows 7
In the case of the version operating system Windows 7 (and Vista and 8), required special program- we are talking about the so-called uninstaller. In this case, we are talking about the DirectX Eradicator program, which removes all DirectX components from the system and supports all its versions.
The advantage of this utility is that it weighs very little (several hundred kilobytes), does not require installation and is extremely easy to use.

After removing the DirectX component, you can download it from the official Microsoft website.
Uninstalling DirectX on Windows XP
In the case of the XP version, the situation is slightly different. The fact is that in this operating system DirectX is shown as regular program, so you can remove it yourself. To do this, go to the “Start” menu - “Control Panel” - “Add/Remove Programs”. Find it and simply delete it.
Still, I strongly do not recommend removing this important component from your computer, either using programs or yourself. The fact is that this can lead to complete inoperability of the system (there have already been cases). Therefore, just update DirectX - you do not need to remove it for this.
8 or other OS versions are required when installing games or other graphically heavy applications. Often the program is included in the installation package of games and such applications. Without her optimal performance and full color graphics are not possible. If there is no such add-on in the package with the game, and it is not installed on the PC, then the game will not start. You can download free DirectX 11 for windows xp from the official Microsoft website.
What is DirectX?
At its core, this name is not the program as such, but the technology. It was developed by Microsoft to make it possible to develop games and run modern versions of them on Windows. The technology includes a package of tools and libraries that produce realistic, vibrant graphics, textures and sounds. DirectX 10 for windows xp and versions higher processes information coming from game control devices - keyboard, mouse, joystick, etc.
WATCH THE VIDEO
The technology has several modules that differ in their area of work:
- DirectDraw – working with two-dimensional graphics;
- Direct 3D – work with three-dimensional graphics;
- DirectSound – providing sound;
- DirectInput – processing information from control systems, etc.
Using the Run command in Windows, you can not only find out what DirectX you have, but also check individual modules. This function very convenient for gamers. Since in case of any problems with the game, individual modules are tested. Launch the Run command by holding Win+R on your keyboard. A window will open in which, in the input field, you need to type dxdiag. After clicking Enter, a window will open in which all technology modules will be displayed. View them by switching between tabs. If you need to install update 7, you should download it from the official Microsoft website.
How to find out the version of a DirectX program
Errors when launching a game are often associated with an outdated version of DirectX or failures in libraries and technology modules. Errors occur different types, most often those that refer to problems with dll file. In this case, you need to find out which DirectX is installed in order to understand whether it is worth updating or reinstalling it.
Windows 7, Vista
To know DirectX version on Windows 7 simply by using program search. To do this, repeat the algorithm:
- Click on the Start menu;
- In the bottom search bar, enter dxdiag;
- Press Enter;
- A window opens with the necessary information.
The library diagnostic tool is deployed. This is the same window that opens when it is necessary to diagnose the health of technology modules. The modules themselves are located in the tabs at the top. You can see what DirectX you have at the bottom of the System tab in the Version line. The method is only suitable for “Seven” and Vista.
Windows XP, 8, 8.1, 10
You can check which DirectX is installed on your computer in a universal way, running on any version of the operating system. To do this, you need to run the Run line. This is done by simultaneously pressing the keyboard buttons Win + R. In the small window that opens, type dxdiag in the input field and press Enter. This will open the same Library and Module Diagnostic Tool window.
Third party utilities
If you cannot check which DirectX you have using these methods, then use third party software, programs that show all the information about the system, its components and installed programs and libraries. Everest is popular. Download and run. Wait for the system to collect information and open the Computer branch in the left block. In it, expand the Summary information. In the constructed list, find the required component and look at the version.
Similarly, you can view the Direct X version using PC Wizard. Here you need to go to the Configurations section and find the required component. By looking at the beginning of the list, you can determine the version.
Update
If your version of DirectX is outdated or does not match the OS version, then you need to update DirectX for Windows 7. To do this, go to the official Microsoft website and download the Web installer from there. Next, follow the algorithm:
- Select the required language;
- Click Download;
- Avoid installing additional update packages for other programs;
- The installer download has started;
- Wait for it to finish;
- Run the installer;
- Follow his instructions.
In a few minutes you will have the latest version of DirectX for Windows 7 installed.
Versions
Installing DirectX 11 for Windows 7 is the optimal solution. This is the latest version, almost all programs and games run successfully with it. But sometimes some games require you to install a specific version of libraries and modules to run. But it won’t work to install one DirectX on another, since automatic removal previous version will not happen. Libraries from the new one will be added to it. Therefore, before installation you need to remove the old one. Functional add-on packages are described below.
- DirectX 9.0 c – suitable for XP and Server 2003. New games may not start without installing their own package;
- DirectX 10.1 - supplemented and expanded package 9.0c. Supported by Vista and Server 2008;
- DirectX 11 is a new version. Includes the previous two and additional components and updates. Supported on both 32 and 64 bit OS. Works on Windows 7, Vista, Server 2008. It is possible to install DirectX 11 for windows xp.
As mentioned above, DirectX, the latest version of which is presented on the Microsoft website, is distributed free of charge. When downloading from the official website of the developer, you should not be afraid of viruses and malware on a PC, but you still cannot disable the antivirus when downloading. The web installer presented on the site will automatically check the OS and install the update to the latest package.
Uninstalling DirectX
To reinstall DirectX, replace with old version, remove the already installed one. When installing a later version, you won’t have to do this, since the update is based on the old one. But it is impossible to permanently remove DirectX 10 for Windows, as the developers claim, since it is an OS component. There are widespread utilities that will help you permanently remove DirectX on Windows 7.
- DirectX Eradictor removes the program core from the OS. Cleans the registry, deletes program files and folders. Works with versions 4 to 9;
- DirectX Killer will only remove older versions. Works on Windows 2000, 2003, XP;
DirectX Happy Unistal – works on OS with XP and up to 8.1. Doesn't work on 10.
Support 32 and 64-bit OS. Removes modules and technology libraries, has a return function, with the help of which a deleted component is restored.
Additionally, the method of replacing Direct X 10 with Direct X 9 is practiced. To do this, write regedit in the Run line. After opening the Registry Editor, go to the HKEY_LOCAL_MACHINE - SOFTWARE - Microsoft - DirectX branch. Open the Version parameter and enter the number 8 instead of 10. After that, install the desired Direct X 9.0. Now you know how to find out which DirectX is installed.
Surely, every person who has at least once installed an operating room windows system and is familiar with the concept of directX. But like most programs, this data library needs to be updated. Where to find Of course, on the Internet.
Perhaps the most reliable and proven way is to download directX updates from the official Microsoft website. First, decide on the version. The history of directX begins back in 1995 with the win 95 operating system, it was directX v 1.0. Currently, versions 9.0c for windows xp are widely used, as well as directX 10 and directX 11 for windows vista and windows 7.
If you download directX updates directly from the developer’s website, then everything is simple. You just have to select the operating system and the type of your Internet connection. If you prefer to manually install directX updates, then, as mentioned above, you need to check the version. How to find out which directX you have installed? You can do this by entering the command in the start menu -> run DxDiag. You will see a window with many tabs. In one of them you can see the directX version. By default, any operating system already has a basic set of libraries built into it.
Another way to update directX, which is more suitable for computer game lovers, is to install it along with the game. Each new game product has a separate folder with the directX distribution. This is done because the lion's share of the functions for reproducing and processing 3D graphics lies precisely in this data library.
All modern games require the latest version of this program. But there is a very important point. You can't just pick it up and install it new version directX over the old one, without deleting the previous one, unless, of course, you are updating via the Internet. In this case, the online installer will only update existing records and will add new ones to the library.
The question arises: how to reinstall directX correctly? Well, there are many different uninstallation programs at your discretion. For example, directX eradicator. This little program works even without installation on your computer. With its help, you can completely uninstall all directX components and, after rebooting the PC, install new ones in any way convenient for you. In my opinion, this is one of best programs for a similar solution to the problem.
Some people say “I installed the new directX on the old one. Nothing, it works.” With such an update, the library files are not completely replaced and the ones that need to be updated are not always updated.
There is another way. You can try to remove directX through the standard installation function/in the system panel. However, as practice shows, in this case, some of the directX files are not completely deleted from the computer, but remain in fragments. For example, some d3d extension files simply do not allow themselves to be deleted in this way.
If you don't regularly install directX updates, and install them in a secure manner, you risk encountering a lot of minor - and sometimes serious - problems when working with your PC. This is especially true for video game lovers. If the currently installed directX is too old, or its components are damaged, the game simply will not start or will work poorly. Check regularly for updates for the library; it will take you no more than half a minute. Full information about all the intricacies of this process can always be found on the developer’s website software- microsoft.
Well, and finally. From personal experience, I can say that some users, including me, try to install a version of directX that is not specific to the operating system they are using. Do not try to install directX version 10 or 11 on Windows XP - you will not see a noticeable increase in performance, but you can harm the system, especially if the installation files were downloaded from unofficial sites. This is perhaps all the user needs to know about directX and how to use it.
Our topic today will be uninstalling any version of Directx on Windows 7, 8 or 10. Well, let's get started...
DirectX is a set of system functions, thanks to which graphics, 3D, sound, and a number of other functions are reproduced on the computer. In addition, DirectX is actively used by computer game developers in their products to control game characters, improve graphics, physics, network interaction with other players in multiplayer games, etc.
At the same time, there are times when you need to remove DirectX; a typical example of this would be the situation when you need an earlier version of it.
First of all, you must understand that you are only allowed to "tear down" directX if it goes like separate program. In Windows XP version 10.0, for Vista - 11. Windows 8 can boast of DirectX 11 already in the package itself - version 12. Remember that if you try to forcefully delete files, you risk the system becoming unstable.
Please note that XP officially supports DirectX only up to 9.0c, installing 10 is possible thanks to the work of amateur programmers who have nothing to do with the product developers, so the developers do not guarantee the stability of the product.
To remove Direct X from Windows XP you need:
- go to “Start”;
- click “Control Panel”;
- further “Add and remove programs”;
- select DirectX 10 from the list;
- click “Delete”.
After that, download DirectX 9 (9.0c) and unpack the files to any folder, find and run “DXSETUP.exe”, accept the agreement and start the installation.
Steps to take before uninstalling DirectX on Windows
- Create backup copy An OS that will help, if failures occur, to roll back the system and return it to a working state. For these purposes, the “Backup and Restore” tool in the “Control Panel” is useful. You can also use third-party programs;
- Pre-prepare the version of DirectX that you plan to install instead of the old one;
- Disable protection in . For these purposes, open the “System” applet in the “Control Panel” or in context menu“My Computer” - “Properties”. Next, go to “System Protection”, and select among the protection options “ System disk", most often this is Drive C:/, click the "Configure" button and select "Disable system protection" among the recovery options.

Uninstalling DirectX using special programs
Delete this program You can use special software, using which you can completely erase all DirectX files and registry keys from the disk.
The advantage of this removal method is that it is completely free, but there is a high risk of compromising the integrity of the registry or “killing” Windows; in addition, library files are not deleted. You are also fully responsible for all lost data and system performance.
How to remove DirectX on Windows 7, 8 or 10?
Practice shows that it is impossible to do this manually in these operating systems; you can only update the package to latest version or reinstall the OS. True, when trying to update, an “Internal system error", practice shows that the reason may be:
- During the installation process, an antivirus program was turned on, which blocks certain functions of the program;
- You are using the web installer. You should use the full installer


