After the release of Windows 8, users, both beginners and advanced, had many questions regarding the new interface of this operating system. For example, some “users” do not know how to change or create a new “account” in Windows 8. Let's help them solve these problems.
After reading this article, you can easily add other users and change account names if the need arises.
How to add an account?
Let's assume that someone else is using the computer besides you. Agree, it’s not very convenient when every “user” adds shortcuts to the programs that he needs for work or entertainment to his “Desktop”. Perhaps you don't like the screensaver your colleague or relative chose. In general, there are a lot of inconveniences. That is why, before learning Windows 8, it is recommended to learn how to create a separate account.

So, swipe to the right area of the screen to bring up the Charms panel. Now head to Settings and then go to Control Panel. Here you are interested in the subsection with accounts. After going to it, go to the “Manage another account” item and at the bottom click “Add a new user”.
Now click the “Add account” button and go through all the registration steps one by one. This process should not cause any difficulties.
Windows 8?
In fact, giving a different name to an “account” in Windows 8 is not as difficult as it seems. Of course, the algorithm of actions will differ from the same “seven” or Windows XP, but even a novice “user” should not have any difficulties.
So, in Windows 8, the following sequence of steps will help you change your username:
Open “PU” and go to the “Accounts” section.
Select the “Change name” option.
Write your new name in the space provided.
The last step is to click the “Rename” button.
You have learned how to change your username on this operating system. Agree, it’s very easy. The whole process will only take you a few minutes.
By the way, the “Control Panel” can be opened not through the Charms Bar, but in a slightly different way. Call the “Run” utility and enter the phrase “control panel” there.
You can also use the search bar located on the Home screen. In this case, write in Russian - “control panel”.
Conclusion
So now you have learned how to change username in Windows 8, so you can easily follow this procedure yourself. In addition, you learned how to create accounts for new “users” and understood why this needs to be done.
If there is someone else working on the computer besides you, practice creating new “accounts” and give them appropriate names. Most likely, your relatives or colleagues will be grateful to you, because everyone wants to customize the device according to their needs and preferences.

At the same time, do not forget to set a password for your “account” and advise other users to do this.
operating room Windows system 8, according to the developers, is the most convenient and provides easy and quick access to all controls. However, given the significant differences between the new OS and its predecessors, you need to get used to it and study a little. For example, many people ask the question, how to change the username in Windows 8?
In fact, the G8 controls themselves are no different from the previous one. Windows versions. The only difference is how to launch them. This is exactly what this article will discuss.
There are many ways to launch this service. Which one to choose depends on you and the goals you are pursuing. So, let's look at all the methods in detail.
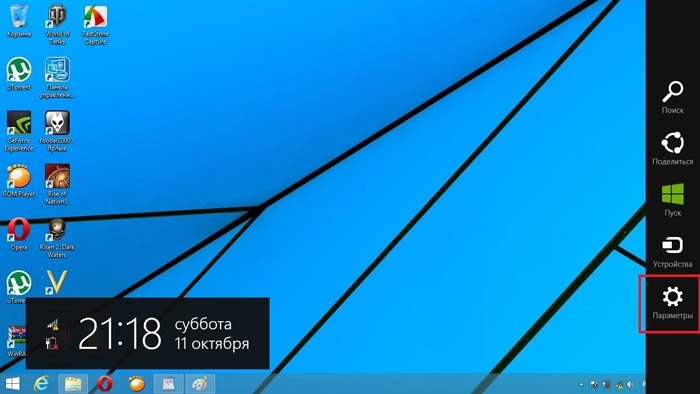
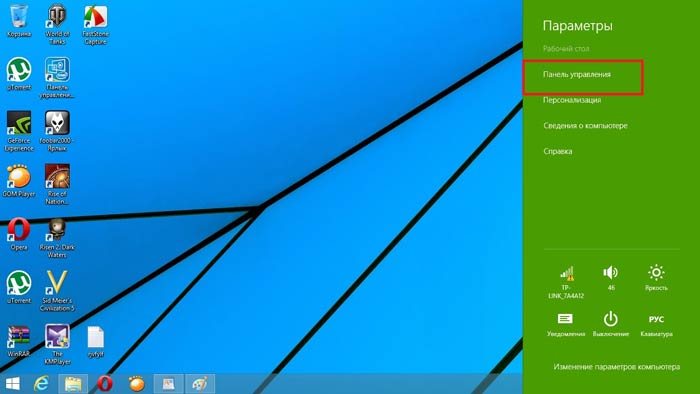
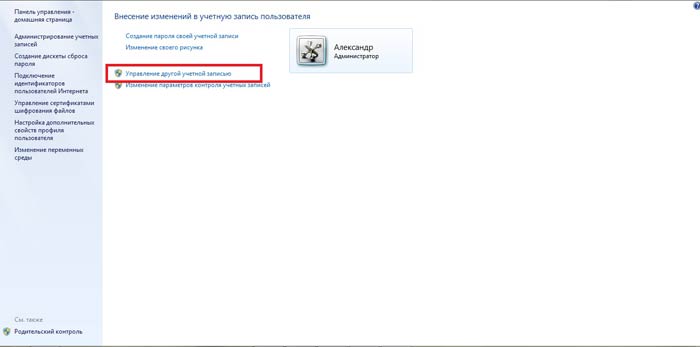
The first way to change the account name in Windows 8 is to launch the service through the Control Panel. To do this, go to your desktop and move your mouse cursor to the right top corner. A pop-up menu will appear in which you should launch “Options”. After this you need to open "".
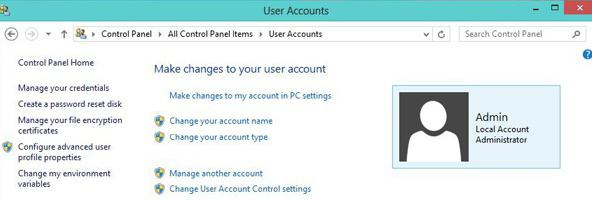
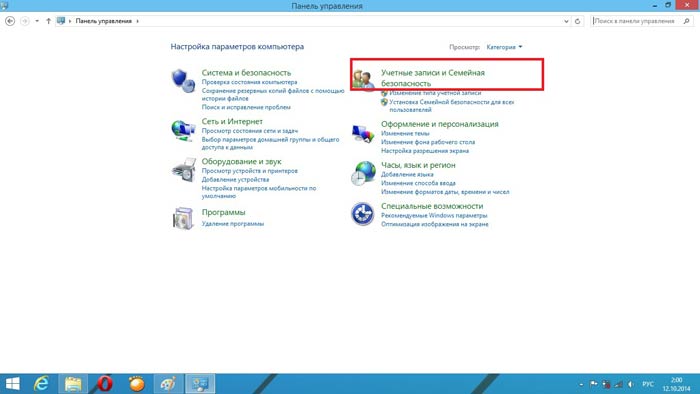
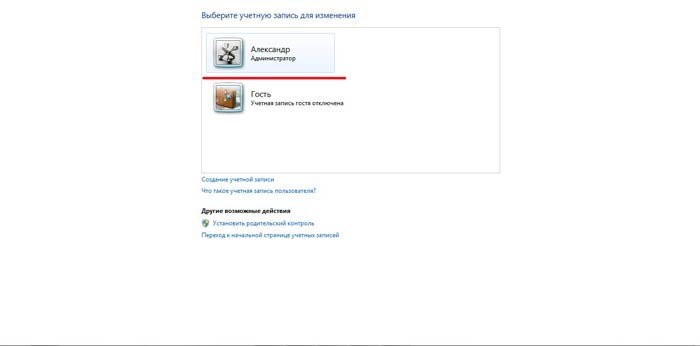
In the window that appears, you need to select the “Accounts and Family Safety” section, after which you just need to open “Accounts”. In the menu that opens, you will see the account that is used in this moment. Click manage another account and select the one that needs to be renamed - in my case it is “Alexander”. Read how to create other accounts. As a rule, the system creates three accounts in total:
- Guest.
- User account.
The first two are systemic. They are automatically created and disabled. Of course, you can enable them, but usually this is not necessary. In this case, the first account provides full rights, without restrictions. In other words, you can perform any action.
You should only use it if you know your PC well. The second is a guest account, which is enabled only if the computer is used by non-regular users, for example, in offices and public purposes.
The last option is a user account, which is created when the operating system first boots. So, in the window that opens, you need to click “manage another account.” Here you should select your entry and in the window that appears, click “change name”.
![]()
As you can see, everything is extremely simple. You just need to know some rules and key combinations that can always be found on the Internet. The developers have really created a new, even more convenient operating system, which provides quick access to all management services. Moreover, Windows 8 has synchronization with a shared server, so other users can find you using the data you provided when registering.
In addition, there is another way to change the username in Windows 8.
Changing username in Windows 8: Video
Changing your account name using the Run service
First, let's start the required service. You can do this in three ways:
- Using the key combination Win+R;
- Using search;
- Through Windows Explorer 8.
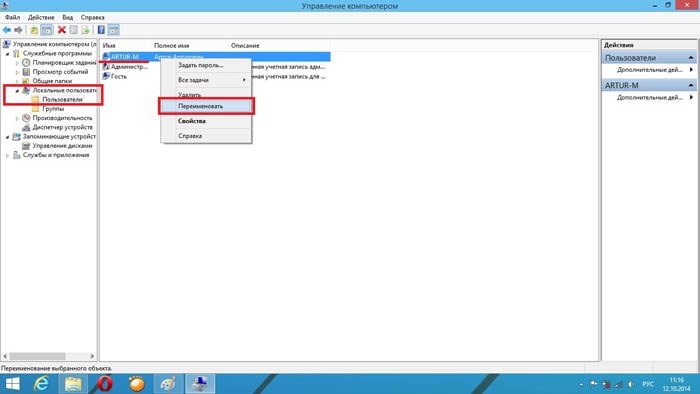
So, we launch the service and write “lusrmgr.msc” in it. Press "Enter". So you start a service to manage accounts. All accounts are displayed here and you can manage them all. The same service can be opened in Explorer by right-clicking on my computer and selecting “manage”.

In the window displaying all system accounts, select the one that needs to be renamed and right-click. Next, select “rename” and enter the desired name. Press “Enter” and close all windows. It is worth noting that this is the simplest and quick method How to rename a user in Windows 8.
However, you should be aware that the first method only changes the full name of the account. However, the login remains the same.
In other words, the login name remains the same as it was - only the name that is displayed on the welcome screen changes. Therefore, you need to choose one method or another depending on what goals you are pursuing. Now you know two methods on how to change your username in Windows 8.
Run Service in Windows 8: Video
Change account on the official Microsoft website
In addition to the above methods, you can change your username on the official Microsoft website (http://go.microsoft.com/fwlink/?LinkId=91489). To do this, follow the link and log into your account using your registered Email and password.
Next, on the “overview” page, you need to select “Change name” and enter the first name and last name that you want to use in the future. After that, click “save”. Close all windows and reboot the system.
A reboot is necessary because the new account name is displayed on the site immediately, but Windows 8 needs a reboot to synchronize. You will then see your new name when you log in.
These are three main methods that are available to everyone and do not require special knowledge. Which one to use is up to you.
With the release of the new Windows 10 operating system, the developers added new account management functions and divided them into two types. The first type of accounts is online, that is, Outlook accounts are used to log in. The second type of accounts is local. This type of account is well known to everyone since the days of Windows XP. It was this confusion with the type of accounts that caused many problems when changing administrators. In this material we will describe the process in detail administrator changes, both for online accounts and for local ones.
Changing the local administrator account
To change local administrator in Windows 10, you first need to create a new one to then delete the old one. So let's go to Control Panel. You can find it in the top ten by clicking on the menu icon “ Start" and select in the appeared context menu the point we need.
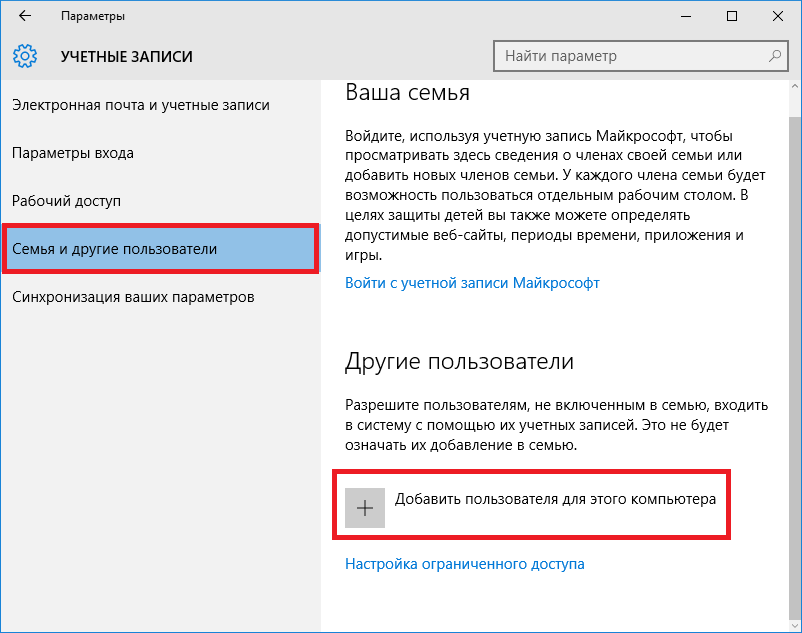
In the launched Panel, go to the accounts section and select the “” link there.
In the window that appears, you will see the old administrator account, in our case this is the name “ User" At the bottom of this window there is add new user button, by clicking on which we will go to the OS settings section.
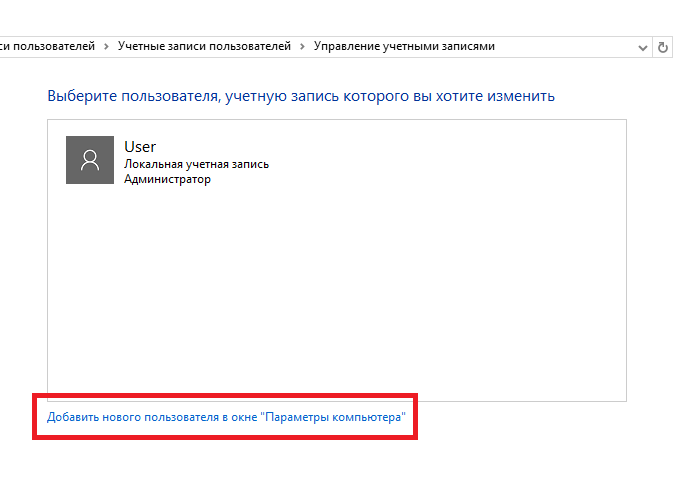
In this section you can add a new admin and remove the old one. To add it, click the " Add a user for this computer" This action will take us to the New User Creation Wizard.
Since we are creating a local admin, we will skip the email entry point by clicking on the link “ I don't have this person's login information" This action will take us to the window for creating an online account for Microsoft.
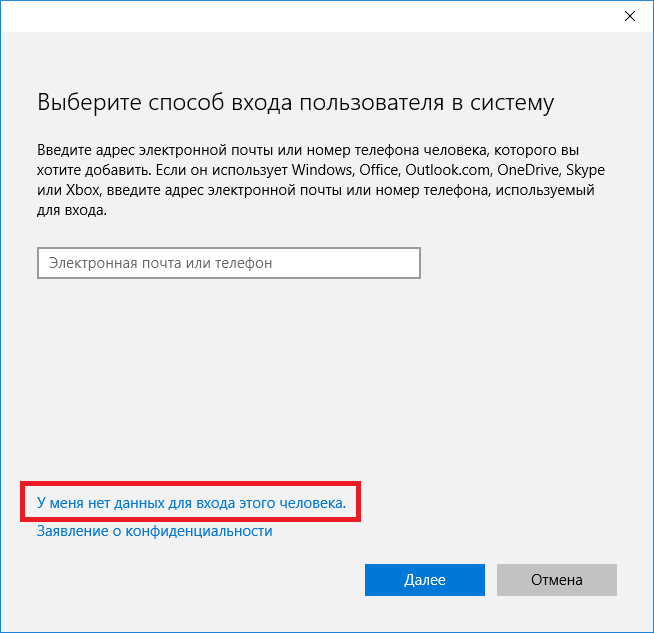
To skip the account creation process, click on the lowest link in the wizard window, which will take us to the local user creation window.
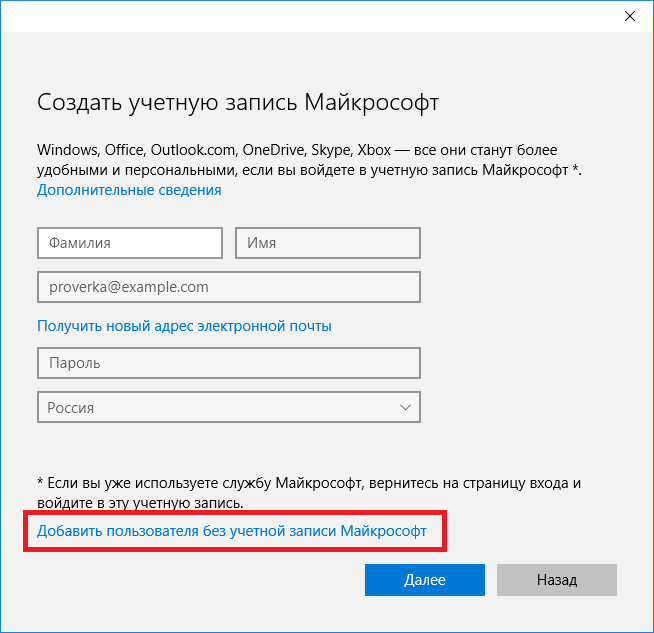
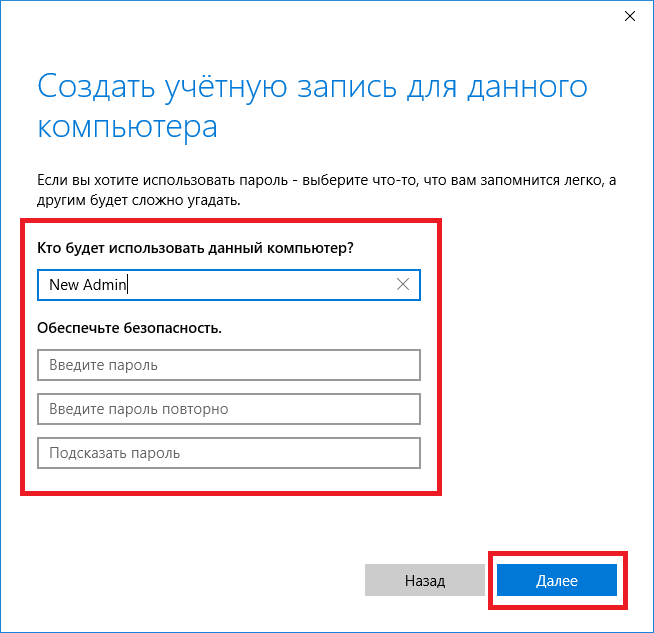
As an example, let's write the name " New Admin"and continue the work of the master. After these steps, a new local account will be created.
Now let's go to our users and select the name " New Admin».

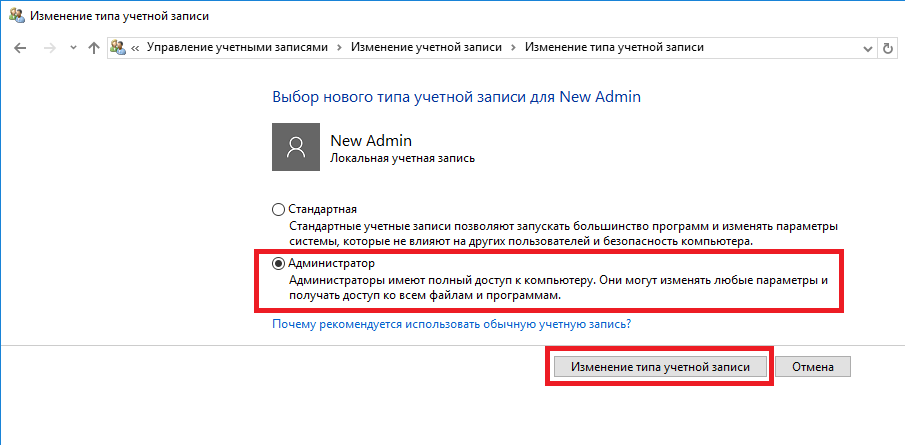
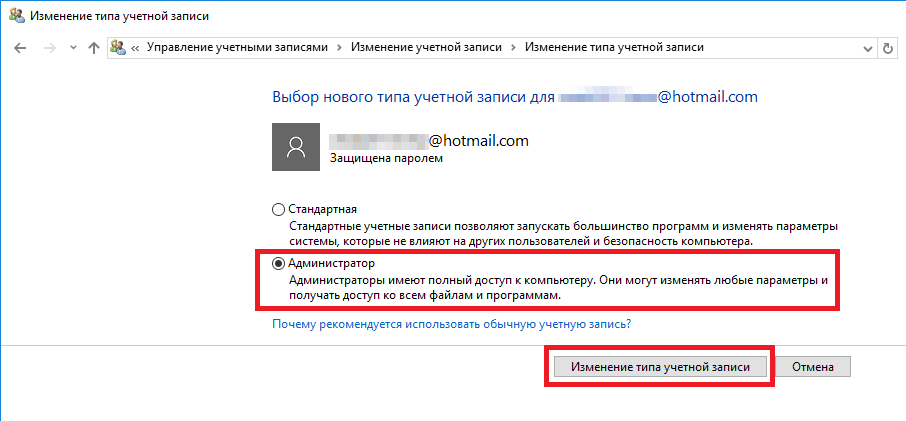
In the next window we need to select the “”. This is necessary in order to change our account type from regular to administrator.
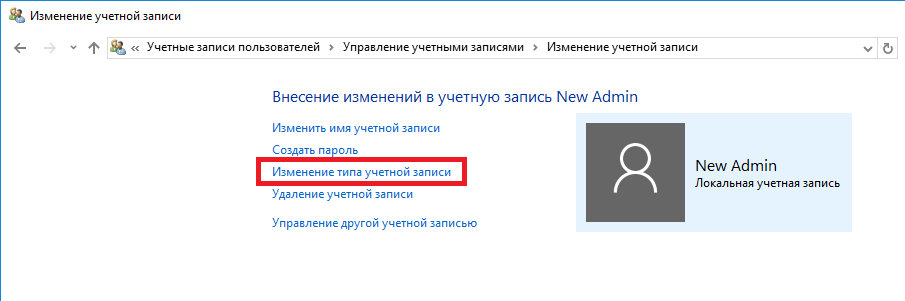 Therefore, feel free to go to this point and change the user type.
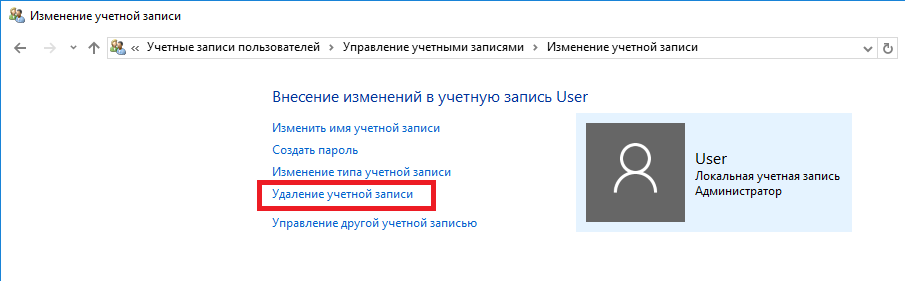
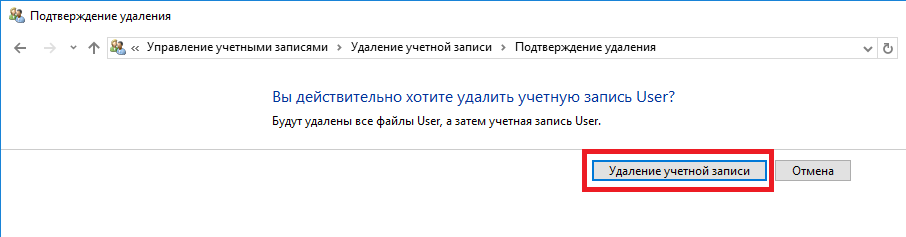
Having made our user an admin, we can now proceed directly deleting old user. Now it is necessary change users. Therefore, let’s log in as an administrator whose name is “ New Admin" into the system and go to the list of our admins by selecting " User" Now to remove the old user, select the “”.
After selecting this item, the system will offer us to delete all user data or save it. So be careful if there is important information, then save it.
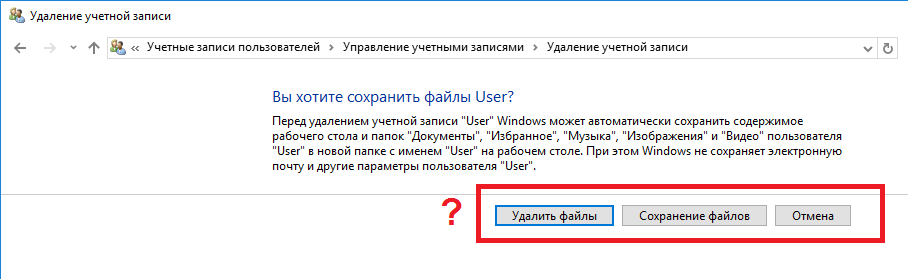
We select one of the options in which we can delete or save files. After confirmation, the old admin will be permanently erased from the system.
From the example it is clear that creating a new and deleting an old admin is not at all difficult, although you will have to tinker a little.
Changing the online administrator account
To change the Microsoft account, which in our case acts as an administrator, let's go to the same wizard discussed in the previous example.
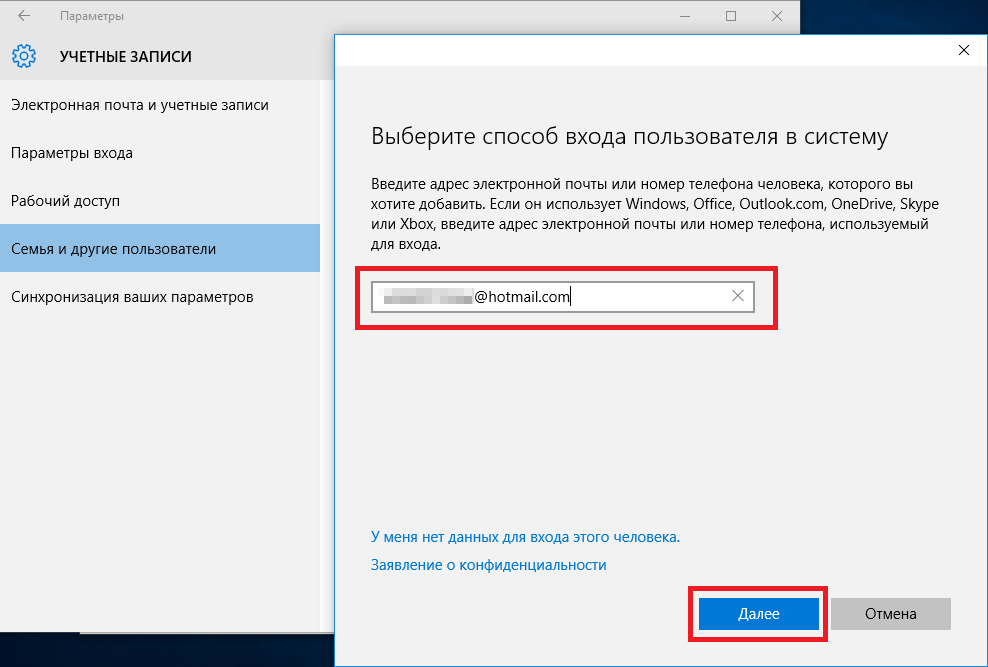
In the wizard, enter your Outlook account email and click Next. These steps will complete the wizard, and the online account will be added as a new account. Now let's go to our online account and change its type, as in the previous example, to administrator.
After changing the account type, we need change user in the system. This is necessary in order to remove the old account. The further procedure is the same as in the previous example. Therefore, feel free to go to the Control Panel and disable the old account.
![]()
The example shows that you can change an online user even faster than a local one.
I would also like to note to our readers that if you use an online Microsoft account in Windows 10, you will significantly expand the capabilities of this operating system.
Create a local user in Windows 10 using the console
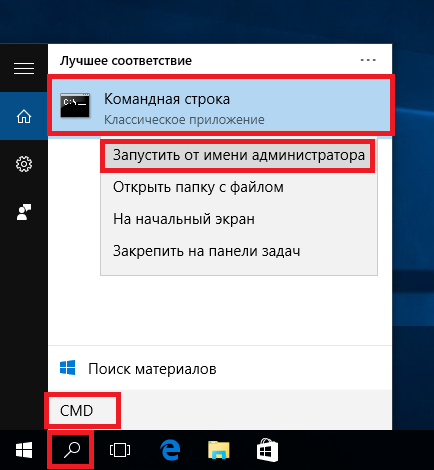
First thing let's launch the console on behalf of the administrator. This can be done by entering Windows search 10 by entering the phrase “ CMD" Now right-click on the found result and select “ Run as administrator».
Now run the command to create a new user whose name is " New_Admin_2” shown in the image below.
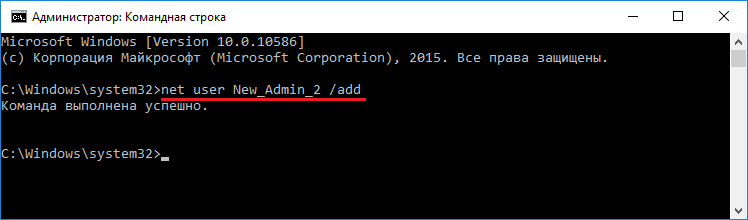
in order to change regular user to admin for the newly created account " New_Admin_2", run this command.
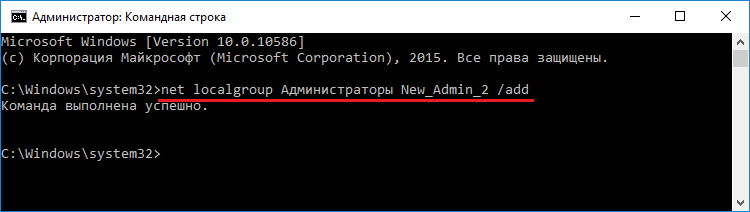
One last step left - removing old admin. In our case, the name of this admin is “ Old_Admin" To do this, let's go under " New_Admin_2» into the system and open the console as administrator. In the console, run the command shown in the image below.

After this, the account will be disabled.
The example shows that in Windows 10, using command line, you can quite quickly both create and delete a local admin.
Let's sum it up
In most cases, changing the user is required for the correct functioning of some programs. For example, you need to run a program that there is a link to a specific user and when running this program under a different name, an error occurs.
This error occurs because the program is trying to access user files from his folder, But the path to the directory does not match the one included in the utility, since the name is different. This is one of many cases when you need to change the admin.
In our material, we looked at all the ways to change the administrator in Windows 10. Therefore, we hope that our article will help our readers complete this task.
Video - how to remove the administrator account in Windows 10


