Java released its latest update on July 19, 2016, and now their recommended version are Java Version 8 Update 101 and Java Version 8 update 102. We observed on different platforms that most users are experiencing Java Error Code 1618 in Java Installation Wizard. On the Java official website there is not detail about this error and it stated that this error code is still under investigation.
Java Error Code 1618 Explained
Java installation wizard prompts Error code 1618 only if Window’s Installer is not working properly, either it is stuck or disable. We can easily fix this by following some simple and easy steps. This error has also been observed before the installation of Skype on windows 10 and windows 7 operating systems. The following are the two methods which will fix your problem:
Start Windows Installer Service
Method 2: Clean Rebooting of Computer
In case if Java Installation wizard is still prompting Java Error Code 1618, then we can go for clean Reboot. Clean rebooting of system means, we are starting operating system with minimum number of drivers and start up programs. Clean rebooting of system will minimize conflict between software and drivers. These conflicts might cause problems while installation or updating application software in Windows. In the process of clean rebooting your computer might lose partial functionality for some time. After rebooting computer normally, it would work perfectly. So, you must reboot your computer once again after completing Clean Rebooting and installing Java. Please refer to the following link for step by step tutorial for clean rebooting.
Your feed and suggestions are valuable for us, don’t hesitate to leave your comments and suggestions, feel free to contact us if you’re facing any problem with your system.
Error 1618 isn't unique to Java. It is an error from Microsoft Installer(.msi) stating that another .msi is currently being processed. You see, the Microsoft Installer, msiexec.exe, can only process one installation at a time. This error will be encountered when one MSI is attempted to be installed while another is currently processing.
Please keep in mind that this doesn’t necessarily mean that another Java installation is occurring. It means that msiexec.exe is currently processing another .msi installation. This could be one of thousands of other applications that use the Microsoft Installer.
Regardless, let’s look at how we can overcome this when it comes to deploying Java.
Even if you install Java from the EXE you can get this error. The Java install EXE file is really just a bootstrapper for an embedded MSI file.
Resolving the Java Error 1618
Here are some steps you can take to work through this issue:
- Wait for the current installation to finish.
- Kill or stop the current installation.
- This could have some bad consequences for whatever was being installed as you could end up with a partially installed or corrupted application.
- Reboot the target computer and then reattempt the deployment.
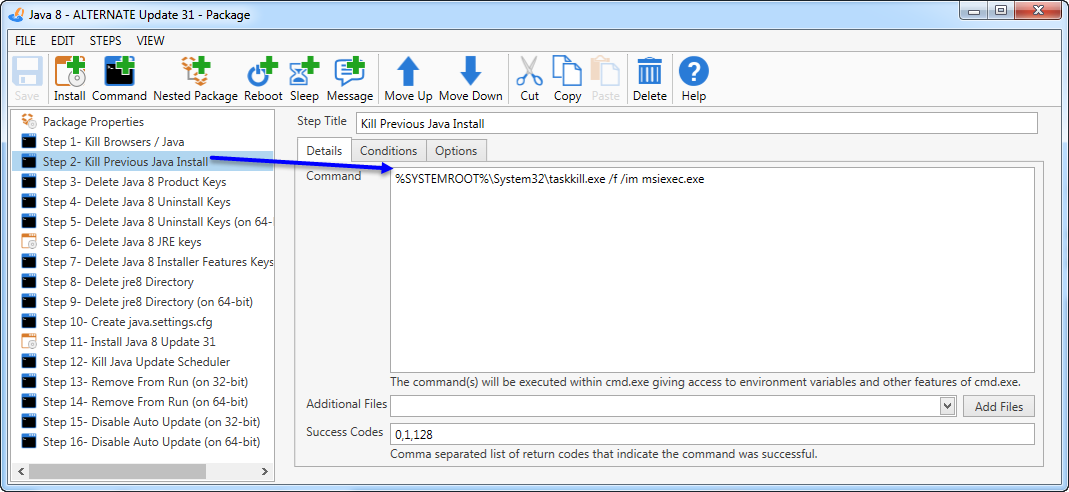
Now if there is a legitimate installation occurring you are better off simply waiting for it to complete. If, however, you consistently get this error then you may want to kill msiexec.exe. We have a Java package in PDQ Deploy that does just that. Step 2 of the Java 8 - Alternate package kills msiexec.exe before proceeding.
Building Your Own Java Package
If you are using your own Java package then you can create a Command Step and enter the following command:
taskkill.exe /f /im msiexec.exe
Make sure to add error codes 0 and 128 to your Success Codes field. 128 is the taskkill.exe return code when it attempts to kill a process that isn’t running. This should, in most cases, be considered a success which is why you should add it here.
Have this step run before your Java installation step. Once again, please keep in mind that you could kill a legitimate installation by doing this.
Just so you know, PDQ Deploy has built-in protection against running concurrent deployments simultaneously on the same targets. When a PDQ Deploy console is told to deploy multiple packages to the same target computer it will only initiate one deployment at a time and simply queue the others. When one deployment completes the next will begin.
Skype is the default messaging app on Windows 10, and millions of people use it every day. Despite the popularity of Skype, sometimes users encounter problems while installing it, and today we will tell you how to how to deal with errors 1603, 1618 and 1619 when installing Skype .
Errors 1603, 1618 and 1619 when installing Skype: how to fix them?
Fixing error 1603
Solution 1: Use the utilityMicrosoft Fix-It for complete removalSkype
Error 1603 most often occurs when you try to update Skype without removing the files and registry entries from previous version Skype. To fix this problem, simply . After that, download the Fix-It utility and run it. Fix-It will find and remove any corrupted keys and registry entries that may be preventing Skype from installing. When the utility finishes scanning, download latest version Skype and try installing.
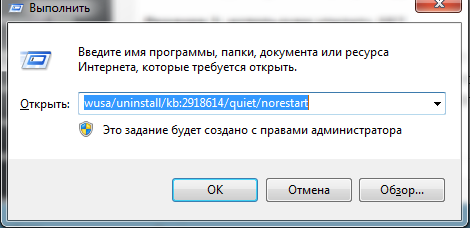
Solution 2: Use the Run dialog box.
1. Open the window Execute" by pressing Win+R.
2. In the line, enter wusa/uninstall/kb:2918614/quiet/norestart and clickEnterto run the command.
If the command doesn't work, restart your computer and try again.
Solution 3: Use the utilitySRT
Many users have reported error 1603, and according to them, the problem is caused by leftover files, corrupted files, or Windows Installer not working properly. Most of these problems are solved by the SRT utility. Download SRT and run it and the problem with error 1603 will be solved and you will be able to .
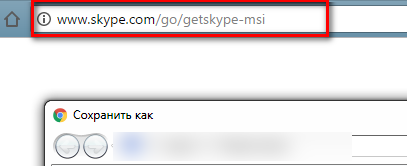
Solution 4: DownloadSkype MSI
Users have reported that this error is a standard error message from the MSI installer and can be fixed by downloading Skype MSI. If that doesn't work, use a utility like Lessmsi to extract Skype.exe from the Skype MSI file and install it.
Solution 5: Uninstall the applicationSkype Video
Some Skype versions may be installing the Skype Video app, and the app may interfere with the Skype update process, causing error 1603. To resolve the issue, uninstall the Skype Video app and try installing Skype again.
Solution 6: Change access settings
Sometimes error 1603 occurs if you do not have the required permissions on the Temp folder. To change access settings, do the following:
1. Press Win+R and enter %temp%. Press Enter or click OK.
2. The Temp folder will open. Click the up arrow to navigate to the Local folder.
3. Find Temp folder , right-click and select "Properties".
4. In the tab "Safety" click "Change".
5. Click "Add".
6.In the field "Enter the names of the objects to select" enter Everyone and press " Check names" Click OK.
7. Under Groups or Usernames, select " All" and check " Full access" in column " Access" Click "apply" and OK to save changes.
By changing the access settings, you can install Skype without any problems.
Solution 7: Completely remove the antivirusMcAfee
Sometimes antiviruses interfere with the Skype installation process and cause error 1603. Judging by user reviews, this error was caused by McAfee antivirus, and after removing it the problem was completely resolved. However, it is not enough to simply uninstall the antivirus - you need to delete all files and registry entries associated with McAfee.
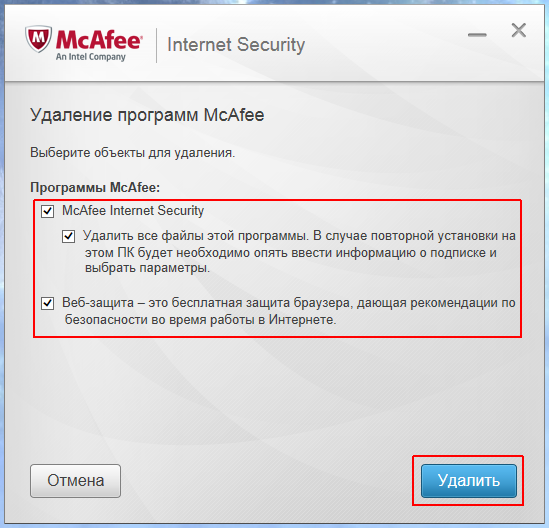
To do this, download the utility for McAfee removal and run it on your computer. Remember that almost any antivirus can cause this problem, so even if you don't have McAfee installed, try uninstalling your antivirus. So, users have reported problems with Spyware Doctor - if you have it installed, try uninstalling it and then installing Skype.
Solution 8: Check if the installation directory is encrypted
If you encounter error 1603, check whether the installation directory is encrypted. Skype cannot be installed in an encrypted folder, so to solve the problem you need to temporarily disable encryption.
Solution 9: Give full access to the accountSystem
The error may occur if you do not have sufficient rights in the installation directory. To do this, open the installation folder and follow steps 3-7 from Solutions 6. Just give full access to the System account.
Solution 10: Disable User Account Control
Account Control – useful feature, designed to warn you if you or someone else is trying to make changes to the system that require administrator rights. While this feature provides some protection, it can also cause error 1603 when installing Skype. To fix it, users suggest disabling User Account Control. To do this:
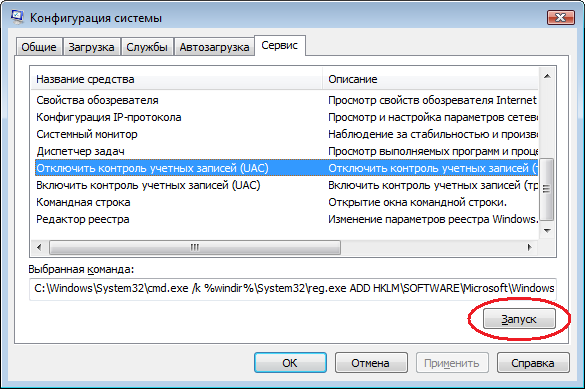
1. Click Win+S and from the menu select " Accounts».
2. Click " Change User Account Control settings»
3. Move the slider all the way down.
After disabling User Account Control, the problem will be resolved.
Fixing error 1618
Solution 1: Terminate the msiexec.exe process
Typically, error 1618 occurs when you try to install more than one application at the same time. For example, it may occur if you accidentally run the Skype installation twice. To fix it, you need to end the process msiexec.exe. For this:
1. Open Task Manager by clicking Ctrl + Shift + Esc.
2. In the Task Manager, go to the “ More details».
3. Select msiexec.exe and press " End the process».
4. After that, try installing Skype again.
Solution 2: Use Windows utility Repair
According to user reviews, they were able to fix error 1618 when using Windows Repair. This third party utility designed to solve problems with the registry and access to folders. Download Windows Repair and run it, and your Skype installation problems will be solved.

Solution 3: Change the values in the registry
1. Click Win+R and enter regedit.
2. In the left pane, open a thread HKEY_LOCAL_MACHINE\Software\Microsoft\Windows\CurrentVersion\Installer\
3. Find and delete the line InProgress.
4. Then open a thread HKEY_LOCAL_MACHINE\System\CurrentControlSet\Control\Session Manager\
5. Delete the line PendingFileRenameOperations.
6.Open the HKEY_LOCAL_MACHINE\SOFTWARE\Microsoft\Updates branch, find the UpdateExeVolatile entry, double click it and change its value to 0 .
We don't know for sure whether this option will work, but try it, just remember to do it first backup copy registry
Solution 4: Restart Windows Installer
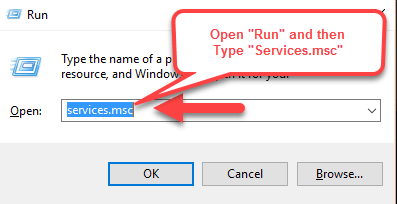
Sometimes the error is caused by Windows Installer, but in this case it can be easily resolved by disabling and re-enabling the service. For this:
1. Click Win+R and enter services.msc. Click Enter or click OK.
2. Find a service InstallerWindows and double click it to open properties.
3. Change "Startup type" on "Disabled".
4. Save your changes and restart your computer.
5. After rebooting, try installing Skype again.
Some users also suggest stopping the service Windows Installer and try to install Skype again - try this option too.

Solution 5: Delete temporary setup files
Many applications download temporary installation files to your PC before they are installed, and when you try to install Skype, these temporary files may cause error 1618. To resolve the problem, you need to delete these temporary files.
1. Click Win+R, enter %temp% and click OK.
2. Remove all files and folders from the folder Temp.
3. Open the folder C:\Windows\Temp and delete all files and folders from it too.
If the installation process allows you to specify where you want to extract temporary installation files, open that folder and delete everything from it. After deleting all temporary files, try installing Skype again.
Solution 6: Re-register the Installer filesWindows
Several users have reported that they can fix error 1618 by simply re-registering the Windows Installer files.
1. Click Win+X select " Command line (with administrator rights)».
2. When the command prompt starts, enter the following commands:
msiexec/unregister
msiexec /regserver
3.When the commands complete, close command line and restart your computer.
After rebootSkypeshould install without problems.
Solution 7: Changing Settings group policy
You can fix error 1618 by simply changing your Group Policy settings.
1. Press Win+R and enter gpedit.msc. Click Enter or OK.
2. When the Group Policy Editor opens, go to Computer configuration> ConfigurationWindows>Security Settings> Local policies > Assigning user rights on the left side of the window.
3. On the right side, find the item “ Debugging programs» and double-click.
4. Make sure the list contains Account « Administrator" If it is not there, click " Add users or group" and add it. Click " Apply" And OK to save changes.
Solution 8: Run the installation as administrator
If all the previous recipes did not help, try running the Skype installation as an administrator. To do this, right-click the Skype installation file and select " Run as administrator».
Fixing error 1619
Solution 1: Extract files fromMSI
Typically the installation files are packaged in an MSI installer, and in most cases you can extract and run them manually. In one of the previous recipes we briefly described how to do this.
Solution 2: Install the latest versionSkype
Skype installation error 1619 may occur if you try. In this case, solving the problem is not difficult: all you need to do is try to install it.
Errors 1603, 1618 and 1619 occur quite often, but our recipes will help you deal with any of them.